---
title: "Discover How to Install Tomcat on Ubuntu Linux"
description: "Learn how to set up the Java web services and how to install Tomcat on Ubuntu Linux in this step-by-step guide!"
canonical: "https://adamtheautomator.com/install-tomcat-on-ubuntu/"
---
# Discover How to Install Tomcat on Ubuntu Linux
> Learn how to set up the Java web services and how to install Tomcat on Ubuntu Linux in this step-by-step guide!
Source: https://adamtheautomator.com/install-tomcat-on-ubuntu/
---
ATA Learning
Tap to hide
[
ATA Learning
](/)
* [Home](/)
* [Tutorials](/tutorials/)
* [Instructors](/author/)
* [Advertising](/advertising/)
* [Recommended Resources](/resources/)
* [About Adam](/about-adam/)
Search for:
* [](https://twitter.com/adbertram)
* [](https://github.com/Adam-the-Automator)
* [](https://www.linkedin.com/company/adam-the-automator-llc)
* [](/feed/)

# Discover How to Install Tomcat on Ubuntu Linux
[Sagar](https://adamtheautomator.com/author/shanky-mendiratta/)11 June 20218 min. read
Categories: [IT Ops](/category/it-ops/)
Tags:[Apache](/tag/apache/)[Tomcat](/tag/tomcat/)[Ubuntu Linux](/tag/ubuntu-linux/)
Table of Contents
* [Prerequisites](#h-prerequisites)
* [Installing the Java Runtime (JRE)](#h-installing-the-java-runtime-jre)
* [Creating an Apache Tomcat User and Group](#h-creating-an-apache-tomcat-user-and-group)
* [Install Tomcat on Ubuntu](#h-installing-apache-tomcat)
* [Updating Apache Tomcat User and Group Permissions](#h-updating-apache-tomcat-user-and-group-permissions)
* [Create a Tomcat Systemd Service File](#h-create-a-tomcat-systemd-service-file)
* [Verifying Apache Tomcat Web Content](#h-verifying-apache-tomcat-web-content)
* [Running Your First Application on Apache Tomcat](#h-running-your-first-application-on-apache-tomcat)
* [Conclusion](#h-conclusion)
If you need to run Java-based web applications, it’s time you check out [Apache Tomcat](https://tomcat.apache.org/index.html). Apache Tomcat is an open-source lightweight implementation of the [Jakarta EE platform](https://projects.eclipse.org/projects/ee4j.jakartaee-platform) that allows you to serve up Java-based web services. Learning how to install Tomcat on Ubuntu is a great way to get started.
Apache Tomcat provides many ways to implement Java-based technologies from [Java Servlets](https://www.geeksforgeeks.org/introduction-java-servlets/), [JavaServer Pages](https://www.infoworld.com/article/3336161/what-is-jsp-introduction-to-javaserver-pages.html), and [Java Expression Language](https://docs.oracle.com/javaee/6/tutorial/doc/gjddd.html). In this tutorial, you will learn how to install Tomcat on Ubuntu, by installing Apache Tomcat 10.0 on an Ubuntu Linux machine in particular.
## Prerequisites
This post will be a step-by-step tutorial. To follow along, be sure you have the following:
* An [Ubuntu](https://adamtheautomator.com/install-ubuntu/) 14.04.4 LTS or greater Linux machine. This tutorial uses [Ubuntu 18.04.5 LTS](https://releases.ubuntu.com/18.04/) with a public IP address 52.15.72.168.
> _Apache Tomcat is supported on all Windows, Linux, and macOS operating systems._
Related:[How to Install Ubuntu 20.04 \[Step-by-Step\]](https://adamtheautomator.com/install-ubuntu/)
## Installing the Java Runtime (JRE)
The basis of all Java applications is the runtime environment. Apache Tomcat’s job is to serve up Java-based applications. Before it can do that, however, the host must be able to run Java applets. The JRE is the way to make that happen.
To install the JRE on your Ubuntu machine:
1\. First, connect to your Ubuntu machine via SSH.
Related:[A Windows Guy in a Linux World: Setting up SSH in Linux](https://adamtheautomator.com/ssh-command-in-linux/)
2\. Run the [`sudo apt update`](https://www.cyberciti.biz/faq/what-does-sudo-apt-get-update-command-do-on-ubuntu-debian/) command to ensure Ubuntu has all of the latest packages available for installation.
```bash
# Updating Package Repositories for the Latest Version
# Sudo is used to elevate permissions for a non-privileged account
sudo apt update
```
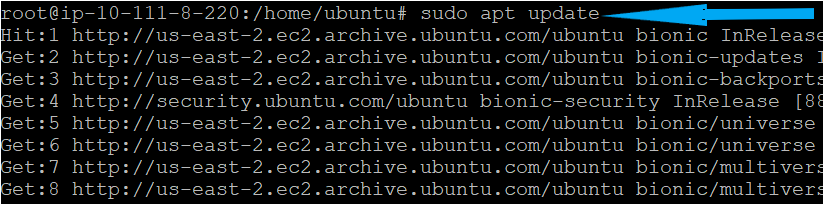
Updating the package repositories on the Ubuntu machine
> _Although this tutorial uses the root user, it is typically best practice to use a less-privileged account that is a member of the sudoers group._
3\. Next, install the [OpenJDK](https://openjdk.org/) package via the [apt utility](https://linuxize.com/post/how-to-use-apt-command/). OpenJDK is the only free and open-source JRE that works well with Tomcat.
> _Apache Tomcat requires a Java Standard Edition Runtime Environment (JRE) version 8 or later._
```bash
# Installing the JRE
sudo apt install default-jdk
```

Installing the JRE
4\. Now, run the `java --version` to verify the JRE version installed. You will see `openjdk 11.0.11` in the command output if the installation is successful.
```bash
checking the java version
java --version
```

Checking the installed Java version
> _At time of writing, the latest version available of OpenJDK is 11.0.11, but your version may be different._
## Creating an Apache Tomcat User and Group
Like all other services in Linux, Tomcat must run under a specific user account to access various system resources. You could run Tomcat using the God-like root account, which has full privileges to the entire system, but that gives Tomcat way too many privileges and could pose a security risk.
To minimize Tomcat’s unnecessary rights, let’s create an Apache Tomcat user and group under which the server will run.
While still connected to your Ubuntu machine:
1\. First, create a new group _tomcat_ with the [`groupadd`](https://linux.die.net/man/8/groupadd) command. You need this group to secure the configuration files of tomcat located at _/opt/tomcat/conf_ by only reading and executing privileges.
```bash
sudo groupadd tomcat
```
2\. Next, create the Apache Tomcat user with the `“>useradd` command.
* `-s` – Don’t allow an interactive login for this user by setting the shell to `/bin/false` as you don’t want anybody to use this as a login user.
* `-g` – Assign the new `tomcat` user to the `tomcat` group that was previously created.`sudo useradd -s /bin/false -g tomcat tomcat`
```bash
sudo useradd -s /bin/false -g tomcat tomcat
```
3\. Finally, verify that the `tomcat` user and group exist with the [`id`](https://man7.org/linux/man-pages/man1/id.1.html) command, as shown below. The `id` command displays the user ID, group ID, and the groups that a user account is a member of.
```bash
id tomcat
```
The UID, GID, and group numbers may differ in your case, but all should have (tomcat) name as shown below.

Verify User Details
## Install Tomcat on Ubuntu
Now that you have installed the JRE and have created a user account and group for Tomcat to use, it’s time to install Apache Tomcat on Ubuntu!
1\. First, create a directory for Apache Tomcat to be installed using the `“>mkdir` command. Navigate into that directory with the `cd` command, as shown below. Although you can install tomcat in any directory, it is recommended that the software is installed under _opt_ directory.
```bash
# Creating the directory tomcat under opt and changing to this directory.
mkdir /opt/tomcat
cd /opt/tomcat
```
2\. Now, download the latest version of Tomcat using the below `wget` command. The below command is downloading Apache Tomcat version 10.0.6.
Check the latest version of Apache Tomcat on the [official site](https://tomcat.apache.org/whichversion.html).
```bash
wget https://mirrors.estointernet.in/apache/tomcat/tomcat-10/v10.0.6/bin/apache-tomcat-10.0.6.tar.gz
```

Downloading the Apache Tomcat 10
After a successful download, extract the Apache Tomcat archive to the previously created _/opt/tomcat_ directory with the [`tar`](https://en.wikipedia.org/wiki/Tar_\(computing\)) command.
* `-x` – Extract the entire archive or one or more files from an archive.
* `-z` – Decompress the archive using the GZip.
* `-v` – Show all files as extracted by the _tar_ command.
* `-f` – Specifies the file to extract.
* `--strip-components=number` – Remove the specified number of leading components from each extracted file (i.e. specifying a `1` value from `directory/file` would result in `file` only).
* `-C` – Extract the files into a specified folder.
```bash
sudo tar xzvf apache-tomcat-10*tar.gz -C /opt/tomcat --strip-components=1
```

Extracting the Apache Tomcat archive
## Updating Apache Tomcat User and Group Permissions
With Apache Tomcat installed, and as mentioned previously, it is important to run Apache Tomcat with a non-root user account. In the following steps, you will update Apache Tomcat to run as the previously created `tomcat` user and group.
1\. Change into the _/opt/tomcat_ directory by running the `cd` command.
```powershell
cd /opt/tomcat
```
2\. Now, change the group membership for the _/opt/tomcat_ directory and all child directories with the [chgrp](https://man7.org/linux/man-pages/man1/chgrp.1.html) command. You are changing the group here because the Tomcat configuration files will be managed by this group when Tomcat service starts.
```powershell
# Change the /opt/tomcat directory group membership to tomcat recursively (-R)
sudo chgrp –R tomcat /opt/tomcat
# Verify that the group has been changed to tomcat
ls -lh
```
3\. Next, grant the `tomcat` group read and execute access to the _/opt/tomcat/conf_ directory and all contained files with the [chmod](https://en.wikipedia.org/wiki/Chmod) command. Tomcat uses the _/opt/tomcat/conf_ directory to perform various functions such as specify Java Servlet to use, information about the user, etc.
To secure the configuration files, it is important to have the group as tomcat with only read and execute permissions because if an attacker compromises the Tomcat process, they can’t change the Tomcat configuration, deploy new web applications or modify existing web applications.
```bash
sudo chmod -R g+r conf # Assign Read permission to the tomcat group on conf
sudo chmod -R g+x conf # Assign Execute permission to the tomcat group on conf
```
4\. Finally, Set the `tomcat` user as the owner of the _webapps_, _work_, _temp_, and _logs_ folders inside the _/opt/tomcat_ directory using the [chown](https://en.wikipedia.org/wiki/Chown) command. Setting the `tomcat` as the owner of these directories allows the Tomcat service to read, write and execute all files in these directories.
```bash
# Assign tomcat as an owner to the entire directory
# The. signifies that you are operating on the current directory
sudo chown -R webapps/ work/ temp/ logs/
```
## Create a Tomcat Systemd Service File
Although you can start Apache Tomcat, it would not stay running once you leave the current command-line session or restart the server. This is where the [systemd](https://en.wikipedia.org/wiki/Systemd) comes in! For Apache Tomcat to run in the background, and launch on startup, you must configure Apache Tomcat as a systemd service.
1\. Run the `update-java-alternatives` command which provides the installation path of java, also know as the JAVA\_HOME environmental variable. It is important to locate the installation directory of the JRE before you create a systemd service.
```apacheconf
sudo update-java-alternatives -l
```
In the following screenshot, you can see that the tutorial’s Ubuntu machine has the OpenJDK JRE installing in the /usr/lib/jvm/\* folder.

Locating the installation directory of the JRE
2\. Next, create the file _tomcat.service_ under the _/etc/systemd/system_ directory with your favorite editor. Creating the service within _/etc/systemd/system_ runs the service in the background after each reboot.
```powershell
sudo touch /etc/systemd/system/tomcat.service
```
3\. Paste the below content into the _tomcat.service_ file. Before saving the file, update the `JAVA_HOME` variable to use the path _/usr/lib/jvm/java-1.11.0-openjdk-amd64_.
A typical service file contains three sections `Unit` that contains a description of the service and the target type, such as a network. Target, which means running Services after the Network is up. Next, the `Service` section contains various environment variables that need to be set as the path of the installation directory or child directories. Finally, Install is set as a multi-user. Target means multiuser mode without networking.
```bash
[Unit]
Description=Apache Tomcat
After=network.target
[Service]
# Type=forking tells systemd that the process is still running even though the parent exited.
Type=forking
Environment=JAVA_HOME=/usr/lib/jvm/java-1.11.0-openjdk-amd64 # Update the JAVA_HOME
Environment=CATALINA_PID=/opt/tomcat/temp/tomcat.pid
Environment=CATALINA_HOME=/opt/tomcat
Environment=CATALINA_BASE=/opt/tomcat
ExecStart=/opt/tomcat/bin/startup.sh
ExecStop=/opt/tomcat/bin/shutdown.sh
User=tomcat
Group=tomcat
Restart=always
[Install]
WantedBy=multi-user.target
```
4\. Next, run the `daemon-reload` command that informs the systemd daemon that a new service exists.
```bash
sudo systemctl daemon-reload
```
5\. Finally, start and enable the Apache Tomcat service, as shown below. Enabling the `tomcat` service allows the process to launch on startup, such as after a reboot.
```powershell
sudo systemctl start tomcat # Start the tomcat service
sudo systemctl enable tomcat # Enable the tomcat service
```

Stating and Enabling the tomcat service
6\. Verify that the Apache Tomcat service is running with the [systemctl](https://www.freedesktop.org/software/systemd/man/systemctl.html) status command.
```powershell
sudo systemctl status tomcat # Check the status of tomcat service
```
In below snapshot, service(running) confirms that tomcat is successfully started.
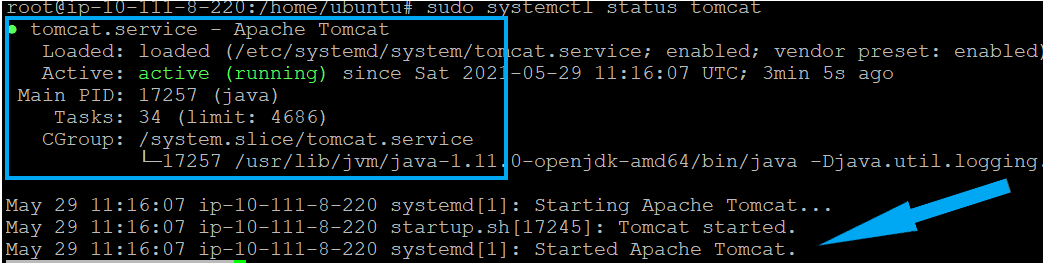
Verifying the status of tomcat service
## Verifying Apache Tomcat Web Content
How do you know that Apache Tomcat is actually running? With the service started, a default web page is available to verify that the server is correctly running.
To access the Apache Tomcat default web interface, open a web browser and navigate to _52.15.72.168:8080,_ and you will see a similar page to the one shown below.
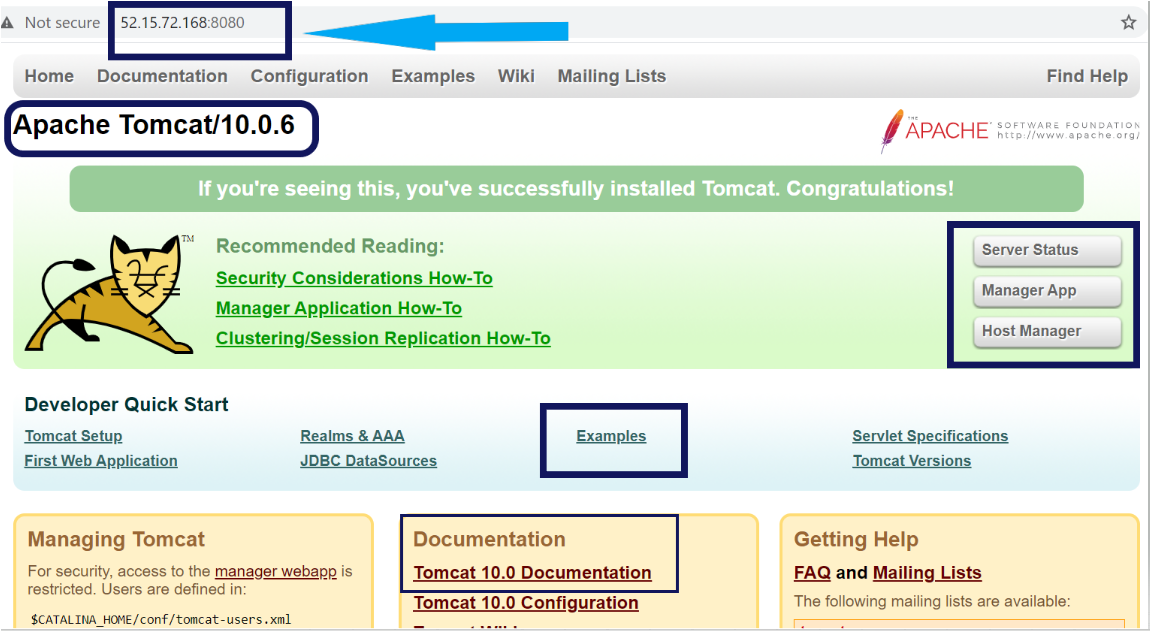
Accessing Apache Tomcat from a web browser.
## Running Your First Application on Apache Tomcat
Apache Tomcat is installed and running, but a default web page is not very useful! Read on to learn how to create and run a basic Java web page!
1\. First, create the file _ata.jsp_ inside the _/opt/tomcat/webapps/ROOT/_ [directory.By](http://directory.By) default, the _/opt/tomcat/webapps/ROOT/_ is the directory that Tomcat looks in this directory to serve files
```bash
cd /opt/tomcat/webapps/ROOT/
sudo touch ata.jsp
```
2\. Paste the below content to the _ata.jsp_ file created above and save it. This JSP file is an HTML file that contains embedded Java code that displays some sample text in the body of the HTML page.
```java
ATA post:TomcatServer
<% out.println("Hello World! I am running my first JSP Application");
out.println("ATA is an Awesome site.");
%>
```
3\. Next, change the owner of the _ata.jsp_ file to `tomcat` user and restart the tomcat service. Setting `tomcat` as owner with all the permissions allows the Tomcat service to start and access the files.
```bash
sudo chown tomcat: /opt/tomcat/webapps/ROOT/ata.jsp
sudo systemctl restart tomcat
```
4\. Now, open your favorite browser and navigate to the JSP page you just created. This tutorial’s web server is using the IP address 52.15.72.168, as you can see below.
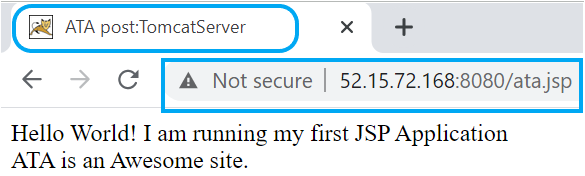
Verifying the application from the web console.
## Conclusion
In this tutorial, you have learned how to install Apache Tomcat on Ubuntu server. Deploying Java applications on Apache Tomcat is a quick and easy process!
Apache Tomcat is the most widely used open-source tool for Java developers to run their web applications. Now, that you have installed Apache Tomcat which Java application are you going to deploy and manage next?
Share this article
[Share on X](https://twitter.com/intent/tweet?url=https%3A%2F%2Fadamtheautomator.com%2Finstall-tomcat-on-ubuntu%2F&text=Discover%20How%20to%20Install%20Tomcat%20on%20Ubuntu%20Linux)[Share on Facebook](https://www.facebook.com/sharer/sharer.php?u=https%3A%2F%2Fadamtheautomator.com%2Finstall-tomcat-on-ubuntu%2F)[Share on LinkedIn](https://www.linkedin.com/sharing/share-offsite/?url=https%3A%2F%2Fadamtheautomator.com%2Finstall-tomcat-on-ubuntu%2F)
## Related Posts

### [Install Apache on Ubuntu and Master Website Traffic Management](/install-apache-on-ubuntu/)
Ready to optimize your website for high traffic? Install Apache on Ubuntu with this step-by-step guide and ensure smooth performance under heavy loads.
### [How to Install and Configure an OpenLDAP Ubuntu Server](/openldap/)
Unlock the power of OpenLDAP on Ubuntu for centralized user authentication, seamless access control management, and enhanced directory services!
### [How to Setup Ubuntu NTP Server](/ubuntu-ntp/)
Learn to configure an Ubuntu NTP server for precise time synchronization across your network. Ensure seamless operations with accurate timekeeping!
## Categories
* [IT Ops](/category/it-ops/)
* [Cloud](/category/cloud/)
* [DevOps](/category/devops/)
* [Home Ops](/category/home-ops/)
* [Information Security](/category/infosec/)
* [Software Development](/category/software-development/)
## Site
* [Home](/)
* [Tutorials](/tutorials/)
* [Instructors](/author/)
* [Advertising](/advertising/)
* [Recommended Resources](/resources/)
* [About Adam](/about-adam/)
Copyright 2026© ATA Learning | [Privacy Policy](/privacy/)