

If you’re looking to streamline your MySQL server management on Linux, why not consider a GUI-based approach? The command-line can be daunting, but a front-end tool like phpMyAdmin can make things a lot easier. In this guide, we’ll cover the steps to install phpMyAdmin, a must-have for any sysadmin or developer. Let’s dive in!
phpMyAdmin, with its web-based interface, simplifies MySQL management. This tutorial will show you how to install and configure phpMyAdmin, making database management a breeze.
By the end of this tutorial, you’ll say goodbye to accidental database mishaps! Let’s learn how to safeguard your databases and, ultimately, your job.
Prerequisites for Installing phpMyAdmin
Before starting, ensure you have the following:
- An Ubuntu Server 18.04 or newer.
- Root or sudo access on your server. Check out how to enable these in Ubuntu.
- Your server should have the LAMP (Linux, Apache, MySQL, PHP) stack. For installation guidance, refer to this guide.
- A separate computer with an SSH client like Putty, Bitvise, or the Chrome SSH Extension. This tutorial uses the default SSH client in Windows 10 (
ssh.exe).
Steps to Install phpMyAdmin on Ubuntu
There are various methods to install phpMyAdmin, but the simplest and most common is using the Advanced Package Tool (APT). Follow these steps for a smooth installation.
1. Connect to your Ubuntu server using an SSH client.
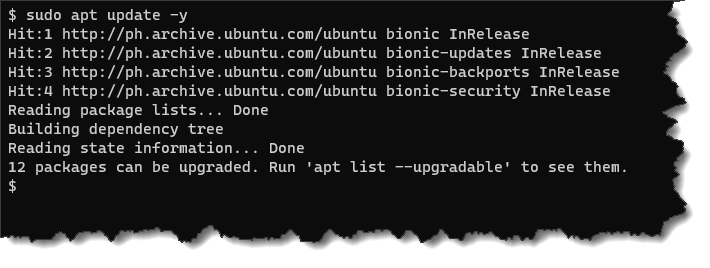
ssh username@server_name_or_IP2. Begin by updating your server’s package repository to ensure you’re getting the latest software versions.
sudo apt update -yDepending on your server’s internet connection and system load, this update might take a few minutes.
3. After updating, install the phpmyadmin package along with its dependencies php-mbstring and php-gettext.
sudo apt install phpmyadmin php-mbstring php-gettext -y4. During the phpMyAdmin installation process, you’ll encounter a series of prompts to configure phpMyAdmin properly.
Configuring Apache2 for phpMyAdmin Installation
On the webserver configuration screen, use the arrow keys to navigate. Highlight apache2 and press SPACE to select it. An asterisk [*] will appear next to apache2, indicating it’s selected. Then, press Enter.

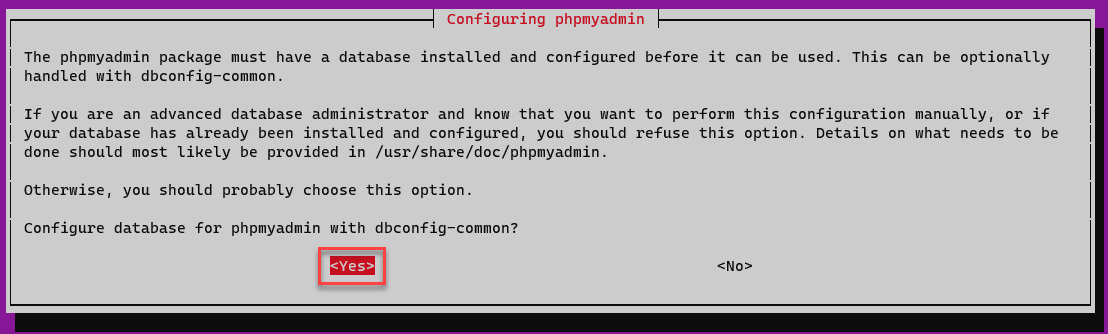
5. The installer will then prompt for the phpMyAdmin database setup. Make sure <Yes> is selected and press Enter to proceed.
Securing phpMyAdmin with a Strong Password
6. The phpMyAdmin installation process automatically creates a MySQL user named phpMyAdmin. Enter a strong password for this new account at the prompt, and press Enter.
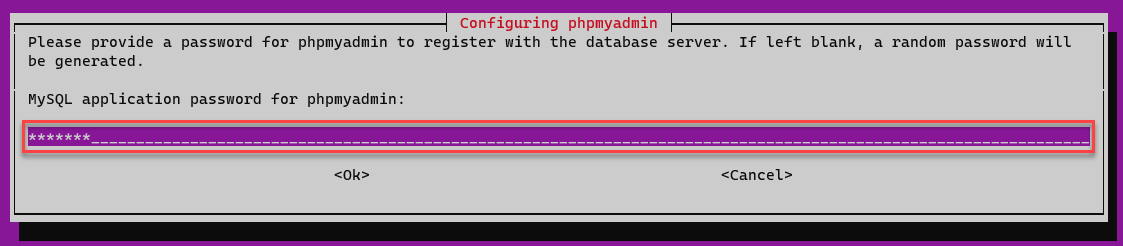
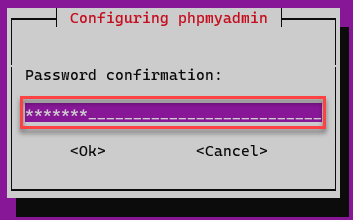
7. Confirm your phpMyAdmin password by re-entering it on the Password confirmation prompt and press Enter. Wait for the installation and configuration to complete.
Verifying phpMyAdmin Configuration Files
8. After installing phpMyAdmin, confirm the existence of the Apache configuration file for phpMyAdmin by running the following command.
ls /etc/apache2/conf-enabled/The phpmyadmin.conf file contains vital phpMyAdmin settings, like installation location and the database server configuration. Usually, there’s no need for manual edits to this file.

Enabling mbstring Extension for phpMyAdmin
9. To optimize phpMyAdmin’s functionality, enable the mbstring PHP extension with the command below.
sudo phpenmod mbstringRestarting Webserver for phpMyAdmin
10. Finally, restart your webserver for the changes to take effect. This step is crucial for making phpMyAdmin accessible.
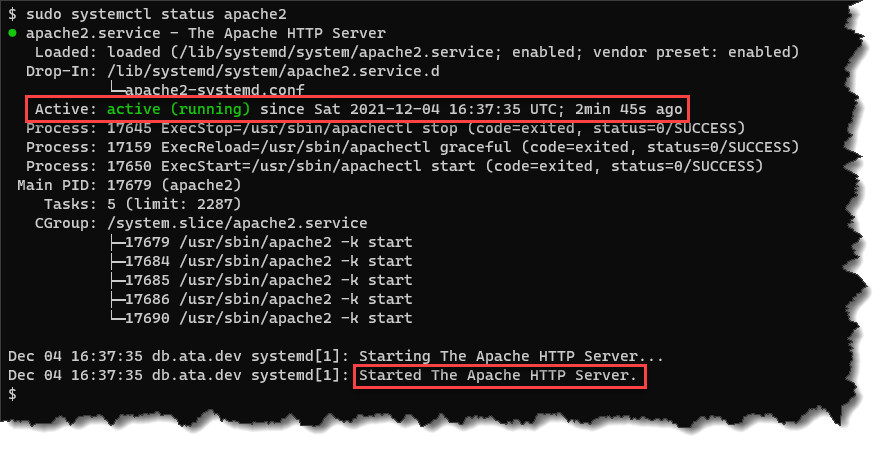
sudo systemctl restart apache211. Now, it’s crucial to verify the webserver’s status. This check confirms that the Apache server is running smoothly after the phpMyAdmin installation.
sudo systemctl status apache2Look for a response indicating the Apache webserver service is active (running), as shown in the screenshot below. This confirmation is a key step in successfully installing phpMyAdmin.
Best Practices for Creating a Secure phpMyAdmin User Account
As part of the phpMyAdmin setup, a default MySQL user named phpmyadmin is created. However, this account is limited to accessing only the phpMyAdmin database and doesn’t have full administrative privileges.
To enhance security, it’s advisable to create a new, dedicated privileged account instead of using the default. This approach reduces the risk of attacks, as common usernames are often targeted.
Follow these steps to set up a secure, dedicated management account for phpMyAdmin:
Step 1: Accessing MySQL Shell
Start by opening the MySQL shell. You can do this directly from the terminal using the following command:
sudo mysqlAlternatively, log in as the root user with this command:
sudo mysql -u root -pStep 2: Creating a New MySQL User
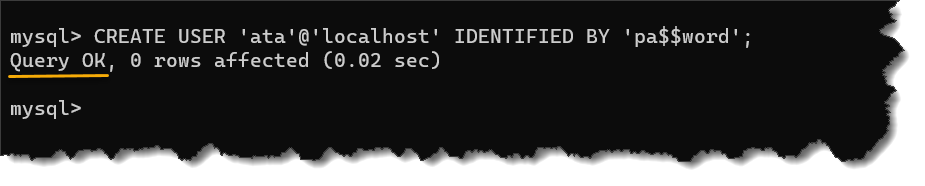
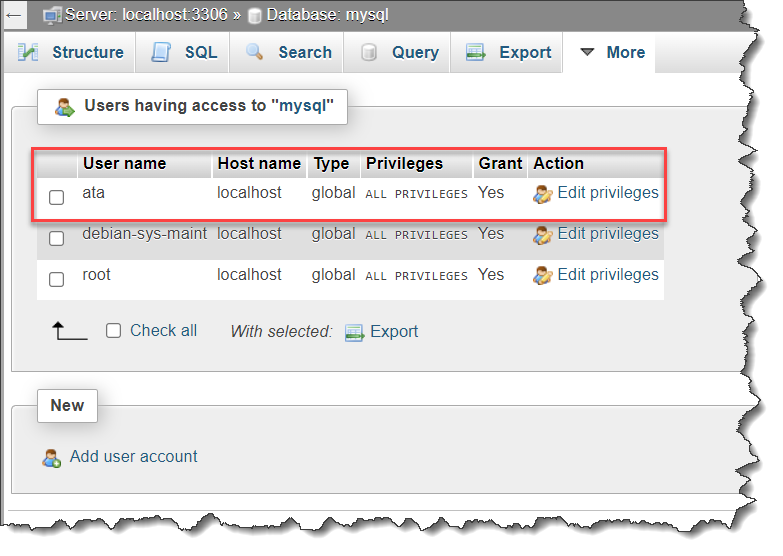
Once in the MySQL prompt, create a new user with custom credentials. Replace ‘ata’ and ‘pa$$word’ with your desired username and strong password. Here’s the command:
CREATE USER 'ata'@'localhost' IDENTIFIED BY 'pa$$word';This step is vital for maintaining a secure phpMyAdmin setup.
Granting Full Privileges to Your New User
3. The next step in securing your phpMyAdmin installation is to grant full privileges to your newly created user. This is done using the GRANT ALL PRIVILEGES statement, which provides complete access to all databases. The WITH GRANT OPTION clause is particularly important as it allows this user to manage other user privileges.
GRANT ALL PRIVILEGES ON *.* TO 'ata'@'localhost' WITH GRANT OPTION;
4. Once you’ve assigned the necessary privileges, exit the MySQL shell to proceed with the phpMyAdmin setup.
exitAccessing the phpMyAdmin Interface
With the installation and user configuration complete, it’s time to access the phpMyAdmin web interface and verify the setup.
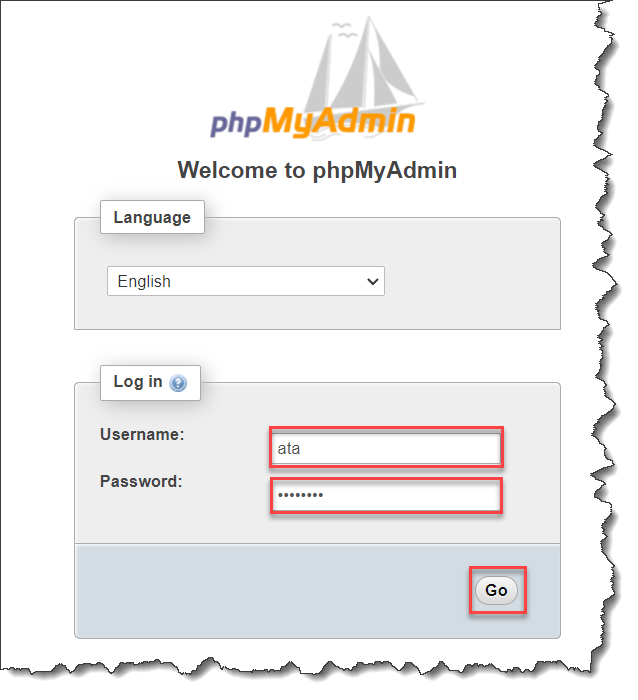
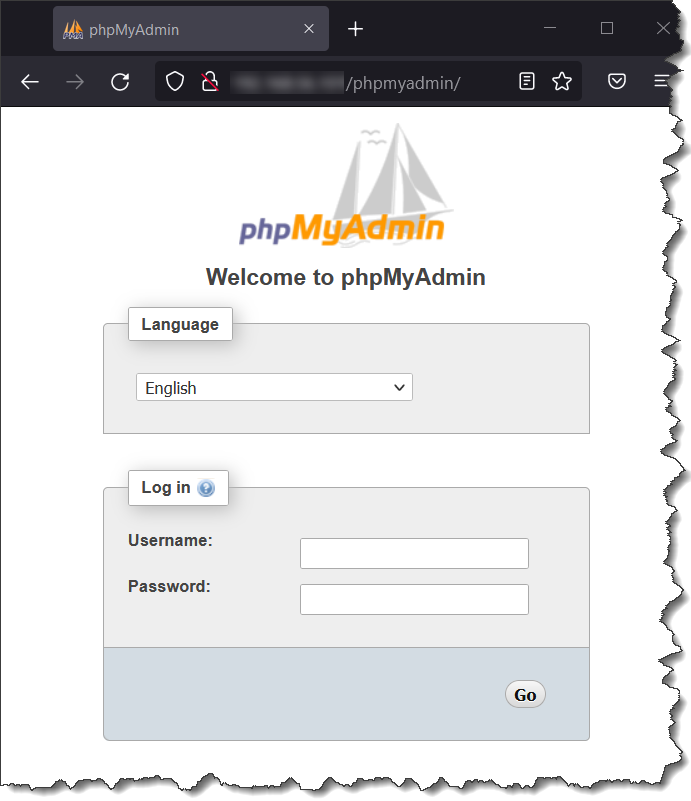
1. Open your web browser and go to http://your_domain_or_IP/phpmyadmin. Replace your_domain_or_IP with your server’s IP address or domain name.
2. You’ll see the Welcome to phpMyAdmin login page. Enter the username and password for the account you just created.
3. Once logged in, the phpMyAdmin dashboard will be displayed, confirming a successful setup.
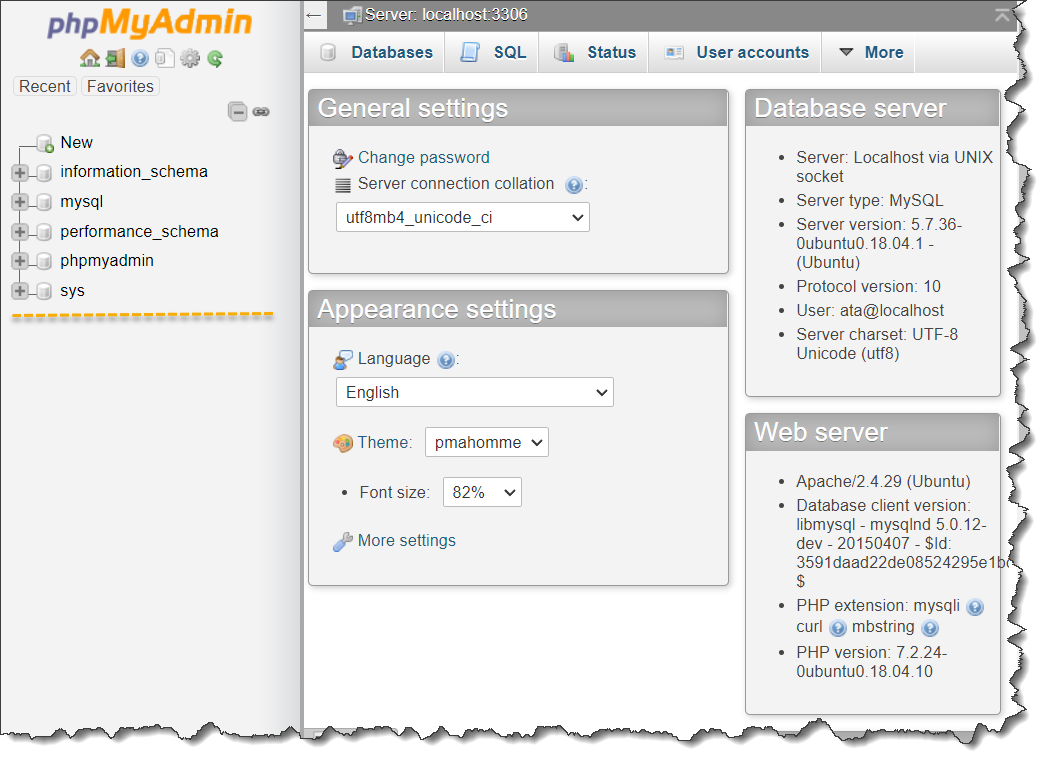
4. Test the new account’s privileges by navigating to the Database tab. Here, you can view all databases on the server and verify user privileges.

This completes the installation and setup of phpMyAdmin, ensuring you have a fully functional and secure database management interface on your Linux server.
Enhancing phpMyAdmin Security with Password Protection
Given its widespread use, phpMyAdmin often becomes a target for unauthorized access attempts. It’s essential to implement additional security measures to protect your installation.
A highly effective way to secure phpMyAdmin is by using Apache’s .htaccess authentication and authorization features. This method adds an additional layer of security, restricting access to the phpMyAdmin interface.
Follow these steps to set up .htaccess protection for your phpMyAdmin installation:
Step 1: Configuring Apache for .htaccess Use
Begin by editing the phpMyAdmin configuration file in Apache to allow .htaccess usage.
sudo nano /etc/apache2/conf-available/phpmyadmin.conf2. In the <Directory /usr/share/phpmyadmin> section of the file, add the AllowOverride All directive. This setting enables .htaccess files in the phpMyAdmin directory.

3. After adding the directive, save and exit the file. Remember to use spaces instead of tabs for indentation.
Step 2: Restarting Apache to Apply Changes
4. Restart the Apache server to ensure the new configuration is active.
sudo systemctl restart apache2Step 3: Creating the .htaccess File for phpMyAdmin
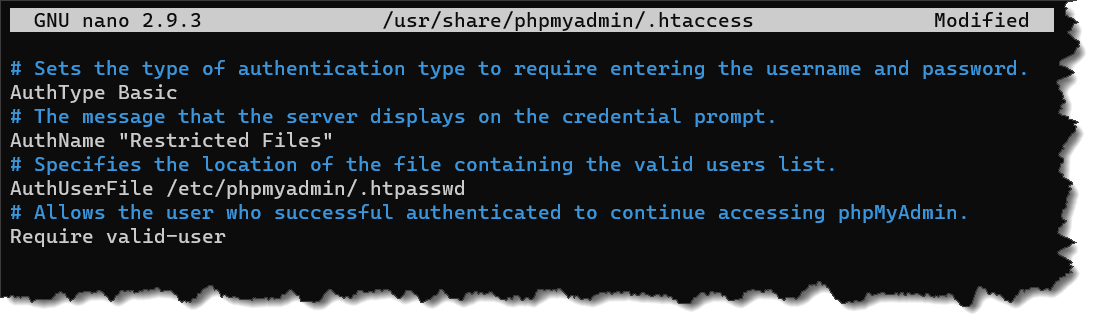
5. The final step involves creating an .htaccess file in the phpMyAdmin directory. This file will manage access to phpMyAdmin.
sudo nano /usr/share/phpmyadmin/.htaccess6. Inside the .htaccess file, add the necessary directives to manage access. Once done, save and close the file.
By completing these steps, you’ll significantly increase the security of your phpMyAdmin installation on Linux, ensuring that only authorized users can access the management interface.
# Sets the authentication type to require entering the username and password.
AuthType Basic
# The message that the server displays on the credential prompt.
AuthName "Restricted Files"
# Specifies the file's location containing the valid users and passwords list.
AuthUserFile /etc/phpmyadmin/.htpasswd
# Allows the user who successfully authenticated to continue accessing phpMyAdmin.
Require valid-user
Not all web browsers display the AuthName directive value during authentication prompts.
Setting Up Additional Authentication for phpMyAdmin
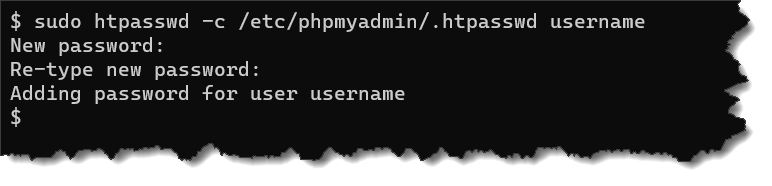
7. To further secure your phpMyAdmin installation, create an authentication file named .htpasswd. This file will store the usernames and encrypted passwords for authorized users.
sudo htpasswd -c /etc/phpmyadmin/.htpasswd usernameEnter and re-confirm the password for the new user. A successful setup will enhance the security of your phpMyAdmin login process.
To add more users, use the command
sudo htpasswd /etc/phpmyadmin/.htpasswd additionaluser, substitutingadditionaluserwith the new username.
Accessing phpMyAdmin with Enhanced Security
8. With the additional security in place, navigate to https://domain_name_or_IP/phpmyadmin in your browser. Enter the username and password you established to access the login page.
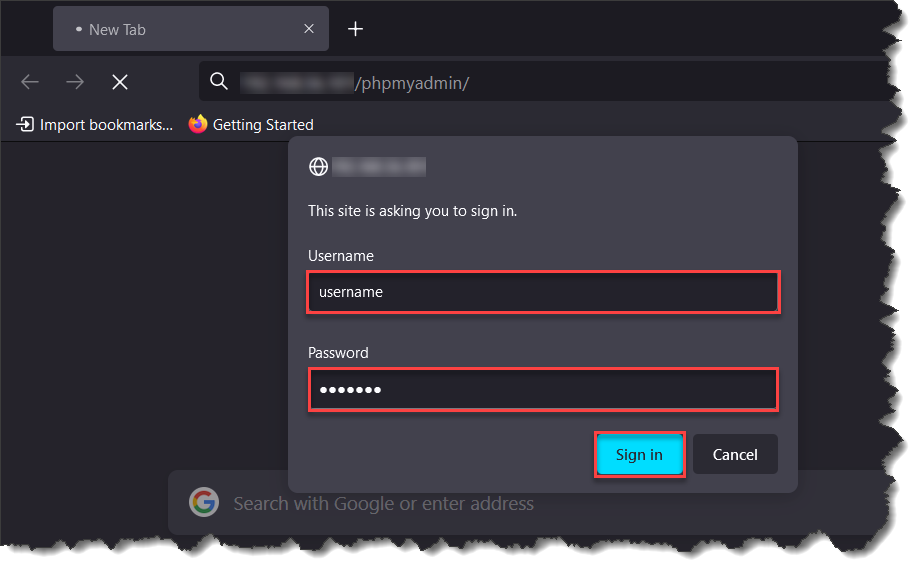
After successful authentication, you will be taken to the main phpMyAdmin login page.
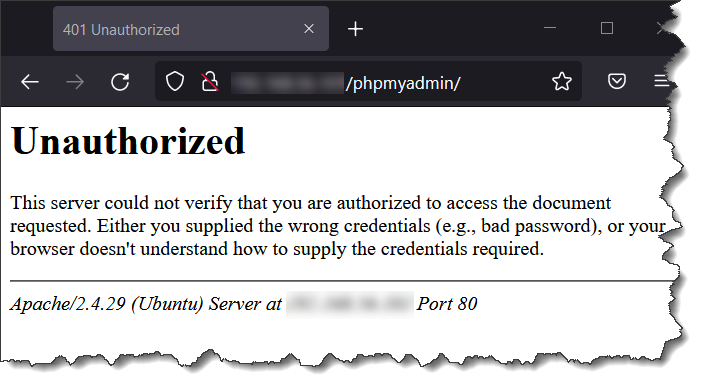
If the authentication fails, you’ll receive an Unauthorized response, indicating the need to recheck your credentials.
Wrapping Up: phpMyAdmin Installation and Security
Congratulations on successfully installing and securing phpMyAdmin on Linux! You’ve now enhanced your database management capabilities, making MySQL management more accessible and secure.
Don’t stop here. Explore more advanced phpMyAdmin features and further security enhancements, such as implementing HTTPS and disabling root logins. Check out additional resources like this guide for more insights. Keep your phpMyAdmin environment secure and efficient!


