


If you’re stuck managing hundreds of containers, Kubernetes is your friend. If you need to learn installing Kubernetes on Ubuntu, this tutorial is your best friend.
Kubernetes is an open-source tool for automating deployment, scaling, and managing containerized applications. In this tutorial, you will learn step-by-step process of installing Kubernetes on Ubuntu machine and get your first container running.
Lets begin!
Tutorial Prerequisites
This post will be a step-by-step tutorial. To follow along, be sure you have two Ubuntu 14.04.4 LTS or greater machines with Docker installed. This tutorial uses Ubuntu 18.04.5 LTS with Docker 19.03.8 installed on each machine.
You technically can install Kubernetes on a single node, it’s not recommended. Separating nodes provides fault tolerance and high availability.
The Ubuntu hosts the tutorial uses will be called MASTER using an IP address of 10.0.0.200 for the master node and WORKER for the worker node.
Installing Kubernetes on Ubuntu Prerequisites
Before you learn installing Kubernetes on Ubuntu, you should first run through a few prerequisite tasks to ensure the install goes smoothly.
To get started, open your favorite SSH client, connect to MASTER and follow along.
1. (Optional) Assign the hostname of master-node to MASTER by running the hostnamectl command. You don’t have to rename the nodes but doing so will ensure that all your nodes have a unique hostname which will be easier to identify while working with the cluster.
# Assiging the hostname master-node to the first ubuntu machine
 sudo hostnamectl set-hostname master-node
Assign a hostname of
worker-nodeto WORKER.
2. (Optional) Next, run the hostname command to verify you’ve successfully updated the hostname. If hostname returns the expected hostname, you’re good to go.

3. Next, run the sudo apt update command to ensure Ubuntu has all of the latest packages available for installation. You should do this to ensure when the time comes, apt can find all of the required package repositories.
# Updating Package Repositories for the Latest Version
# Sudo is used to elevate permissions for a non-privileged account
sudo apt update 
Although this tutorial uses the root user, it is typically best practice to use a less-privileged account that is a member of the sudoers group.
4. Now, run apt install begin installing Kubernetes on Ubuntu dependency packages transport-https and curl. You’ll need these packages to download the required Kubernetes packages later.
# Installing the transport-https and curl package on each ubuntu system
 sudo apt-get install -y apt-transport-https curl
5. Run curl to download and add the required GPG security key with apt-key to authenticate to the Kubernetes package repository later. If successful, you should get an OK response in your terminal.
# Adding the Kubernetes GPG Key on each ubuntu system
 curl -s https://packages.cloud.google.com/apt/doc/apt-key.gpg | sudo apt-key add -
6. Now, run the apt-add-repository command to add the Kubernetes package repository in Ubuntu. You must perform this step because, by default, the Kubernetes repository is not present in the /etc/apt/sources.list file.
# Adding the Kubernetes repository on each ubuntu system
 sudo apt-add-repository "deb http://apt.kubernetes.io/ kubernetes-xenial main"
7. Finally, run the sudo apt update command again to force apt to read the new package repository list and ensure all of the latest packages available for installation.
8. Perform steps 1-7 on WORKER also.
Installing Kubernetes on the Master and Worker Nodes
Now that you have the prerequisite packages installed on both MASTER and WORKER, it’s time to set up Kubernetes. Kubernetes consists of three packages/tools, kubeadm, kubelet, and kubectl. Each of these packages contains all of the binaries and configurations necessary to set up a Kubernetes cluster.
Assuming you are still connected to the MASTER via SSH:
1. Run the apt-get install command to install the kubeadm, kubectl, and kubelet packages.
- kubelet is an agent that runs on each worker node and manages all containers in pods.
- Kubeadm is a tool that helps in initializing and creating Kubernetes clusters.
- kubectl allows you to run commands against Kubernetes clusters.
# Installing the kubeadm kubelet kubectl package/tool on each ubuntu machine.
 sudo apt-get install kubeadm kubelet kubectl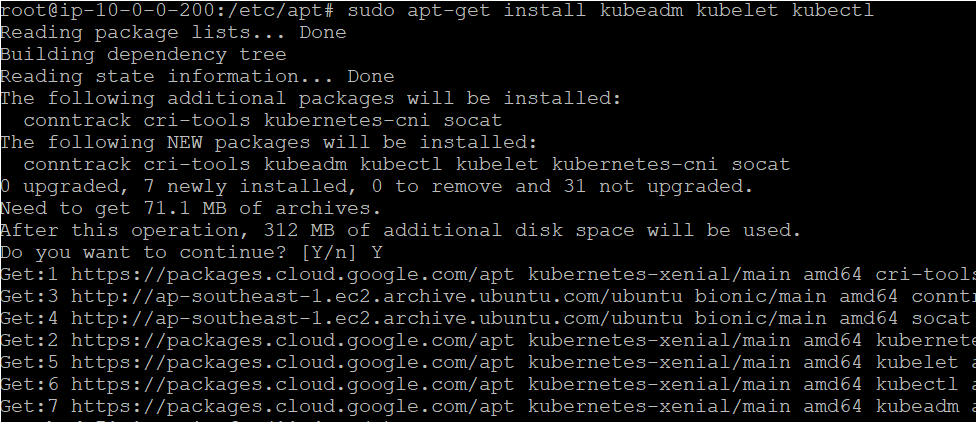
2. Run each previously installed package with the version parameter. The below code snippet is combining all of the commands on a single line for simplicity.
# Verify the version of each of the tools on each machine.
 kubeadm version && kubelet --version && kubectl version
If all goes well, the set of commands above should return a kubeadm version, a line that says Kubernetes vX.XX.X for kubelet, and a Client Version representing the version for kubectl.

3. Now, go through steps one and two on WORKER also.
Initializing a Kubernetes Cluster
By now, you should have Kubernetes installed on both the master node (MASTER) and a worker node (WORKER). But, Kubernetes on Ubuntu isn’t doing much good if it’s not running. You now need to initialize the cluster on MASTER.
Assuming you are still connected to the MASTER via SSH:
1. Run the kubeadm init command below to initialize the Kubernetes cluster. The below command tells Kubernetes the IP address where its kube-apiserver is located with the --apiserver-advertise-address parameter. In this case, that IP address is the master node itself.
The command below is also defining the range of IP addresses to use for the pod network using the -pod-network-cidr parameter. The pod network allows pods to communicate with each other. Setting the pod network like this will instruct the master node to automatically assign IP addresses for every node.
kubeadm init --pod-network-cidr=10.244.0.0/16 --apiserver-advertise-address=10.0.0.200If successful, you will see output similar to the below screenshot.
Be sure to copy the two commands highlighted in blue. You will need these commands later to join the worker node to the cluster.
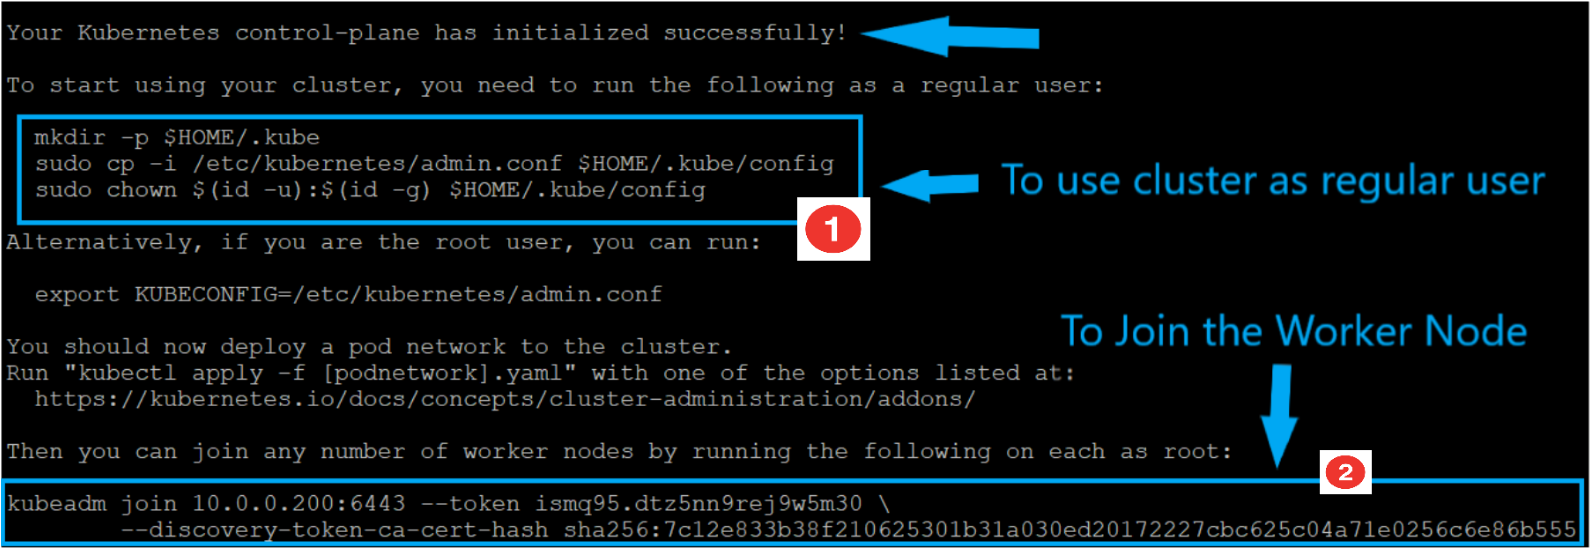
2. Run the first highlighted box commands in step 1 now on the master node. These commands force Kubernetes to run as a non-root account for security reasons.
# Run the below commands on Master Node to run Kubernetes cluster with a regular user
   # Creating a directory that will hold configurations such as the admin key files, which are required to connect to the cluster, and the cluster’s API address.
   mkdir -p $HOME/.kube
   # Copy all the admin configurations into the newly created directory
   sudo cp -i /etc/Kubernetes/admin.conf $HOME/.kube/config
   # Change the user from root to regular user that is non-root account
   sudo chown $(id -u):$(id -g) $HOME/.kube/config
3. Now, SSH into the worker node and run the kubeadm join command as shown above in the second highlighted box in step 1.
This command joins the worker node to the cluster. Both the --token and --discovery-token-ca-cert-hash values are generated by the master node in step 1 to allow the worker node to connect securely to the master node and validates that the root CA public key is the same as the one held by the master node.
# Run the below command on Worker Node to join the Kubernetes cluster
 kubeadm join 10.0.0.200:6443 --token ismq95.dtz5nn9rej9w5m30 \
         --discovery-token-ca-cert-hash sha256:7c12e833b38f210625301b31a030ed20172227cbc625c04a71e0256c6e86b555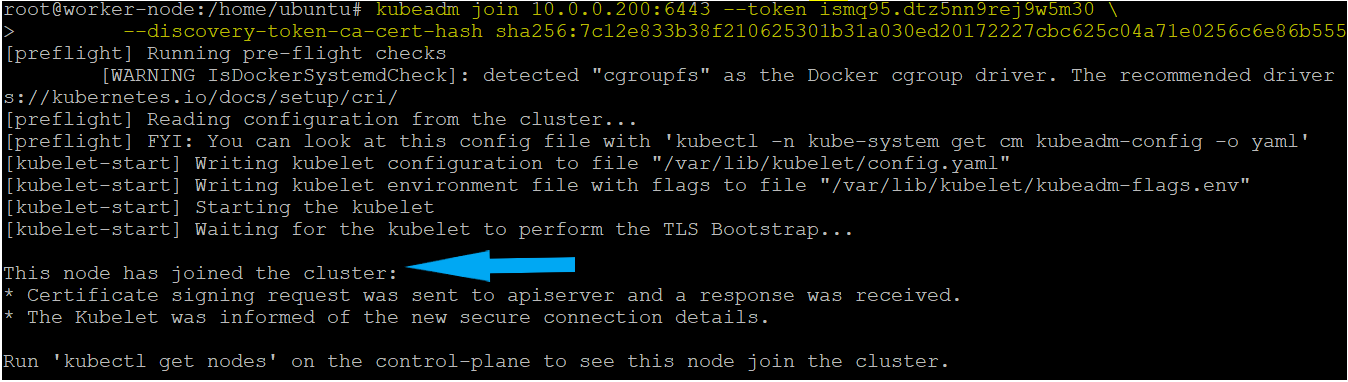
4. Next, run the kubectl command on the master node to verify the worker node has been successfully added to the cluster. If successful, you should see both the master and worker node show up with a STATUS of NotReady.
The nodes show a status of NotReady because you haven’t yet set up the network for them to communicate.
# Verifying the nodes on the Kubernetes cluster
 kubectl get nodes
5. Run the kubectl apply the command to download a popular pod network YAML configuration and deploy a pod network to the master node. Creating a pod network establishes network connectivity between two pods in two different nodes.
Kubernetes allows you to set up pod networks via YAML configuration files. One of the most popular pod networks is called Flannel. Flannel is responsible for allocating an IP address lease to each node.
The Flannel YAML file contains the various configuration necessary for setting up the pod network.
# Establishing the Network connectivity between two MASTER AND WORKER
 kubectl apply -f https://raw.githubusercontent.com/coreos/flannel/master/Documentation/kube-flannel.yml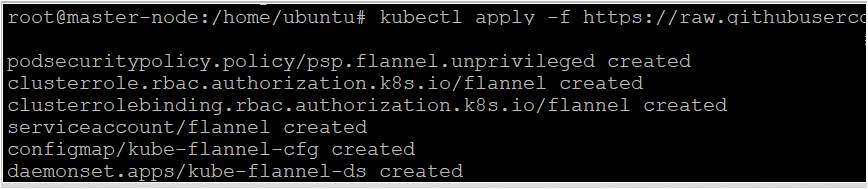
6. Now, run kubectl get nodes again to verify both nodes show a STATUS of Ready on the master node.

Running Your First application on Kubernetes
You should now have a fully functioning Kubernetes environment set up. Great job! A running Kubernetes cluster is great but it’s not doing much good until you deploy some containers on it.
In this final section, let’s briefly cover how to create a Kubernetes deployment and service to run a simple NGINX container.
Assuming you are still connected to the MASTER via SSH:
1. Run the kubectl create deployment command to create a deployment configuration. Deployments are how Kubernetes create and update application instances. A deployment also allows Kubernetes to continually monitor the application and fix any issues via a self-healing mechanism.
The below command creates a deployment configuration called nginx, downloads thenginx Docker image from Docker Hub, and creates a pod (and container within) on the worker node.
kubectl create deployment nginx --image=nginx2. Now, run kubectl get deployments to ensure Kubernetes has created the deployment.
kubectl get deployments nginx3. Next, run kubectl create service to create a service. A service is a way Kubernetes exposes an application over the network running on one or more pods.
The below command creates a network service to expose the nginx deployment (and pod)’s TCP port 80 outside of the cluster.
kubectl create service nodeport nginx --tcp=80:804. Run the kubectl get svc command to verify Kubernetes created the service successfully. The kubectl get svc command is a great way to get an overview of all Kubernetes services.
kubectl get svcYou can also see more information about the service by running
kubectl describe services nginx.
Below, you can see that Kubernetes has successfully created the NGINX service and is currently running on port 80 on the master node and mapping that port to port 31414 on the pod.

5. Since the pod running the application is now available via port 31414 via the service, run curl to ensure you can bring up the default NGINX web page.
# Testing the NGINX service on MASTER Node listening on Port 31414
 curl localhost:31414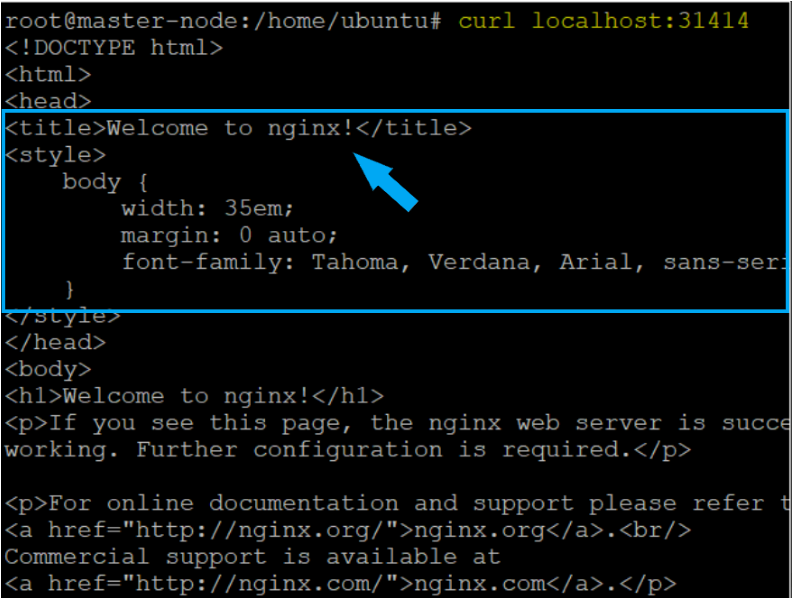
Conclusion
You should now know how installing Kubernetes on Ubuntu is done. Throughout this tutorial, you walked through each step to get a Kubernetes cluster set up and also deploying your first application. Good job!
Now, that you have a Kubernetes cluster set up, what applications are you going to deploy next to it?


