

Are you spending a lot of time tracking issues than you should? Is your tracking method scattered all over the place? Why not install Jira and start tracking issues in a consolidated platform with optional notifications.
Jira allows you to collaborate with all teams to track customer issues and user stories, plan sprints, and distribute tasks across your software team.
Read on and continue learning. This tutorial will teach you how to install JIRA on Ubuntu and later create a tracking ticket with a new project.
Prerequisites
This post will be a step-by-step tutorial. To follow along, you’ll need a computer with at least Ubuntu 14.04.4 LTS. This tutorial uses Ubuntu 20.04.4 LTS. Also, you must have an Atlassian account. If you don’t have one, sign up for a free Atlassian account first.
Installing JIRA
As the main point of this tutorial, your first task is to install JIRA. But before you install JIRA on your machine, you must first install Java, which is a dependency of JIRA.
You can use multiple Java implementations to work with JIRA, but OpenJDK is the most popular, which you will install and use in this tutorial.
Install Jira Dependency (Java)
To install Java on Ubuntu, follow these steps.
1. Log in to your Ubuntu machine using your preferred SSH client.
2. Next, update the package cache to ensure you’re getting the latest available versions in the succeeding steps.
sudo apt update3. After updating the package cache, run the below command to install Java on your machine.
# Installing Java Version: Java SE 11 (LTS)
sudo apt install default-jdk -y
4. Finally, run the below command to check the Java version. Doing so ensures that you’ve successfully installed Java.
# Checking the Version of Java to verify Java installation.
java -version
Install Jira Software
Now that you installed Java, you’re ready to install JIRA on the computer. To do so, proceed as follows.
1. Run the following commands to create a directory named /opt/install-jira-demo and switch to that directory. You’ll be using this directory as the download location of the JIRA installer.
sudo mkdir /opt/install-jira-demo && cd /opt/install-jira-demo && pwd2. Now, download the Jira binary file from the official website using the wget command below.
To install JIRA, find the JIRA installer links on the JIRA Software page. The latest version as of this writing is 8.22.1.
sudo wget https://www.atlassian.com/software/jira/downloads/binary/atlassian-jira-software-8.22.1-x64.binWait for the download to finish. The file size as of the latest version is approximately 480MB.

3. After the download, make the Jira installer file executable by running the below command.
# Adding the Execute permission on the binary file
sudo chmod a+x atlassian-jira-software-8.22.1-x64.bin
4. Now that you’ve made the installer executable run the below command to install Jira.
Starting the JIRA installation with sudo creates a dedicated account that will run Jira and allows running Jira as a service.
sudo ./atlassian-jira-software-8.22.1-x64.bin5. Suppose you see the below message, press y and Enter to install the fontconfig package. Jira requires fontconfig to work correctly.
We couldn't find fontconfig, which is required to use OpenJDK. Press [y, Enter] to install it.
For more info, see https://confluence.atlassian.com/x/PRCEOQ.
6. Next, press o and Enter to confirm installing the Jira software.
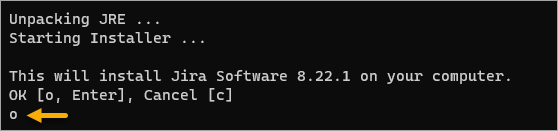
7. Now, select the option on how you’d like to install Jira. The options are:
Express Install (use default settings) [1]
Custom Install (recommended for advanced users) [2, Enter]
Upgrade an existing Jira installation [3]
In this example, select the Express Install option by pressing 1.

The installer shows you the directories and settings it will use for the installation, such as:
- The default installation directory (
/opt/atlassian/jira).
- The home directory of the service account (
atlassian).
- The HTTP default port for the web interface (
8080).
- The RMI port (
8085).

8. Next, press i and Enter to install Jira as a service.
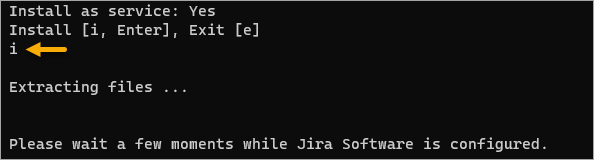
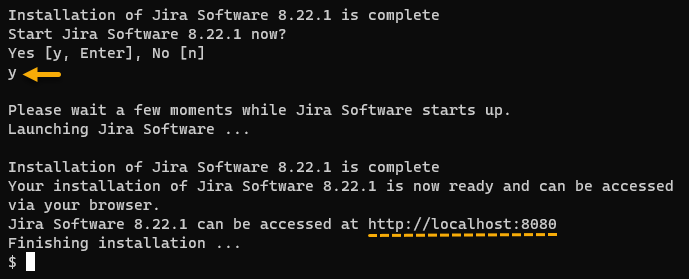
9. Finally, press y and press Enter on the below prompt to start the Jira software.
Initial Jira Setup
So you’ve installed Jira. Congratulations! But, you need to do a few more initial setups before using Jira. You’ll be doing the configuration from the Jira Software web interface this time.
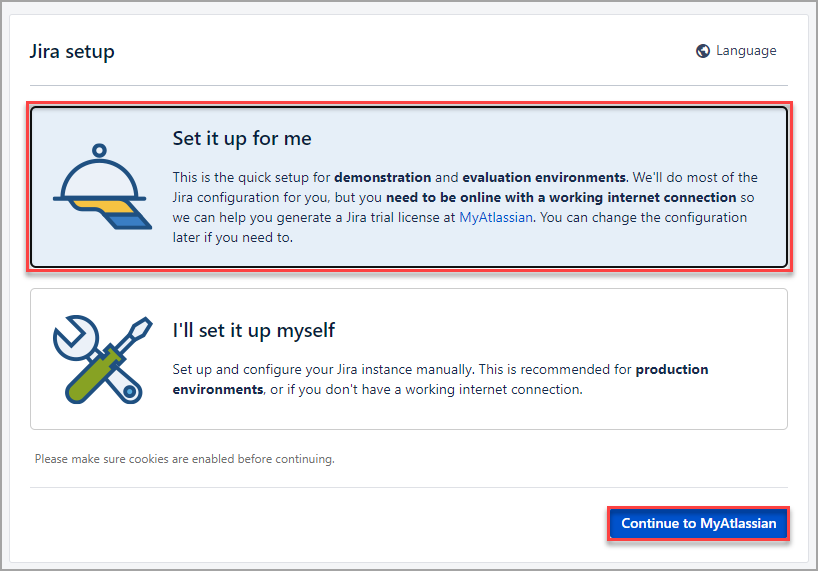
1. Open your browser and navigate to HTTP://<server_ip>:8080 to access the JIRA setup screen, as shown below. Since this tutorial is only for learning purposes and not production, click the option to Set it up for me and click Continue to MyAtlassian.
2. On the next page, log in to your Atlassian account. Depending on how you registered your account, select the appropriate login option.

3. Select the following options on the New Trial License page and click Generate License to generate a 90-day trial license.
- Product: Jira Software.
- License type: Jira Software (Data Center).
- Organization: <Your organization name>.
- Your instance: up and running.
- Server ID: DO NOT CHANGE. The Jira setup automatically populates this field with your server’s Server ID.
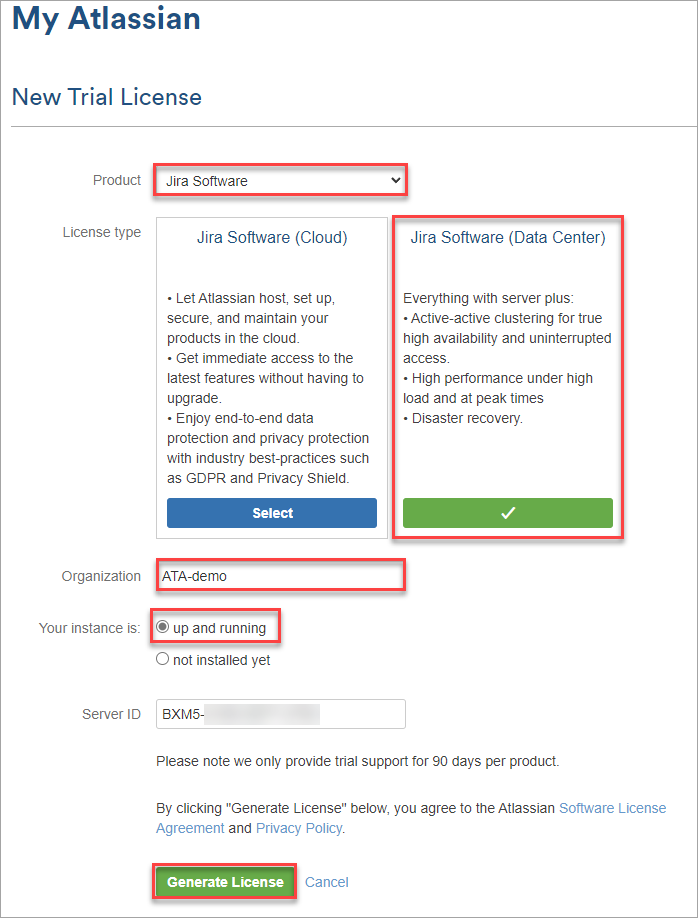
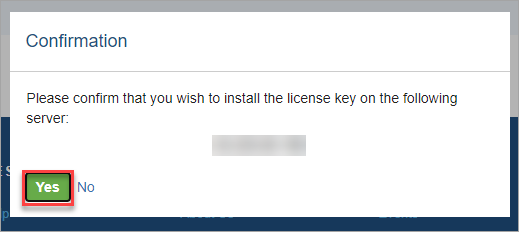
4. Click Yes on the Confirmation prompt to install the license key on your Jira server.
You will see the below message when the license installation is complete.

5. Next, set up the administrator account to have complete control of the JIRA software. Enter your registered email address, username, and password, and click on the Next button.

Now, wait for the setup to finish.

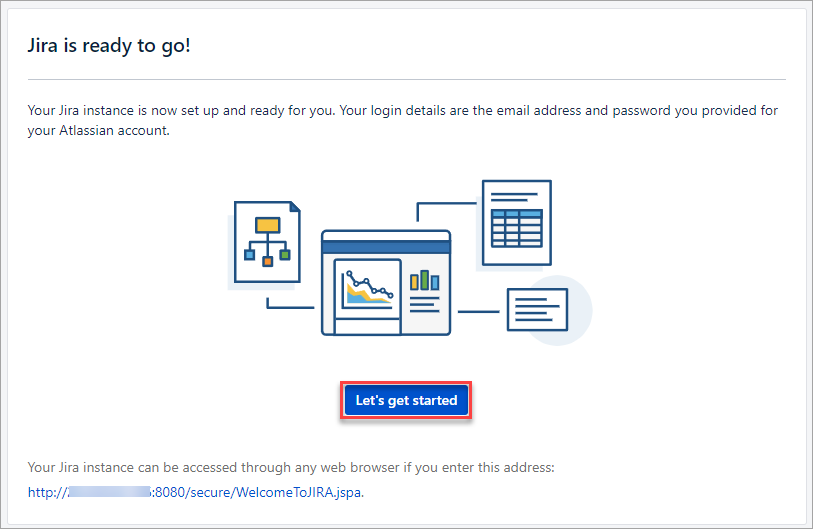
6. You should see the Jira is ready to go! page, which means you’ve completed the Jira server setup stage. Click Let’s get started to take you back to the Jira web interface.
7. Select your preferred language on the Welcome to Jira page and click Continue.

8. On the next page, choose an avatar or leave the current one and click Continue.

Finally! You’ve completed the Jira server setup.
Creating a New Project
Now that you’ve completed your Jira installation and configuration, your next task is to create your first project. Whether you’re working on a software development project or tracking an ongoing project via project management, Jira got you covered.
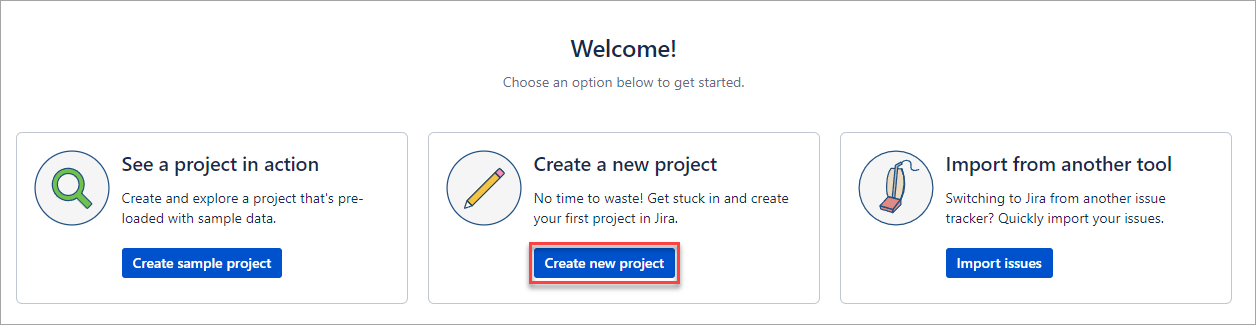
1. On the Jira welcome page, you’ll see three options on how you want to get started. In this example, click Create new project.
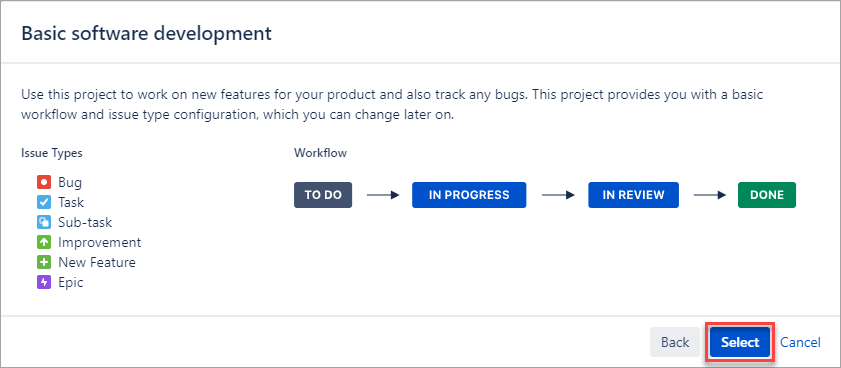
2. Next, click Basic software development and click Next on the list of project types.

3. Confirm the project type you selected by clicking on Select on the next page.
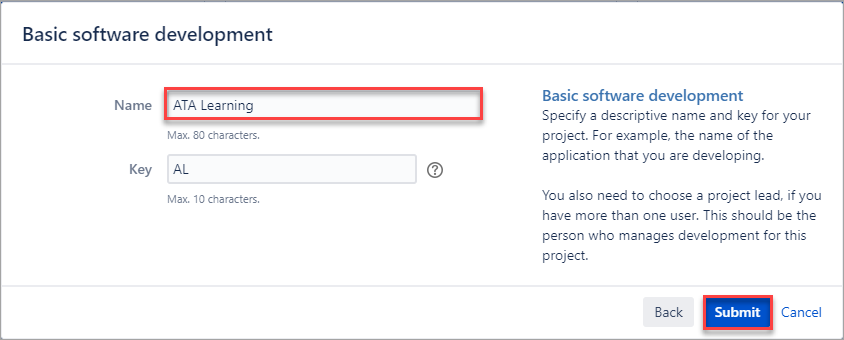
4. Next, type the name of a project. For this tutorial, the name of the project is ATA Learning. Leave the Key value and click Submit.
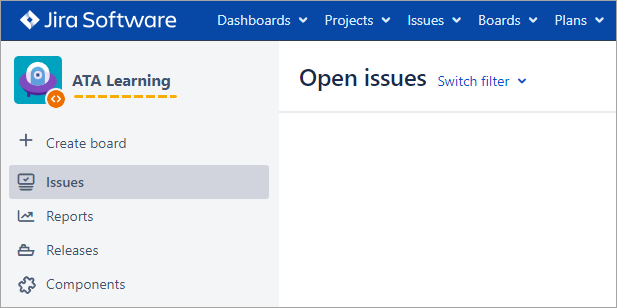
You’ve now created your first Jira project
Creating an Issue Entry
Once you’ve created the project for the software development you’re tracking, you can now start submitting issues to the project. The type of issues you can create are:
- Improvement – improvement to an existing feature.
- New Feature – development of a new feature.
- Bug – problems with the functions of the product.
- Task – pending tasks.
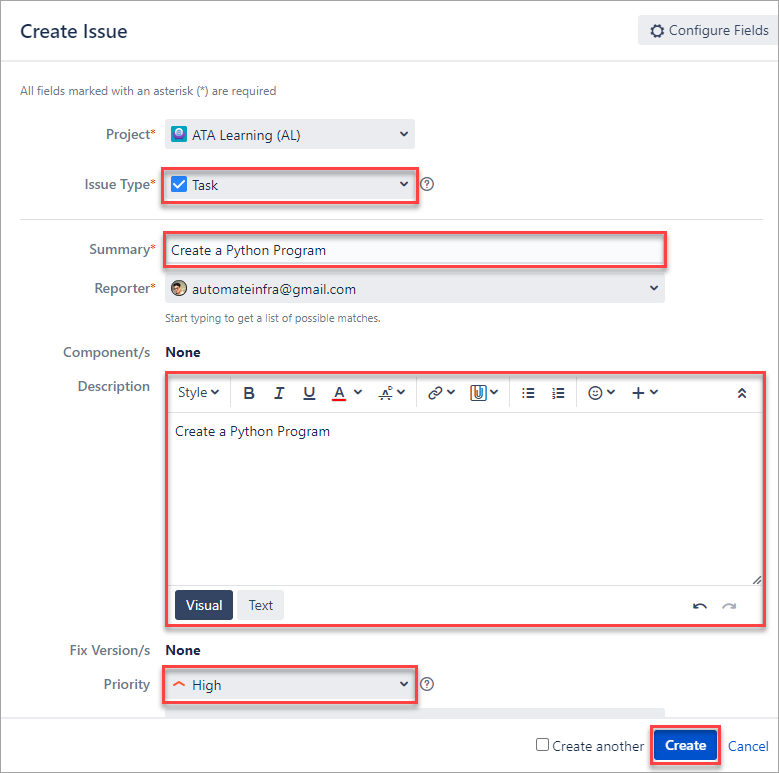
For example, suppose you need to add a new Python program to the software your team is developing. You could create an issue in Jira to start tracking that task. To do so, follow the below steps.
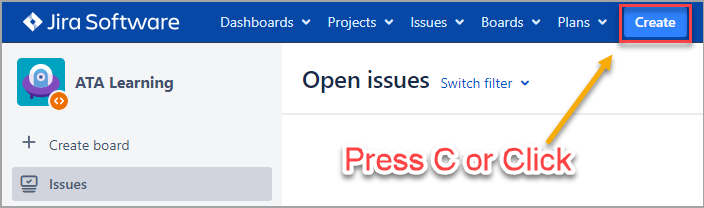
1. Press c or click the Create button at the top of the main project page.
2. Select the Task option from the Issue Type dropdown box on the Create Issue form. Type in the Summary and Description of the issue you’re creating. Set the issue Priority as you deem necessary. This example sets the priority High. Lastly, click Create.
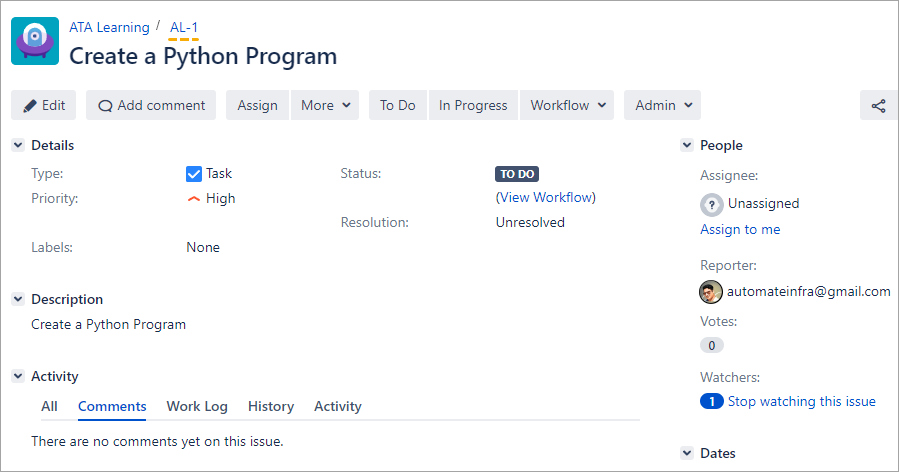
As you can see below, you have created a new issue under the project. Repeat the same steps to add new issues. At this point, you can now start tracking issues in an organized manner.
Conclusion
In this tutorial, you learned to install Jira on Ubuntu and configure its initial settings to get started. You created a project and a task within, letting you track issues more organized and convenient for your and your team.
You can do more in Jira as far as tracking issues go. How about configuring an SMTP server for sending email notifications? You could also create professional reports on issue resolution times or time tracking.


