

You got an AWS account and feel excited about finally taking the plunge into the world of cloud computing but are unsure where to start. Why not use and install AWS CLI on Windows? Like with most things AWS, getting started with AWS CLI can be a bit daunting. But no worries! This tutorial will help you get started in no time.
In this tutorial, you will learn how to install and take full advantage of all the features that AWS CLI has to offer.
Read on and delve into AWS CLI on Windows for better cloud computing!
Prerequisites
This tutorial will be a hands-on demonstration. To follow along, be sure you have a Windows computer handy and an AWS account (free tier).
Downloading AWS CLI to Install on Windows (MSI Installer)
Even though AWS CLI works on different operating systems, like Windows, MacOS, and Linux, AWS CLI does not come installed by default. The easiest way to install AWS CLI on Windows is via the MSI installer, so you do not have to worry about manually configuring anything.
To download the AWS CLI MSI installer:
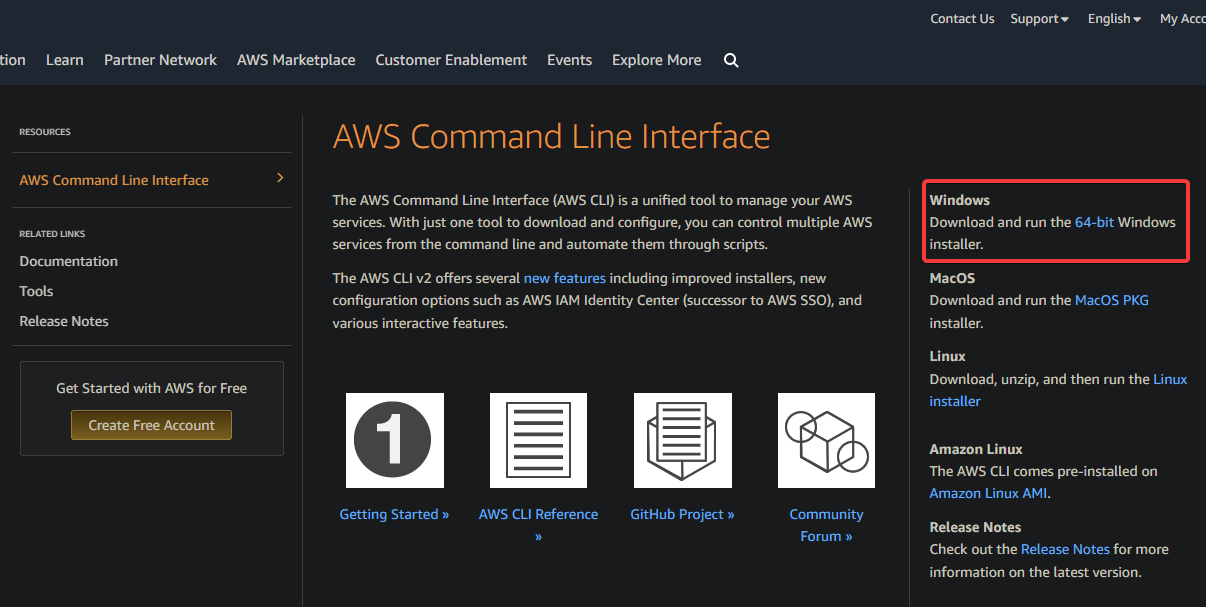
1. Open your favorite web browser, and visit the AWS CLI page on the Amazon website.
2. Navigate to the section labeled Window (right panel), and click the 64-bit hyperlink under Windows to download the latest MSI installer for AWS CLI.
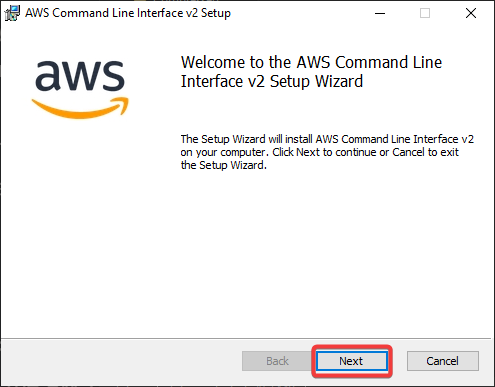
3. Once downloaded, double-click on the MSI installer file to launch the AWS CLI installation wizard (step four).

4. Click Next on the welcome screen of the installer wizard to continue with the installation.
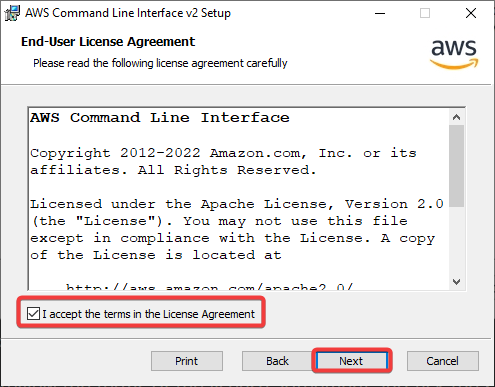
5. Now, review the license agreement terms, tick the I accept the terms in the license agreement checkbox, and click Next to accept the agreement.
6. On the next page, either keep the default install location of AWS CLI, or click on Browse to choose a different one, and click Next.

7. Click Install to start the installation process.

8. Once installed, click Finish to exit the installation wizard.

9. Finally, open PowerShell as administrator and run the following command to verify the installation was successful.
This command returns the current version of AWS CLI installed on your computer.
aws --versionBelow, the output shows the latest version of AWS CLI installed at this time of writing is 2.7.28.

Creating an IAM User
After successfully installing AWS CLI, you are ready to use it — well, almost. Before running commands in AWS CLI, you must have an IAM user in your AWS account. IAM is the service that AWS uses to manage users and their permissions.
Only the root user in your AWS account can access all the resources by default. But when you create a new IAM user, security-wise, you can give them access to only the resources that they need.
To create an IAM user, follow these steps:
1. Sign in to your AWS Management Console on your web browser as your root user.
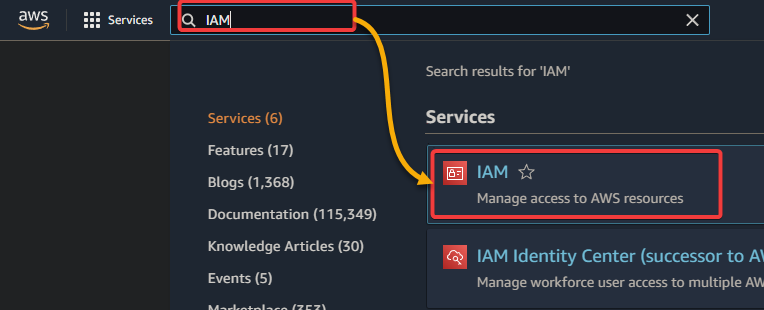
2. Next, search for IAM in the console’s search bar (top-most), and select the IAM service from the list of results to access the IAM console.
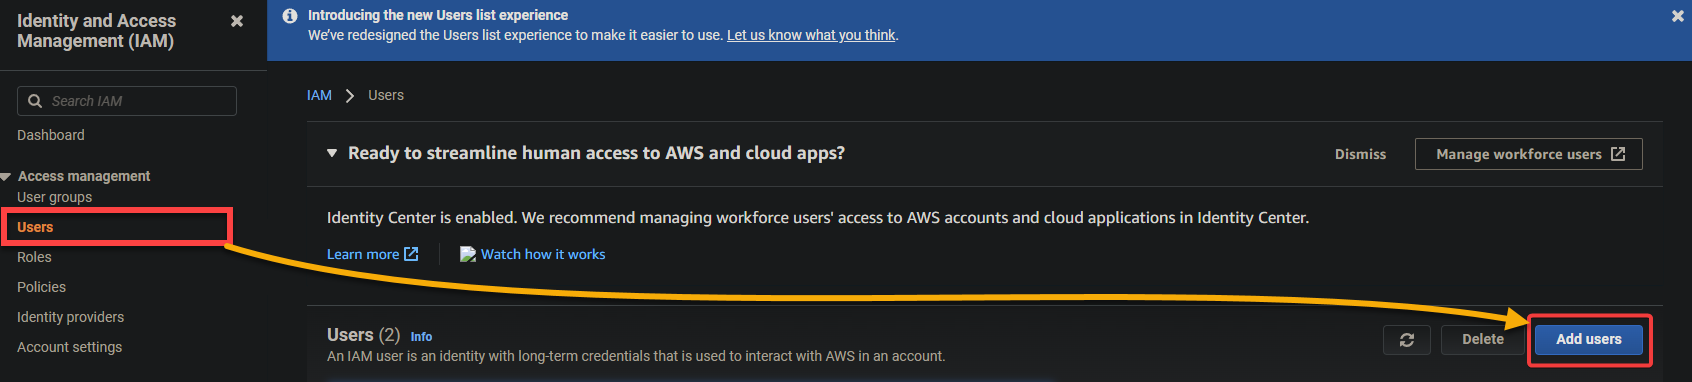
3. In the IAM console, click on Users in the left sidebar and then click on Add user. This action opens the Add user page.
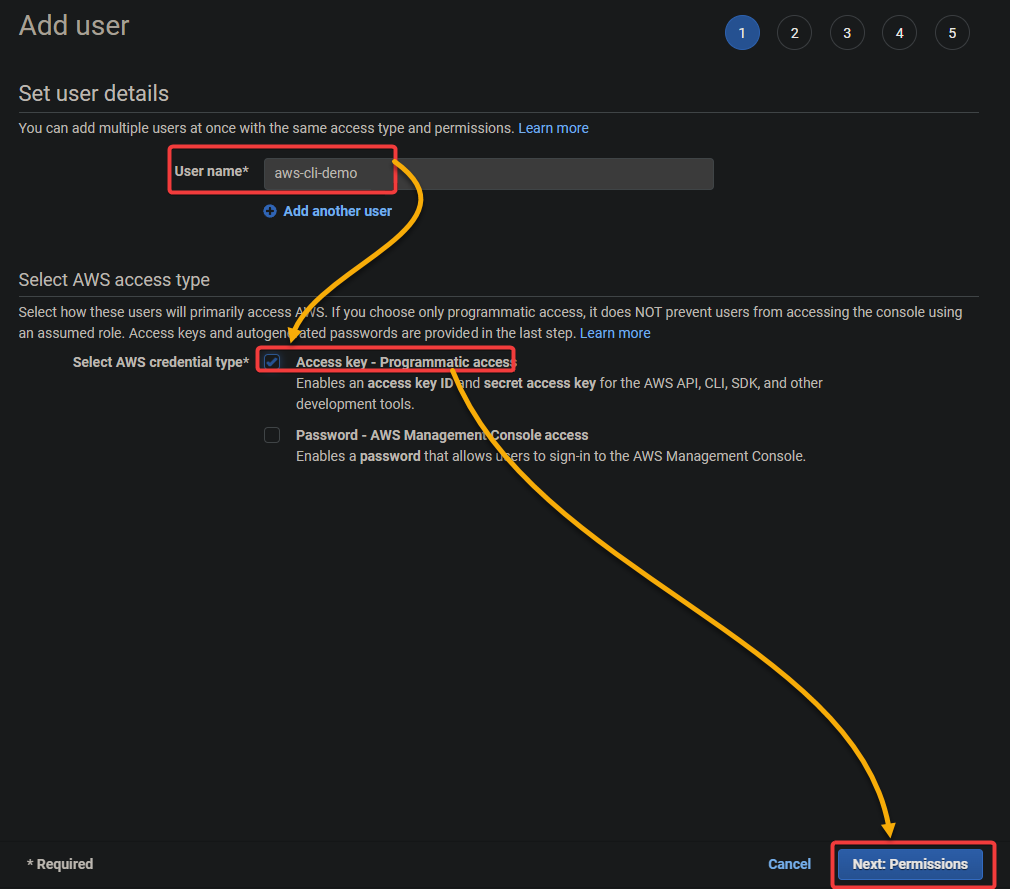
4. Now, set the user details with the following:
- Set a User name for your IAM user.
- Select the Access key – Programmatic access option for the AWS access type. This option gives your IAM user access to the AWS API, which you need for using AWS CLI.
- Click Next: Permissions to continue.
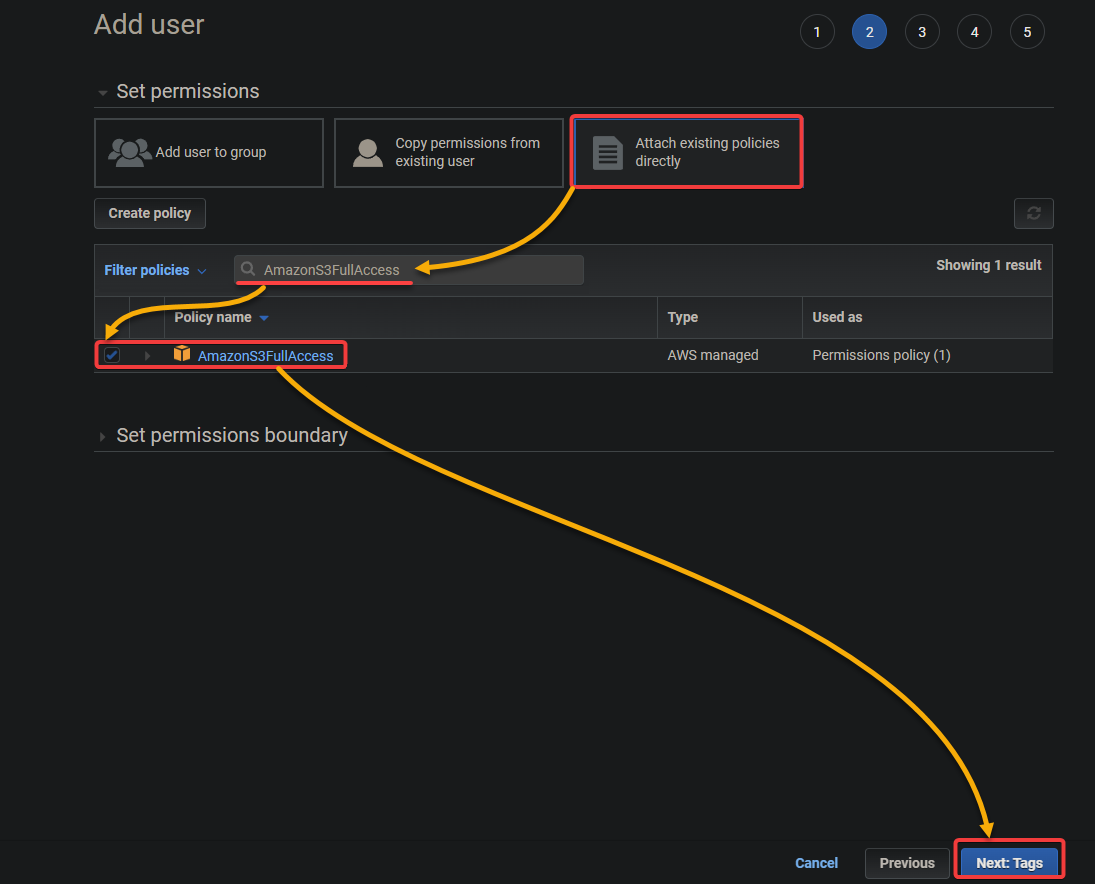
5. Set permissions for your IAM user, and you can set permissions in two ways:
- The first way is to create a new IAM policy and attach it to your IAM user.
- The second way is to add an existing IAM policy with the necessary permissions.
But for this tutorial, you will set permissions using the latter approach:
- Select the Add existing policies directly option.
- In the Filter field, type AmazonS3FullAccess and tick the checkbox next to that policy. This action adds the AmazonS3FullAccess policy to your IAM user, giving the user full access to all Amazon S3 resources.
- Click Next: Tags to continue.
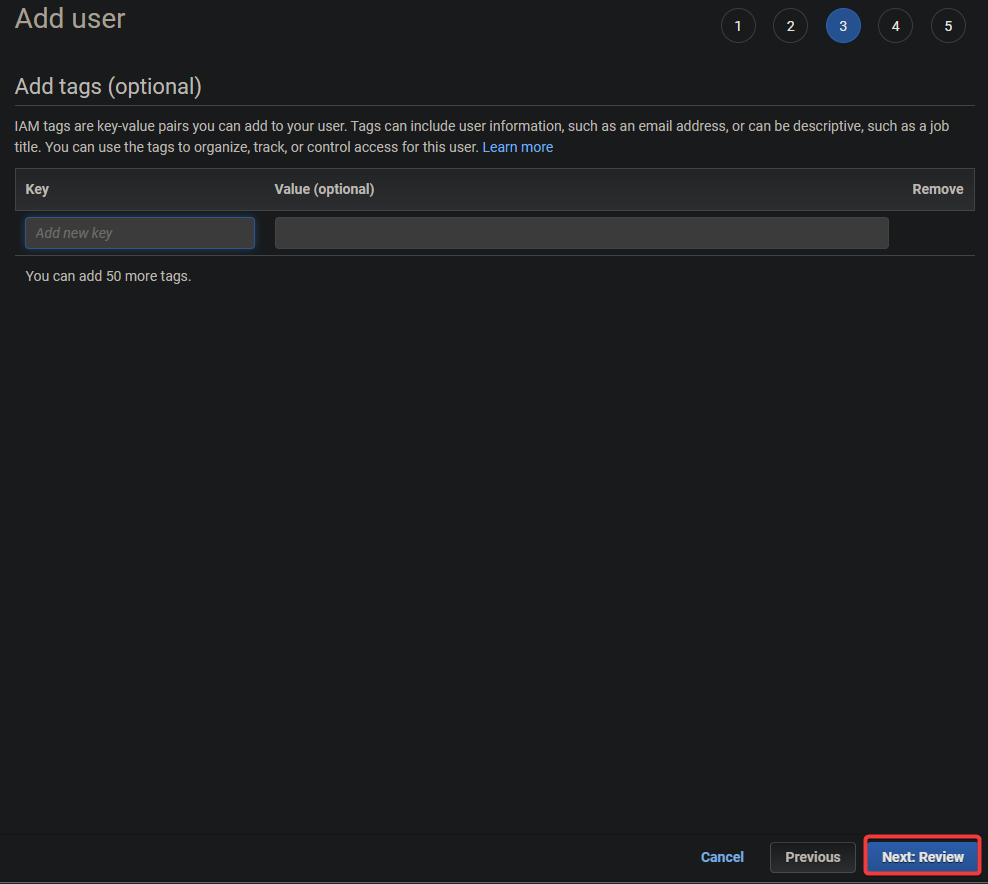
6. Next, add tags as you like, and click Next: Review (bottom-right). Tags are key-value pairs that you can use to categorize your resources.
But for this tutorial, you don’t need to add any tags.
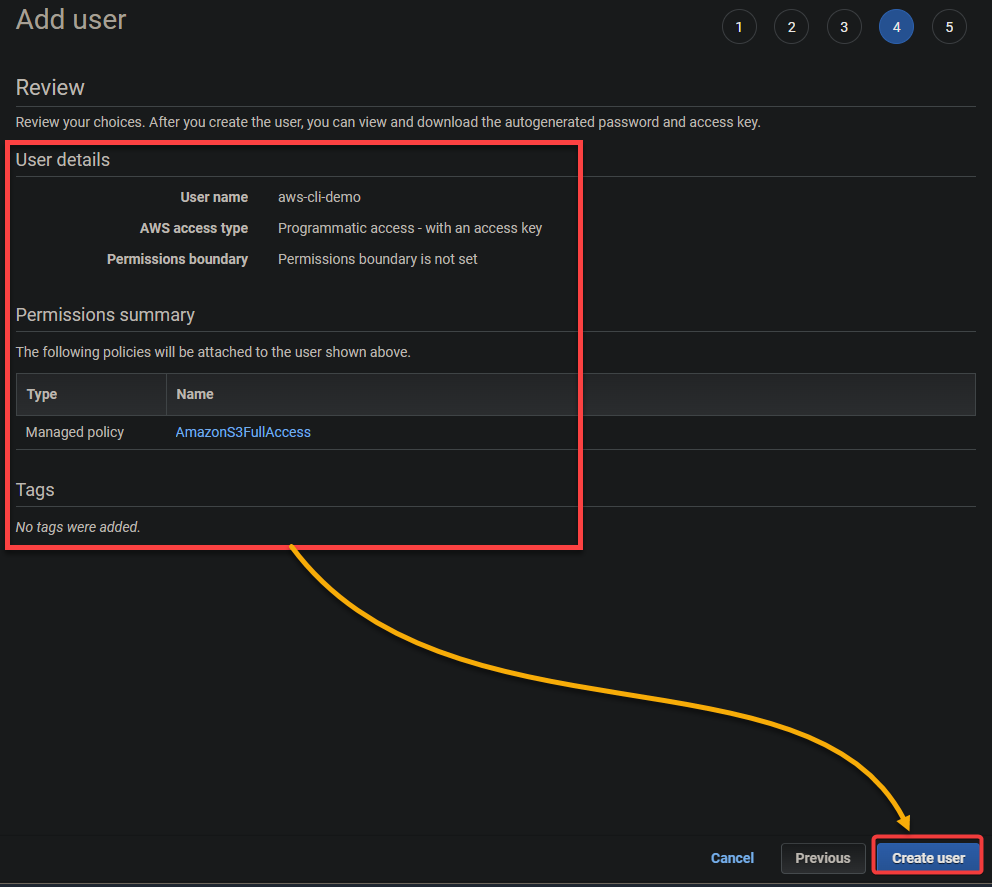
7. Finally, review the information about your IAM user and then click Create user to create the IAM user.
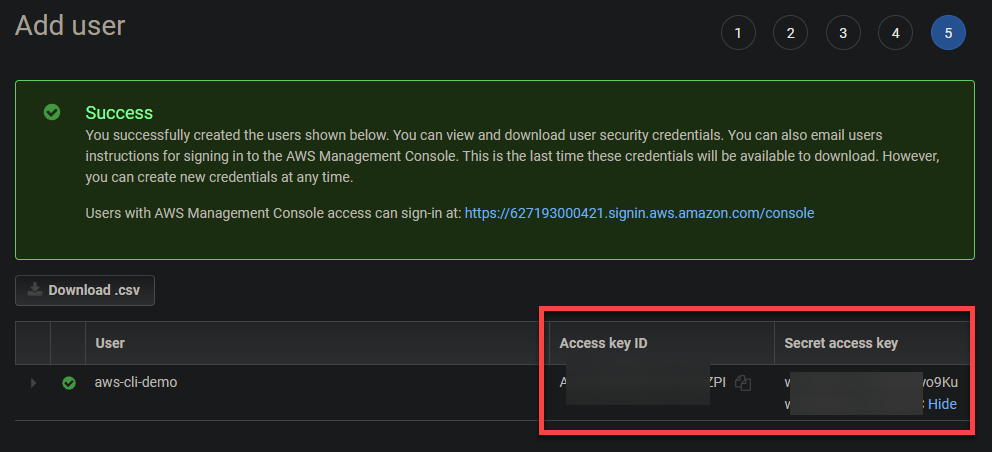
Once the user has been created, you will see a confirmation message with the user’s access and secret access keys. Make sure to copy these keys or download the CSV file because you will need them later in configuring your AWS profile.
Never share your secret access key with anyone. Someone who obtains your secret access key will have full access to your AWS account.
Configuring the AWS Profile
You now have an IAM user ready to use in your AWS CLI. But first, you need to configure your AWS profile to interact with your AWS resources. Your AWS profile is a set of credentials you can use to authenticate yourself using the AWS CLI.
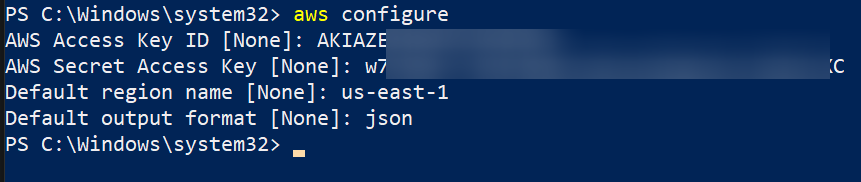
Run the following aws configure command on PowerShell to start configuring your AWS profile. This command prompts you to enter your access key, secret access key, default region, and output format.
aws configure
When prompted, configure your AWS profile with the following:
- AWS Access Key ID and AWS Secret Access Key – Enter your access and secret keys you noted in the last step of the “Creating an IAM User” section.
- Default region name – Enter the AWS Region where you want to run your commands. For example, you can enter “us-east-1”.
- Default output format – Enter “json,” the default output format for the AWS CLI, which is easier to parse programmatically.
Your AWS profile should be configured at this point, and all the AWS CLI commands you run will use these credentials by default.
Now, run the cat command below to view the contents of the ~/.aws/credentials file where your credentials are saved. The AWS CLI reads this file to determine your credentials when you run a command.
cat ~/.aws/credentials

Creating an S3 Bucket and Uploading Files
After fully configuring your AWS profile, you’ve come to the most exciting part. You will use the AWS CLI to interact with your AWS services, creating an S3 bucket by running commands.
If you’ve been using the AWS console, you can think of the AWS CLI as an alternative way to manage your AWS resources. The AWS CLI unlocks even more possibilities, such as scripting and automating tasks.
To create an Amazon S3 bucket using the AWS CLI:
1. Run the following aws s3 mb command to create a bucket named aws-cli-s3-demo02456412. Ensure you replace aws-cli-s3-demo02456412 with a unique name for your bucket.
Note that the bucket’s name must be unique across all Amazon S3.
aws s3 mb s3://aws-cli-s3-demo02456412
2. Next, run the below aws s3 ls command to list the buckets available in your AWS account.
aws s3 lsThe output below confirms the newly-created S3 bucket exists.

3. Run the aws s3 cp command below to upload a file called text01.txt from your local machine to your new Amazon S3 bucket (s3://aws-cli-s3-demo02456412/).
Replace C:\textfiles\text01.txt with your file’s name and location.
aws s3 cp C:\textfiles\text01.txt s3://aws-cli-s3-demo02456412/
4. Finally, navigate to your Amazon S3 console to verify that the file has been uploaded.
You should now see the file in your Amazon S3 bucket, as shown below. This output confirms the AWS CLI in your Windows machine works correctly.

Conclusion
Having AWS CLI, a unified tool is a breeze to manage your AWS services. And in this tutorial, you learned how to install and use the AWS CLI on Windows. You’ve configured your AWS credentials and used the AWS CLI to create an Amazon S3 bucket and upload files.
Now that you have a fully functional AWS CLI, why not start automating your AWS tasks? Your CI/CD pipelines will thank you!


