


If you’re checking and changing file permissions via something like Windows File Explorer, you must click around and open/change permissions for each file and folder. This approach is fine if you need to modify a permission or two. But perhaps you want to determine and change permissions for a hundred files or more in a folder. Let the icacls command be the solution.
In this tutorial, you will learn everything about how the icacls command allows you to read, save, restore file and folder permissions.
Let’s get started!
Prerequisites
This tutorial comprises step-by-step instructions. To follow along, be sure you have the following in place:
- A Windows Server or Client PC with administrator privileges.
- A remote Windows computer with Windows file and print sharing ports open if you’d like to learn how to change permissions on remote computers.
- Microsoft’s Process Explorer v16.42 (optional) shows which program has a particular file or directory open.
Learning What icacls Command is and How it Works
There are times that a user cannot access or modify a file or folder, and one of the reasons would be a lack of user permissions on the object. The icacls command is a command line utility executed to view or modify a file or folder permissions on the Windows file system.
But before you get into changing file and folder permissions with the icacls command, you must first understand Access Control Lists (ACL). In this context, an ACL contains a list of a user or a group’s permissions on an object within the NTFS file system.
Each entry in an ACL is called an Access Control Entry (ACE). ACEs contain permissions and details about how child objects inherit these permissions. NTFS permissions are in place to protect systems from unauthorized access.
The icacls command can set many granular permissions in file or folder properties in the advanced security settings page. These permissions include allowing or denying specific rights, along with basic read/write permissions.
To see a file or folder’s advanced permissions:
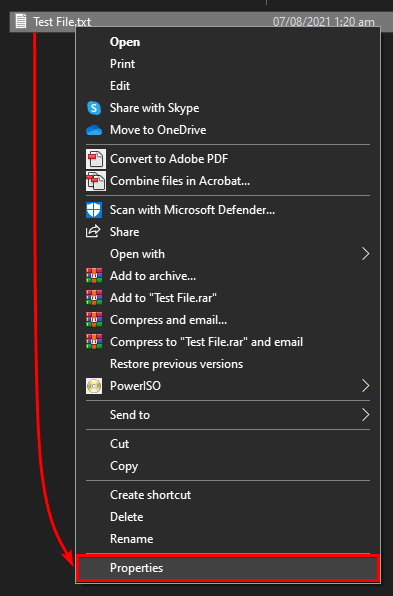
1. Open File Explorer, right-click on a file or folder, and choose Properties from the context menu.
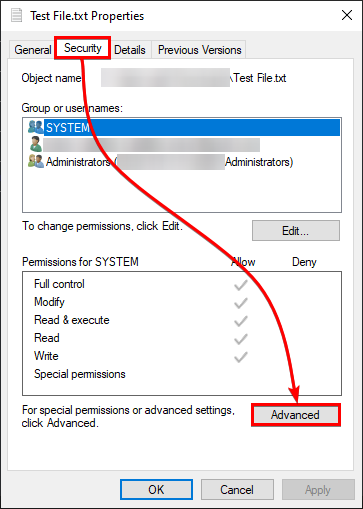
2. Click on the Security tab —> Advanced to access the file or folder’s advanced security settings.
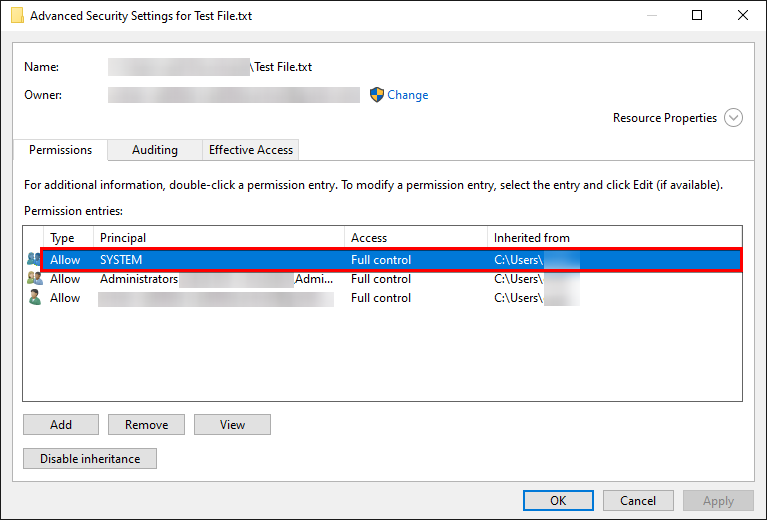
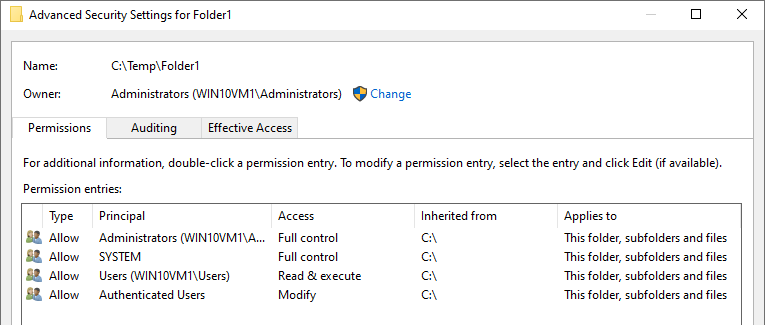
In the advanced view, you’ll see a Permissions tab along with each ACE that makes up the ACL for that file system object.
3. Double-click on any ACE in the list to bring up the Permission Entry dialog box.
4. Now, click on the Show advanced permissions link to dive deep into all of the individual permissions set on that object.
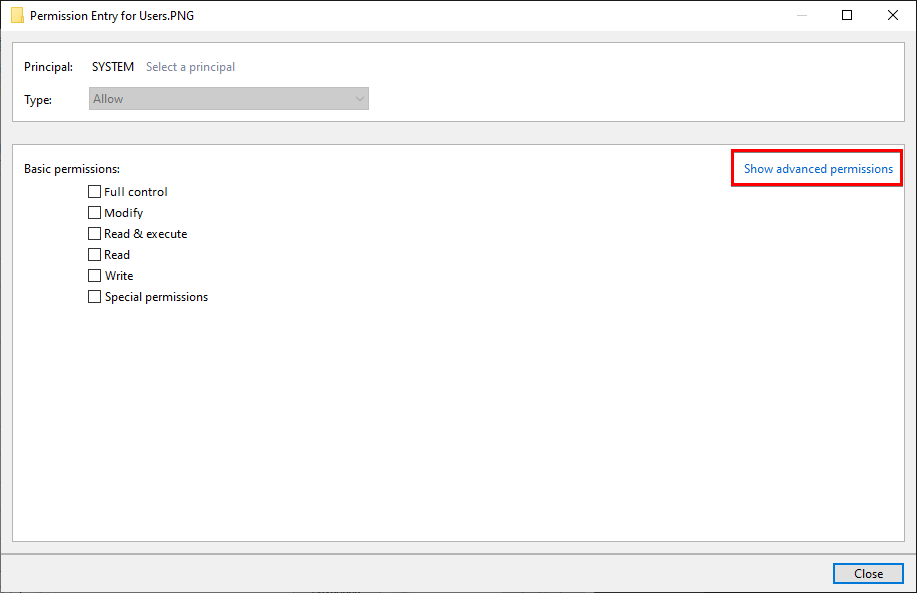
Below, you can see all the advanced permissions to grant or deny a user ID for a file or folder.

Running the Basic icacls Command Syntax
Now that you understand all of the clicking involved to view and change file/folder permissions let’s now learn how to use the command-line using the icacls command.
The icacls command accepts many switches and parameters to change file and folder permissions successfully, but let’s start with running a basic icacls command syntax.
Open a command prompt and enter the icacls command as-is to see its default output. You can see below the icacls command’s help information with all the switches, and parameters are displayed by default.
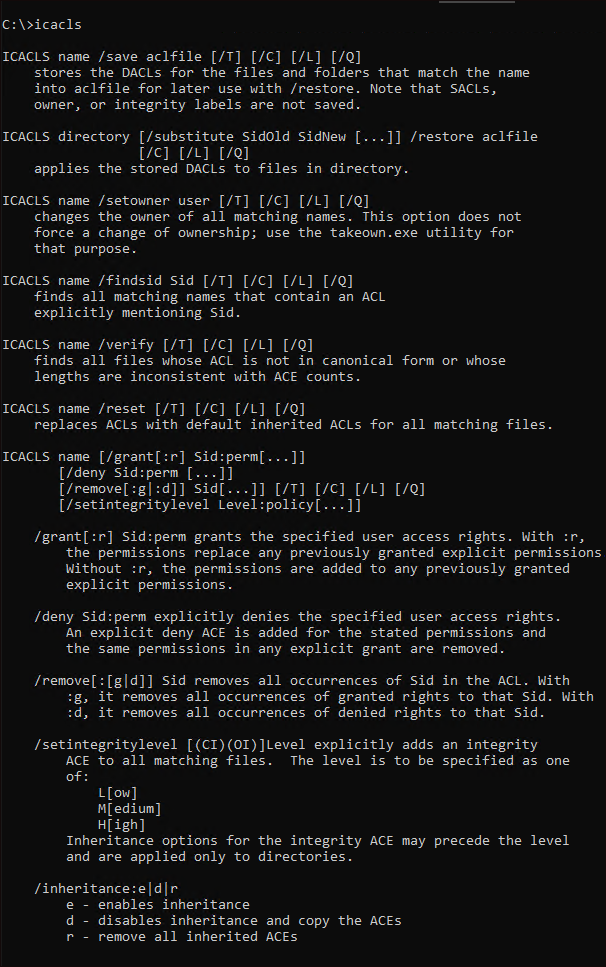
icacls command’s default output Perhaps you want to see the existing permissions on a file or folder. If so, a basic icacls command syntax command would suffice. To demonstrate, create a folder and then run icacls to view its permissions, as shown below.
# Make a new folder named Folder1
md Folder1
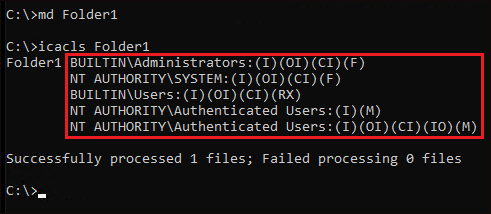
# Checking permissions of the folder named Folder1
icacls Folder1icacls returns the ACL assigned to the object; in this case, the Folder folder includes all of the ACEs inside. Below, you can see that BUILTIN\Administrators and NT AUTHORITY\SYSTEM user IDs have full (F) permissions with the object inheritance (OI) and container inheritance (CI).
The BUILTIN\Users user ID, on the other hand, indicates the local user group on the PC has object inheritance (OI) and container inheritance (CI) enabled, along with the read and execute access. (RX)
Lastly, the two NT AUTHORITY\Authenticated Users user IDs indicate that the authenticated users group has modify-level (M) access with object inheritance (OI) and container inheritance (CI) enabled.
Saving and Restoring Files and Folders’ ACLs
Changing file and folder permissions is a sensitive task; one wrong move could mess up user access or group access. The good news is that the icacls command allows you to save an ACLfile. An ACL File contains your files and folders’ ACLs.
To demonstrate how to save and restore ACLs, let’s first create a folder called C:\Temp\Folder1 and save all permissions for that folder by running the commands below.
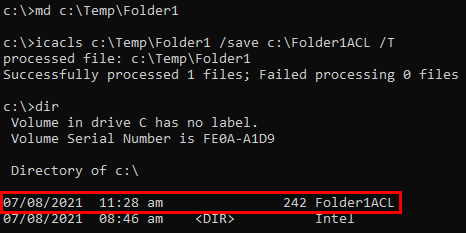
1. Run the icacls command below to recursively (/T) back up your files and folder’s ACLs (c:\Temp\Folder1) and save (/save) them in a file (C:\Folder1ACL).
# Make a new folder named Folder1
md c:\Temp\Folder1

# Save folder1's permissions to a file named Folder1ACL
icacls c:\Temp\Folder1 /save c:\Folder1ACL /T
Below, you can see that you’ve created a new folder and successfully saved that folder’s ACLs in an ACL File. Confirm that the ACL file (Folder1ACL) exists by running the dir command.
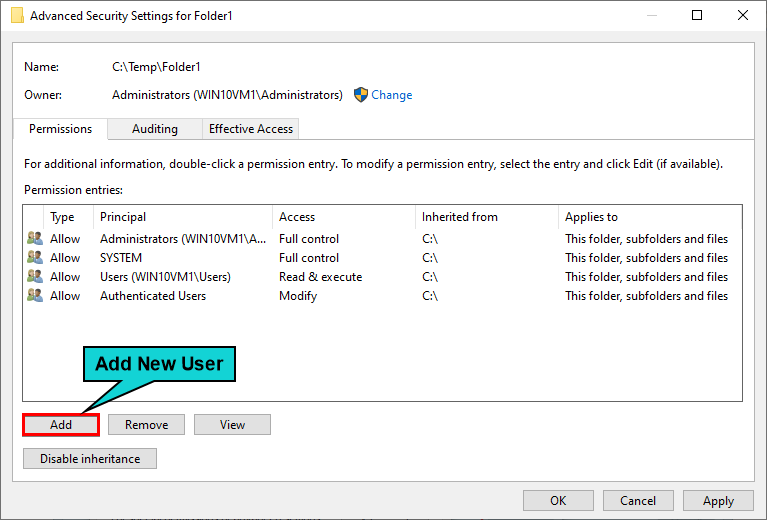
icacls command 2. Now, access Folder1’s advanced security settings, as you did previously. Below, add a new user to the folder permissions by clicking on the Add button.
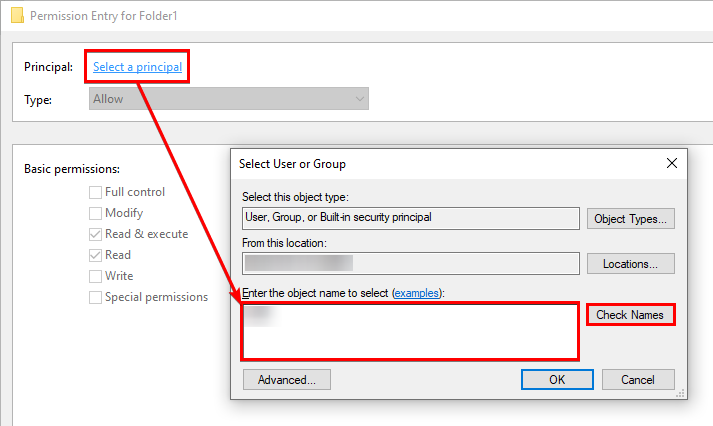
3. Select a user or group to add to Folder1’s permissions by clicking on the Select a principal option below. Type the user or group ID to add in the pop-up window and click on Check Names. When the user or group ID is found, click OK.
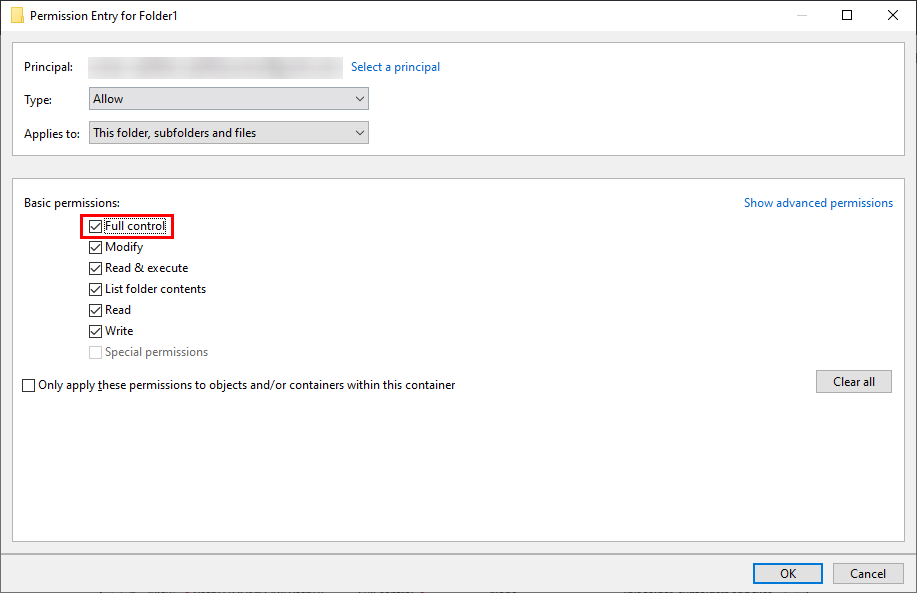
4. Grant the new user full permissions to Folder1 by checking on the Full control option and click OK.
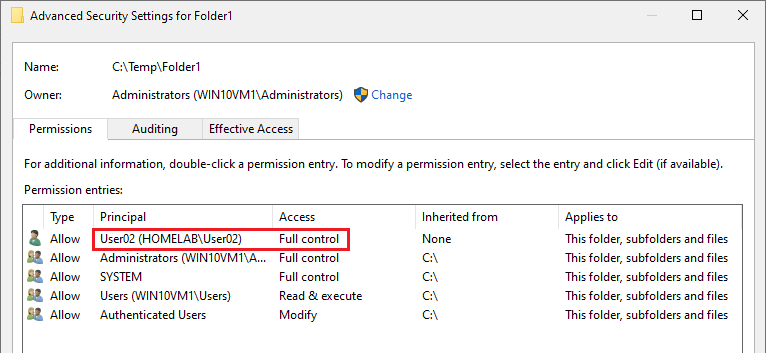
Below, you can see that User02 is added to Folder1’s permissions and granted full permissions.
5. Now that you’ve changed the folder’s permissions restore the original permissions using the ACL file you saved earlier.
In the command below, you’re restoring (/restore) Folder1’s ACLs that you saved in a File (Folder1ACL) located in the directory (c:\).
icacls c:\Temp\ /restore c:\Folder1ACL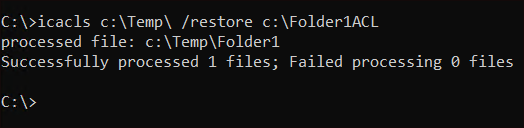
6. Finally, confirm whether the original permissions were restored or not by accessing Folder1’s advanced security settings.
Below, you can see that the Usre02 you previously added was removed, indicating that the original permissions in the ACL file are restored.
Granting User Permissions to a File and Folder
From learning the icacls command’s basic syntax, it’s time to set up some basic permissions to a file and folder. The icacls command allows you to grant, deny or remove permissions from a file or folder via switches. Let’s cover how these switches are used.
Perhaps you’re unable to access or modify a file or folder. In that case, you can grant the user the appropriate permission with the /grant switch.
Below, the command will grant (/grant) full permissions (F) to a user (user01) on the myfile.txt file.
In place of the userid (
user01), an Active Directory (AD) or local group name also works.
icacls myfile.txt /grant user01:FGranting permissions to a user on a folder is different from how you grant permission on a file.
Below, the command will grant (/grant) read permissions (R) to a user (user01) on the MyFolder folder.
icacls Folder1 /grant user01:R
The icacls command also allows you to set special permissions to a file or folder. Below, you’re granting (/grant) delete (D) and read data/list directory (RD) permissions to a user (user01) on a folder (Folder1).
icacls Folder1 /grant user02:(D,RD)When you use special permissions (like RD, as shown below), you must enclose them in parentheses.

Denying User Permissions to a File and Folder
There may be a case where you want to explicitly deny access to a user or group to a file or folder. You can do this with /deny switch.
Deny full permissions for a single user on a file and a folder with the following commands. The commands below will ensure user01 cannot access the MyFile.txt file and MyFolder folder.
# Deny (/deny) full permissions (F) for a user (user01) on a file (MyFile.txt)
icacls MyFile.txt /deny user01:F

# Deny (/deny) full permissions (F) for a user (user01) on a folder (MyFolder)
icacls MyFolder /deny user01:(F)
Removing User Permissions to a File and Folder
Perhaps you want to remove all permissions a user currently has on a file or folder. In that case, use the /remove switch together with the icacls command.
The commands below are removing all permissions from user01 on a file and folder. When the commands are complete, user01 can’t access or modify both the myfile.txt text file and the folder named Folder1 anymore.
# Removing all user01's permissions from myfile.txt
icacls myfile.txt /remove user01

# Removing all user01's permissions from Folder1
icacls Folder1 /remove user01
Securing Files and Folders with Integrity Levels
Along with permissions, all the objects in Windows like files, folders, registry keys, running processes, and user sessions are included with an integrity level.
You can apply an integrity level to any object that has a security descriptor. Even though a user has full permissions on a file or folder, an integrity level can set more restrictive permissions for less trustworthy objects.
See the list of integrity levels you can set to a Windows object in the table list below.
| Integrity Level Name | Explanation | Example |
| Untrusted | Processes that are launched automatically are marked as Untrusted. | Apps like Edge and chrome launch their update processes automatically. They are marked as untrusted. |
| Low | Very restricted integrity level. Processes with low integrity level cannot write to registry and they have very limited access on files and folders. | Internet Explorer in protected mode has low integrity level. |
| Medium | This is the integrity level that most of the objects will have. Standard or non-admin users get this medium integrity level. Also objects that are not marked as low or high will be in medium integrity level by default. | |
| High | Admins have the high integrity level by default. With this admins can interact with other objects with high integrity levels and objects with medium and low integrity levels. | Processes started with “Run as Administrator” option or elevated. |
| System | This integrity level is assigned to windows OS files and core services. | Windows Services that run under local service, network service or NT authority\system. |
| Installer | Installer integrity level is highest of all other integrity levels. Objects that has installer integrity level can also uninstall other objects as they are almost equal to High integrity level. |
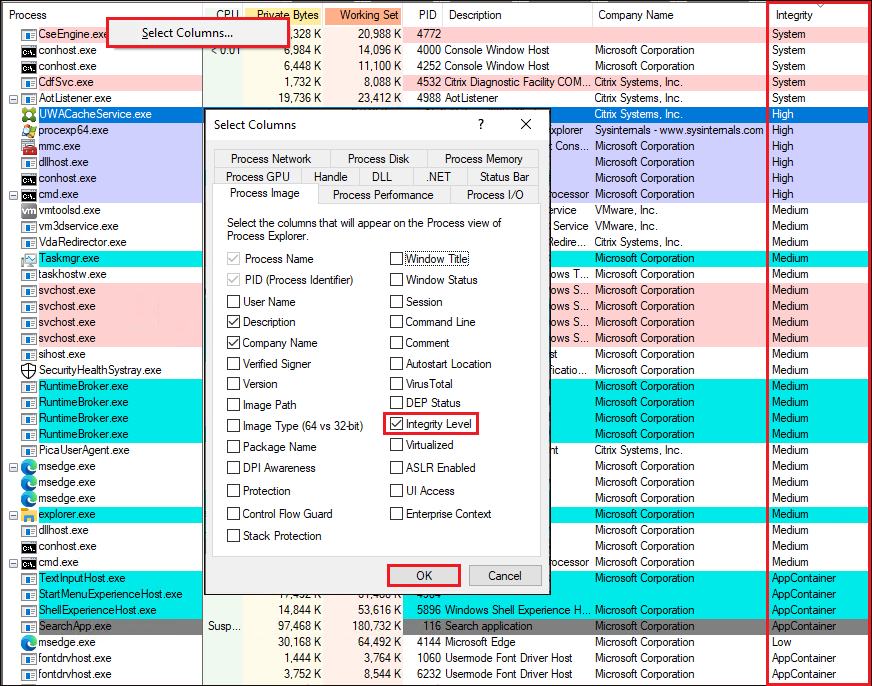
Perhaps you’re curious to see which integrity level is set to each running Windows process on your computer. If so, launch Microsoft Process Explorer, right-click on any column header, and click on Select Columns, as shown below.
Now, add the Integrity column in the table list by checking on the Integrity Level option inside the Select Columns pop-up window, then click OK.
Notice that the Integrity column will appear in the right-most part of the process table list, where you’ll see each of the process’ integrity levels.
Restricting Non-Admin Users to Modify a File or Folder
Set a high integrity level on a file or folder when you’d like to restrict other users from modifying a file or folder, set a high integrity level on that file or folder. Only administrators can access and modify files and folders with high integrity levels.
Let’s see how the icacls command sets integrity level in action.
1. Create a text file in the current directory, and set the file’s integrity level to high with the following commands.
# Create a text file named demo.txt in the current directory
echo . > demo.txt

# Run icacls command to set the text file's (demo.txt) integrity level to high (H)
icacls demo.txt /setintegritylevel H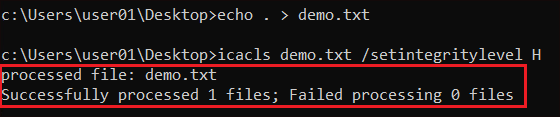
2. Verify the file’s integrity level by running the following command. Below, you can see that you have full access to the file, but the file’s integrity level is set to high.
icacls demo.txt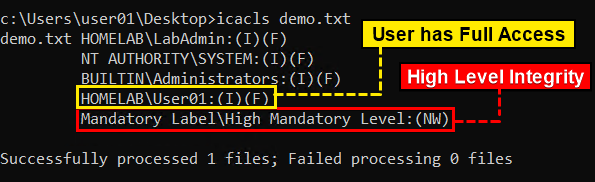
3. Now test the integrity level of the file by switching to a non-admin account on your PC, then add text to the text file with the following command.
echo "Adding text to demo file" >> demo.txtNotice that you’ll get an error message saying Access is denied. Even though you have full access to the file, you can only modify the file with a user account from the administrator group.

Restricting File and Folder Modification by Disabling Inheritance
By default, files and folders inherit their parent folder’s permissions. Perhaps you want to avoid giving users unnecessary access when you create a new folder or file. Disabling inheritance is one way to solve that concern.
You don’t have to be an administrator to disable inheritance, but you should have full permission for the object.
An example of inheritance is when you create the folder C:\myfolder\testdata, which will inherit permissions from the parent folder C:\myfolder.
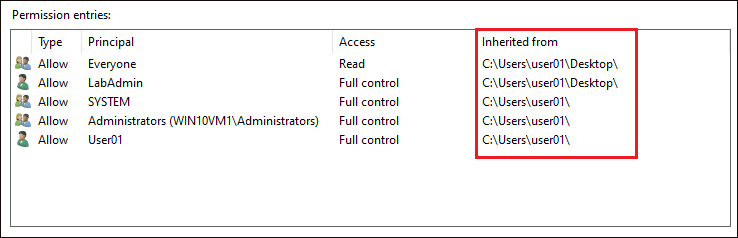
To understand inheritance and the effect of disabling it, view the permissions of any file in your ~\Desktop folder in File Explorer. You’ll see permissions similar to what you see below. Notice that the file inherits permissions from its parent folders.
Disable inheritance on this file with icacls by running the command below using the inheritance parameter. The command below is specifying the d argument that disables inheritance and converts inheritance to explicit permissions.
# Disabling inheritance on a file named Myfile.txt
icacls ~/Desktop/Myfile.txt /inheritance:d
You can also specify
eto enable inheritance andrto disable and remove all occurrences of inherited ACEs from the object using theinheritanceparameter, e.g.,/inheritance:eor/inheritance:r.
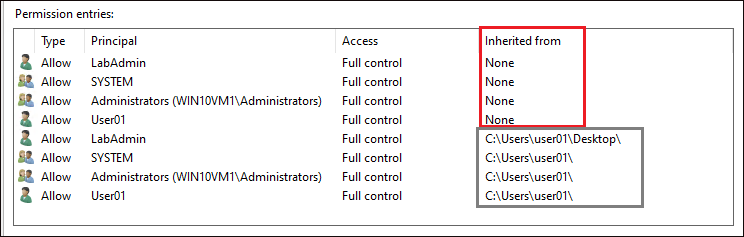
Once you disable inheritance, you can see below that icacls converts each inheritance ACE to an explicit permission (inherited from none).
Perhaps you want those explicit permissions removed after re-enabling the file’s inheritance. To do that, you could either delete the permissions manually or reset the file’s inheritance. Resetting the file’s inheritance will remove all permissions, and the file will inherit the parent folder’s permissions.
The command below is resetting (/reset) a file’s (demo.txt) inheritance while suppressing success messages (/q) and ignoring errors (/c).
icacls demo.txt /q /c /reset
Granting or Denying Permissions in Different Inheritance Levels
The NTFS file system is a big hierarchy of folders with a parent and sometimes child folder for every other folder. That hierarchy has different “levels.” And you can set inheritance at each “level.” For example, if you have a path like C:\Folder\Subfolder, you can set inheritance on C:\, Folder, and Subfolder.
When you set a permission on a folder with icacls, icacls automatically sets that folder inheritance to propagate permissions to its subfolders. But maybe you only want to apply a particular permission without enabling inheritance to that folder’s subfolders?
The command below grants full permission (F) to the user (user02) on mydemo folder. But since no inheritance options are specified, icacls grants full permission to the mydemo folder only. Without a specified inheritance option, the default option (OI) will be applied automatically.
icacls mydemo /grant user02:(F)Perhaps you want to grant permission to a user along with specified inheritance. In that case, run the following command.
Below, you’re granting (/grant) read-only permission (R) to a user (user02) that applies from the mydemo folder to its files and subfolders (OI)(CI).
icacls mydemo /grant user02:(OI)(CI)(R)Below is a list of options to set the level of inheritance to a file or folder:
OI– Object Inheritance – Applies to this folder and files. There will be no inheritance or propagation to subfolders.CI– Container Inheritance – Applies to this directory and subdirectories.IO– Inherit Only – Does not apply to the current file or directory.(OI)(CI)– Applies to this folder, subfolders, and files.(OI)(CI)(IO)– Applies to subfolders and files only.(CI)(IO)– Applies to subfolders only.(OI)(IO)– Applies to files only.
Changing File Permissions on a File Share
So far, you’ve learned about changing permissions on your local PC. But icacls can also set permissions on remote files, though there is no direct way to achieve this.
When changing permissions on a remote PC, you must specify the full path of the file on the remote PC, as shown below. You should also have permissions on the actual folder, file, and share path to allow permissions for other users.
Below, you’re either granting (/grant) or denying (/deny) full permission (F) to a user (user02) on a text file (\c$\temp\testfile.txt) from a remote PC (\\win10vm2).
# Granting full permission to a user on a text file from a remote PC
icacls \\win10vm2\c$\temp\testfile.txt /grant user02:F

# Denying full permission to a user on a text file from a remote PC
icacls \\win10vm2\c$\temp\testfile.txt /deny user02:F
Conclusion
Throughout this guide, you’ve learned how to run the icacls command to set up permissions from basic to advanced. You’ve also learned to back up your files and folders’ ACLs in an AclFile as a fallback when changing permissions goes wrong.
Now with this newfound knowledge, how would you prefer to manage file and folder permissions? Locally? Remotely? Or a combination of both?


