

The Crowdstrike Falcon Platform is a cloud-based, AI-powered, next-generation endpoint protection platform. Through the use of their lightweight agent called the Crowdstrike Falcon Sensor, you can quickly secure your systems and begin to stop breaches in a matter of minutes but how do you get it installed?
In this article, you’ll learn how to remove that complication by deploying the Crowdstrike Falcon Sensor for Windows using PowerShell & Group Policy. You will see, step-by-step, what is needed for installation and deployment. You will then configure and link a Group Policy Object containing your deployment script configuration.
Are you ready to deploy the best endpoint security platform on the market today to your Windows environment and stop breaches? If so, keep reading!
Prerequisites
Here’s what you need to get started:
- A Crowdstrike account – You can get a 15-day free trial here. You have to use a Customer Identifier (CID) to complete this guide.
- Access to an Active Directory Domain Admin account. This account is required for editing and managing Group Policy.
- Have the Remote Server Administration Tools (RSAT) software package installed on a domain-joined computer. Alternatively you can access Group Policy Management from a Active Directory Domain Controller as well.
- A file share to host the Crowdstrike Falcon Sensor executable where machines can access. This tutorial will use the path \\srv1\Installers.
- At least one domain-joined Windows 7+ computer to deploy the Crowdstrike Falcon Sensor to.
Let’s get started!
Find Your CID and Downloading the Crowdstrike Falcon Sensor
In the upcoming PowerShell script, you’re going to need your Crowdstrike Customer ID so be sure to find that first, if you don’t know it already. To do so:
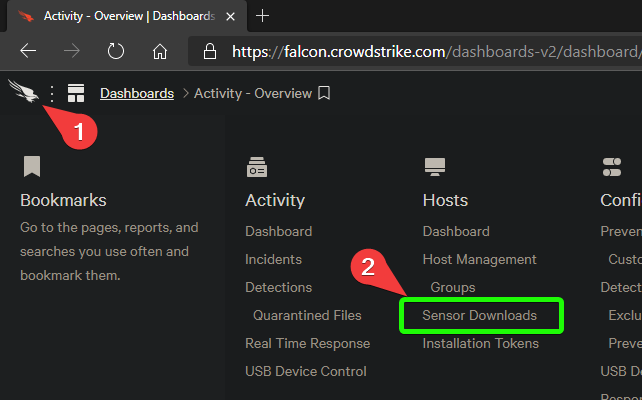
- Open up a browser and navigate to the Sensor Downloads section of the Crowdstrike management portal or you could alternatively click on the Sensor Downloads item on the Falcon dashboard as shown below.
2. Once on the Sensor Downloads page, you should see a HOW TO INSTALL section shown below. This section contains your customer ID. Copy that ID to your clipboard.
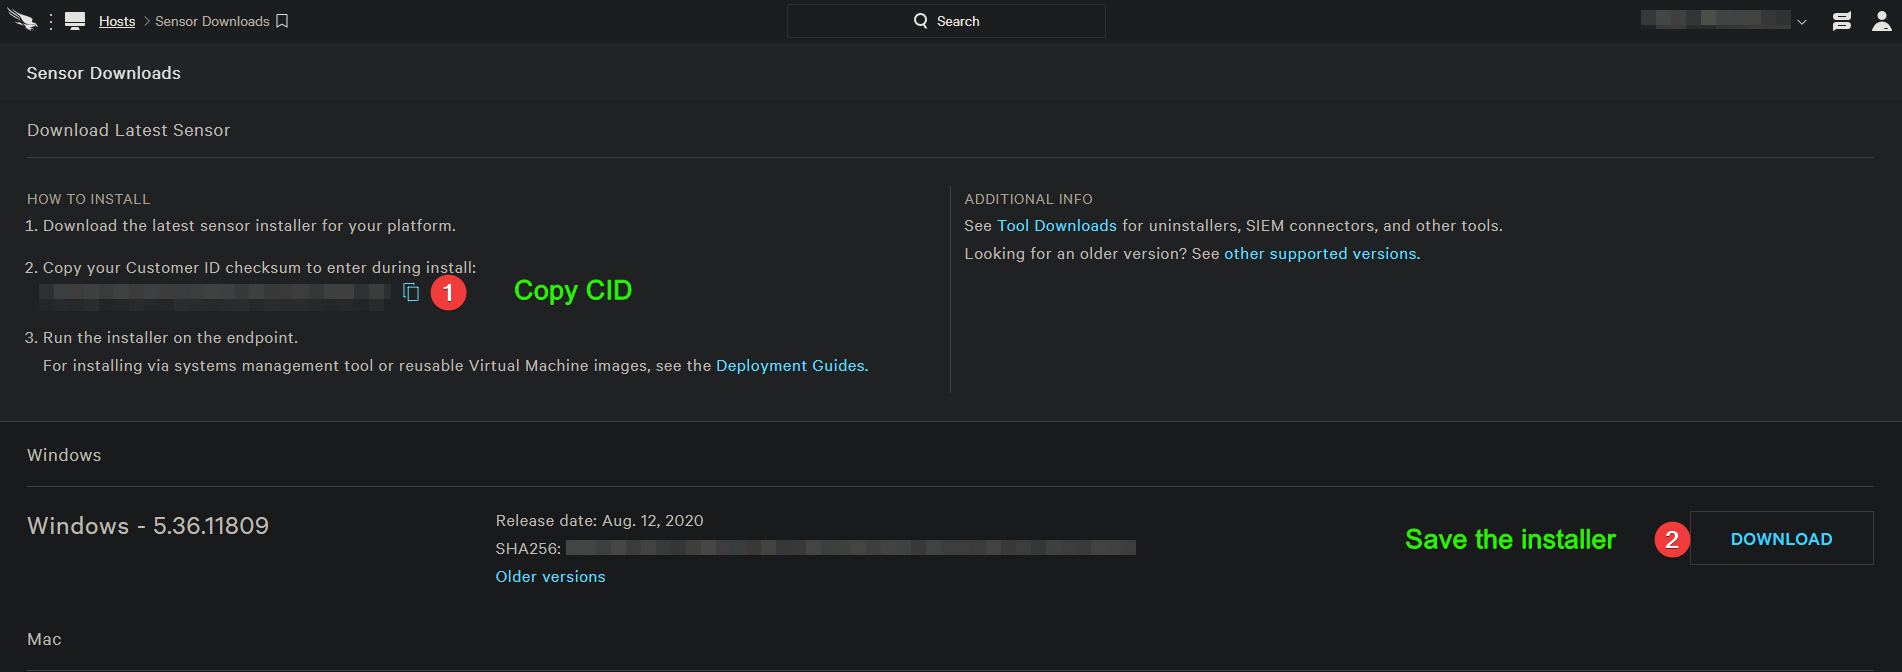
3. On that same page click on the Download button in the lower right corner highlighted by the #2 in the screenshot above.
4. Once downloaded, you should have a file called WindowsSensor.exe. Now move this file to a network share where all of the computers you’ll be installing this on can access.
The network share can be any share that has Read-Only permissions for users and computers. In practice, these could be shares that contain other installation files used across your network.
Once you have the CID in your clipboard or saved somewhere and the Falcon Sensor downloaded, you are ready to create the PowerShell script that will install and activate the Crowdstrike Falcon Sensor.
Create a PowerShell Installation Script
Next up, it’s time to build a PowerShell installation script. This script will prepare the PC it’s running on, download the sensor, install, and activate the sensor. The official Crowdstrike documentation only gives you instructions on creating a batch file to use for installation.
Batch files are considered legacy and not a good option for modern Windows OS-based systems. Instead, you should use PowerShell! Don’t believe me? Then take a look at this 20 year old TechRepublic article on batch scripting. PowerShell is easier.
You may have to change the PowerShell execution policy to run PowerShell scripts. This is something normally controlled by Group Policy when PowerShell security settings are centrally managed.
To create this PowerShell script:
- Fire up Visual Studio (VS) Code or your favorite code editor and paste in the following code. The script below does a few things:
- Create a temporary folder for the download
- Copies the sensor file from the file share to the temporary folder
- Checks if the Falcon Sensor is already running and if not:
- Installs the Falcon Sensor
# Update these variables as needed
$CID = 'your CID here'
$SensorShare = 'path to the sensor executable'

if (!(Get-Service -Name 'CSFalconService' -ErrorAction SilentlyContinue)) {
    # The sensor is copied to the following directory
    $SensorLocal = 'C:\Temp\WindowsSensor.exe'

    # Create a TEMP directory if one does not already exist
    if (!(Test-Path -Path 'C:\Temp' -ErrorAction SilentlyContinue)) {
        New-Item -ItemType Directory -Path 'C:\Temp' -Force
    }
    # Now copy the sensor installer if the share is available
    if (Test-Path -Path $SensorShare) {
        Copy-Item -Path $SensorShare -Destination $SensorLocal -Force
    }
    # Now check to see if the service is already present and if so, don't bother running installer.
    & $SensorLocal /install /quiet /norestart CID=$CID
}
2. Before saving the script, replace the value defined for the $CID variable in the script above with your CID you obtained from the Falcon dashboard.
3. Also, replace the UNC share defined above via the $SensorShare variable with the location where your WindowsSensor.exe Falcon sensor is stored such as \\SERVER\Fileshare\WindowsSensor.exe.
4. Save the script to the same network share ie \\SERVER\Fileshare and call it Install-Crowdstrike.ps1
You should now have a PowerShell script and WindowsSensor.exe in your shared network location folder.
Create a Group Policy Object to Install Crowdstrike Falcon Sensor
To install the Crowdstrike Falcon Sensor, you need to get it and the PowerShell script on all of the endpoints. To do that, create a Group Policy Object (GPO). This GPO will contain instructions to create a Windows scheduled task that will run the installation script you just created at a specified time.
If you’re unfamiliar with creating a GPO, check out the Microsoft documentation.
- On your domain-joined machine, open up a run prompt and type GPMC.msc and click OK. This action will open the Group Policy Management Console.
2. Next, right-click Group Policy Objects and select New, as shown below:

3. Provide a name for your GPO a meaningful name. In this tutorial, the GPO is called Deploy Crowdstrike Windows Sensor as shown below:
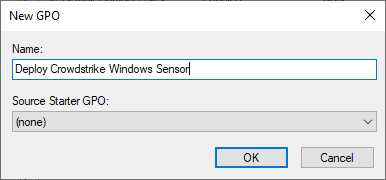
4. Click OK to create the GPO.
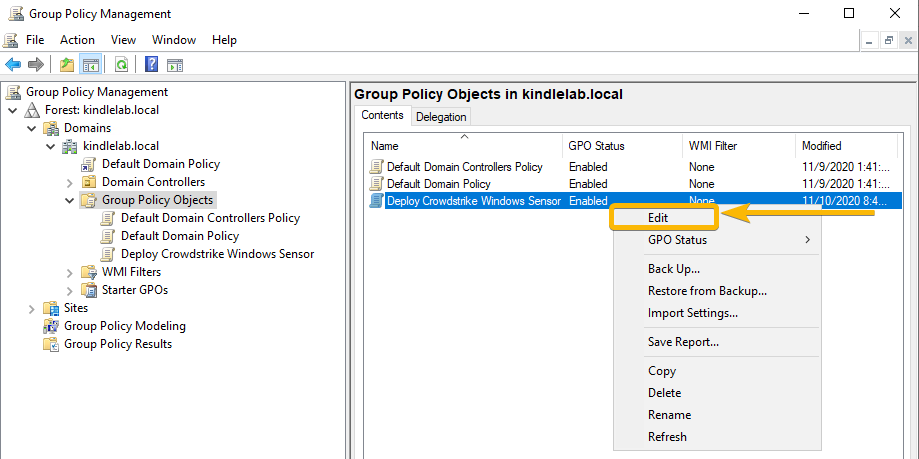
5. In the Contents tab, right-click on the GPO you created as shown below and click on Edit.
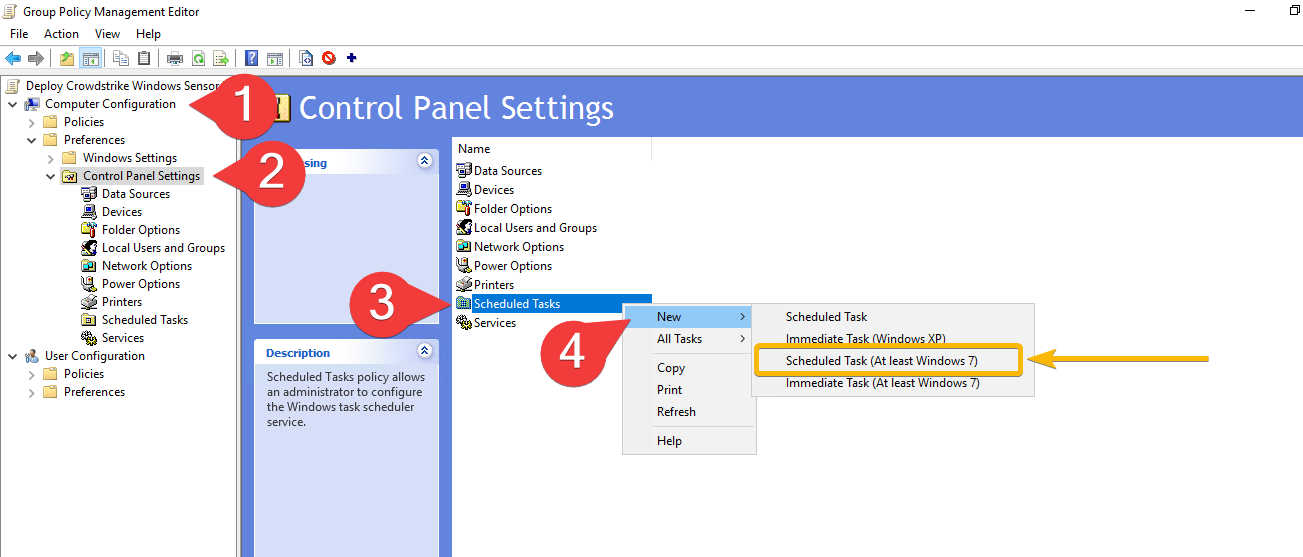
6. Navigate to Computer Configuration —> Preferences —> Control Panel Settings.
7. Right-click on Scheduled Tasks and select New —> Scheduled Task (At least Windows 7) as shown below. The New Task configuration screen will appear.
Set up the Scheduled Task
Once you’ve created the GPO template, it’s time to create a scheduled task which will execute the installation script. The Scheduled Task is a critical part of this process which you can exercise the most control over the deployment. To get started:
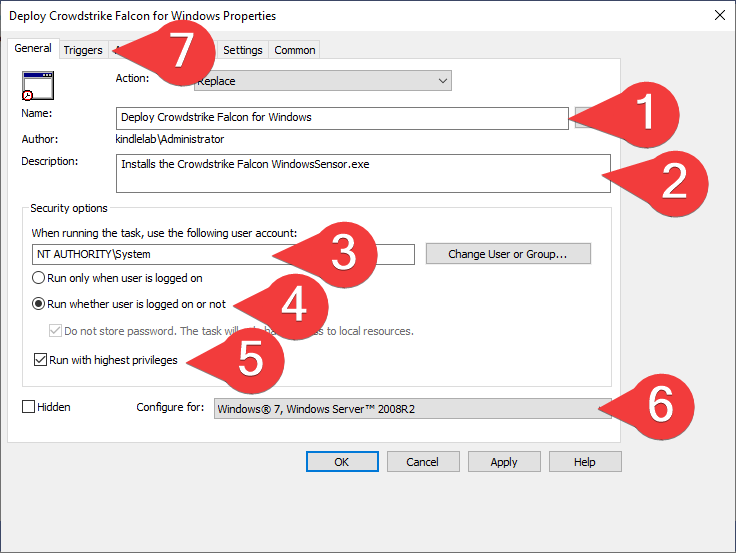
- On the New Task screen, begin configuring the scheduled task options by changing the Action to Replace. This will the GPO will create the scheduled task every time the GPO refreshes.
2. Give the scheduled task a name and a short description. This tutorial’s scheduled task name is Deploy Crowdstrike Falcon for Windows.
3. Next, adjust a few settings:
- Under Security options, choose to run the task as NT Authority\System.
- Select Run whether a user is logged on or not to not require a user account to interactively log in to kick off the script.
- Check the box to Run with highest privileges ensuring the script runs with elevated credentials.
- Change the Configure for menu to be Windows 7, Windows Server 2008R2.
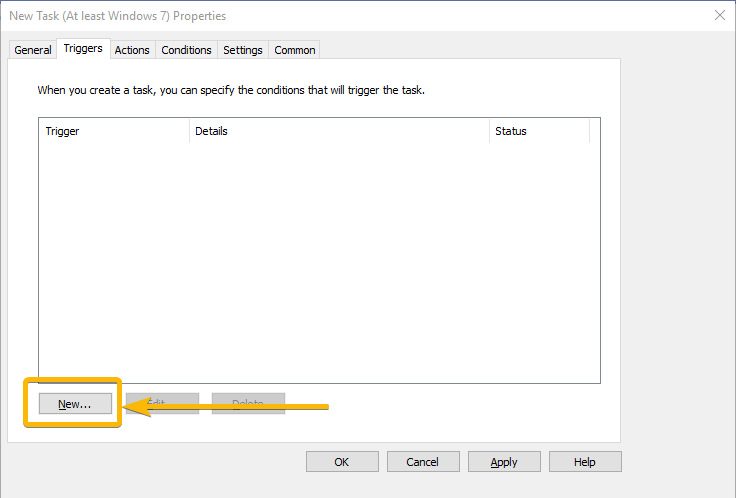
4. Click on the Triggers tab. On this tab, you can stipulate when this task will run. This is an important step as you can decide to run the installation task at a later date or shortly after you complete the GPO configuration.
5. While on the Triggers tab, click New as shown below and the dialog will disappear.
6. Select the time you’d like the install to happen. For this guide, the example is using an established maintenance window of 11 AM on a Tuesday. You can use a time that works best for you. Begin the task On a schedule, with the Settings and Advanced Settings you want. Once satisfied, click OK, as shown below:
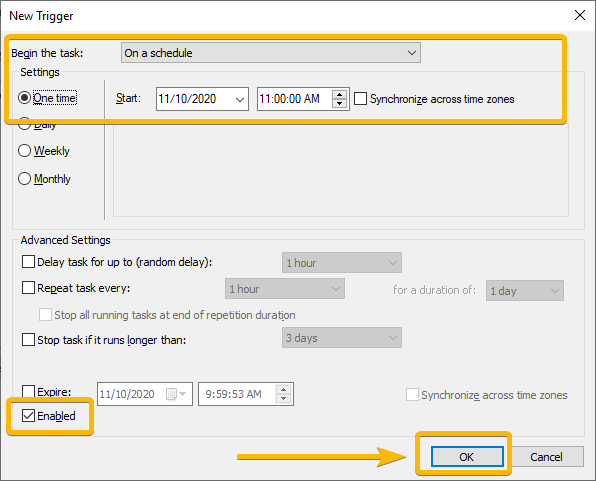
New Trigger – Configured When using Computer policies, a reboot may be necessary to create the Scheduled Task. Keep this in mind when choosing a trigger time.
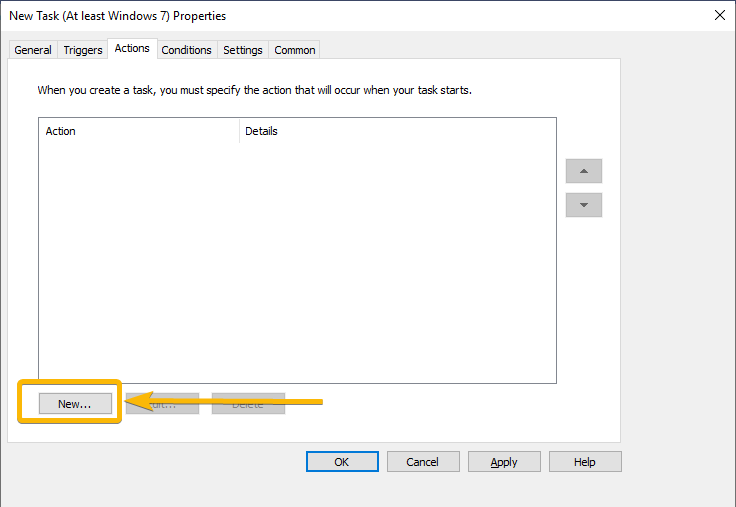
7. Now you must add Actions or what to execute when the scheduled task is triggered. To start, click on the Actions tab as shown below. Here you will configure the Scheduled Task to run the Install-Crowdstrike.ps1 script.
8. While on the Actions tab, click New, as shown below. The New Action dialogue will appear.
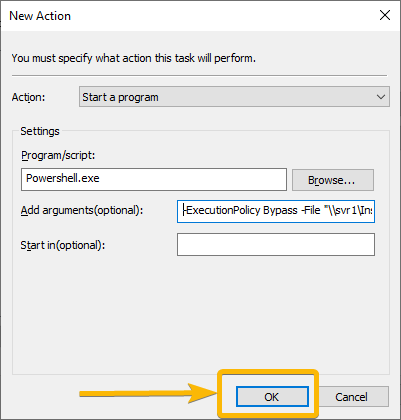
9. Since you are running a PowerShell script, leave the Action option at Start a program. The scheduled task will be executing powershell.exe.
10. Next under Settings, type Powershell.exe.
11. You now need to provide a few parameters to the powershell.exe engine. Add the following arguments in the Add arguments(optional) box. These arguments tell PowerShell not to pay attention to the execution policy on the client machine and to run the script created earlier from the network share.
-ExecutionPolicy Bypass -File "\svr1\Installers\Install-Crowdstrike.ps1"12. When finished, click OK as shown below:
- You are now back to the Actions tab. The Scheduled Task configuration is complete! Click OK to return to the Group Policy Management Console as shown below:
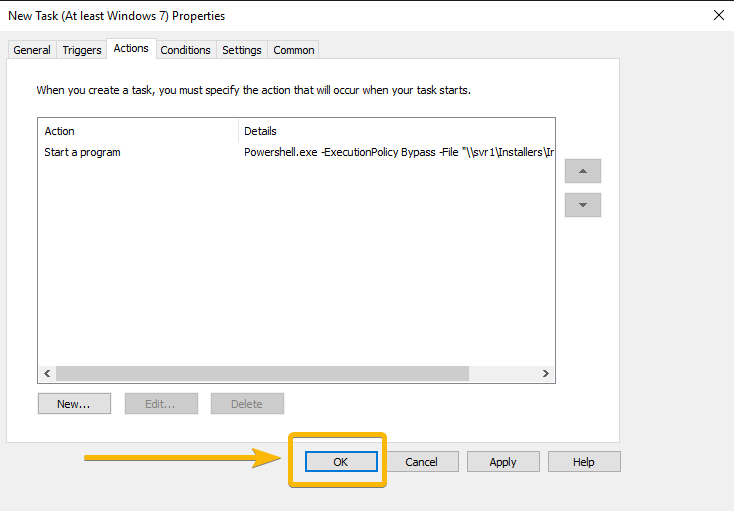
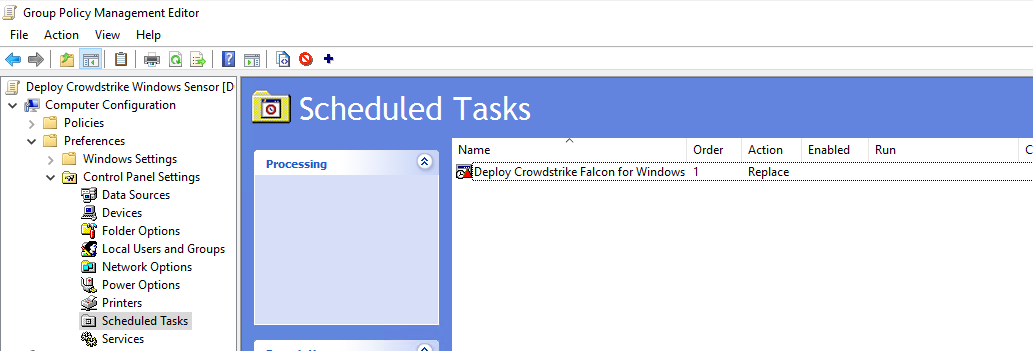
You should now see the Scheduled Task listed in the GPO. Congrats! One more step down.
Link the GPO to an Organizational Unit
If you have been following along up to this point, congratulations! You are now on the way to a successful deployment.
The last step is to link the GPO you just created to an OU of your choice using the Group Policy Management Console. The OU should contain all of the computers you’d like to install the Crowdstrike Falcon Sensor on.
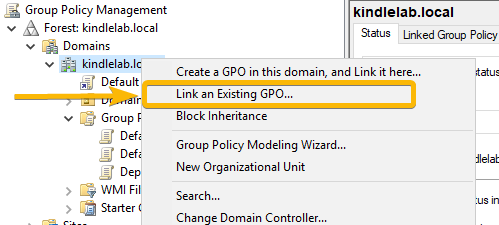
- To link to an OU, Right-click the OU and choose Link an Existing GPO as shown below:
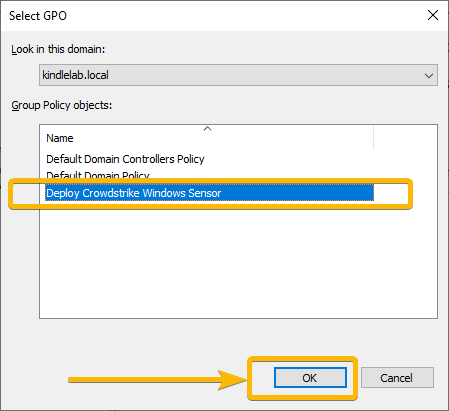
2. The Select GPO dialogue will appear. Choose the GPO you just created and click OK.
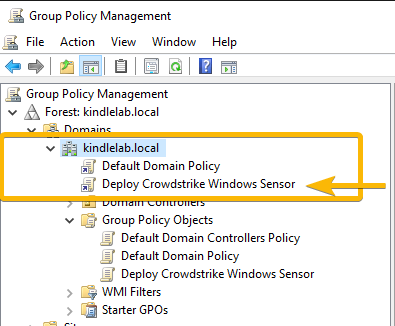
3. You should now see the GPO linked to the GPO. In the following example, the policy is being applied to the entire kindlelab.local domain:
Applying the GPO
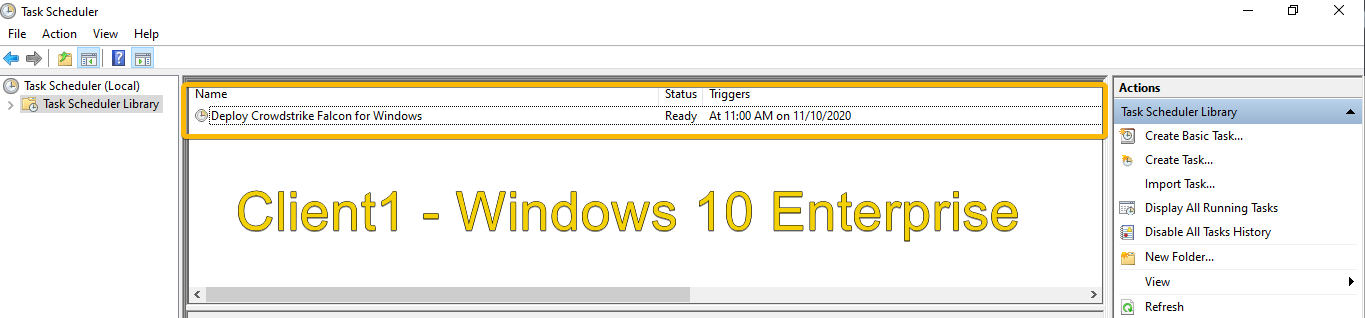
Once the GPO is linked to the target systems’ OU, they need to reboot to run the GPO and create the scheduled task. To test your implementation, reboot one of the computers you’ve targeted in the OU. When the computer comes back up, you should see a new scheduled task created in Task Scheduler as shown below.
All that’s left to do now is wait for the scheduled task to execute the installation script and install the Falcon Sensor. An agent typically installs in 30 seconds or so.
Verifying Sensor Deployment
Eventually, you’ll see agents installed on all of the target computers appearing in the Falcon console. Deployed agents appear within five minutes or less after installation is successful.
There are a couple of ways you can verify the deployment was successful. The easiest way is to visit the Crowdstrike Falcon console and selecting Hosts —> Hosts Management.
You can alternatively use PowerShell to enumerate the CSFalconService on an endpoint using the Get-Service cmdlet as shown below. This command is querying for the service. If the service shows up and is running, the Falcon Sensor is installed and operational!
Get-Service -ServiceName 'CSFalconService'

Additional Resources
Here are some additional articles you may find useful:


