

Have you ever lost your BitLocker recovery key and wondered how to bypass BitLocker recovery screens? You’re not alone. Even a wise person forgets a few things here and there. BitLocker is a useful feature but can also act up and keep you reeled in the BitLocker recovery screen.
No worries, though! In this tutorial, you’ll learn ample ways how to bypass BitLocker and get your data back.
Read on and never get locked out of your computer again!
Add the security of MFA when recovering BitLocker keys and support for Symantec Endpoint Protection. Try it FREE with Specops’ Key Recovery!
Prerequisites
This tutorial will be a hands-on demonstration, but as long as you have a Windows 10 PC, you’re good to go – This tutorial uses Windows 10 Pro 21H2, but other versions will work (except the Home edition).
Suspending and Resuming BitLocker Protection in Control Panel
One possible reason BitLocker asks for the recovery key is if your computer is trying to install non-Microsoft software updates. This behavior will keep the BitLocker recovery screen pop-up each time you boot your computer.
To ensure that non-Microsoft software updates are installed successfully, temporarily suspend BitLocker protection and resume it afterward.
1. Turn on your PC and wait until the BitLocker recovery screen shows up, as shown below. Loading the
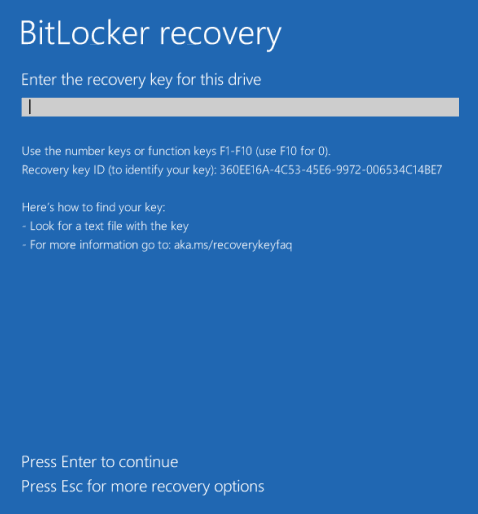
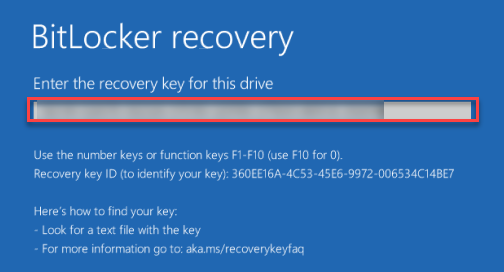
2. Next, find your BitLocker recovery key (unique 48-digit code), enter your BitLocker recovery key, and press Enter.
If BitLocker does not accept your recovery key, jump to the “Disabling the BitLocker Protection from the Boot Drive” section.
3. Once Windows has loaded, log in with your account details and open Control Panel.
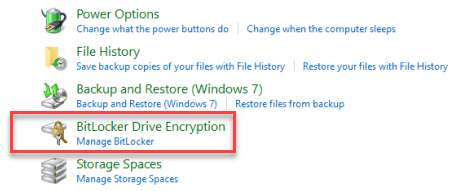
4. Now, click System and Security if you’re viewing the list by Category, as shown below. Doing so opens the list of tools under System and Security (step five).

5. Click BitLocker Drive Encryption to navigate to the screen where you can manage your BitLocker Drive Encryption (step six).
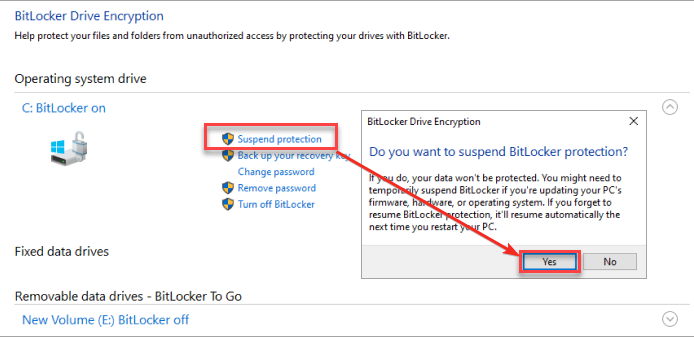
6. Next, click Suspend protection, and click Yes from the dialog box to suspend BitLocker protection.
7. Check your computer for any non-Microsoft software or firmware updates and install them
After installing the updates, or if there are none, be sure to resume the BitLocker protection.
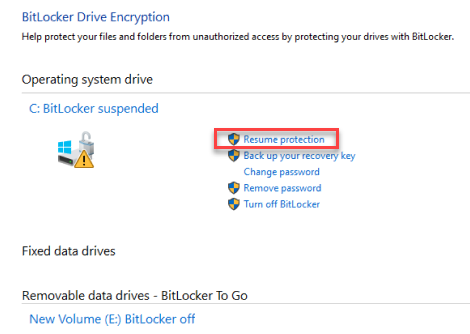
8. Now, go back to the BitLocker Drive Encryption page in Control Panel and click Resume protection to resume your BitLocker protection.
9. Lastly, restart your PC and see if BitLocker still asks for the recovery key on startup.
How to Bypass Bitlocker by Disabling the BitLocker Protection from the Boot Drive
If you still get the BitLocker recovery screen on startup, or if you’re getting an error entering the BitLocker recovery key, try disabling the BitLocker protection from the boot drive. How? You’ll be running commands in command prompt from the Windows Recovery Environment (Windows RE).
This method works if you have the BitLocker password or the recovery key. Skip this method altogether if you have neither.
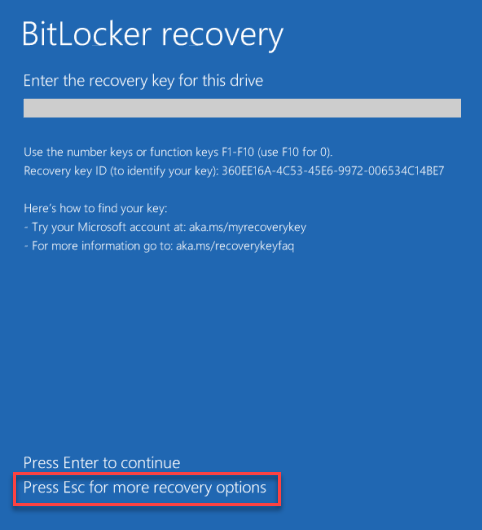
1. Press Esc on your keyboard for more recovery options on the BitLocker recovery screen.
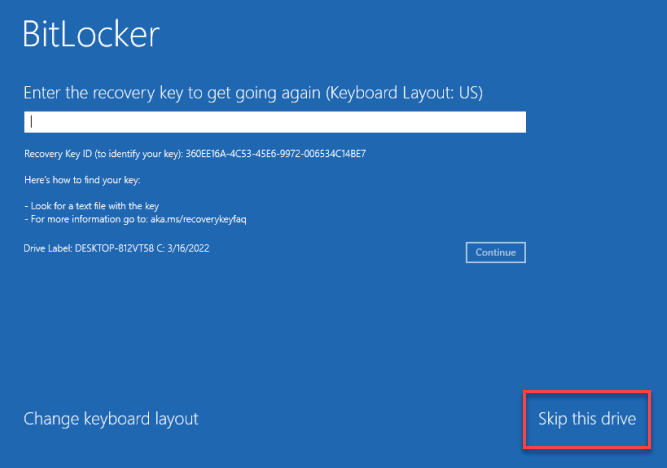
2. Next, click Skip this drive, and you’ll see more options you can choose on Windows RE (step three).
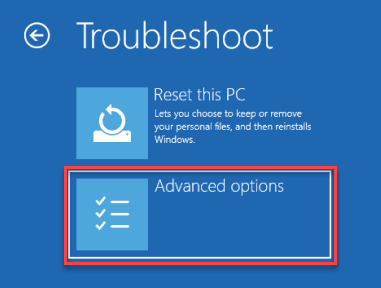
3. Click Troubleshoot on the options shown below. Doing so navigates the screen to where you’ll access advanced options for troubleshooting.
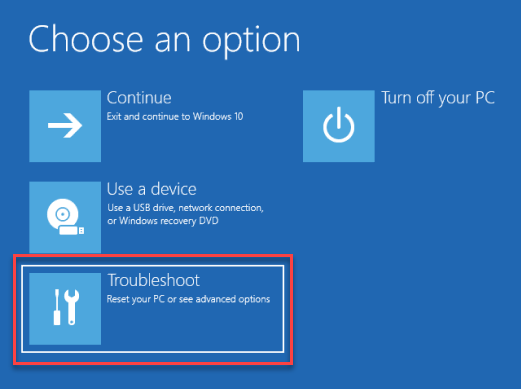
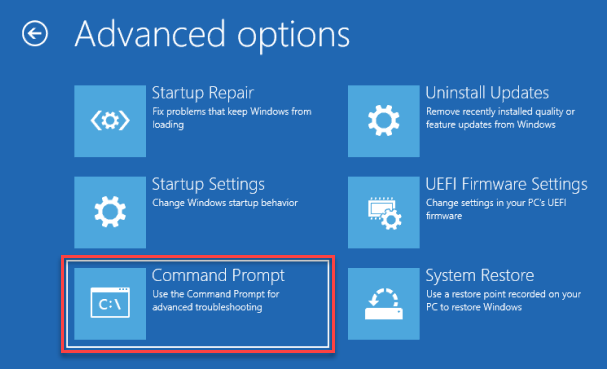
4. Now, click Advanced options on the Troubleshoot screen to get the screen where you can run the command prompt.
5. From the Advanced options screen below, click Command Prompt to open the command prompt.
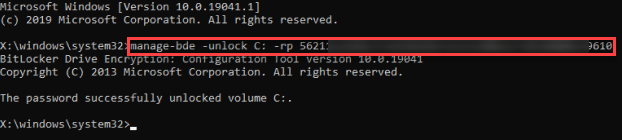
6. In the command prompt, run the below manage-bde command and enter the password for BitLocker carefully when prompted to unlock the drive/volume.
manage-bde -unlock C: -password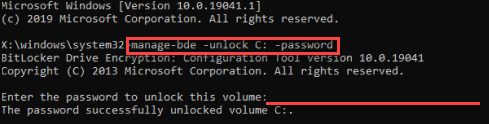
Perhaps you lost your BitLocker password. If so, run the command below instead to use your BitLocker recovery key. Replace recoverykey with your BitLocker recovery key with no hyphens. manage-bde -unlock C: -rp recoverykey
7. After unlocking the drive, run the following command to disable BitLocker protection.
manage-bde -protectors -disable C: 
8. Run the exit command or click the X button on the upper right to close the command prompt.
exit
9. Finally, click Continue to boot up Windows. After booting up, see if you still get stuck in the BitLocker recovery screen. Or if you still get an error entering your BitLocker recovery key.

Enabling Secure Boot
Another reason why you’re getting the BitLocker recovery screen is that Secure boot is disabled on your PC. Secure boot ensures that your computer boots up safely and successfully. You don’t want your computer to be hijacked by unauthorized software like malware on startup, right?
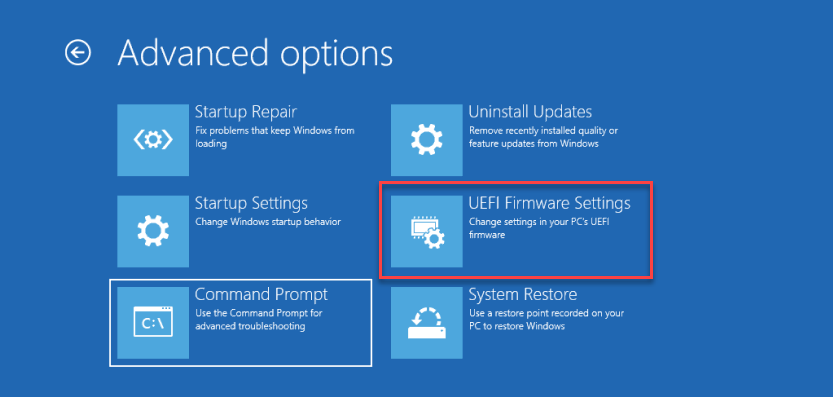
1. Navigate to the Advanced options screen on the BitLocker recovery screen as you did in steps one to four of the “Disabling the BitLocker Protection from the Boot Drive” section.
2. In the Advanced options screen, choose UEFI Firmware Settings.
3. Click Restart on the UEFI Firmware Settings screen to restart your computer and enter UEFI settings, as shown below.

4. Once your computer restarted to your UEFI firmware settings, explore to find and enable Secure boot.
UEFI settings differ per manufacturer. Check the manufacturer support website for the exact instructions on where to find and enable the Secure boot.
5. Lastly, exit the UEFI settings and save the changes. Reboot your PC and see if you still get straight to the BitLocker screen on startup.
Disable Secure boot and jump to the following section if you’re still stuck with the BitLocker screen. Why now, after enabling Secure boot? Some hardware, graphics cards, or software are not compatible with Secure Boot. As a result, the BitLocker recovery screen pops up each time you boot up your PC.
Updating BIOS to Reduce Security Risk
If enabling and disabling Secure Boot didn’t resolve BitLocker asking for a recovery key, try updating your BIOS. BitLocker possibly has determined outdated BIOS is a security risk.
Refer to your motherboard’s manual for step-by-step instructions about updating its BIOS with the latest firmware version.
Using Legacy Boot (with Elevated Command Prompt)
Legacy Boot is a boot process used by BIOS firmware to initialize hardware devices. Use Legacy Boot in the command prompt to make BitLocker boot up in a DOS-based environment, using fewer graphics.
When you change the boot mode property value on your BIOS utility, your operating system becomes inoperable and will not boot. But you’ll use Legacy Boot with command prompt as doing so does not affect the boot settings in your BIOS.
1. Launch Command Prompt as Administrator.
2. Next, run the below bcdedit command to /set legacy boot as default boot in Windows boot configuration.
bcdedit /set {default} bootmenupolicy legacy
3. Finally, close the command prompt, restart your computer and see if BitLocker still asks for the recovery key.
If you’re still stuck in the BitLocker recovery screen asking for the recovery key after using Legacy Boot, run the following command to revert to using UEFI. bcdedit /set {default} bootmenupolicy standard
Uninstalling and Reinstalling Recent Windows Updates
After installing Windows updates, BitLocker also tends to start asking for the recovery key instead of the recovery password. This case rarely happens, but you may have gotten corrupted updates when it does.
To rule out the updates as the culprits for this BitLocker conundrum, uninstall and reinstall the recent updates.
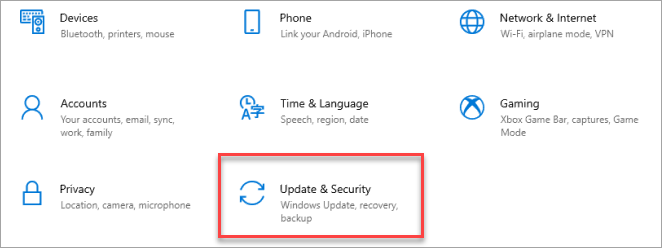
1. Click the Start button and click Settings to access your Windows Settings app.
2. On the Windows Settings app, select Update & Security to see the Windows update options.
3. Next, select View update history to see the options to manage your Windows update history.
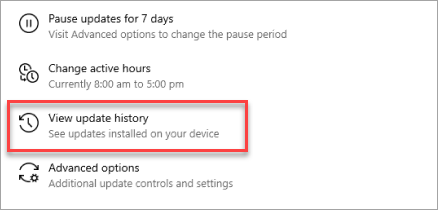
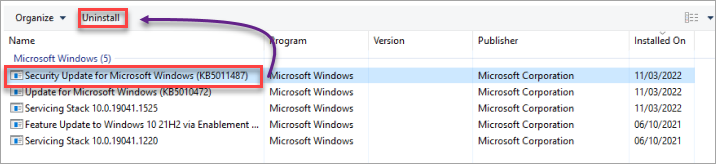
4. Click Uninstall updates on the View update history page to see the list of recent Windows updates.

5. Select the most recent update, click Uninstall, and click Yes on the dialog box to confirm uninstalling the update. If there is more than one recent update, uninstall them one at a time.
6. Now, restart your computer to apply the changes and remove unused update-related files and folders.
7. Temporarily suspend BitLocker protection in Control Panel.
8. Repeat steps one and two to access the Windows updates and install available updates. Windows might require you to restart your computer for the changes to take effect.
9. Next, resume the BitLocker protection in Control Panel.
10. Finally, restart your computer to see if you still get the BitLocker recovery screen at startup.
Apart from the software side, plugging in new hardware can trigger your computer to ask for the BitLocker recovery key as it detects a potential security risk. So if you recently installed new hardware, try removing the hardware in question before booting up your computer.
Removing BitLocker from a Hard Drive or USB Flash Drive
If BitLocker still asks for the recovery key after reinstalling recent updates or re-plugging in hardware, turn off BitLocker protection from the drive altogether.
This method only works if you’re able to boot up to Windows and have the BitLocker password or the BitLocker Key.
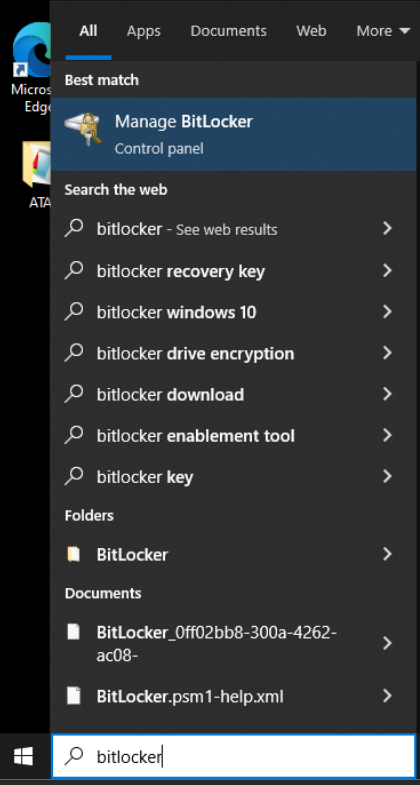
1. Click the Start button, search for BitLocker, and select Manage BitLocker.
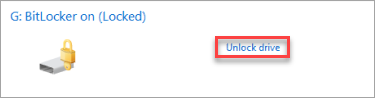
2. Next, click Unlock drive for a USB flash drive or any removable data drive to unlock the BitLocker-encrypted drive. (For an operating system drive, skip to step four).
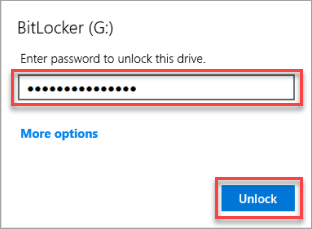
3. Enter your BitLocker password and click Unlock to unlock the drive.
If you prefer to enter the BitLocker key instead, click More options —> Enter recovery key, enter the recovery key, and click Unlock.
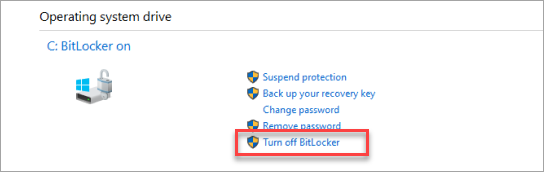
4. Now, click Turn off BitLocker to turn off the BitLocker on the selected drive.
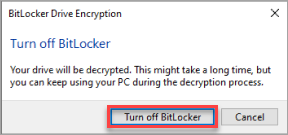
5. Click Turn off BitLocker in the dialog box.
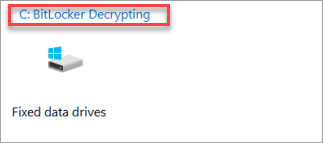
Turning off BitLocker takes time to complete because it needs to decrypt the drive.
How long does it take to decrypt a drive and turn off BitLocker? The duration depends on the number and size of files in the drive.
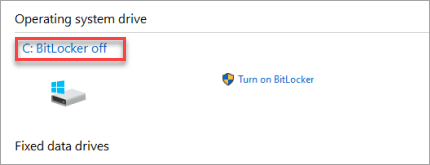
Wait until the status changes to BitLocker off, as shown below.
6. Lastly, reboot your computer and see if the BitLocker recovery screen is still persistent.
Formatting System Drive via the Windows Installation Disk
If all else fails in resolving the BitLocker recovery issue, your last resort is to format and reinstall your OS using DISKPART. As the saying goes, it’s always better to start with a clean slate. The sad part is that you’ll have to let go of the data saved in your BitLocker-protected drive.
If you can decrypt your drive with BitLocker, try backing up your data before formatting your drive. If not, try recovering your data with third-party software like iBoysoft Data Recovery Software.
1. Prepare a bootable USB flash drive with Windows installation media.
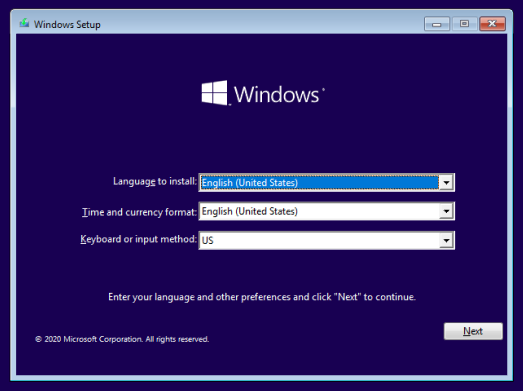
2. Boot from your Windows 10 installation media to get to the Windows Setup window, as shown below.

From the Windows Setup window, press Shift + F10 to open the command prompt and run the diskpart command below to access the diskpart prompt.
diskpart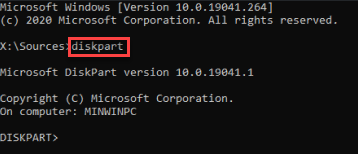
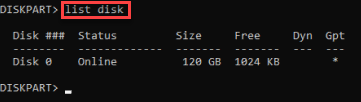
4. Run the below list disk command to list all available disks detected by the system.
list diskBelow, you can see there’s only one available disk (Disk 0), where Windows is installed.
5. Now, run the following select command to select your target disk. Replace the x with the correct disk number.
select disk x
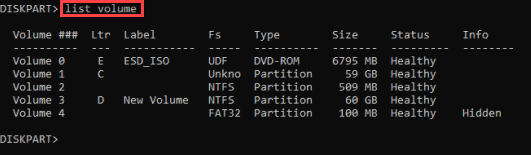
6. After selecting the target disk, run the list volume command below to list all volumes in the selected drive.
list volumeNote down the volume number of the drive where Windows is installed. In this case, Windows is installed in Volume 3.
7. Next, run the select volume command below to set the active volume to manage. Replace x with the volume number you noted in step six.
select volume x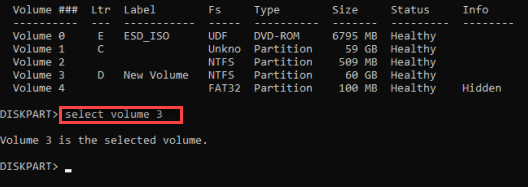
8. Run the following commands (format and exit)to format the drive, delete everything in the drive, and exit diskpart.
format fs=ntfs
exit
9. Finally, close the command prompt after formatting the drive to go back to the Windows Setup window and proceed with installing a fresh copy of Windows.
After installing Windows, BitLocker shouldn’t ask for a recovery key at bootup.
Minimize encryption lockout calls at the service desk. A self-services BitLocker and Symantec Endpoint Encryption solution with added security of MFA. Try it FREE with Specops’ Key Recovery
Conclusion
In this tutorial, you’ve learned many ways to bypass the BitLocker recovery screen and prevent BitLocker from asking for the recovery key at bootup. You’ve touched on suspending BitLocker protection to removing BitLocker from your drive.
At this point, you already know how to bypass BitLocker and not get locked out of your computer. And hopefully, you don’t get to the point where you need to format your drive.
Whichever method worked best for you, always remember to back up your BitLocker recovery key in your Microsoft account for easier access moving forward.


