

If you’re tasked with managing disks, partitions, and volumes on your Windows machine, then mastering Diskpart is essential. Diskpart is a powerful disk management tool that allows you to manipulate disks, partitions, and volumes in Windows, all through the command line interface.
Not a fan of reading? Watch this related video tutorial!”In this Diskpart tutorial, you’ll learn how to shrink, extend, and delete volumes, as well as manage unallocated space.
Ready to dive in? Let’s get started!
Diskpart Prerequisites
To follow the demos in this Diskpart guide, make sure you have the following:
- A machine running Windows 7 or higher. All demos will use Windows 10, but the techniques should apply to older versions as well.
- A local user account with administrator privileges for full access to Windows storage management features.
How to Access Diskpart in Windows
Unlike many command-line tools, Diskpart is interactive. Instead of running the diskpart command multiple times, you initiate it once to start an interactive session.
To launch the Diskpart interface, open Windows PowerShell as an administrator.
Cmd.exe can also be used, but since PowerShell is the modern successor, this tutorial focuses on using PowerShell.
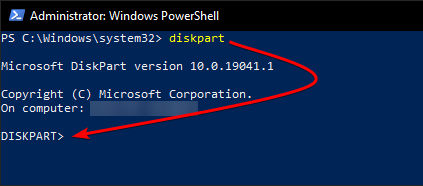
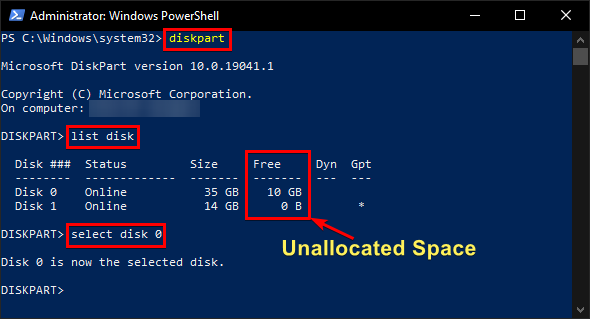
Once in PowerShell, initiate a Diskpart session by typing diskpart. You’ll know you’re in when you see the DISKPART> prompt, as illustrated below.
To exit the Diskpart interface, simply type exit.
Selecting a Disk
Many sections in this Diskpart tutorial involve selecting a disk. To avoid redundancy, here’s how you can select a disk whenever it’s mentioned.
If you’re working with multiple disks on your Windows system, your first task in Diskpart is to specify which disk you wish to manipulate. To do so, list all available disks within your Diskpart session.
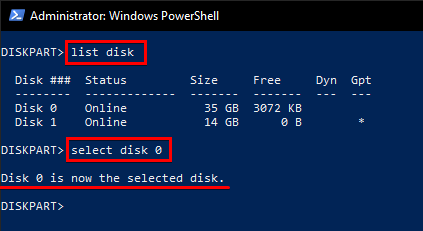
list diskThe list disk command will display all of the disks that your Windows operating system currently recognizes. To proceed, you’ll need to select a disk by providing the disk number. For instance, in the command below, we are selecting disk number 0 using Diskpart.
select disk 0Once Diskpart has selected the disk, a message similar to the one below will appear, indicating that the disk is now selected. This will return you to the Diskpart prompt, and you’re ready to start managing the disk’s partitions and volumes.
Selecting a Volume
Just like you select a disk, Diskpart also enables you to select a volume. Below, we’ll explain what it means when the tutorial instructs you to select a volume.
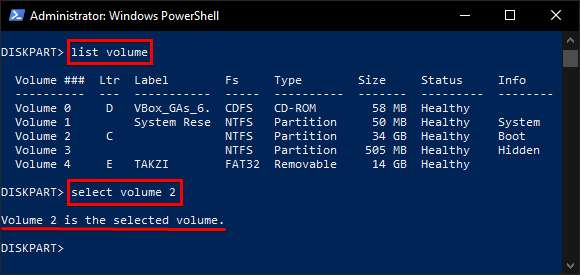
When it comes to volumes, the process is similar to disks: list the available volumes and then choose the one you’d like to manipulate using Diskpart.
Shrinking a Volume
Now that we’ve covered the basics, let’s delve into something practical—shrinking a volume using Diskpart.
Shrinking a volume with Diskpart will convert unused space from the selected volume into unallocated space, which is essentially space that doesn’t belong to any partition.
If you’re following along, be sure you have a disk that has some unused space with an unformatted volume or one formatted as NTFS (see Creating and Formatting a Volume). Also, ensure the partition isn’t an Original Equipment Manufacturer (OEM) partition, Extensible Firmware Interface (EFI) system partition, or recovery partition. This tutorial will use Volume 2 labeled as C.
- Launch Diskpart.
2. Choose a disk that has some unallocated or unused space.
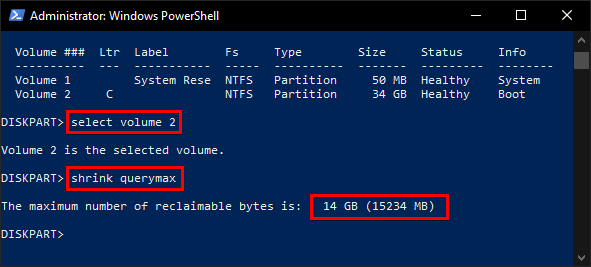
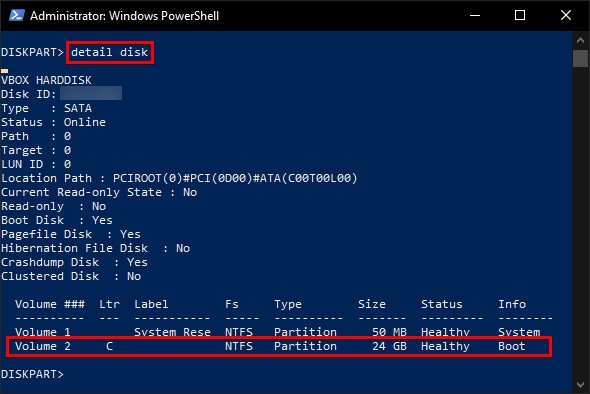
3. Next, identify a volume by running the list volume command, or execute the detail disk command to view information about the disk and its associated volumes. Volume 2 below is ideal for shrinking, given its NTFS formatting.

4. After selecting the volume, find out the maximum amount it can be shrunk by executing the shrink querymax command in Diskpart.
In this tutorial, you’ll discover how to reduce your example disk volume by 14GB using Diskpart. See how it’s done below.
5. Enter the amount of space you’d like to reduce by typing shrink desired=#, replacing # with your chosen amount in megabytes. The example below demonstrates how to do this.
10240megabytes is equivalent to 10GB.
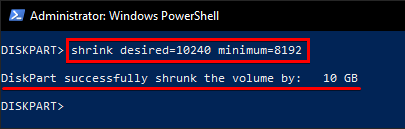
If other applications might be utilizing the disk volume, execute the shrink Diskpart command below with a minimum parameter. This parameter acts as a fallback if your desired size is not attainable.
shrink desired=10240 minimum=8192As you can see, Diskpart successfully reduces the chosen volume by 10GB.
Creating a Partition
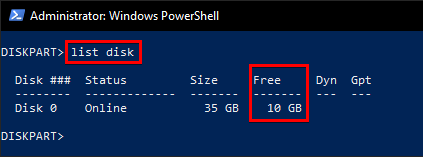
After you’ve reduced a volume, that space becomes unallocated. To confirm the unallocated space in Diskpart, you can list the disks again using the list disk command. Look under the Free column to find this space.
Unallocated space does not belong to any partition. To make use of this space, you’ll have to create a Diskpart partition from it.
To initiate a new volume from unallocated space using Diskpart:
- Open Diskpart on your computer.
2. Use list disk to view all available disks. Select the disk with unallocated space to transform it into a separate Diskpart volume.

3. Execute the create partition Diskpart command to set up a 10GB partition on the selected disk.
create partition primary size=10240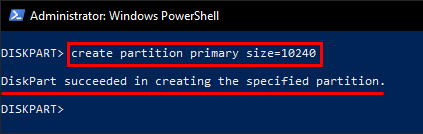
If you plan to install an operating system on your newly created partition, make the partition bootable using the
activeparameter.
Creating and Formatting a Volume
Once you’ve created a partition using Diskpart, it’s time to format it. Formatting the partition creates a volume, enabling you to use the space for storage.
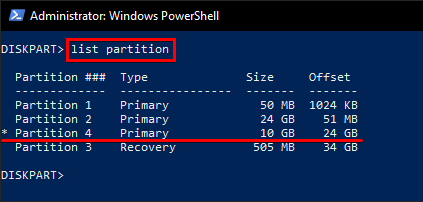
With Diskpart, once you create a partition, the tool automatically focuses on the new partition. To verify this, you can run the list partition command. Below, you’ll see that Partition 4 is currently selected, as indicated by the asterisk (*) next to the partition number.
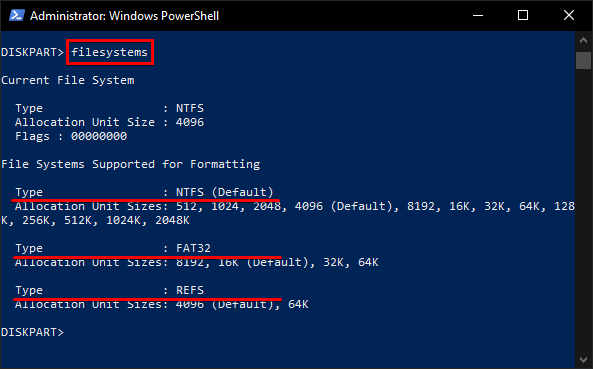
1. To start, first determine which file systems are supported by your partition. Use the Diskpart filesystems command for this. As you can see below, the selected partition (Partition 4) supports NTFS, FAT32, and REFS.
A file system manages how files are named, stored, and retrieved, letting you distinguish each file from one another.
2. Next, perform a quick format (quick) on the partition. Opt for NTFS (fs=NTFS) and label the volume (label="Backup") as you see fit.
By default, Diskpart retains control of the session until the format is complete. Use the
nowaitparameter to immediately regain console control.
format fs=NTFS label="Backup" quick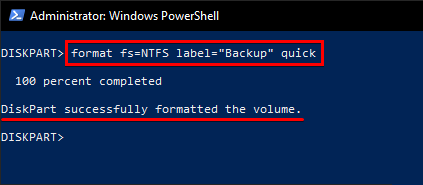
3. Optionally, you can assign a drive letter to the newly-created volume using Diskpart’s assign command. Check out your new volume by running the list volume command.
assign letter=F
 list volume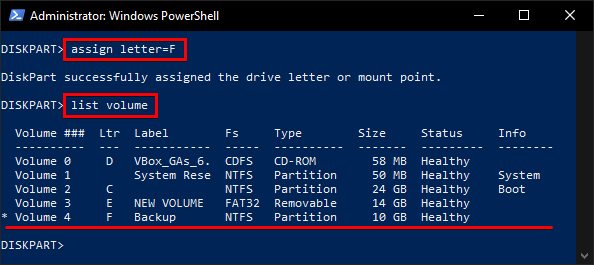
Extending a Volume
If you’re running low on disk space and have some unallocated space next to a Windows volume, you can use Diskpart to extend that volume. Extending a volume with Diskpart is essentially the opposite of shrinking one.
Extending a Windows Volume
Here’s how to extend a volume using Diskpart:
- Open Diskpart on your Windows machine.
2. Use the command list disk to find a disk with enough unallocated space for extending your desired volume.
If you don’t have enough unallocated space to extend, you may skip this whole section and clean up your disk to get additional space.
Next, select the disk that has unallocated space adjacent to it. For this Diskpart tutorial, we’ll use disk 0 as an example.
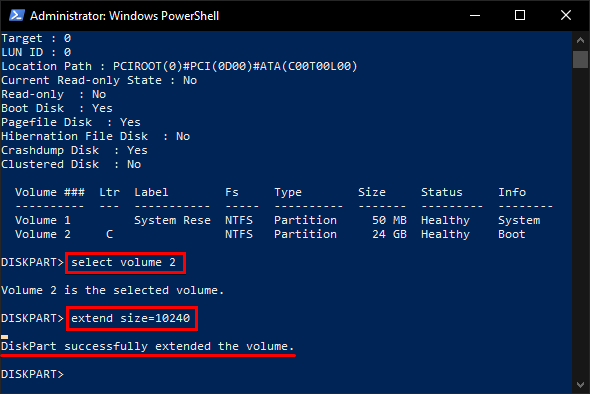
3. List all volumes by executing list volume or you can run detail disk to find the specific volume you wish to extend. In this guide, we’ll work with Volume 2.
4. Once you’ve identified the volume, select it and use Diskpart’s extend command to expand it. For instance, to extend Volume 2 by 10GB, you would use the command as shown below.
Congratulations! If the Diskpart extend operation was successful, you now have an extra 10GB of space on your volume.
Deleting a Volume or Partition
If you have multiple volumes or partitions and wish to consolidate space, Diskpart can also be used to delete them and convert them into unallocated space. If, however, your system has only a single-volume drive, deleting is not advisable.
To ensure data safety, always have all critical data backed up before deleting any volume.
Deleting a volume with Diskpart follows a similar procedure to the steps you’ve learned for extending and shrinking volumes.
1. Start by selecting the disk that contains the partition or volume you want to delete using the select command in Diskpart.
2. List the Diskpart partition or volume with the list command.
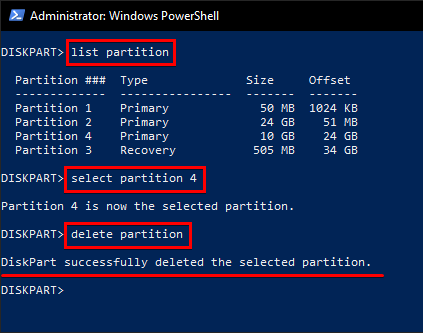
list partition
list volume
3. Select the Diskpart partition or volume you aim to remove.
select partition #
select volume #
4. Execute the Diskpart delete command to remove the partition or volume.
delete volume
delete partition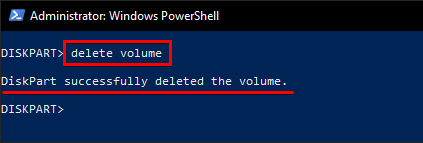
Using Diskpart to Clean an Entire Disk
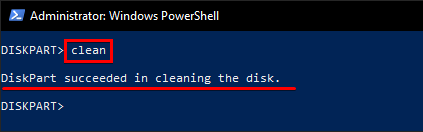
If you have a disk without useful data and you’re opting for a clean slate, Diskpart can turn that disk into unallocated space with the clean command.
Cleaning a disk erases everything inside the selected disk and cannot be undone. If the disk is inaccessible and has important files in the disk, give Windows File Recovery Tool a try to recover files after cleaning the entire disk.
To initiate Diskpart’s clean command on an entire disk, select the disk you wish to clean and simply run clean.
If you intend to create another partition from a cleaned disk, run the
create partition primarycommand without thesizeparameter (See Creating a Volume/Formatting a Partition).
Conclusion: Mastering Diskpart for Volume and Partition Management
In this tutorial, you’ve honed your skills in using Diskpart for creating partitions, extending, deleting, and shrinking volumes, as well as cleaning an entire disk. Diskpart is a versatile tool for controlling partitions and volumes on your disks.
So, will you turn to Diskpart for managing disk partitions and volumes the next time?


