

Windows 10 is a phenomenal operating system (OS), but like any other OS, the more you install applications, change settings and browse the web, you can clutter it up. In this article, you’re going to learn how to keep Windows clean by covering how to delete backup files in Windows 10, use the disk cleanup cmd, remove file history, unnecessary system restore points, delete the Windows.old folder, and the $Windows.~BT folder and more.
By following the steps in this tutorial, you could potentially clean up tens or even hundreds of gigabytes of valuable space on your Windows 10 machine!
Before You Start
If you’d like to follow along with each of these handy storage-saving tips, you’ll only need to meet one prerequisite; Windows 10. All examples demonstrated in this tutorial were done on Windows 10 Build 1909, but these tips should work on older builds also.
Removing Windows 10 Backups
Let’s start this space-saving tutorial and cover how to delete backup files in Windows 10. Windows 10 has a built-in feature that automatically backs up files to a separate storage volume.
The Backup and Restore feature helps ensure you don’t lose important files, but it has a downside; the backed-up files’ size keeps inflating.
To conserve space, you should periodically check for and delete backup files. To do so, follow the instructions below to remove the backups you don’t need.
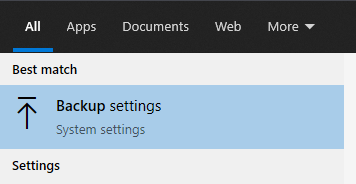
- First, click on the Start button, then type backup. You should see the Backup settings application; click on that.
2. Once in the Backup settings, click on the Go to Backup and Restore (Windows 7) link to open up the Backup and Restore (Windows 7) app.

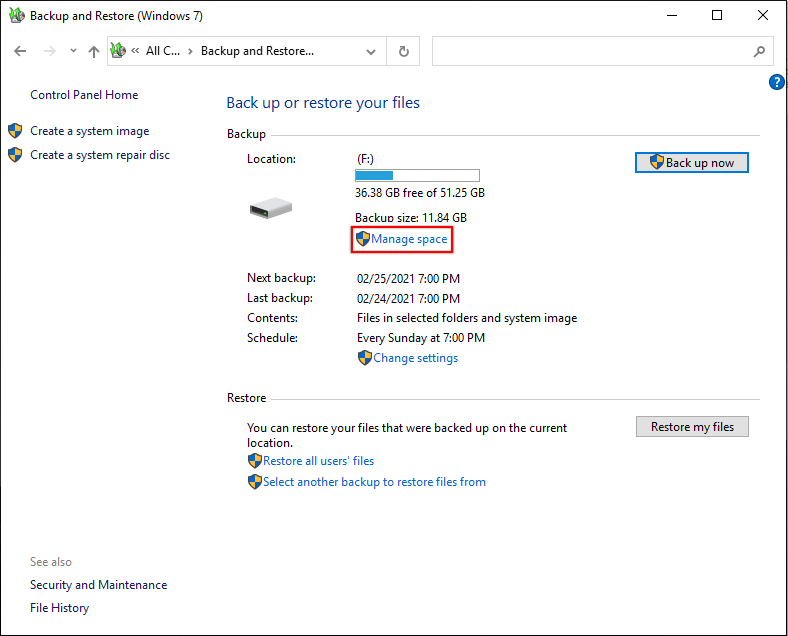
3. In the Backup and Restore window, you’ll see your backup drive. As shown below, click on the Manage space option.
If you see “Windows Backup has not been set up” under the Backup section, you can skip the rest of this section. You have no older Windows backups taking up space.
4. In the Manage Windows Backup disk space window, you’ll see two options to manage your backup drive; the View backup and Change settings options.
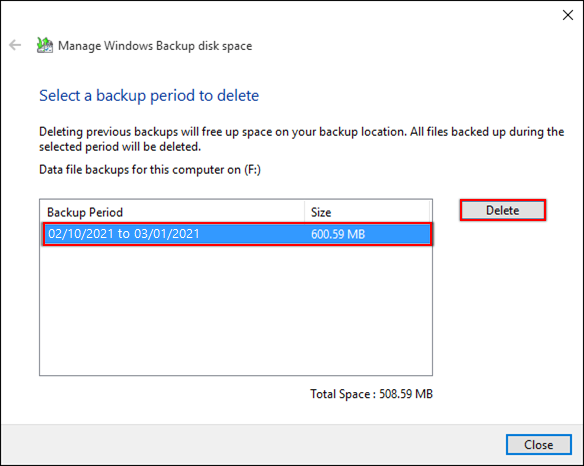
Click on the View backups… button. This button lets you choose and select a backup period to delete.

5. Choose a Backup Period from the list from a timeframe you feel comfortable with removing.
6. Click Delete to remove all contents of the backup files in the selected time period.
The Backup and Restore feature saves a copy of the files inside the folder you selected upon setting up this feature. Meaning, deleting a Backup Period will delete all the files the system backed up on that time period.
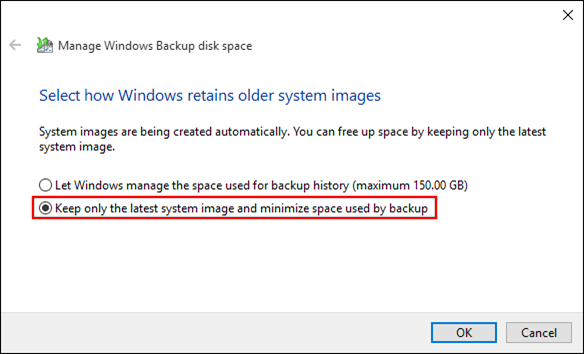
7. Back on the main Manage Windows Backup disk space window, click on the Change settings button.
8. Click on the Keep only the latest system image and minimize space used by backup option. Setting this option automatically removes all of the currently-stored backups and only keeps the latest ones.
9. Click OK to proceed with the option selected.
Deleting Windows File History
Assuming you’ve already cleared your backups from the previous example, but you’re still missing a large amount of space in your drive. Clearing up space from using the File History is another way to reclaim some space.
Windows File History is another built-in feature of Windows 10 that lets you automatically back up your files. Unlike the Backup settings, File History only stores files that are in your Documents, Music, Pictures, Videos, and Desktop folders to your separate or external drive.
To clean up Windows File History:
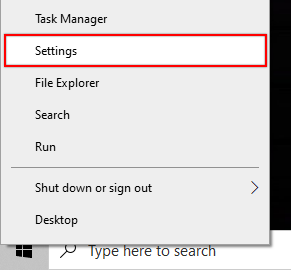
- Right-click on the Windows Start button and choose Settings to open up the Windows Setting window.
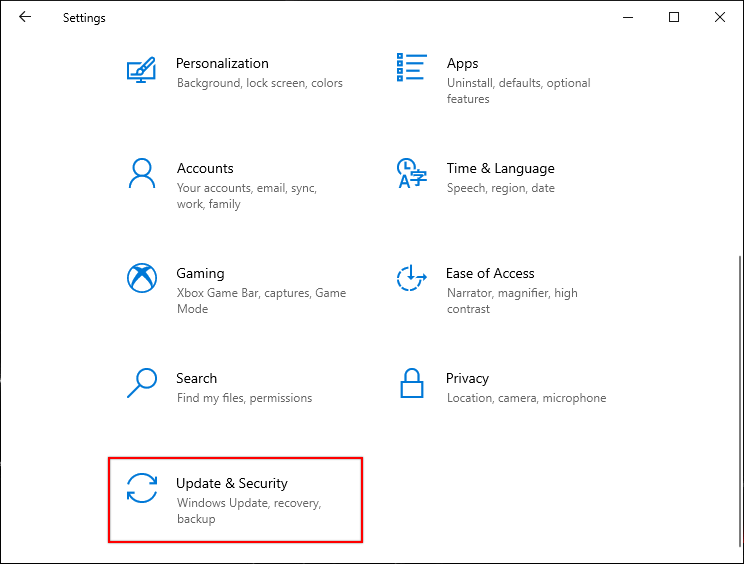
2. On the Windows Settings page. scroll down and click on Update & Security.
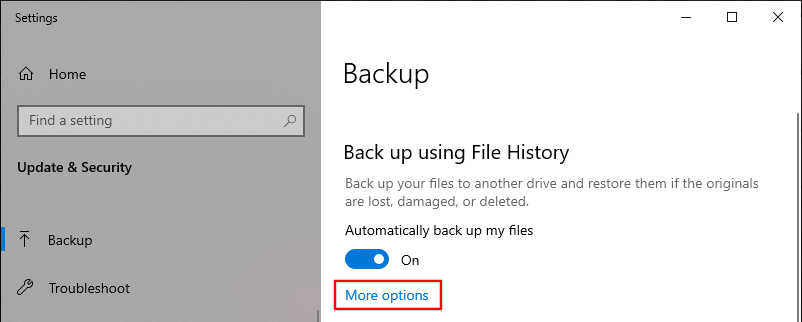
3. Click on Backup.
4. If you’re using Windows File History already, press the More options link to open the Backup Options window.
If you see Back up using File History turned off, you can skip the rest of this section. You have no backed-up files taking up space.
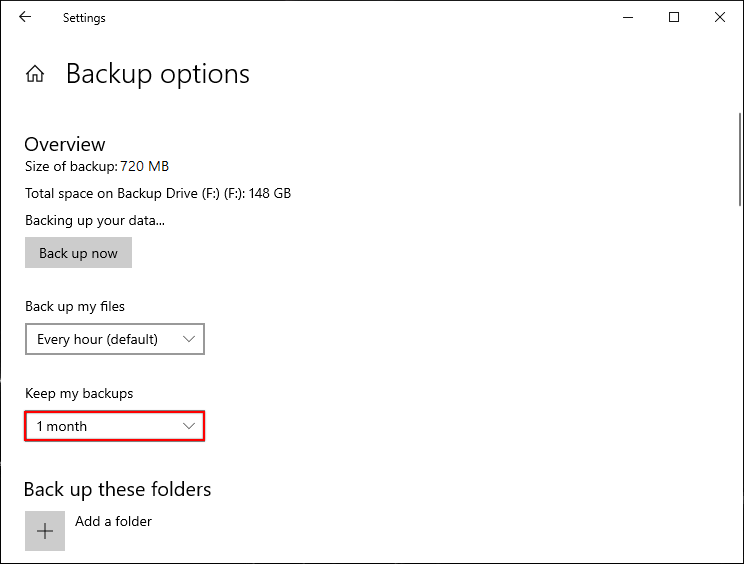
5. In the Backup options window, you’ll probably find the Keep my backups dropdown is set to keep files Forever. To free up space on your drive, change the Keep my backups option to 1 month or whatever time interval you prefer, as shown below.
You can also remove the current backup drive as it completely disables the File History. But, you should think twice before doing so since you wanted to back up your files in an external drive in the first place!
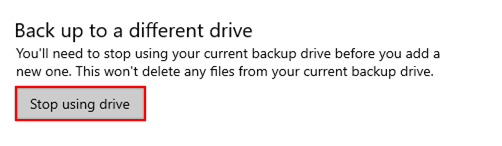
6. While you’re in the Backup Options window, scroll down to the bottom. You’ll see an option as shown below, then click on the Stop using drive button.
There’s also an option to delete all file backups while keeping the recent ones. Run PowerShell as an administrator, then type in this command
fhmanagew.exe -cleanup 0and press Enter.
Windows Backup and File History both focus on a separate or external drive. Now it’s time to clear up space in your local drive.
Removing Windows System Restore Points
If you’ve ever experienced corruption with your Windows 10 OS and discovered you could restore it with system Restore Points, you know the benefit. A system restore point is a collection of files and registry settings taken at a specific point in time.
Even though having a system restore point is a great benefit, storing many restore points will eventually take up disk space. To ensure restore points don’t go overboard, follow the steps below on how to remove them.
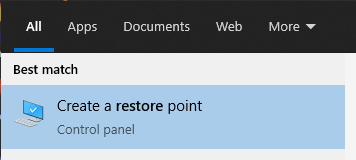
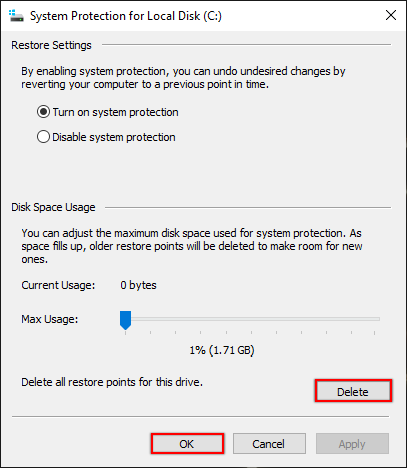
- Click the Start button and type restore, then click on Create a restore point.
2. As demonstrated below, click on the Configure button under the System Protection tab. This will open up the System Protection window that lets you configure the system’s restore points settings.
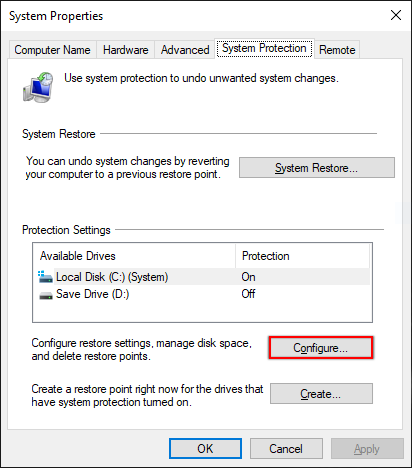
3. Click on the Delete button to delete all restore points freeing up the most space and click OK.
You can set the maximum space restore points consumes by adjusting the slider if you need to maintain some restore points.
Removing Cached Updates
Windows Updates tend to do what they please in the Windows 10 background. When Microsoft releases new updates, Windows 10 will tend to download and install them automatically.
When Windows 10 downloads and installs updates, it caches update files that let you uninstall them at some point if needed. The only caveat is that the files keep piling up, eating away storage space.
Other than cleaning up your storage, removing cached updates fixes issues with Windows Update. Perhaps you’re getting an error, or it’s stuck at 0% download progress. You should start with a clean slate.
Stopping the Windows Update Service
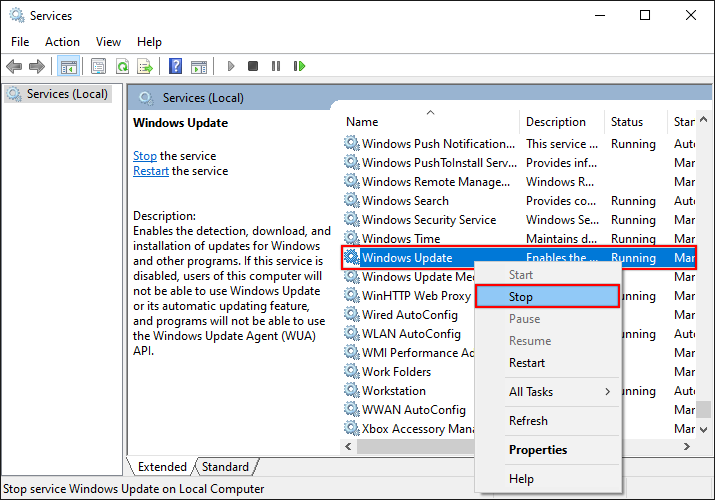
The Windows Update service typically locks cached updates. To remove cached updates, you’ll first need to stop the Windows Update service. To do so:
- Click on the Windows start menu and type services.msc. You should then see the Services window pop up.
2. Inside the Services window, right-click on Windows Updates and select Stop. Keep the Services window open to re-enable the Windows Update service later.
You can also stop the Windows Update service via PowerShell by running
Get-Service -Name 'wuauserv' | Stop-Service.
Deleting Cached Updates via the GUI
Once you’ve stopped the Windows Update service, it’s time to begin removing some files and folders.
- Open up File Explorer and navigate to the C:\Windows\SoftwareDistribution\Download folder.
2. Select all the files and folders by pressing Ctrl+A.
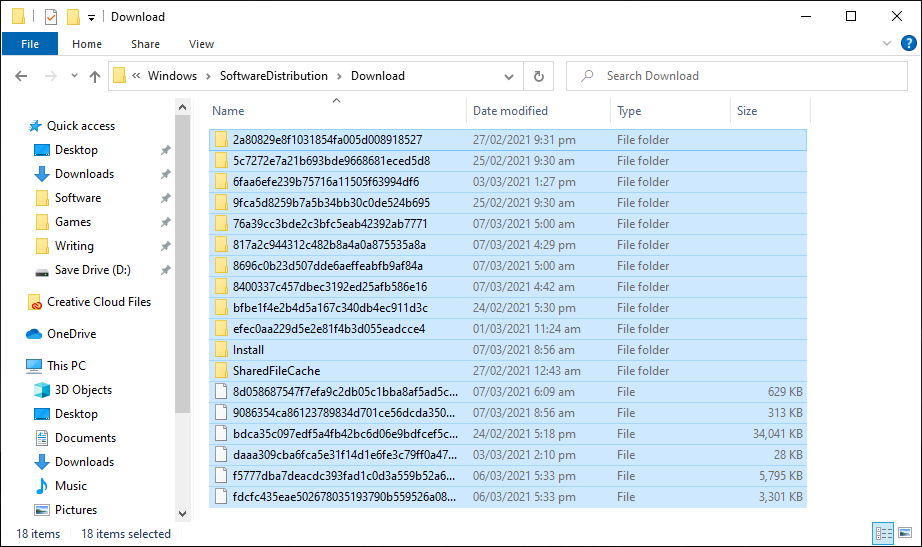
3. Once everything is selected, press the Delete key to remove the cached updates.
To delete the files without moving to Recycle Bin, press the Shift+Delete keys instead.
4. After removing the cached updates, go back to the Services window, right-click on the Windows Update service and choose Start.
Deleting Files Using PowerShell
In the previous example, manually removing the cached updates from the File Explorer is surely efficient. However, it takes a lot of effort to complete the process.
You can use PowerShell to remove the cached updates with a single script and it all happens at once.
Create a PowerShell script and paste the following code in or open up Windows PowerShell as Administrator and paste the code snippet below into the console.
## Stops the Windows Update Service
Stop-Service -Name 'wuauserv'

## Targets the Windows Cached Update location
Set-Location $env:windir\SoftwareDistribution\Download

## Deletes everything inside the *Download* folder *-Force - forces deletion of read-only files
## -Recurse - includes files in sub-directories
## -Confirm:$false - (quiet mode) suppresses prompts*
## Remove-Item * -Recurse -Force -Confirm:$false

## Starts the Windows Update Service
Start-Service -Name 'wuauserv'
Deleting the Windows.Old Folder After a Windows 10 Upgrade
If you were previously running Windows 7 on your computer and upgraded to Windows 10, you may have a folder named Windows.old on your computer. This folder is a backup of your Windows 7 installation when you upgrade to Windows 10.
In a sense, it’s great that you can still access stuff you had in your old Windows version. However, an old Windows version takes up a large amount of space in your drive, so how do you fix that?
You can clean up this Windows.old folder in three different ways, each with its advantages and disadvantages.
Using the Storage Sense Settings
You can remove old Windows versions by using a Windows 10 feature called Storage Sense. Storage Sense is a built-in Windows 10 feature that monitors storage and frees up space automatically. Below are some of Storage Sense features that make it stand-out from other methods of cleaning up your Windows 10 system.
- Clears Temporary Files in your system that are not in use
- Dehydrates cloud-backed content that hasn’t been opened in a certain amount of days
- Deletes files in the Downloads folder if they haven’t been opened for more than a certain number of days.
- Removes files in the Recycle Bin if they have been there longer than the time configured in the Storage Sense settings.
Storage Sense is pretty useful for many things, like the sole purpose of deleting the old versions of your Windows system, here’s how.
To delete a Windows.old folder with Storage Sense:
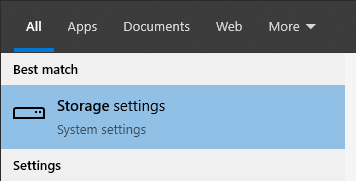
- Click on the Start button and type in storage, then click on Storage Settings.
2. Once you have the Storage settings up, click on the Configure Storage Sense or run it now option.
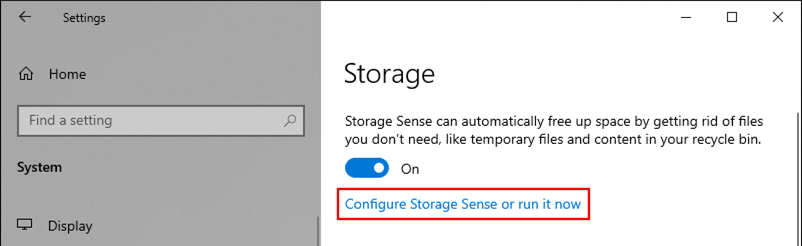
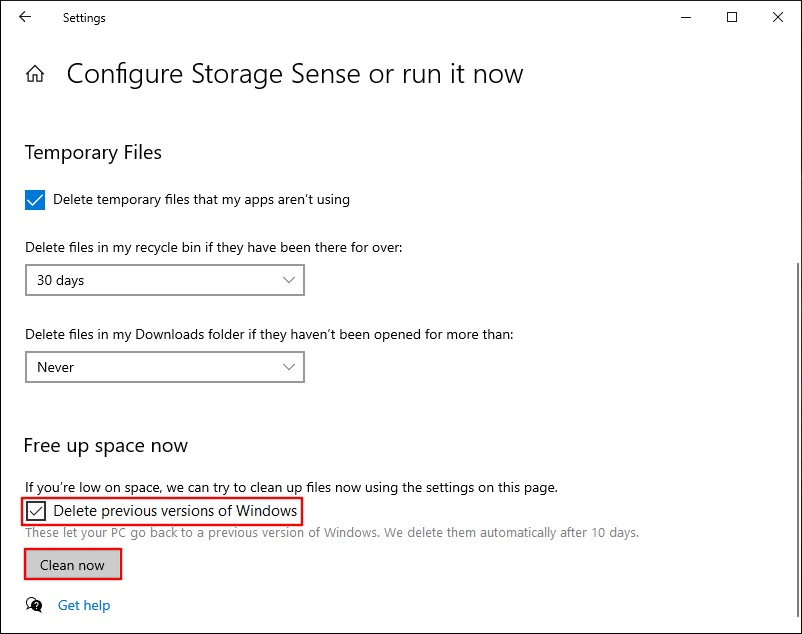
3. In the Configure Storage Sense window, scroll down and enable the Delete previous Windows option.
If you don’t see the Delete previous Windows option, you can skip this section.
4. Click on the Clean now button.
Using the Temporary Files Settings
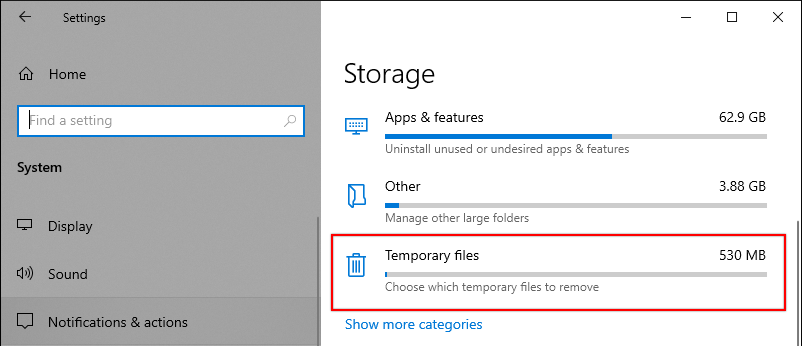
Windows 10 also has a handy feature hidden under the Storage section in the Settings menu called Temporary Files. This feature can clean up many types of unwanted files but for now, let’s focus on deleting the Windows.old folder.
- Navigate back to the Storage settings window. Click on Temporary files.
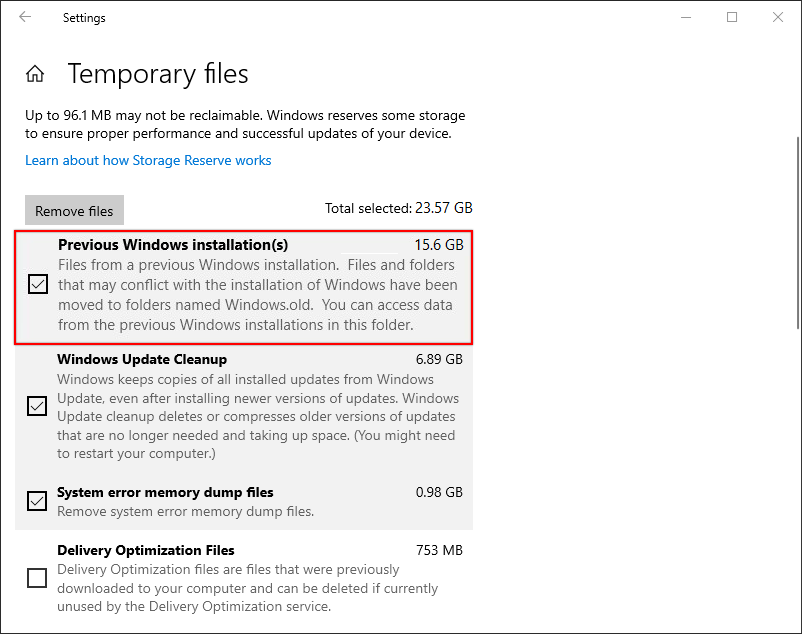
2. In the Temporary files window, check the Previous Windows installation(s) option. This selection includes the entire old Windows version.
In case you don’t see the Previous Windows installation(s) option, it means you don’t have old Windows versions in the system, and you can skip this section.
3. Click on the Remove files button to clean up every type of temporary file checked.
As shown below, the total space to be cleared is 23.57 GB—huge, right?
Running the Disk Cleanup Tool
For the final way to remove a Windows.old folder and old installation, we have the Disk Cleanup tool. Disk Cleanup is part of the Windows legacy tool. It was first introduced in Windows 98. You can say that the Disk Cleanup tool is an old version of the Storage Sense in Windows 10.
Yes, it’s old but not obsolete as it still does its job pretty well, such as cleaning up the previous version of Windows you have on your storage.
To run the Disk Cleanup tool to cleanup the Windows.old folder:
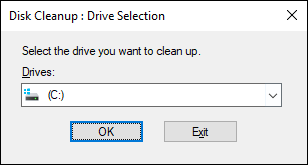
- Click on the Windows start button, type cleanmgr and select Disk Cleanup.
2. On the small pop-up window that comes up, choose the drive you want to clean up and click OK. Since you’re using the Disk Cleanup tool to remove the windows.old folder, choose C:\.
3. Inside the Disk Cleanup window, click on the Clean up system files button to include the system files on the list of files and folders you can delete.
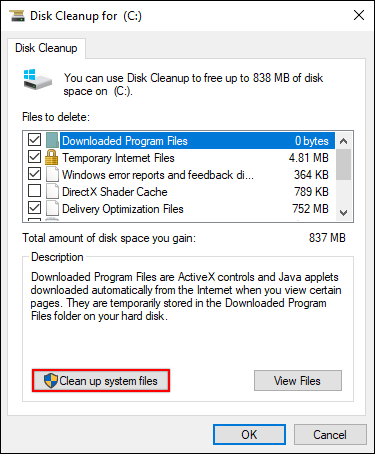
You can also choose to delete temporary files in the Disk Cleanup selection area, which you’ll see covered later.
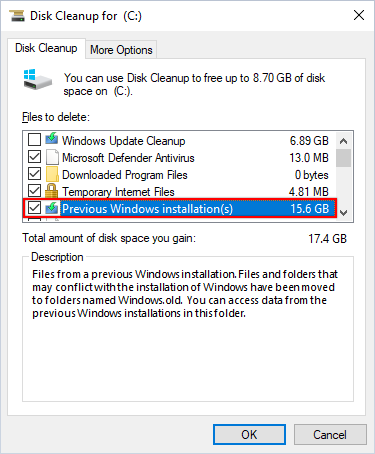
4. When you click on the Clean up system files button, select the C:\ again. You’ll then see a list containing the system files, such as the old windows versions displayed with Previous Windows installation(s).
5. Check the Previous Windows installation(s) option to add to the list of files to delete from the system and click OK.
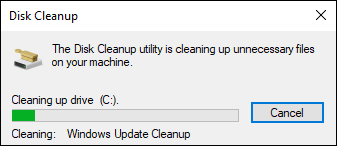
It will take some time to complete cleaning up the drive depending on the total amount of disk space to be cleaned. Once the cleaning is done, then you’re all set!
Deleting the $Windows.~BT and $Windows.~WS Folders?
Like the Windows.old folder from the previous section, when you upgrade Windows to Windows 10, it creates a $Windows.~BT and a $Windows.~WS folder. These folders contain a copy of your Windows system that enables you to revert to your old version of Windows.
Since the release of the Windows 10 Anniversary Update (Version 1607), you can roll back to your previous Windows version within ten days after upgrading. Then, both the $Windows.~BT and $Windows.~WS folders are deleted automatically once the rollback period is over.
Is it safe to delete them on your own? Yes, but it’s a bit tricky getting rid of these folders.
The ~WS folders are system folders, meaning the system owns them, not the user. To delete the folders, you’ll first need to take ownership, see how to in the next section.
Deleting System Folders Using PowerShell
There are many ways to delete the $Windows.~BT and $Windows.~WS folders that you’ll find on the internet. Some say they work, some say they don’t do anything, but the most effective way of deleting these system files is using PowerShell as administrator.
To delete the $Windows.~BT Folder and other system folders, open up Windows PowerShell as administrator, and copy the following code into the console. You can also create a PowerShell script with this code.
## takes ownership of the folder
## */F - specifies the filename or directory name pattern
## /R - recurse: instructs the tool to operate on files in the specified directory and all subdirectories.
## /A - gives ownership to the administrators' group instead of the current user.*
takeown /F C:\'$Windows.~BT\*' /R /A

## Grants full control for the Administrator account to make changes on the folder
## */T - indicates that this operation is performed on all matching files/directories below the directories specified in the name.
## /grant - grants the specified user access rights.*
icacls C:\'$Windows.~BT\*.*' /T /grant administrators:F

## Deletes the system folder
## *-Force - forces deletion of read-only files
## -Recurse - includes files in sub-directories
## -Confirm:$false - (quiet mode) suppresses prompts*
Remove-Item C:\'$Windows.~BT\' -Recurse -Force -Confirm:$False
You can see the demonstration below of deleting the $Windows.~BT folder, but the same method applies for deleting the $Windows.~WS folder.
Other Space-Saving Tips to Clean up Windows 10
Aside from the main examples in this tutorial, there are other ways you can clear up space in your storage, such as deleting files from the Downloads folder and uninstalling unused applications.
Clearing Your Downloads Folder
A typical culprit causing you to lose space in your drive is your Downloads folder. Usually set as the default download location in your web browser, this folder can expand quickly.
To clean it up:
- Open up File Explorer, paste C:\Users\%USERPROFILE%\Downloads in the address bar, and press Enter. This path points to the Downloads folder in your home directory.
2. Select everything inside of this folder by pressing Ctrl+A to select all files or hold the Ctrl key while clicking on each file to delete and leave the ones you want to keep.
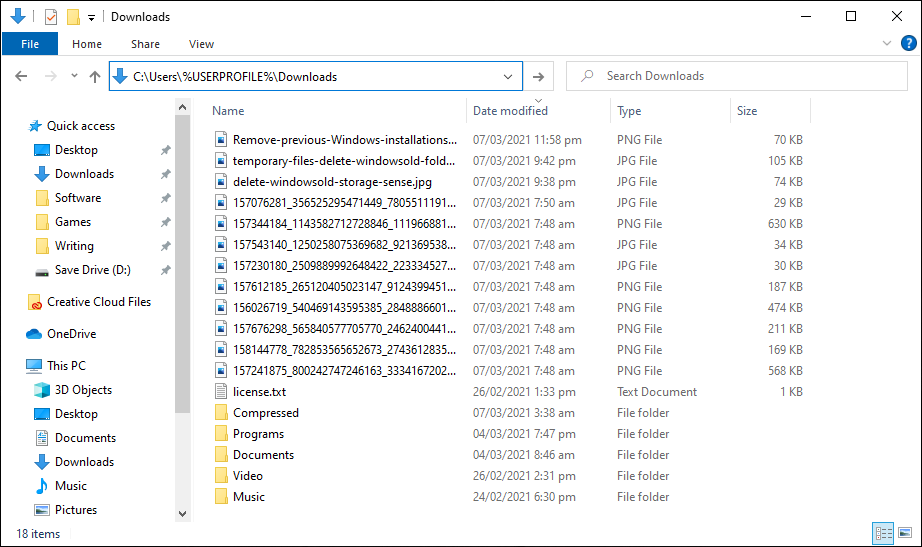
3. Once you’re happy with your selection, press the Delete or Shift+Delete keys to delete the files permanently.
Removing Unused Applications
Often than not, you tend to install applications and leave them there in the system even if you’re not using them. As a result, these applications take up space in your drive, so it would be wise to uninstall some of them.
To uninstall applications:
- Click on the Start button, type in apps and click on Apps & Features.
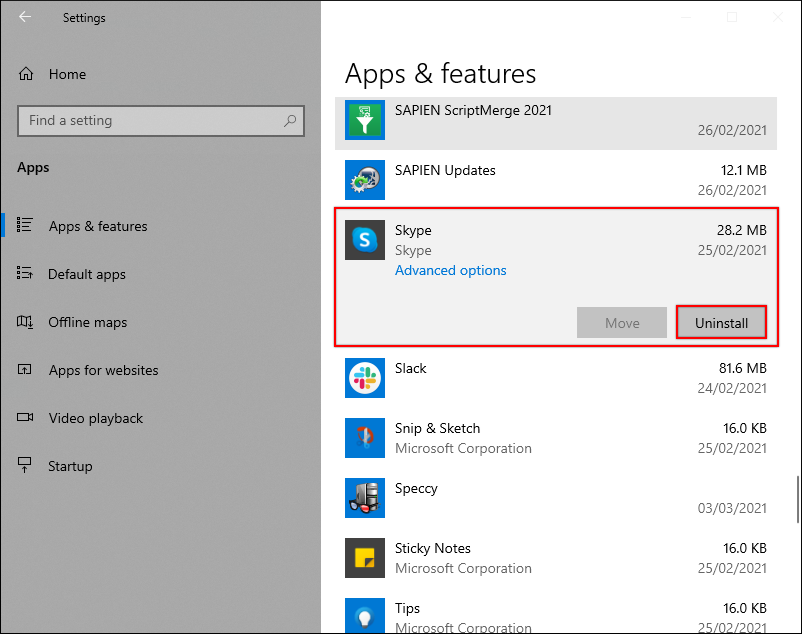
2. From the Apps & features section, look for any application you don’t need anymore, select an application and click on Uninstall to remove it from the system.
Deleting Temp Files in Windows 10
If you’ve been following along, you may have already run the Disk Cleanup tool. This tool, by default, Temporary Files are cleaned up when using Disk Cleanup. But if you’re skeptical and want to be on the safe side, you can also clean up temporary files via File Explorer or PowerShell.
Temp files are located in the C:\Users\%USERPROFILE%\AppData\Local\Temp folder. You can safely delete all files in this folder using either File Explorer or perhaps PowerShell if you prefer the command line or are automating this step.
If you’d like to delete temp files in Windows 10 with PowerShell:
- Click on the Windows start menu and type powershell.
2. Right-click on Windows PowerShell and choose Run as Administrator.
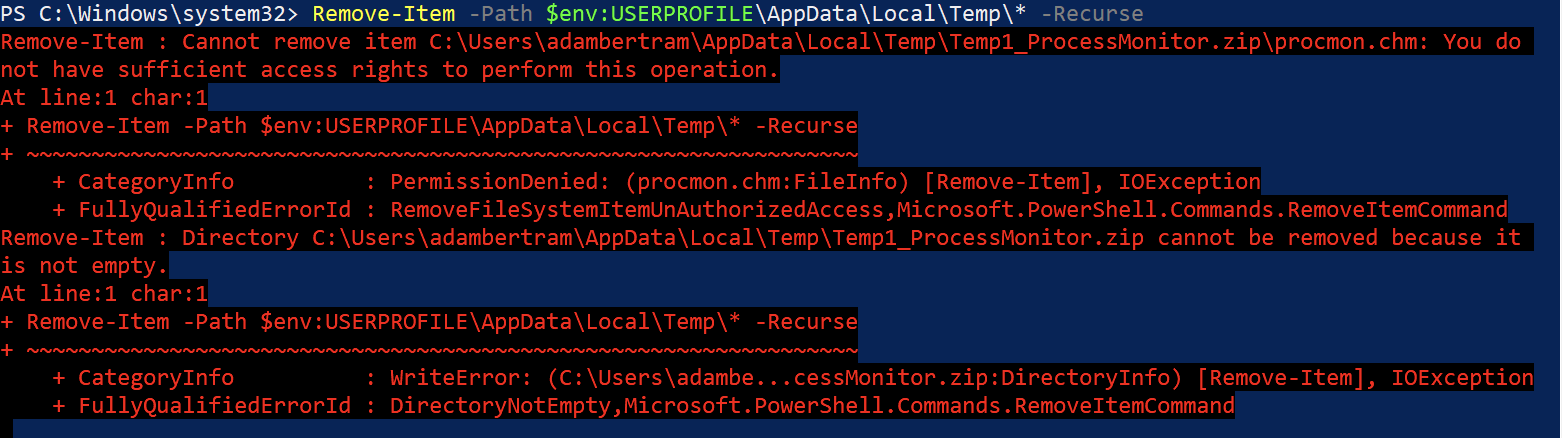
3. Paste the following command inside of the PowerShell console. This command will attempt to remove all files and folders inside of your temp file folder.
Remove-Item -Path $env:USERPROFILE\AppData\Local\Temp\* -RecursePowerShell may return a few errors, as shown below. This is to be expected. You’ll usually find other programs are actively using some files. If this happens, restart Windows 10 and try again, but you may not be able to remove all files.
Conclusion
You should now have the knowledge you need to keep Windows 10 free of clutter! Once you’ve deleted backup files, file history, the Windows.old folder, run disk cleanup cmd, and deleted temp files in Windows 10, your OS should be streamlined and ready to go!


