


The docker run command is one of the first commands you should learn after installing Docker. But have you wondered how else you can use docker run commands to deploy and manage your applications effectively? Going through one Docker run example (docker run) would be great. But guess what, you’ll get more on this tutorial!
In this article, you’ll learn how to up your DevOps game with some Docker run example that you can use to improve your workflow.
Read on and never be lost when running Docker commands again!
Prerequisites
This tutorial will be a hands-on demonstration. If you’d like to follow along, be sure you have the following.
- A Linux machine – This demo uses Ubuntu 20.04, but any Linux distribution will work. Here’s how to install Ubuntu.
- Docker installed on the machine.
- A user account with root/sudo privileges.
Docker Run Example # 1: Running a Container Interactively
You may have been running containers for some time now, but did you know there are a few preferable situations to run a Docker container in interactive mode?
Docker lets you run containers in interactive mode when:
- You’re troubleshooting a problem and need to see the output of the commands executed inside the container.
- You’re experimenting with a new Docker command and want to see the command results in real-time.
- You’re running a process in the container that requires manual input from you.
When executing a Docker run example ( docker run ) command with no options, the default behavior is to run the container in interactive mode. When you run a container in interactive mode, you can see the output of the commands that you execute in the container on your terminal as they are executed.
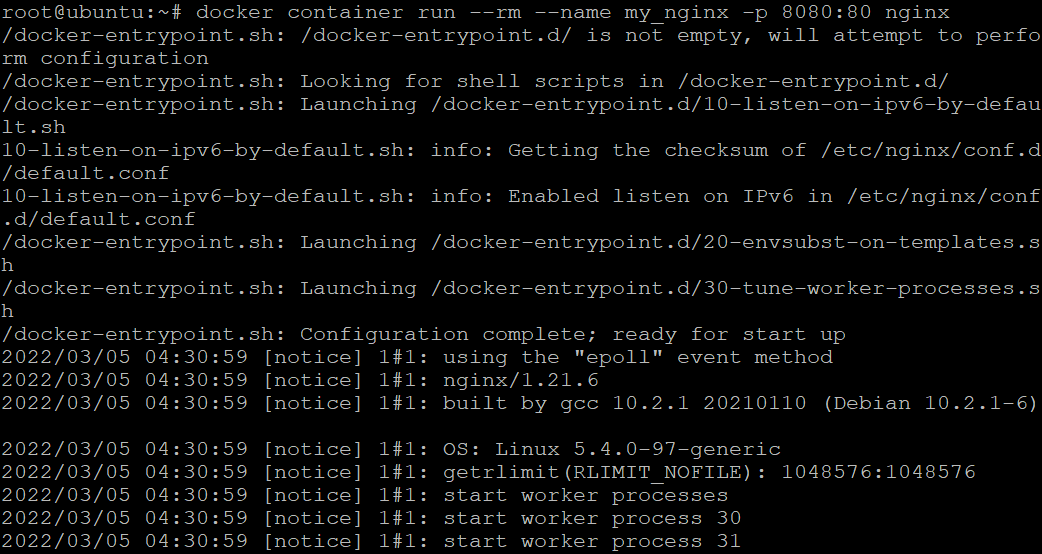
1. Run the following command to run a container (my_nginx) in interactive mode and publish (-p) port 80 of the container to the port 8080 of your host machine. You can change the name of the container as you prefer.
The command uses the nginx image from the Docker hub to create the container and automatically removes (--rm) the container when the container is stopped.
docker container run --rm --name my_nginx -p 8080:80 nginxSince you’re using a non-root user with sudo privileges, there’s no need to prepend sudo when running Docker commands
You’ll see the log output of the nginx web server in your terminal directly, as shown below.
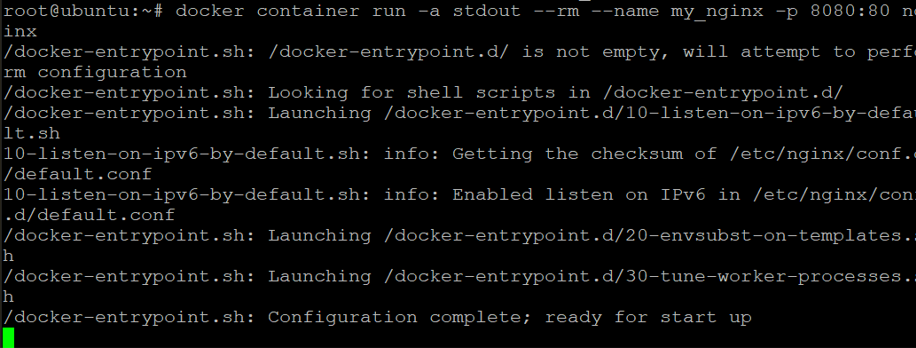
Running an interactive container provides a lot of information, but perhaps you prefer to filter out information you only need. If so, append the -a flag and specify a standard stream (-a) for the container, as shown below.
Specifying a standard stream tells Docker to display only the stdout output of the my_nginx container.
docker container run -a stdout --rm --name my_nginx -p 8080:80 nginxBy default, if you don’t provide the -a flag, stdin, stdout, and stderr are all attached to the terminal. The -a flag takes the following arguments and helps declutter your output to see only the relevant information:
-a stdin– attachesstdinto the container, sending all inputs on your terminal to the container.
-a stdout– attachesstdoutto the container, displaying all output generated by the container to your terminal.
-a stderr– attachesstderrto the container, displaying all error messages generated by the container to your terminal.
You can see below that the output is less cluttered now.
2. Next, open another terminal and run the docker ps command to see the list of containers running on your host machine.
docker psBelow, you can see your my_nginx container listed in the output.

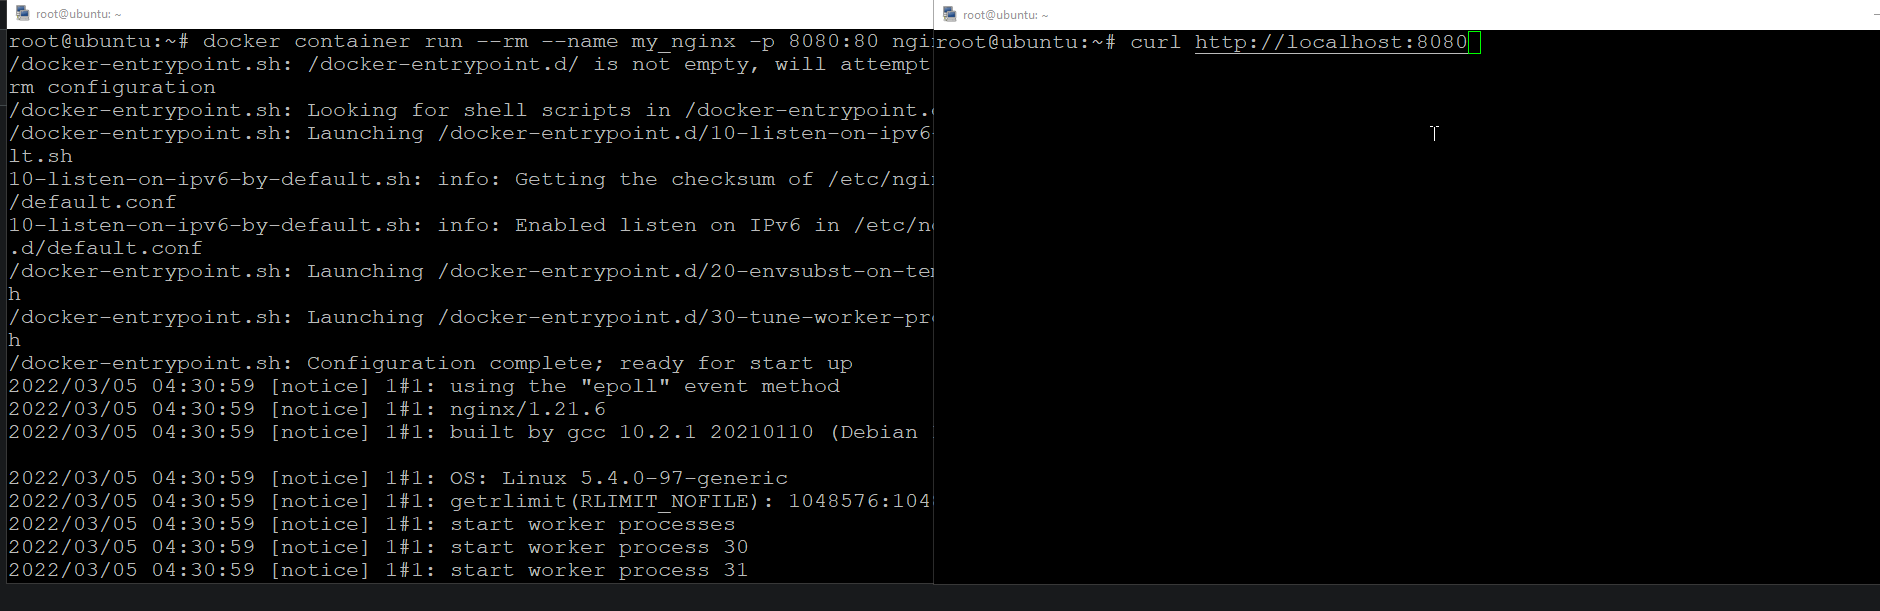
3. Finally, run the curl command below to test the nginx web server.
curl http://localhost:8080You can see below that the log output of the nginx web server is displayed in your terminal (left-hand side) as soon as the output generates.
Docker Run Example # 2: Running the Container in Detached Mode
You’ve just learned to run your containers in interactive mode and see the output in your terminal as they execute. But if you’re not eyeing for outputs of the container in your terminal, you can run the container in detached mode.
In detached mode, the container runs in the background, and you don’t see the output of the commands you execute in the container in your terminal.
Run the following command to run a container (my_nginx) in detached mode (-d).
docker container run --rm --name my_nginx -d -p 8080:80 nginx
Once the container is running in detached mode, Docker redirects the output to the container’s logs. At this point, the my_nginx container is running in the background command outputs, as shown below.
You can also see the unique container ID in the output. You can use this ID to attach the container or start/stop/remove the container.

Now, run the docker ps command to see the list of containers running on your host machine.
Since the container (my_nginx) is running in the background, you can run any commands without opening a new terminal.
docker ps
You’ll see the following output, which shows that the my_nginx container is now running in detached mode.

If for some reason, your NGINX webservers aren’t working correctly while your container is running in detached mode, you’ll have to attach your terminal to the running container. You can attach to a running container by running the docker attach command followed by the container’s ID or name (my_nginx), as shown below.
docker container attach my_nginx
As you see below, you’ve successfully attached to the my_nginx container. Now, you can find out the root cause of the issue and fix it.

Creating a Bridge Network
One of the advantages of using Docker is that it manages your containers networking for you. With Docker, you don’t have to worry about configuring your network. Docker sets up the networking for you automatically. Including creating networks, connecting containers to networks, and managing IP addresses.
See how Docker sets up networking for your containers and creates a bridge network.
1. Run the docker command below to run an Ubuntu container with full access to the networking resources on the host machine (--net=host), which is handy for debugging.
The -ti options tell Docker to keep the container in interactive mode. You must specify this option when you are working with Bash shell. Running this command as in the “Running a Container Interactively” section does not work.
docker run -ti --rm --net=host ubuntu bash
2. Next, run the apt update command in the container to update the package list.
apt update -y
3. Run the below command to install the bridge-utils package. This package is needed to create and manage bridge devices.
apt install bridge-utils
4. Now, run the following brctl show command to list the bridge networks on your system.
brctl showYou’ll see a list of bridge networks similar to the following output. Notice that there is a bridge device named docker0. This network is the virtual network that Docker uses to create virtual networks for your containers if you do not specify a custom bridge virtual network.

5. Open another terminal and run the docker network command below to create a new network. You can name the network differently, but in this tutorial, the network is named my-ata-network.
docker network create my-ata-networkYou’ll see a unique network ID returned, as shown below. Note down the network ID as you’ll match it with the new bridge network ID later (step six).

6. Return to your Ubuntu container terminal, and run the following command to list the bridge network (show) on your system again.
brctl showAs shown below, you’ll see a new bridge network listed in the output named br-d9ba7f94ac73. You can see the d9ba7f94ac73 part matches the network ID returned in step five.
This output confirms that Docker created a new bridge network named my-ata-network and added the Ubuntu container to that bridge network.

Docker Run Example # 3: Running a Container with Port Forwarding
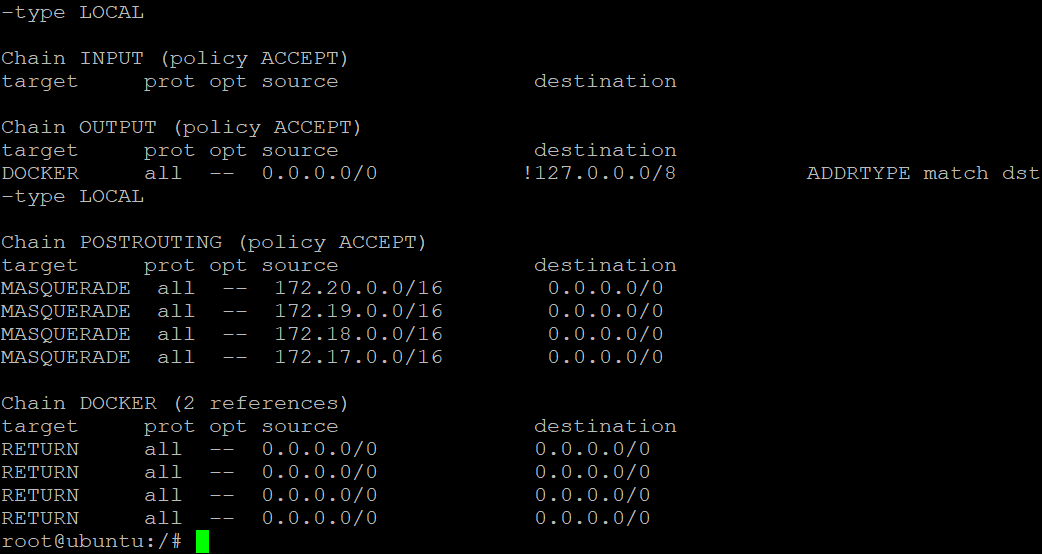
Docker uses the built-in firewall features of the Linux kernel, namely the iptables command, to create firewall rules. These firewall rules control when packets get sent between the bridges and thus become available to the containers attached to those bridges.
Take a look at how Docker accomplishes port forwarding under the hood with iptables.
1. Run the following command to start a privileged Ubuntu container (--privileged=true) with full access to all networking resources on the host, including port forwarding.
docker run -ti --rm --net=host --privileged=true ubuntu bash2. Next, run the below command to update the package list and install iptables.
apt update && apt install iptables
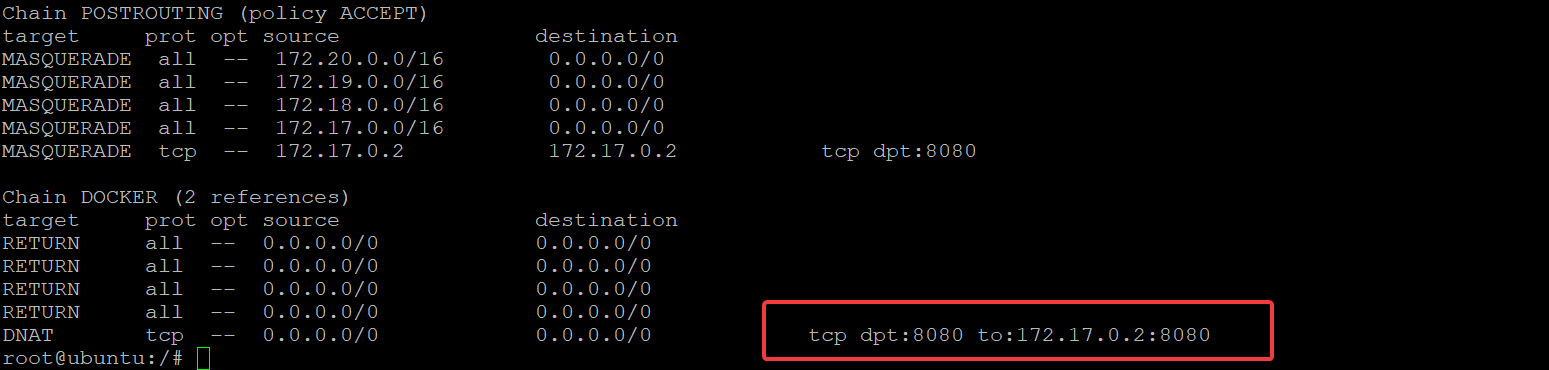
3. Run the iptables command below on the privileged Ubuntu container to list (-L) the nat table rule.
iptables -n -L -t natWhat you can see below are just the default rules shipped with Ubuntu.
4. Now, execute the below command run an Ubuntu container with port forwarding to your host on port 8080.
docker run -ti --rm -p 8080:8080 ubuntu bash
5. Finally, rerun the iptables command below to list the nat table rule.
iptables -n -L -t natNotice below that a new rule is added, forwarding all packets from the host’s port (8080) to the container’s port (8080). You can see that exposing ports in Docker is merely port forwarding at the network layer.
Creating a User-defined Network
Your Docker DCA exam may ask you to create bridge networks for developers. How? Using the docker network command, you can create a bridge network (a User-defined virtual network). The docker network provides a way for containers on different networks to communicate.
1. Run the docker network command below to create a new bridge network named ata-app-net using the bridge driver.
docker network create --driver bridge ata-app-net
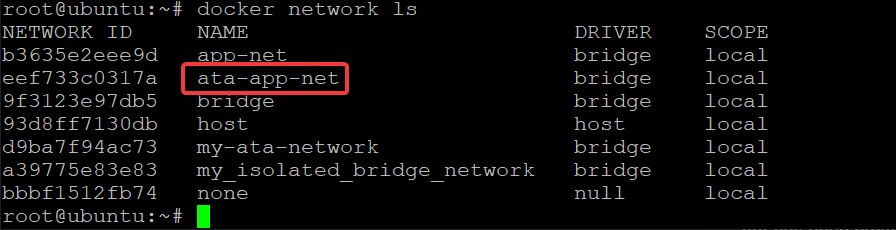
2. Next, run the following command to list (ls) the bridge networks on your host.
docker network lsNotice below that a new user-defined bridge network named ata-app-net has been created.
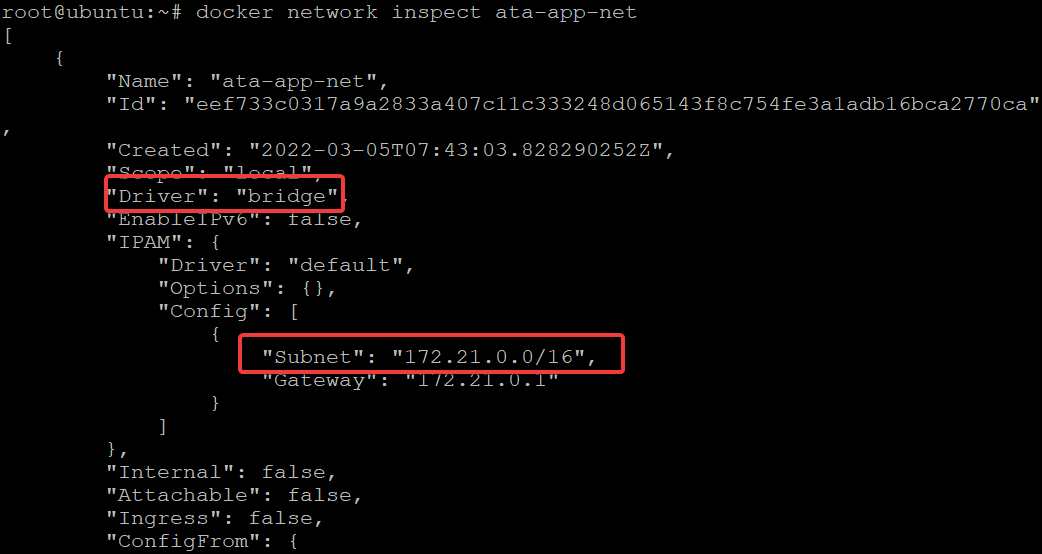
3. Run the below command to view (inspect) the details of the ata-app-net bridge network.
docker network inspect ata-app-netBelow, notice that the ata-app-net bridge network has a single subnet (172.21.0.0/16). This subnet is automatically assigned when you create a bridge network. You can also see the driver (bridge) associated with the bridge network.
4. Now, execute this Docker run example ( docker run ) command below to run a couple of alpine containers on your user-defined bridge networks to try to ping each other.
docker run -dit --name ata-app1 --network ata-app-net alpine ash
5. Run the docker ps command to list the running containers.
docker psAs you see below, both containers are now running.

6. Rerun the docker network command below to inspect your ata-app-net bridge network.
docker network inspect ata-app-netYou can see below that your two containers are now connected to the ata-app-net bridge network along with their IP addresses and names.

7. Now, run the docker container attach below to connect to your ata-app1 container.
docker container attach ata-app18. Ping to ata-app2 to verify that the containers can communicate with each other.
ping ata-app2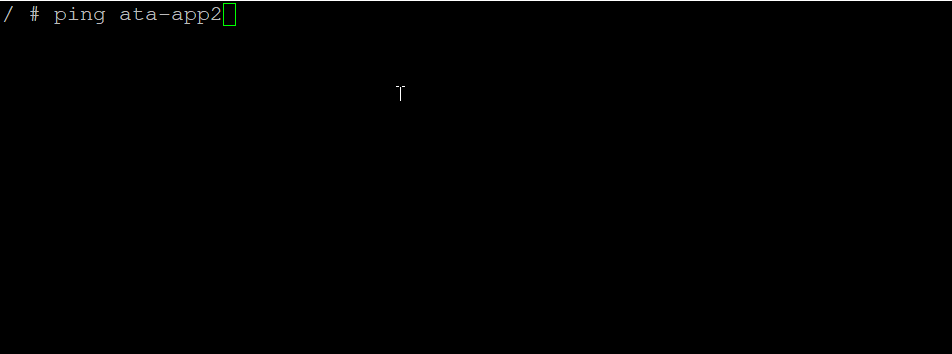
9. Next, ping google.com to verify that ata-app1 can communicate with the internet.
ping google.com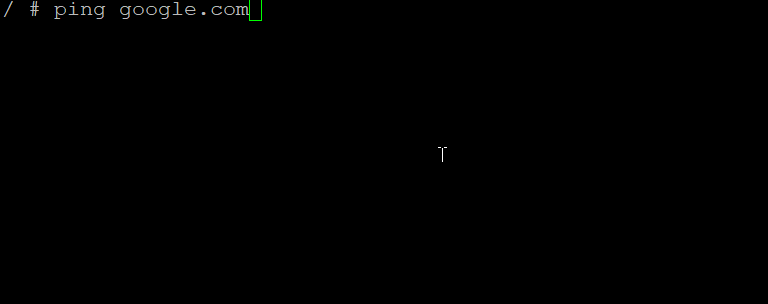
10. Finally, repeat steps seven to nine to connect to ata-app2 and ping ata-app1.
Be sure to press CTRL + PQ to detach from the ata-app1 container and keep it running. Or else, the container will stop, and when you ping ata-app1 from ata-app2, the ping command will fail.
docker container attach ata-app2
ping ata-app1
ping google.com
Below, you can see all packets are transmitted and received, which confirms both containers can communicate with each other and the internet.

Conclusion
In this tutorial, you’ve learned many Docker run example ( docker run )you can use to ease up deploying and managing your applications. You can now use Docker more effectively by understanding how docker runs and how Docker sets up networking for your containers.
At this point, you already know how to take advantage of Docker run example ( docker run ) commands to up your DevOps game.
With this knowledge, why not deploy your applications more efficiently and in a scalable way?


