Have you ever needed to see what’s going on inside a Docker container? Containers are intended to be idempotent: If there is a problem, redeploy a new container. Often life isn’t that simple. You need to run commands in the container to identify the issue. This is where the docker exec command can help.
This article will teach you how to run commands on a running Docker container using the docker exec command.
Prerequisites
To follow along with the examples in this article, you will need to adhere to the following.
- Any recent version of the Docker Desktop will work on Windows, Linux, or macOS. This tutorial uses v3.1.0 running on Windows 10.
Starting an NGINX Container
Docker exec runs commands in containers. But, to do that, you must first have a container to run those commands in. Let’s start by downloading a Docker image and creating a demo container.
- Create a new directory, this tutorial uses C:\gitrepos\test, to hold the files used for the container.
2. Create a file, named dockerfile (no extension), containing the following code. The Dockerfile defines the steps necessary to create a container.
FROM nginx:alpine
 COPY index.html /usr/share/nginx/html/index.html
3. Next, create a file, in the same directory, named index.html which contains the following code. This is an HTML file that, when the container is started, will display a Hello World message.
<!DOCTYPE html>
<html lang="en">
<head>
    <meta charset="UTF-8">
    <meta name="viewport" content="width=device-width, initial-scale=1.0">
    <meta http-equiv="X-UA-Compatible" content="ie=edge">
    <title>Hello World - Nginx Docker</title>
    <style>
       h1{ font-weight:lighter; font-family: Arial, Helvetica, sans-serif;
       }
    </style>
    </head>
    <body>
       <h1>
          Hello World
       </h1>

    </body>
    </html>
4. Now create the Nginx Docker container. Since the Dockerfile is in the current working directory, specify . to let the Docker engine know to look there. Also, be sure to tag the container with my-ngnix using the t parameter to ensure an easier reference in the future.
docker build -t my-nginx .
5. Now that the container is built, start the container with the Docker run command.
# rm - Informs Docker to delete the container after it has stopped
# d - Return control of the command-line after the command has been executed
# p - Map the internal container port 80 to an external port 80 docker run --rm -d -p 80:80 my-nginx
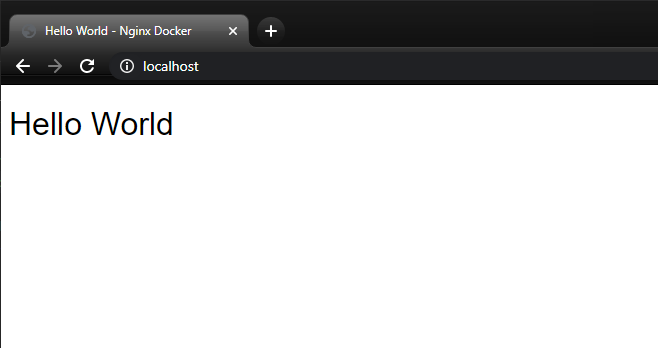
6. Finally, open your web browser and navigate to http://localhost/ to see the following.

Running Commands with Docker Exec
When running commands in a Docker container, you may need to run a command interactively. Running commands interactively means typing in a command, getting feedback, typing in another command, etc. Interactive commands take over your session and prevent you from doing anything else.
But what if you already know the commands to send to the container ahead of time and want to run commands in the background? In that case, you can run non-interactive commands. Non-interactive commands allow you to send a command to Docker and instantly return control of the console.
Locating the Container Name and ID
Now that you have the container built, you can execute commands inside of the container. Before running a command, locate either the NGINX container’s name or ID. Either the name or ID will work in Docker commands. With that in mind, remembering the ID may be more challenging than the name!
To display any running container information, run the Docker ps command to output the following information.
docker ps
Copy either the unique ID, e17e4b6be01a, or the randomly generated name mystifying_chandrasekhar to your clipboard for later use.
Running a Non-Interactive Command with Docker Exec
As an example of running a non-interactive command, copy and run the below command to return a list of files in the /var/log directory with the ls -l command. Pass everything after the container name, mystifying_chandrasekhar, to the Docker exec command.
docker exec mystifying_chandrasekhar ls -l /var/log
Avoiding Console Output with Docker Commands
By instantly returning shell control to the user, large operations avoid tying the console up. Forgo console output with the detached d option. The command below creates the file /tmp/execWorks via the touch command within the container and does not display any output on the console.
docker exec -d mystifying_chandrasekhar touch /tmp/execWorksExecuting Interactive Commands with Docker Exec
Up to this point, you’ve learned how to run non-interactive commands in a Docker container with docker exec. But, you might face a time when you must troubleshoot a container, for example, when you need to issue commands to the container interactively. In that case, you need to run commands interactively.
Running commands interactively with docker exec requires two options, i and t. The i option keeps STDIN open, allowing commands to be sent to the container, and the t option allocates a pseudo-TTY (PTY), a communication channel, to type commands in.
Copy and paste the following command to open an interactive command prompt to the running Docker container with the Bourne (sh) shell, as indicated by the prompt change to / #.
docker exec -it mystifying_chandrasekhar sh
Once in the shell, now run the commands below to demonstrate listing files from within the container. Finally, running the exit command to leave the interactive shell.
ls -l /var/log
exit
To open an interactive prompt in a specific directory, pass the path to the
woption telling Docker to start the shell in a specified directory.
Passing Environmental Variables to a Running Container
Many programs use environment variables to set configurations at startup. For example, most Java applications require the JAVA_HOME environmental variable to set to the Java path.
You can pass environment variables to a session using the e option. For example, perhaps you need to populate an environment variables called MYVAR into a running container. To do that, use the e option and provide the key/value pair of MYVAR="<some value>" as shown below.
docker exec -it -e MYVAR="hello" mystifying_chandrasekhar sh
echo $MYVAR
Passing Environment Variables With a File
If you have many environmental variables or a shared configuration, storing those variables in a file may be easier. Pass the file via a relative or absolute path to Docker with the --env-file option. This technique is often used to provide secure credentials to a container. Be sure never to commit credentials to version control!
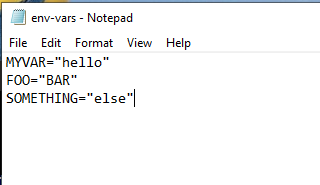
Create a text file named env-vars.txt with the environmental variables to pass and their values. This file can be called anything you like and does not need the .txt file extension.

Pass the environmental variables to Docker with the env-file option. Verify that the variables are available with the echo command as shown in the below screenshot.
# Pass the env-vars.txt file and open an interactive prompt
docker exec -it --env-file env-vars.txt mystifying_chandrasekhar sh
# Verify that the environmental variables are available in the Docker container
echo $MYVAR
echo $FOO
echo $SOMETHING
Interacting with a Running Container as a Different User
In production, applications often run as a specific user to restrict their access. If you’re running applications as a specific user in production, you should also do so while testing commands.
In this example, the Docker container is run as the nginx user. Pass the user to the w option to tell Docker to start the container as the nginx account. The whoami command, run from within the container, confirms that the nginx user is indeed used.
docker exec -it -u nginx mystifying_chandrasekhar sh
whoami
nginx user.Next Steps
You have learned how to execute commands within a running container using the docker exec command. Utilizing the exec command to enter and interrogate running containers, you have a powerful new tool in your arsenal to troubleshoot Docker containers.
Now try to take what you have learned a step further and use Git version control to pull a static website into the container, rather than copying a single file. If Git is new to you, then the article A Beginner’s Guide to Visual Studio Code and Git is a great place to start.


