

Are you looking for a cloud-native tool you can use to build and deploy applications locally in a way that mimics a real-time Kubernetes environment? Well, look no further. DevSpace is just around the corner.
DevSpace is a cloud-native tool that lets you deploy applications locally using either a local or remote Kubernetes cluster. In this tutorial, you’ll learn how to initialize a Node application with DevSpace and perform hot-reloading with DevSpace.
Read on and start building your applications on the cloud!
Prerequisites
This tutorial will be a hands-on demonstration. If you’d like to follow along, be sure you have the following:
- NPM globally installed.
- A local or remote Kubernetes cluster – This tutorial uses Minikube.
- A text editor – This tutorial uses Visual Studio Code (VSC). Related: A Beginner’s Guide to Visual Studio Code and Git
Installing DevSpace on Local Machine
Before building your applications with DevSpace, you must install the DevSpace CLI on your machine. You have a handful of options to install the DevSpace CLI; via NPM, Yarn, and Curl for Linux, Mac, Windows, and brew.
But in this tutorial, you’ll install DevSpace CLI globally using NPM:
Open your terminal and run the below npm command to install devspace globally (-g) on your local machine.
npm install -g devspace
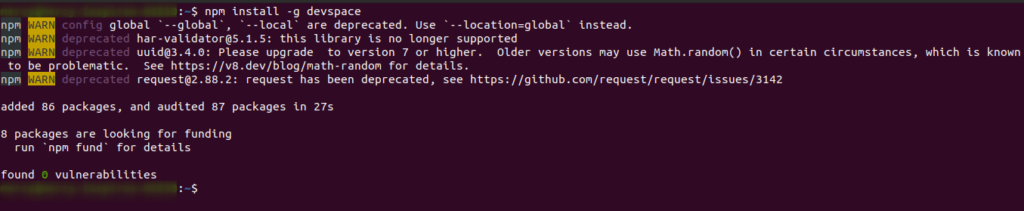
Now, run the command below to check DevSpace CLI’s installed version.
devspace --versionBelow, you can see DevSpace CLI’s installed version, which indicates you’ve successfully installed the DevSpace CLI.

Initializing a Node-based Project
Now that DevSpace is installed on your machine, it’s time to create a Node project. You’ll then create a Dockerfile that DevSpace will use to create a Docker image for your project to deploy to Kubernetes.
1. Run the below commands, which don’t provide output, but create a directory (mkdir) and switch (cd) to that directory.
You can freely name the directory, but this tutorial’s choice is node-devspace.
mkdir node-devspace
cd node-devspace
2. Open the newly-created directory (node-devspace) on your preferred text editor.
code .3. Run the below command to initialize (init) a package.json file, since you’re creating a Node project, to track important metadata and dependencies.
npm init -y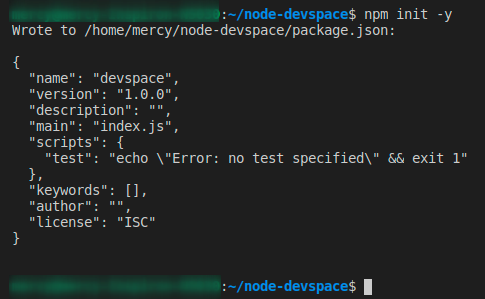
Now, run the following command to install Fastify. Fastify is a Node.js library used for building fast web applications.
npm i fastify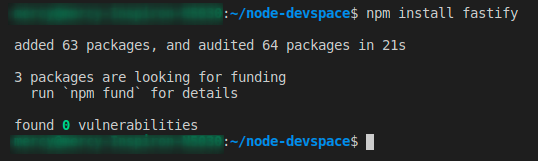
5. Create an index.js file and add the code below, which spins up a web server that listens on port 4000.
// Importing fastify and setting fastify logger to true
const fastify = require('fastify')({ logger: true})

// Creating a get request for the  home route
fastify.get('/', (req,res) => {
    res.send('Hello Devspace')
})

// Spinning up the server on port 4000
fastify.listen(4000, () => console.log('server listening on port 4000'))
6. Next, run the below command to install nodemon.
Nodemon is a Node.js tool used to watch for changes in a Node-based application by automatically starting the server on code changes.
npm i --save-dev nodemon
7. Add the following line to your package.json file, which initializes nodemon to watch for code changes when the npm start command is run.
"start":"nodemon index"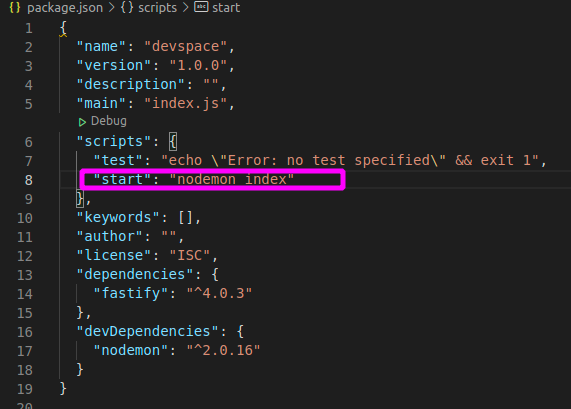
8. Now, run the command below to run (start) your Node application.
npm start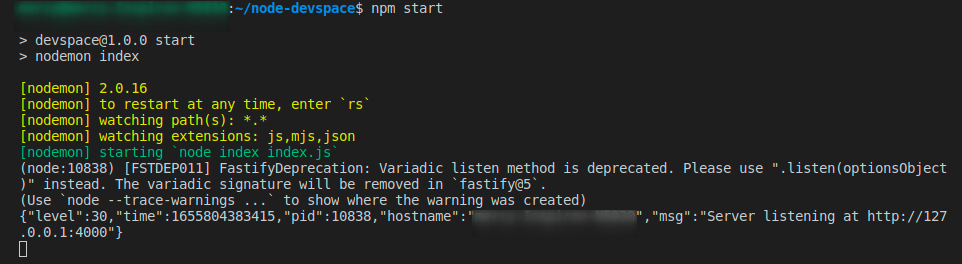
9. Visit your localhost via port 4000, and you’ll see the following output.

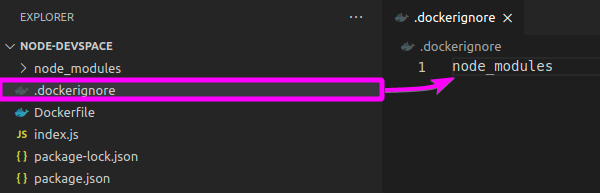
10. Create a .dockerignore file and add the node_modules folder since the node_modules folder is not part of the application code. Doing so adds efficiency to the Docker image build process.
11. Finally, create a Dockerfile and add the following configurations, which creates a Docker image with a node version of 17-alpine.
FROM node:17-alpine //Node version for building the image

WORKDIR /app //A working directory in the image

COPY package.json . // Copy the package.json file to the working directory

RUN npm install // Run npm install to install all dependencies

COPY . . // Copy all other files into the working directory

EXPOSE 4000 //Expose the image container on port 4000

CMD ["npm", "start"] //Run the image container with the `npm start` command
Initializing the Node-based Project with DevSpace
You’ve set up all resources for your project, and now you’re ready to initialize your Node application with DevSpace. You’ll choose options like ones that tell DevSpace to create a Helm chart for your Node application and to build your container image based on your Dockerfile.
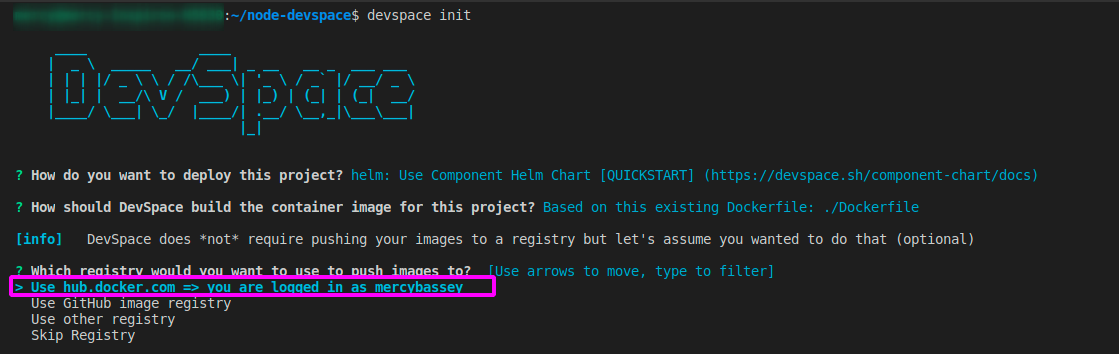
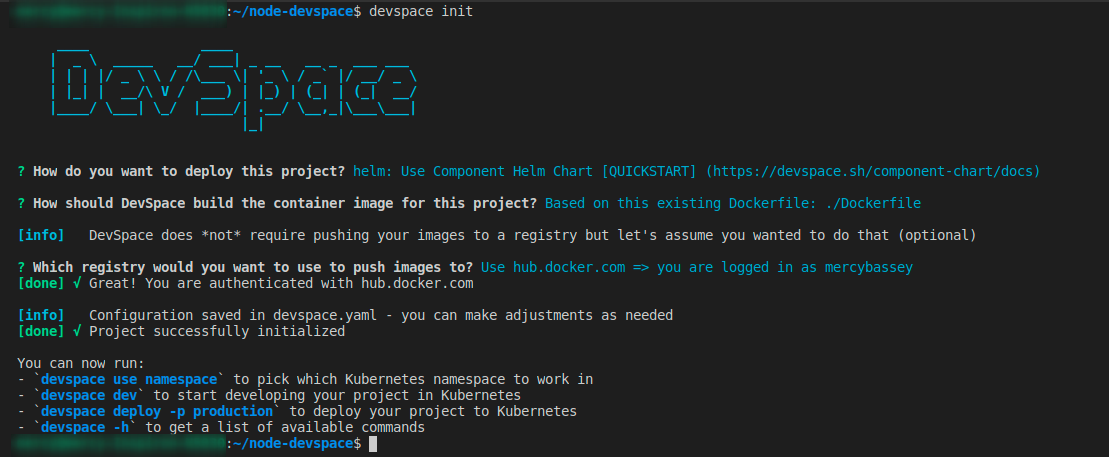
1. Run the devspace command below to initialize (init) a DevSpace project for your Node application.
As you initialize your project, DevSpace comes with some questions on how you’d like to initialize your DevSpace project (step two).
devspace init2. Select the first option since you currently don’t have a local or remote Helm chart or a manifest file configured in your Node project, and press Enter.
This option allows DevSpace to create a Helm chart for your Node application and deploy your application in your Kubernetes cluster as a Helm chart.

3. Next, select the first option and press Enter.
This option indicates that DevSpace should build the container image based on the Dockerfile it has detected in your project.

4. Lastly, select hub.docker.com and press Enter to set what registry to push your images to.
Once DevSpace has successfully initialized your project, you’ll get the following output. In addition, DevSpace will create some files based on the successful initialization of your project:
- devspace.yaml – This file is automatically generated by DevSpace based on the configuration settings in your Dockerfile.
- .gitignore – An auto-generated file that DevSpace creates and adds the devspace.yaml file into it.
- devspace_start.sh – This contains a shell script that can be used to deploy your application.
- And a .devspace folder that will contain all logs from your DevSpace project.
Starting up the Dev Mode in DevSpace
Now that you’ve successfully initialized your project with DevSpace, it’s time to see DevSpace in action with Dev mode. The DevSpace Dev mode is where you can use DevSpace commands to interact with your Kubernetes cluster and develop your project in a development mode in Kubernetes.
To start up Dev mode in DevSpace:
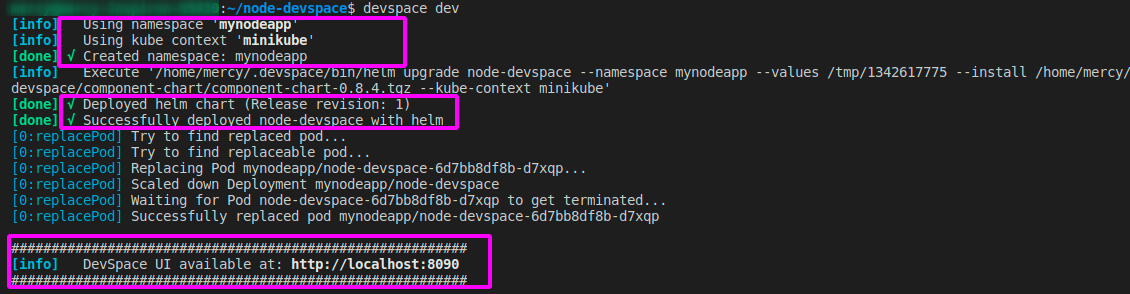
1. Run the DevSpace command below to create a namespace mynodeapp in your Kubernetes cluster.
This command below tells DevSpace to spin up the development mode for your application in a namespace called mynodepp.
devspace use namespace mynodeapp
2. Next, run the following devspace command to start the DevSpace dev mode. devspace dev
devspace devAfter running the command, DevSpace will:
- Use the namespace mynodeapp, and your KUBE_CONTEXT o set up a Kubernetes development environment on the cluster provisioner your KUBE_CONTEXT is pointing to.
- Deploy your application as a Helm Chart and give you a URL you can access via localhost to view your project on the DevSpace UI.
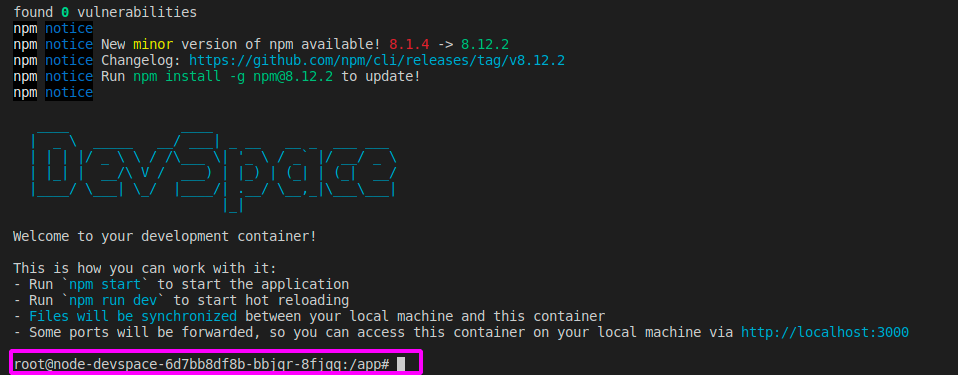
- Port forwarding is also automatically configured so your application can be accessed via localhost. DevSpace will also sync your local source code with the source code in the container and install all dependencies in the container.
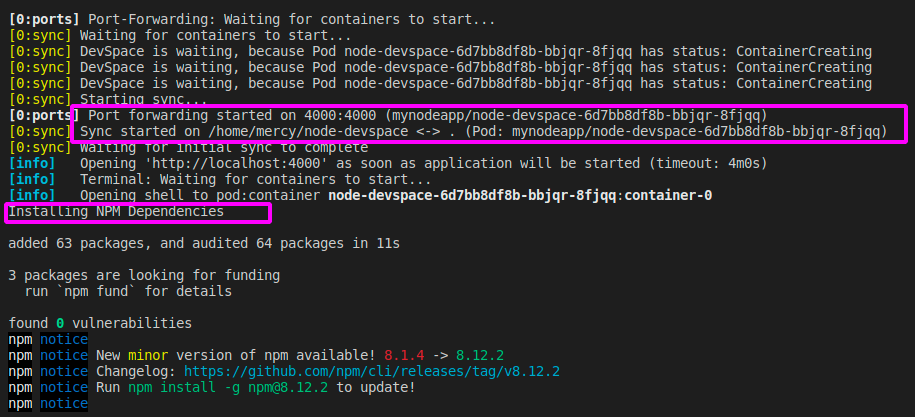
- And lastly opens up the Docker container to interact with the container directly.
3. Now, run the below node command to test your application in the Kubernetes development environment. This command spins up your Fastify web server in your container.
node index.jsYou’ll see below that your web server is up on localhost:4000 from the pod DevSpace created and not your local machine.

4. Now, open your favorite web browser and navigate to localhost:4000. If all goes well, you’ll see the following output.

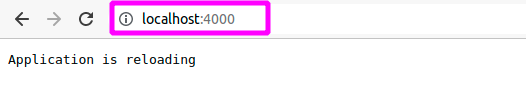
5. Edit the code in your index.js file to display “Application is reloading message” instead of “Hello DevSpace” on the home route.
You’ll see your container picks up the code changes and reloads automatically. This feature is called hot-reloading.

6. Lastly, refresh the web page, and you’ll see the new output, as shown below.
Deploying Application to Kubernetes with DevSpace
After confirming your project works as expected in the Kubernetes development mode, it’s time to deploy your application to see how it performs in a real-time Kubernetes environment.
DevSpace uses the current KUBE_CONTEXT, which is the same as the one currently configured for KUBECTL. So at this stage, DevSpace will deploy your application to the cluster provisioner your KUBE_CONTEXT is pointing to, which can either be a Kind, Minikube, or a remote Kubernetes cluster.
1. Run the command below to create and use the namespace mynodeapp-in-production.
devspace use namespace mynodeapp-in-production
2. Next, run the following command to deploy your application to Kubernetes (production) with DevSpace.
devspace deploy -p productionAfter running the command, DevSpace will:
- Use the namespace
mynodeapp-in-productionand deploy your application on the Kubernetes cluster provisioner your kube config is pointing to. - Build the Docker image of your application.
- Tag your image with a string by default.
- Use the Helm chart created by DevSpace to deploy your application to Kubernetes.
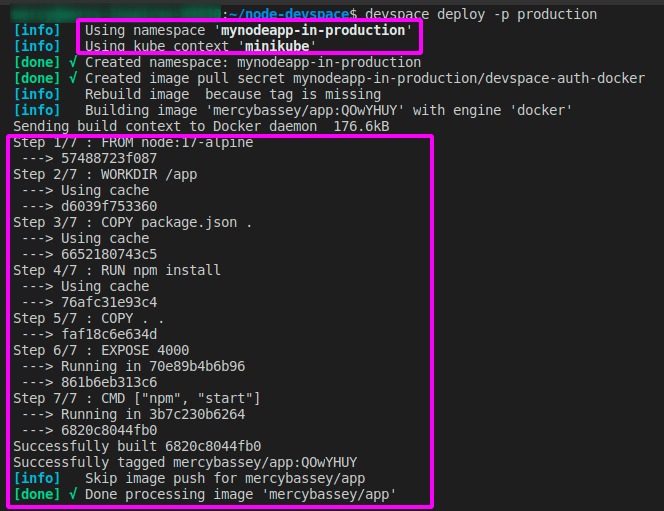
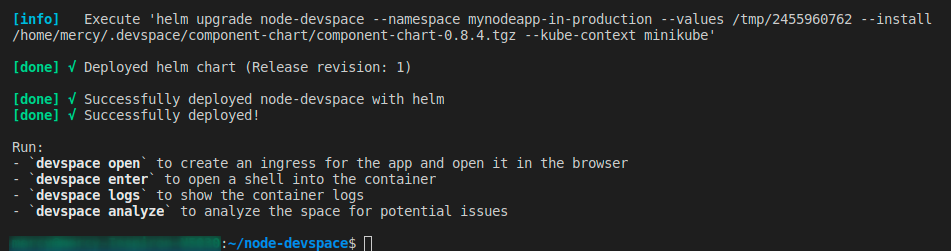
On successful deployment, you’ll see an output similar to the one below.
3. After deployment, run the below command to view your application on your browser.
The command below prompts a question about how you’d like to open your application, either via localhost or a domain.
devspace open
Press Enter to select the first option, which lets DevSpace open your application via localhost.
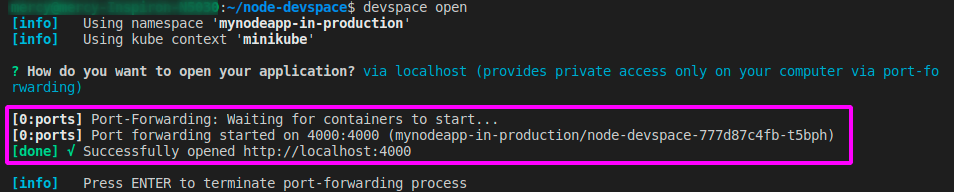
DevSpace configures port-forwarding for your application to be accessed via localhost on port 4000 and opens your application on your default browser, as shown below.

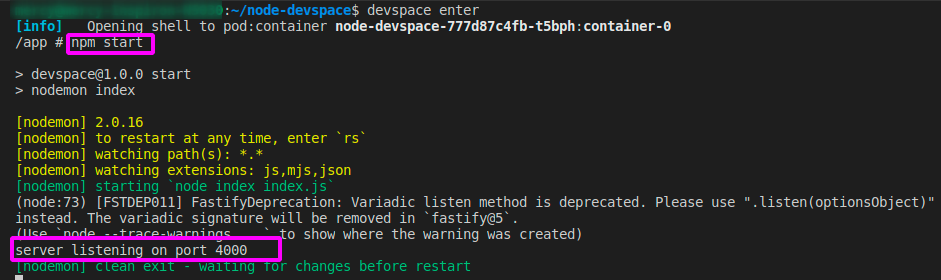
4. Now, open another terminal and run the command below to launch the container where you can run your commands directly on the container.
devspace enterYou should have the following output:

devspace enter5. Run the command below to spin up (start) your Fastify web server.
npm startIf spun up successfully, you’ll have the following output. You have now successfully deployed your application to Kubernetes using DevSpace.
Confirming Cluster Resources
DevSpace uses your current KUBE_CONTEXT to know which cluster provisioner you’re connected to on your machine and create resources in that cluster. This process happens whether you have a cluster on Minikube, Kind, or any other cluster provisioner
So far, you’ve developed your application on a Kubernetes development environment and deployed it to a Kubernetes production environment with DevSpace.
Now, it’s time to check what resources DevSpace created in your cluster:
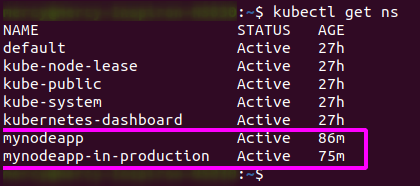
1. Run the kubectl command below to check (get) the namespaces (ns) DevSpace created in your cluster.
kubectl get nsYou should see that DevSpace created two namespaces, one for the development mode ( mynodeapp) and one for the production mode (mynodeapp-in-production).
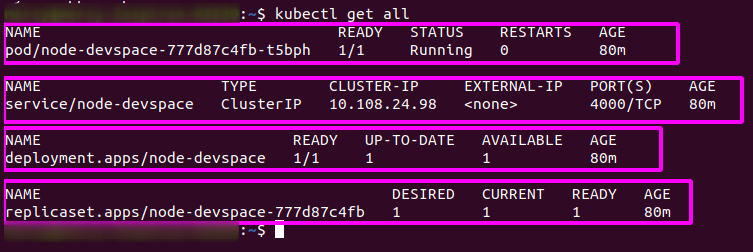
2. Next, run the following command to get all other resources DevSpace created in your cluster.
kubectl get allYou should see that DevSpace created the following:
- A pod to house your Node application as a Docker container.
- A service to expose your application to port 4000.
- A deployment to deploy your application.
- And a replica set to run a single instance of your pod.
3. Lastly, run the below helm command to check the lists (ls) of helm charts available in your cluster.
helm lsYou’ll that DevSpace deployed your application as a Helm chart in the mynodeapp-in-production namespace.

Deleting Resources in DevSpace
Now that you’ve verified your application will perform as expected in a real-time Kubernetes environment, you can start deleting the resources DevSpace created.
1. Run the following devspace command to delete (purge) all resources in both the mynodeapp-in-production and mynodeapp namespaces.
devspace purge
2. Next, run the kubectl command below to list all available resources.
kubectl get allThe output below confirms all resources are deleted.

3. Run the following devspace command to instruct DevSpace to use the mynodeapp namespace.
devspace use namespace mynodeapp
4. Now, run the command below to delete all resources (purge) created by DevSpace in the mynodeapp namespace. devspace purge
devspace purge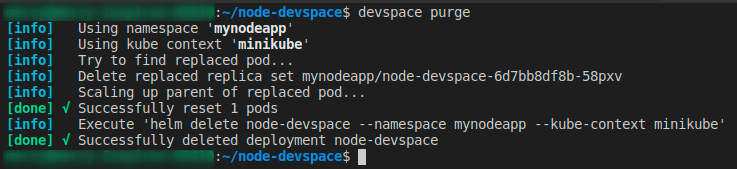
5. Finally, run the below command to get all available resources and confirm no more resources are available in your cluster.
kubectl get allThe output below confirms there are no more resources in your mynodeapp namespace.

Conclusion
In this tutorial, you’ve learned how to initialize a project with DevSpace, start a development mode, and deploy your application onto Kubernetes.
You’ve seen how DevSpace allows you to redeploy applications when source code changes locally on development mode. And at this point, you can confidently expose your application to being easily accessible through a browser.
What kind of project will you be building with DevSpace next? Perhaps a Python project deployed to Kubernetes using DevSpace and opens up in the browser via a domain?


