


Kubernetes technology has become popular among DevOps and system administrators in modern server infrastructure for automating containerized application deployment. And when it comes to deployment, the CRI-O Container Runtime is up to the task.
CRI-O provides service discovery and load balancing, automated rollout and rollback, self-healing containers, and secret and configuration management. And In this tutorial, you will learn how to deploy Kubernetes Cluster with the CRI-O Container Runtime.
Read on to level up your deployment workflow!
Prerequisites
This tutorial will be a hands-on demonstration. To follow along, ensure you have the following in place:
- Three or more Linux servers – This demo uses three Ubuntu 20.04 servers with details and roles as below.
| Hostname | IP Address | Used as |
| control-plane | 172.16.1.10 | Control Plane |
| worker1 | 172.16.1.120 | Worker Node |
| worker2 | 172.16.1.121 | Worker Node |
- A non-root user with root privileges on each server.
Setting up Kernel Modules and Parameters
Before bootstrapping the Kubernetes cluster, you must set up all of your servers according to the Kubernetes prerequisites, which include the following:
- Enabling kernel modules.
- Setting up kernel parameters.
- Disabling SWAP.
To set up kernel modules and kernel parameters on all servers:
1. Open your preferred terminal and log in via SSH to all of your Kubernetes servers. In this case, the control-plane, worker1, and worker2.
2. Next, run the modpreobe commands below, which do not provide output but enable the Kernel modules, overlay, and br_netfilter. These Kernel modules are required for Kubernetes Container Network Interface (CNI) plugins.
# Enabling kernel modules (overlay and br_netfilter)
sudo modprobe overlay
sudo modprobe br_netfilter
3. Run the following command to create a new file called /etc/modules-load.d/kubernetes.conf. This command automatically loads the Kernel modules (overlay and br_netfilter) at system startup.
# automatically load kernel modules via the config file
cat <<EOF | sudo tee /etc/modules-load.d/kubernetes.conf
overlay
br_netfilter
EOF
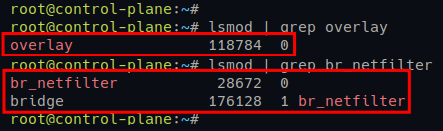
4. Now, run the below lsmod commands to verify the Kernel modules (overlay and br_netfilter) are enabled.
# Checking kernel module status
lsmod | grep overlay
lsmod | grep br_netfilter
If kernel modules are enabled, you will see the following output.
5. Once verified, run the following command to create a new Kernel parameters configuration file (/etc/sysctl.d/kubernetes.conf).
This command performs the following:
- Enables the bridge network (
net.bridge) on Linux servers viaiptables
- Enables the port-forwarding (ip_forward), which the Kubernetes CNI plugin will use.
# setting up kernel parameters via config file
cat <<EOF | sudo tee /etc/sysctl.d/kubernetes.conf
net.bridge.bridge-nf-call-iptables  = 1
net.bridge.bridge-nf-call-ip6tables = 1
net.ipv4.ip_forward                 = 1
EOF
6. Lastly, run the following sysctl command below to apply new kernel parameters without restarting the system.
# Applying new kernel parameters
sudo sysctl --system
You will see the output of all kernel parameters being applied at the current session, including the config file (/etc/sysctl.d/kubernetes.conf), as shown below.

Disabling SWAP
For every Kubernetes deployment, you must disable SWAP on all instances/servers. Doing so allows you to get better performance for your application deployment on Kubernetes and lets the kubelet service (main Kubernetes service) work properly.
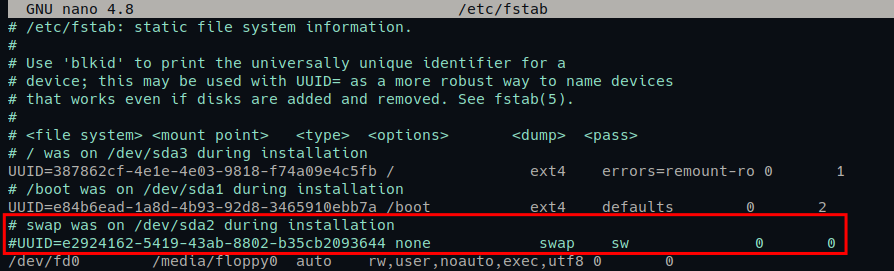
1. Open the configuration file /etc/fstab using your preferred editor.
2. Comment out the SWAP line by adding the # symbol at the beginning of the line. Below is an example of SWAP configuration on the /etc/fstab file.
3. Now, run the following swapoff command to disable SWAP. This command does not provide output, but you will verify the SWAP’s status in the next step.
sudo swapoff -a4. Lastly, check the SWAP status using the following command.
# checking SWAP via /procs/swaps
cat /proc/swaps

# checking SWAP via command free -m
sudo free -m
If your SWAP is disabled, you will see the output like the following.

Securing Kubernetes Cluster by Setting up a Firewall
In a production environment, you must turn on the firewall for your Kubernetes cluster. For Ubuntu servers, you will use the UFW (Uncomplicated Firewall). So, be sure you have configured and enabled the UFW firewall.
Note: You may have different ports that you need to open, depending on the CNI plugin you will use for your cluster.
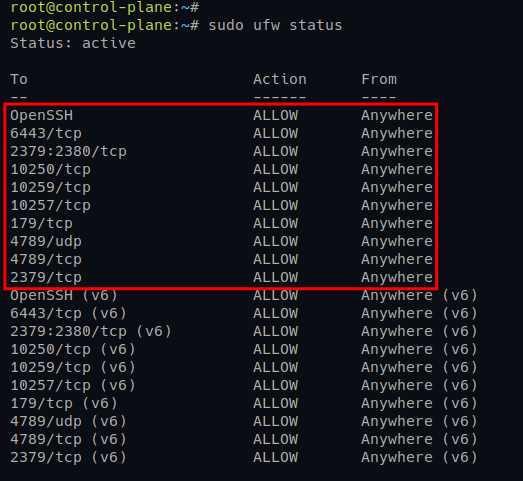
1. Move to the control-plane server and run the following ufw commands to open ports for the Kubernetes Control Plane.
All these ports are required by the Kubernetes Control Plane and the Calico CNI plugin.
# Opening ports for Control Plane
sudo ufw allow 6443/tcp
sudo ufw allow 2379:2380/tcp
sudo ufw allow 10250/tcp
sudo ufw allow 10259/tcp
sudo ufw allow 10257/tcp
# Opening ports for Calico CNI
sudo ufw allow 179/tcp
sudo ufw allow 4789/udp
sudo ufw allow 4789/tcp
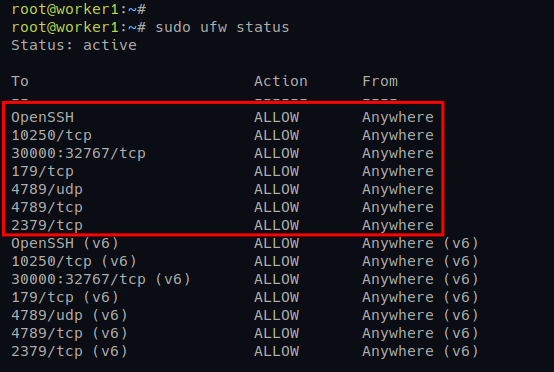
sudo ufw allow 2379/tcp2. Next, move to the worker1 and worker2 servers and run the following ufw commands.
The main Worker Nodes port 10250 is used for Kubernetes API, and the range ports 30000:32767 will be used by pods.
# Opening ports for Worker Nodes
sudo ufw allow 10250/tcp
sudo ufw allow 30000:32767/tcp

# Opening ports for Calico CNI
sudo ufw allow 179/tcp
sudo ufw allow 4789/udp
sudo ufw allow 4789/tcp
sudo ufw allow 2379/tcp
3. Lastly, run the following command to check the firewall status and verify the open ports on the UFW firewall list.
sudo ufw statusBelow you can see the output from both Kubernetes Control Plane and Worker Nodes.
Installing the CRI-O Container Runtime
CRI-O is an OCI-based implementation of Kubernetes container runtime optimized for Kubernetes deployment. CRI-O is a lightweight container runtime that can be used as an alternative to Docker.
CRI-O supports the following:
- Multiple container images, including Docker images.
- Numerous image registries, which include trust and image verification.
CRI-O manages the lifecycle of containers and provides a utility conmon used to monitor the containers and handle logging.
But before taking advantage of CRI-O, you first have to install CRI-O from the third-party repository and configure it as the container runtime for the Kubernetes Cluster deployment.
1. Run the following command to create a new environment variable for the Ubuntu and CRI-O versions. The OS is xUbuntu_20.04, and the CRI-O VERSION is 1.25.
# Creating environment variable $OS and $VERSION
export OS=xUbuntu_20.04
export VERSION=1.25
2. Next, run the below command to add the CRI-O repository.
# Adding CRI-O repository for Ubuntu systems
echo "deb [signed-by=/usr/share/keyrings/libcontainers-archive-keyring.gpg] <https://download.opensuse.org/repositories/devel:/kubic:/libcontainers:/stable/$OS/> /" > /etc/apt/sources.list.d/devel:kubic:libcontainers:stable.list
echo "deb [signed-by=/usr/share/keyrings/libcontainers-crio-archive-keyring.gpg] <https://download.opensuse.org/repositories/devel:/kubic:/libcontainers:/stable:/cri-o:/$VERSION/$OS/> /" > /etc/apt/sources.list.d/devel:kubic:libcontainers:stable:cri-o:$VERSION.list
3. Once added, run the following commands to download (curl) the GPG key of the CRI-O repository.
# Creating directory /usr/share/keyrings
mkdir -p /usr/share/keyrings

# Downloading GPG key for CRI-O repository
curl -L <https://download.opensuse.org/repositories/devel:/kubic:/libcontainers:/stable/$OS/Release.key> | gpg --dearmor -o /usr/share/keyrings/libcontainers-archive-keyring.gpg
curl -L <https://download.opensuse.org/repositories/devel:/kubic:/libcontainers:/stable:/cri-o:/$VERSION/$OS/Release.key> | gpg --dearmor -o /usr/share/keyrings/libcontainers-crio-archive-keyring.gpg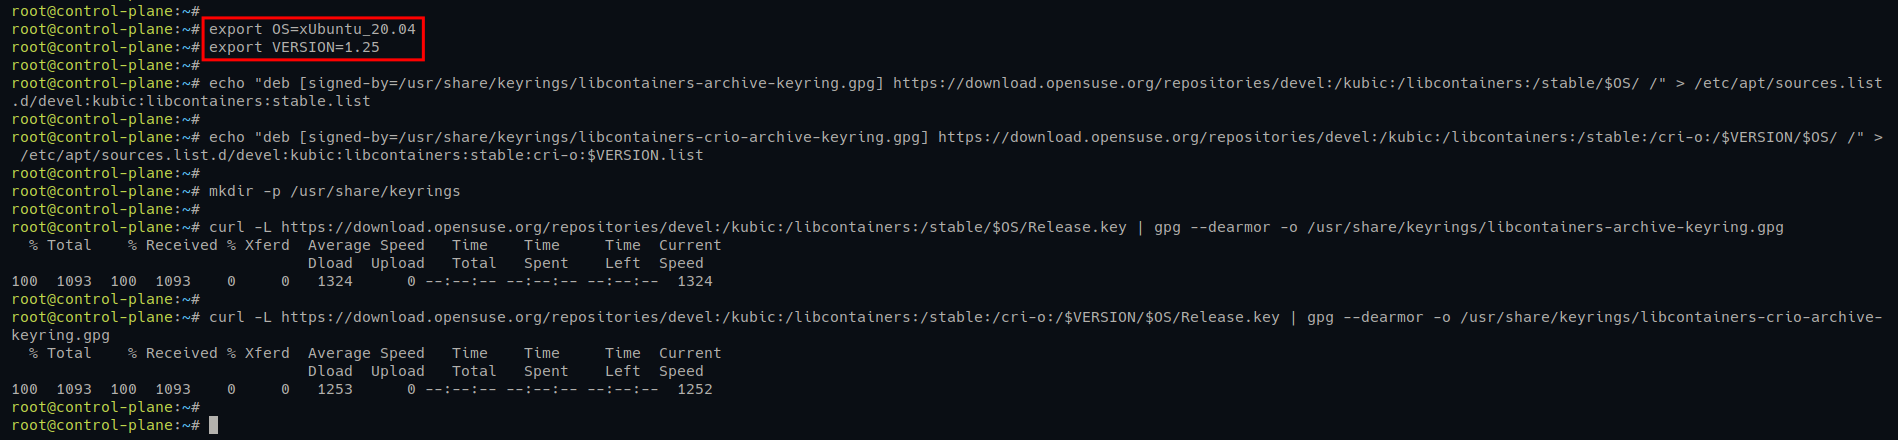
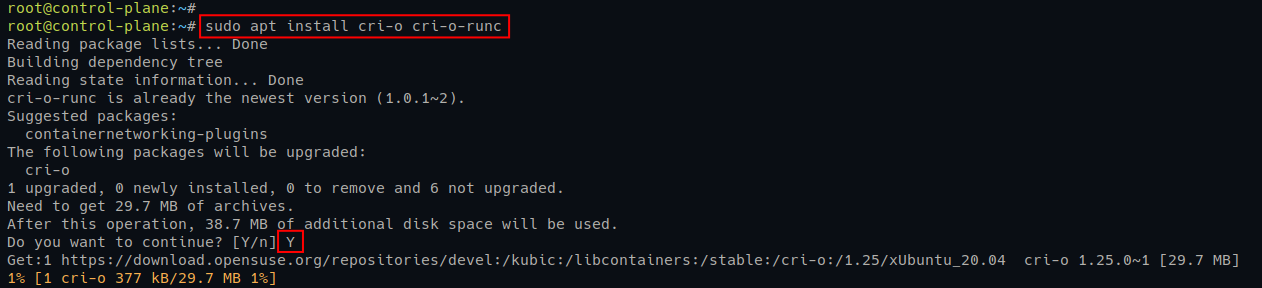
4. Now, run the following commands to update and refresh repositories and install the CRI-O container runtime.
# Update and refresh package index
sudo apt update

# Install CRI-O container runtime
sudo apt install cri-o cri-o-runc
Input Y and press Enter when prompted to confirm the installation.
5. Once CRI-O is installed, edit the default CRI-O configuration file (/etc/crio/crio.conf) using your preferred editor.
Under the [crio.network] section, uncomment the following options:
- network_dir – stores CNI configuration files
- plugin_dirs – the path of CNI plugin binary files.
The configuration file should look like the one below.

6. Next, open the CNI plugin config file (/etc/cni/net.d/100-crio-bridge.conf) using your preferred editor and define the network subnet IP address for pods.
Look for the ranges line and add a network subnet for pods. In this example, pods will have an IP address of 10.42.5.0/24, as shown below.

7. Now, run the following systemctl command to restart the CRI-O service (crio) and apply new changes. This command does not provide output, but you will verify the service status in the next step.
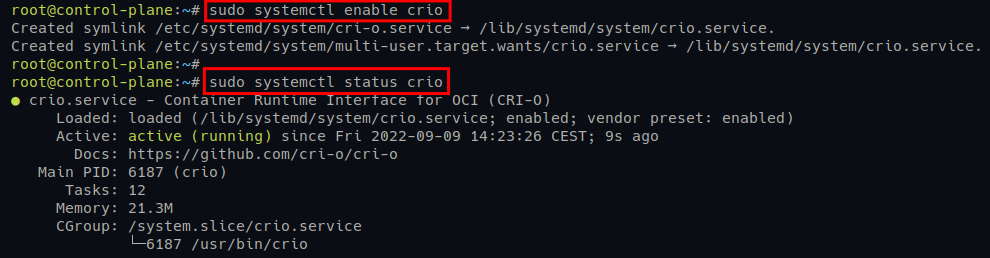
sudo systemctl restart crio8. Lastly, run each command below to enable and verify the CRI-O service status.
# Enabling CRI-O service to start at boot
sudo systemctl enable crio

# Checking CRI-O service status
sudo systemctl status crio
If the CRI-O service runs, you will see a similar output as the following.
Installing Kubernetes Packages
Now that you have installed the CRI-O container runtime on your systems, it is time to install Kubernetes packages.
These packages include the following:
kubeadm– for bootstrapping the Kubernetes Cluster.kubelet– main Kubernetes service.kubectl– for a command line for managing Kubernetes Cluster.
1. Run the following commands to download the GPG key of the Kubernetes repository, and add the Kubernetes repository for the Ubuntu system.
# Adding GPG key for Kubernetes repository
sudo curl -fsSLo /usr/share/keyrings/kubernetes-archive-keyring.gpg <https://packages.cloud.google.com/apt/doc/apt-key.gpg>

# Adding Kubernetes repository
echo "deb [signed-by=/usr/share/keyrings/kubernetes-archive-keyring.gpg] <https://apt.kubernetes.io/> kubernetes-xenial main" | sudo tee /etc/apt/sources.list.d/kubernetes.list
2. Next, run the apt update command to update and refresh your package repository and index.
sudo apt updateYou will see the Kubernetes repository is added, as shown below.

3. Once updated, run the command below to install Kubernetes packages kubeadm, kubelet, and kubeadm.
sudo apt install kubelet kubeadm kubectlWhen prompted, input Y and press Enter to confirm the installation.

4. Now, run the following command to disable automatic update for Kubernetes packages kubelet, kubeadm, and kubeclt. Doing so prevents version skew between Kubernetes packages.
sudo apt-mark hold kubelet kubeadm kubectl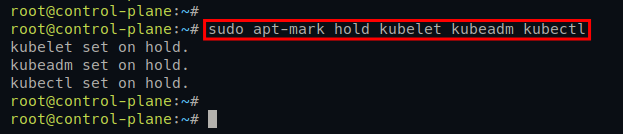
Initializing Kubernetes Control Plane
At this point, you have configured Ubuntu servers for Kubernetes cluster deployment and installed the CRI-O container runtime and Kubernetes packages. The next step is initializing the Kubernetes Control plane on the server control-plane.
The Control Plane is the brain of the Kubernetes Cluster, which contains essential components for Kubernetes, such as:
kube-apiserver– exposes Kubernetes API.etcd– for storing all data about the cluster.kube-scheduler– handles pods lifecycle between nodes.
To initialize the Kubernetes Control Plane:
1. Run the below kubeadm command to download (pull) container images for Kubernetes
sudo kubeadm config images pull
2. Once downloaded, run the below kubeadm command to initialize (init) the Kubernetes Cluster, where the options perform the following:
-pod-network-cidr - determine the network subnet for pods, in this example, 10.42.5.0/24, which must be matched with the CRI-O bridge configuration (/etc/cni/net.d/100-crio-bridge.conf) and the CNI plugin that you will use.
- -apiserver-advertise-address – sets which IP address to use when running the Kubernetes API. In this example, the Kubernetes API will run the control-plane internal IP address 172.16.1.10.
- -cri-socket – sets the path of the container runtime socket to use for your Kubernetes Cluster. The default CRI-O socket is available at /var/run/crio/crio.sock.
sudo kubeadm init --pod-network-cidr=10.42.5.0/24 \\
--apiserver-advertise-address=172.16.1.10 \\
--cri-socket=unix:///var/run/crio/crio.sock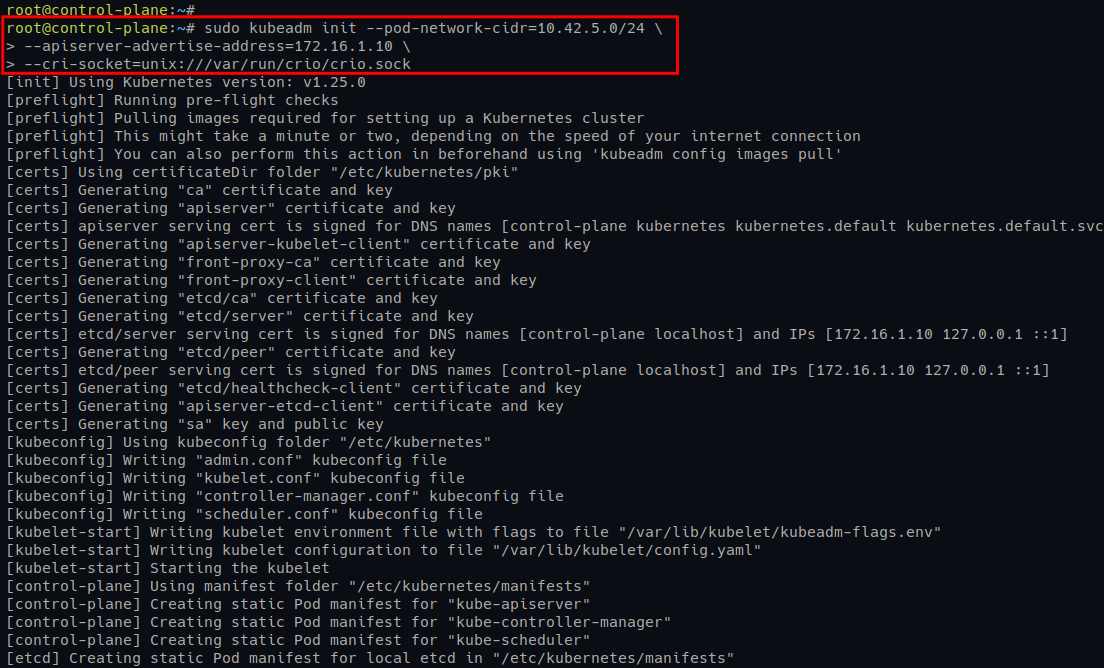
Once the Kubernetes Control Plane is initialized, you will see the following output with some instructions as follows:
- Setting up Kubernetes admin credentials.
- Deploying the CNI plugin.
- Adding worker nodes to the Kubernetes Cluster.
Ensure you note down the output.
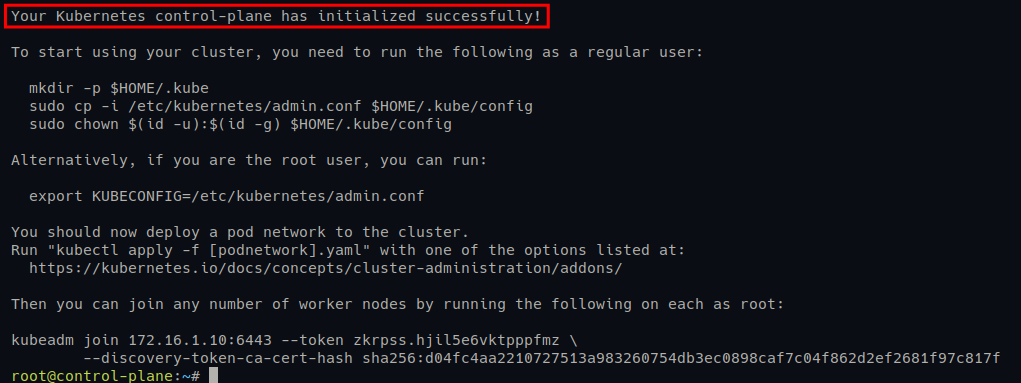
3. Next, run the following commands to set up Kubernetes credentials, which allows you to manage Kubernetes Cluster via the kubectl.
Note that these commands do not provide output, but you will confirm the cluster information in the following step.
# Setting up Kubernetes credentials
mkdir -p $HOME/.kube
sudo cp -i /etc/kubernetes/admin.conf $HOME/.kube/config
sudo chown $(id -u):$(id -g) $HOME/.kube/config
4. Lastly, run either of the commands below to check your Kubernetes Cluster information.
# Checking Kubernetes Cluster info
kubectl cluster-info

# Checking Kubernetes Cluster info in details
kubectl cluster-info dump
Below, you can see the Kubernetes Control Plane and CoreDNS are running.

Deploying Calico Networking for Kubernetes
Now that you have initialized the Kubernetes Control Plane, you are ready to deploy the Pod networking add-on. This add-on lets you manage pods networking to the control-plane server.
There are many Pod networking add-ons for Kubernetes that you can use. But, in this example, you will use Calico. Calico is open-source networking and network security solution for multiple environments, including containers and virtual machines.
In addition, Calico is a flexible network solution that supports multiple data planes, such as Linux eBPF, standard Linux networking, and Windows HNS.
To deploy the Calico Networking on Kubernetes:
1. Run the curl command below to download the Calico YAML manifest file (calico.yaml).
curl https://docs.projectcalico.org/manifests/calico.yaml -O
2. Next, open the file calico.yaml in your editor, uncomment the CALICO_IPV4POOL_CIDR section and input the network subnet for pods. In this example, the network subnet for pods is 10.42.5.0/24.

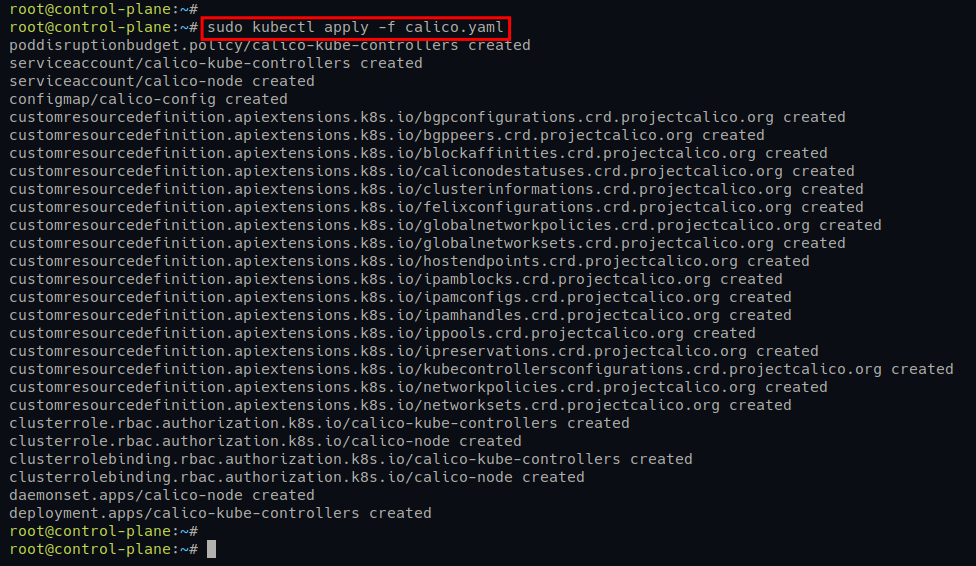
3. Now, run the below command to deploy (apply) the Calico manifest file (calico.yaml).
sudo kubectl apply -f calico.yamlYou will see the following output. And the new pods for Calico will be deployed.
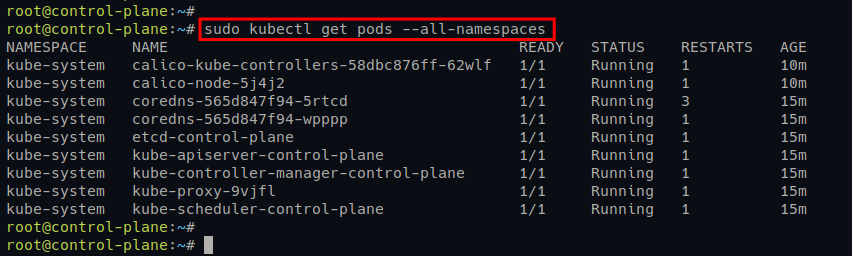
4. Lastly, run the following kubectl command to get all available pods on your Kubernetes Cluster.
sudo kubectl get pods --all-namespacesIf your Calico Networking deployment is successful, you will see Calico pods on your Kubernetes Cluster running, as shown in the screenshot below.
Adding Kubernetes Worker Nodes
The Kubernetes Control Plane is running, and the Calico networking is deployed. But you need a way to handle the workloads of your application deployment. How? Add worker nodes to your Kubernetes Cluster so that when you deploy applications to Kubernetes, the application will run on worker nodes.
The worker nodes have three main components: the kubelet service, the container runtime (i.e., CRI-O), and the kube-proxy.
To add worker nodes to the Kubernetes Cluster:
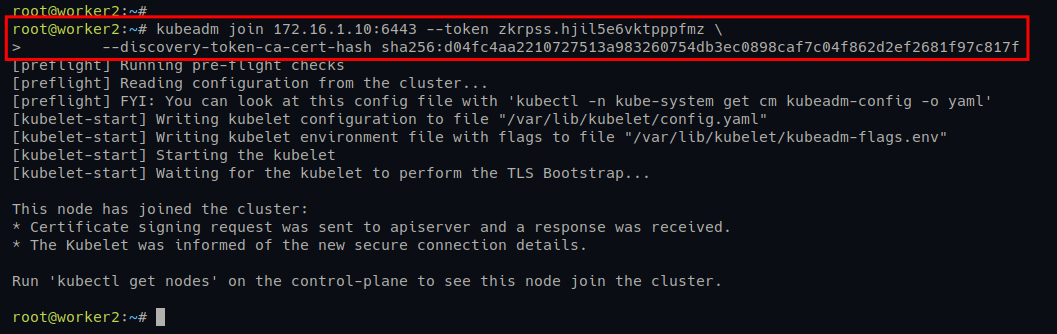
1. Run the following kubeadm join command on worker1 and worker2 servers to add them to the Kubernetes Cluster.
kubeadm join 172.16.1.10:6443 --token zkrpss.hjil5e6vktpppfmz \\
        --discovery-token-ca-cert-hash sha256:d04fc4aa2210727513a983260754db3ec0898caf7c04f862d2ef2681f97c817f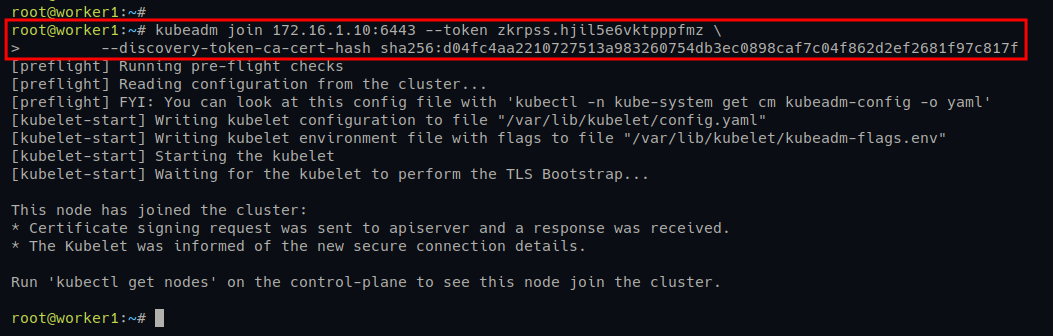
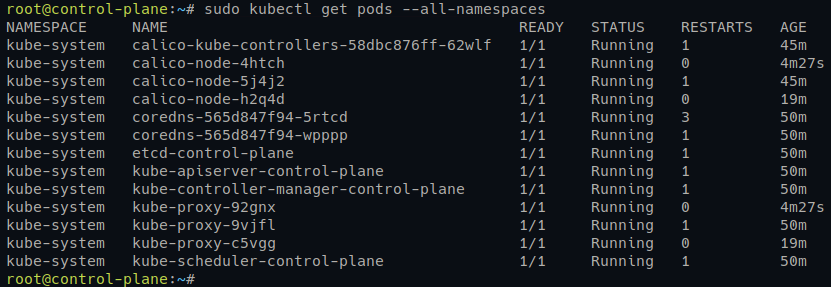
2. Next, switch back to the control-plane server and run the kubectl command below to check all pods on the Kubernetes Cluster.
kubectl get pods --all-namespacesYou will see multiple versions of pods, such as calico and kube-proxy, which also run on worker nodes.
3. Lastly, run the kubectl commands below to verify the list of nodes on your Kubernetes Cluster.
# Checking nodes on Kubernetes Cluster
kubectl get nodes

# Checking nodes on Kubernetes Cluster complete version
kubectl get nodes -o wide
If your worker nodes deployment is successful, you will see worker1 and worker2 servers on the list of Kubernetes nodes with the Ready status.
You will also see the details of OS for all nodes, kernel version, and the current container runtime you are using.

Conclusion
In this tutorial, you have learned how to deploy Kubernetes Cluster with CRI-O container runtime and Calico Networking plugin on Ubuntu servers. At this point, you can now confidently deploy your containerized applications with the CRI-O Container Runtime.
Now, why not build upon this newfound knowledge? Perhaps try creating a deployment for stateless and stateful applications?


