


Sure enough, comparing files or file contents in Windows is one thing you’ve been doing through the years. But doesn’t eyeballing files and contents strain your eyes at some point? Well, lucky for you, you can compare objects with PowerShell the way you want to with the Compare-Object command.
In this tutorial, you’ll learn to compare objects with PowerShell, like files or file contents, while customizing the output.
Save your eyes the strain and effectively compare objects!
Prerequisites
This tutorial will be a hands-on demonstration, but so long as you have a Windows PC with PowerShell, you’re good to go. PowerShell version 5.1 is used in this tutorial.
Comparing File Contents
Imagine you’re keeping two different files with the same content. How would you know if both files keep the same content? Running the Get-Content command can be the solution. The Get-Content command retrieves the content of a file from a specified location.
Open PowerShell, and run the below commands to get the content (Get-Content) of the specified files into variables ($file1 and $file2). Replace the path below with your chosen files’ path to compare.
# Grab the content of the text files into variables
$file1 = Get-Content C:\\Temp\\File1.txt
$file2 = Get-Content C:\\Temp\\File2.txt

Now, run the Compare-Object command below to compare contents of $file (-ReferenceObject) with $file2 (-DifferenceObject).
By default, Compare-Object does not show the values present in both variables. As a solution, add the -IncludeEqual parameter to show the values in the output.
Compare-Object -ReferenceObject $file1 -DifferenceObject $file2 -IncludeEqual
From the output below, the SideIndicator tells whether both files have the same content (per line) or not:
| SideIndicator | Definition |
| == | Indicates the content is present in both files ($file1 and $file2). |
| => | Indicates the content only exists in the -DifferenceObject file ($file2). |
| => | Indicates the content only exists in the -ReferenceObject file ($file1). |

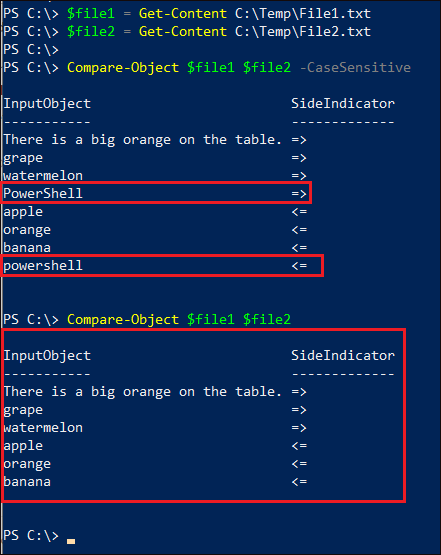
Perhaps you prefer to compare strings with case sensitivity. If so, append the -CaseSensitive parameter since the Compare-Object command is not case-sensitive by default.
Run the below commands to compare $file1 with $file2, both with and without case-sensitivity.
# Comparing file contents with the -CaseSensitive parameter
Compare-Object $file1 $file2 -CaseSensitive
# Comparing file contents without the -CaseSensitive parameter
Compare-Object $file1 $file2
As you can see below, without the -CaseSensitive parameter, the Compare-Object command doesn’t show powershell in the output.
Comparing strings also works is similar to comparing file contents, where you can either specify the strings or use variables to represent the strings to compare. Bear in mind that the
Compare-Objectcommand compares source strings and not characters.
Comparing Lists of Files from Different Locations
Now that you know how to compare file contents, why not compare actual files from different locations? Comparing lists of files comes in handy when you’re managing two different servers where you keep the same folder for a service containing the same files.
This time, you’ll use the Get-ChildItem command to get the list of files in a folder to compare with another folder’s list of files.
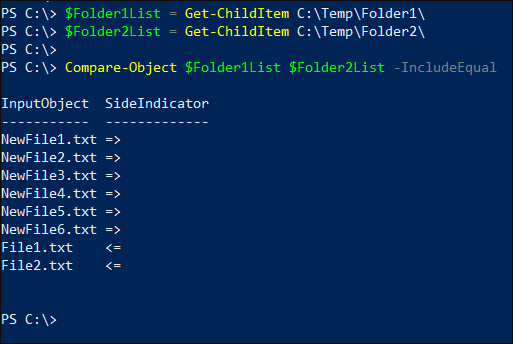
Run the below commands to get the lists of files from C:\Temp\Folder1\ and C:\Temp\Folder2 folders and store the lists in the $Folder1List and $Folder2List variables.
# Capture the list of file names into variables
$Folder1List = Get-ChildItem C:\\Temp\\Folder1\\
$Folder2List = Get-ChildItem C:\\Temp\\Folder2\\
# Comparing the lists
Compare-Object $Folder1List $Folder2List -IncludeEqual
You can also use
-Recurseparameter in theGet-Childitemcommand to recursively retrieve a list of files in subfolders.
Compare Objects with PowerShell by Properties
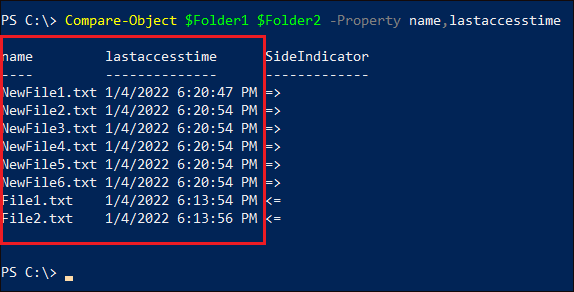
You’ve just compared files in different locations, but you may want to add another option to compare files by properties. And in this demo, you’ll compare files by lastaccesstime.
Run the following commands to compare files from different folders ($Folder1 and $Folder2) by lastaccesstime.
# Retrieve list of files from specified files
$Folder1 = Get-ChildItem C:\\Temp\\Folder1\\ -Recurse
$Folder2 = Get-ChildItem C:\\Temp\\Folder2\\ -Recurse
# Compare files by lasttimeaccess with file names
Compare-Object $Folder1 $Folder2 -Property name,lastaccesstime
Comparing Processes and Services
The Compare-Object command’s capabilities are not limited to just comparing strings or content in files. You can also compare processes, services, and so on.
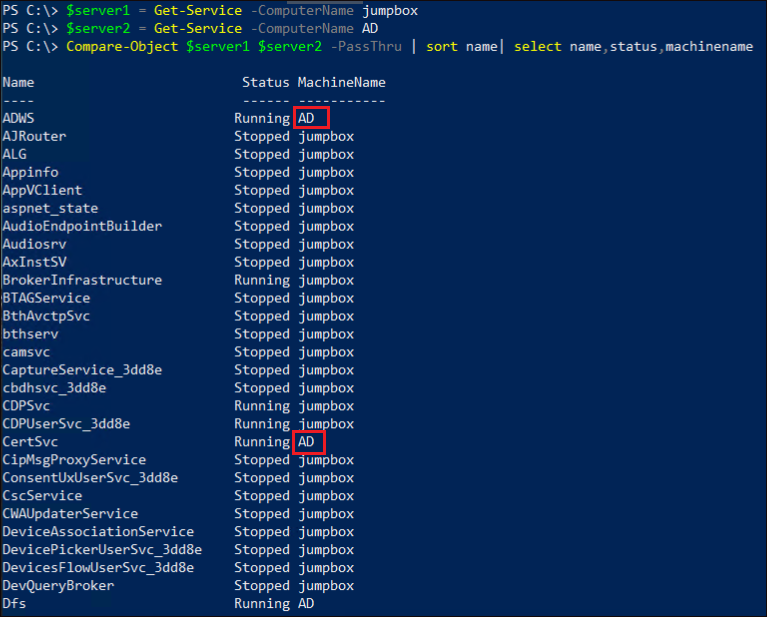
Perhaps you want to capture services between two servers. If so, you can store the services into variables and compare the services.
Run the following commands to compare services between two different servers ($server1 and $server2).
# capture the services list into variables
$server1 = Get-Service -ComputerName jumpbox
$server2 = Get-Service -ComputerName AD
# compare services on both the servers and sort them as per the service name
Compare-Object $server1 $server2 -PassThru | sort name| select name,status,machinename
If you prefer to compare processes, the commands to execute are similar to comparing services. You can also compare processes on the same machine or two different servers.
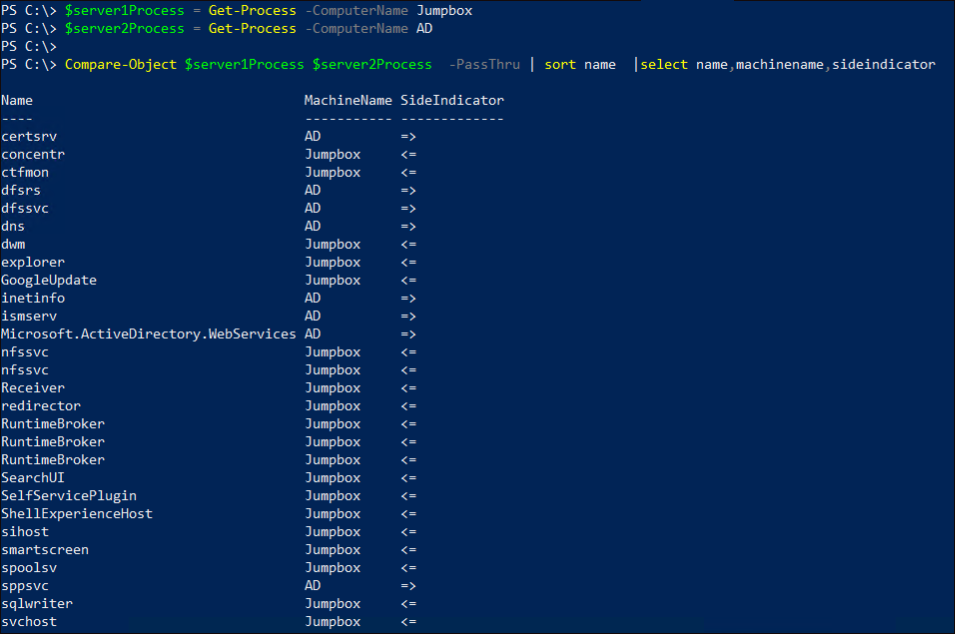
Run the below commands to capture running processes from two machines (Jumpbox and AD servers) into variables and compare them.
# Get process list from remote servers into PowerShell variables
$server1Process = Get-Process -ComputerName Jumpbox
$server2Process = Get-Process -ComputerName AD
# Compare processes from two servers and list process names and the corresponding server name in the output
Compare-Object $server1Process $server2Process -PassThru | sort name  |select name,machinename,sideindicator
Identifying Activities by Comparing Lists of Processes
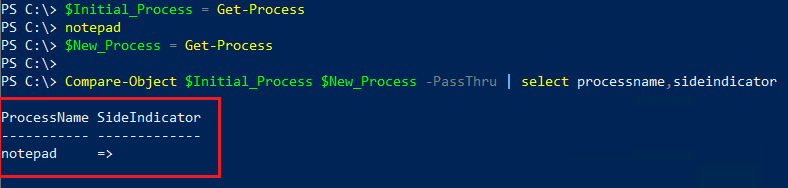
The Compare-Object cmdlet is also helpful in some troubleshooting scenarios. How? You can capture current running processes into a variable and start your activity. You then capture the running processes into a new variable and compare the new processes.
Run the below commands to identify activities by comparing two different lists of captured processes.
# Capture processes before starting your activity.
$Initial_Process = Get-Process
# Open notepad (your activity)
notepad
# Capture processes after your activity completes.
$New_Process = Get-Process
# Comparing Initial and New Process
Compare-Object $Initial_Process $New_Process -PassThru | select processname,sideindicator
Comparing Users Between Different Active Directory Groups
If you’re managing the same set of users from different AD groups, comparing the list of users with the Compare-Object command will come in handy. Doing so lets you keep a close watch if a user is missing from either of the two different AD groups.
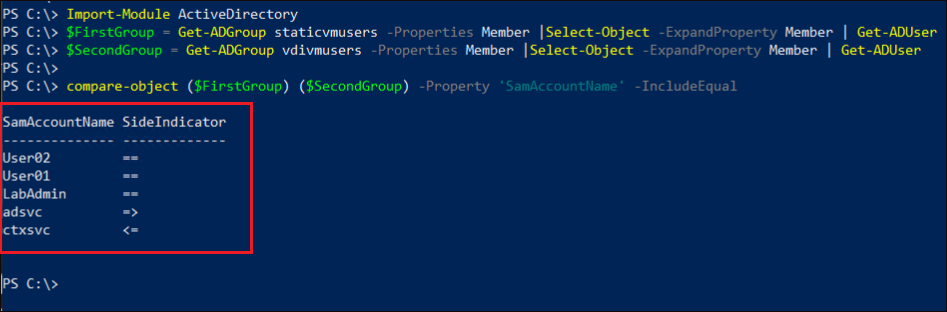
Run the below commands to compare users between two different AD groups (staticvmusers and vdivmusers).
# Import Active directory module to run Get-ADGroup and Get-ADUser commands.
Import-Module ActiveDirectory
# Store users list from different AD groups into variables.
$FirstGroup = Get-ADGroup staticvmusers -Properties Member |Select-Object -ExpandProperty Member | Get-ADUser
$SecondGroup = Get-ADGroup vdivmusers -Properties Member |Select-Object -ExpandProperty Member | Get-ADUser
#Run compare-object cmdlet to compare users in those two AD groups.
Compare-Object ($FirstGroup) ($SecondGroup) -Property 'SamAccountName' -IncludeEqual
Conclusion
In this tutorial, you’ve learned dabs of how to compare objects with PowerShell in many ways, from file contents to users in AD groups. You’ve realized that the Compare-Object cmdlet is a quick solution to comparing files, services, processes, and so on.
You’ve gained the basic knowledge of using the Compare-Object cmdlet. Now, why not build on this newfound knowledge by learning powerful PowerShell compare arrays?


