

So you’ve installed a new Linux server. Wouldn’t it be nice if you didn’t have to memorize and issue commands to do the initial configuration and ongoing maintenance? Lucky for you, there’s a tool for it, and it’s the Cockpit Linux web console.
Cockpit is a web-based interface for Linux servers with a friendly interface where you can manage storage, networking, firewall, and containers, to name a few. You can even open a terminal session right on your web browser for when you need to break out the command line!
In this tutorial, you’ll learn how to install Cockpit on a Linux server. You’ll also learn to manage a Linux server using the Cockpit Linux dashboard through the web browser.
Prerequisites
You only need a Linux server with an internet connection and root access to follow this tutorial. This tutorial will be using a Rocky Linux 8.5 server, which is RedHat Enterprise Linux (RHEL)-based.
Cockpit supports other Linux distributions, such as Ubuntu, Debian, and Arch Linux.
Installing the Cockpit Linux Web Console
Before you can start managing a Linux server with Cockpit, you’ll be installing Cockpit packages to your server. And like any package, you can conveniently install Cockpit using your distro’s package manager, which, in this example, is the DNF package manager.
Follow the below steps to install Cockpit.
1. Open your preferred SSH client and log in to your server.
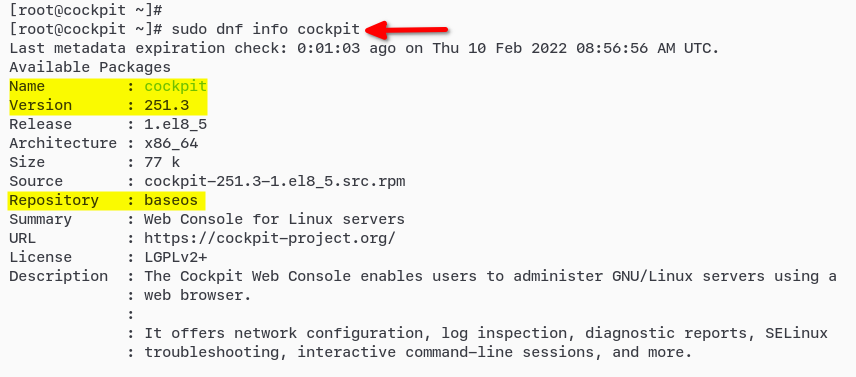
2. Run the dnf command below to check the available cockpit packages.
# checking Cockpit package
sudo dnf info cockpit
As you can see below, the latest available cockpit package is 251.3, as of this writing.
3. Now, run the below command to install the Cockpit Linux package.
# installing Cockpit
sudo dnf install cockpit -y
4. After installing, run the below systemctl commands to start and confirm the cockpit service.
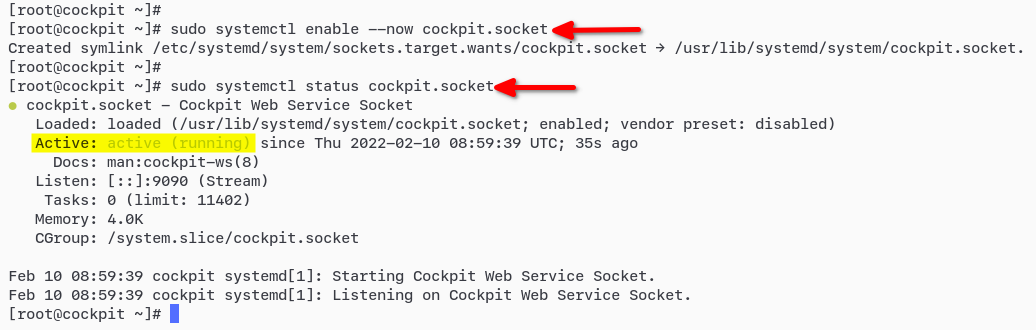
# start and enable Cockpit service
sudo systemctl enable --now cockpit.socket

# verify Cockpit service
sudo systemctl status cockpit.socket
You should see the output as below. The cockpit service status is active (running) and enabled — which means that the service will automatically run at system startup.
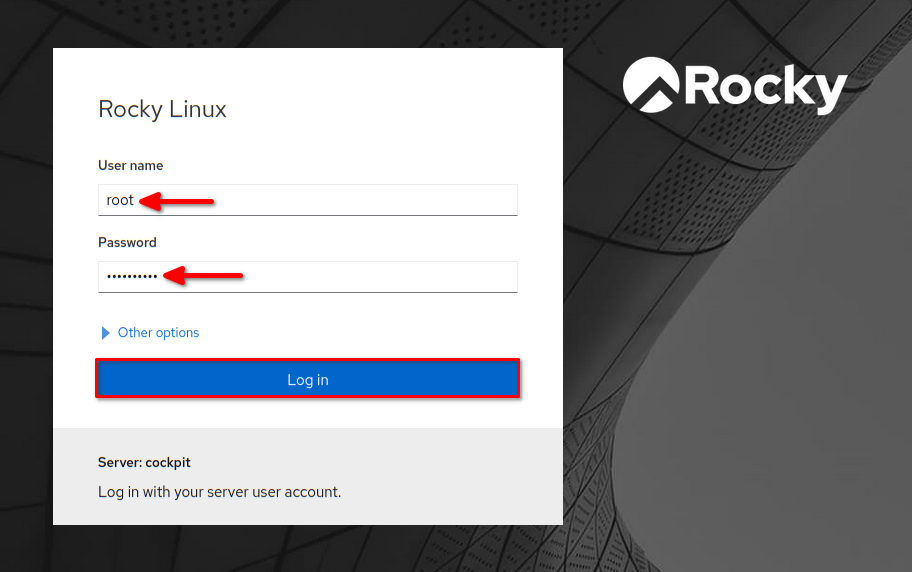
5. Lastly, open your web browser, and navigate to your server IP address followed by the default listening port 9090 (i.e., https://172.16.1.20:9090/) to access the Cockpit web application.
You should see the Cockpit login page. Enter the server root user and password, then click the Log in button to log in to the Cockpit dashboard.
And below is the screenshot of the Cockpit Linux dashboard.
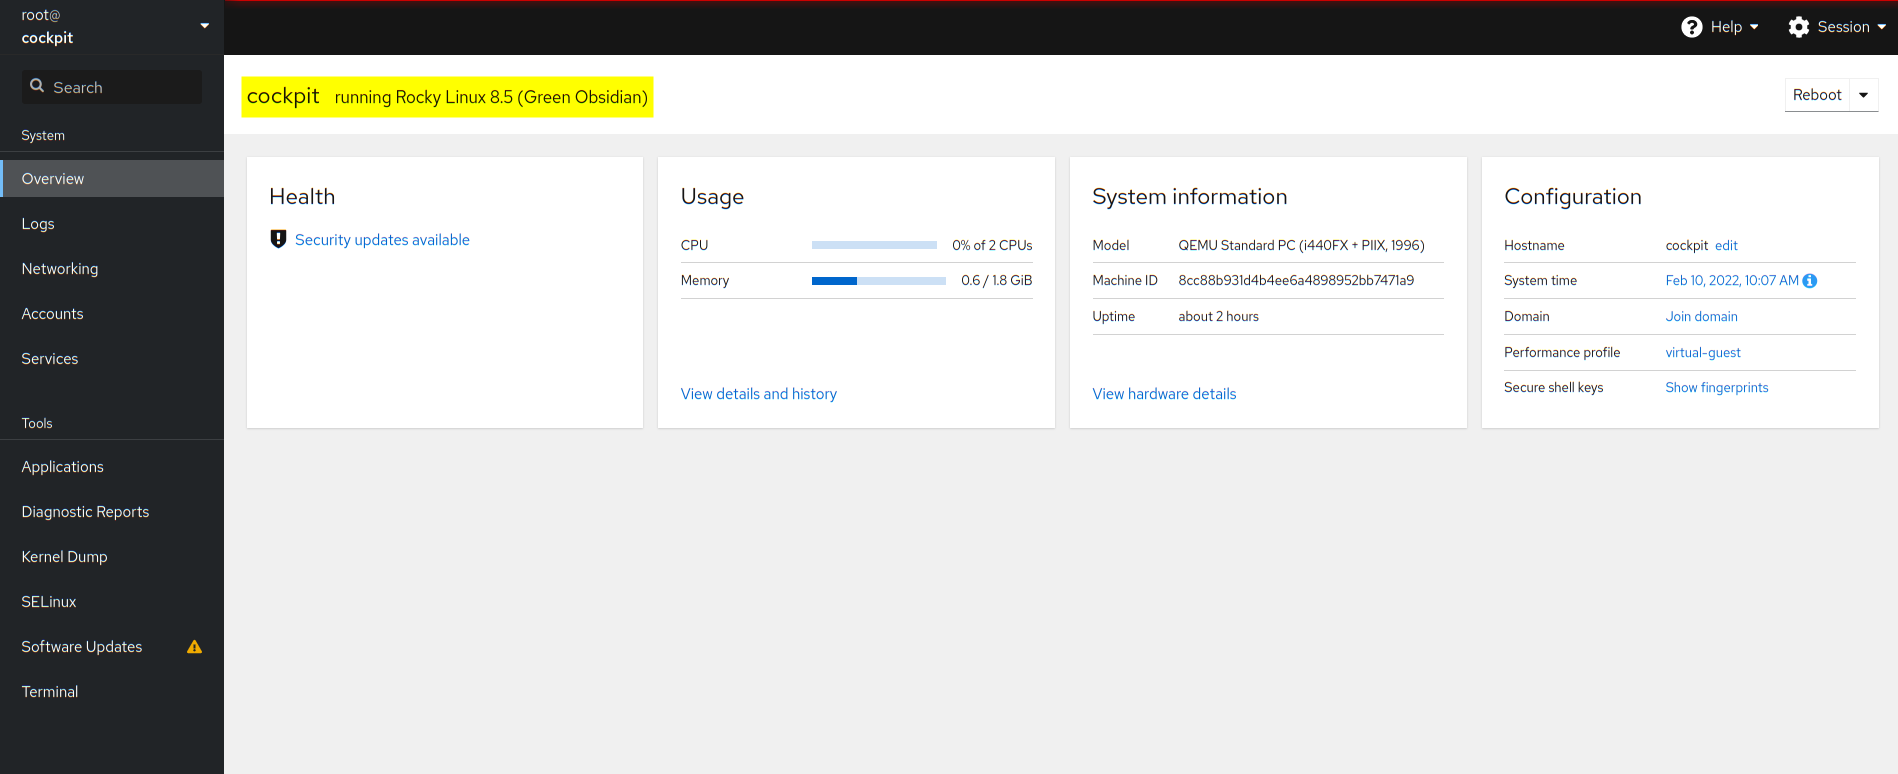
Managing Your Server with Cockpit Linux
Now that you’ve installed Cockpit Linux, the following sections will teach you how to manage and configure your Linux server. Usually, you would establish a terminal session to configure these, but these settings are a few clicks away with Cockpit.
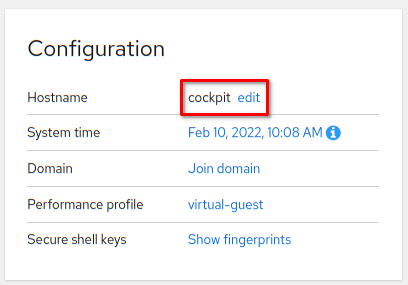
Updating Hostname and System Time
The first items you would typically configure are the server hostname, FQDN, and time zone. These initial configuration items ensure that you establish the server’s identity and update the computer clock synchronization.
1. On the Cockpit Overview page, locate the Configuration section and click the edit link next to the Hostname.
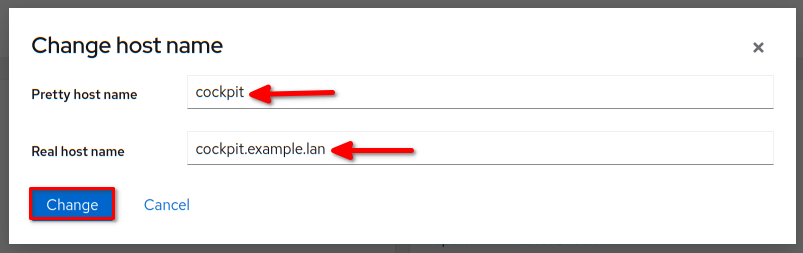
2. Type in the Pretty host name to display on the user interface and the FQDN of the server into the Real host name field. Click Change to apply the changes.
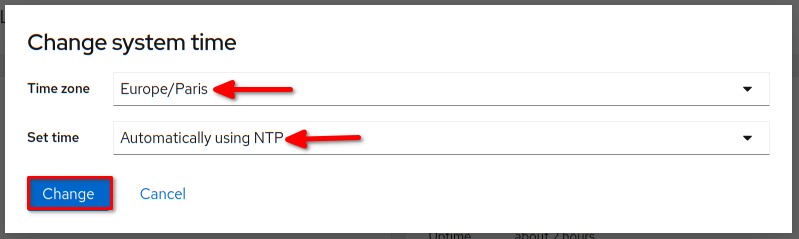
3. Also, on the Configuration section, click the current time on the system time field to change the time and time zone.
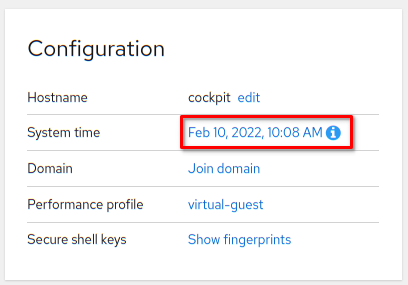
4. Now change the Time zone to your preferred time zone and choose the option Automatically using NTP to set up the time.
The Automatically using NTP option allows Cockpit to use the NTP service to synchronize the computer clock.
Provisioning a Server Administrator Account
After you’ve configured the FQDN and system time, you’ll now set up a new user. In this example, you’ll create a server administrator account so that others won’t need to log in as root.
For security reasons, the best practice is to use non-root users to log in to Cockpit and SSH applications.
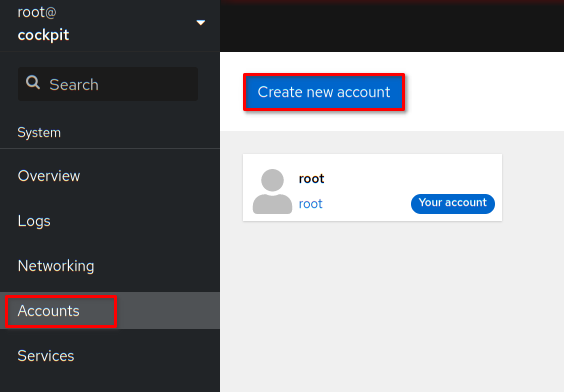
1. Click on the Accounts menu on the left side, and you should get the list of users on your system. Click the Create new account button to create a new user.
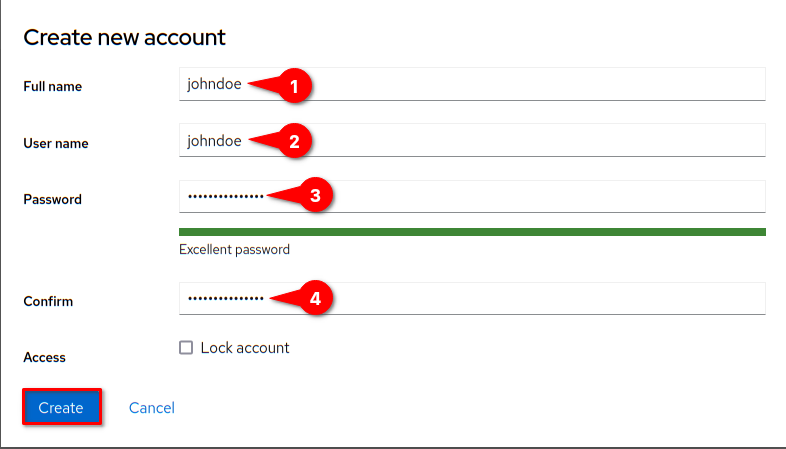
2. Enter the new account’s username and password on the popup window, and click Create. This demo is creating a new user named johndoe.
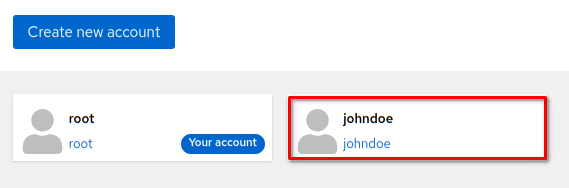
3. On the Accounts page, click the new account you’ve created (johndoe) to open the account’s information page.
4. Now, check the Server administrator box next to Roles. This step adds johndoe to the wheel group and allows the sudo command to get the root privileges.
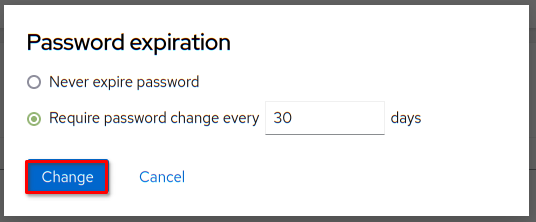
5. Click edit on the Password section to set up the password expiration.
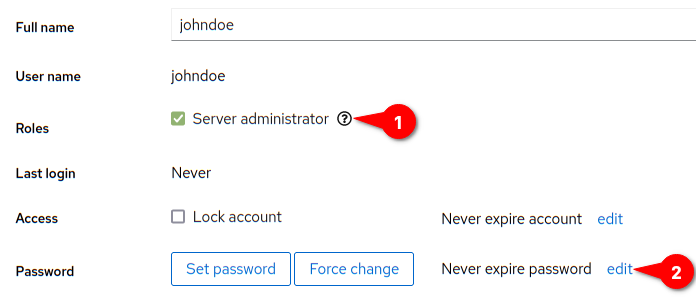
6. Select the option to Require password change on the password-expiration popup and input the max days for password expiration. Click the Change button to apply new changes.
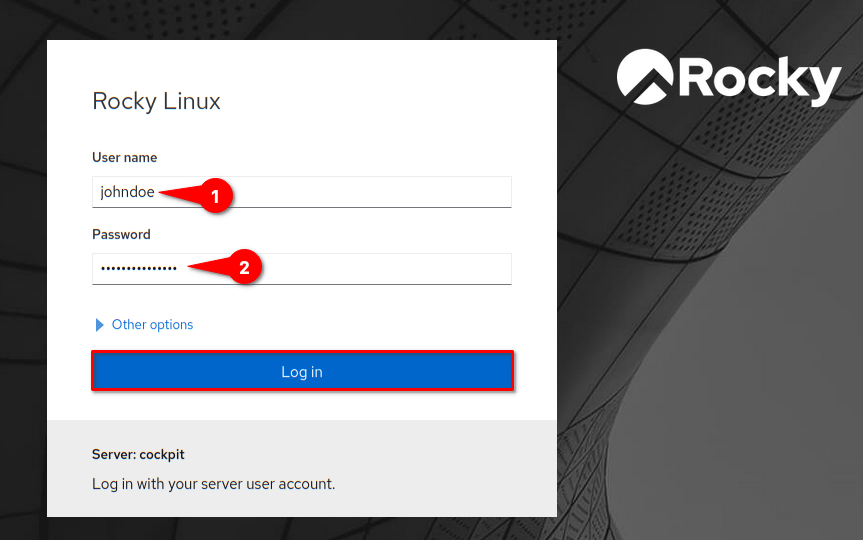
7. Next, click the Session menu on the top right, then select Log out.

8. Log in again with the new user, johndoe.
9. You should see the message Web console is running in limited access mode. Click the button Turn on administrative access to get full access to the Cockpit administration. Clicking this button is equivalent to issuing the sudo su command in the terminal to elevate access.
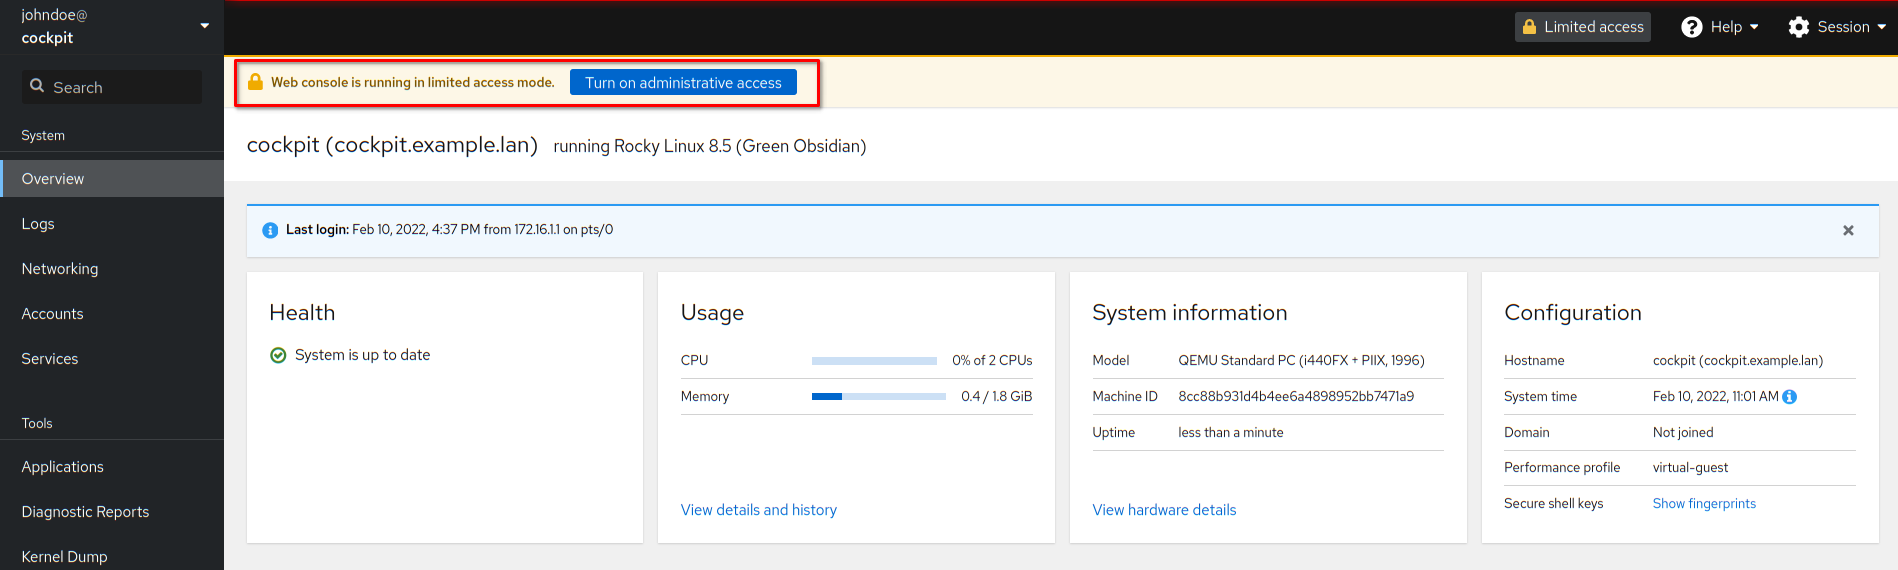
10. Input the password for your user and click Authenticate.

11. Now you will see at the top-right menu the indicator Administrative access, which means the administration for Cockpit is enabled.

Accessing the Terminal
You’ve now created a new user using the Cockpit dashboard; the next step is accessing the server terminal from the Cockpit Linux dashboard and verifying the sudo root privileges.
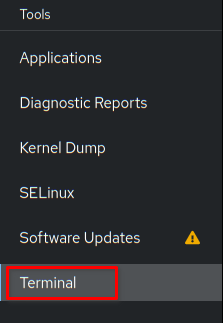
1. Click the menu Terminal on the left side to access the server terminal session.
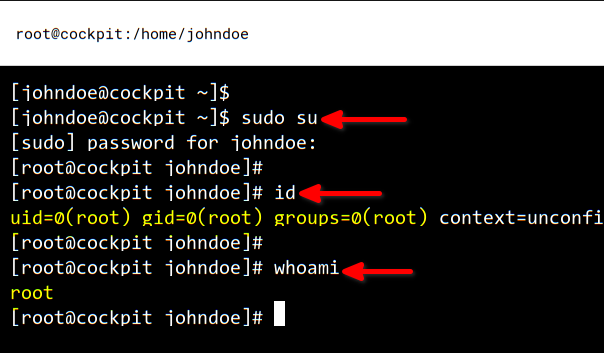
2. Now run the sudo su command to get the root privileges. Enter your password at the prompt.
3. Lastly, run the below command to verify the root privileges.
# print detail user and group
id

# print userid
whoami
You should see the output like the screenshot below. You’ve now got the root privileges and become a root user.
Ensure to log out from the terminal issuing the exit command or pressing Ctrl+D when you no longer need the terminal access.
Managing Network IP Addresses
Suppose you have another network adapter on the server that needs a new static IP address assignment. Or perhaps your primary network interface is getting its IP address from the DHCP server, but you need to configure it manually instead.
Whatever your situation, Cockpit has the feature to set up IP address configuration.
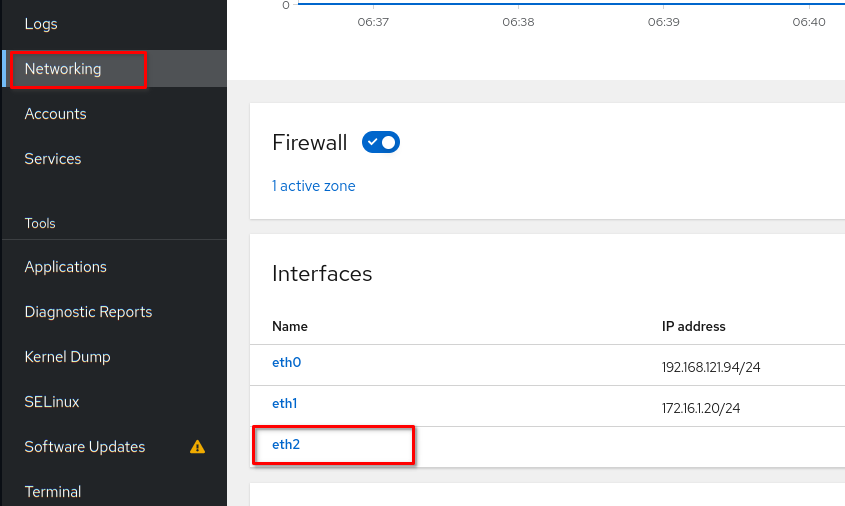
1. Click on the Networking menu on the left side, and you should see the Interfaces section. Cockpit will automatically detect available network interfaces on the server.
2. Click the interface name to set up an IP address. This demo will set up an IP address for the interface eth2 with the detailed static IP address below.
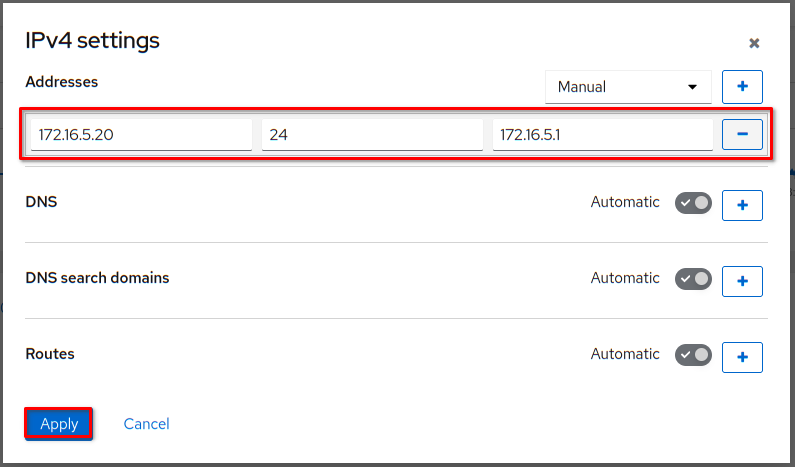
IP Address: 172.16.5.20
Gateway: 172.16.5.1
3. Click Activate button to activate the eth2 interface. Check the option Connect automatically to make the eth2 interface start automatically at system startup. Click edit on the IPv4 section to set up an IP address.

4. Select Manual on the Addresses section to set up a static IP address for the eth2 interface. Now, input the IP address, prefix, and gateway, and click Apply.
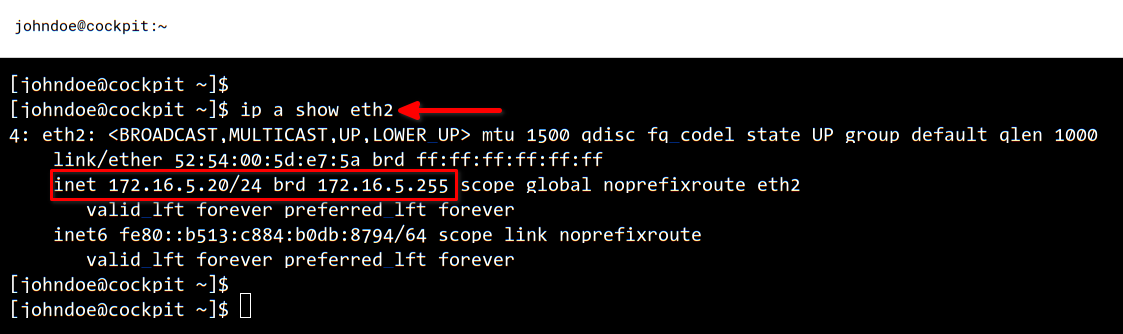
5. Lastly, open the Cockpit Terminal and run the below command to verify the new IP address.
# checking IP address eth2
ip a show eth2
You should see the output as below. The interface eth2 has the static IP address 172.16.5.20 as you configured.
Adding Services Firewall Rules
Another configuration item when setting up the new server is the firewall. The firewall will make your server more secure, and Cockpit allows admins to enable and manage the firewall rules.
For example, if you plan to set up the server to serve websites, you would want to configure the firewall rules to allow ports 80 and 443. To configure the firewall in Cockpit, proceed as follows.
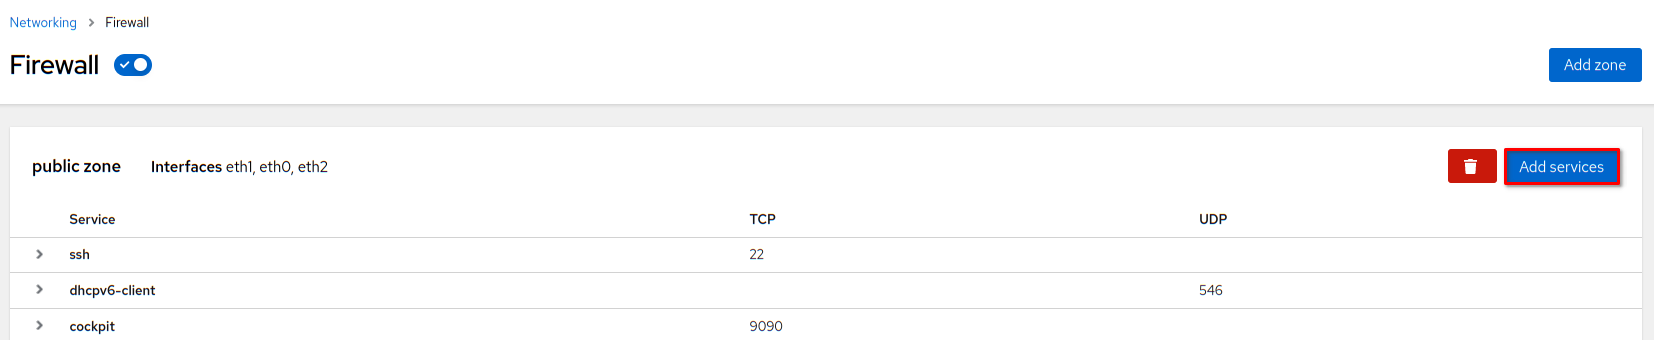
1. Click the Networking menu on the left side. If the Firewall status is not yet enabled, click the switch to turn on the firewall. Next, click Edit rules and zones on the Firewall section.

2. On the Firewall page configuration, click Add services to add new services and ports.
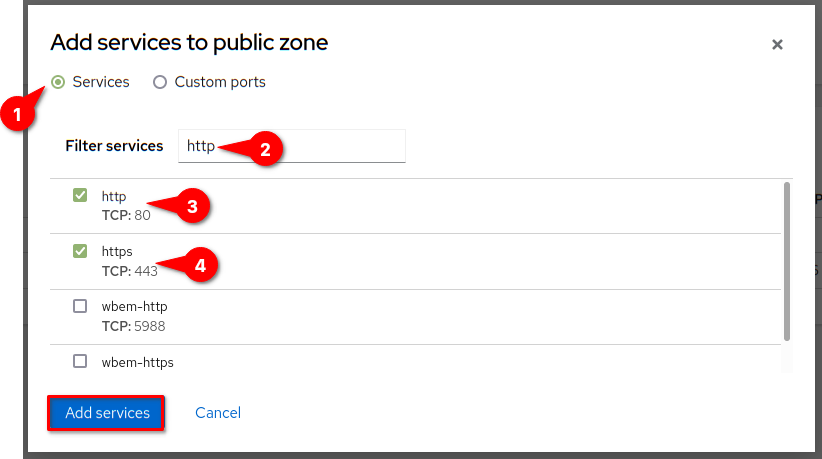
3. Select Services to add pre-defined services to the firewall on the Add services popup.
The Custom Ports option lets you add custom ports instead.
In this example, add the HTTP and HTTPS services to the firewall. To do so, type http on the Filter services field. Check both the http and https boxes and click the Add services button.
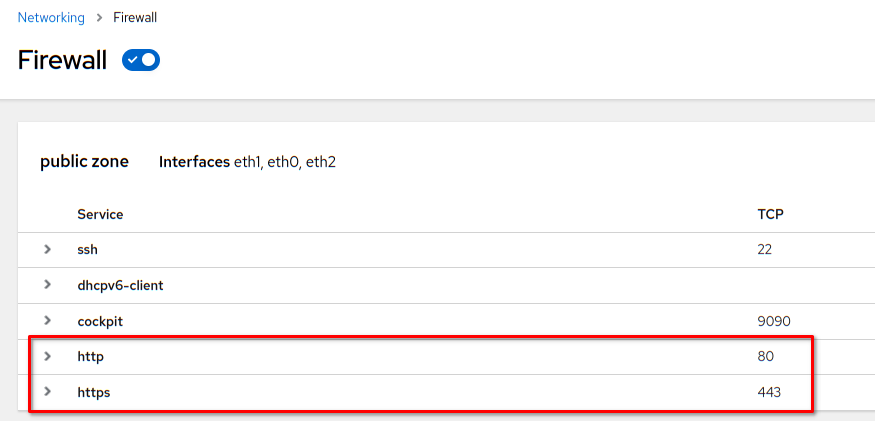
You should now see the http and https services on the Firewall page.
Enabling Automatic Update
Automatic updates will ensure you’re using the latest version of packages. Also, you’ll always get the latest security patch for your system.
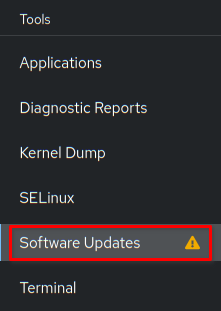
1. Click the Software updates menu on the left side, and you’ll see the Software updates page.
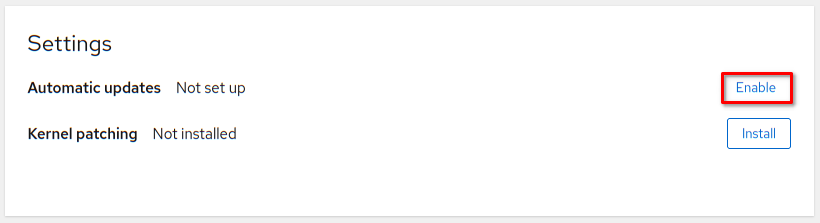
2. Click the Enable button to set up automatic updates on the Settings section.
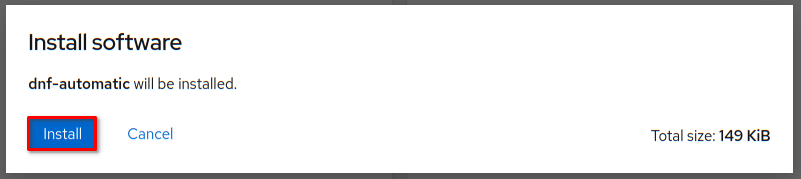
3. Click Install to install dnf-automatic to your system on the Install software popup. Cockpit Linux uses the dnf-automatic package to set up automatic updates. Wait for the installation to finish.
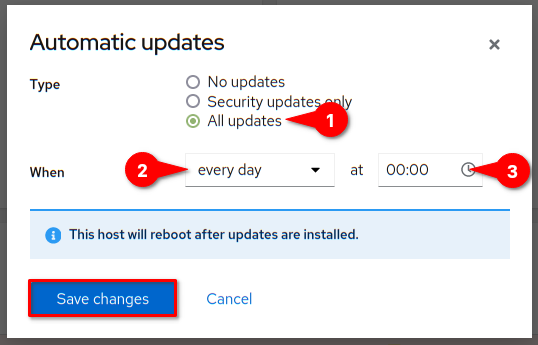
4. Next, select one of the following options on the Automatic updates prompt.
- Security updates only – to enable automatic security updates only.
- All updates – to enable updates for all packages.
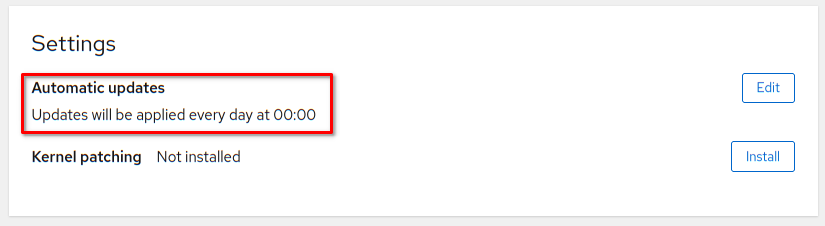
This example will enable automatic updates for all packages every day at 00:00. Click Save changes to apply the new automatic updates settings.
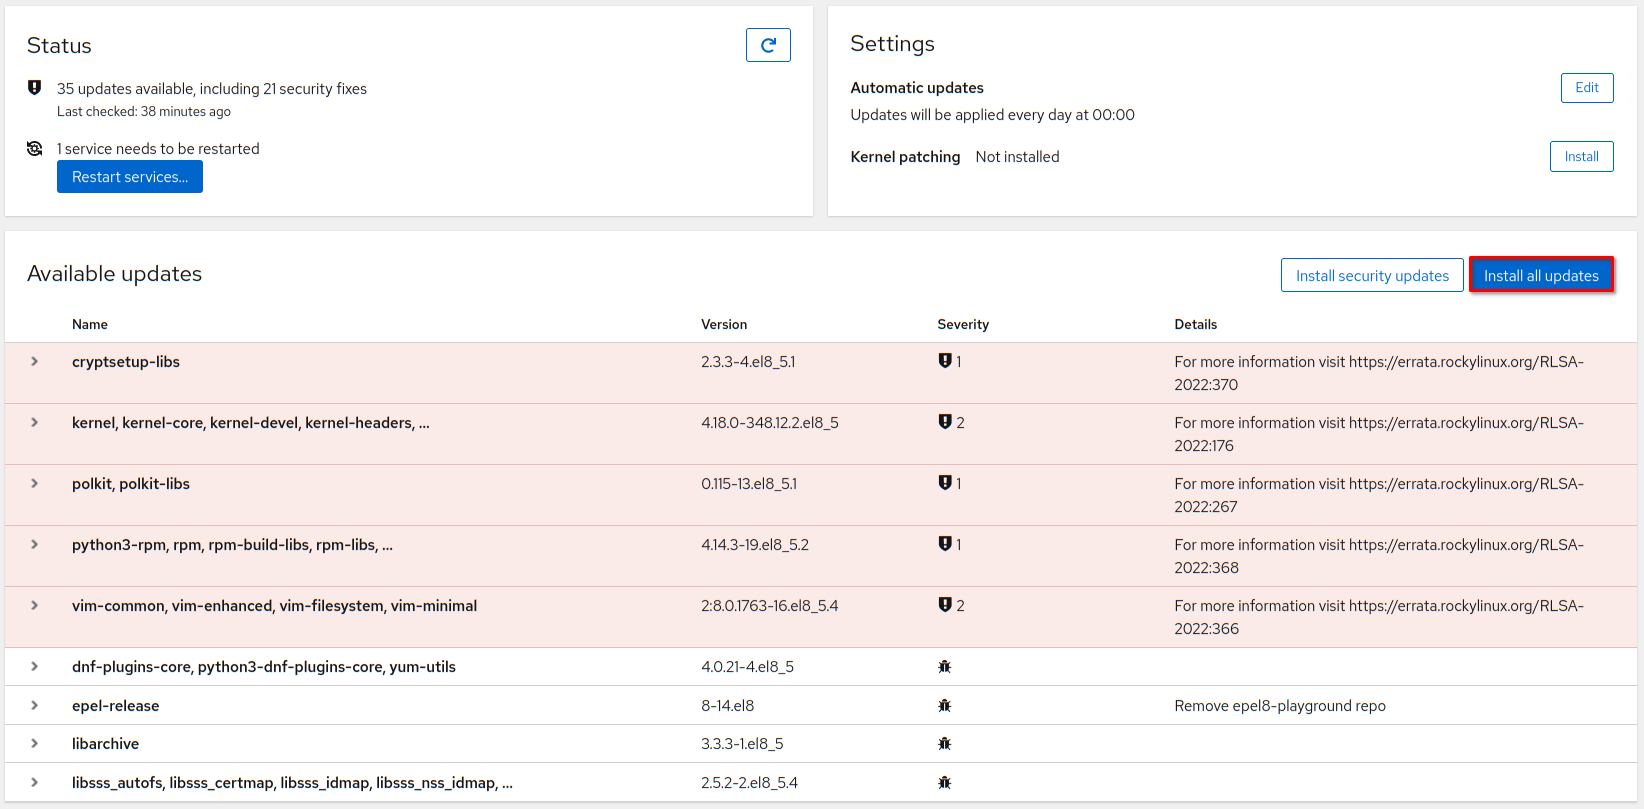
Now you’ll see the message Updates will be applied every day at 00:00 under the Automatic updates section.
Apart from automatic updates, Cockpit allows you to install updates manually, too. On the Software updates page, you’ll see the Available updates section. Click install all updates to update all packages on your system, or click Install security updates to only install security updates.
Managing Containers
What if you want to run containers on your Linux server? You’d think you have to do everything in the terminal – but no. Cockpit Linux provides the interface to run containers with Podman.
Podman is a Linux-native tool for managing Open Container Initiative (OCI) containers and container images for your application. Podman also supports Docker images.
In this example, you’ll enable Podman in Cockpit and create a new container running an instance of NGINX. Follow the below instructions to enable container management in Cockpit Linux.
1. First, install the latest cockpit-podman package, which provides the Cockpit user interface for Podman containers. To install, open the Terminal on Cockpit and run the below command.
# installing Cockpit-podman add-ons
sudo dnf install cockpit-podman -y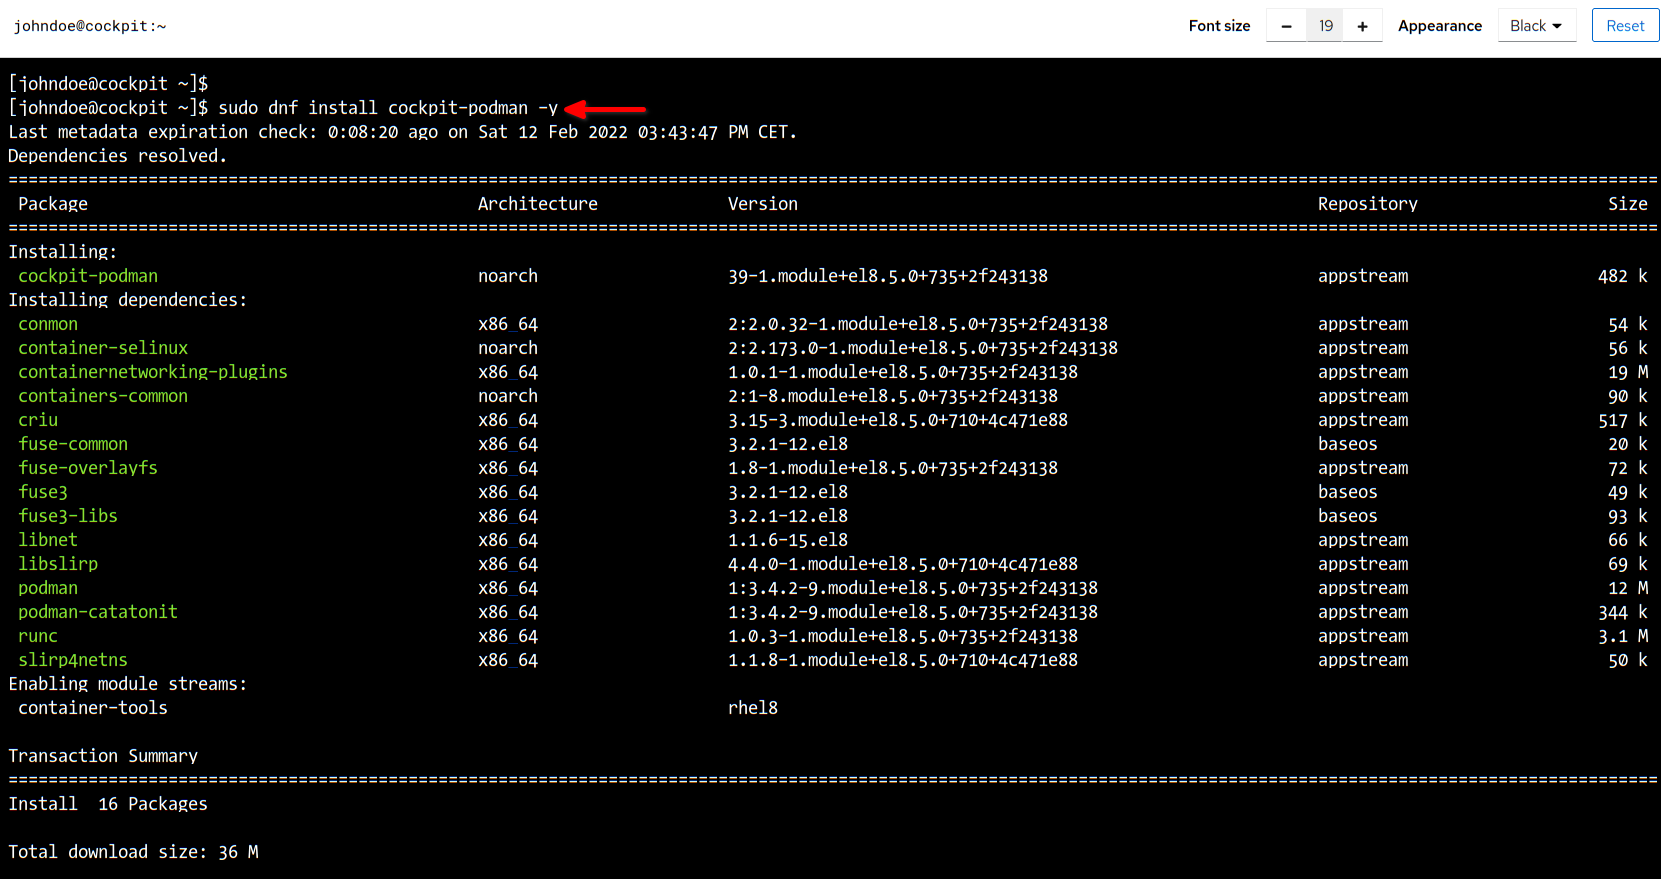
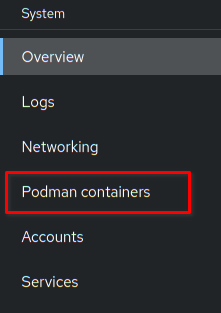
2. Now, reload or refresh the Cockpit web browser tab. Once the Cockpit refreshes, you should see the new menu called Podman containers. Click the menu Podman containers.
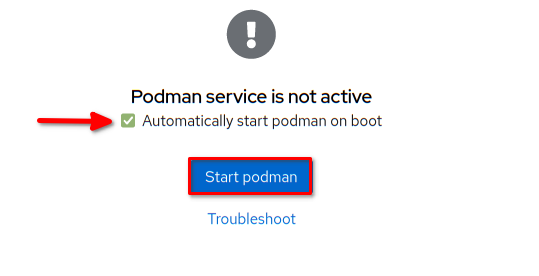
3. Next, check the Automatically start podman on boot box and click Start podman to start the podman service.
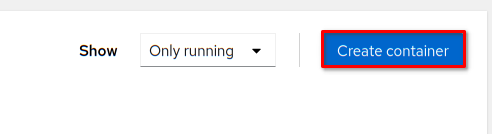
podman service4. Click the Create container button to create and set up a new container.
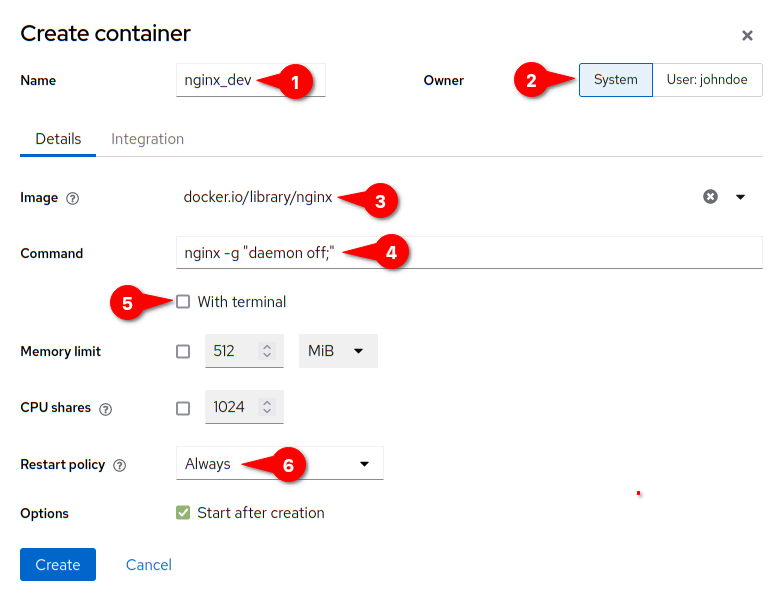
5. On the Create container popup, enter the following information.
- Type in nginx_dev into the Name field.
- Select System as the Owner. This option will ensure that the root account will own the container.
- Input nginx as the base Image for the new container.
- Input the start Command for the new container
nginx -g "daemon off;". This command issues the global directive not to startnginxas a daemon.
- Uncheck the option With terminal. Disable this option when there is no need for an interactive terminal for the new container.
- Select Always on the Restart policy option. This option allows the container to restart whenever the container exits.
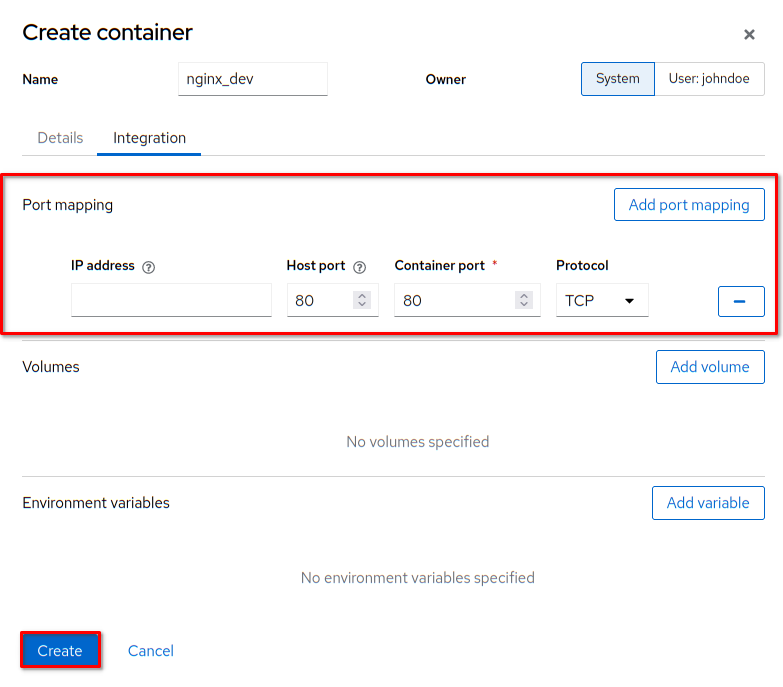
6. Next, click the Integration tab and add the port mapping for the Host port to 80 and the Container port to 80. Finally, click the Create button to confirm and create the new container.
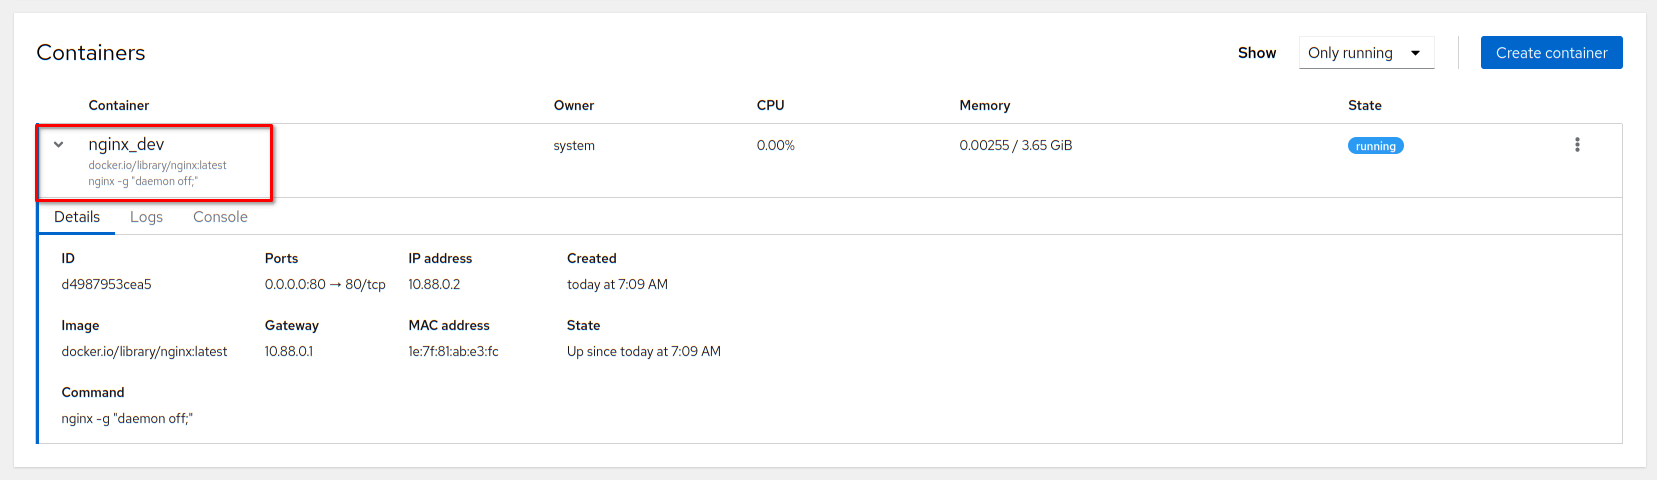
7. Click on the nginx_dev container, and you should see details of container configuration below.
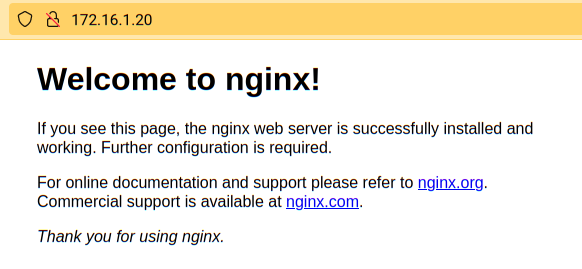
8. Finally, open a new tab on your web browser and type the server IP address (i.e., http://172.16.1.20/) on the address bar. And you should see the default NGINX welcome message from the nginx_dev container you’ve created.
Conclusion
Throughout this tutorial, you’ve learned how to install and configure the Cockpit Linux web console. Also, you’ve learned how to perform various management and configuration tasks from the web browser.
What’s next? Perhaps you may be interested in enabling virtualization using Cockpit and adding storage to your Cockpit Linux server.


