


So you need to create or manage some existing Amazon Web Service (AWS) EC2 instances, but it’s not just efficient to be clicking around in the Management Console all of the time. We got you. With the Boto3 EC2 Python SDK, you’ll be creating, tagging, starting, and stopping EC2 instance in no time!
Not a reader? Watch this related video tutorial!In this tutorial, you will learn how to use the Boto3 EC2 Python SDK to manage AWS EC2 instances with an example-driven approach.
Let’s begin.
Prerequisites
This post will be a step-by-step tutorial. If you’d like to follow along, ensure you have the following in place:
- An AWS account
- Python v3.6 or later installed on your local machine. This tutorial will be using Python v3.9.2 on a Windows 10 machine.
- A code editor. Even though you can use any text editor to work with Python files. This tutorial will be using Visual Studio (VS) Code.
- An AWS IAM user, an access key ID, and a secret key set up on your local machine with access to create and manage EC2 instances. This tutorial will use an IAM user called ec2user.
Ensure the IAM user is set up for programmatic access and that you assign it to the existing policy of AmazonEC2FullAccess.
- The Boto3 Python AWS SDK already installed on the local machine.
Creating EC2 Instances with Boto3
Boto3 can do just about anything when it comes to AWS EC2 instances. This tutorial is going to be hands-on and to ensure you have at least one EC2 instance to work with, let’s first create one using Boto3.
1. Open your favorite code editor.
2. Copy and paste the following Python script into your code editor and save the file as ec2_create.py. The tutorial will save the file as ~\ec2_create.py.
The Python script below creates a single (MinCount and MaxCount) AWS EC2 instance using an image ID “ami-013f17f36f8b1fefb” (ImageId) using an instance type of t2.micro (InstanceType).
You can find all of the available instance types here and use the Launch Instance Wizard to find image IDs as shown below. This tutorial assumes you’re in the us-east-1 region.
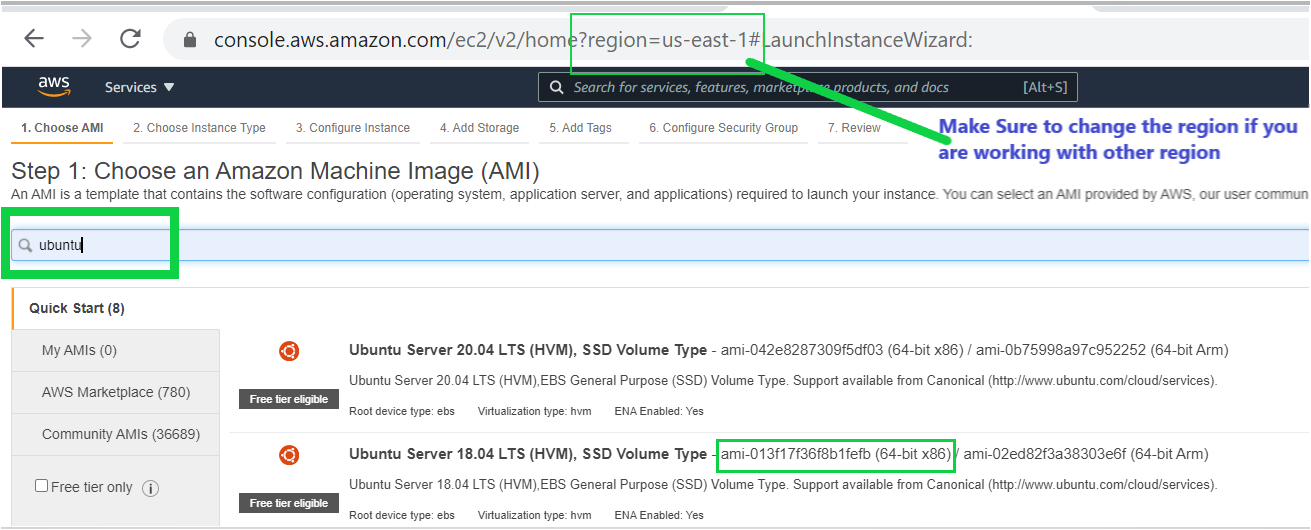
The instance is in the AWS Region US East-1 because the default region is set to us-east-1 in the AWS profile.
# Importing boto3 library to make functionality available
 import boto3
# Creating the connection with the resource of AWS EC2 service
 ec2 = boto3.resource('ec2')
# creating a new EC2 instance
 instances = ec2.create_instances(
      ImageId='ami-013f17f36f8b1fefb',
      MinCount=1,
      MaxCount=1,
      InstanceType='t2.micro',
  )
  print("EC2 Launched succesfully")
Boto3 supports two types of interactions with AWS; resource or client levels. The script above is using the resource API (
resource('ec2'). The client level provides low-level service access while the resource level provides higher-level, more abstracted level access.
3. Open your command-line of choice (Bash, cmd.exe, PowerShell, etc) and execute the ec2_create script. If successful, you should see a single message of EC2 Launched successfully.
python ~\ec2_create.py4. Now, open your favorite web browser, navigate to the AWS Management Console and log in.
5. Click on the search bar at the top of the console, search for ‘EC2’, and click on the EC2 menu item.
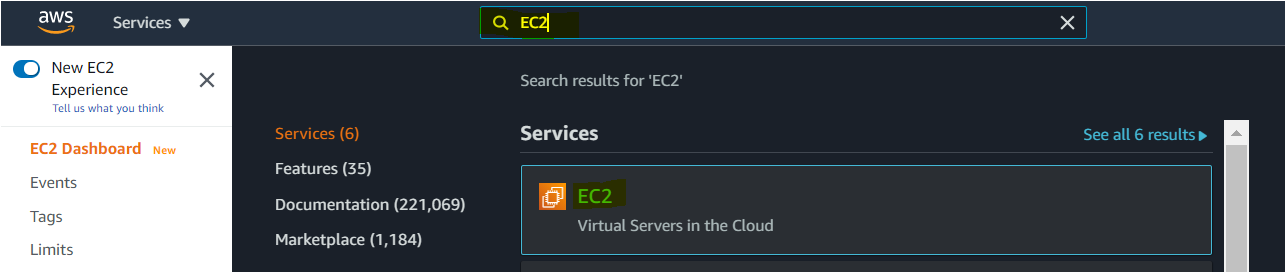
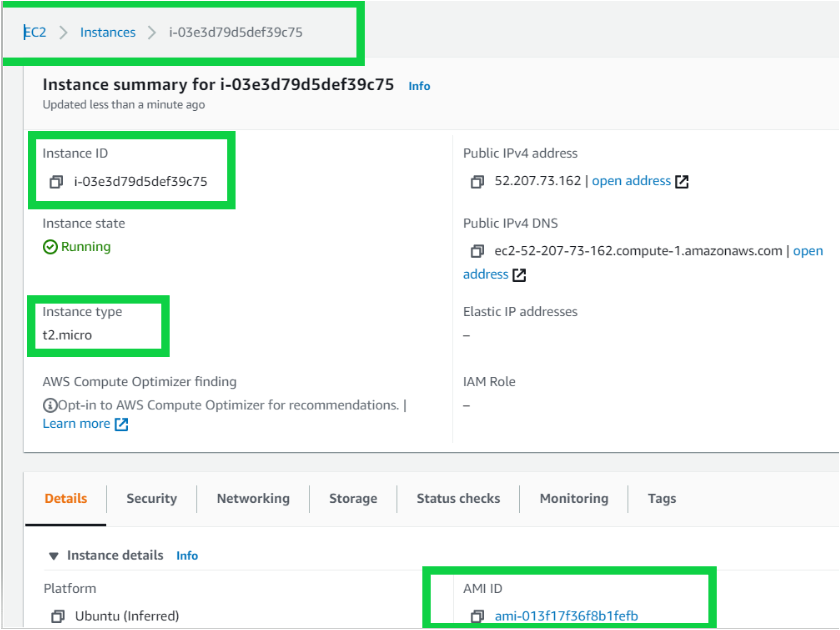
On the EC2 page, you should now see your newly-created instance as shown below.
Tagging EC2 Instance with Boto3
In a typical AWS cloud environment, an organization could have hundreds or thousands of resources to manage. To simplify managing resources, AWS provides a feature called tagging that allows you to categorize resources based on environment, department, or any other organization-specific criteria.
Let’s now see how to apply a sample tag to the EC2 instance just created.
With your code editor open, copy and paste the following Python code into your code editor and save it as tag_ec2.py. The Python script below tags the instance ID of i-03e3d79d5def39c75 created above with the Name of Boto3 using the create_tags()method.
# Importing boto3 library to make functionality available
import boto3
# Creating the connection with the resource of AWS EC2 service
ec2 = boto3.resource('ec2')
# Adding the Tag Boto3 for AWS EC2 using the instance ID
response = ec2.create_tags(
    Resources=[
        'i-03e3d79d5def39c75',
    ],
    Tags=[
        {
            'Key': 'Name',
            'Value': 'Boto3'
        },
    ]
)
A tag consists of a tag key and a tag value. To tag a resource, both the Tag keys and tag values are required.
Once you’ve saved the script, execute it and you should see your instance is tagged with the name boto3 in your account.
python tag_ec2.py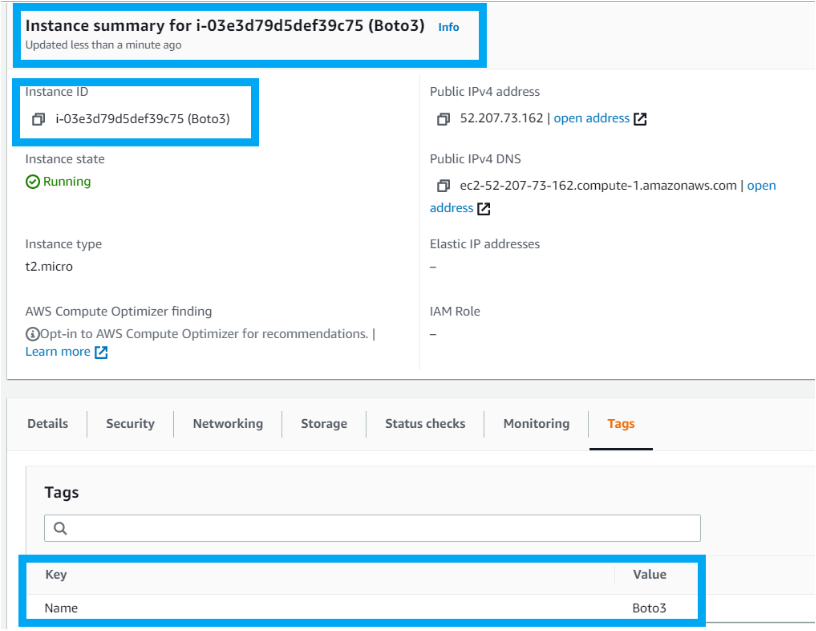
Describing EC2 Instance with Boto3
If you need to discover all EC2 instances with specific attributes, you can “describe” instances to find EC2 instances matching a specific architecture, image ID, instance type, or tags. Using the describe API and Boto3, you can build a Python script to query EC2 instances by tag, for example.
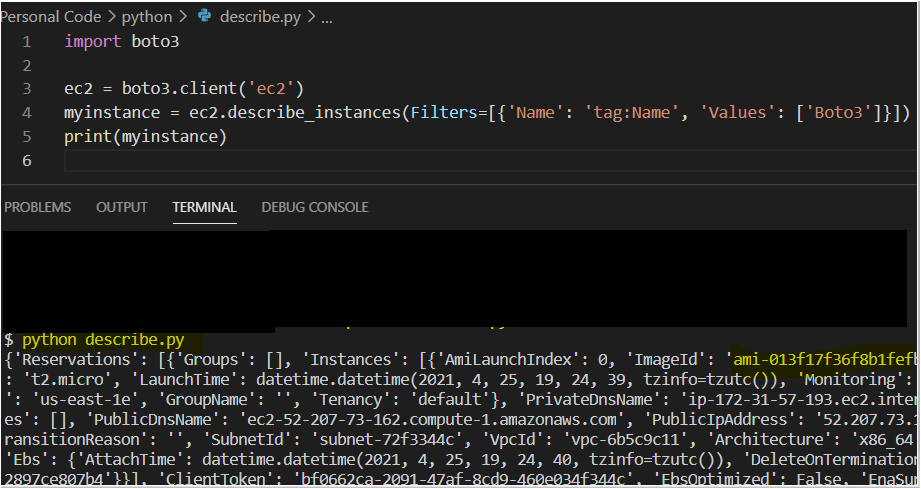
With your code editor open, copy and paste the following Python code into your code editor and save it as ec2_my_instance.py. Using the describe_instances() method, this script uses a filter defined in JSON to find all attributes associated with all EC2 instances with a tag called Name (tag:Name) with a value of Boto3 ('Values': ['Boto3'] ).
# Importing boto3 library to make functionality available
import boto3
# Creating a client connection with AWS EC2
ec2 = boto3.client('ec2')
# Using the Describe_Instance Method along with filters
myinstance = ec2.describe_instances(Filters=[{'Name': 'tag:Name', 'Values': ['Boto3']}])
print(myinstance)
The Resource() API provides a higher-level abstraction than the raw, low-level calls made by service clients. At times, such as when you’re using the
generate_presigned_url()API and need to access an S3 bucket temporarily, which is not possible with the resource API, you must connect to resources directly rather than using the Service (Client) API.
This time you don’t need to hop over to the AWS Management console. The script’s JSON output gives you all the details of your instance, such as the instance type, Public/Private IP address, and many more as shown below.
Starting, Stopping and Terminating EC2 Instances with Boto3
Perhaps you don’t need an EC2 instance anymore. If an instance is running, you’ll be incurring a bill for it so it’s best to manage its startup, shutdown, and termination routine.
Stopped instances do not incur charges, but Elastic IP addresses or EBS volumes attached to those instances do. Terminated instances do not incur charges anyways.
The Python code to start, stop and terminate EC2 instances with Boto3 are nearly identical so let’s build a simple Python script that can do all three.
With your code editor open, copy and paste the following Python code into your code editor and save it as ec2_manage_my_instance.py.
The Python script below has the code to stop stop_instance(), start start_instance() or terminate the instance terminate_instance() with ID of i-03e3d79d5def39c75.
import boto3
# Creating a client connection with AWS EC2
ec2 = boto3.client('ec2')
# Use response = ec2.start_instances( if you need to Start the Machine
# Use response = ec2.terminate_instances( if you need to terminate the Machine

# Stopping the instance using stop_instances.
response = ec2.stop_instances(
	    InstanceIds=[
        'i-03e3d79d5def39c75',
    ],
)
Execute the script above and, depending on which you chose, the EC2 instance will be in a different state.
python ec2_manage_my_instance.py


Finding Details of Multiple EC2 Instances at Once
To wrap up this tutorial, let’s finish off with a final Python script that demonstrates returning specific attributes on many different EC2 instances at once using the describe_instance() method.
With your code editor open, copy and paste the following Python code into your code editor and save it as ec2_all_instances.py.
The Python script below first creates a client connection to AWS. Once connected, it then uses the describe_instances() method as shown earlier to query various attributes of all running EC2 instances. It’s limiting results to only running instances by filtering on one of the available attributes, instance-state-name, with the value of running.
You can find all of the available attributes to filter on via the AWS documentation.
When you anticipate the describe_instances() method returning more than one instance, you must use the get() method with the Reservations argument to return all instances. Then, to only return certain attributes, the script uses a for loop to iterate over each reservation and each instance inside of each reservation to print out the InstanceID, InstanceType, and PrivateIPAddress of each instance found.
# Importing boto3 library to make functionality available
import boto3
# Creating a client connection with AWS EC2
ec2 = boto3.client('ec2')
# Using the Describe_Instance Method and filters to get a list of instances which are currently running
#.get("Reservations") is used when you need to work with more than one instance. As each instance gets a single reservation.
reservations = ec2_client.describe_instances(Filters=[
    {
        "Name": "instance-state-name",
        "Values": ["running"],
    }
]).get("Reservations")

# Using for loop() to iterate over reservations to generate instance id, instance type, and private IP address of running instances
for reservation in reservations:
    for instance in reservation["Instances"]: ## Each reservation has an embedded Instances array that contains all EC2 instances in the reservation
        instance_id = instance["InstanceId"]
        instance_type = instance["InstanceType"]
        private_ip = instance["PrivateIpAddress"]
        print(f"{instance_id}, {instance_type}, {private_ip}"
Open your terminal and execute the script. If all goes as planned, you should see each of your EC2 instances returned with their respective instance ID, instance type and private IP address.
python ec2_all_instances.py
Conclusion
You should now have the basic knowledge to manage EC2 instances with the Boto3 EC2 Python SDK. Performing tasks in the Management Console such as creating, tagging, listing, and describing instances should be a thing of the past!
Now that you have a AWS EC2 set up with Boto3, what do you plan to manage next?


