


Do you find setting up a Secure Shell (SSH) server complicated? Don’t worry; you’re not alone. Typically, SSH servers are command-line based, and setup can be a challenge. If you need to manage or transfer files to a Windows machine remotely, the Bitvise SSH Server could be the answer.
Configuring a Bitvise SSH Server will not require you to enter a single command. You can perform everything in the GUI! Read on because this tutorial will teach you how to install and set up the Bitvise SSH Server on Windows.
In the end, you’ll have built an SSH server that you can manage remotely, transfer files to, and log on to the remote desktop all from one SSH client.
Prerequisites
If you plan to follow along with this tutorial, be sure to have the following requirements in place.
- A Windows computer to install the Bitvise SSH server. Any Windows desktop or server OS will work. This tutorial uses a server with the following configuration.
- Operating system: Windows Server Datacenter 2019
- Computer name: xdc01
- Domain-joined: No (standalone)
- DNS Name: xdc01.lzex.ml
- IP Address (internal, public): 10.0.1.4, 52.186.86.26
- Windows administrator account: winadmin1
- Another Windows computer to use as the SSH client. For testing purposes, using one computer for the SSH server and SSH client should be fine. This tutorial uses a Windows 10 computer as the SSH client.
Installing the Bitvise SSH Server
The Bitvise SSH server has two editions – standard and personal. The standard edition requires you to specify a license during installation. On the other hand, the personal edition is free to use for personal and non-commercial users but with certain limitations.
This tutorial focuses on the Bitvise SSH Server personal edition only. And going any further, you need to know about the personal edition’s limitations.
- Only local Windows accounts can log in if the server is not a domain controller (DC).
- You can configure only the Everyone group as the SSH users group.
- You can create and configure only one virtual group.
- Allows adding up to 10 Windows accounts only.
- Allows creating up to 10 virtual accounts only.
- Connections are limited to 15 concurrent sessions.
- Kerberos and NTLM authentication methods do not work.
Now that you know the limitations going in let’s dive into the installation. There are two ways to install Bitvise SSH Server – interactive (GUI) and unattended. And which one you should use depends entirely on your deployment type.
Downloading the Bitvise SSH Server Installer
The latest Bitvise SSH Server version is 8.49 as of this writing. Fortunately, the latest versions always have the same installer file name and download link, which means you don’t need to worry about downloading the wrong file to install the later version.
To download the Bitvise SSH Server installer via the browser, on the server where you’ll install Bitvise SSH Server, click this download link and save the file to C:\BvSshServer-Inst.exe.
Alternatively, to download the installer using PowerShell instead, open PowerShell as admin and run the commands below.
# Bitvise SSH Server download URL
$url = 'https://dl.bitvise.com/BvSshServer-Inst.exe'
# Local download destination
$installFile = 'c:\BvSshServer-Inst.exe'
# Download the Bitvise SSH installer
[System.Net.WebClient]::new().DownloadFile($url,$installFile)
Interactive Installation (GUI)
To perform the interactive Bitvise SSH server installation, follow the steps below.
1. Open the File Explorer, locate the BvSshServer-Inst.exe installer, and double-click the file to start the installation.
2. On the installer window that pops up, check the I agree to accept all the terms of this License Agreement. Next, select the Install new default instance option. Do not change the Location value and click Install.

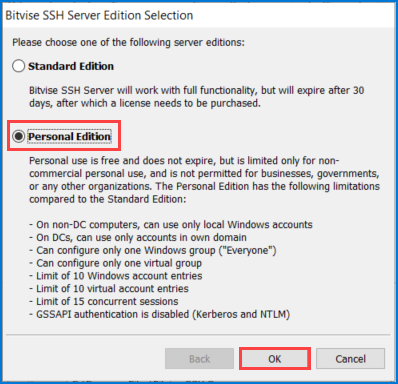
3. Next, choose the Bitvise SSH Server edition to install. In this example, click Personal Edition and click OK.
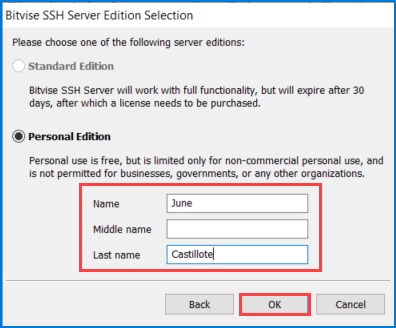
4. Now, enter your name information and click OK and wait for the installation to complete.
5. After the installation, the installer recommends restarting the server to ensure a fully operational Bitvise SSH Server. Click OK.

6. Finally, restart the computer.
Unattended Installation (Command-Line)
Another method to install the Bitvise SSH Server is the unattended installation. This method is more suitable if you plan to deploy an instance or instances of the Bitvise SSH Server on one or multiple servers.
To run an unattended installation, proceed as follows.
1. Open PowerShell as admin.
2. Run the command below to start the installation and wait for the installation to complete.
# Invoke the Bitvise SSH Server installer.
# The -defaultInstance parameter installs a default instance of Bitvise SSH Server.
# The -acceptEULA parameter tells the installer that you access the license agreement.
# The -activationCode=XXX parameter specifies the activation code to apply to the Bitvise SSH Server instance installation.
## The activation code below installs applies the Personal Edition license.
## Do not change the activation code below unless you have a standard edition license that you can use instead.
& C:\BvSshServer-Inst.exe -defaultInstance -acceptEULA -activationCode=000000000000000000000000000000000000000000000000000000000000000000000000000000020000FFFFFFFFFFFFFFFFFFFFCEA10000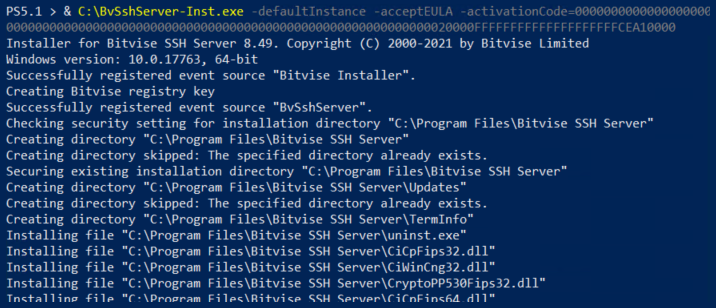
3. Finally, restart the computer by running the command below.
shutdown -r -t 0Configuring the Basic Bitvise SSH Server Settings
At this point, even after you’ve installed the Bitvise SSH server, no one can log in to the server via SSH yet. Also, the default configuration only allows connections from the local subnet. Let’s start by configuring the Bitvise SSH Server firewall rule and adding users.
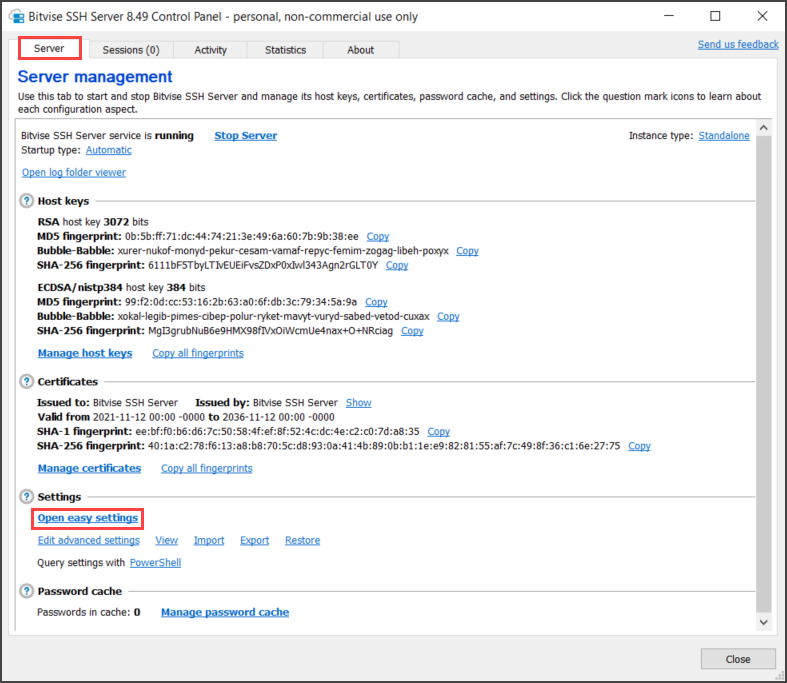
To perform any administration work, you first need to open the Bitvise SSH Server Control Panel, which provides the GUI to configure the SSH server options.
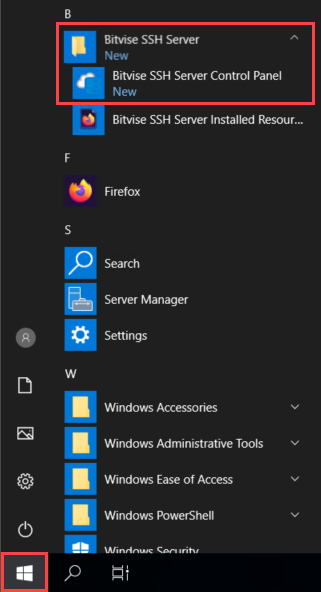
1. On the server, click Start —> Bitvise SSH Server —> Bitvise SSH Server Control Panel.
2. Next, under the Server tab, click the Open easy settings link to open the settings editor.
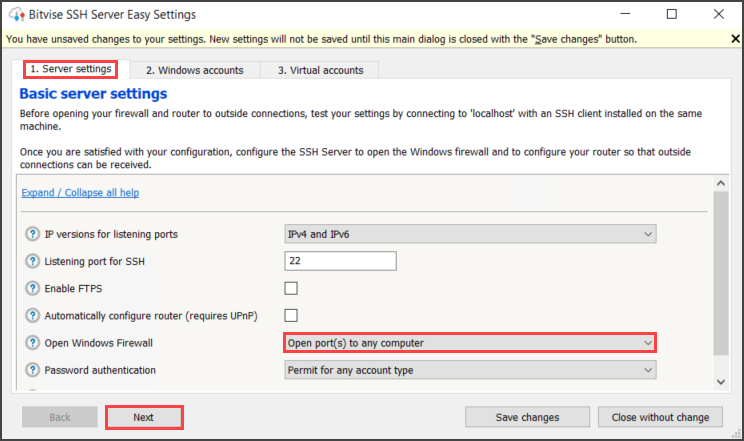
3. Under the Server settings tab, change the Open Windows Firewall value to Open port(s) to any computer, and click Next. Choosing this option allows SSH connections to come from any source by automatically updating the Bitvise SSH Server rule in the Windows Firewall.
Adding a Windows Account
With Windows accounts in Bitvise SSH Server, you can leverage existing user accounts and permissions of the local or domain accounts.
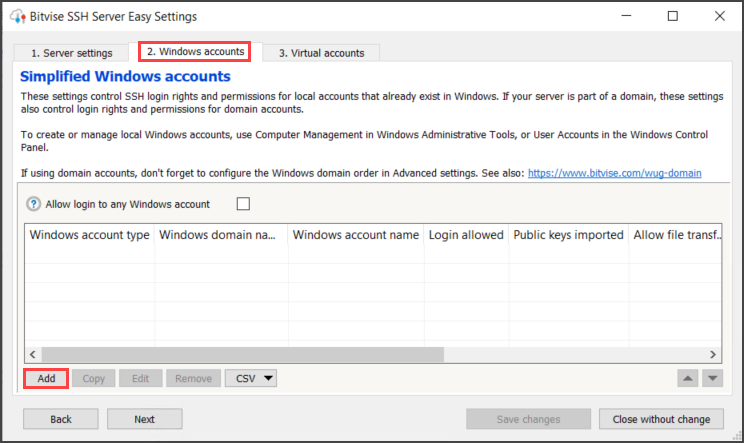
To allow a Windows account to log in to the Bitvise SSH Server, follow these steps:
- On the Windows accounts tab and click Add.
2. Next, provide the Windows account information and the default terminal shell.
- (a) Choose the Windows account type (Local account or Domain account). This example will choose Local account (assuming that the Bitvise SSH Server is a Personal Edition and on a non-DC machine).
- (b) Enter a username in the Windows account name box, but this example uses a local Windows account named winadmin1.
- (c) Click the drop-down box that says Shell access type and choose PowerShell. This option sets the default terminal shell to PowerShell instead of the default command line.
- (d) Lastly, click OK to complete adding the new Windows account.

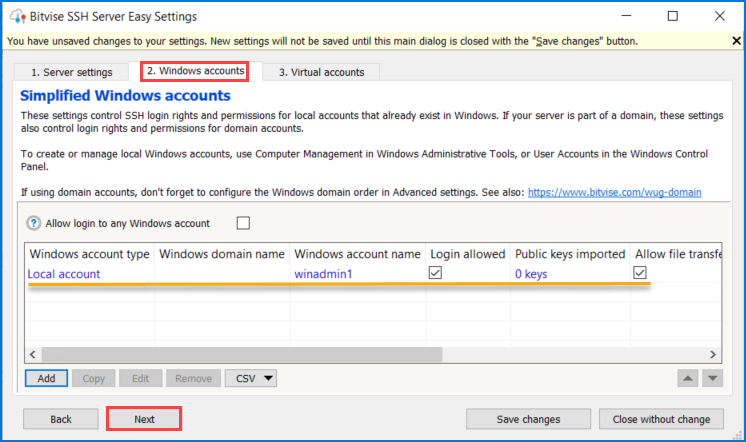
3. Back on the Windows accounts tab, notice that you now have one account on the list.
You’ve now added a Windows user account that uses password authentication and has full access to the SSH server’s file system.
Click Next to save the changes and start creating a virtual account in the next section. If you don’t want to create a virtual account at this time, click Save changes instead.
Adding a Virtual Account
Suppose you want to allow a user limited access to the SSH server, perhaps only allowing file transfers to a specific directory. In this scenario, a virtual account will be appropriate.
Unlike Windows accounts (local or domain), virtual accounts only exist in the Bitvise SSH Server configuration. To create one, follow the steps below.
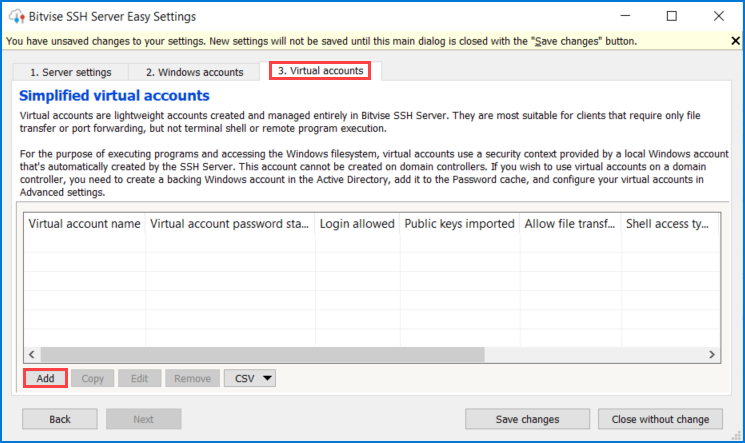
1. On the Virtual accounts tab, click Add to open a “New entry” form where you’ll set up the virtual account’s settings.
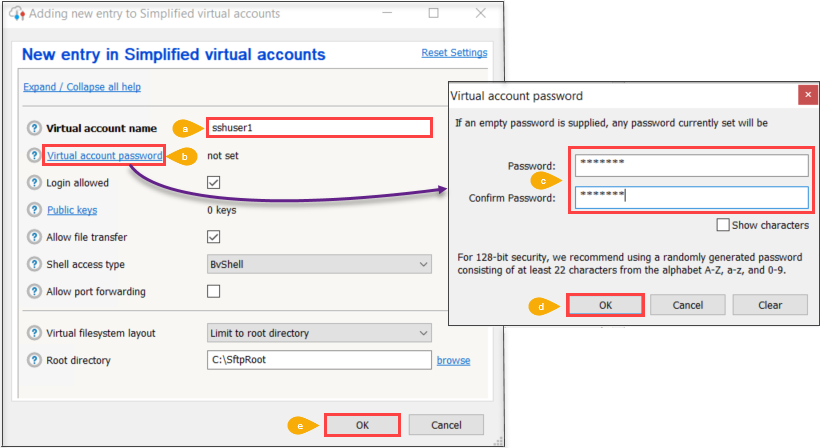
2. On the New entry form, specify the new virtual account information as follows.
- (a) Enter your preferred Virtual account name. In this example, the new virtual account name is sshuser1.
- (b) Click Virtual account password and a ****pop-up window appears
- (c) In the pop-up window, type in a new password and click OK.
- (d) Back to the New entry form, leave the rest of the values as default, and (e) click OK.
The BvShell shell access type is a Bash-like shell specific to the Bitvise SSH Server. This shell restricts the user’s access to the SSH server’s virtual file system root directory you assign to them.
Make sure that the default path in the Root directory exists. If not, you can continue creating the virtual account and create the folder afterward. In this example, the root directory is C:\SftpRoot.
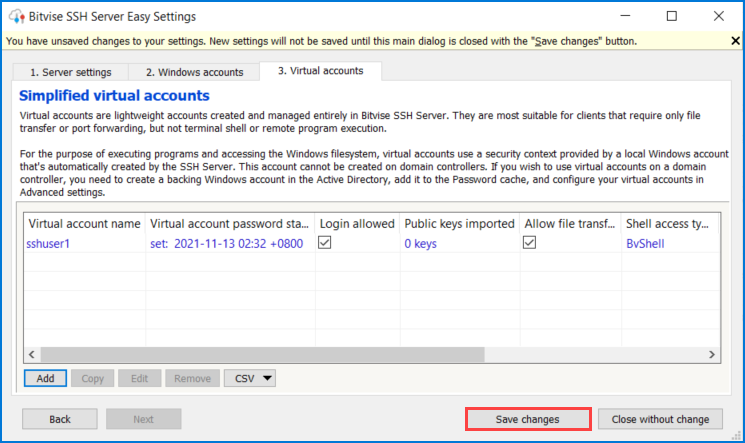
3. Back on the Virtual accounts tab, you’ll see that there is now a virtual account with the name sshuser1. Click Save changes to commit all the changes you made so far to the SSH server configuration.
You’ve now created a new virtual account that uses password authentication and only has access to the C:\SftpRoot folder.
Installing the Bitvise SSH Client
If you’re not new to SSH, you’ve probably used an SSH client before, such as WinSCP and Putty, among others. There’s even a Chrome SSH extension! There are many SSH clients available that you can use to connect to the SSH server.
But to realize the full functionality of the Bitvise SSH Server, the Bitvise SSH Client is the best client companion that you can use. The Bitvise SSH Client is free to use, whether personal or in an organization.
To install the Bitvise SSH Client quickly in a non-interactive way, proceed as follows.
1. Open PowerShell as admin on your SSH client computer.
2. Copy the code below and run it in PowerShell to perform a non-interactive installation of the Bitvise SSH Client.
# Bitvise SSH CLient download URL
$url = 'https://dl.bitvise.com/BvSshClient-Inst.exe'
# Local download destination
$installFile = 'c:\BvSshClient-Inst.exe'

# Download the Bitvise SSH installer
[System.Net.WebClient]::new().DownloadFile($url,$installFile)

# Install
& $installFile -acceptEULA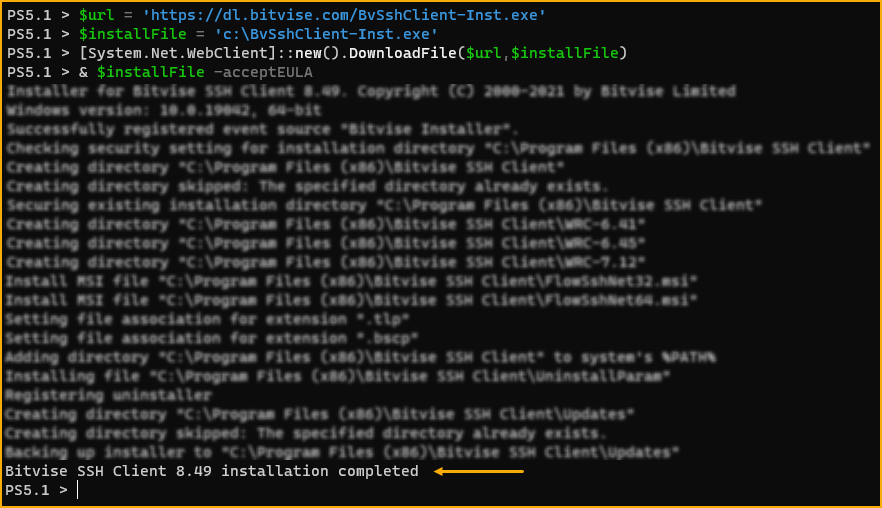
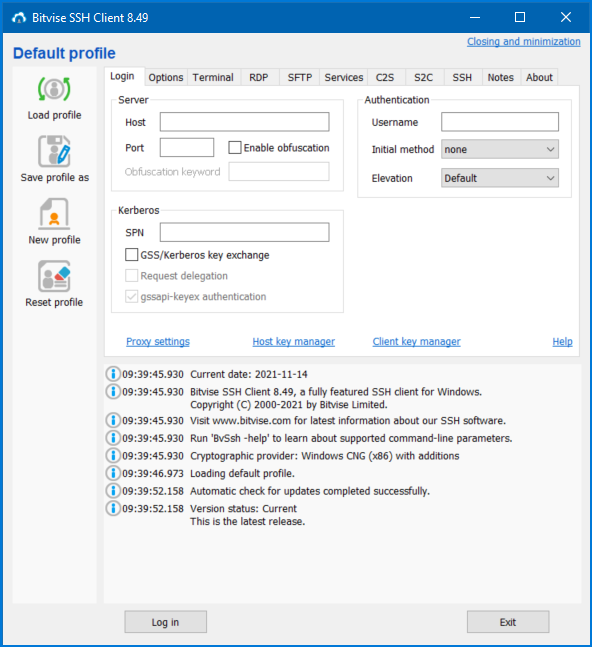
3. After installing, launch the program by clicking on Start —> Bitvise SSH Client —> Bitvise SSH Client.

And below, you can see how the Bitvise SSH Client looks like.
Connecting to the Bitvise SSH Server
With the Bitvise SSH Client installed, there are several ways you can connect to the Bitvise SSH Server, depending on your intended operation.
Whether only to run commands (terminal), transfer files (SFTP), or log in to the remote desktop (RDP), the Bitvise SSH Client has got you covered.
Note: The examples and instructions use the Windows account you set under the “Adding a Windows Account” section (step two) to interact with the SSH server from this point forward. This way, the instructions will be consistent and not switch between the Windows account and the virtual account.
Once you have the Bitvise SSH Client window open, follow the steps below to log in to the SSH server.
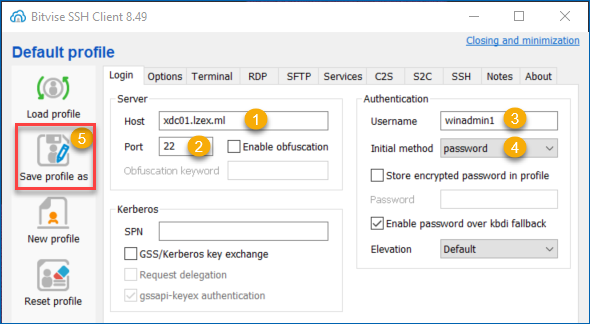
1. Under the Log-in tab, type the SSH server address into the Host box. In this case, the Bitvise SSH server address is xdc01.lzex.ml.
2. Type the SSH server port number into the Port box. The default port number would be 22 if you did not change it.
3. On the Authentication section, type in the username of the account into the Username box. In this example, type in the Windows account that you previously set up on the SSH server.
4. Change the Initial method to password for now since your SSH account only has password authentication.
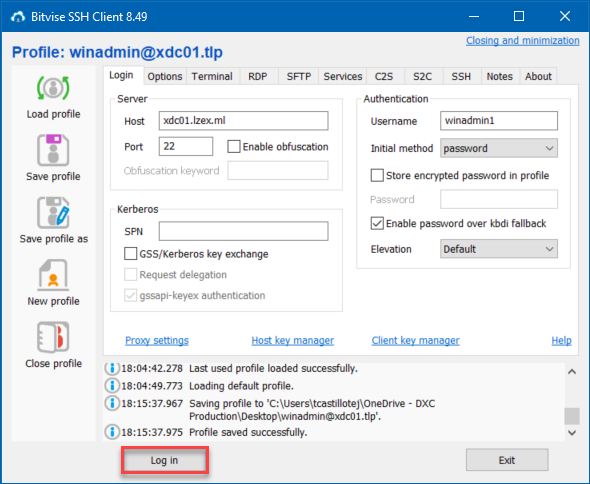
5. Now click Save profile as to save your client configuration.
6. Select the location to save the profile and enter a filename. For better recognition, name your profile in the username@server format, then click Save.

7. Back on the Bitvise SSH Client window, click Log in.
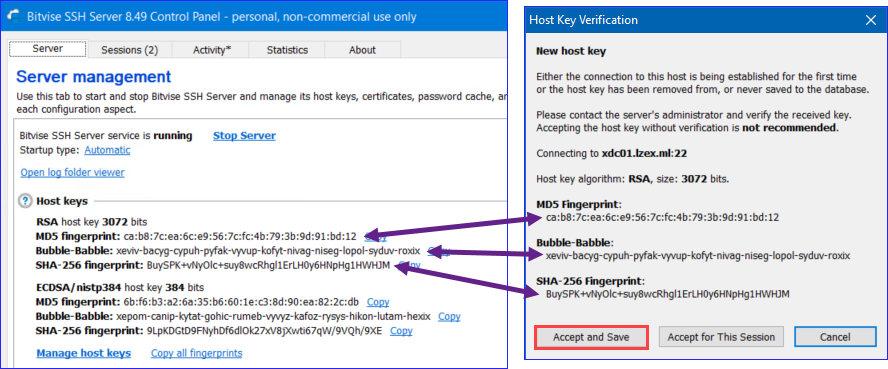
8. The client first prompts you to verify the SSH server host key when connecting to the SSH server. This step ensures that you are aware of and connecting to the correct SSH server host.
As you can see below, the image to the left shows the host keys on the Bitvise SSH Server, while the image to the right is the SSH keys verification prompt on the Bitvise SSH Client-side.
Once you’ve confirmed the correct host keys, click Accept and Save.
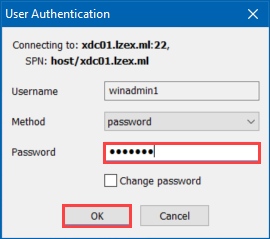
9. Next, on the password prompt, type in the account password and click OK.
10. Now that you’ve logged in notice that the window title has changed to username@ssh-server:port format. Click New terminal console to launch a console window.
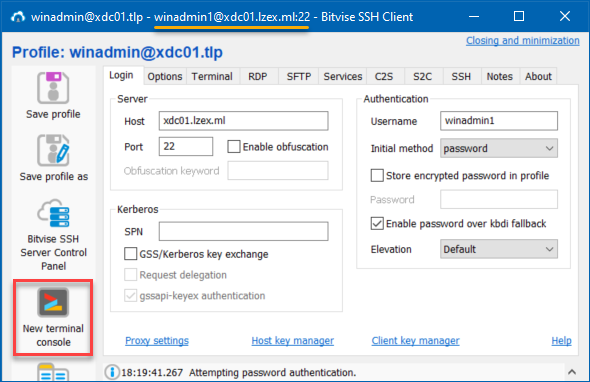
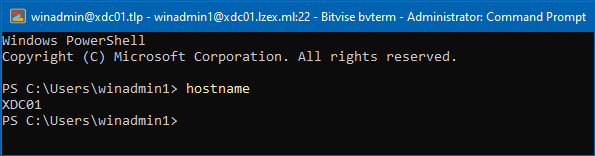
Finally, test the terminal by running the command hostname.
Transferring Files
The Bitvise SSH Client has a GUI front-end feature that allows you to transfer files to or from the Bitvise SSH Server. To start transferring files, follow these steps.
1. On the Bitvise SSH Client window, click the New SFTP window button on the left-hand side. This button launches a new file transfer window.
2. Next, set the local files and remote files location:
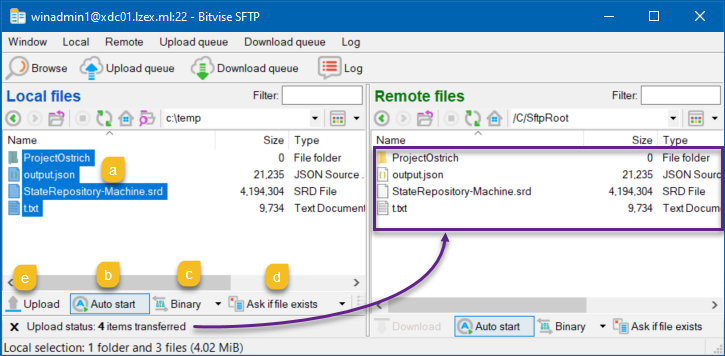
- (a) On the Local files pane (left), browse or type in the location containing the files you want to transfer. In this example, the local path is C:\temp.
- (b) On the Remote files pane (right), browse or type in the remote location. This example uses /C/SftpRoot as the remote location.

3. Transfer files from the local to the remote location.
- (a) Select which files to transfer. This example selects all local files for transfer.
- (b) Leave the Auto start option enabled. This option immediately starts the file transfer once you click the Upload button.
- (c) Leave the transfer mode as Binary. With this transfer mode, no file conversions will happen during the transfer.
- (d) Leave the existing file rule to Ask if file exists. This rule will prompt you for action if the file already exists on the remote destination.
- (e) Finally, click Upload to start the file transfer.
Logging in to Remote Desktop via SSH Tunneling
Apart from an SSH terminal and SFTP file transfer, you can also log in to the SSH server via RDP. There’s no additional Bitvise SSH Server configuration on the to use this feature — it works out-of-the-box.
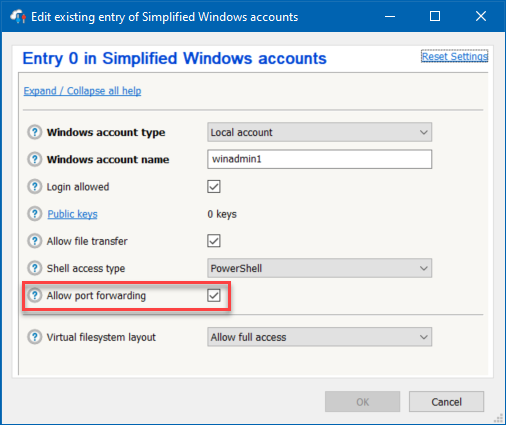
You only need to ensure that the user account has port forwarding permission, which is on by default for Windows accounts. Refer to the image below as a refresher if you missed that permission when adding the Windows account.
To log in to RDP via SSH tunneling, proceed as follows.
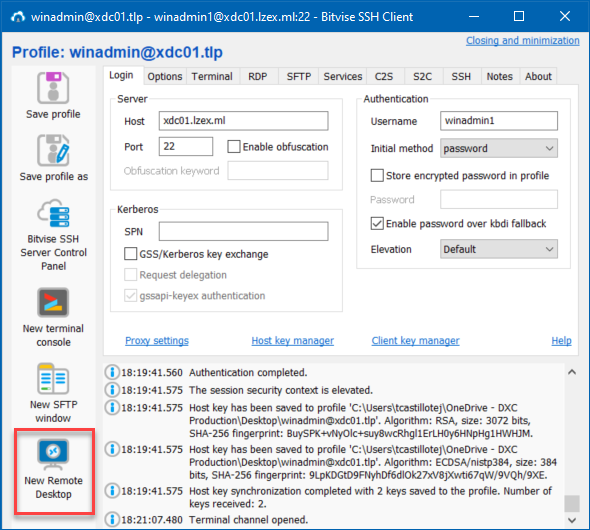
1. On the Bitvise SSH Client window, click the New Remote Desktop button to start a remote desktop connection.
Next, you should see a familiar Remote Desktop Connection window like the one below. Click Connect to continue.
Note: There will be no credential prompt because the Bitvise SSH Client automatically uses your supplied SSH credential.

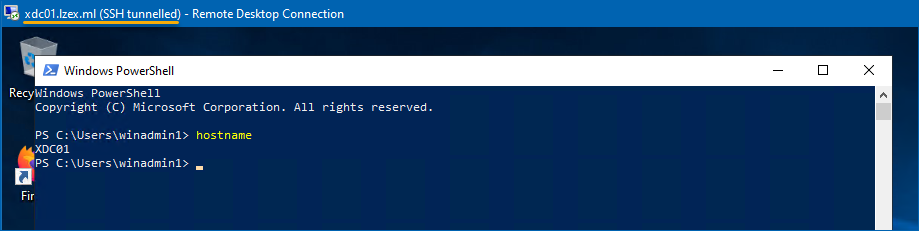
Lastly, log out from the RDP session.
Configuring Public Key Authentication
So far, every test you did requires only password authentication. Using complex passwords may help secure your accounts, but password authentication is the weakest, least secured. Don’t panic, though. There are additional configurations to remedy this possible security risk!
Note: The succeeding instructions assume that you are logged in to the Bitvise SSH Server using your Windows account.
A key pair consists of a public key and a private key. The public key is what you upload to the SSH server, while the private key is what the SSH client presents to the server during authentication. As the name implies, a key pair ensures that only matching keys can pass the server authentication.
To generate a key pair and configure your SSH client authentication, follow these steps.
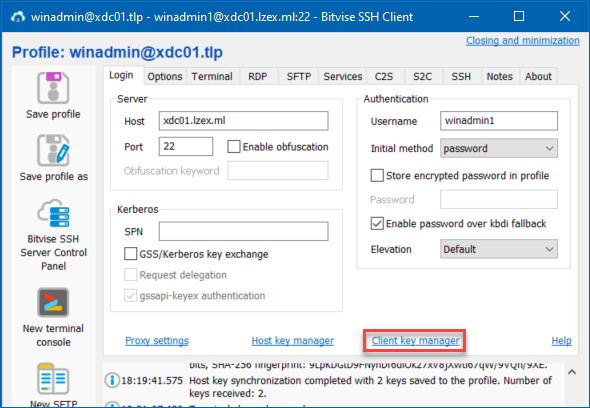
1. On the Bitvise SSH Client, click the Client key manager link. This link launches the Bitvise Client Key Management window.
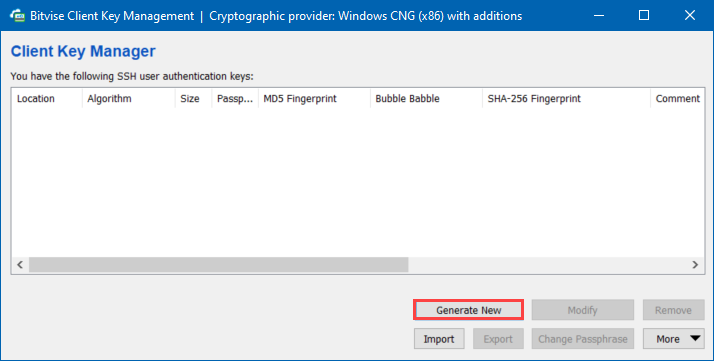
2. On the Bitvise Client Key Management window, click Generate New to set up a new keypair.
3. On the Generate New Keypair pop-up window, type a meaningful description for this new key into the comments box, such as the example below. Afterward, click Generate to save the changes and generate a new keypair.
To generate a password-protected key, enter a passphrase. But for this example, leave the passphrase blank.

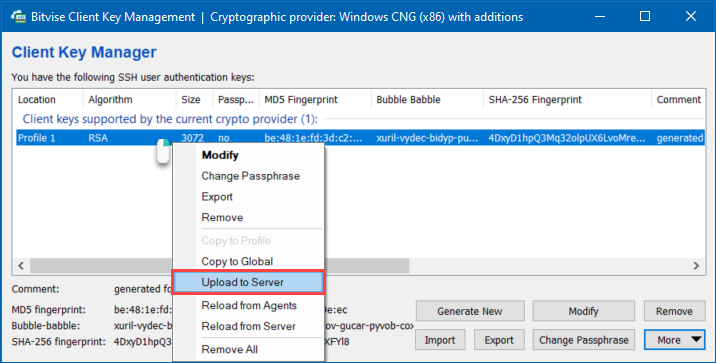
4. Back on the Client Key Manager, you’ll see the new key pair that you’ve generated with the location Profile 1. Remember that a key pair has private and public keys, and the public key should be on the SSH server.
Right click on the key and click Upload to Server to upload the public key to the Bitvise SSH Server.
After the upload, you’ll see a new entry in the list, but the location is on Server 1.

5. Now, close the Client Key Manager window to go back to the Bitvise SSH Client window.
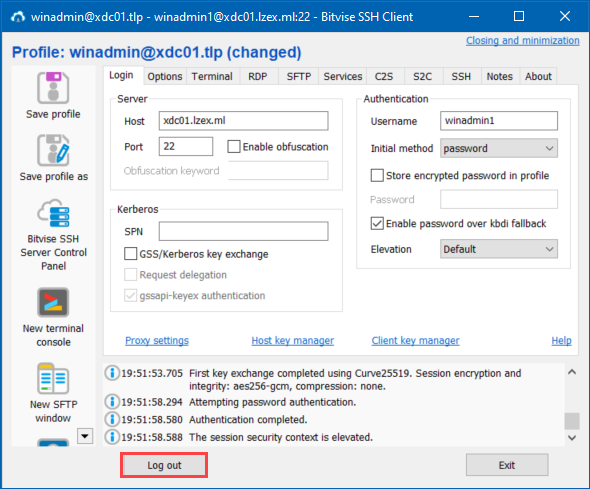
6. Back on the main window, click Log out to log out of your current SSH session.
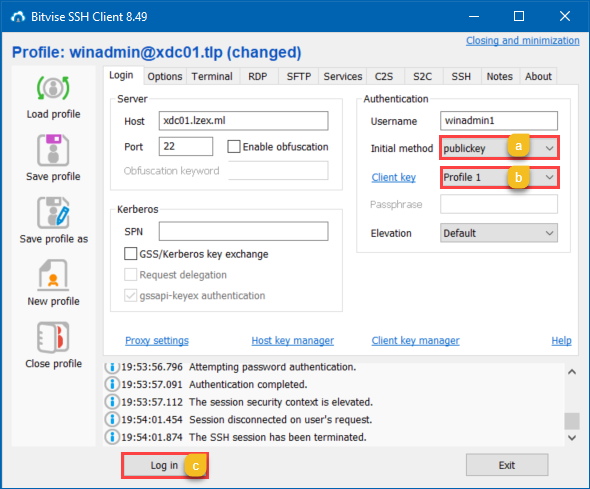
7. Next, set the authentication method to use the key instead of the password since the SSH user account already has a key pair.
- (a) Change the Initial method to publickey. Doing so changes the SSH client’s authentication method to use the key pair.
- (b) For the Client key, click the drop-down box and choose the key pair you previously generated. In this example, the client key is Profile 1.
- (c) Finally, click Log in to login to the SSH server.
Below, you’ll notice on the logs that the SSH client used the public key authentication method, and the log-in was successful.

Conclusion
The Bitvise SSH Server is a robust, secure, and convenient SSH server to configure. And this tutorial aimed to teach you how to get started with Bitvise SSH Server by installing and configuring the essential SSH server elements.
If you’ve set up other SSH servers before, how do you think the Bitvise SSH Server compares? Is this solution a better alternative, a balanced counterpart, or not at par? Let us know!


