


Developers like yourself have a lot on their plate and typically need a common place to plan, collaborate, test, and deploy codes. Save yourself the frustration; consider the Bitbucket API to ease the management of your Bitbucket environment!
The Bitbucket API lets you automate setting up authentication, creating repositories, managing user groups, and pull requests. And in this tutorial, you will learn how the Bitbucket REST API takes care of administrative tasks for you.
Read on and start enhancing your GIT DevOps productivity!
Prerequisites
This tutorial comprises hands-demonstrations. To follow, ensure you have the following:
- A Bitbucket account.
- Postman desktop application installed. This guide used Postman v10.5.6.
Authenticating Bitbucket with an App Password
Since REST APIs are available all over the internet, anyone can make a call to modify sensitive information. How do you mitigate this risk? An authentication check lets you determine the access level, allowing only administrators to install and evaluate apps.
Bitbucket Rest API provides various methods for authentication, including OAuth 2.0 Authentication and App passwords. But for a start, you will create an App password to authenticate Bitbucket.
To create an App password, follow these steps:
1. Open your favorite web browser, and log in to Bitbucket.
2. Once logged in, click on your account profile (top-right), and select Personal settings. Your browser redirects to your Personal settings page (step three).
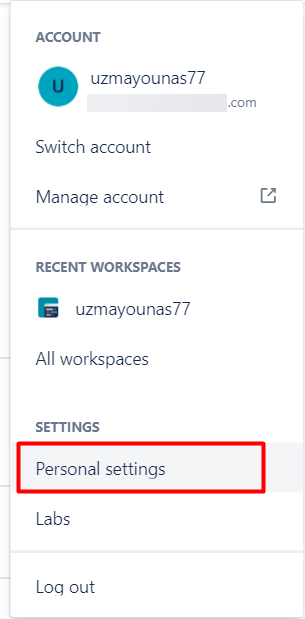
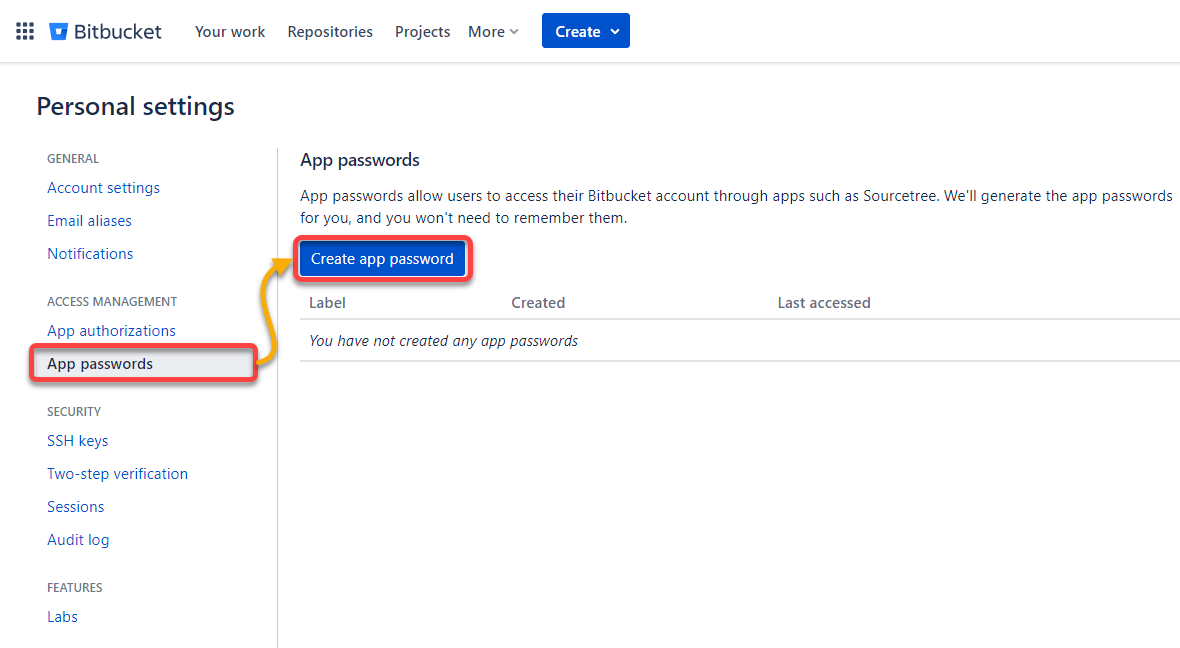
3. Next, click App passwords (left panel) to access the App passwords manager page, and click Create app password to initiate creating an App password.
💡 App passwords are tied to an individual account’s credentials. These passwords are useful to administrators to oversee Bitbucket-connected app testing while in development.
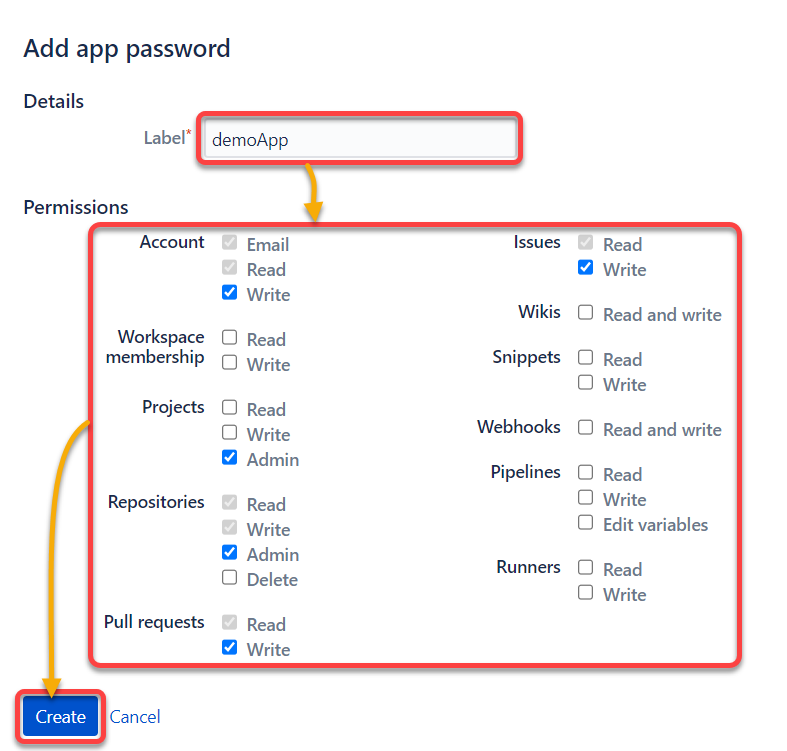
4. Now, configure the App password with the following:
- Provide a Label (i.e., demoApp), which serves as the name of the App password.Enable different types of Permissions depending on your project requirements.Click on the Create button to finalize creating your App password.
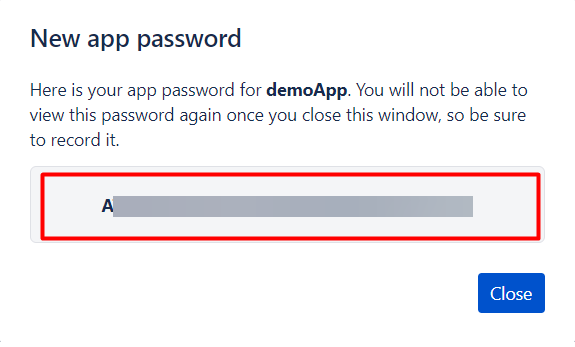
5. Lastly, copy the generated password from the New app password pop-up window, and save it somewhere safe for later use.
Authenticating Bitbucket via OAuth 2.0
OAuth 2.0 is considered a more secure method to authenticate when you are uncomfortable using an App password. OAuth protocol for Bitbucket uses third-party OAuth/OIDC providers to authenticate API calls.
With OAuth 2.0, the provider issues an access token, which serves as proof of identity for an API call. As a result, you do not have to share password data as this behavior restricts the access level, and the token needs to be revoked after some time.
To set up OAuth 2.0, you will create a consumer who will be responsible for making API calls:
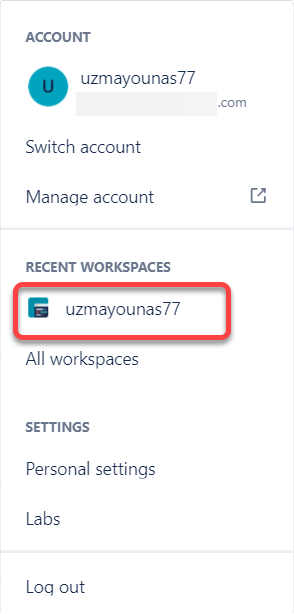
1. On Bitbucket, click your profile (top-right), and select your workspace.
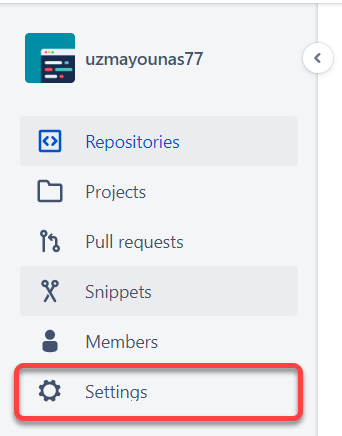
2. Next, click Settings (left panel) on your workspace page to access your workspace Settings.
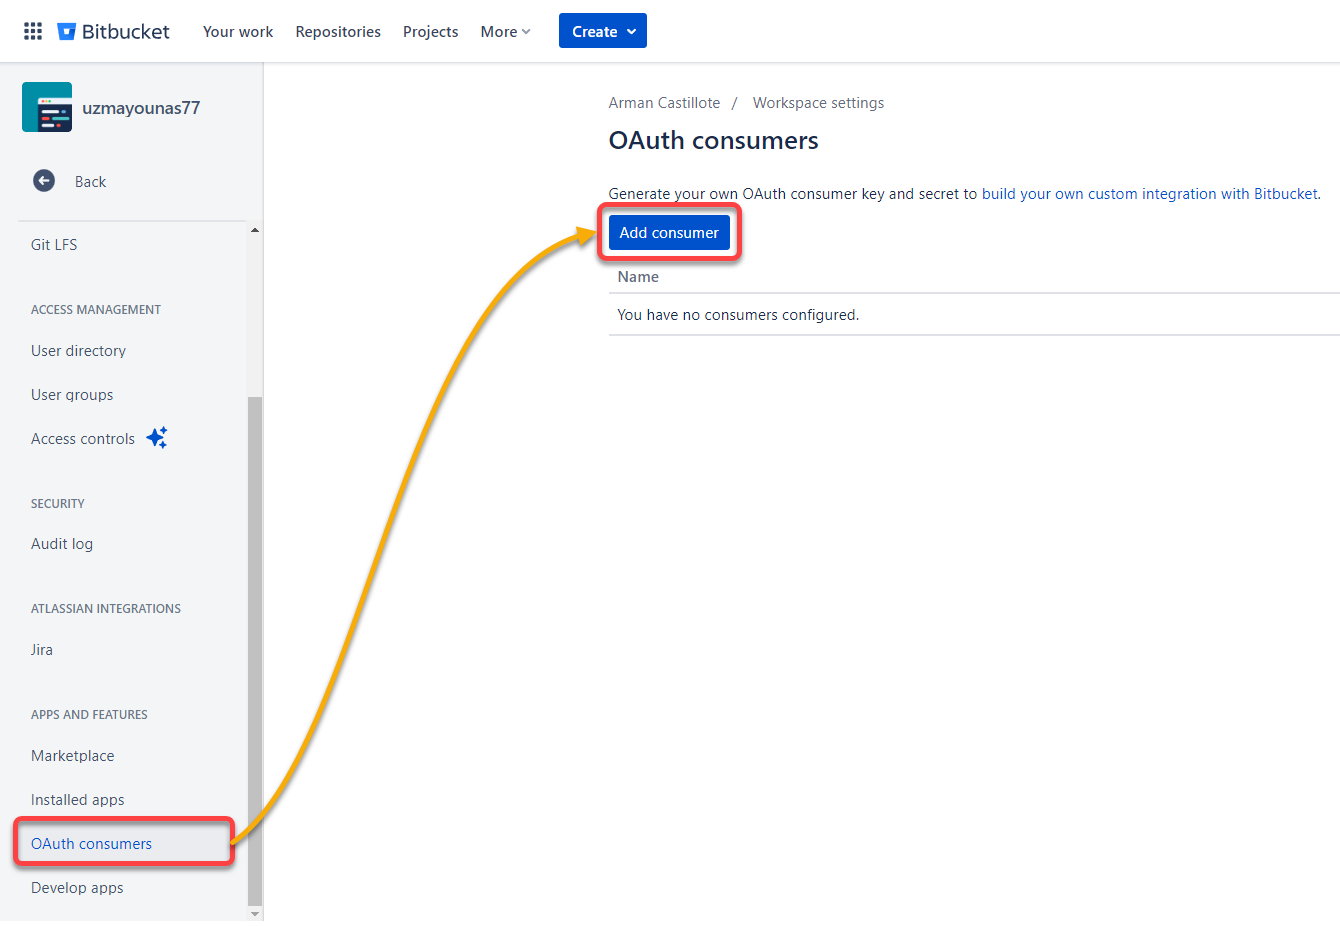
3. Navigate to OAuth consumers under the Apps and features section, and click Add consumer to initiate adding a new consumer. Your browser redirects to a page where you can fill in consumer information (step four).
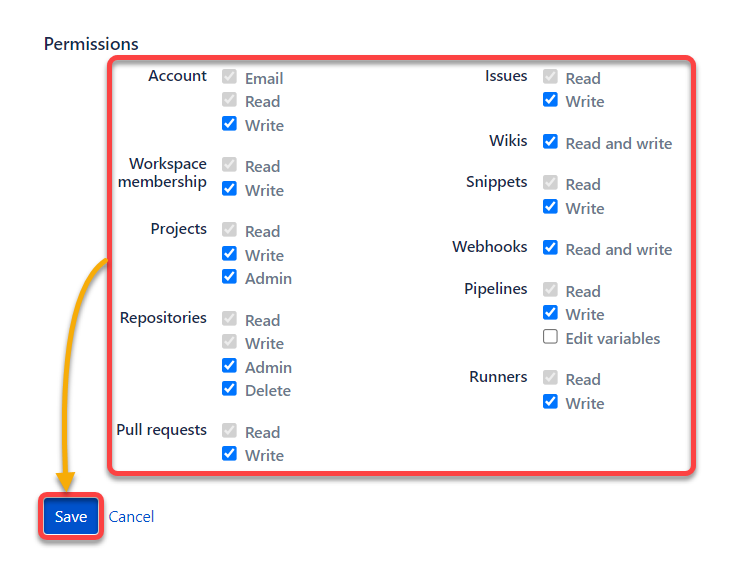
4. Now, configure the new OAuth consumer as follows:
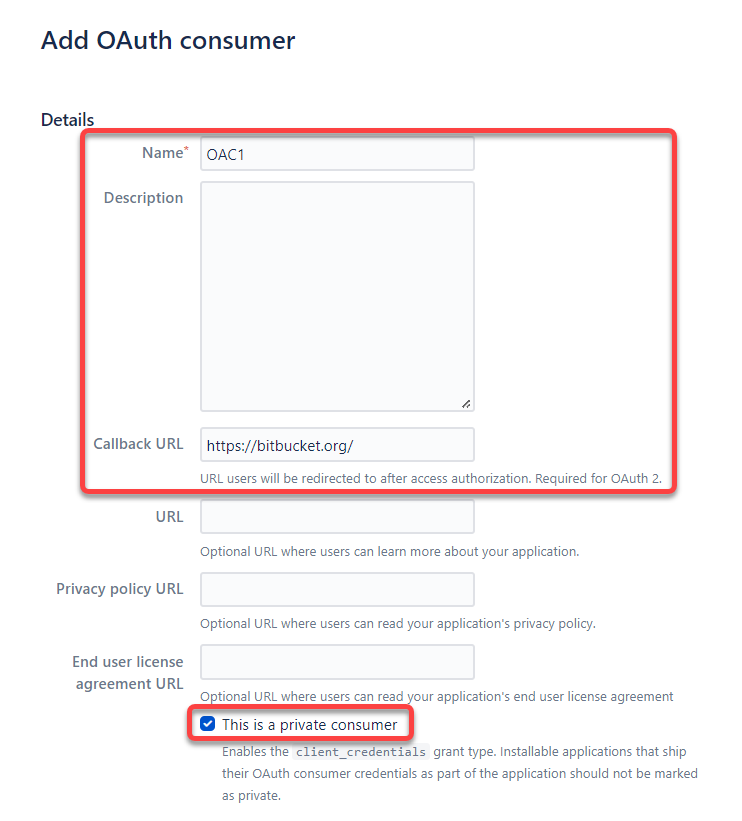
5. Choose which Permissions to provide, similar to creating an App password, and click Save to finalize creating the new OAuth consumer.
Once created, your browser redirects to the OAuth consumers page (step six).
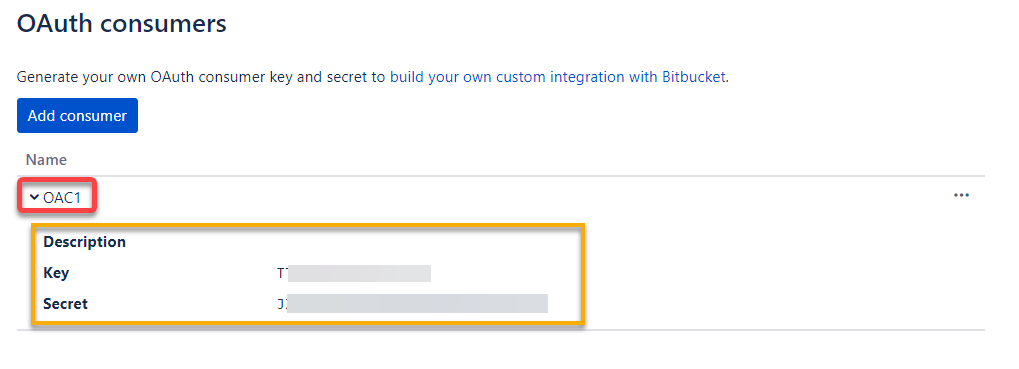
6. Next, click on the consumer’s name to expand its information.
Note the generated Key and Secret value for the consumer, as you will need them to interact with the Bitbucket API.
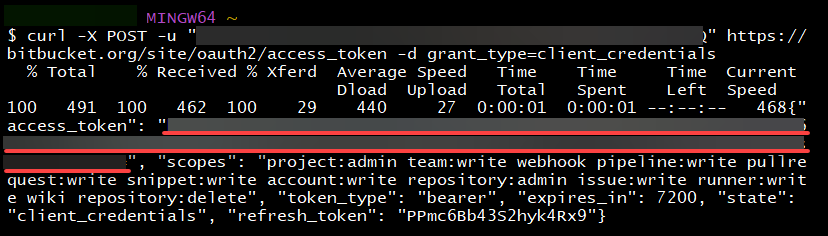
Finally, open your terminal, and run the below curl command to acquire an access token using your key and secret values to interact with Bitbucket API. The request is made to the Bitbucket API endpoint reserved for generating an access token.
Ensure you replace client_id and secret with your OAuth consumer’s key and secret value, respectively.
curl -X POST -u "client_id:secret" https://bitbucket.org/site/oauth2/access_token -d grant_type=client_credentialsTake note of the access_token, as shown below. You can use this access token to send requests to the projects/repositories associated with your consumer workspace.
Creating a Git Repository to Interact with Bitbucket API
Since you now have an access token, you are ready to interact with the Bitbucket API. How? You will create a repository as virtual project storage to save versions of your code.
A Git repository lets you track and manage the history of all changes made to repositories that belong to a specific workspace.
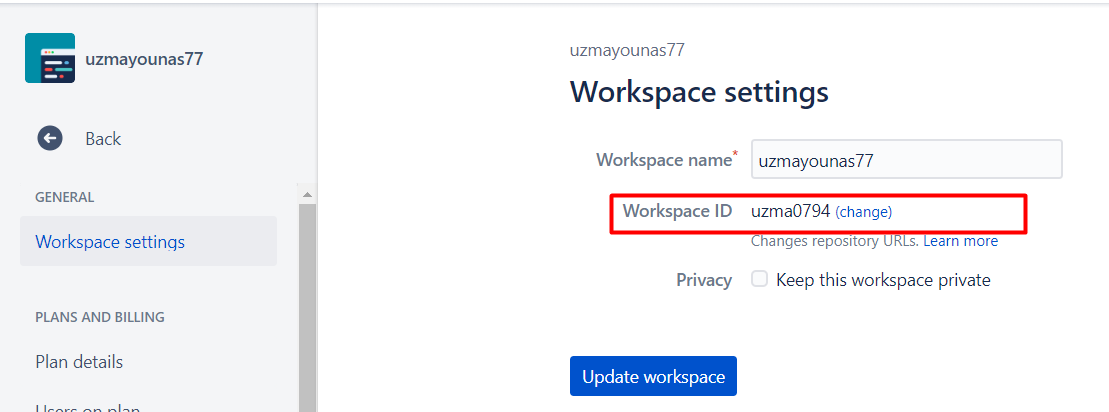
Retrieve your workspace ID first, which can be seen on the Workspace settings page.
Now, run the below command to create a repository, but ensure you replace the following:
XXXX– An identifier for your project within the workspace.{access_token}– The access token you noted in the last step of the “Authenticating OAuth 2.0” section.{workspace_id}– The ID of the workspace where you wish to create the new repository.{repo_name}– A name to set for your repository.
curl -X POST -H "Content-Type: application/json"-H "Authorization:Bearer {access_token}" -d '{
          "scm": "git",
           "project": {
                "key": "XXXX"
                }
     }' https://api.bitbucket.org/2.0/repositories/{workspace_id}/{repo_name}
💡 Bitbucket rest API supports the following endpoint for repositories.
POST /2.0/repositories/{*workspace_id*}/{repo_name}

Creating a User Group and Adding Users
For companies with many projects and employees, appropriate user access can be managed by creating user groups. All users belonging to a particular group share the same access privileges.
The 2.0 REST API version relies on 1.0 API resources for users and group management, as endpoints for 2.0 are not available yet.
💡 Bitbucket Cloud REST API version 1.0 is deprecated, but Bitbucket supports the
/1.0/groupsendpoint to manage groups. The current working version is 2.0, but 1.0 still supports limited 1.0 API resources, which include group and invitation endpoints.
Run the following curl command to create a new group via API call.
The groups endpoint is useful for querying information about Bitbucket user groups, creating new ones, updating memberships, and deleting them. The caller needs to authenticate with administrative rights on an account to access its groups.
Ensure you replace the following accordingly, in each command, throughout this tutorial:
| Placeholder | Value |
|---|---|
| username:password | Your key and secret values if you are using OAuth2. But if you are using an App password, provide your username and the password you obtained from App password creation |
| {workspace_id} | Your workspace ID. |
| group_name or group_slug | Your group’s name. |
curl --request POST --user username:password https://api.bitbucket.org/1.0/groups/{workspace_id} --data "name=group_name"
Now, run the below command to add members to the newly-created group.
Replace {group_slug} with the group’s name and {username} with either the member’s unique account name or email. Members will receive an email notification of the invitation.
curl --request PUT --user username:password --header "Content-Type: application/json" https://api.bitbucket.org/1.0/groups/{workspace_id}/{group_slug}/members/{username}/ --data '{}'If executed successfully, the response body contains details about the newly added user, including user display name and User ID (UUID), as shown below.

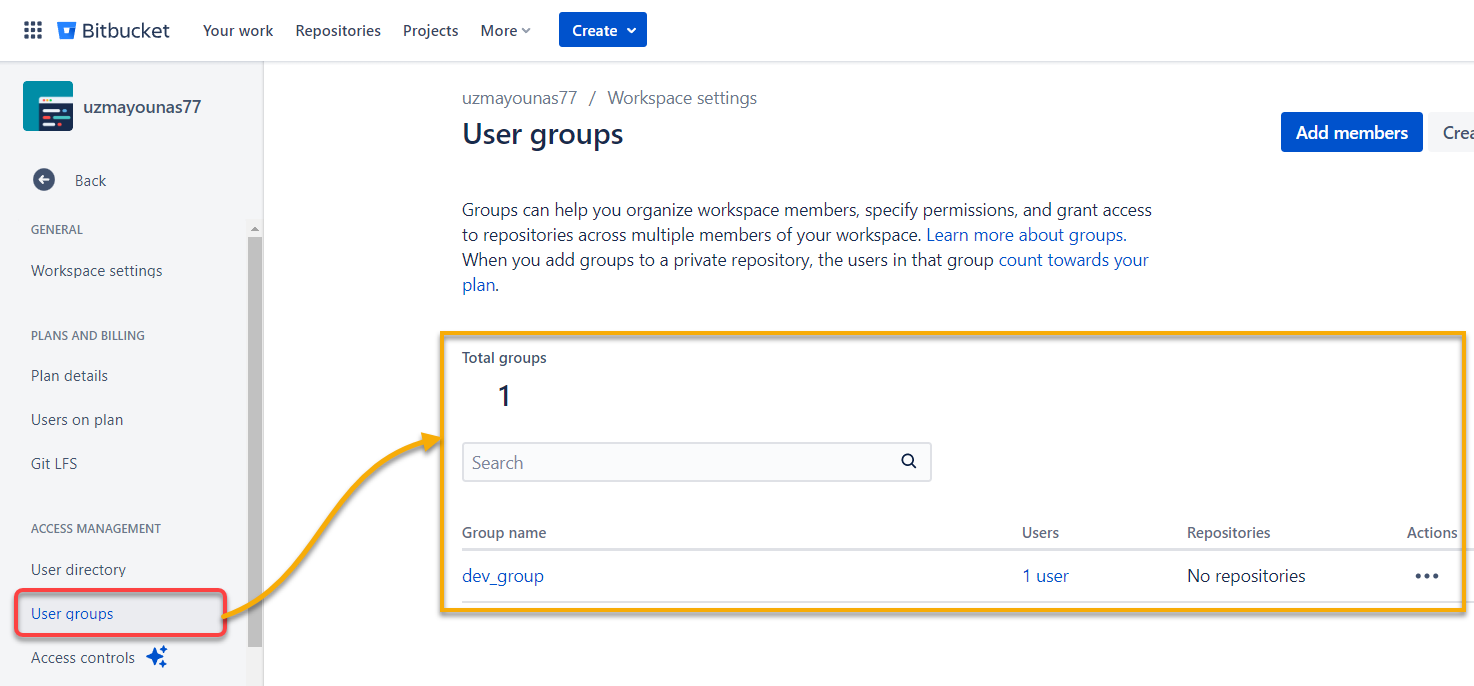
Below, you can see a member is successfully added to the group (dev_group) in Bitbucket and now has access to all the repositories in the assigned workspace.
Listing All Pull Requests
Since Git is a version control system (VCS), your repository will have different versions of changes. How do you put these versions together? You need a pull request to merge the local repository changes to the main or developer branch.
Mind you, though, that pull requests must be approved by an administrative user after proper review. So, you first need to get a list of all the pull requests using Postman, an API testing application that presents the API response in a readable form.
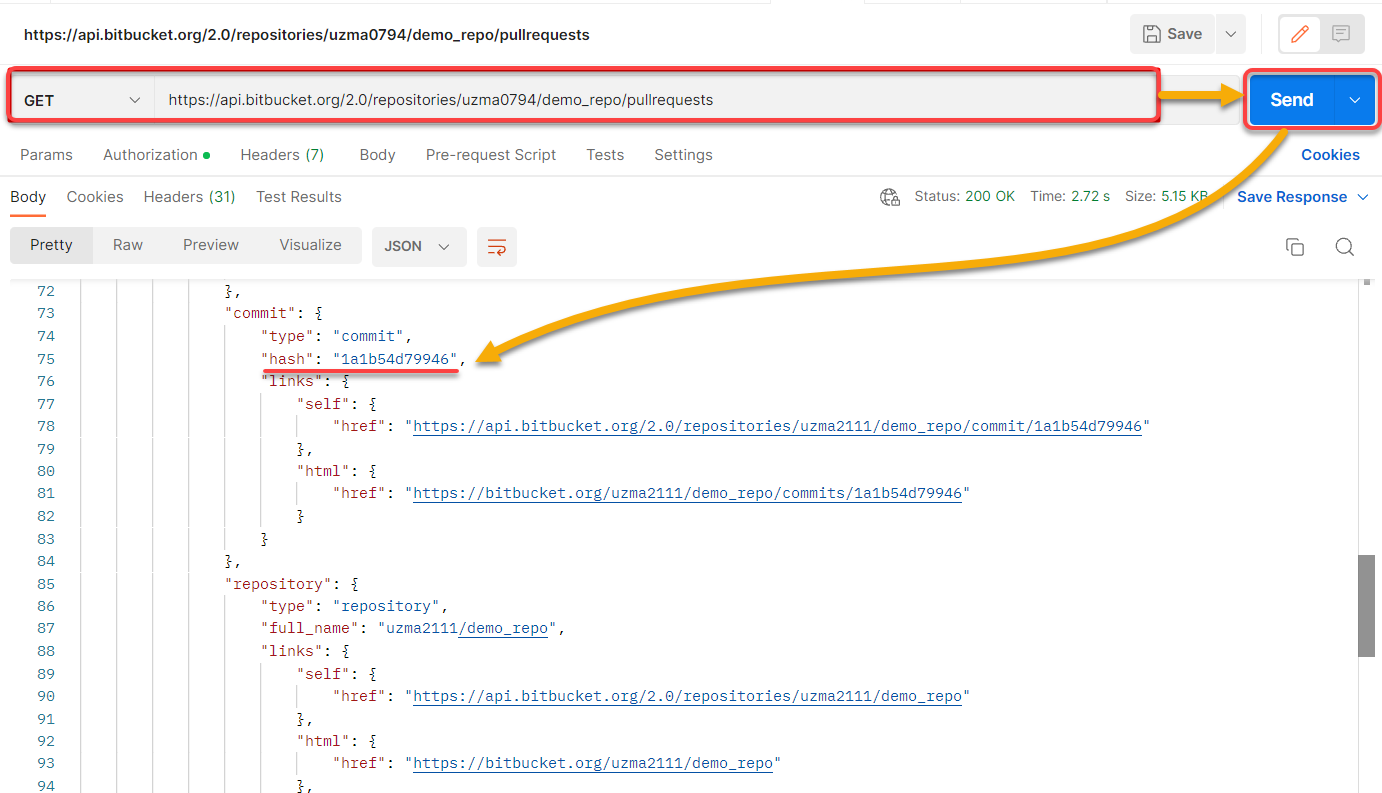
Launch Postman, choose the GET option from the dropdown field, and run the below URL to list all pull requests for a specified repository.
https://api.bitbucket.org/2.0/repositories/{workspace_id}/{repo_name}/pullrequestsBelow, you can see that Postman is like cURL’s GUI version. cURL offers a command line utility to transfer data over URLs. Postman does the same job but provides an interactive UI.
Take note of the commit ID in the hash, as shown below, which you (an admin) will use to approve the pull request.
But if you prefer cURL, run the below curl command instead to list all the pull requests for a specified repository. But from this point throughout the tutorial, ensure you replace {workspace_id}, {repo_name}, and {access_token} in each endpoint URL and command.
curl --request GET --url 'https://api.bitbucket.org/2.0/repositories/{workspace_id}/{repo_name}/pullrequests' --header 'Authorization: Bearer {access_token}' --header 'Accept: application/json'Reviewing and Responding to Commits (Approve/Unapprove)
A commit is an action that sends the latest source code to the repository using a pull request. But a pull request will just be lying around without an admin’s commit approval.
The updated code needs to be revised before it is merged into the main repository. As an admin user with access privileges, you can approve or reject specified commits using Bitbucket API.
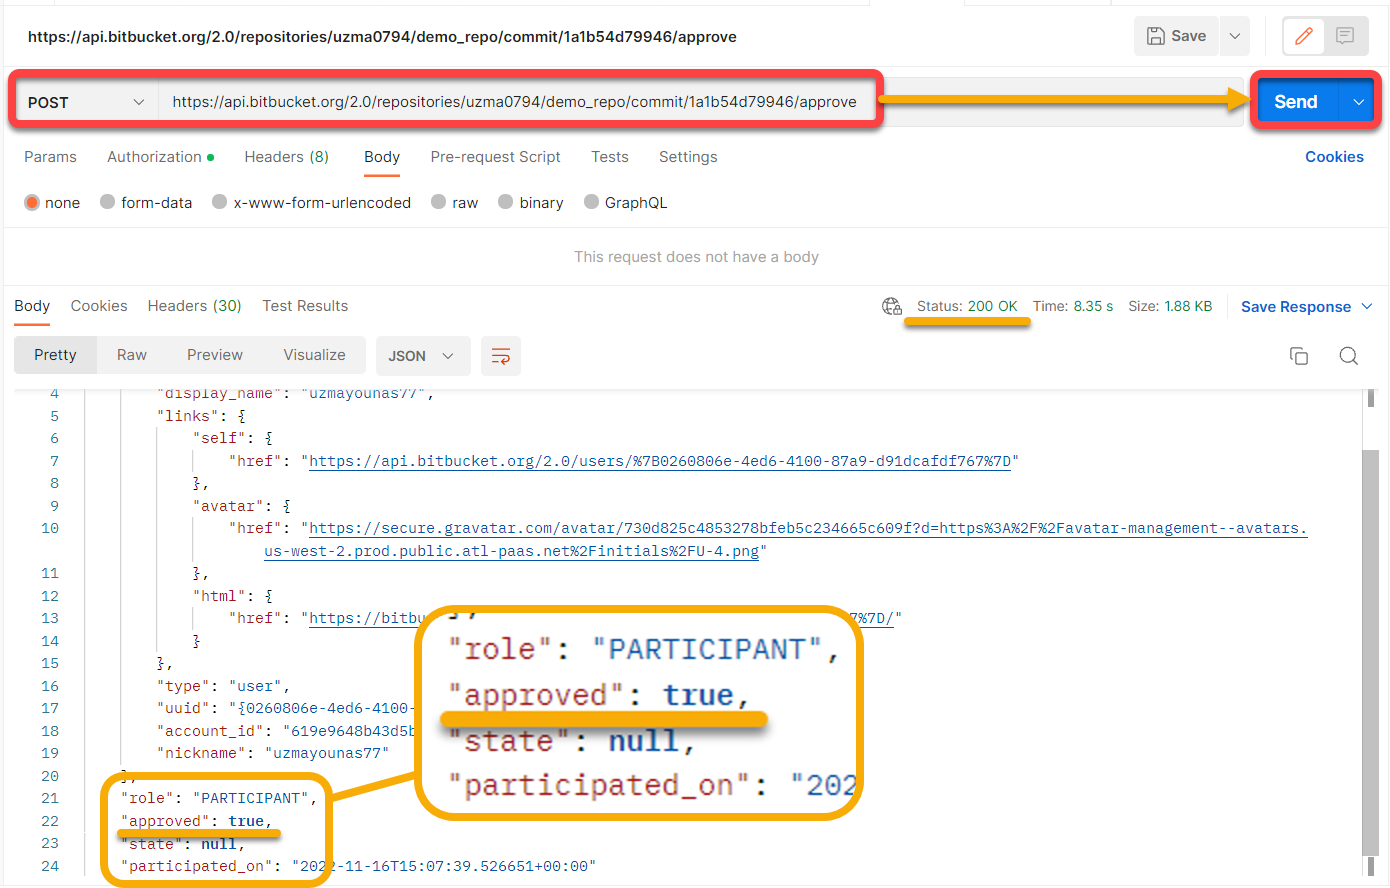
Choose the POST option from the dropdown field in Postman, and run the following URL to approve a commit. Ensure you replace {commit_ID} with the commit ID you noted in the last step of the “Listing All Pull Requests” section.
https://api.bitbucket.org/2.0/repositories/{workspace_id}/{repo_name}/commit/{commit_ID}/approveYou can see below that the commit has the approved status (”approved”: true or 200 OK).
For cURL, run the below command to approve a specific commit, replacing {commit_ID} with the commit ID you plan to approve.
curl --request POST --url 'https://api.bitbucket.org/2.0/repositories/{workspace_id}/{repo_name}/commit/{commit_ID}/approve' --header 'Authorization: Bearer {access_token}' --header 'Accept: application/json'💡 Similarly, users with explicit access to the repository can Redact specified commits using the following command.
curl --request DELETE --url 'https://api.bitbucket.org/2.0/repositories/{workspace}/{repo_name}/commit/{commit}/approve' --header 'Authorization: Bearer {access_token}Deleting Groups and Repositories
Cleaning your workspace is one way of enhancing productivity. Who would not want a clutter-free environment? But how? Delete groups and repositories that do not serve any purpose.
So long as you are the root user with admin rights to delete a group of users, cleaning your workspace is just a few steps away.
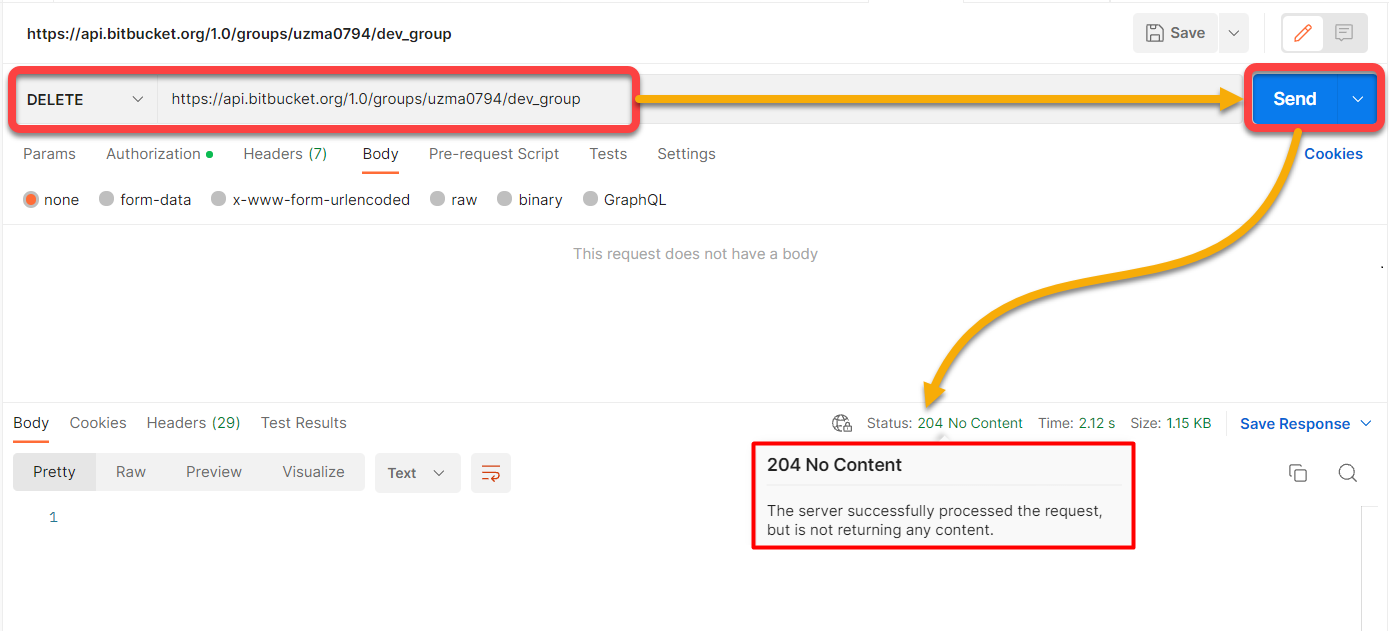
Switch to the DELETE option, and run the following URL to delete a specific group
https://api.bitbucket.org/1.0/groups/{workspace_id}/{group_slug}You can see below that the status is 204 No Content, which indicates the group no longer exists.
For cURL, run the below command to delete a specific group.
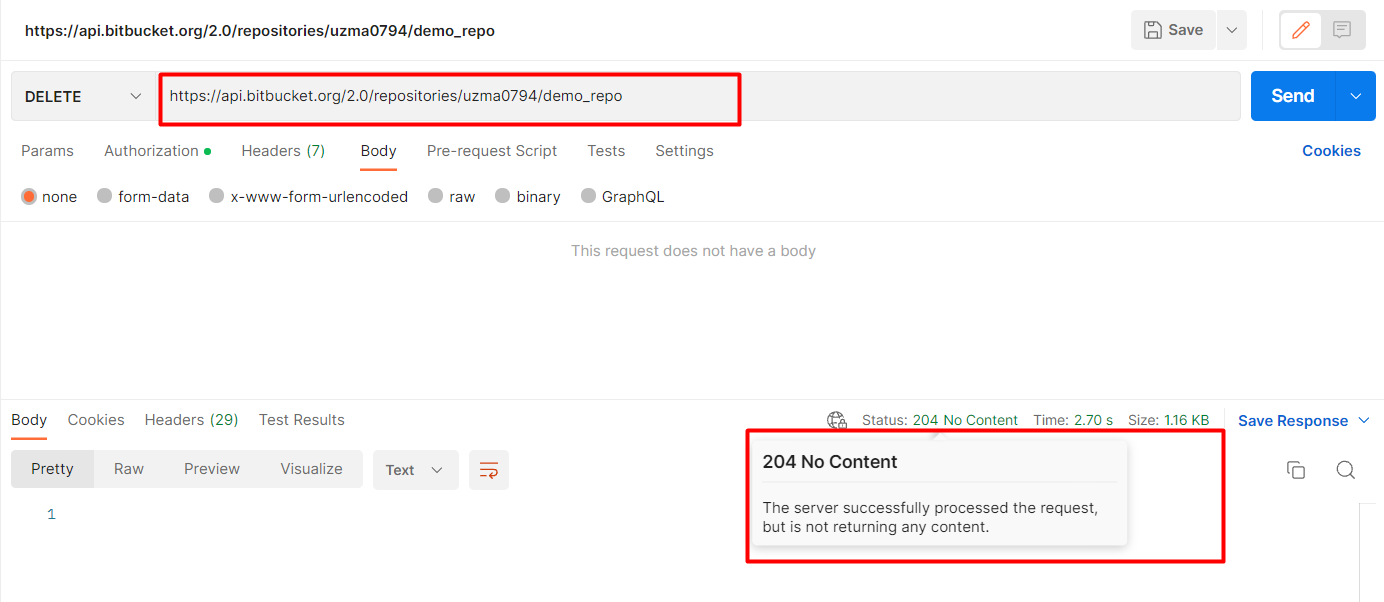
curl --request DELETE --user username:password --header "Content-Type: application/json" https://api.bitbucket.org/1.0/groups/{workspace_id}/{group_slug}/Now, run the below URL to delete a specific repository.
https://api.bitbucket.org/2.0/repositories/{workspace_id}/{repo_name}Below, you can see the same 204 No Content status, which tells you the repository no longer exists.
But for cURL, run the following command to delete a repository permanently.
curl --request DELETE --url 'https://api.bitbucket.org/2.0/repositories/{workspace}/{repo_slug}' --header 'Authorization: Bearer {access_token}'Conclusion
This tutorial has walked you through all the necessary practices carried out by a Bitbucket administrator user. Specifically, you have learned to create, manage and control access to Bitbucket workspaces using Bitbucket API calls.
APIs are the fastest and easiest ways to manage various Bitbucket operations without going through the manual setup. Bitbucket uses standard HTTP requests to access and use data, making it compatible with any programming language or framework.
The API is of great help to streamline workflows and maintain high-quality code. Why not move ahead with setting up Bitbucket Pipelines? Bring continuous delivery by synchronizing Bitbucket API events!


