

Azure Network Security Groups or Azure NSGs allow you to filter network traffic both inbound and outbound, from one or more Azure resources. If you’re ever needed to prevent access to an Azure resource, you must understand how NSGs work.
Not a reader? Watch this related video tutorial!In this article, you’re going to learn the purpose of the Azure NSG and how to get them set up with the PowerShell scripting language.
Prerequisites
- An Azure resource to target. This tutorial will be using a pay-as-you-go subscription and a Windows Server 2019 Azure virtual machine.
- PowerShell 7+. Earlier version of PowerShell may work but this tutorial is using PowerShell 7.0.1 for configuration.
- The Azure Az module PowerShell module
Understanding Azure NSGs
Think of an Azure NSG as a firewall. A firewall consists of rules defining actions to take on incoming and outgoing traffic called rulesets. Firewalls typically come with default rulesets which are rules that dictate what can and can’t traverse through the firewall; Azure NSGs have similar.
Unlike traditional firewalls, Azure NSGs also have a cloud concept called service tags. Services tags are Azure’s way of abstracting address ranges to make them easier to manage.
Let’s briefly cover each of these important topics.
Using Service Tags to Simplify Rule Configuration
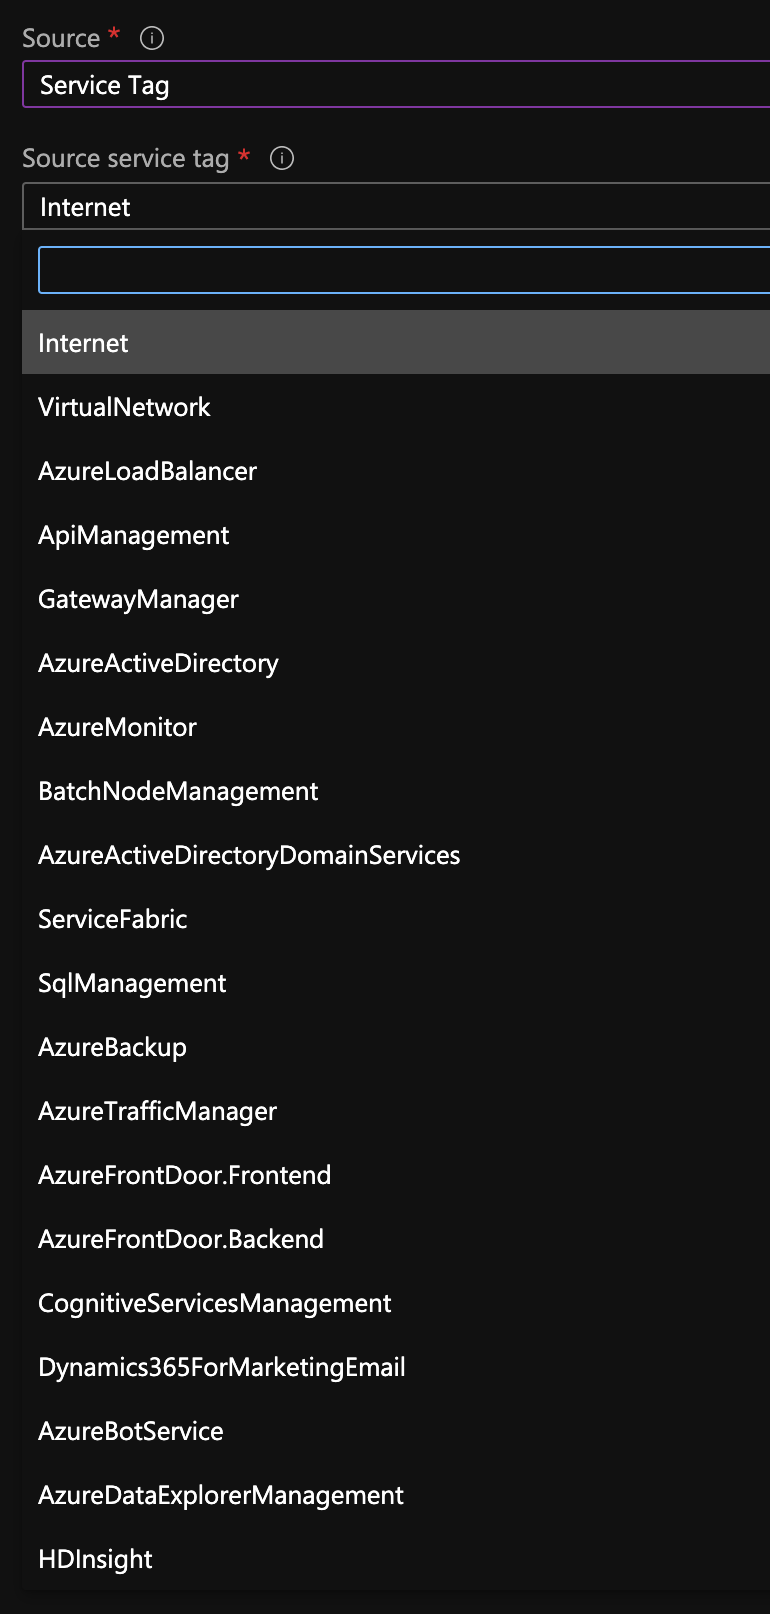
In cloud services, IP addresses and ranges can often change. This can make maintaining manually defined Azure IP range rulesets difficult. Thankfully, Azure defines many different service tags that your NSG rule can target.
Service tags are a concept that will always use the most up to date address list. Service tags are a way of assigning placeholders to sets of address ranges for easier management.
Be Aware of the Default Rule Sets
When you create and apply an Azure NSG, you must first need to know about the rules that those NSGs automatically apply. These default rulesets are immutable and are created for both inbound and outbound traffic.
Each rule in an Azure NSG ruleset has a priority. The priority dictates the order of operation or which rules override others. If, for example, a rule with a priority of 65000 exists that blocks all inbound traffic and you create a rule with a priority of 64999 that allows port 80, the Azure NSG will block all traffic excluding port 80.
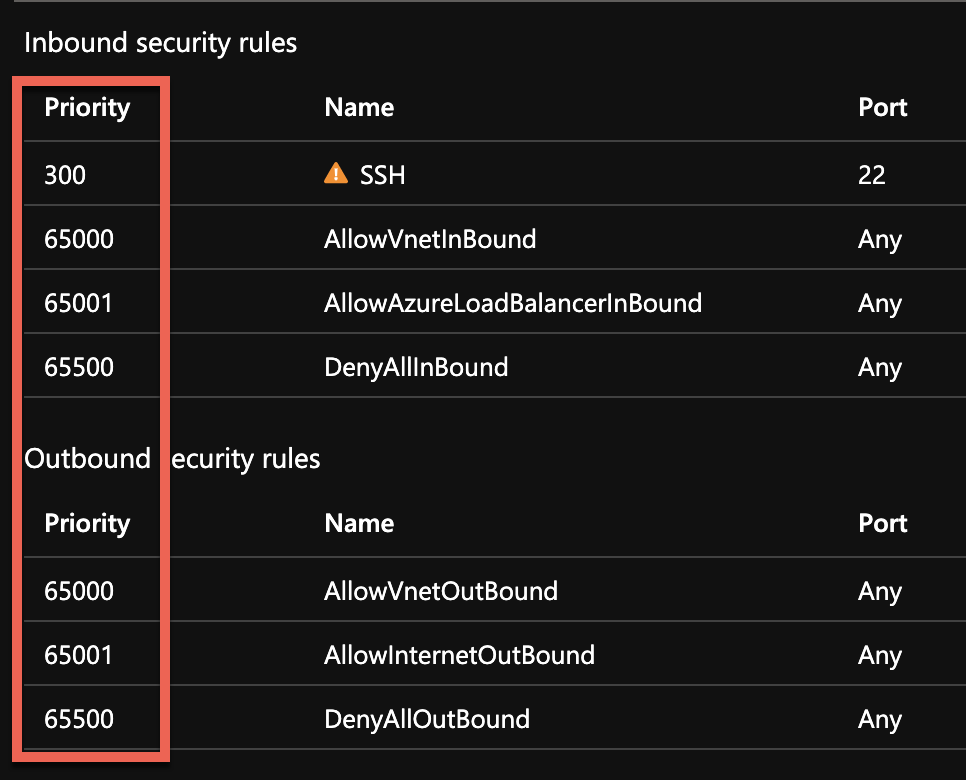
Default rulesets cannot be changed but you can override them using a higher priority rule as shown above. Each of these rules applies to all protocols such as TCP, UDP, and ICMP.
Make sure that your rules use a number lower than
65500to override the default rules!
When you create an Azure NSG, you’ll see various default rules:
Inbound Rules
AllowVNetInBound– This inbound rule contains all IP address ranges defined for the virtual network and all connected on-premises address spaces. Additionally, this rule contains peered virtual networks, virtual networks connected to a virtual network gateway, virtual IP address of the host, and any address prefixes used on user-defined routes. This rule is set with a65000priority.AllowAzureLoadBalancerInBound– TheAzureLoadBalancerservice tag translates to the virtual IP address of the host,168.63.129.16where the Azure health probe originates. Actual traffic does not travel through here, and if you don’t use Azure Load Balancing, this rule can be overridden. The virtual IP address of the host exists in all regions specifically to provide essential infrastructure services such as DHCP, DNS, IMDS, and health monitoring. This rule is set with a65001priority.DenyAllInbound– Set as the very last rule, using priority65500, this rule denies all non-explicitly allowed inbound traffic.
Outbound Rules
AllowVNetOutBound– This contains all IP address ranges defined for the virtual network, all connected on-premises address spaces, peered virtual networks, virtual networks connected to a virtual network gateway, virtual IP address of the host, and any address prefixes used on user-defined routes. This rule is set with a65000priority.AllowInternetOutBound– IP address space that’s outside of the virtual network and reachable by the public internet. Includes the address range of Azure-owned public IP address space. This rule is set with a65001priority.DenyAllOutBound– Like in the inbound ruleset, this rule is set as the very last rule, using priority65500. This outbound rule will deny all non-explicitly allowed traffic.
Building Azure NSGs with PowerShell
Enough talk, let’s get your hands dirty and begin building some Azure NSGs with PowerShell! Assuming you’re in your PowerShell console and authenticated, continue reading.
Related: Connect-AzAccount: Your Gateway to Azure with PowerShell
To create an Azure NSG with PowerShell, you need one command; New-AzNetworkSecurityGroup. To create an NSG with this command, provide it the name, the resource group name to create the NSG under, and the location.
The below code example is using the New-AzNetworkSecurityGroup cmdlet to create an NSG called NSG-MyVM in the Articles resource group that’s located in the eastus Azure datacenter.
$Params = @{
  'Name'              = 'NSG-MyVM'
  'ResourceGroupName' = 'Articles'
  'Location'          = 'centralus'
}

$NSG = New-AzNetworkSecurityGroup @Params
Creating Azure NSG Rules with PowerShell
Once you have the NSG, the default set of rules probably isn’t enough. You’ll need to create your own rules.
Configuring an Inbound Rule for Remote Desktop Protocol
A common administrative task is the need to create an inbound rule for the Remote Desktop Protocol (RDP). In the tutorial’s example, perhaps it’s going to be applied to a Windows Server Azure VM and you need to access the VM via RDP. In that case, you need to open up port 3389 inbound.
To add a new inbound rule to an existing NSG requires three steps:
- Run the
Get-AzNetworkSecurityGroupcommand to retrieve the existing NSG. - Run the
Add-AzNetworkSecurityRuleConfigto create the rule. - Run the
Set-AzNetworkSecurityGroupcommand to apply that rule to the NSG.
The below code example is using the Get-AzNetworkSecurityGroup to retrieve an existing NSG. Next, a rule is defined using Add-AzNetworkSecurityRuleConfig which is then applied to the existing NSG using the Set-AzNetworkSecurityGroup cmdlet.
$NSG = Get-AzNetworkSecurityGroup -Name 'NSG-MyVM' -ResourceGroupName 'Articles'

$Params = @{
  'Name'                     = 'allowRDP'
  'NetworkSecurityGroup'     = $NSG
  'Protocol'                 = 'TCP'
  'Direction'                = 'Inbound'
  'Priority'                 = 200
  'SourceAddressPrefix'      = 'my.ip.address'
  'SourcePortRange'          = '*'
  'DestinationAddressPrefix' = '*'
  'DestinationPortRange'     = 3389
  'Access'                   = 'Allow'
}

Add-AzNetworkSecurityRuleConfig @Params | Set-AzNetworkSecurityGroup
The Priority parameter determines when the rule is evaluated, the value of
200is near the top as4096is the lowest priority rule.
Denying Outbound SANS Recommended Traffic
Often outbound traffic is not blocked as it can be challenging to know all the possible ports that an application may need to use. Fortunately, you can find some expert egress filtering recommendations from the SANS Institute, a widely trusted organization for information security standards.
To implement SANS’ recommendations, we can use the same three steps provided above but this time create a rule with mulitple ports and with a Direction of Outbound rather than Inbound.
- MS RPC – TCP & UDP port 135
- NetBIOS/IP – TCP & UDP ports 137-139
- SMB/IP – TCP port 445
- Trivial File Transfer Protocol (TFTP) – UDP port 69
- Syslog – UDP port 514
- Simple Network Management Protocol (SNMP) – UDP ports 161-162
The below code retrieves an existing NSG rule using the Get-AzNetworkSecurityGroup cmdlet. An outbound rule is defined using the Add-AzNetworkSecurityRuleConfig and applied via the Set-AzNetworkSecurityGroup cmdlet.
$NSG = Get-AzNetworkSecurityGroup -Name 'NSG-MyVM' -ResourceGroupName 'Articles'

$Params = @{
  'Name'                     = 'DenySANSOutBound'
  'NetworkSecurityGroup'     = $NSG
  'Protocol'                 = '*'
  'Direction'                = 'Outbound'
  'Priority'                 = 4000
  'SourceAddressPrefix'      = '*'
  'SourcePortRange'          = '*'
  'DestinationAddressPrefix' = 'Internet'
  'DestinationPortRange'     = @('135', '137','139','445','69','514','161','162')
  'Access'                   = 'Deny'
}

Add-AzNetworkSecurityRuleConfig @Params | Set-AzNetworkSecurityGroup
Of course, some of these ports are valuable and necessary, depending on the services that you are providing. Most likely, you will need to customize this list depending on what your application requires, which are typically provided by the vendor or using a tool to find open ports such as netstat.
Related: Finding Ports with Netstat and PowerShell
Configuring an Azure NSG for a Specific Subnet
Perhaps you have segmented your virtual network space via subnets. To get more granular, you can apply NSGs to just a specific subnet thereby granularly controlling the traffic in that subnet.
The code snippet below is finding an entire address prefix and applying an NSG to it.
# Retrieve an existing Virtual Network
$VNet = Get-AzVirtualNetwork -Name 'Articles-vnet' -ResourceGroupName 'Articles'
# Retrieve an existing NSG
$NSG  = Get-AzNetworkSecurityGroup -Name 'NSG-MyVM' -ResourceGroupName 'Articles'

# Select the first subnet using array notation and the first record located at the 0 index
$Params = @{
    'VirtualNetwork'       = $VNet
    'Name'                 = ($VNet.Subnets[0]).Name
    'AddressPrefix'        = ($VNet.Subnets[0]).AddressPrefix
    'NetworkSecurityGroup' = $NSG
}

# Apply the updated configuration to the subnet configuration and then apply the change to the VNet
Set-AzVirtualNetworkSubnetConfig @Params
Set-AzVirtualNetwork -VirtualNetwork $VNet
Next, learn how to use network interfaces to further segment and limit NSG’s to just what may be needed, such as a network interface.
Applying an Azure NSG to a Network Interface
Similar to how subnets work, you can apply NSG rules directly to a network interface. This granularity level is usually unnecessary, but when you have multiple network interfaces per virtual machine, it can make sense to apply different rulesets to the individual NIC’s as necessary.
Similar to how the subnet limiting is defined, you can apply rules to an individual NIC. In this case, you are using the Get-AzNetworkInterface cmdlet to retrieve a specific NIC on the given VM. This will have the previously created NSG set to the NetworkSecurityGroup property.
$NSG = Get-AzNetworkSecurityGroup -Name "MyVM-nsg" -ResourceGroupName "Articles"
$NIC = Get-AzNetworkInterface -name "MyVM-vm-nic"

$NIC.NetworkSecurityGroup = $NSG
$NIC | Set-AzNetworkInterface
What about diagnosing and analyzing traffic through an NSG? Read on to learn about NSG flow logs and how you can use them!
Debugging and Troubleshooting with NSG Flow Logs
Throughout NSG creation and usage, you may find that you need further debugging to troubleshoot a broken rule or analyze traffic. Flow Logs is a feature of the Azure Network Watcher that logs information about IP traffic throwing through an NSG.
Once the Azure Network Watcher captures network traffic, it stores that data in an Azure Storage Account. Using PowerShell, you can configure Azure NSG flow logs to parse through that Azure storage account and debug and better troubleshoot what’s going on.
Related: How to Download and Install the AzCopy Tool
Enabling NSG flow logs consists of three rough steps in PowerShell:
- Register the
Microsoft.Insightsprovider. - Create an Operational Insights Workspace to store the data.
- Enable the NSG flow log with the
Set-AzNetworkWatcherConfigFlowLogcommand.
To make configuration of Azure NSG Flow Logs easier, the below PowerShell code will simplify the different required steps. Notably, this code creates an Operational Insights Workspace and associates a Flog Log configuration with the correct subscription, workspace, and NSG.
$resourceGroupName = '<some resource group name>'
$NetworkWatcher = Get-AzNetworkWatcher -Name '<some name>' -ResourceGroupName $resourceGroupName
$NSG            = Get-AzNetworkSecurityGroup -Name 'NSG-MyVM' -ResourceGroupName $resourceGroupName
$StorageAccount = Get-AzStorageAccount -ResourceGroupName $resourceGroupName -Name '<storage account name>'
$Subscription   = Get-AzSubscription -SubscriptionName '<your subscription name>'

$Workspace = New-AzOperationalInsightsWorkspace -Location 'centralus' -Name "DefaultWorkspace-$($NSG.Name)-Articles" -Sku 'Standard' -ResourceGroupName $resourceGroupName

$Params = @{
  'NetworkWatcher'         = $NetworkWatcher
  'TargetResourceId'       = $NSG.Id
  'StorageAccountId'       = $StorageAccount.Id
  'EnableFlowLog'          = $True
  'FormatType'             = 'JSON'
  'FormatVersion'          = 2
  'EnableTrafficAnalytics' = $True
  'WorkspaceResourceId'    = $Workspace.ResourceId
  'WorkspaceGUID'          = $Workspace.CustomerId
  'WorkspaceLocation'      = 'centralus'
}

Set-AzNetworkWatcherConfigFlowLog @Params
Flow logs contain many different properties, as is typical in firewall logs. This includes such properties such as source and destination IP, ports, protocols, and time stamps. Version 1 and 2 logs contain one big difference in that version 2 has the concept of flow state. This marks the continuation and termination of a flow along with traffic bandwidth information.
Next Steps
Azure NSGs are powerful tools to limit and audit traffic to a resource. Used effectively, you can secure your resources and infrastructure properly. With auditing capabilities through NSG flow logs and the ability to limit NSG’s to subnets or network adapters, you have the flexibility necessary to scope rules as needed and verify that all traffic is as expected.


