


The AzCopy tool is a free and handy tool that allows you to copy and move data to and from Azure storage. It’s a great command-line utility that can automate and streamline the process but requires some setup. Let’s get into how to download AzCopy and get started.
In this article, you’re going to learn how to prepare your system to use AzCopy. This includes downloading and authenticating the tool to have access to Azure storage. By the time you’re through, you’ll be ready to use AzCopy to manage Azure storage data.
The latest and supported version of AzCopy as of this writing is AzCopy v10. AzCopy is available for Windows, Linux, and macOS. In this article, only the Windows AzCopy utility is covered.
Prerequisites
You’ll learn hands-on how to perform a few different tasks in this article. If you’d like to follow along, be sure you have the following prerequisites met.
- An Azure subscription. If you do not have this yet, you can request a trial subscription.
- Azure Storage Account. Please refer to Create a storage account to learn more.
- An Azure AD tenant created with a user account part of the Storage Blob Data Contributor or Storage Blob Data Owner groups
- Windows PowerShell 5.1 or PowerShell Core 6+ (optional if downloading AzCopy via PowerShell script)
Download AzCopy: The Manual Way
There are a couple of different ways to download AzCopy. Let’s first do it the manual way. You might use this method if you don’t intend to install AzCopy on many computers at once.
Navigate to this URL – https://aka.ms/downloadazcopy-v10-windows and it should initiate a download of the zip file. Once downloaded, extract the zip file to the C:\AzCopy or a folder of your choice.
Lastly, add the installation directory to the system path. Refer to the article How to set the path and environment variables in Windows if you need to know how to do that. Adding the folder path to the Windows PATH allows you to call the azcopy executable whenever you are in any working directory at the command line.
Download AzCopy via PowerShell Script
If you intend to install AzCopy on many machines or simply need to provide instructions for someone else to install it, you can use PowerShell also. Using a PowerShell script simplifies the process down to a single script.
Create a new PowerShell script and copy/paste the below contents into it. You can get an idea of which each section of the script is doing by inspecting the in-line comments.
By default, the below script will download AzCopy in the C:\AzCopy folder. If you’d like to change that, when running the script, use the InstallPath parameter or simply change the default path in the script itself.
$InstallPath = 'C:\AzCopy'

# Cleanup Destination
if (Test-Path $InstallPath) {
    Get-ChildItem $InstallPath | Remove-Item -Confirm:$false -Force
}

# Zip Destination
$zip = "$InstallPath\AzCopy.Zip"

# Create the installation folder (eg. C:\AzCopy)
$null = New-Item -Type Directory -Path $InstallPath -Force

# Download AzCopy zip for Windows
Start-BitsTransfer -Source "https://aka.ms/downloadazcopy-v10-windows" -Destination $zip

# Expand the Zip file
Expand-Archive $zip $InstallPath -Force

# Move to $InstallPath
Get-ChildItem "$($InstallPath)\*\*" | Move-Item -Destination "$($InstallPath)\" -Force

#Cleanup - delete ZIP and old folder
Remove-Item $zip -Force -Confirm:$false
Get-ChildItem "$($InstallPath)\*" -Directory | ForEach-Object { Remove-Item $_.FullName -Recurse -Force -Confirm:$false }

# Add InstallPath to the System Path if it does not exist
if ($env:PATH -notcontains $InstallPath) {
    $path = ($env:PATH -split ";")
    if (!($path -contains $InstallPath)) {
        $path += $InstallPath
        $env:PATH = ($path -join ";")
        $env:PATH = $env:PATH -replace ';;', ';'
    }
    [Environment]::SetEnvironmentVariable("Path", ($env:path), [System.EnvironmentVariableTarget]::Machine)
}
Once the script has run, you can then confirm that AzCopy was downloaded successfully. While still in the PowerShell console, listing the files in the install path by running Get-ChildItem -Path $InstallPath replacing whatever folder you used.
If everything went well, you should see the azcopy.exe utility and a license text file.
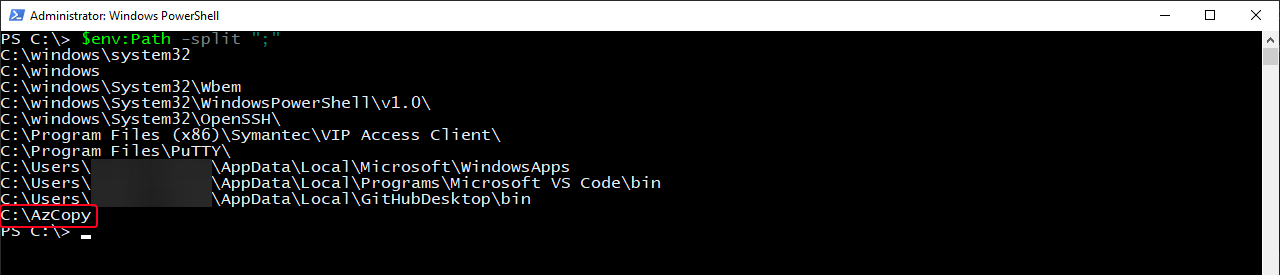
You can also confirm that the installation path is added to the system path variable by running $env:Path -split ";" and noticing that the install folder shows up at the bottom of the list.
In the example below, C:\AzCopy is listed which means that the location was added successfully.
Authenticating AzCopy
The download AzCopy task should be complete. But before you can perform any tasks, it is necessary to authenticate to your Azure subscription to access Azure Storage first.
There are two ways to authenticate AzCopy to your Azure storage accounts – Azure Active Directory or by a Shared Access Signature (SAS) token. In this article, we’ll focus on using Azure AD. If you’d like to learn how to create a SAS token to authenticate that way, check out How to Generate an Azure SAS Token to Access Storage Accounts.
The most common method to authenticate AzCopy is via Azure AD. When using Azure AD, you have several options. Some of these options are:
- Interactive Login – User is prompted to log in using the browser.
- Service Principal + password – For non-interactive login. Recommended for automation and scripting.
- Service Principal + certificate – For non-interactive login. Recommended for automation and scripting.
In this article, you will learn how to authenticate via interactive login. To do so, first, open a command prompt or PowerShell and run the below command. The --tenant-id parameter is optional but recommended, especially if your login account is associated with more than one Azure tenant.
> azcopy login --tenant-id "TENANT-ID"`If you need help finding your Azure AD tenant ID, check out, this article.
Once executed, you will be asked to open a browser and navigate to https://login.microsoftonline.com/common/oauth2/deviceauth and enter the displayed code. You can see what that will look like below.
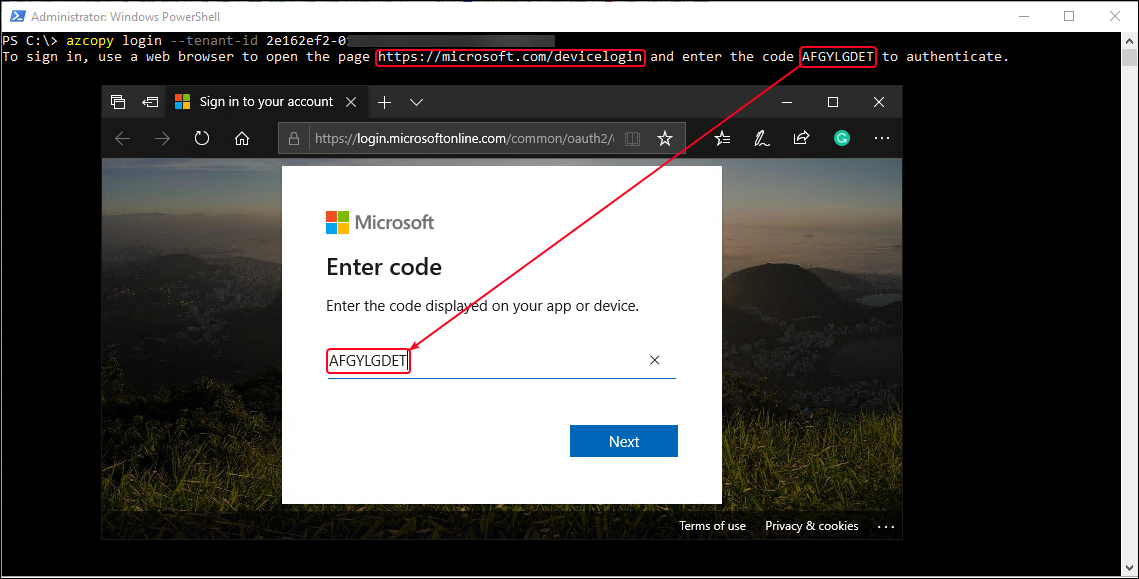
Once you’ve entered the code into the browser, click Next and proceed to sign in to your account.

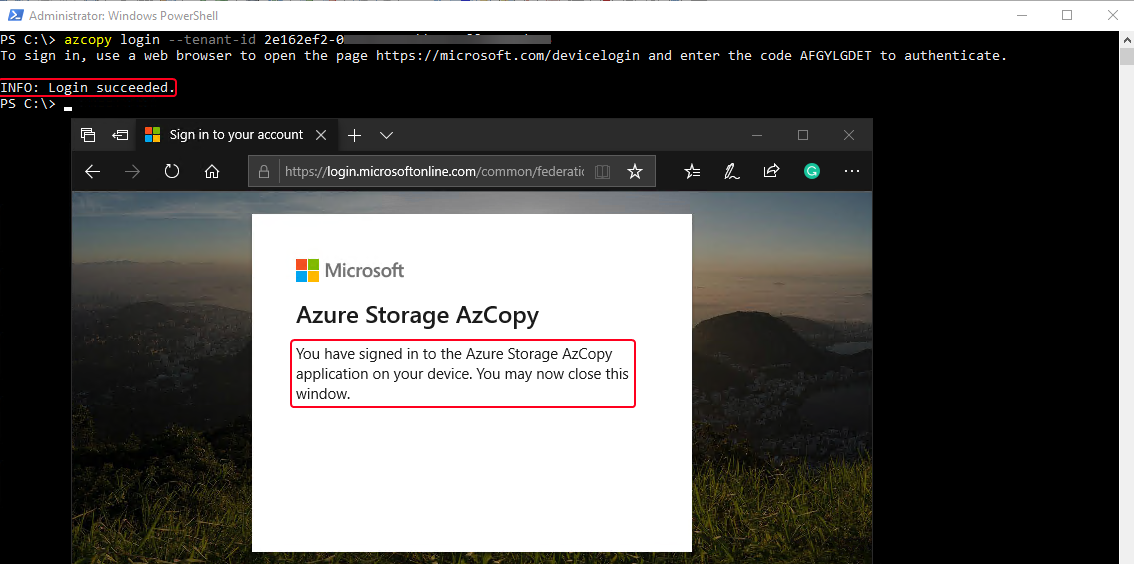
When sign-in is done, you should see the status shown in the browser and in the terminal similar to what’s shown in the screenshot below.
Summary
In the end, you now have the needed knowledge on how to download and authenticate AzCopy on your machine.
Now that you have all this knowledge, you should now be ready to put AzCopy into action! If you’d like to take AzCopy for a spin, head over to the next article How To Manage Files Between Local And Azure Storage With AZCopy to learn how to use AzCopy to manage and transfer data between local and Azure storage.


