


You might be aware of the features and capabilities of Kubernetes offers your applications. But you do not have to go through the hassle of installing and managing Kubernetes on your own servers. Why not get started with Azure Kubernetes Service (AKS)?
AKS is a fully managed container management service that offers you a way to ease up deploying and scaling your applications in Kubernetes. And in this tutorial, you will learn the skills to quickly deploy apps (a managed Kubernetes platform) on Microsoft Azure.
Read on and take advantage of end-to-end deployment, scalability, and availability with AKS!
Prerequisites
This tutorial will be a hands-on demonstration. To follow along, be sure you have the following:
- Azure CLI installed.
- A container image – The tutorial uses a simple NodeJS application container image.
Deploying an AKS Cluster via the Azure Portal
One way to get started with AKS is by deploying an AKS cluster in Azure Portal. An AKS cluster is primarily represented by two components: the cluster itself with a particular version of Kubernetes and the resource group in which the cluster can be placed. An AKS cluster can be a single resource in a resource group or part of a shared resource group.
Compared to managing your own custom Kubernetes cluster, operating AKS offers all the advantages of Kubernetes without the complexity or operational burden.
To deploy an AKS Cluster via the Azure Portal, follow these steps:
1. Open your favorite web browser, and log in to your Azure account in the Azure Portal.
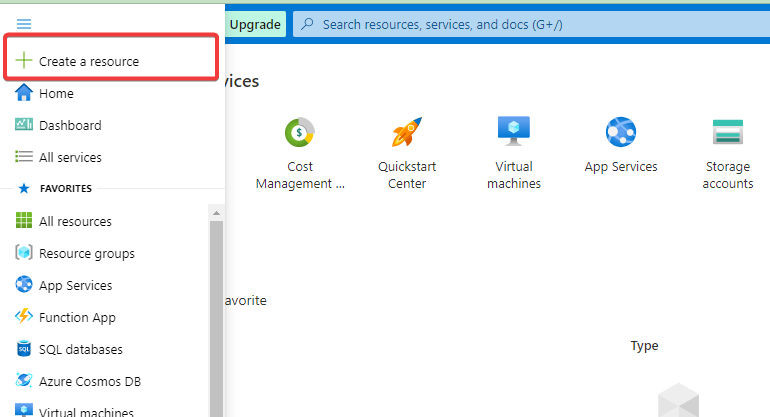
2. Next, click on Create a resource (left panel) in the Azure Portal, which takes you to Azure Marketplace.
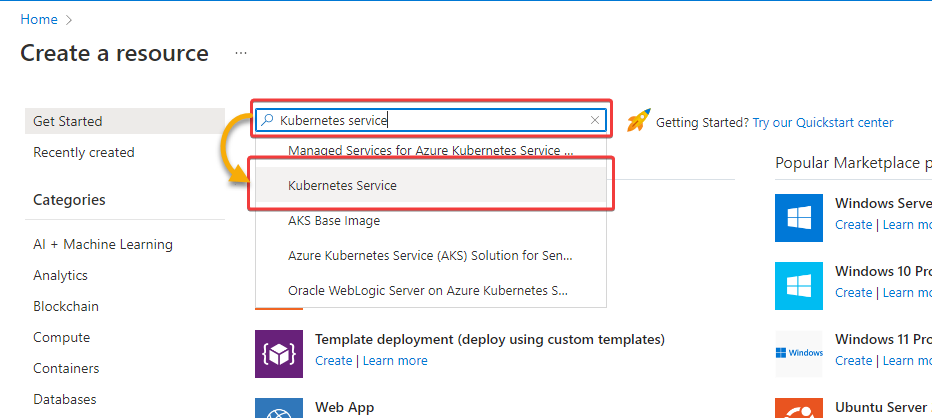
3. Search for Kubernetes service in the Azure Marketplace and select Kubernetes Service from the search results. Doing so redirects your browser to the Kubernetes Service overview page.
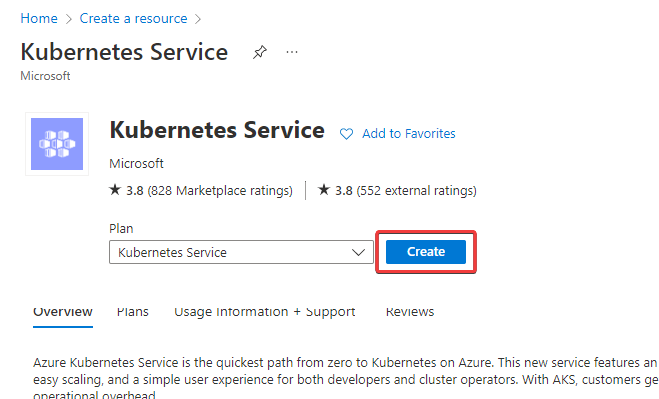
4. Now, click on Create to access the Kubernetes cluster creation page.
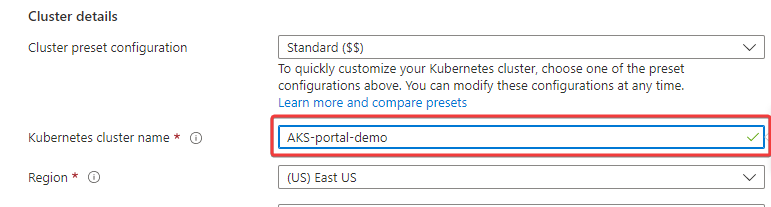
5. On the Create Kubernetes cluster page, configure the cluster’s resource group and cluster name with the following:
- Click Create new under the Resource group field, input the Name of your resource group, and click OK to create a new resource group. This tutorial’s choice for the resource group name is AKSResourceGroup, but you can name it differently.
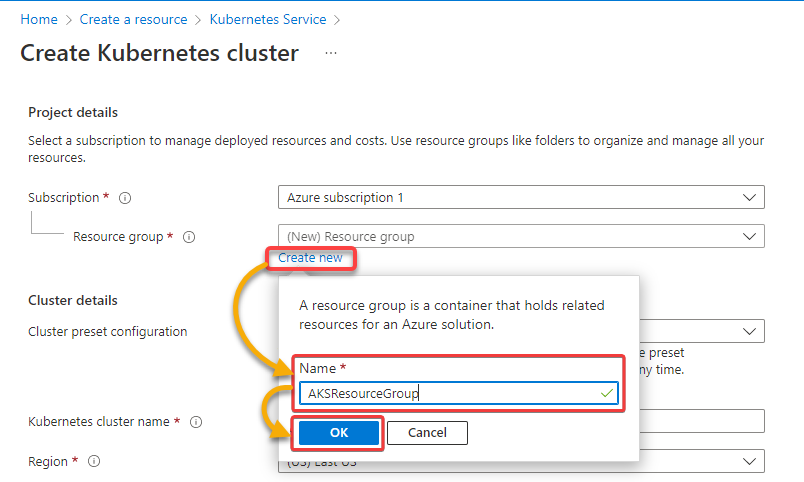
- Input a Kubernetes cluster name for your cluster. AKS-portal-demo was used in this demonstration, but you can provide your own.
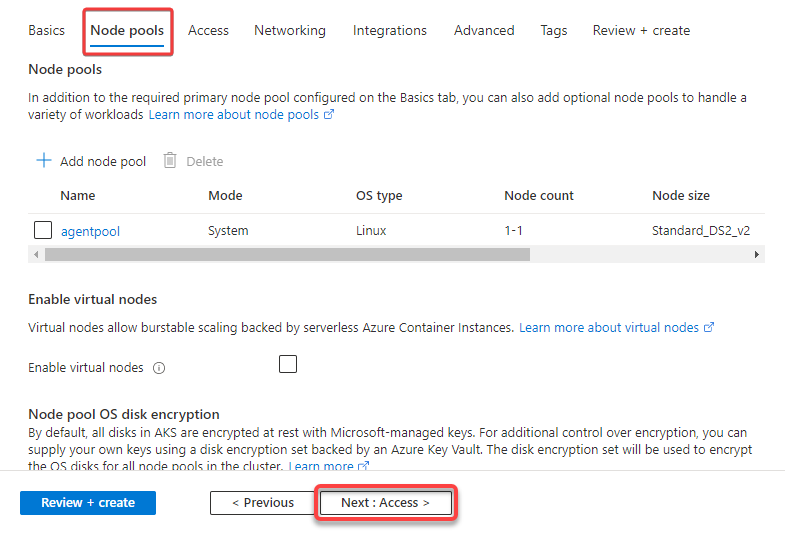
6. Leave the rest settings as default (or edit them as you desire), and click Next (page bottom) to continue to the Node pool settings screen.
7. Under the Node pools tab, you can add an additional node pool, like a Windows node pool or a second Linux node pool, using a different node count or size but for this demonstration, you can leave the settings as default and click Next : Access >.
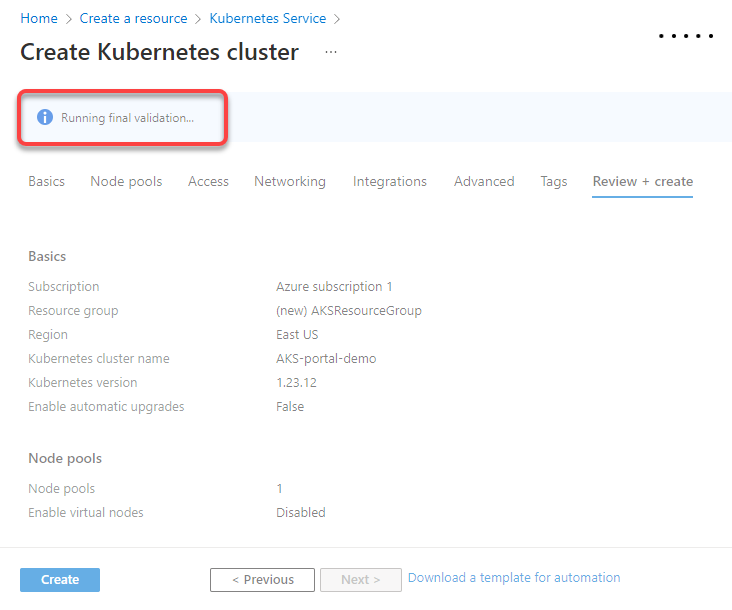
8. Leave the default settings and keep clicking Next from the Networking page up to the Review + create page.
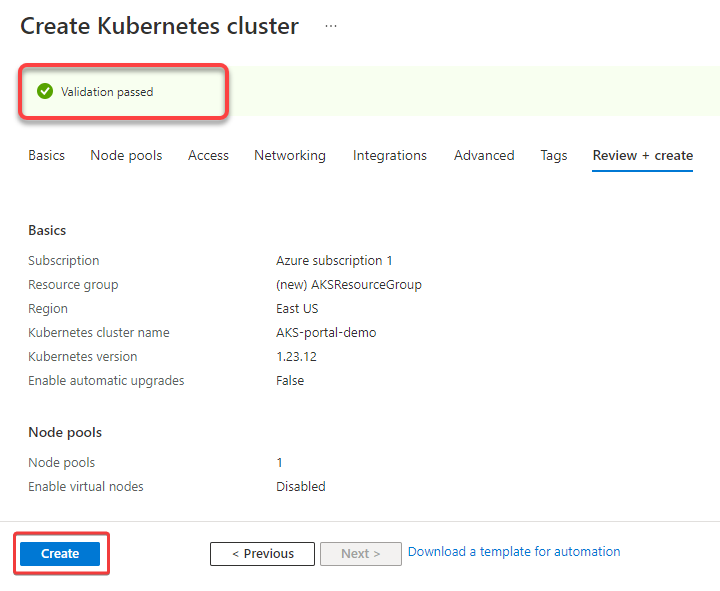
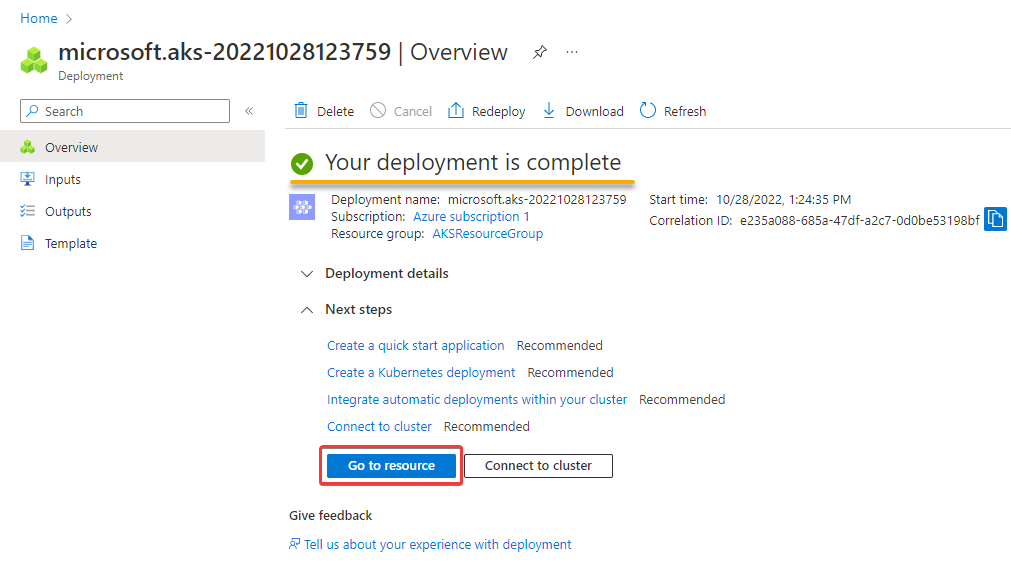
9. Double-check your settings, and wait for the final validation to complete, as shown below.
10. After validating the settings, click Create to finalize creating the cluster, and your cluster will be submitted for deployment.
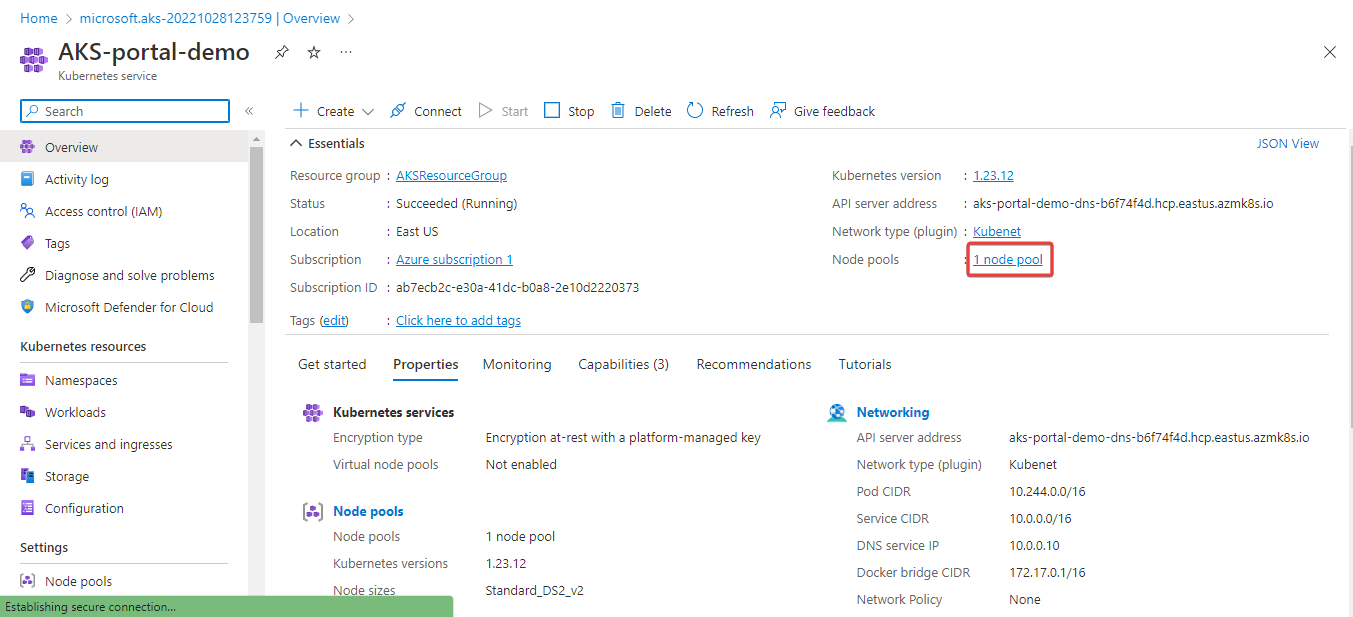
11. Once deployed, click Go to resource and view the details of your Kubernetes cluster.
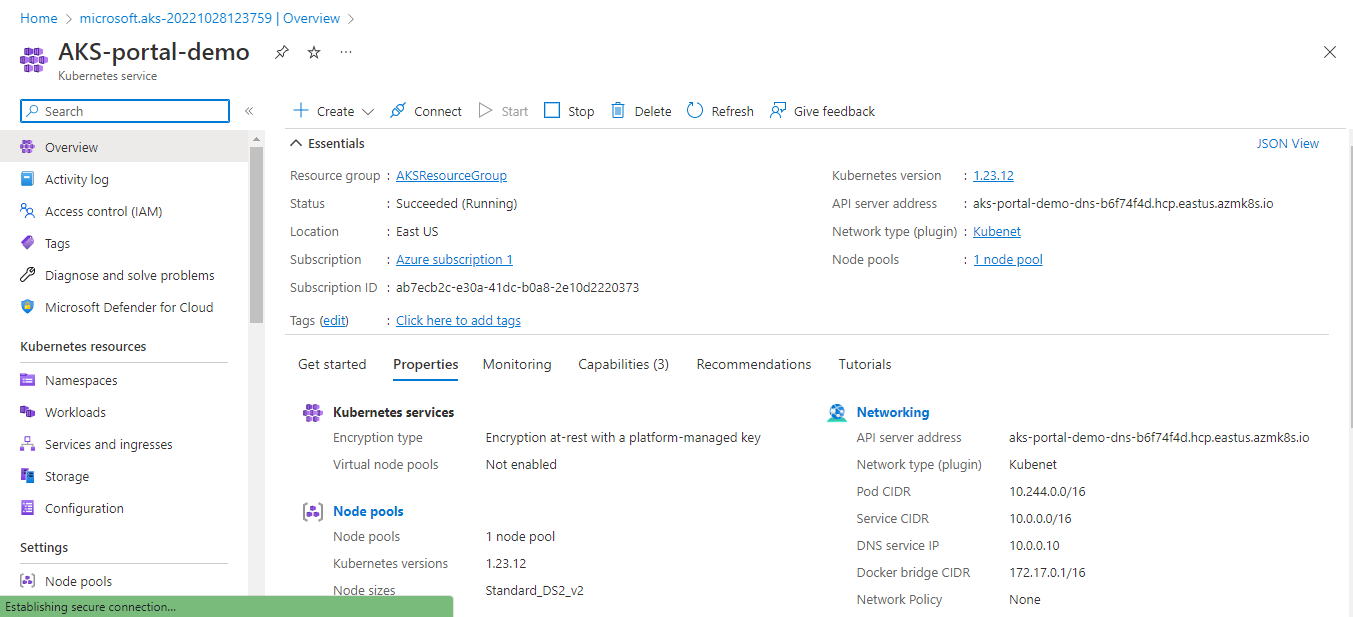
The Kubernetes cluster Overview page below confirms everything you configured earlier.
Deploying an AKS Cluster via The Azure CLI
You have seen how to deploy an AKS cluster via the Azure Portal without any complicated stuff, but click-throughs can get tedious at some point. If you prefer to work mostly in a command-line environment, deploying an AKS cluster via the Azure CLI will suit you better.
But before you can interact with Azure via the Azure CLI, you first have to log in to Azure:
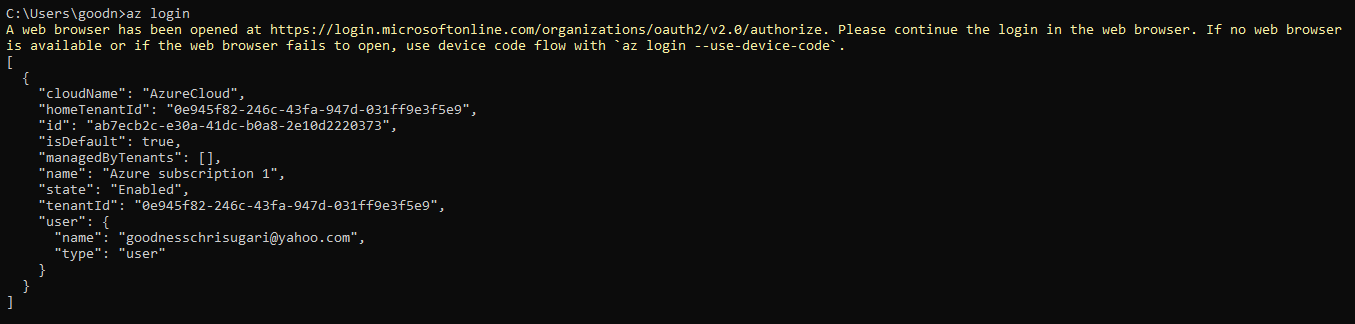
1. Open your command prompt and run the az login command below to initiate logging in to your Azure account. A new tab on your default web browser opens to the Azure login page (step two).
az login
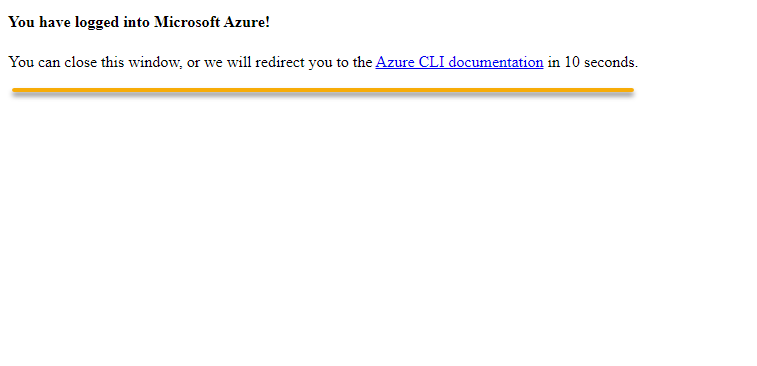
2. Next, sign in to your Azure account.

The output below confirms you have successfully signed in to Azure.
Back to your command prompt, you will see the details of your account printed on the screen, as shown below.
💡 If you have more than one subscription in your account, run the below command to set the subscription where you like to run the demo in. But since only one subscription is available in this tutorial, there is no need to set the subscription manually.
az account set --subscriptionName.
💡 Perhaps you wish to use a different resource group, run the
az group createcommand below, replacing theREGIONandRESOURCE_GROUPwith your own.az group create -l REGION -n RESOURCE_GROUP
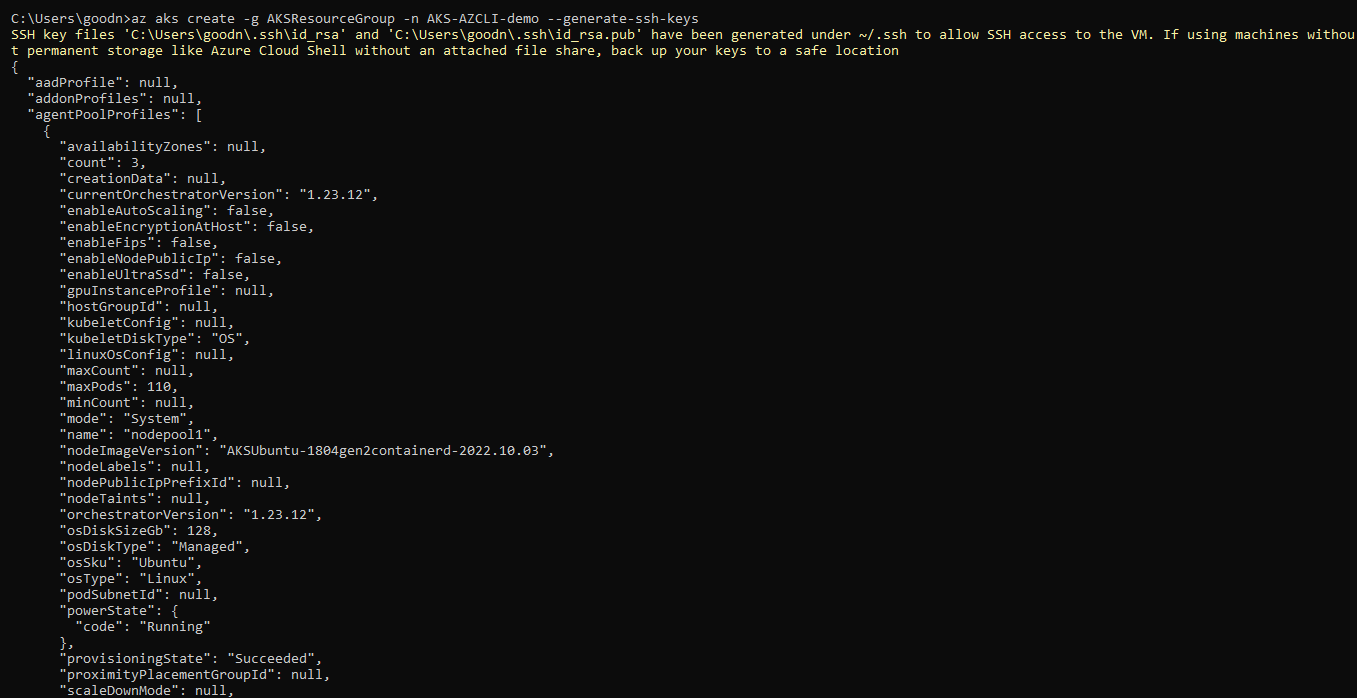
3. Now, run the below az aks create command providing the resource group (AKSResourceGroup) and the name of the cluster (AKS-AZCLI-demo). This cluster will use whatever the Kubernetes version of the region is.
The --generate-ssh-keys switch generates a pair of keys in your home directory if they do not exist yet and pass them to the AKS cluster. If the keys already exist, the switch will use the existing keys.
💡If you prefer to use a different node family or type, add the
--node-vm-sizeoption, and for the number of nodes, use the--node-countoption.
az aks create -g AKSResourceGroup -n AKS-AZCLI-demo --generate-ssh-keysThe cluster creation takes a couple of minutes to complete, then Azure CLI will return the JSON definition of the cluster you created. This JSON definition includes the settings you didn’t provide with their default values, as shown below.
4. Run the below az aks list command to list all available clusters. This command returns an array of objects with details of the clusters.
az aks list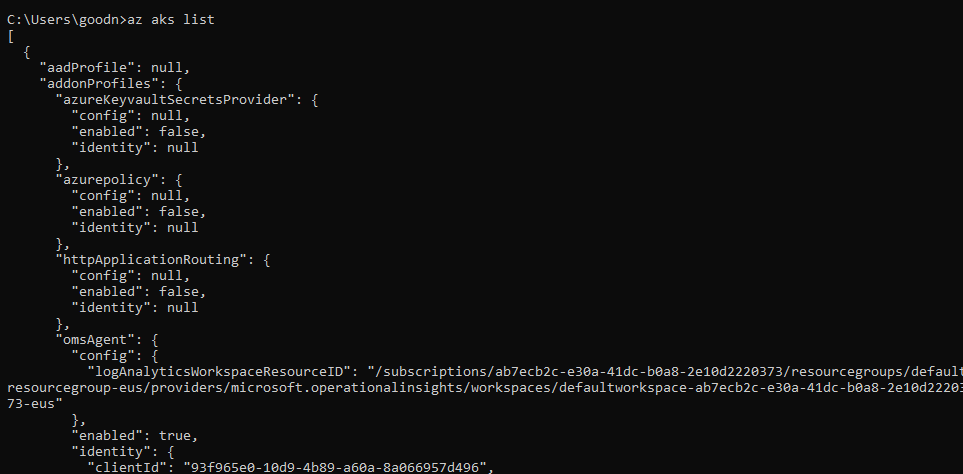
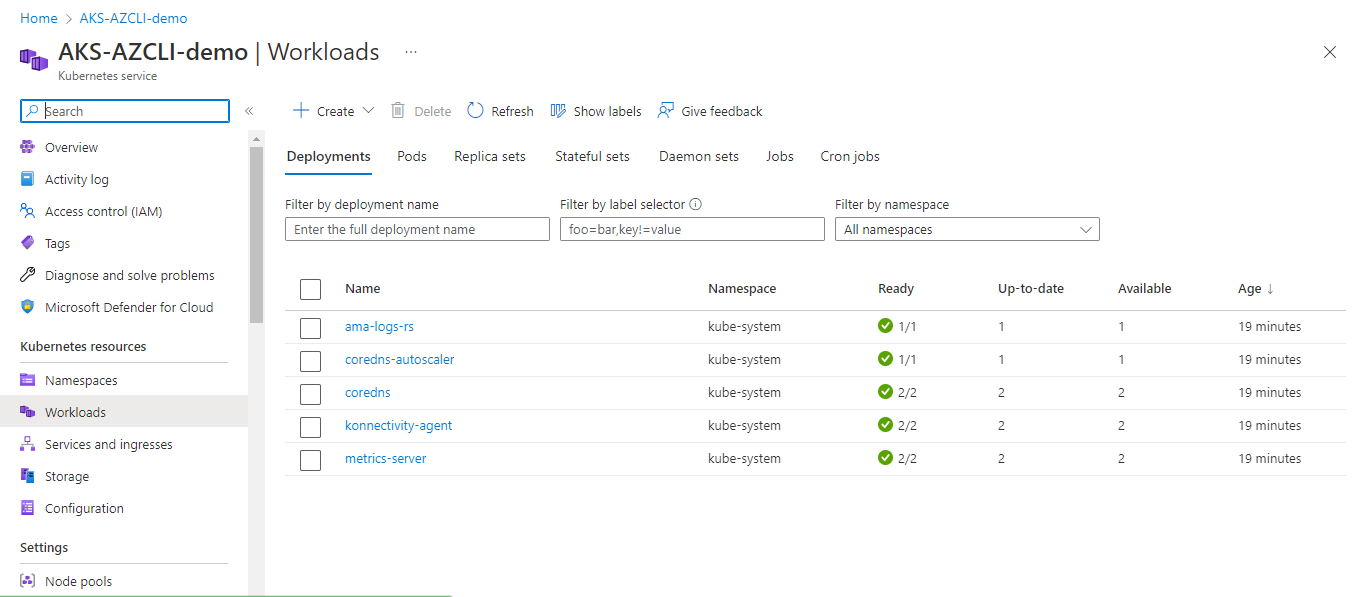
5. Next, run the following az aks browse command providing the cluster name (AKS-AZCLI-demo) and the resource group of the cluster (AKSResourceGroup). This command prompts your browser to open up the cluster’s workload page in the Azure Portal.
az aks browse -n AKS-AZCLI-demo -g AKSResourceGroup
💡 Perhaps you have set up connection credentials for the cluster using
kubectl. If so, instead of the Azure Portal, this command takes you to the cluster’s internal dashboard.
6. Finally, execute the az aks get-credentials command below to retrieve your Kubernetes cluster credentials, which you need to communicate with your cluster using kubectl. Regular communication with your cluster mostly runs through kubectl. The command below performs the following:
- Passes your cluster’s name (
AKS-AZCLI-demo) and resource group (AKSResourceGroup) to theaz aks get-credentialscommand.
- Merges the credentials and cluster information into your local
kubectlconfig file.
- Set your
kubectlconfig file as the active context.
az aks get-credentials -g AKSResourceGroup -n AKS-AZCLI-demoAt this point, you can now run commands like kubectl cluster-info to get more details on your cluster, like its endpoints. Or run the kubectl get nodes command to get more details on the nodes in your cluster.

Deploying an Application to the AKS Cluster
Like deploying to any other Kubernetes cluster, you need a deployment object to deploy an application in Kubernetes. For this application, you will define a service and a deployment for the application using a simple NodeJS app container image.
1. In your current directory, create a YAML file for deployment called app-deployment.yaml and add the code below.
apiVersion: apps/v1
kind: Deployment # Kubernetes object type
metadata:
  name: app-deployment # Deploymnent name
  labels:
    app: nodeapp
spec:
  replicas: 2 # Number of matching pod replicas to be created by the deployment
  selector:
    matchLabels: # Should match labels set on the pod
      app: nodeapp
  template: # Pod configuration
    metadata:
      labels:
        app: nodeapp # Label set on pod
    spec:
      containers:
      - name: nodeapp
        image: goodiec/nodeapp:v1 # The container the pod will run
        imagePullPolicy: Always # Always pull image from the repository
        ports:
        - containerPort: 3000 # Port to reach app inside the container
2. Next, ceate another YAML file called app-service.yaml, and add the code below to define a service named nodeapp.
apiVersion: v1
kind: Service # Kubernetes object type
metadata:
  name: nodeapp # Service name
spec:
  type: LoadBalancer # Utilizes the load balancer of a cloud provider to externally expose the Service.
  selector:
    app: nodeapp
  ports:
    - port: 80 # Service port
      targetPort: 3000 # The app's port
      nodePort: 30004 # Externak traffic port
3. Next, run the below kubectl apply commands below to create the deployment (app-deployment.yaml) and service objects (app-service.yaml).
kubectl apply -f app-deployment.yaml /
kubectl apply -f app-service.yaml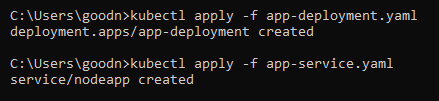
4. Now, run the following kubectl get command, providing the service name (nodeapp), to confirm your application is running and is accessible via the internet. kubectl get service nodeapp
kubectl get service nodeappInitially, the EXTERNAL-IP will be in the ‘pending’ state. Wait a few minutes and rerun the same command, and you will see the EXTERNAL-IP address, as shown below.
Note down the EXTERNAL-IP address, as you will need it to access the application in the following step.

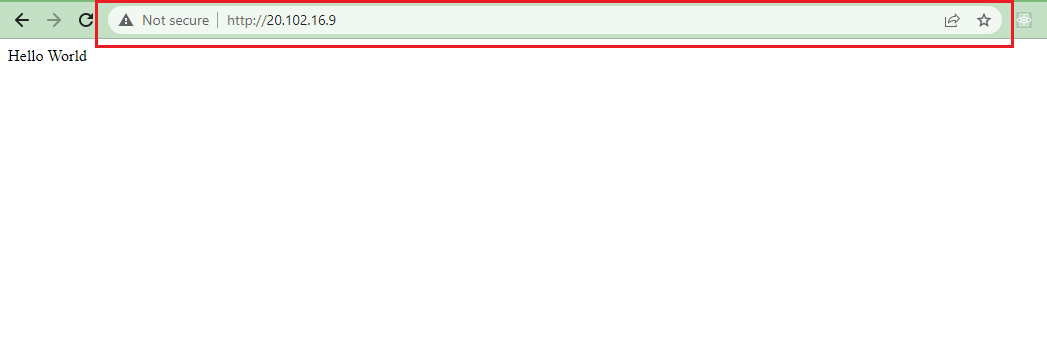
5. Lastly, navigate to the EXTERNAL IP (20.102.16.9) on your web browser to access the application
If successful, you will see the application, as shown below.
Scaling an AKS Cluster Manually
There are ways to scale an AKS cluster manually. You can either scale the pods or scale the nodes depending on what suits your need best.
Below are some examples of scaling your AKS cluster manually:
- Assuming you have a pod with
2replicas and you want to change that number to4. You can run thekubectl scalecommand for that pod and change the number of replicas to4. Doing so creates the extra two replicas, which scales up the number of pods. - You can also manually scale the number of nodes in your cluster. Launch the deployment tool of your choice and add those nodes. Technically, you do not add them to your cluster but to your node pool in your cluster.
- Using the same logic, you can also remove nodes from your node pool. As you remove nodes, they get locked, and their workloads will be drained. In essence, their pods will be terminated, and new instances will be created on another node. Once all pods have been drained, the nodes will be removed.
Read on and see how scaling an AKS cluster works in action in the following sections.
Scaling Up the Node Count via the Azure Portal
The Azure Portal provides you with one of the quickest ways to scale your Kubernetes cluster. In this example, you will scale up the node count in your cluster.
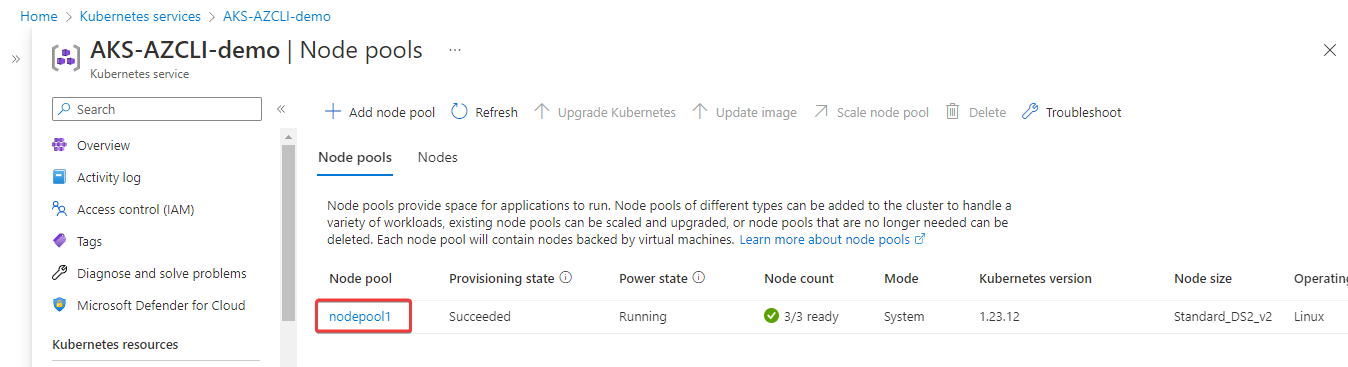
1. Navigate to your cluster’s overview in the Azure Portal, and click on the 1 node pool hyperlink to access the list of node pools.
2. Next, click the node pool from the list (nodepool1), as shown below, to access the node pool’s overview page.
There is only one node pool by default, but you can have more than one. The number of virtual machines in each pool will be fixed with the same size or VM family.
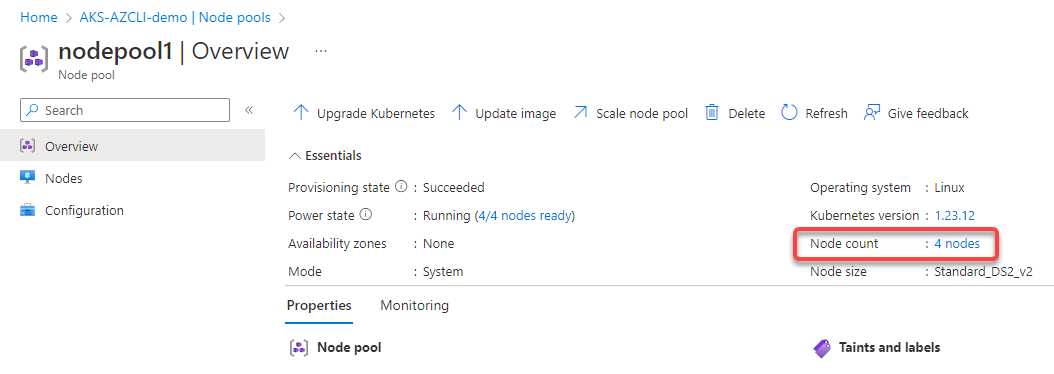
3. Click the node count on the node pool’s Overview page, which opens a blade (right-most) where you can scale your node pool (step four).
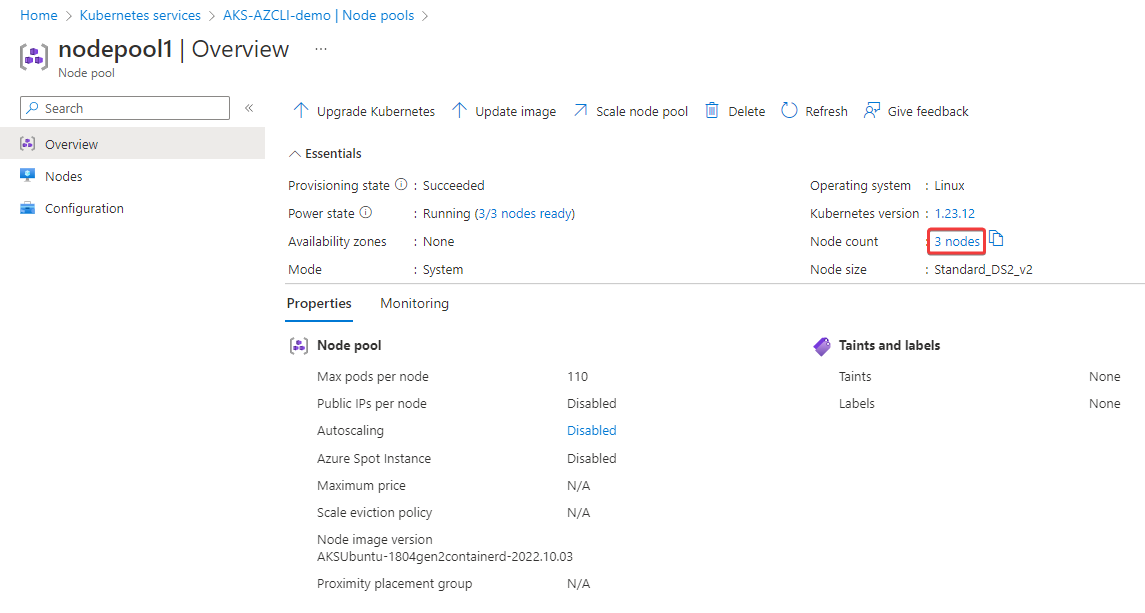
4. Now, change the current node count from 3 to 4 in the provided field shown below, and click Apply to start the scaling operation immediately.

The Azure Portal will inform you once the scale has been completed, and you will see the updated node count (4 nodes), as shown below.
Scaling Down the Node Count via the Azure CLI
The Azure CLI does not only let you deploy Kubernetes clusters, but you can also scale them. Unlike what you did in the Azure Portal, in this example, you will scale down the node count.
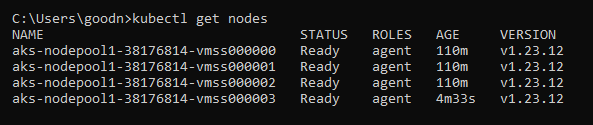
1. Run the kubectl get nodes command below in your command prompt to get all available nodes.
kubectl get nodesBelow, you can see a fourth node, which you added via the Azure Portal.
2. Next, run the following az aks show command to --query the name of your node pool (agentPoolProfiles[0].name).
az aks show -g AKSResourceGroup -n AKS-AZCLI-demo --query agentPoolProfiles[0].nameNote down the name of the node pool that you see, like in the screenshot below.

3. Now, run the below az aks scale command to scale down the node’s (nodepool1) --node-count to 3.
az aks scale -g AKSResourceGroup -n AKS-AZCLI-demo --node-count 3 --nodepool-name nodepool1As you can see below, the scaling operation is in progress (Running).

4. Once scaling is complete, rerun the below command to verify the fourth node has been removed.
kubectl get nodesThe output below confirms the fourth node has been removed after scaling down the node count to three.

Deleting a Kubernetes Cluster
Perhaps you do not have any use for your Kubernetes clusters anymore. If so, deleting them will do you a favor and leaves you with fewer resources to manage — and fewer charges.
You can either delete the resource group containing the cluster or just the AKS cluster resource. But in this tutorial, you will delete the AKS cluster resource.
Run either of the below commands to delete the cluster or the resource group.
# Deleting the cluster
az aks delete -g AKSResourceGroup -n AKS-AZCLI-demo

# Deleting the resource group, the cluster and all related reources
az group delete -n AKSResourceGroup
Input Y and press Enter to confirm the deletion.


Once confirmed, AKS starts removing the following:
- The objects in the managed cluster resource group.
- The managed resource group itself.
- The AKS cluster resource.
💡 If you do not need a cluster at the moment but do not want to delete it, you can just stop the cluster with the
az aks stop-n CLUSTER -g RESOURCE_GROUPcommand. When you stop a cluster, you will not have to rescale or reconfigure anything again. But remember, stopping a cluster does not make it free of charge.
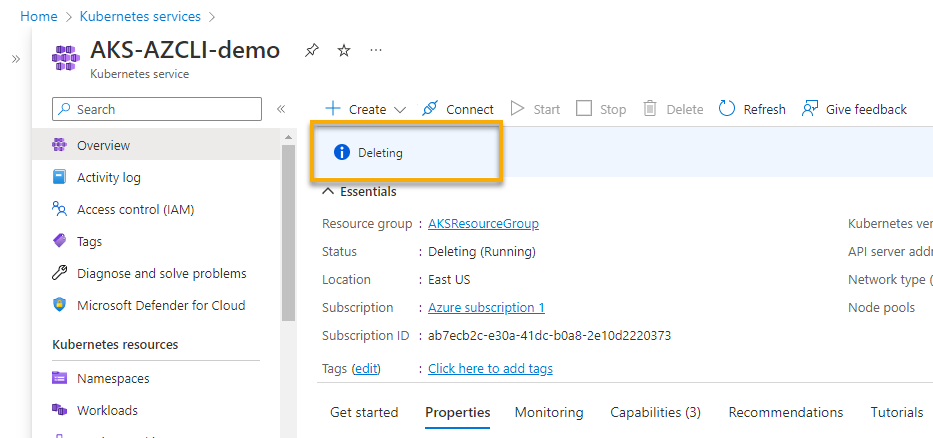
If you view the cluster from the portal instead, you will also see an indication that the cluster is being deleted.
Conclusion
Quickly getting started with a tool like Kubernetes is of great benefit. And thankfully, in this tutorial, you have seen how AKS allows you to take advantage of all Kubernetes has to offer. At this point, you can deploy and scale your applications with minimum effort.
After getting started with AKS, why not try using other Kubernetes features on AKS like autoscaling? Let autoscaling adjust your workloads through automation and configuration!


