


Protecting your data in the cloud can be worrisome when you don’t use any service to keep your secrets safe. The good news is that Azure Key Vaults provide a mechanism for securely storing and accessing secrets. Not sure how the Key Vaults work? No worries! This tutorial has got you covered with Azure Key Vault best practices.
With Key Vaults, you can ensure that only authorized people and resources can access and interact with your secrets. And in this tutorial, you’ll learn to protect your Key Vaults from attacks or unwanted exposures.
Stay tuned so you can keep your secrets, well, a secret (pun intended)!
Prerequisites
This tutorial will be a hands-on demonstration. If you’d like to follow along, be sure you have the following:
- An Azure Subscription – If you do not have one yet, you can try Azure for free.
- An Azure Storage Account for storing logs.
- A Virtual Network and Subnet for demonstrating network access.
- An Azure AD group where you can assign access policy – This tutorial uses an AD group called Key Vault – Key, secret, and Certificate Manager.
Creating a Key Vault to Use for Azure Key Vault Best Practices
When creating Azure Key Vaults, a best practice is having a separate key vault per application and environment. Separating Key Vaults this way provides the following advantages versus larger, shared key vaults:
- A security boundary between secrets that have different purposes.
- Decreases the “blast radius” in the unfortunate case of a security event, such as a malicious attacker.
- Prevents misconfigured code from accessing secrets meant for another environment.
To create a new Azure Key Vault, follow these steps:
1. Launch your favorite web browser and navigate to the Azure Portal.
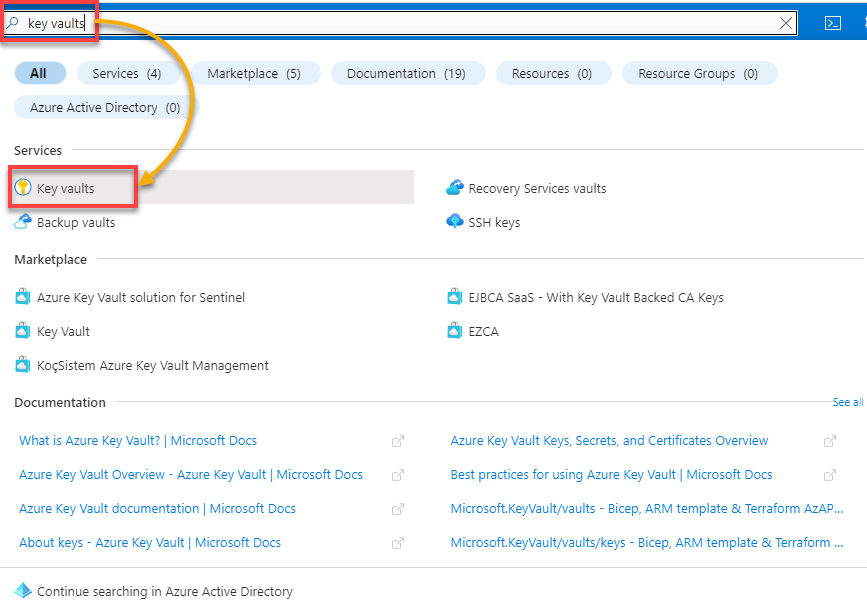
2. In the Azure Portal, search for key vaults in the search bar, and choose Key vaults under Services in the search result, as shown below.
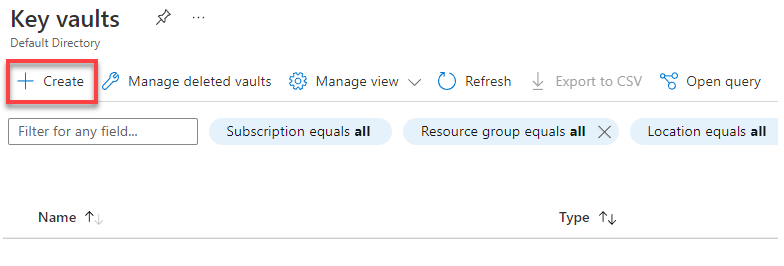
3. On the Key vaults page, click on Create to initiate creating a Key Vault.
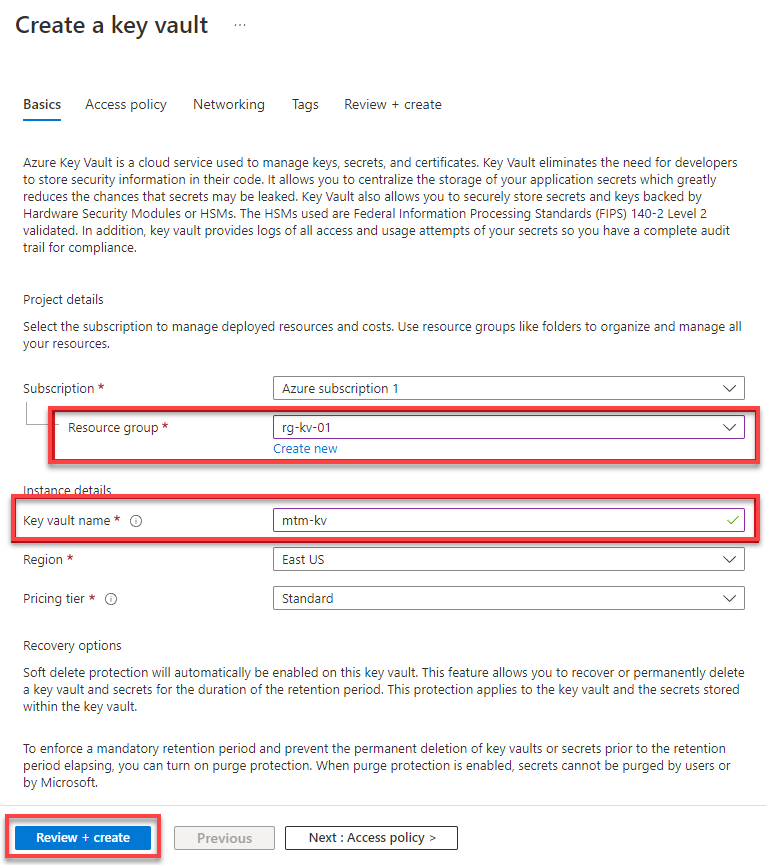
4. Now, configure the new Key Vault’s basic settings with the following:
- Choose an existing resource group or create a new one where this Key Vault will be stored.
- Specify a unique name for the new Key Vault. Keep in mind that Key Vault names must be globally unique across Azure.
- Click on Review + Create (bottom-left) to review and validate the settings.
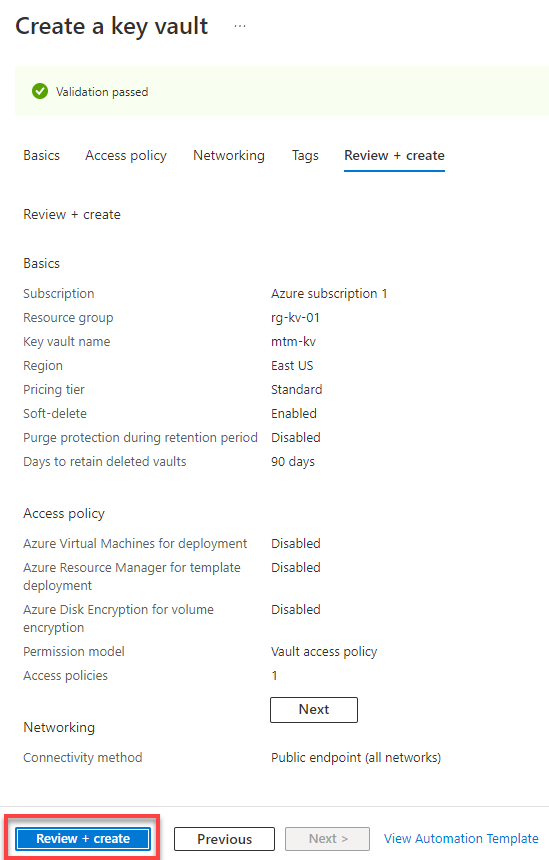
5. Verify the validation has passed, and click on Review + Create again (bottom-left) to finalize creating the new Key Vault.
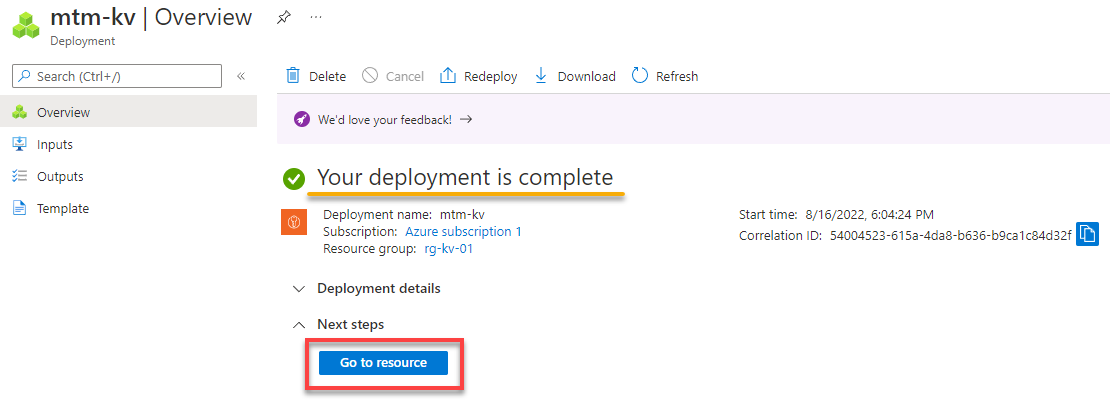
Once created, your browser redirects to the deployment overview page (step six).
6. Lastly, verify that the deployment was completed successfully, and click on Go to Resource to view the new Key Vault.
Controlling Access to the Key Vault
Creating siloed Key Vaults is just the first step in protecting sensitive and business-critical keys and secrets. Controlling who and what can access a Key Vault helps ensure that secrets don’t end up in the wrong hands, maliciously or otherwise.
When setting up access to a Key Vault, an important distinction is the differences between Control Plane and Data Plane permissions.
| Permission | Description |
| Control Plane | Lets you manage resources in the Azure subscription, including creating and deleting resources, retrieving the properties of a resource, and configuring role assignments to the resource. |
| Data Plane | Handles actions that take place within a given resource, such as creating or deleting secrets within a Key Vault. |
Read on to see different ways you can control access to your Key Vaults.
Vault Access Policy
With an access policy, you can specify actions that a principal (user, group, service principal, or managed identity) can perform, like for keys, secrets, and certificates. Vault Access Policy enables data plane access to the secrets stored in Azure Key Vaults.
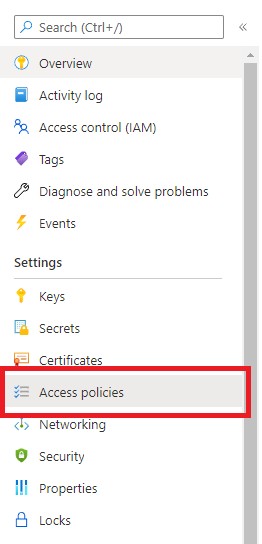
1. From the newly created Key Vault’s page, click on Access policies (left panel) to access the settings for Vault Access Policy.
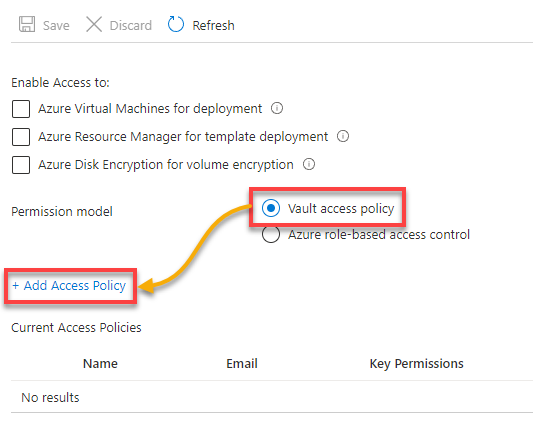
2. On the Access Policies page, keep the default option (Vault Access Policy) selected for the permission model and click on Add Access Policy to create a new policy.
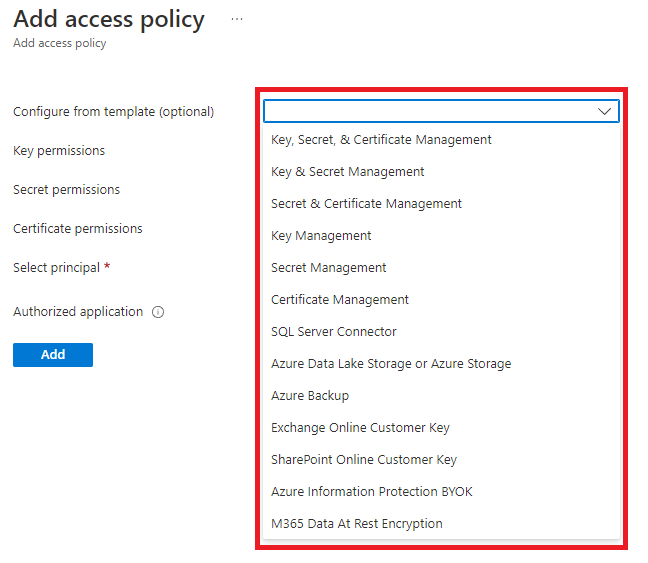
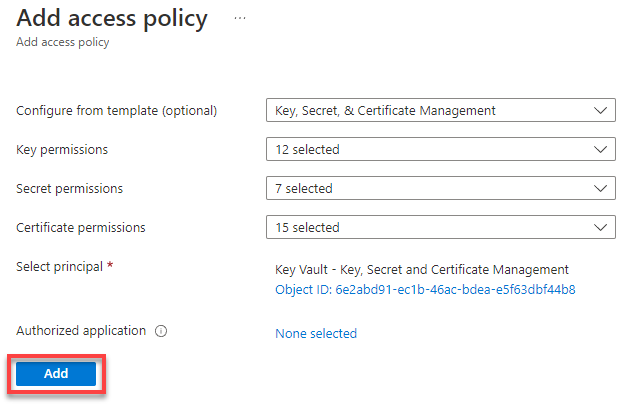
3. Choose permissions for the access policy depending on your needs.
The Add access policy blade manages three kinds of permissions, Key Permissions, Secret Permissions, and Certificate Permissions.
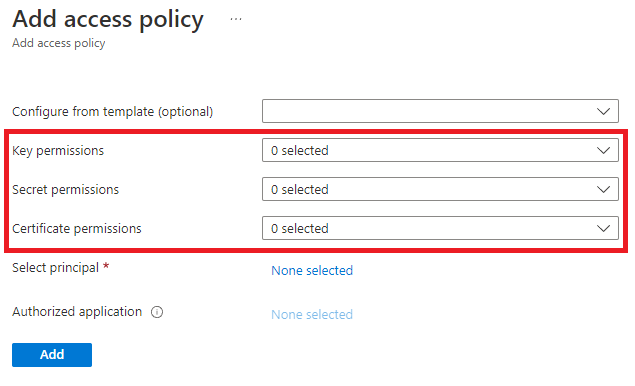
Optionally, select a template from the Configure from template dropdown field, automatically assigning the appropriate permissions across the three categories.
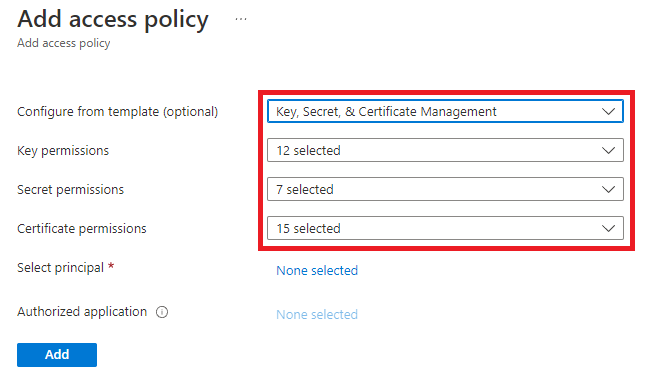
This tutorial uses the Key, Secret, & Certificate Management template.
After selecting a template, three dropdown fields automatically populate, as shown below.
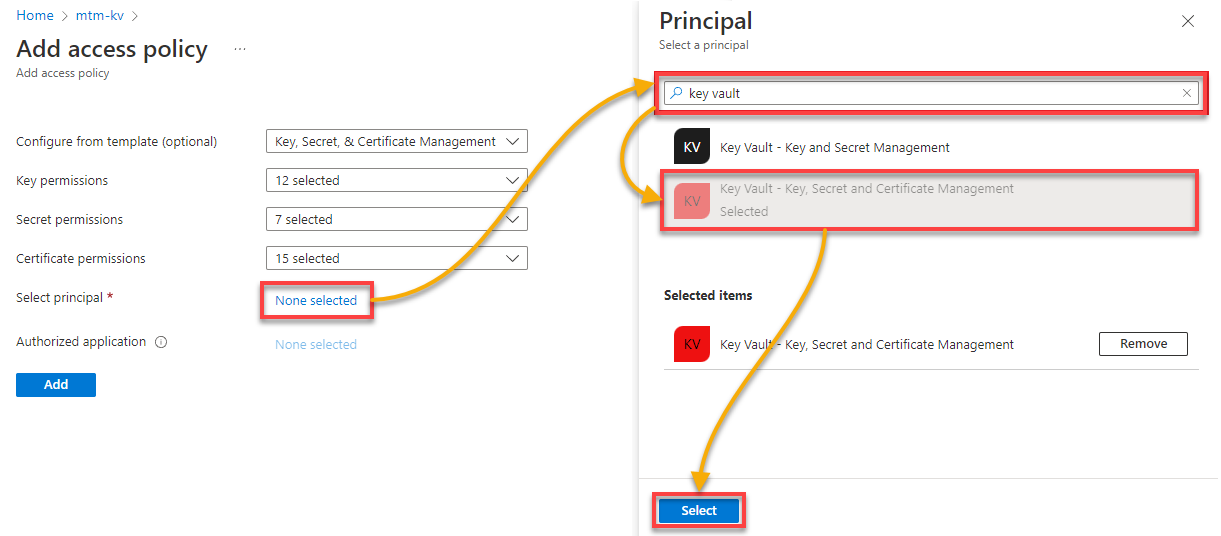
4. Now, assign a principal, which can be a user account, Azure Active Directory group, application, or service, to this new access policy with the following:
- Click the None Selected hyperlink on the Add access policy blade, which opens the Principal blade (rightmost).
- Search for the AD group or user (key vault) to assign to this policy in the Principal blade’s search bar.
Using Azure AD groups is recommended to prevent the need to update all Key Vaults a user has access to. This behavior occurs whenever their role changes or they move on.
- Choose your target group or user (as the principal), and click Select.
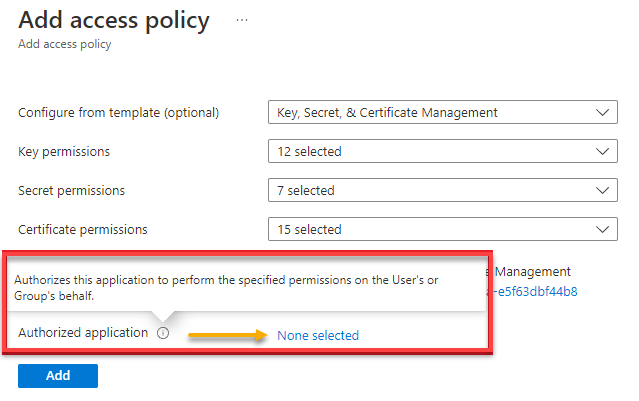
Optionally, click on None selected shown below to assign an application that will be authorized to run the tasks specified by the permissions on the user’s or group’s behalf.
5. Click on Add once you’ve specified all permissions and selected a principal.
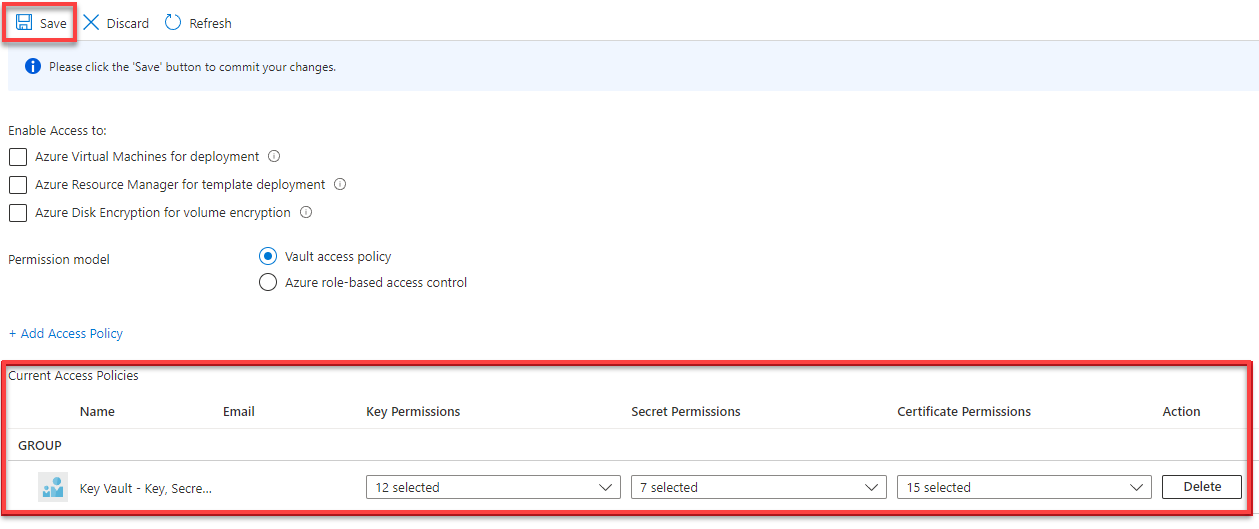
The new policy appears under the Current Access Policies list (step six).
6. Finally, modify the permissions under Current Access Policies if desired, and click the Save button to save the changes.
Azure Role-Based Access Control (RBAC)
RBAC for Key Vaults is an alternative to the Vault Access Policy model. This access control is built on the Azure Resource Manager, which lets you configure access across resources in Azure.
This feature allows permissions to secrets, keys, and certificates to be managed using Role Assignments under Access Control (IAM). In this example, you’ll update an existing Key Vault to use Azure Role-Based Access Control.
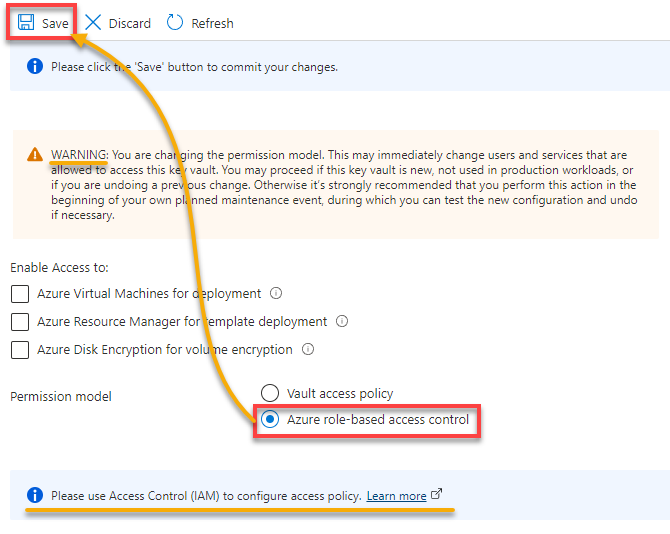
1. Navigate to the Access Policies page again as you did in steps one to two of the “Vault Access Policy” section. But this time, choose Azure Role-Based Access Control for the Permission model and click Save to save the changes.
You’ll see that the Current Access Policies section is replaced by an information message that says access policies are now being managed under the Access Control (IAM) blade.
There will be a WARNING that says changing the permission model may impact any existing permissions. So, proceed with caution if this is not a new Key Vault.
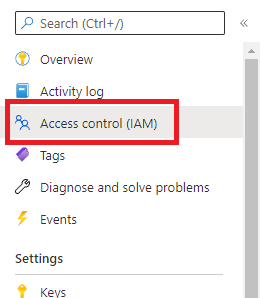
2. Once saved, click on Access control (IAM) on the left panel to access the page where you can manage IAM access.
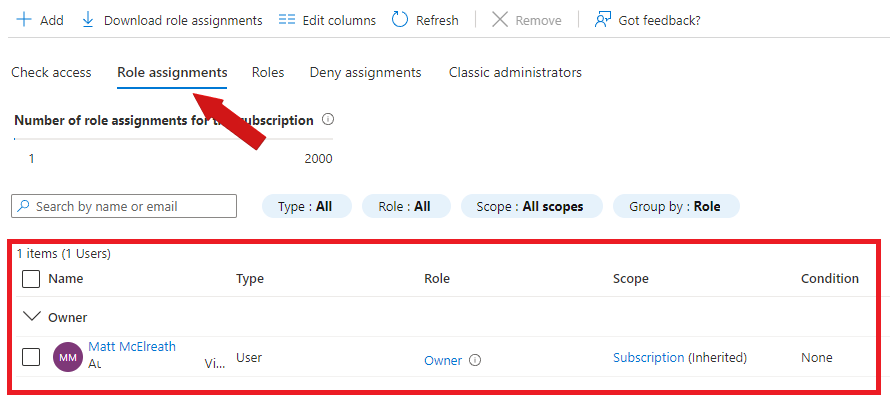
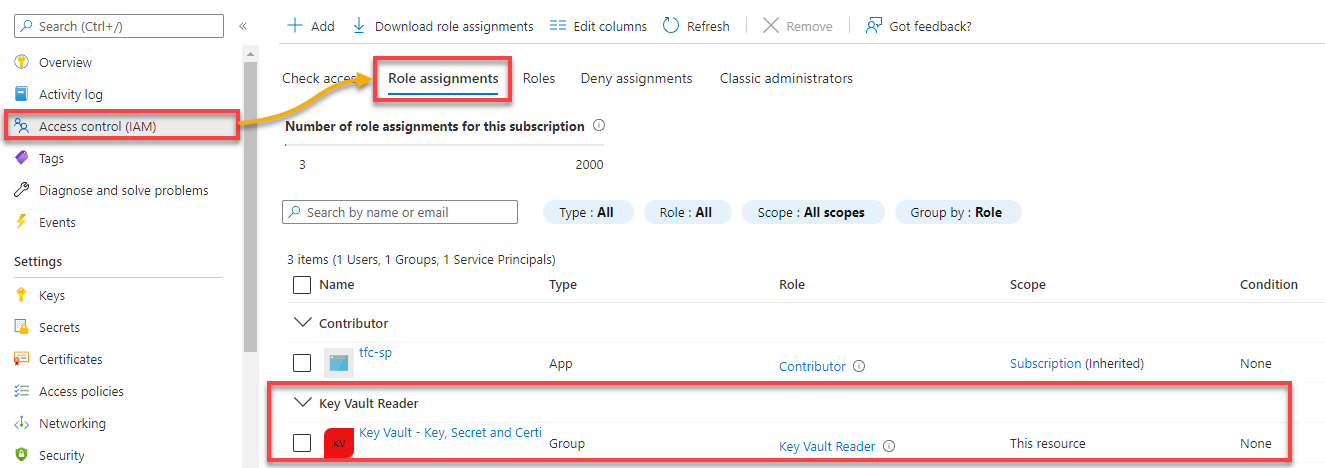
3. Click on the Role Assignments tab to view the current role assignments, as shown below.
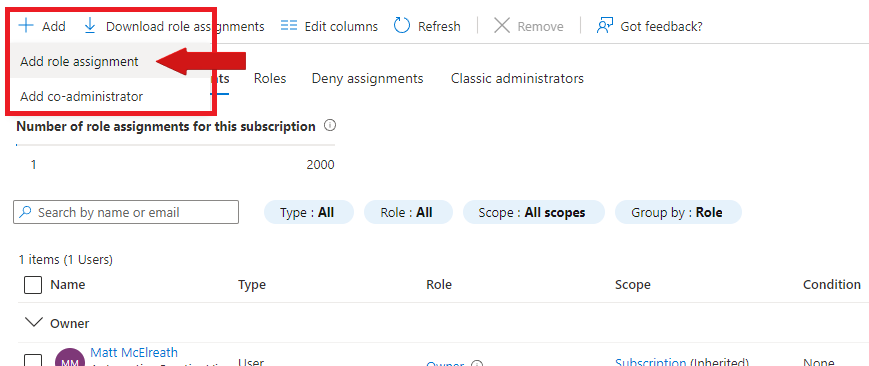
4. Now, click Add → Add role assignment to configure a new role assignment for this Key Vault.
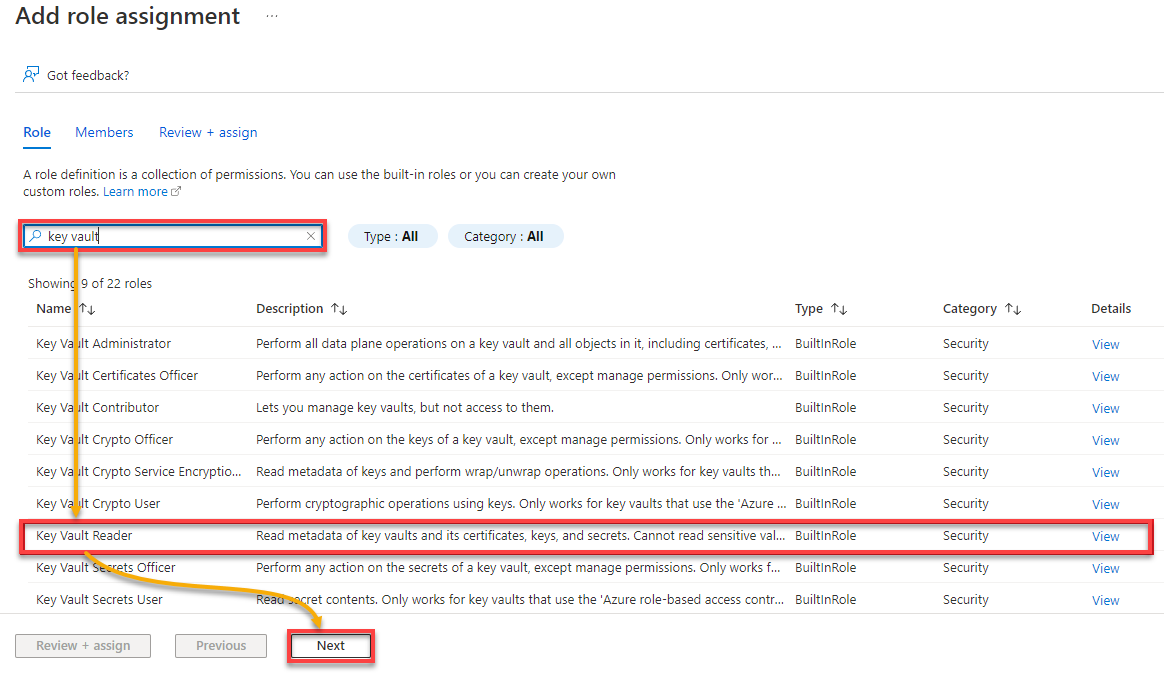
5. On the Add role assignment page, search for key vault, select Key Vault Reader from the result list and click Next.
Choosing Key Vault Reader gives the member(s) assigned to this role assignment access to see the Key Vault at the Control Plane level.
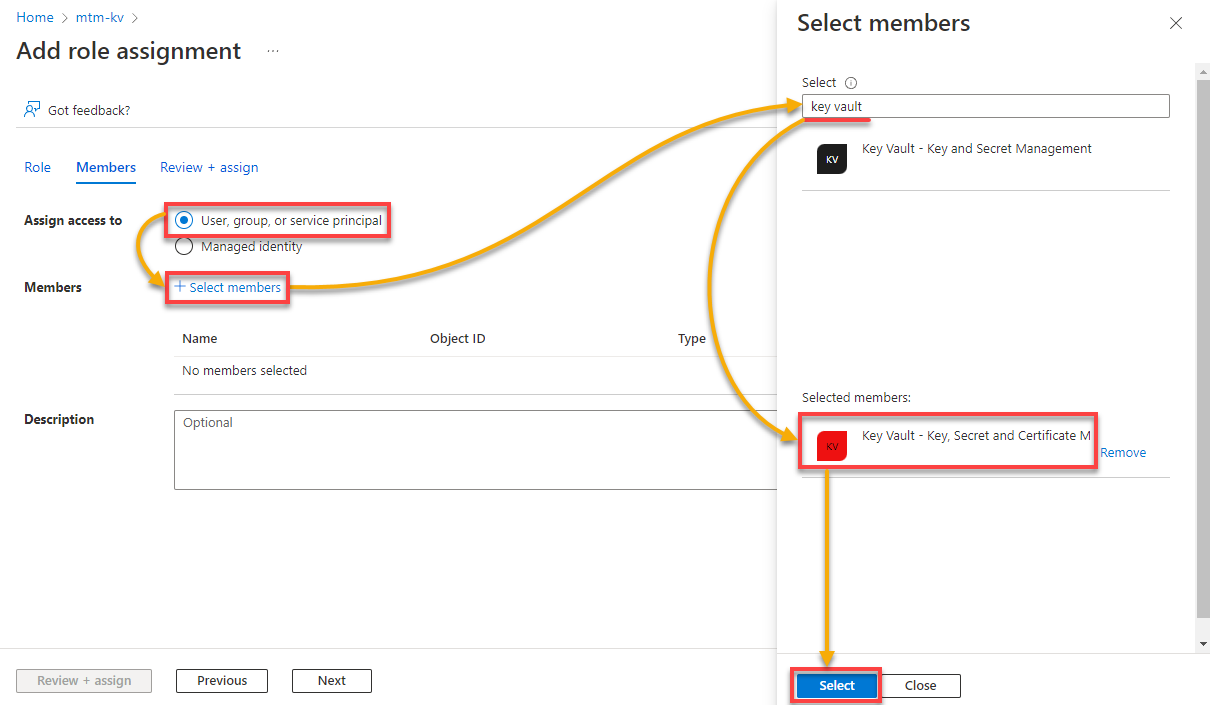
4. Add members to this role assignment with the following:
- Select User, group, or service principal under Assign Access to.
- Click Select members, and the Select Members blade (rightmost) opens.
- Search for the group or user to assign to this policy in the Select Members blade.
- Select your target group or user, and click Select.
7. Once all correct members have been added, click Review + Assign twice to create the new role assignment.

8. Lastly, navigate the Access control (IAM) page, and click on the Role assignments tab.
The new role assignment is now listed under Key Vault Reader, as shown below.
Secret Role Assignments
Unlike Vault Access Policies, you can assign role assignments to specific secrets with the Azure Role-Based Access Control for Key Vaults.
When using Vault Access Policies, if a user or principal is given access to view or change secrets, that user will have that same access across all secrets in the Key Vault. This option may be acceptable in certain situations. But there may be a need to set some security boundaries between secrets in a vault.
To configure role assignments for a particular secret, assuming the Azure Role-Based Access Control is enabled on the Key Vault:
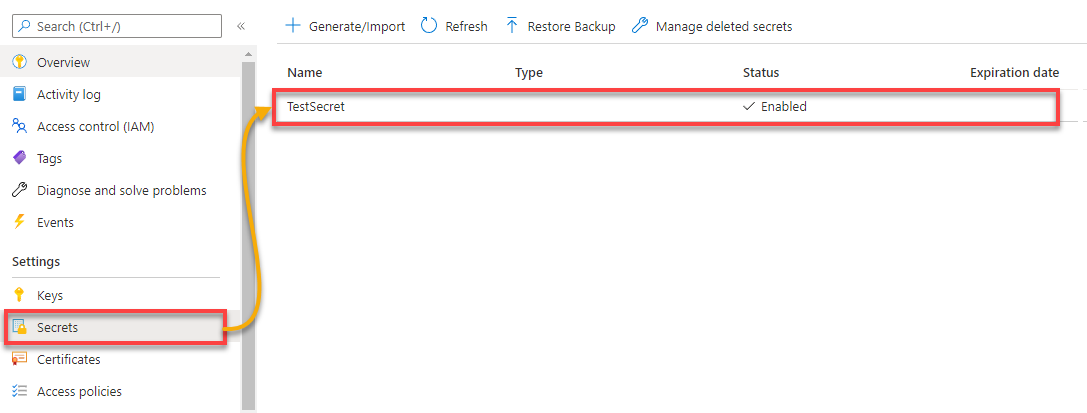
1. Navigate to Secrets (left panel), and click on an existing secret to open the secret’s Overview page.
2. Next, click on Access Control (IAM) on the left panel → Add → Add role assignment to create a new role assignment to apply to the secret selected.
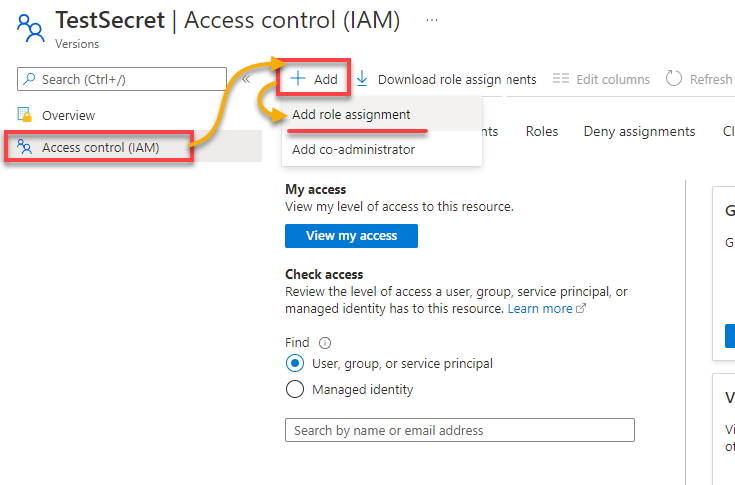
3. Ultimately, follow steps five to eight of the “Azure Role-Based Access Control” section. But this time, search for and select Key Vault Secrets Officer role to assign.
The Key Vault Reader role assignment in the Azure Role-Based Access Control section gave the principal read access to secret contents (like metadata) in this Key Vault. But not sensitive values.
Once selected, choose the same AD group to assign the role assignment, and click Review + Assign to validate the settings.
Once the Key Vault Secrets Officer role assignment is created, the users can see the sensitive value of this secret only. The only way they can see other secret values is if a role assignment is created for those specific secrets, creating security boundaries between the key vault’s secrets.
Networking Best Practice
You’ve seen different ways to manage Azure Key Vaults. But there’s another best practice you must know, restricting access to only specified virtual networks or IP addresses.
1. Enable the Azure firewall on a Key Vault:
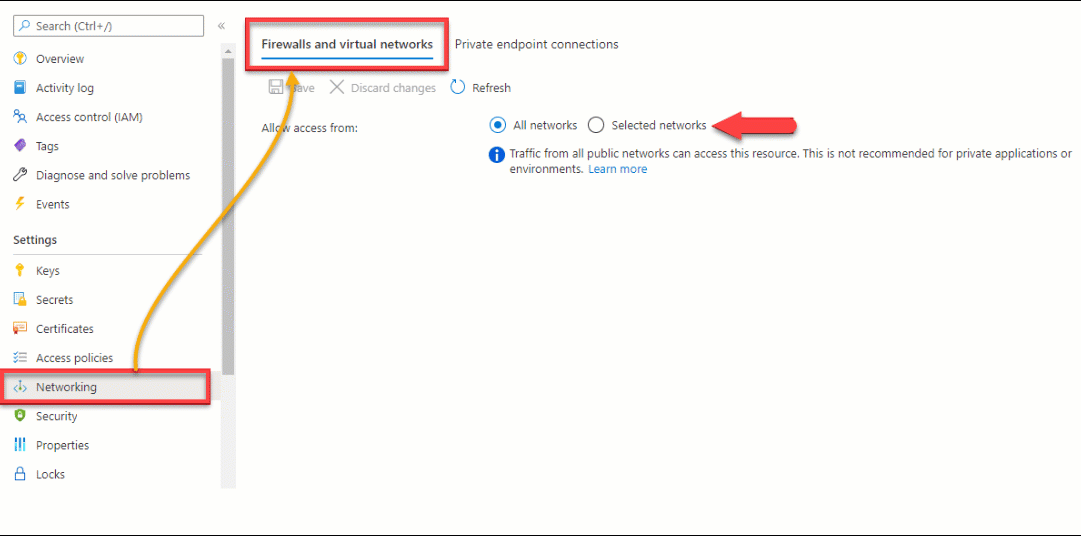
- Navigate to the desired Key Vault and click on Networking (left panel) under the Settings section.
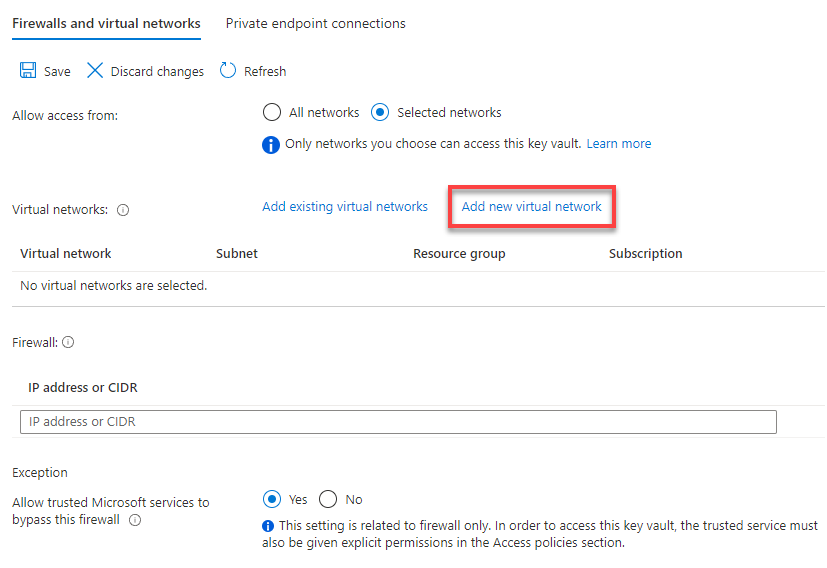
- Click on the Firewalls and virtual networks tab, and select the Selected networks option since you’ll restrict access to specific IP addresses.
Once selected, more options become available, as shown below.
2. Decide whether to add an existing virtual network or create a new one. But for this tutorial, click on Add new virtual network to initiate creating a virtual network.
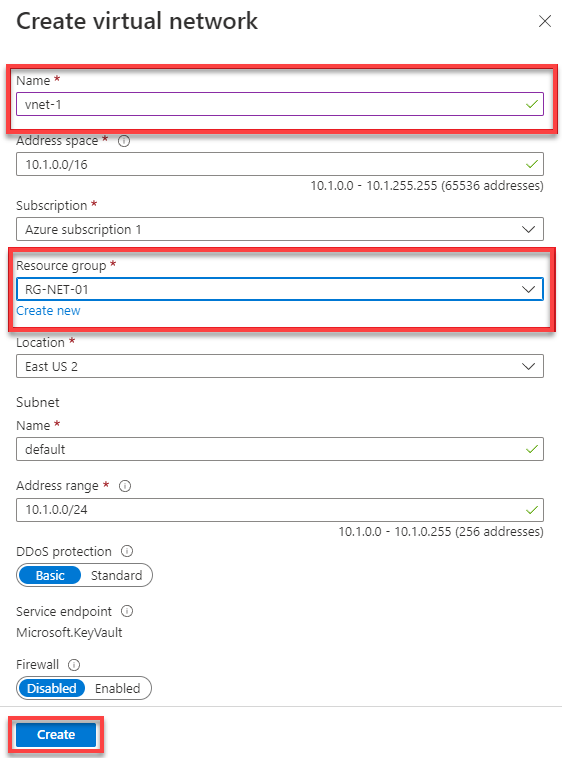
3. Configure the new virtual network on the Create virtual network blade (rightmost) with the following:
- Specify a descriptive name for the new virtual network (i.e., vnet-01).
- Address space and Subscription fields will have default values and can be left as-is.
- Choose a Resource Group where the virtual network will be created or create a new one.
- Leave the rest of the fields with their default values, and click Create to create and deploy the new virtual network.
4. Confirm that the new virtual network is in the list under the Virtual networks section, as shown below.
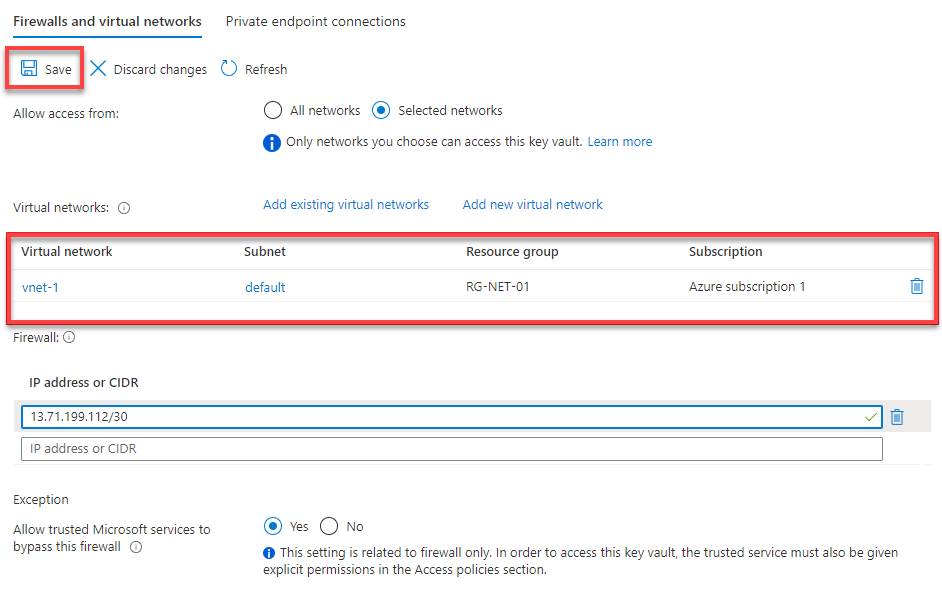
5. Next, under Firewall, IP addresses can be added from the public Internet or an on-premises network:
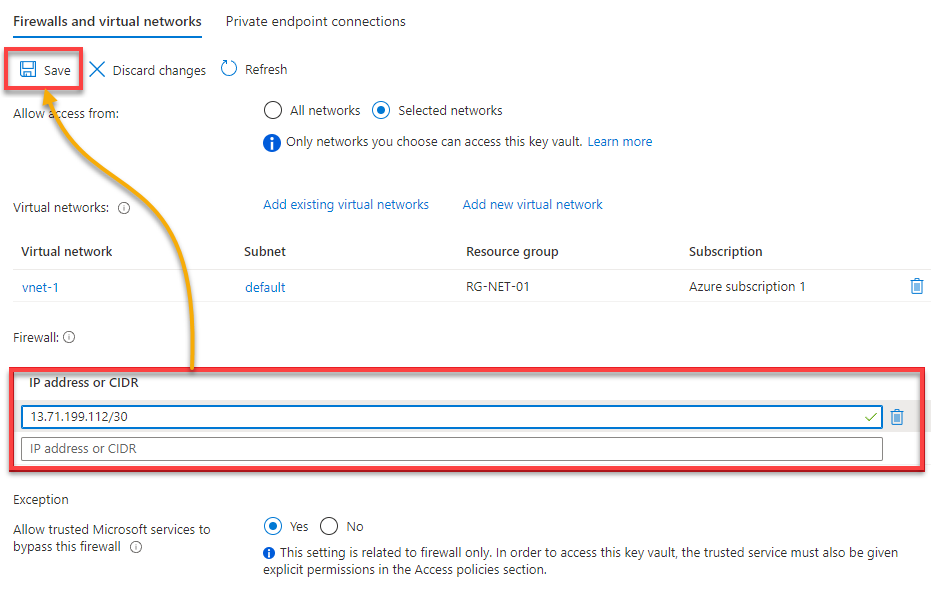
- For this demo, enter 13.71.199.112/30 (public Azure IP range). The IP address or CIDR field accepts an IP Address or CIDR block.
- Click the Save button to save the changes.
Verify that vnet-1 is listed under Virtual Networks and the Azure IP CIDR block is listed under Firewall. Now, only traffic that originates from the default subnet in vnet-1 or the public range can communicate with this Key Vault.
Enabling Recovery Options
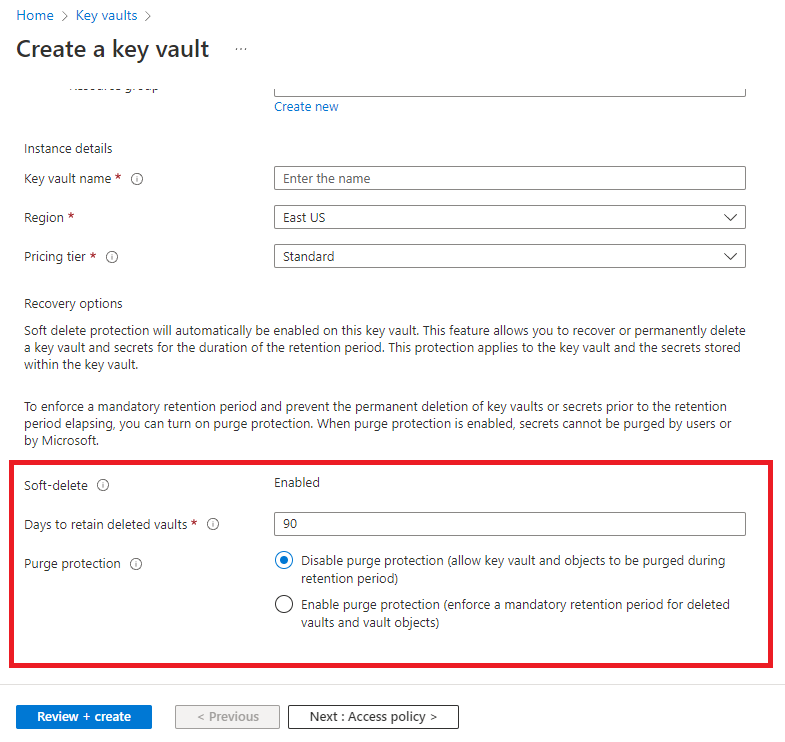
In the unfortunate scenario that a Key Vault or Key Vault object resource is inadvertently or maliciously deleted, enabling recovery options on the key vault is the best practice. Key Vaults offer both soft-delete and purge protection options to allow objects to be quickly recovered.
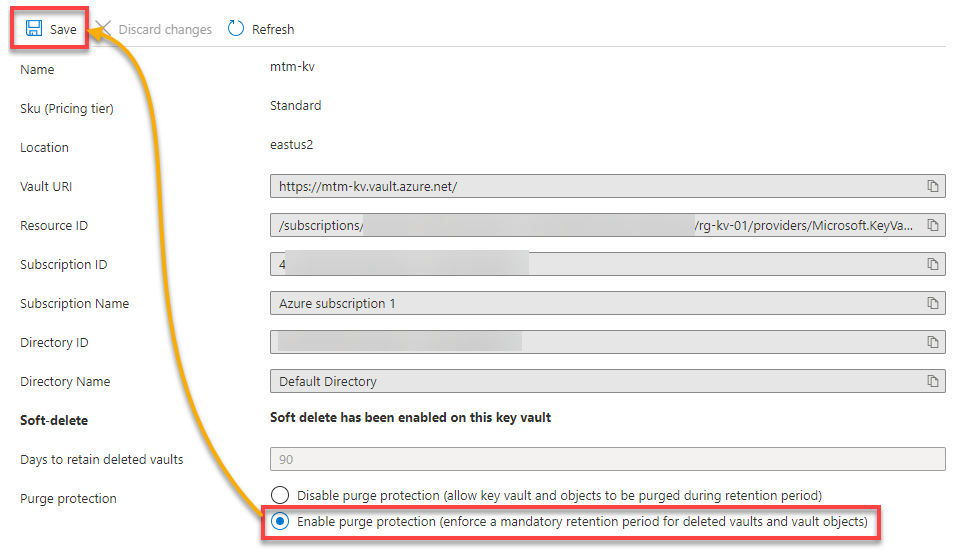
Navigate to Properties under the Settings section (left panel) to access the properties of the Key Vault.
Below, you can see that Soft-delete is enabled by default (upon Key Vault creation). When soft-delete is enabled, deleted resources are retained for some time. 90 days is the default retention period, but you can set the value anywhere between 7 and 90 days.
Note that you can only change the retention period during Key Vault creation. Once created, the retention period cannot be modified anymore.

For new Key Vaults, Soft-delete, Purge protection, and retention period can be configured under the Recovery options section.
Now, choose the Enable purge protection option, which enables purge protection for the Key Vault, and click Save. Note that once enabled, purge protection can’t be disabled again.
Enabling purge protection lets you avoid losing important data. A mandatory retention period is applied to the deleted Key Vault and Key Vault objects. As a result, a Key Vault or one of its objects (even when deleted) cannot be fully purged until the retention period has expired.
Enabling Platform Logging
Once an Azure Key Vault is created, you need a way to track how and when a Key Vault is accessed. Logging should be enabled to help with this task. Enabling platform logging provides visibility into the operations performed within the Key Vault and can be accessed for troubleshooting purposes.
To enable platform logging on a Key Vault:
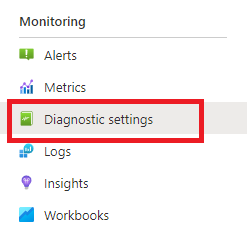
1. Click on Diagnostic settings under Monitoring to access the Diagnostic settings page.
2. Next, click the Add diagnostic setting link to configure logging for the Key Vault.
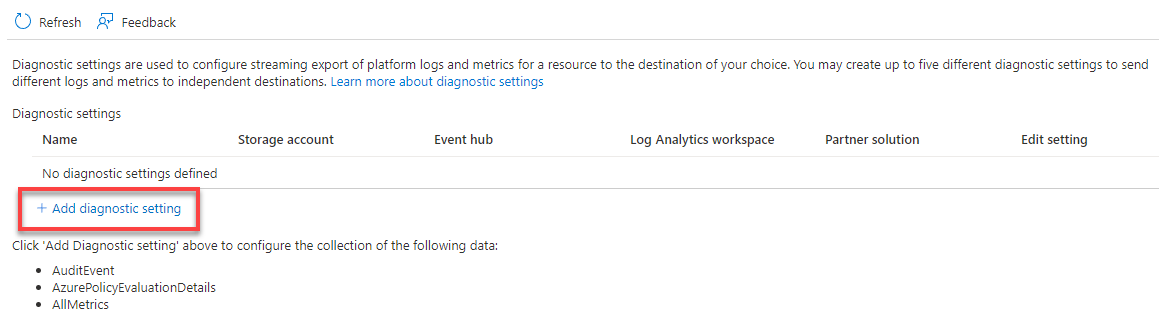
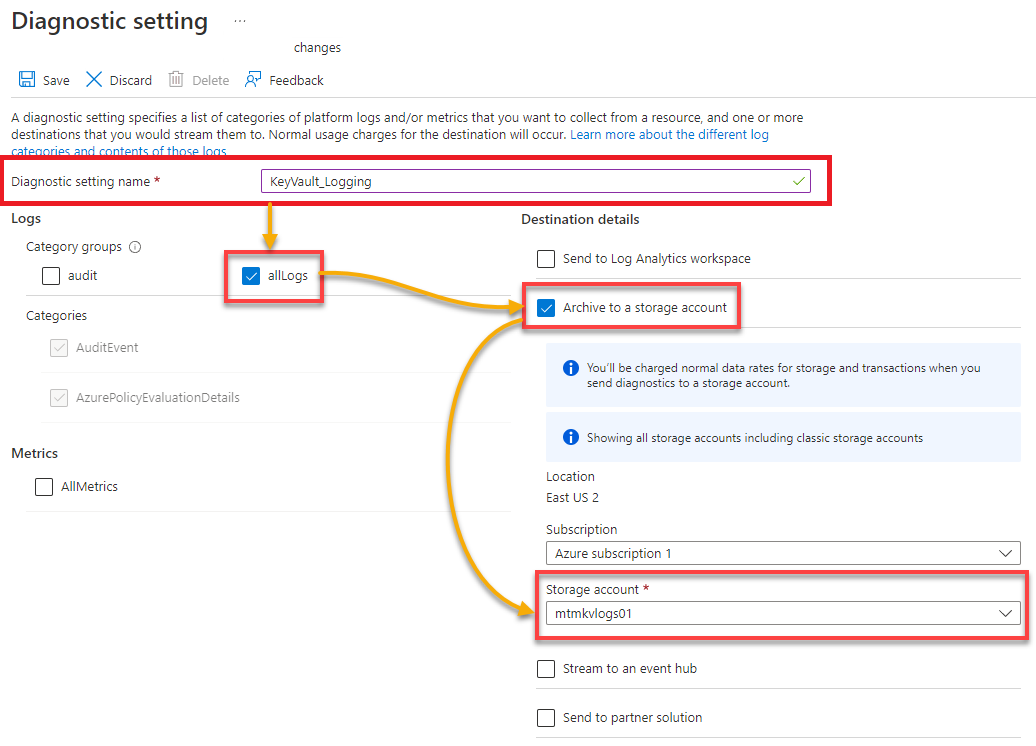
3. Configure the diagnostic settings as follows:
- Specify a unique Diagnostic setting name (i.e., KeyVault_Logging).
- Tick the allLogs box to select all available categories. Logging can then be configured for different categories based on the resource type.
Below are the available options for the destination where these logs will be sent to and stored:
- Send to Log Analytics workspace – Logs can be stored in an existing Log Analytics Workspace where they can be consolidated, correlated, and queried.
- Archive to a storage account – Logs can be stored as blob storage in an existing storage account.
- Stream to an event hub – Integrates logs with third-party Security Information and Event Management (SIEM) tools like Splunk and QRadar.
- Send to partner solution – Logs can be sent to a partner solution in the Azure Marketplace.
But for simplicity in this tutorial, tick the Archive to a storage account box. In the Storage account dropdown, specify an existing storage account where these logs should be stored, and click Save.
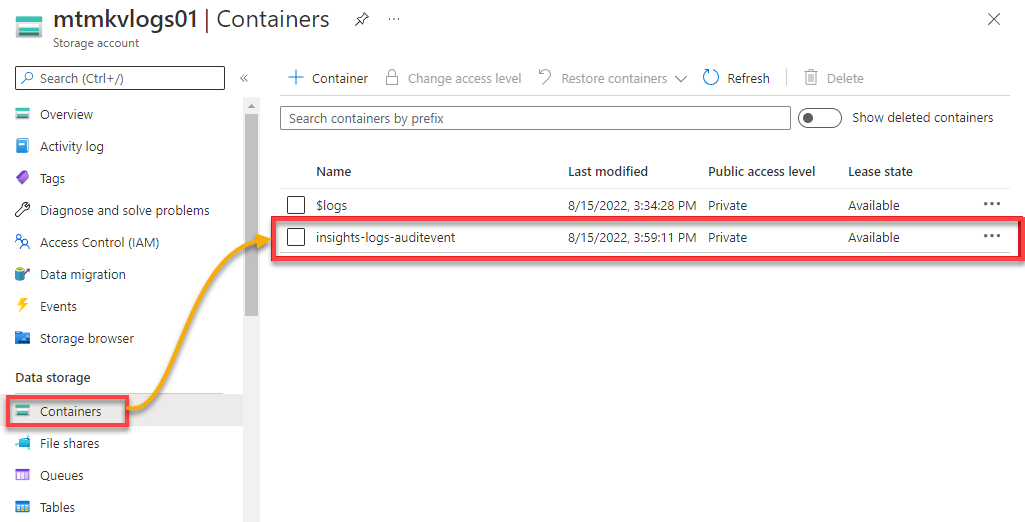
4. Lastly, navigate to Containers under the Data storage section (left panel) to see the container called insights-logs-auditevent, where the logs are stored, as shown below.
Backing Up Key Vaults
The recovery options available for Azure Key Vaults helps prevent the loss of sensitive and important data. But backing up business-critical secrets, keys, and certificates when updated or changed is the best practice to avoid possible data loss.
There are some considerations to take when backing up Key Vault objects. Azure does not currently provide a way to back up entire Key Vaults through the portal or command line. So secrets need to be backed up individually if desired.
To back up an existing secret:
1. Navigate to Secrets under the Settings section in the Key Vault dashboard, and click on the secret to be backed up.

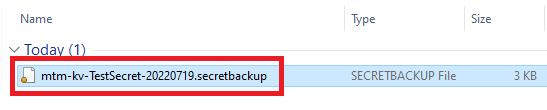
2. Next, click on Download Backup to begin the process of downloading a backup of the selected secret.

3. Finally, click Download on the pop-up message to download a backup of the secret.
The pop-up message below explains the secret will be encrypted and can only be restored to another Key Vault in the same subscription.
Note that the secret must be restored in the same Azure Geography. Why? A secret can only be restored in the same country where that secret was backed up.

The secret will be downloaded as an encrypted block with an extension of .secretbackup, which can only be decrypted inside Azure.
Learn more about backing up and restoring to an Azure Key Vault.
Conclusion
This tutorial’s goal was to demonstrate the Azure Key Vault best practices available in Azure. You learned the importance of separating Key Vaults based on their purpose, the different ways you can configure access policies for Key Vaults, and networking and firewall considerations.
By enabling purge protection, you’ve also protected Key Vaults and resources from accidental or malicious deletion. At the same time, you learned to back up Key Vault secrets.
But the best practices you’ve learned in this tutorial only scratch the surface regarding maintaining safe and secure Key Vaults in your environment. Everyone’s needs are different, so why not dive deeper into all these concepts? Make the right decisions based on your own needs.


