

One of the most important aspects of running workloads in Azure is keeping track of expenses. How you do that is through tracking resource usage with an Azure detailed usage report. In this article, you’ll learn how to create a PowerShell script to easily query Azure resource usage and charges across all of your Azure resources by date.
Resources in Azure are constantly running up your bill in many different ways. Although you can see resource usage via a web portal, it’s limited. But by using a couple of PowerShell cmdlets, you can build a handy report to give you a bird’s eye view of what kind of usage (thus expenses) your Azure resources are up to.
This article was created from a TechSnips YouTube video. If you’re a more visual learner, feel free to check out the video. Otherwise, read on!
Downloading Reports via the Azure Account Center
You can download many different usage reports from the Azure Account Center. The Azure Account Center is a web portal that allows you to view your billing cycle history, download invoices, and see the overview of your Azure subscription.
Although you can download Azure usage reports via the Azure Account Center, there is no flexibility in choosing a date range. You can’t limit usage to a date range because the dates are fixed to coincide with your billing cycle.
You can see below an example of a billing period and links to download usage reports.

Inside of these usage reports contains a lot of other information that you might not need.
Perhaps you need usage reports for the last 60 days. To get this information using the Azure Account Center, you’d have to download usage reports for at least three billing cycles to cover all your required dates.
After the reports are downloaded, you’d then have to remove the excess data. You’d then have to figure out a way to consolidate that data somehow. No thanks! That’s too much overhead.
Using PowerShell, you can build a reusable script, function or module to pull Azure resource usage reports. These, in turn, can be run manually with a few lines of commands, or as a scheduled task to automate the execution.
Prerequisites
This is a walkthrough article. To follow along, you’ll need to have a few things in place.
- Windows 10 or later.
- Windows Powershell v5.1
- A script editor, like Notepad++ or an Integrated Scripting Environment (ISE) like Windows PowerShell ISE and Visual Studio Code.
- An Azure subscription.
- Azure PowerShell module. The latest version as of this post is 2.6.0. This module must be installed in your machine. If you don’t have it yet, you can install it using PowerShellGet
- An established connection to Azure using the Connect-AzAccount cmdlet
How to Get Resource Usage Data
Before creating the script, let us first discuss the basics using the Get-UsageAggregates cmdlet. This is a cmdlet that allows you to pull Azure resource usage by date range, metrics like hourly or daily and more. The Get-UsageAggregates cmdlet is the main cmdlet that pulls off most of the magic you’ll be learning in this article.
To demonstrate the Get-UsageAggregates cmdlet, let’s say you need to find Azure resource usage from April 1st, 2019 to September 12th, 2019. The same technique can be used for any date range. Below you will see a snippet to find usage data based on those dates.
$params = @{
    ReportedStartTime = '04-01-19'
    ReportedEndTime = '09-12-19'
    AggregationGranularity = 'Hourly'
    ShowDetails = $true
}
$usageData = Get-UsageAggregates @params| Parameter | Value | Usage Explanation |
| ReportStartTime | 04-01-19 | This is the oldest date you want to retrieve.
(Month Day Year) |
| ReportEndTime | 09-12-19 | This is the latest date you want to retrieve.
(Month Day Year) |
| AggregationGranularity | Hourly | The granularity of data to return. Valid values are “Daily” and “Hourly” |
| ShowDetails | $True | Indicates whether the instance-level details are expanded |
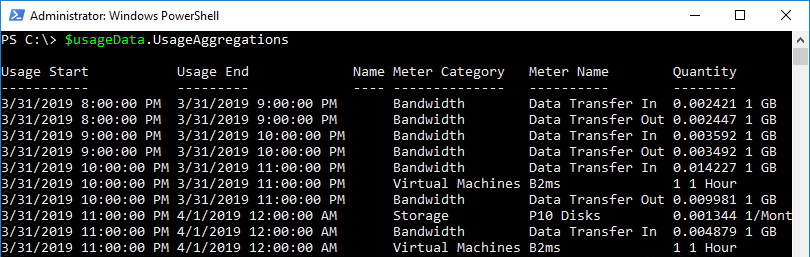
If there are data returned, you should get the results similar to this screenshot below. You can see that the actual usage data is stored in the UsageAggregations property.
Dealing with Paging in Get-UsageAggregates
In the section above, it would be common for the command to return many thousand objects especially for long date ranges. To prevent overwhelming the API, the Get-UsageAggregates command only returns a maximum of 1000 results. If you’ve saved the $usageData variable as covered in the previous section, you can confirm it by using running this command $usageData.UsageAggregations.count.
What if there are more than 1000 results? You’re going to have to do a little more work.
When you example the properties returned by Get-UsageAggregates, you’ll notice a property called ContinuationToken as shown below. You can see this token is a long string of characters.
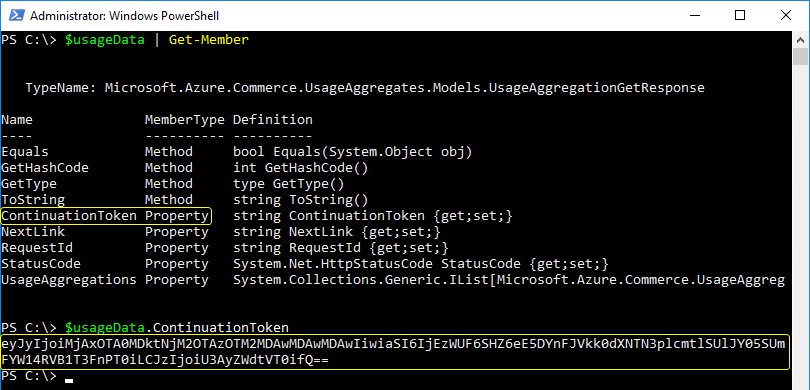
The ContinuationToken is a pointer to the next set of results. This property acts as a bookmark to know from which page to get the next batch of results.
To demonstrate, get the last item in the previous result using $usageData.UsageAggregations[-1] as shown below. Note the Usage Start and Usage End times.

Now pass the same parameters to the Get-UsageAggregates command again. But this time, use the ContinuationToken parameter and use the value of the ContinuationToken property returned earlier. Below you can see an example of how to do this.
$params = @{
    ReportedStartTime      = '04-01-19'
    ReportedEndTime        = '09-12-19'
    AggregationGranularity = 'Hourly'
    ShowDetails            = $true
    ContinuationToken      = $usageData.ContinuationToken
}
$usageData = Get-UsageAggregates @params
Now get the last item in the UsageAggregations property array using $usageData.UsageAggregations[-1]. Compare it to the previous result to confirm that the new results are different.
The comparison should be similar to the ones you see below. Notice the date ranges are seven days apart. By using the ContinuationToken, you retrieved the second page of results.


Building an Azure Resource Usage Reporting Function
You should know how paging works and how to use the ContinuationToken property and parameter. But what if there are tens or even hundreds of thousands of results to retrieve? Manually using the token in this way isn’t going to work too well.
Let’s build a PowerShell that handles this paging requirement for us and allows us some further flexibility. This script will allow you to provide your own parameters and to handle the paging requirement. It’ll also give you the flexibility to extend it down the road to perform other tasks if need be.
Building the Parameters
First build some function scaffolding. Below you can see an example function called Get-AzureUsage. This function has three parameters that may look familiar.
Previously, these parameters were defined on the Get-UsageAggregates cmdlet itself. You’re now building a “wrapper” function which will pass values to this cmdlet.
Function Get-AzureUsage {
    [CmdletBinding()]
    param(
        [Parameter(Mandatory)]
        [ValidateNotNullOrEmpty()]
        [datetime]$FromTime,

        [Parameter(Mandatory)]
        [ValidateNotNullOrEmpty()]
        [datetime]$ToTime,

        [Parameter()]
        [ValidateNotNullOrEmpty()]
        [ValidateSet('Hourly', 'Daily')]
        [string]$Interval = 'Daily'
    )
Below is a table providing further information on all of these parameters.
| Parameter | Usage |
| FromTime | This is a mandatory parameter that accepts a DateTime value. The value represents the oldest date of the report. |
| ToTime | This is a mandatory parameter that accepts a DateTime value. The value represents the latest date of the report. |
| Interval | This is a non-empty parameter that accepts two possible values: ‘Daily’ and ‘Hourly’. The default value is Daily. This represents the granularity of the report to return. |
Querying Resource Usage
Once the function has been created and all parameters defined, it’s time to fill out the rest of the function.
You can see the rest of the Get-AzureUsage function below. Be sure to take a look at the comments for a deeper understanding of what the code is doing.
Write-Verbose -Message "Querying usage data [$($FromTime) - $($ToTime)]..."
    $usageData = $null
    ## Start the do/while loop to automatically handle the continuation token
    do {
        ## Define all parameters to pass to Get-UsageAggregates
        $params = @{
            ReportedStartTime      = $FromTime
            ReportedEndTime        = $ToTime
            AggregationGranularity = $Interval
            ShowDetails            = $true
        }
        ## Only use the ContinuationToken parameter if this is not the first run
        if ((Get-Variable -Name usageData -ErrorAction Ignore) -and $usageData) {
            Write-Verbose -Message "Querying usage data with continuation token $($usageData.ContinuationToken)..."
            $params.ContinuationToken = $usageData.ContinuationToken
        }
        $usageData = Get-UsageAggregates @params
        $usageData.UsageAggregations | Select-Object -ExpandProperty Properties
    } while ('ContinuationToken' -in $usageData.psobject.properties.name -and $usageData.ContinuationToken)
}
The Completed Script (Copy/Pastable)
After putting the parameters and functional code together, you’ll get a completed script as you can see below. You can now copy this out into your own script or directly into the PowerShell console for testing.
Function Get-AzureUsage {
    [CmdletBinding()]
    param(
        [Parameter(Mandatory)]
        [ValidateNotNullOrEmpty()]
        [datetime]$FromTime,

        [Parameter(Mandatory)]
        [ValidateNotNullOrEmpty()]
        [datetime]$ToTime,

        [Parameter()]
        [ValidateNotNullOrEmpty()]
        [ValidateSet('Hourly', 'Daily')]
        [string]$Interval = 'Daily'
    )

    Write-Verbose -Message "Querying usage data [$($FromTime) - $($ToTime)]..."
    $usageData = $null
    do {
        $params = @{
            ReportedStartTime      = $FromTime
            ReportedEndTime        = $ToTime
            AggregationGranularity = $Interval
            ShowDetails            = $true
        }
        if ((Get-Variable -Name usageData -ErrorAction Ignore) -and $usageData) {
            Write-Verbose -Message "Querying usage data with continuation token $($usageData.ContinuationToken)..."
            $params.ContinuationToken = $usageData.ContinuationToken
        }
        $usageData = Get-UsageAggregates @params
        $usageData.UsageAggregations | Select-Object -ExpandProperty Properties
    } while ('ContinuationToken' -in $usageData.psobject.properties.name -and $usageData.ContinuationToken)
}
Querying Resource Usage with Our Function
Now is the time to put the function to the test. Either paste the code above in a script and dot source it into your current PowerShell session or copy the code directly into your PowerShell session.
Tip: If you’re using PowerShell ISE or Visual Studio Code, you can highlight the code you want to import and press F8. Otherwise, it is easier to copy and paste the code into a PowerShell session.
Now run the function providing a value to FromTime, ToTime and the interval you’d like to see the results as. You can see an example below on how to call this function.
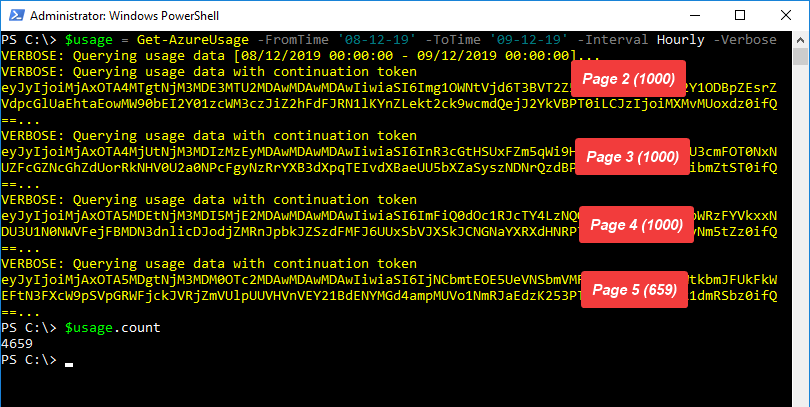
$usage = Get-AzureUsage -FromTime '08-12-19' -ToTime '09-12-19' -Interval Hourly -VerboseOnce this runs, you’ll see some verbose messages if you’ve chosen to use the optional Verbose parameter. As you can see from the example below, the usage report count is 4,659. You’ll also notice that function ran the Get-UsageAggregates function four times getting the next page of results each time. The function was able to do this because it used the correct ContinuationToke value for each call.
Filtering the Report
At this point, the report includes all usage details about all resource types available. But you can filter the report to display only the resource you want. To do this, you could either extend the function to allow this functionality or pipe the output to other PowerShell cmdlets.
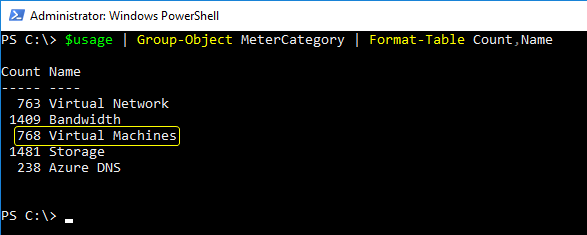
The output from the Get-Azure function returns all resource types but includes a property called MeterCategory. This property defines the type of resource that row represents. For example, to get only Azure Virtual Machine usage reports, you could group together all of the objects with a MeterCategory of Virtual Machines using the Group-Object cmdlet.
The Group-Object cmdlet will return how many rows were present in the output as the Count property. Then, limiting the output to just the Count and Name property (value for MeterCategory), you can see how many usage report rows exist for all Azure resource types.
As you can see in the screenshot below, there are 768 entries for Virtual Machines in the report.
To take this filtering concept a bit further, you could also leverage calculated properties to create friendlier output as shown below.
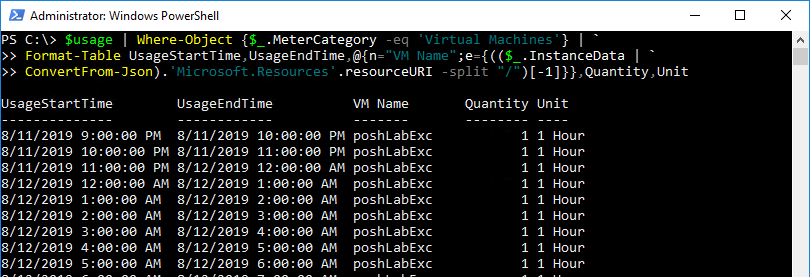
$usage | Where-Object {$_.MeterCategory -eq 'Virtual Machines'} | `
Format-Table UsageStartTime,UsageEndTime,@{n="VM Name";e={(($_.InstanceData | `
ConvertFrom-Json).'Microsoft.Resources'.resourceURI -split "/")[-1]}},Quantity,Unit
When you run the code snippet above, you should see output similar to what you see below.
Ideas for Extending the Report
Using the code in this article, you can extend the functionality of the tool just created many different ways.
You could export the output to a CSV fileand manipulate your data in Excel or create an HTML report using ConvertTo-HTML or the EnhancedHTML2 PowerShell module.
Take things a bit further and add an email notification to the result too with the Send-MailMessage cmdlet. The world is your oyster!
Summary
In this post, you learned how to retrieve resource usage reports from Azure. You’ve also learned how to build a custom PowerShell function to automate the process and use that function to manipulate the output.
The next time you’re hit with an expected Azure bill, you have no excuse! Build yourself a PowerShell function to query Azure resource usage at any time to keep an eye on that bill.


