


PowerShell is a powerful tool that helps you simplify and automate tedious and repetitive tasks. Administrators typically use PowerShell to extract information from a system or database when the data set required has to be presented as a report. But reports in text or CSV files usually lack the flare and fancy styling of HTML. In this tutorial, you will learn how to create nn HTML Report With PowerShell,
Not a reader? Watch this related video tutorial!
Not seeing the video? Make sure your ad blocker is disabled.
PowerShell can help you build HTML reports and get away from these other bland formats. Using just PowerShell, you can make a report come alive with HTML allowing you to make a meaningful presentation of the raw data extracted from the system. You can even apply Cascading Style Sheets (CSS) to easily customize the layout of your report.
In this article, you will learn how to use the ConvertTo-HTML combined with Out-file cmdlets to generate an HTML report. You will also learn the basic scripting for CSS and how it can be useful in formatting the design of your HTML based report.
If these reports need spreadsheet cleanup, document extraction, or recurring analysis before they become HTML output, compare PopAi AI Sheets for spreadsheet editing, report generation, and document data extraction before choosing a paid AI spreadsheet tool.
Prerequisites
This article will be a walkthrough. If you intend to follow along, make sure you have the following prerequisites set up ahead of time.
- All examples will be shown using Windows 10 Build 1709, but this version isn’t required
- Windows PowerShell 5.1 or later version or PowerShell Core 7
- Browser like Internet Explorer or Google Chrome
Creating a Basic Computer Information Report using ConvertTo-Html
To demonstrate how to use the ConvertTo-Html cmdlet and its parameters, you will create a script that gets basic information of a machine (such as Operating System, Processor, BIOS, and available Disk space) and generates the information to an HTML report.
You begin with a command that collects information about the operating system version from a machine. Open your PowerShell console then copy and paste the command below then press enter to run the command.
Get-CimInstance -Class Win32_OperatingSystem | Select-object Version,Caption,BuildNumber,ManufacturerWhen you run the command above, the Get-CimInstance cmdlet collects the properties of the Win32_OperatingSystem class which contains the information about the operating system of the machine, the command will return many results, thus filter is needed to get only the relevant information. The result should look similar to the screenshot shown below.

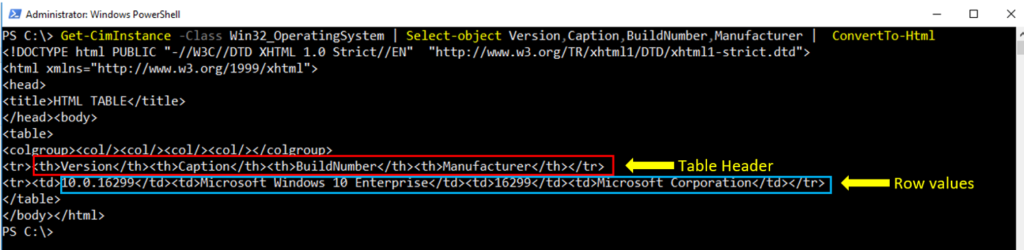
Now that you’ve got the command to return the operating system information, let’s convert the result to HTML code. To convert the result (objects) from the above command in HTML code, you can pipe the output of Get-CimInstance cmdlet to ConvertTo-Html. Run the command below in your PowerShell console.
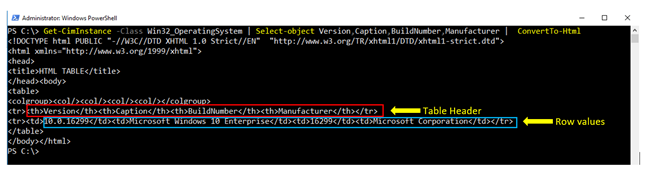
Get-CimInstance -Class Win32_OperatingSystem | Select-object Version,Caption,BuildNumber,Manufacturer | ConvertTo-HtmlYou can see in the following screenshot below that PowerShell automatically generates the HTML tags from the output of Get-CimInstance cmdlet. The result is displayed in a table format, where the table header shows the property names such as Version, Caption, BuildNumber, and Manufacturer. Each table row represents an object and displays the object’s values for each property.
Exporting The Report Into HTML File
Now that you’ve got the result and converted to HTML code, let’s export the report to an HTML file using Out-file cmdlet and view the report in a web browser. Pipe the output of ConvertTo-Html cmdlet and specify the path where you want to save the report using -FilePath parameter and use Basic-Computer-Information-Report.html as the name of the file.
Open your PowerShell ISE or any text editor, copy the code below and save the script with the filename Generate-HTML-Report.Ps1
Get-CimInstance -Class Win32_OperatingSystem | Select-object Version,Caption,BuildNumber,Manufacturer | ConvertTo-Html | Out-File -FilePath .\Basic-Computer-Information-Report.htmlRun the Generate-HTML-Report.Ps1 script in your PowerShell Console
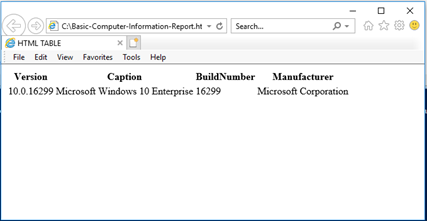
.\Generate-HTML-Report.Ps1After running the script, open the Basic-Computer-Information-Report.html file in a web browser. The web browser interprets the code of the HTML report and displays the data on the browser screen. The report should contain information about the machine’s operating system similar to the screenshot below.
Combining Reports Using Fragment Parameter
At this point, you now have a script that gets information of the machine’s operating system and exports the result to the HTML report. Your goal is to add more commands in the script to get the remaining information of the computer such as Processor, BIOS, Disk, and Services.
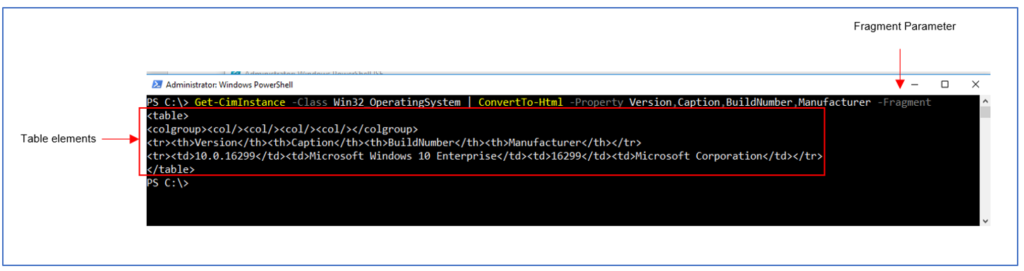
Each command will return different computer information formatted as HTML code. To properly consolidate the information in one single HTML report, use the Fragment parameter in order to get the table part only of the HTML code generated by ConvertTo-Html cmdlet.
As you can see in the screenshot below, PowerShell generates all basic HTML elements when the output is piped to ConvertTo-Html cmdlet.

ConvertTo-Html cmdletWhen you use the Fragment parameter, PowerShell generates the HTML table element only. The elements <HTML>, <HEAD>, <TITLE>, <BODY>, and others are omitted. The result is shown below.
Now that you already know how the Fragment parameter works from the above example, let’s apply that in the script.
The commands in the script below performs the following:
- The first five lines of commands gets different information from the machine such as Operating System, Processor, BIOS, Disk and Services.
- Filter the result using
-Propertyparameter to display only the relevant values - Store the values in respective variables. Each information is formatted as table using
-Fragment - Consolidate the HTML tables using
-Bodyparameter into single HTML report - Set the title of the report to “Computer Information Report” using
-Titleparameter - Export the report as HTML file using
Out-fileparameter
Additional information about the script is available in the comments in the code snippet below. Update the script with the following code.
#The command below will get the Operating System information, convert the result to HTML code as a table and store it to a variable
$OSinfo = Get-CimInstance -Class Win32_OperatingSystem | ConvertTo-Html -Property Version,Caption,BuildNumber,Manufacturer -Fragment
#The command below will get the Processor information, convert the result to HTML code as table and store it to a variable
$ProcessInfo = Get-CimInstance -ClassName Win32_Processor | ConvertTo-Html -Property DeviceID,Name,Caption,MaxClockSpeed,SocketDesignation,Manufacturer -Fragment
#The command below will get the BIOS information, convert the result to HTML code as table and store it to a variable
$BiosInfo = Get-CimInstance -ClassName Win32_BIOS | ConvertTo-Html -Property SMBIOSBIOSVersion,Manufacturer,Name,SerialNumber -Fragment
#The command below will get the details of Disk, convert the result to HTML code as table and store it to a variable
$DiscInfo = Get-CimInstance -ClassName Win32_LogicalDisk -Filter "DriveType=3" | ConvertTo-Html -Property DeviceID,DriveType,ProviderName,VolumeName,Size,FreeSpace -Fragment
#The command below will get first 10 services information, convert the result to HTML code as table and store it to a variable
$ServicesInfo = Get-CimInstance -ClassName Win32_Service | Select-Object -First 10 |ConvertTo-Html -Property Name,DisplayName,State -Fragment
#The command below will combine all the information gathered into a single HTML report
$Report = ConvertTo-HTML -Body "$ComputerName $OSinfo $ProcessInfo $BiosInfo $DiscInfo $ServicesInfo" -Title "Computer Information Report"
#The command below will generate the report to an HTML file
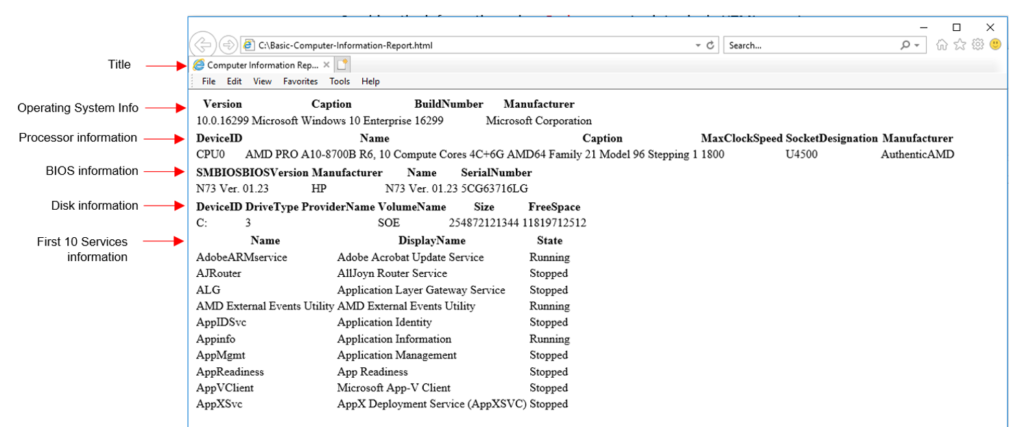
$Report | Out-File .\Basic-Computer-Information-Report.htmlRun the script in PowerShell console. You can see the output of the report as shown below.
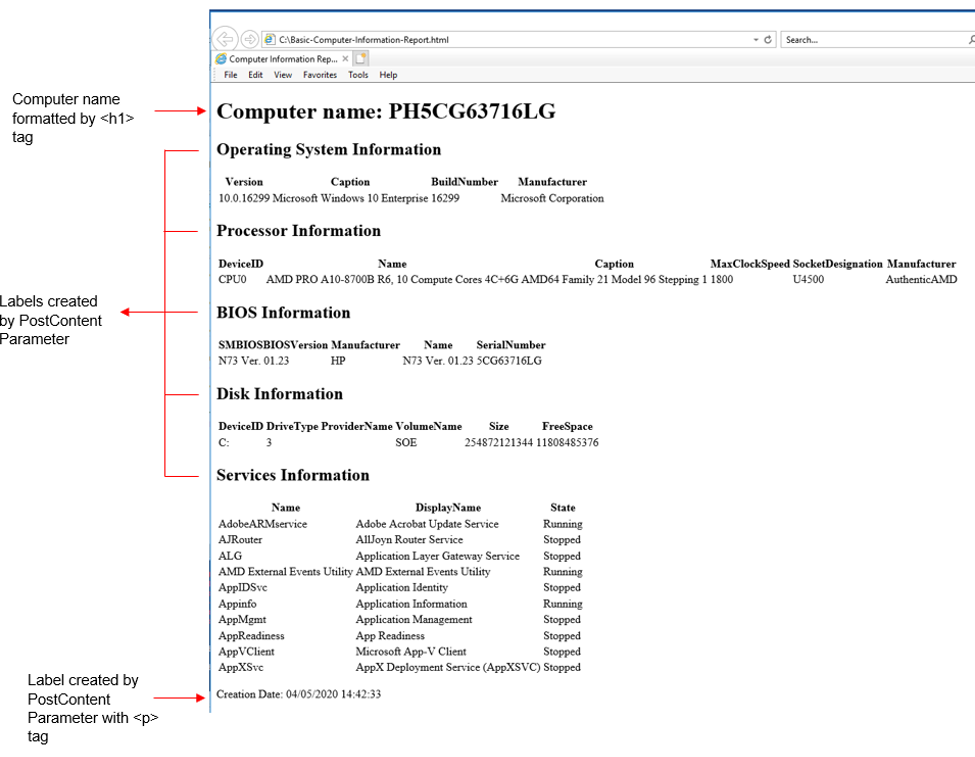
Adding Label Using PreContent and PostContent Parameter
At this point, the script can now get all the basic information of a computer and export the result to HTML. However, as you can see in the above screenshot, someone or a recipient of the report might have difficulty in understanding the content when you remove the annotation as the information is not properly labeled or categorized.
By using the PreContent and PostContent parameters, you can add labels into each table so anyone can easily discern the content of the report.
The PreContent parameter specifies the text to add before the opening <TABLE> tag and the PostContent parameter specifies the text to add after the closing </TABLE> tag. Values added on these parameters are not automatically converted to Html code, so you need to explicitly use HTML tags so it will be properly rendered as HTML elements.
Update the script using the commands below then run the script in PowerShell console.
Below are the changes in the script:
- New command is added to get the name of the computer. The value of
$ComputerNamevariable has<h1>tag to change the text format to heading when rendered in a browser. - Different labels are added in each table using
PreContentParameter and values are placed in<h2>tags - Creation date label is added at the end of the report using
PostContentParameter and value is placed in<p>tag
#The command below will get the name of the computer
$ComputerName = "<h1>Computer name: $env:computername</h1>"

#The command below will get the Operating System information, convert the result to HTML code as table and store it to a variable
$OSinfo = Get-CimInstance -Class Win32_OperatingSystem | ConvertTo-Html -Property Version,Caption,BuildNumber,Manufacturer -Fragment -PreContent "<h2>Operating System Information</h2>"

#The command below will get the Processor information, convert the result to HTML code as table and store it to a variable
$ProcessInfo = Get-CimInstance -ClassName Win32_Processor | ConvertTo-Html -Property DeviceID,Name,Caption,MaxClockSpeed,SocketDesignation,Manufacturer -Fragment -PreContent "<h2>Processor Information</h2>"

#The command below will get the BIOS information, convert the result to HTML code as table and store it to a variable
$BiosInfo = Get-CimInstance -ClassName Win32_BIOS | ConvertTo-Html -Property SMBIOSBIOSVersion,Manufacturer,Name,SerialNumber -Fragment -PreContent "<h2>BIOS Information</h2>"

#The command below will get the details of Disk, convert the result to HTML code as table and store it to a variable
$DiscInfo = Get-CimInstance -ClassName Win32_LogicalDisk -Filter "DriveType=3" | ConvertTo-Html -Property DeviceID,DriveType,ProviderName,VolumeName,Size,FreeSpace -Fragment -PreContent "<h2>Disk Information</h2>"

#The command below will get first 10 services information, convert the result to HTML code as table and store it to a variable
$ServicesInfo = Get-CimInstance -ClassName Win32_Service | Select-Object -First 10  | ConvertTo-Html -Property Name,DisplayName,State -Fragment -PreContent "<h2>Services Information</h2>"

#The command below will combine all the information gathered into a single HTML report
$Report = ConvertTo-HTML -Body "$ComputerName $OSinfo $ProcessInfo $BiosInfo $DiscInfo $ServicesInfo" -Title "Computer Information Report" -PostContent "<p>Creation Date: $(Get-Date)<p>"

#The command below will generate the report to an HTML file
$Report | Out-File .\Basic-Computer-Information-Report.html
You can see with a little bit of extra work, the report can look a whole lot better, the report should be updated as shown below.
Changing Table Layout Using As Parameter
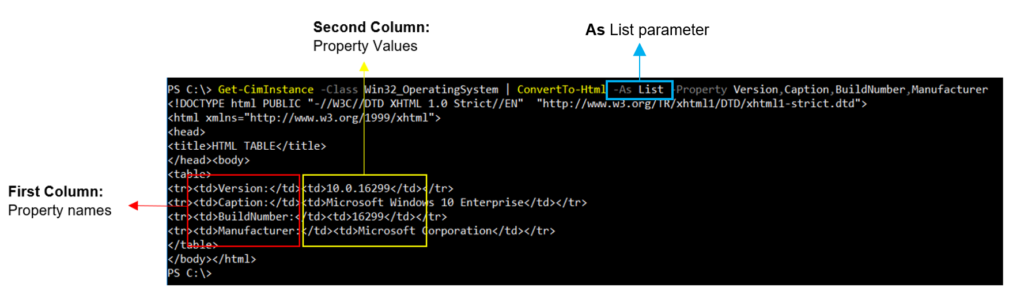
Perhaps, the generated HTML table has multiple columns and you want to change the format to properly display the value as a list, you can use the As parameter. By default, when you pipe the output to ConvertTo-html, PowerShell generates an HTML table that resembles the Windows PowerShell table format.
As you can see in the screenshot below, the table header displays the property names such as Version, Caption, Build Number and Manufacturer and each table row represents an object and displays the object’s values for each property.
To change the layout of the table to list, use the parameter -As then followed by List. PowerShell generates a two-column HTML table for each object that resembles the Windows PowerShell list format. The first column displays the property names such as Version, Caption, Build Number and Manufacturer and the second column displays the property value.
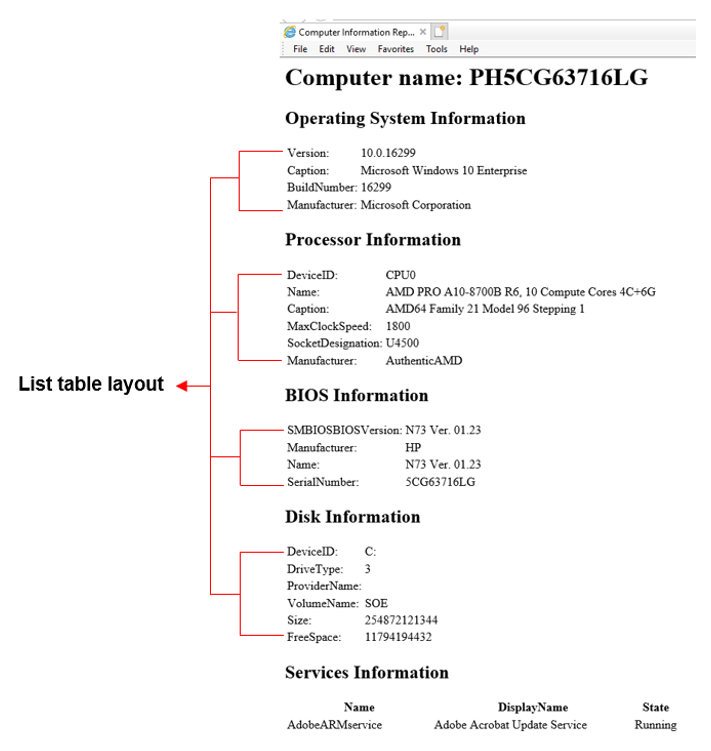
From the above examples, you now have an idea on how to change the layout of the table, let’s apply the As parameter in our script to change the layout of Operating System, Processor, BIOS and Disk information tables to list format.
Update the script with the following code below. The script has -As parameter in the command lines for Operating System, Processor, BIOS and Disk.
#The command below will get the name of the computer
$ComputerName = "<h1>Computer name: $env:computername</h1>"

#The command below will get the Operating System information, convert the result to HTML code as table and store it to a variable
$OSinfo = Get-CimInstance -Class Win32_OperatingSystem | ConvertTo-Html -As List -Property Version,Caption,BuildNumber,Manufacturer -Fragment -PreContent "<h2>Operating System Information</h2>"

#The command below will get the Processor information, convert the result to HTML code as table and store it to a variable
$ProcessInfo = Get-CimInstance -ClassName Win32_Processor | ConvertTo-Html -As List -Property DeviceID,Name,Caption,MaxClockSpeed,SocketDesignation,Manufacturer -Fragment -PreContent "<h2>Processor Information</h2>"

#The command below will get the BIOS information, convert the result to HTML code as table and store it to a variable
$BiosInfo = Get-CimInstance -ClassName Win32_BIOS | ConvertTo-Html -As List -Property SMBIOSBIOSVersion,Manufacturer,Name,SerialNumber -Fragment -PreContent "<h2>BIOS Information</h2>"

#The command below will get the details of Disk, convert the result to HTML code as table and store it to a variable
$DiscInfo = Get-CimInstance -ClassName Win32_LogicalDisk -Filter "DriveType=3" | ConvertTo-Html -As List -Property DeviceID,DriveType,ProviderName,VolumeName,Size,FreeSpace -Fragment -PreContent "<h2>Disk Information</h2>"

#The command below will get first 10 services information, convert the result to HTML code as table and store it to a variable
$ServicesInfo = Get-CimInstance -ClassName Win32_Service | Select-Object -First 10  |ConvertTo-Html -Property Name,DisplayName,State -Fragment -PreContent "<h2>Services Information</h2>"

#The command below will combine all the information gathered into a single HTML report
$Report = ConvertTo-HTML -Body "$ComputerName $OSinfo $ProcessInfo $BiosInfo $DiscInfo $ServicesInfo" -Title "Computer Information Report" -PostContent "<p>Creation Date: $(Get-Date)<p>"

#The command below will generate the report to an HTML file
$Report | Out-File .\Basic-Computer-Information-Report.html
After applying the -As parameter, the report should be updated as shown below. The table layouts for Operating System, Processor, BIOS and Disk information are now changed to list.
Enhancing The Report Using CSS
Let’s take the report to the next level and start adding the design using CSS. CSS is used to control how the HTML report will look in a web browser. CSS controls the fonts, text, colors, backgrounds, margins, and layout. At the end of this section, you should be able to see how the report will transform from plain to rich format using CSS.
There are three ways to apply CSS in HTML such as Inline, Internal and External. For this article, you will apply the Internal method using the Header parameter in the HTML report.
The Header parameter specifies the content of the <HEAD> tag. The <HEAD> tag is part of HTML structure where you place the code for CSS. As you can see in the screenshot below the <head> tag is already included when the HTML code is generated by the ConvertTo-Html cmdlet.
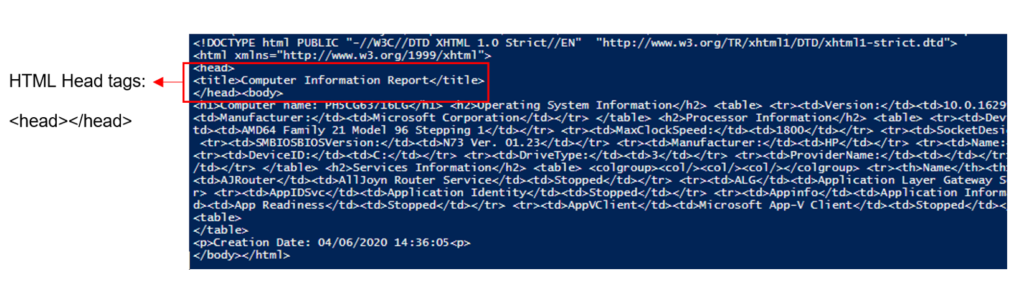
Let’s now use CSS to format the HTML report. First, copy the code below and paste it at the beginning of the script. The CSS code assigned in the $header variable will change the formatting of texts in the report which are placed in <h1> tag.
$header = @"
<style>

    h1 {

        font-family: Arial, Helvetica, sans-serif;
        color: #e68a00;
        font-size: 28px;

    }
</style>

@”
Next, use the Header parameter and assign the $header variable. Update the script using the code below.
$Report = ConvertTo-HTML -Body "$ComputerName $OSinfo $ProcessInfo $BiosInfo $DiscInfo $ServicesInfo" `
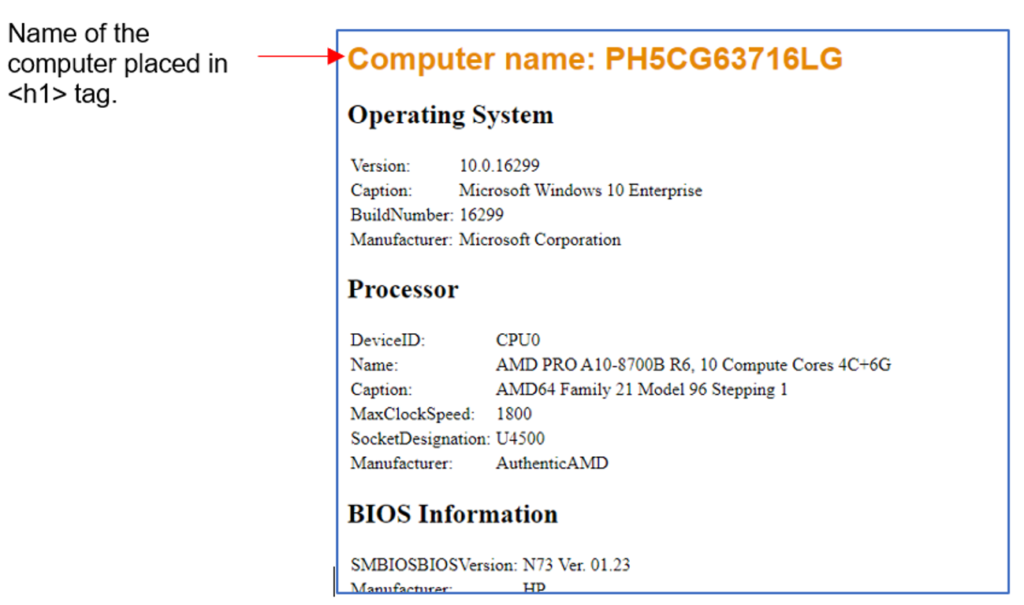
-Title "Computer Information" -Head $header -PostContent "<p>Creation Date: $(Get-Date)<p>"When you run the script, the report should be updated as shown below. Notice that the only affected HTML element is the <h1> which applied to the “Computer name” label. The steps above are a great example of how you can control or manipulate the design of the HTML report using CSS.
To add more design to other tables and labels which are placed in <h2> tag in the report, continue to update the $header variable with the CSS code below.
$header = @"
<style>

    h1 {

        font-family: Arial, Helvetica, sans-serif;
        color: #e68a00;
        font-size: 28px;

    }


    h2 {

        font-family: Arial, Helvetica, sans-serif;
        color: #000099;
        font-size: 16px;

    }


   table {
		font-size: 12px;
		border: 0px;
		font-family: Arial, Helvetica, sans-serif;
	}

    td {
		padding: 4px;
		margin: 0px;
		border: 0;
	}

    th {
        background: #395870;
        background: linear-gradient(#49708f, #293f50);
        color: #fff;
        font-size: 11px;
        text-transform: uppercase;
        padding: 10px 15px;
        vertical-align: middle;
	}

    tbody tr:nth-child(even) {
        background: #f0f0f2;
    }

        #CreationDate {

        font-family: Arial, Helvetica, sans-serif;
        color: #ff3300;
        font-size: 12px;

    }


</style>
"@
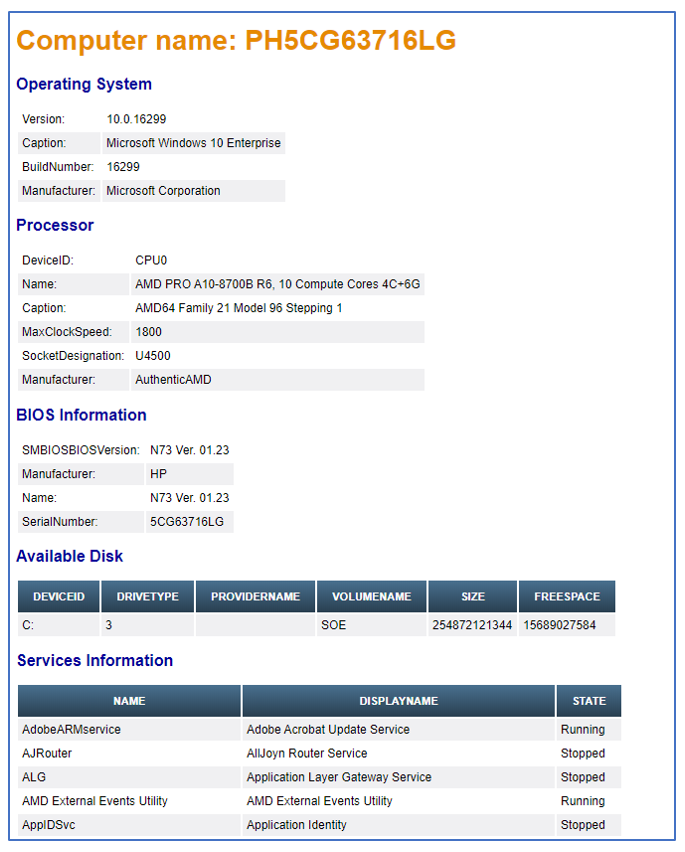
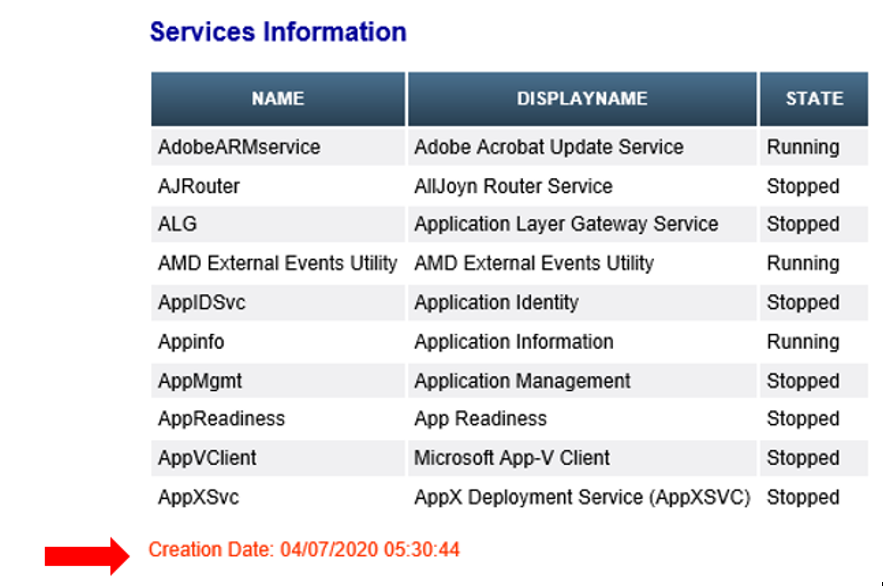
After updating and running the script, the report should be formatted as shown below – Thanks to CSS it is now visually appealing and looks professional.
Using HTML Id And Class Attributes In CSS
HTML elements are the building blocks of your entire HTML report, CSS use these elements as a selector to know where the style should be applied. From the previous examples, the CSS code was applied to HTML elements h1,h2, and table in the report. But what if you need to apply different style on different elements? This is where id and class attributes come in. In designing your HTML report, you can use either id or class to define a single element.
Please note that an HTML element can only have one unique id that belongs to that single element, while a class name can be used by multiple elements. For web developers, these attributes are not just for designing the page but primarily being used in scripting to handle how the page will respond to every event or request.
Let’s apply the id and class attributes in the HTML report. As you can see in the code snippet below the creation date label is placed in <p> tag.
-PostContent "<p>Creation Date: $(Get-Date)</p>"When the report is generated and viewed in the browser, the creation date label is formatted as shown below.
To format the creation date label using id attribute – First, assign an id name ‘CreationDate‘ to <p> tag. The id name should be placed inside the start tag. The updated code is shown below.
-PostContent "<p id='CreationDate'>Creation Date: $(Get-Date)</p>"Second, create a new CSS code to format the creation date label. Use # symbol followed by the ID name when declaring an ID in CSS. Add the CSS code below in the $header variable then save and run the script in the PowerShell console.
#CreationDate {
font-family: Arial, Helvetica, sans-serif;
color: #ff3300;
font-size: 12px;
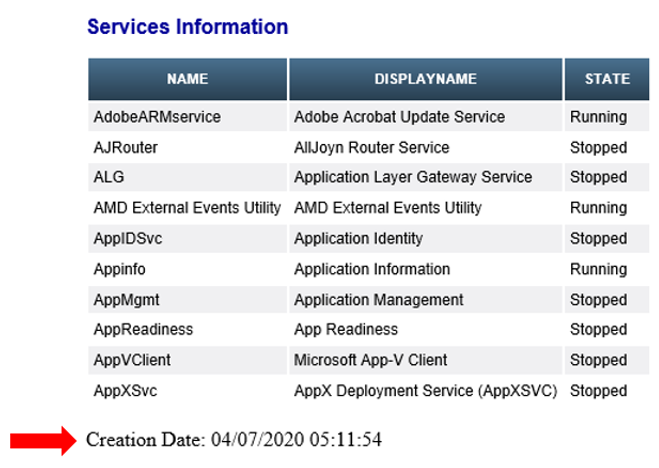
}After assigning the id and creating a new CSS code that targets the id attribute of the <p> tag, the report should be updated as shown below.
Let’s apply the class attribute in the Service information table. Using CSS change the color of the text to green **when the value of the state is Running and use red when the value is Stopped.
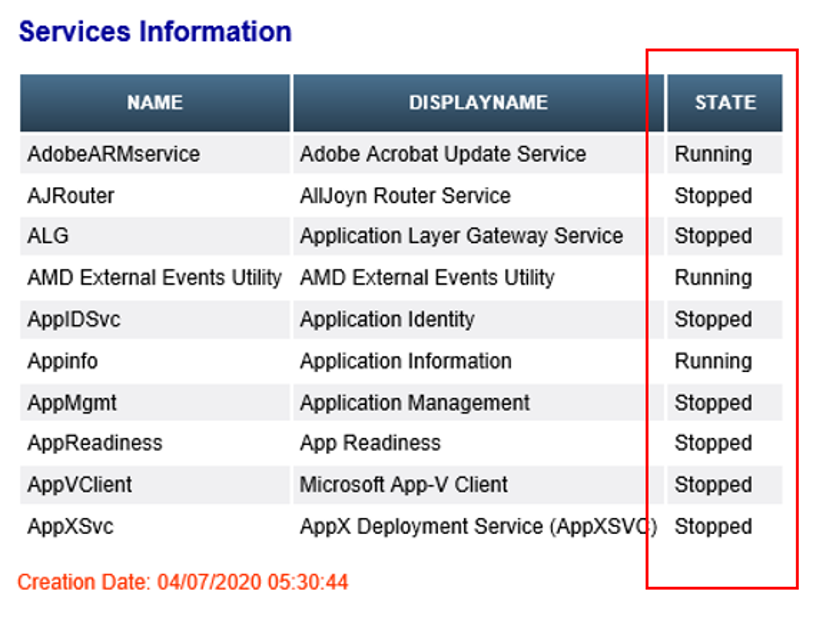
As previously mentioned, the class attributes can be assigned to multiple HTML elements. In the HTML report, the element that holds the Running and Stopped text is <td> tag. Using -Replace method of PowerShell, assign the class names RunningStatus and StopStatus to all <td> tags within Services information table. Use the commands below and update the script.
$ServicesInfo = Get-CimInstance -ClassName Win32_Service | Select-Object -First 10  | ConvertTo-Html -Property Name,DisplayName,State -Fragment -PreContent "<h2>Services Information</h2>"
$ServicesInfo = $ServicesInfo -replace '<td>Running</td>','<td class="RunningStatus">Running</td>'
$ServicesInfo = $ServicesInfo -replace '<td>Stopped</td>','<td class="StopStatus">Stopped</td>'
Add the following CSS code below in the $header variable. All <td> tags with a class name of RunningStatus will have the hexadecimal value of #008000 which is equivalent to color green, and All <td> tags with a class name of StopStatus will have the hexadecimal value of #ff0000 which is equivalent to color red.
.RunningStatus {
    color: #008000;
}

.StopStatus {
    color: #ff0000;
}
Save and Run the script. The Service information table in the report should be updated as shown below.
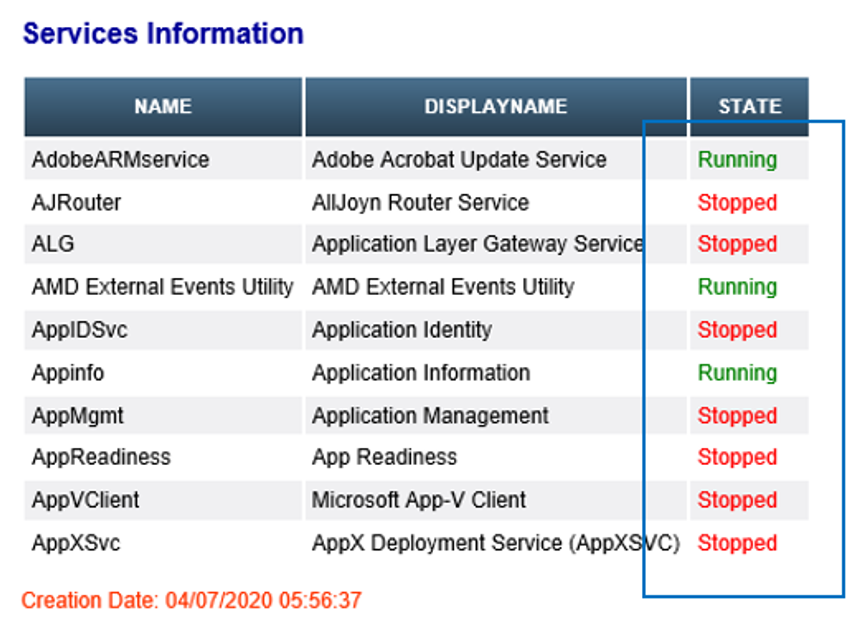
Below is the final layout of the HTML report formatted using CSS.
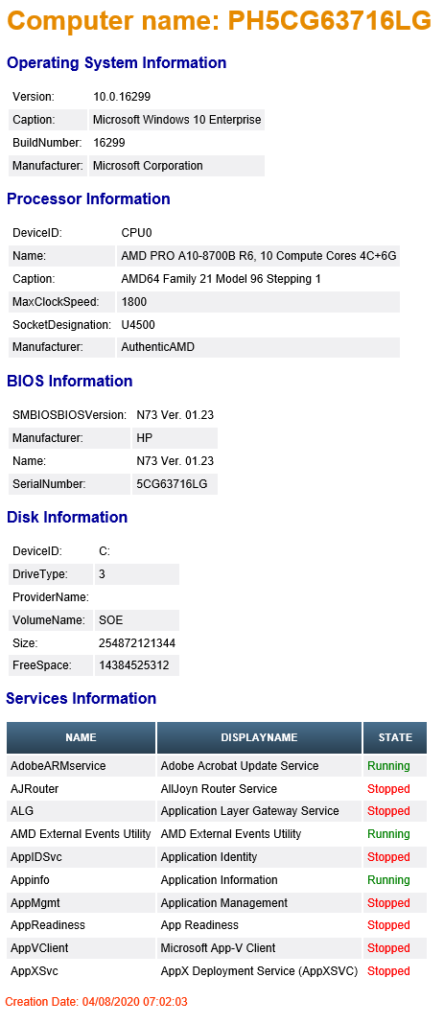
Below are the complete commands for Generate-HTML-Report.Ps1
#CSS codes
$header = @"
<style>

    h1 {

        font-family: Arial, Helvetica, sans-serif;
        color: #e68a00;
        font-size: 28px;

    }


    h2 {

        font-family: Arial, Helvetica, sans-serif;
        color: #000099;
        font-size: 16px;

    }


   table {
		font-size: 12px;
		border: 0px;
		font-family: Arial, Helvetica, sans-serif;
	}

    td {
		padding: 4px;
		margin: 0px;
		border: 0;
	}

    th {
        background: #395870;
        background: linear-gradient(#49708f, #293f50);
        color: #fff;
        font-size: 11px;
        text-transform: uppercase;
        padding: 10px 15px;
        vertical-align: middle;
	}

    tbody tr:nth-child(even) {
        background: #f0f0f2;
    }


    #CreationDate {

        font-family: Arial, Helvetica, sans-serif;
        color: #ff3300;
        font-size: 12px;

    }


    .StopStatus {

        color: #ff0000;
    }


    .RunningStatus {

        color: #008000;
    }


</style>
"@

#The command below will get the name of the computer
$ComputerName = "<h1>Computer name: $env:computername</h1>"

#The command below will get the Operating System information, convert the result to HTML code as table and store it to a variable
$OSinfo = Get-CimInstance -Class Win32_OperatingSystem | ConvertTo-Html -As List -Property Version,Caption,BuildNumber,Manufacturer -Fragment -PreContent "<h2>Operating System Information</h2>"

#The command below will get the Processor information, convert the result to HTML code as table and store it to a variable
$ProcessInfo = Get-CimInstance -ClassName Win32_Processor | ConvertTo-Html -As List -Property DeviceID,Name,Caption,MaxClockSpeed,SocketDesignation,Manufacturer -Fragment -PreContent "<h2>Processor Information</h2>"

#The command below will get the BIOS information, convert the result to HTML code as table and store it to a variable
$BiosInfo = Get-CimInstance -ClassName Win32_BIOS | ConvertTo-Html -As List -Property SMBIOSBIOSVersion,Manufacturer,Name,SerialNumber -Fragment -PreContent "<h2>BIOS Information</h2>"

#The command below will get the details of Disk, convert the result to HTML code as table and store it to a variable
$DiscInfo = Get-CimInstance -ClassName Win32_LogicalDisk -Filter "DriveType=3" | ConvertTo-Html -As List -Property DeviceID,DriveType,ProviderName,VolumeName,Size,FreeSpace -Fragment -PreContent "<h2>Disk Information</h2>"

#The command below will get first 10 services information, convert the result to HTML code as table and store it to a variable
$ServicesInfo = Get-CimInstance -ClassName Win32_Service | Select-Object -First 10  |ConvertTo-Html -Property Name,DisplayName,State -Fragment -PreContent "<h2>Services Information</h2>"
$ServicesInfo = $ServicesInfo -replace '<td>Running</td>','<td class="RunningStatus">Running</td>'
$ServicesInfo = $ServicesInfo -replace '<td>Stopped</td>','<td class="StopStatus">Stopped</td>'


#The command below will combine all the information gathered into a single HTML report
$Report = ConvertTo-HTML -Body "$ComputerName $OSinfo $ProcessInfo $BiosInfo $DiscInfo $ServicesInfo" -Head $header -Title "Computer Information Report" -PostContent "<p id='CreationDate'>Creation Date: $(Get-Date)</p>"

#The command below will generate the report to an HTML file
$Report | Out-File .\Basic-Computer-Information-Report.html
Conclusion
In this article, you’ve learned how to convert the objects (result) to HTML code and generate them to an HTML report.
Generating the report to HTML format gives you the ability to apply CSS that makes the report easier to enhance and manipulate. There are many free online resources that you can use to level up your HTML coding and CSS designing skills.
I hope this article gives you enough ideas on how you can create and improve your HTML report. Cheers!


