


Are you tired of interacting with your AWS Services from your PowerShell environment through the REST API endpoints? Although functional, interacting with AWS services through the REST API endpoints can be complex. What is the way out? AWS PowerShell Tools is the solution!
The AWS Tools for PowerShell provide developers and system administrators a way to manage their AWS resources from a PowerShell environment. The AWS PowerShell Tools allow you to perform actions against your AWS resources and services all within PowerShell.
Keep reading and follow along. This tutorial will teach you to leverage the AWS PowerShell tools to manage AWS resources and automate tasks.
Prerequisites
This tutorial will be a hands-on demonstration. If you’d like to follow along, be sure you have the following:
- An AWS account. You may register a free tier account first if you don’t have one.
- An AWS S3 bucket. Follow this link on creating an S3 bucket if you do not have one yet. Make sure to get the name of your S3 bucket.
- A computer with at least Windows PowerShell 5.1 or PowerShell 6.0 installed. The examples in this tutorial will be using PowerShell version 7.2.1.
Installing the AWS PowerShell Tools Installer Module
The AWS Tools Installer introduces a modular approach to installing, removing, and updating PowerShell modules for different AWS services. The AWS Tools Installer is available across Windows, Linux, and Mac operating systems.
Proceed as follows to install the AWS Tools Installer.
1. Open a PowerShell window and execute the below command to install the AWS.Tools.Installer module.
Install-Module -Name AWS.Tools.Installer2. To confirm the successful installation, run the below command to verify the module information.
Get-Module AWS.Tools.Installer -ListAvailableAs you can see below, the latest AWS.Tools.Installer version as of this writing is 1.0.2.4.

3. Finally, list the module cmdlets by running the below command.
Get-Command -Module AWS.Tools.InstallerYou’ll see that there are three cmdlets in the module: the Install-AWSToolsModule, Uninstall-AWSToolsModule, and Update-AWSToolsModule. These cmdlets are for installing, uninstalling, and updating AWS PowerShell modules, respectively.

Building a PowerShell Module using AWS PowerShell Tools
Now that you’ve installed the AWS.Tools.Installer module, get ready to jump in with both feet. The following sub-sections will teach you how to interact with the AWS S3 service from your PowerShell environment.
Installing Modules for AWS Services
At this point, remember that you’ve only installed the AWS Tools installer, which allows you to install other AWS Tools modules conveniently.
In this example, before you can interact with the AWS S3 service with PowerShell, you’ll first need to install the AWS.Tools.S3 module. With this module, you can create, upload, and delete files within an S3 bucket.
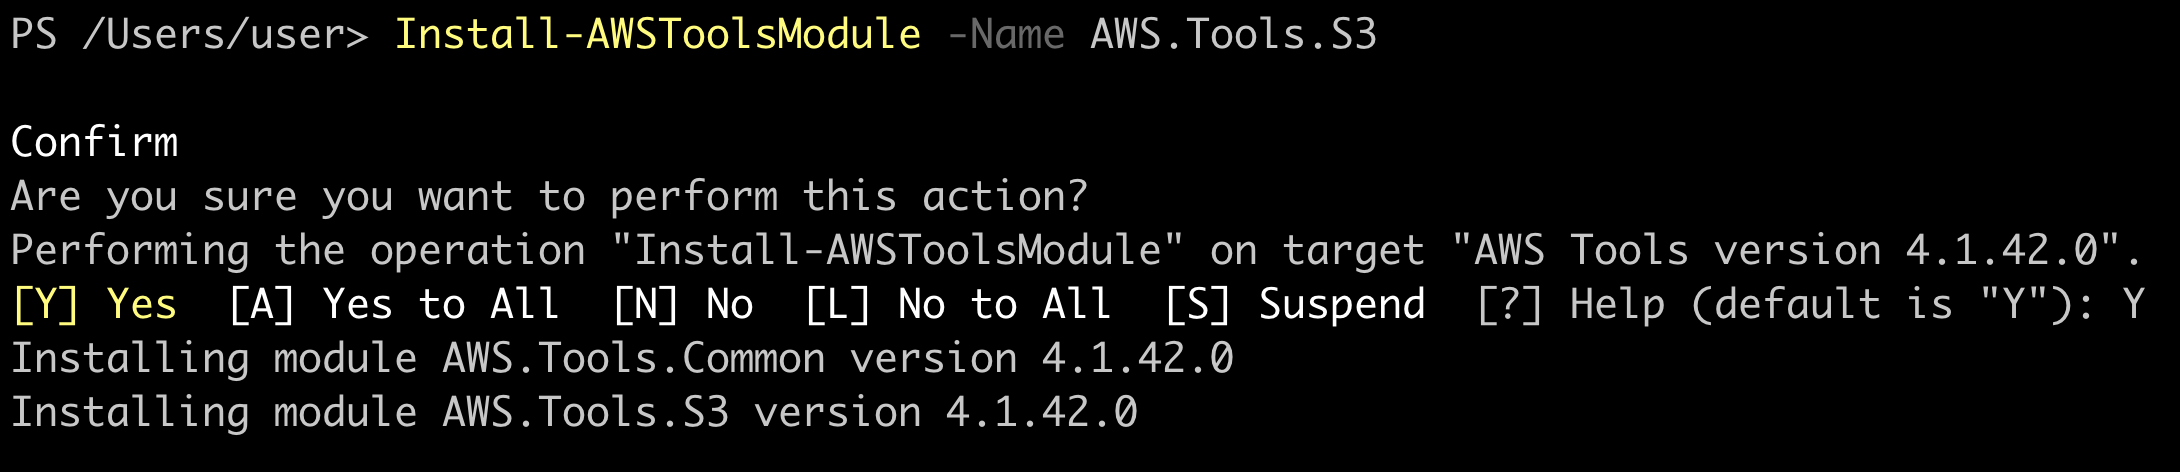
To install the AWS.Tools.S3 module, run the below command.
Install-AWSToolsModule -Name AWS.Tools.S3
At the confirmation prompt, press Y and Enter to continue with the installation.
Creating An IAM User for PowerShell
Every API requests you make by running commands in PowerShell require an IAM user credential to authenticate. The same is true when running commands against AWS S3. To create the IAM user with appropriate permissions, proceed as follows.
You may also create the IAM user via the AWS CLI, but this tutorial will teach you how to do so in the Amazon Management Console.
1. Open a web browser and log in to your AWS Management Console.
2. Navigate to the IAM user page, typing “IAM user” into the search box. Click on the Users item within the Features section.

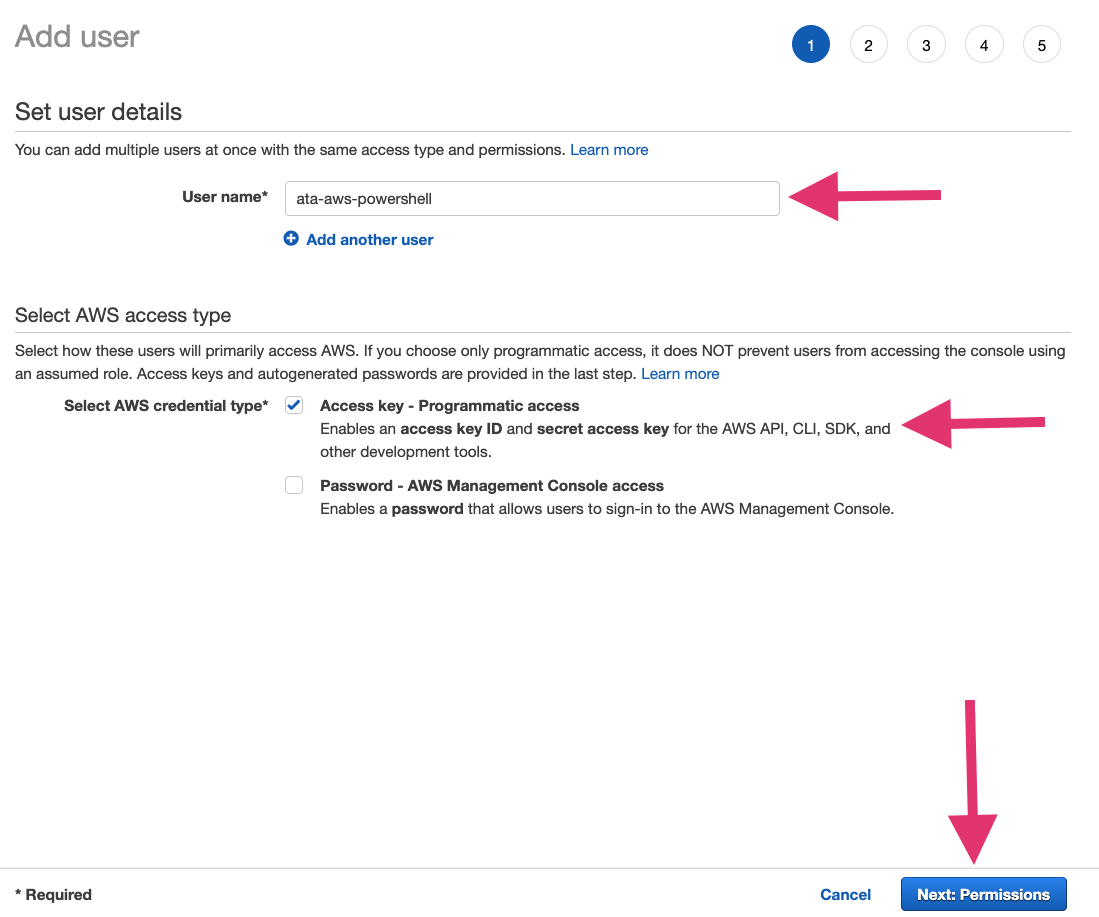
3. Click the Add Users button on the IAM users page.

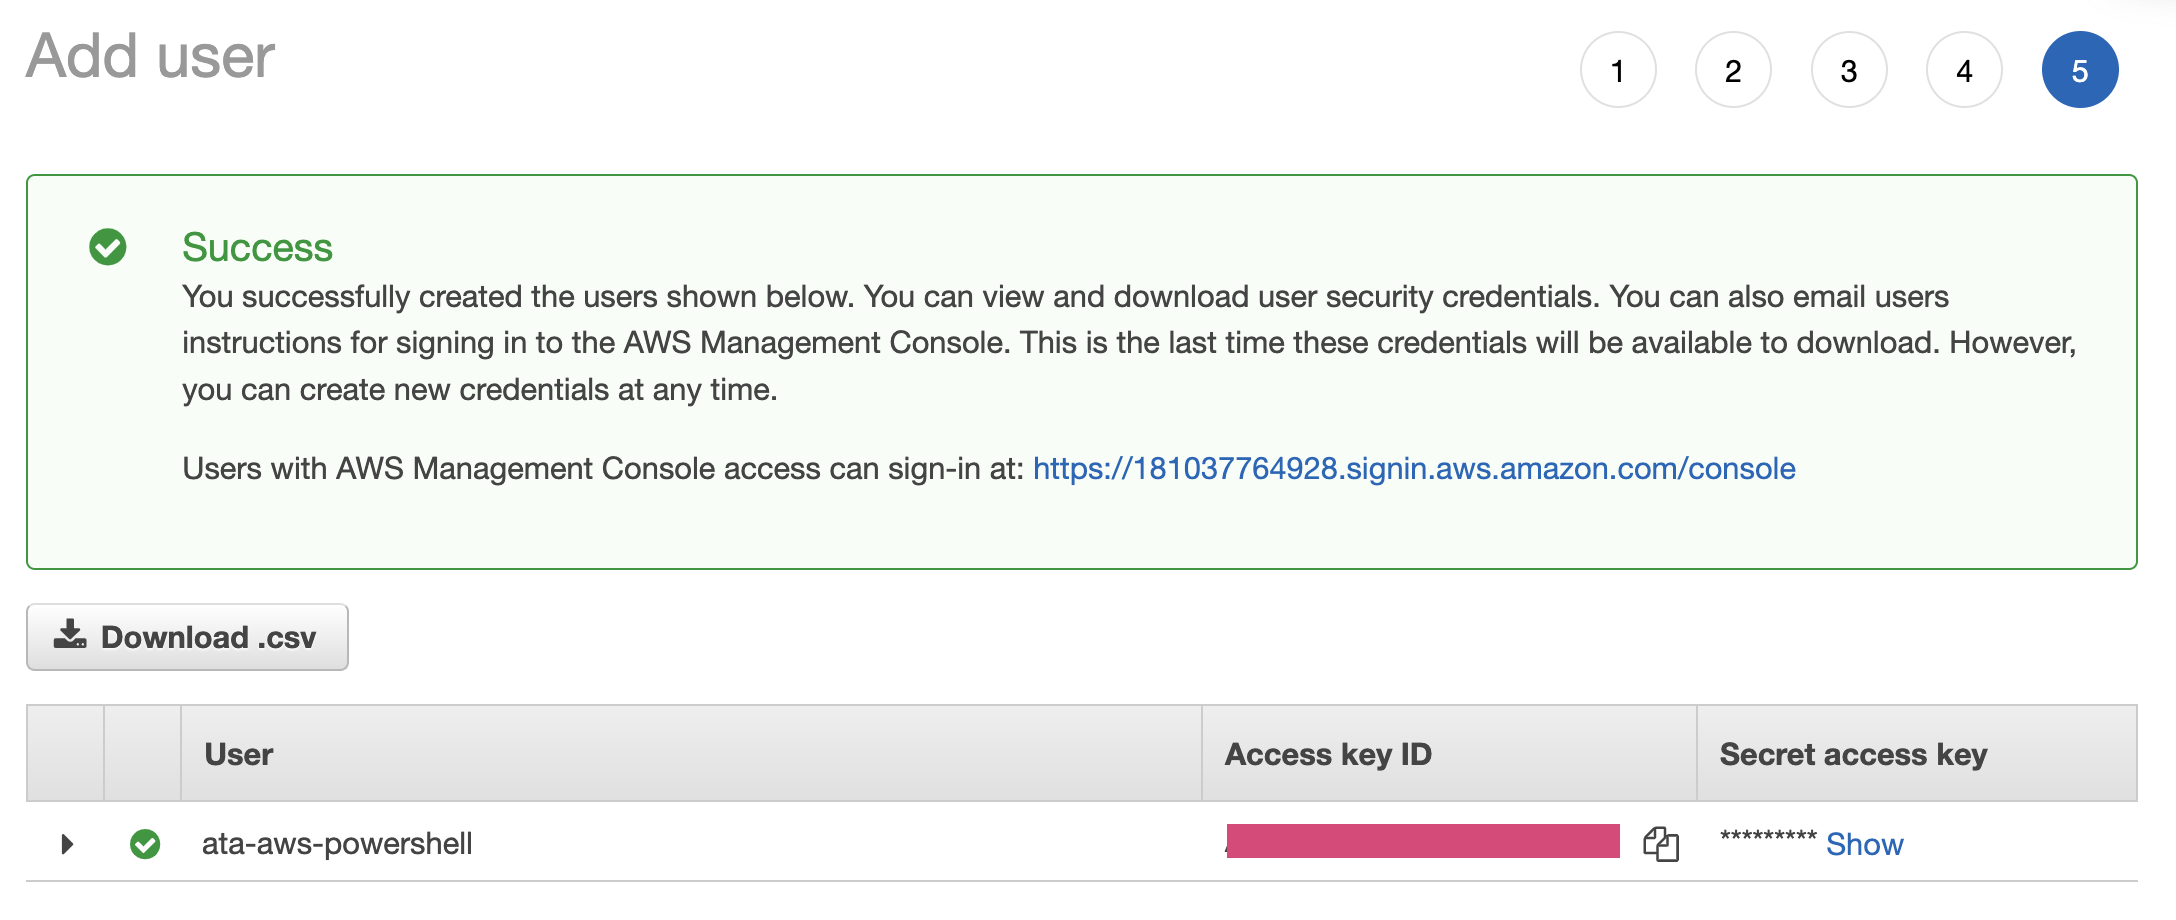
4. Provide a unique name for the User name field. This IAM user name in this example is ata-aws-powershell.
Next, click the Access key – programmatic access checkbox under the Select AWS access type section. Lastly, on this page, click the Next: Permissions button.
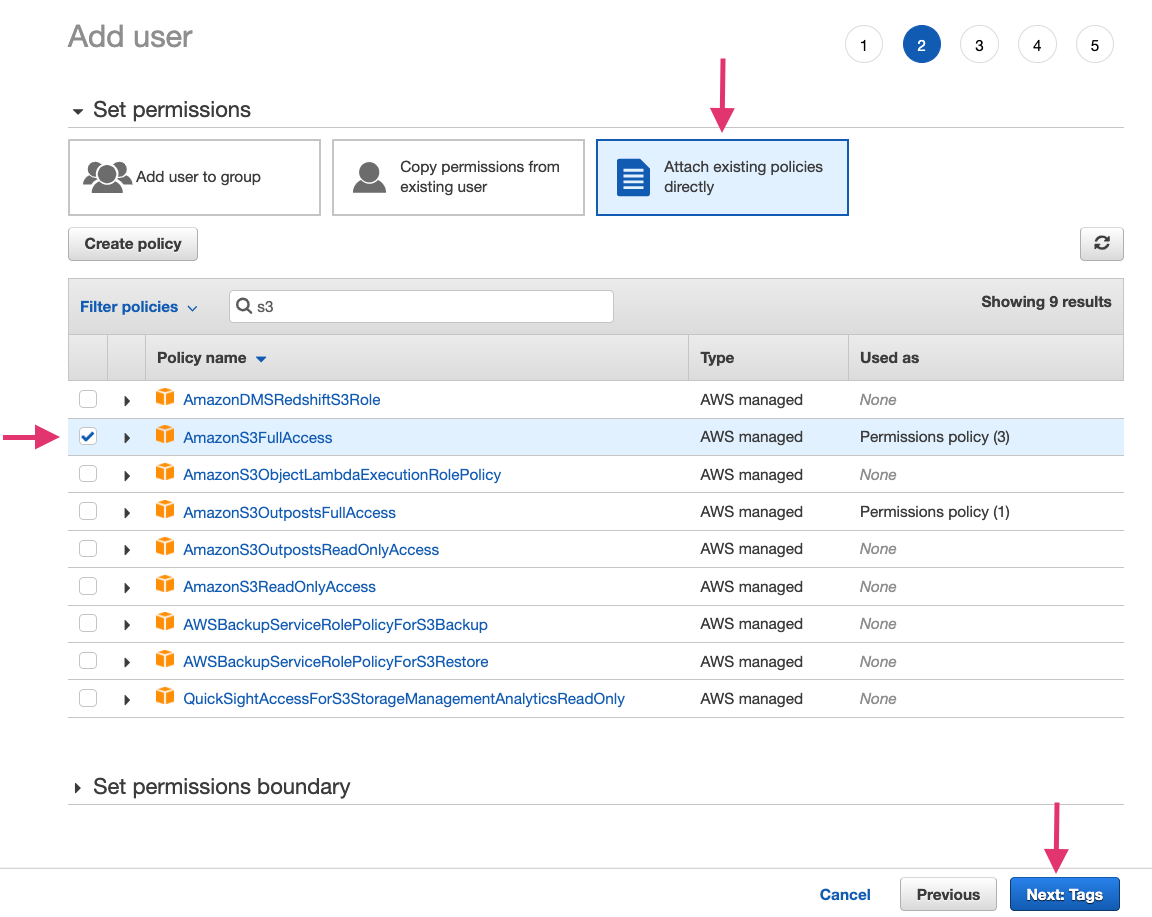
5. Click the Attach existing policies directly to add an existing AWS policy to the IAM user. Type “S3” in the policy search box to find existing policies used for the AWS S3 service.
Click the checkbox for the AmazonS3FullAccess policy. This policy will give the IAM user complete control over the S3 service for your AWS account.
Click the Next: Tags button (do not assign any tags at this point), and then click the Next: Review button.
6. Confirm the user details you’re creating and click the Create user button to create the IAM user.
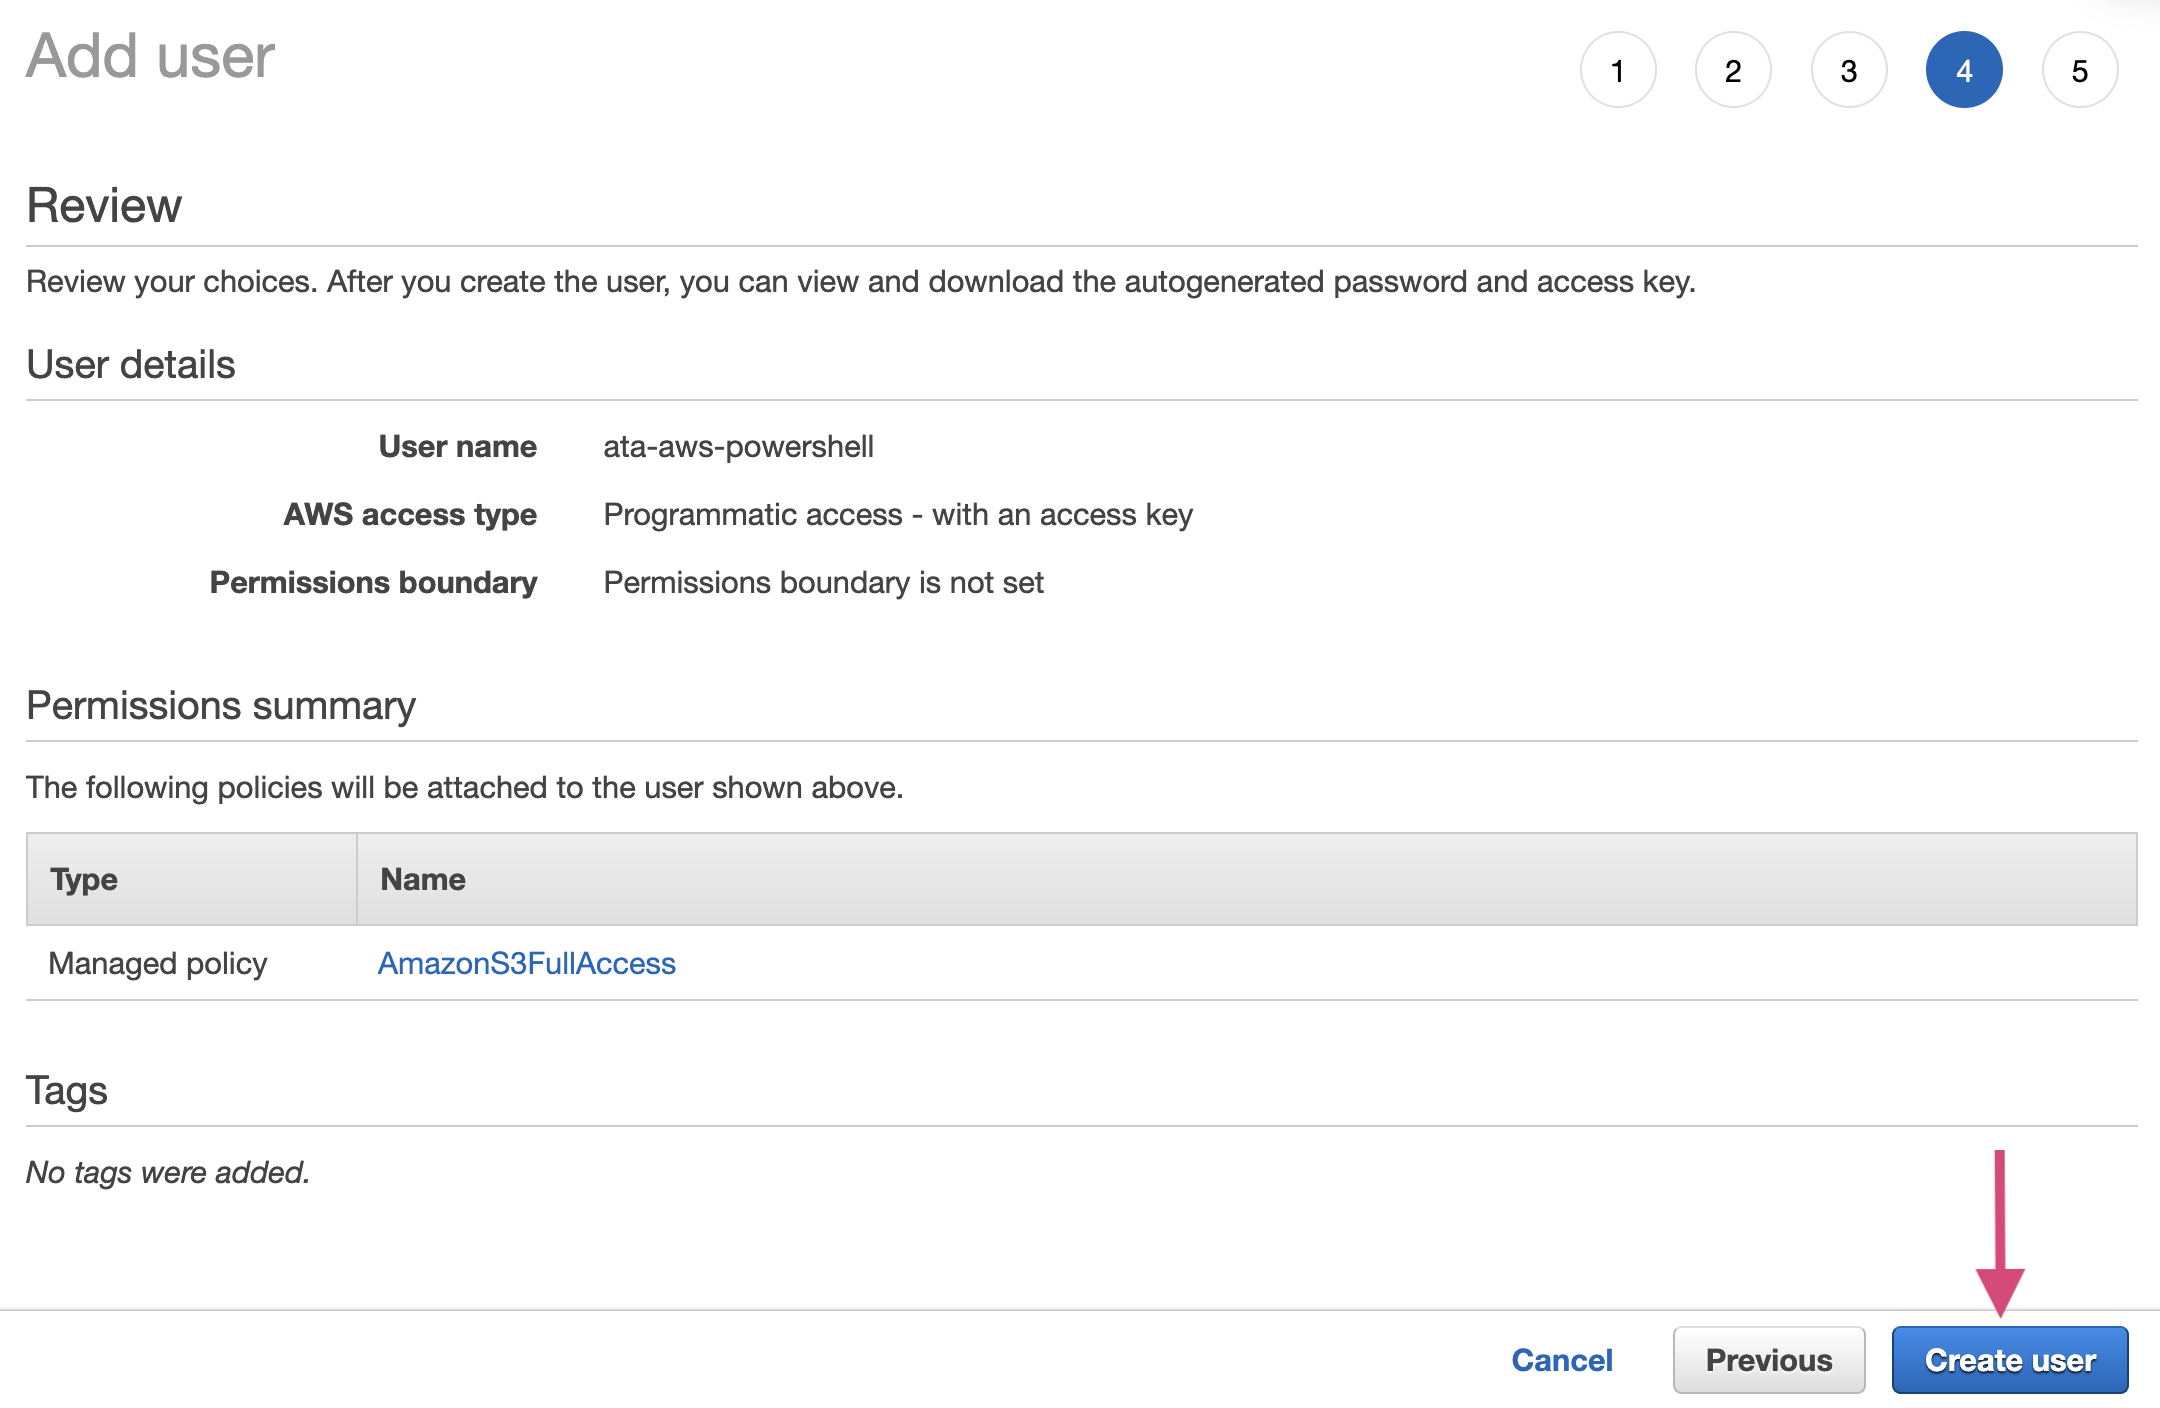
7. Copy the Access Key ID and Secret access key values into a secured notepad on your computer. You will use these values in the next step.
Handling AWS Credentials for PowerShell Tools
So now you have the AWS credentials in the form of the Access key ID and Secret access key. How do you use these keys with AWS PowerShell? There are two ways – inline with the cmdlet parameters and in AWS credential profile.
Inline Credentials
Using the inline credentials approach requires you to specify your AWS Secret Key ID and Secret Access Key when executing an AWS command from PowerShell.
For example, the command below uses your IAM User secret access key (-SecretKey) and access key ID (-AccessKey) credentials when retrieving (Get-S3Object) the content of an S3 bucket (-BucketName).
Get-S3Object -BucketName testbucket -SecretKey XXXX -AccessKey XXXX -Region us-east-1
The inline approach may be convenient, but you’ll be supplying your credentials in plain text. As such, be cautious when using this method in scripting because you’d have to hard code the credentials in your scripts.
AWS Credentials Profile
Unlike the inline credential approach, you can create multiple credential profiles. For example, you can have a separate credential profile with access to S3 and EC2. These credentials are encrypted, making them secure. You can then reference each profile when executing commands.
Execute the command below (Set-AWSCredential) to create a profile containing the IAM User key (SecretKey) access key (-AccessKey) credentials.
The -StoreAs default parameter means that this credential is the default when you don’t specify a credential profile when running commands. To create an alternate profile, specify a name other than default. For example, -StoreAs myS3profile creates a profile named myS3profile.
Set-AWSCredential -AccessKey ACCESS_KEY_ID -SecretKey SECRET_KEY_ID -StoreAs default
Creating a Custom PowerShell Module
At this point, you’ve already set up the AWS.Tools.S3 module, including the credential profile. Now you’ll start writing the custom PowerShell Module called Custom.AWS.Blob.Backup.
The module will contain two functions in a single PowerShell module file named Custom.AWS.Blob.Backup.psm1 and one module manifest file called Custom.AWS.Blob.Backup.psd1.
1. Open PowerShell as administrator on your computer.
2. Execute the following commands to create the new module files.
# Change the working directory PowerShell module path.
Set-Location $env:PSModulePath

# Create a new subdirectory matching the custom module name.
New-Item -Type Directory -Name Custom.AWS.Blob.Backup

# Change the working directory into the new module directory.
Set-Location Custom.AWS.Blob.Backup

# Create module and manifest files
New-Item -Type File -Path "Custom.AWS.Blob.Backup.psm1","Custom.AWS.Blob.Backup.psd1"
3. Open the module manifest file (Custom.AWS.Blob.Backup.psd1) using your code editor and add the code block’s content below.
The code block contains manifest details of the Custom.AWS.Blob.Backup module alongside the names of two functions to export from the Custom.AWS.Blob.Backup.psm1 file.
#
# Module manifest for module 'Custom.AWS.Blob.Backup'
#
@{
    # Script module or binary module file associated with this manifest
    RootModule             = 'Custom.AWS.Blob.Sync.psm1'
    ModuleVersion          = '0.0.1'
    Author                 = 'Tutorial Reader'

    # Description of the functionality provided by this module
    Description            = 'The Custom.AWS.Blob.Backup.psm1 module makes it easier to backup old files to an S3 bucket and retrieves new files stored in the bucket.'

    FunctionsToExport      = @(
        'Backup-S3BlobFiles',
        'Restore-S3Files'
    )
}
4. Open the module file (Custom.AWS.Blob.Backup.psm1) and add the code block’s content below. The comments below contain the comment-based help for the Custom.AWS.Blob.Backup PowerShell module.
<#
.SYNOPSIS
    Synchronizes files between a local computer and AWS S3 bucket
.DESCRIPTION
    The Custom.AWS.Blob.Backup.psm1 module makes it easier to backup old
		files to an S3 bucket and retrieve new files stored in a bucket.
.EXAMPLE
    PS C:\> Backup-S3BlobFiles -S3Bucket test-bucket -ExtensionType .png -DayInterval 50
    Uploads files the extension parameter files, created within the DayInterval
	  parameter to the S3 bucket specified in the S3Bucket param

    PS C:\> Backup-S3BlobFiles -S3Bucket test-bucket -FileAge 50
    Downloads files within the FileAge range from the S3 bucket specified
		in the S3Bucket parameter
.INPUTS
    -S3Bucket
    -ExtensitionType
    -DayInterval
    -FileAge
    -S3Bucket
.NOTES
    - This function supports the backup and pulling down of data from AWS S3 buckets only.
#>
5. Next, append the function Backup-S3BlobFile below into the module file Custom.AWS.Blob.Backup.psm1.
Below is an advanced function that accepts three mandatory parameters. The function uses the Get-ChildItem cmdlet to retrieve the files in a directory that matches the ExtensionType parameter. The retrieved files are piped to the Where-Object cmdlet to be filtered by the DayInterval parameter.
Finally, each filtered file is uploaded to the specified S3 object (BucketName) using the Write-S3Object cmdlet during a foreach iteration.
function Backup-S3BlobFiles {
    [CmdletBinding()]
    param (
        [Parameter(Mandatory)]
        [string]$S3Bucket,

        [Parameter(Mandatory, HelpMessage="Enter extension type of files to backup.")]
        [ValidateSet(".png", ".jpeg", ".jpg", ".mp4", ".mkvi", ".heic")]
        [string]$ExtensionType,

        [Parameter(Mandatory, HelpMessage="Enter date interval of files to backup from 0 - 1000")]
        [Int32][ValidateRange(0, 1000)]$DayInterval
    )

    $LocalFiles = Get-ChildItem -Path "*$ExtensionType" -Recurse | Where-Object { $_.CreationTime -lt ($(Get-Date).AddDays(-$TimeInterval))}
    $NoOfLocalFiles = $LocalFiles.Length
    Write-Verbose -Message  "Found $NoOfLocalFiles files to backup to S3 bucket." -Verbose

    foreach ($file in $LocalFiles  ) {
        Write-S3Object -BucketName $S3Bucket -File $file -Key $file
    }
}
6. Lastly, append the below function code (Restore-S3Files) below into the module file (Custom.AWS.Blob.Backup.psm1).
The advanced function below accepts two mandatory parameters (S3Bucket and FileAge). The Get-S3Object cmdlet retrieves all files within the S3 bucket specified in the S3Bucket parameter.
A foreach iteration runs on the files, and if a file is within the date range within the FileAge, the Read-S3Object cmdlet downloads the file.
function Restore-S3Files {
    [CmdletBinding()]
    param (
        [Parameter(Mandatory)]
        [string]$S3Bucket,

        [Parameter(Mandatory, HelpMessage="Enter age of file to pull down from S3 bucket")]
        [Int32][ValidateRange(0, 1000)]$FileAge
    )

    $RemoteFiles = Get-S3Object -BucketName $S3Bucket
    $NoOfRemoteFiles = $RemoteFiles.Length
    Write-Verbose -Message  "Found $NoOfRemoteFiles files in $S3Bucket bucket." -Verbose

    foreach ($file in $RemoteFiles ) {
        if ($file.LastModified -gt ($(Get-Date).AddDays(-$FileAge))) {
            Read-S3Object -BucketName $S3Bucket -File $file.Key -Key $file.Key
        }
    }
}
Running Your Custom AWS PowerShell Module
Now that you’ve created the custom module, it’s time to put it into action.
The steps below assume that you have previously created a bucket within the S3 service. Make sure to replace the YOUR_S3_BUCKET placeholders with the name of your S3 bucket.
Backing Up Files to S3
Suppose you have a bunch of screenshots in PNG format that you want to backup to your S3 bucket. To do so, execute the Backup-S3Blobfiles command below to upload PNG files less than ten days old.
The module auto-loading feature automatically loads the appropriate module that contains the command you’re executing.
Backup-S3BlobFiles -S3Bucket YOUR_S3_BUCKET -ExtensionType .png -DayInterval 10

Restoring Files from S3
Execute the Restore-S3Files command below to download files from the S3 bucket whose last modification dates are within the previous five days.
Restore-S3Files -S3Bucket test-bucket -FileAge 5

Conclusion
The goal of this tutorial was to teach you how to interact with AWS using the AWS PowerShell Tools programmatically. You learned how to install, configure and interact with the S3 service on AWS through AWS.Tool.S3 module.
With your newly built custom PowerShell module, you now have a baseline for automating other AWS tasks. Perhaps you could also schedule AWS PowerShell Tools execution at your desired intervals using PSake?


