

So you’ve learned how to automate tasks with a PowerShell script.
That’s great! But now you’ve got a disorganized mess of scripts and modules with a hodgepodge of manual script executions, scheduled tasks, and more. It’s time to bring some order to the chaos and implement the automation orchestration engine known as PowerShell PSake.
Not a reader? Watch this related video tutorial!
Not seeing the video? Make sure your ad blocker is disabled.
PSake is an orchestration engine written as a PowerShell module that adds order to your scripts and gives you full control of what runs when and under what conditions. Though PSake is a build automation tool and its primary use case is in build scripts (usually executed by a build server in release automation scenarios), it is generally overlooked in everyday scripting scenarios. Let’s change that.
In this tutorial, you’re going to learn how PSake works along with some great examples for you to put into practice today!
Prerequisites
This article will be a tutorial expecting you to follow along. If you’d like to follow along exactly as covered, be sure you have:
- Windows PowerShell 3+. The tutorial uses Windows PowerShell v5.1
- The PSake zip file from Github. This tutorial uses v4.9.0.
Setting Up the PSake Module
Assuming you have the PSake project from GitHub on your local machine, you’ll first need to run through a few steps to get it set up.
- Extract the PSake zip file downloaded from GitHub.
- Move the src folder inside of the extracted ZIP file contents to a path under
$env:PSModulePathto ensure PowerShell knows of the new module. - Rename the src folder to PSake.
- Now run
Get-Module PSake -ListAvailableto confirm it shows up. If you don’t receive an error, you’re ready to proceed.
Related: Understanding and Building PowerShell Modules
Creating a Basic PowerShell PSake Script
To understand PSake, you need to build something. Let’s build a simple PSake script to see what it can do.
- Create a script named psakefile.ps1 with a single task. At a minimum, a task should have a name and an action block. The name psakefile.ps1 is not mandatory, but it is the default name expected by the engine.
A PSake task in its basic form is very similar to a PowerShell function:
a container for one or more commands that, when performed together, achieve a certain goal. These commands go into a script block that is passed to theActionparameter. A task has many advantages over a function. You will learn about these advantages as you read along.
Below is an example of a psakefile.ps1 with a somewhat simple task:
task HelloWorld -Action {
    Write-Host '*** Hello World ***' -ForegroundColor Yellow
}
2. Now that you’ve built the PSake file, you can call it from a PowerShell console with the Invoke-PSake command and pass the task name as a value to the TaskList parameter.
Invoke-PSakeis the execution engine for PSake. This command triggers tasks defined in psakefile.ps1. You pass a task name, or a list of comma-separated tasks to theTaskListparameter. If you’re executing multiple tasks, each task will execute in the order you have passed them toTaskListregardless of their location in psakefile.ps1.
Below is how you can trigger the HelloWorld task:
Invoke-PSake -BuildFile C:\Work\psakefile.ps1 -TaskList 'HelloWorld'
As long as you keep the name psakefile.ps1, and given that you set the console to the folder where it is located, you may omit the
BuildFileparameter and its value.
- Running
Invoke-PSakewill show PSake output to the console. When you execute the tasks in psakefile.ps1, you’ll see output similar to what you see below.
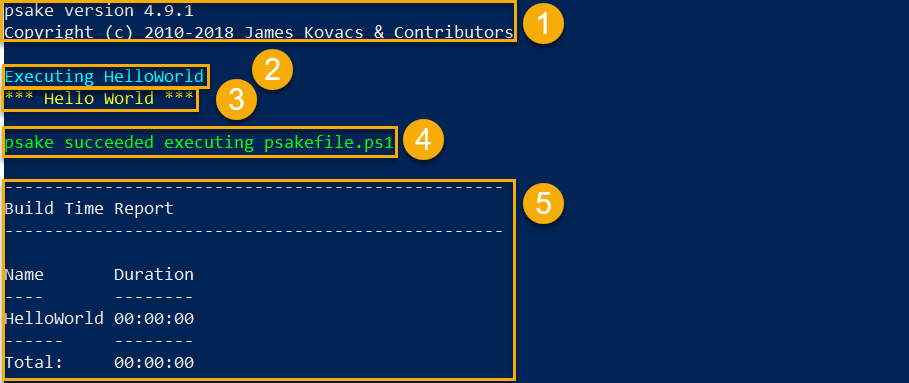
The output consists of these components:
- The details about the PSake version.
- The name of each build task right before it runs (PSake considers every task as a build task). In the example: Executing HelloWorld in cyan.
- Any output the task had produced. In the example: Hello World in yellow.
- Success/fail message. In the example: psake succeeded… in green.
- Time summary (named Build Time Report) with the duration of each task, plus the total duration of the whole script.
Installing SQL with PSake
In the previous section, you didn’t do much but invoke a dummy PSake script. Now build upon that knowledge and create a PSake script that installs SQL!
In this example, you’re going to create a PSake script that:
- Validates free disk space on a machine.
- Downloads a SQL ZIP file from a local repository.
- Extracts the ZIP file.
- Runs the installation on the C or D drive (whichever of the two exists).
Let’s see next how we can harness PSake for the job.
Designing the Building Blocks
PSake is all about orchestrating tasks. Each task should have its own unique name and ideally should perform a single atomic operation like a PowerShell function. Using this concept, you can describe the steps below to build a task for each.
- ValidateDiskSpace
- DownloadSql
- ExtractSql
- InstallSqlDriveC
- InstallSqlDriveD
At this stage, you’re not actually building the code to do anything; you’re simply scaffolding out the tasks and creating the PSake file. You’ll notice the Write-Host references in the tasks below; you’ll be adding to the tasks later.
You should always use the
Descriptionparameter for each task. TheDescriptionparameter provides more information about each task both when executing the tasks and while reviewing the code.
task ValidateDiskSpace -Description 'Validate Disk Free Space' -Action {

	Write-Host "`n   *** Checking disk free space ***`n" -ForegroundColor Yellow

}

task DownloadSql -Description 'Download SQL Setup' -Action {

	Write-Host "`n   *** Downloading SQL Setup from LAN ***`n" -ForegroundColor Yellow

}

task ExtractSql -Description 'Extract SQL Setup' -Action {

	Write-Host "`n   *** Extracting SQL Setup files ***`n" -ForegroundColor Yellow

}

task InstallSqlDriveC -Description 'Install SQL on C:' -Action {

	Write-Host "`n   *** Installing SQL Server on C drive ... please wait... ***`n" -ForegroundColor Yellow

}

task InstallSqlDriveD -Description 'Install SQL on D:' -Action {

	Write-Host "`n   *** Installing SQL Server on D drive ... please wait... ***`n" -ForegroundColor Yellow

}
Defining Task Execution Order
You now have a PSake file that contains a set of tasks. At this point, you can run all of the tasks at once or choose to only execute some of them with the Invoke-PSake command.
You can call some (or all tasks) using Invoke-PSake and the TaskList parameter as you did earlier in the simple example. If you have more than one task to invoke, create an array, and define each task’s name as an item as shown below.
Invoke-PSakewill run each task in the order defined in the array.
$taskList = @()
$taskList += 'ValidateDiskSpace'
$taskList += 'DownloadSql'
$taskList += 'ExtractSql'
$taskList += 'InstallSqlDriveC'
$taskList += 'InstallSqlDriveD'
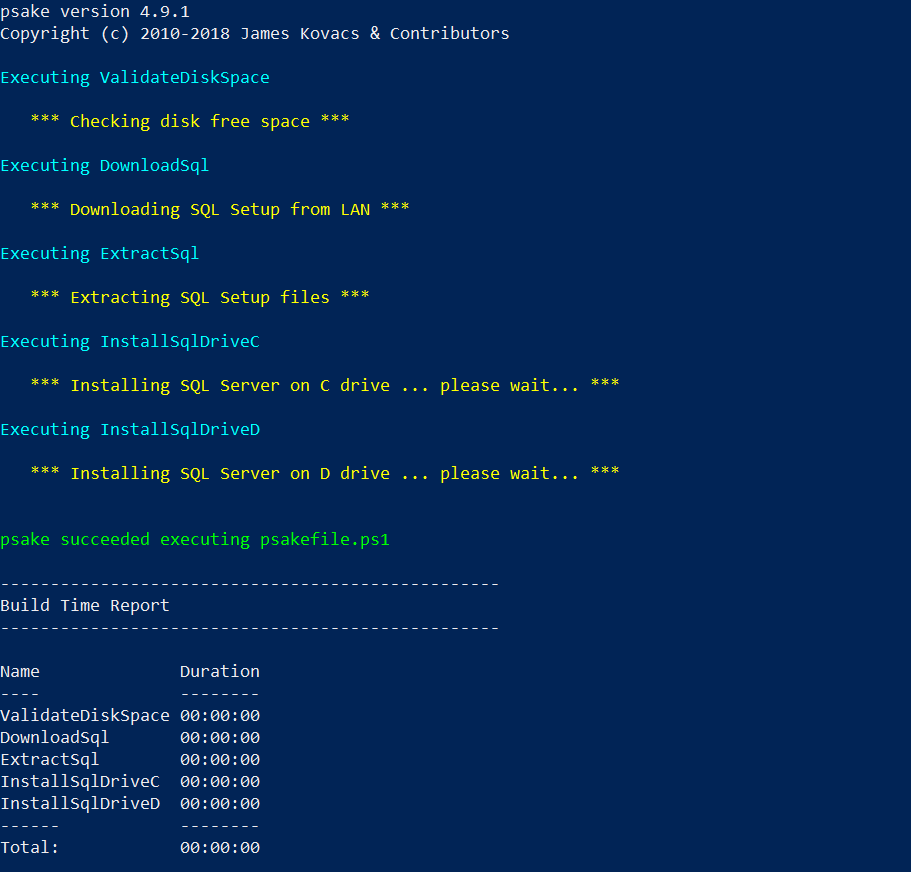
Invoke-PSake -TaskList $taskList
When you run the above code, you should get a result like the following:
Adding a PreCondition
Perhaps you need to perform some action only if a certain condition is met. In this tutorial’s example SQL installation script, for example, maybe you need to test whether the volume where you store the installer is available before executing the task to invoke said installer.
You can use the PreCondition parameter to execute a piece of code that returns either a boolean True or False that dictates whether or not that task runs.
Notice in the example below the $installSqlOn_C_Drive and $installSqlOn_D_Drive variables. When Invoke-PSake invokes this script, these variables will contain a True or False value depending on if a C or D volume exists.
On each task line, you can then see that each task has a PreCondition scriptblock parameter which contains the value of those variables. At run time, either the InstallSqlDriveC or the InstallSqlDriveD task will run, depending on these variables.
$installSqlOn_C_Drive = (Test-Path -Path 'C:') -and (-not (Test-Path -Path 'D:'))
$installSqlOn_D_Drive = (-not (Test-Path -Path 'C:')) -and (Test-Path -Path 'D:')

task InstallSqlDriveC -Description 'Install SQL on C:' -PreCondition { $installSqlOn_C_Drive } -Action {

	Write-Host "`n   *** Installing SQL Server on C drive ... please wait... ***`n" -ForegroundColor Yellow

}

task InstallSqlDriveD -Description 'Install SQL on D:' -PreCondition { $installSqlOn_D_Drive } -Action {

	Write-Host "`n   *** Installing SQL Server on D drive ... please wait... ***`n" -ForegroundColor Yellow

}
Task Parameters
In addition to the Action and Description a task also support these parameters:
PreCondition– Script block that returns a boolean value. On False, the specific task is skipped. (A usage example is shown above).PostCondition– Validation step. A script block that returns a boolean value. False means validation has failed to cause the whole script to stop.PreAction– A script block to run prior to the task.PostAction– A script block to run right after the task has completed with success.ContinueOnError– Switch parameter. If used, any errors that may occur during the task runtime will not cause the whole script to break.Depends– A name of a task (or a list of task names) that must run before the current task is executed. PSake will use this information to execute the task dependencies in the right order. E.g., if task A is dependent on task B, then PSake engine will run B before A.
At first the dependency mechanism sounds like a good idea. It helps to set tasks in a logical order. However, using the
Dependsparameter glues different tasks together, making it later difficult to test independently. But, since the user can explicitly set the order of tasks execution and pass this order when calling the PSake file → the use of theDependsparameter can be avoided altogether.
Let’s see next a usage example for some of these task parameters:
Adding PreAction and PostCondition
Using the InstallSqlDriveD task from the example above as a starting point, perhaps you have an additional request for the installation.
Maybe you need to record the times when the installation starts and ends. You need to record these times to two environment variables named SqlSetupStartDate and SqlSetupEndDate. Second, after the installation completes, you need to verify that the D:\TempSqlFiles folder does not exist.
Luckily, the PSake task parameters PreAction, PostAction and PostCondition (respectively) meet exactly these new requirements. Below is an example of how it can be done:
task InstallSqlDriveD -Description 'Install SQL on D:' -PreAction {

     Write-Host '*** Writing SQL install start time to env. var. SqlSetupStartDate ***' -ForegroundColor Yellow
     $date = Get-Date -Format 'yyyy-MM-dd HH:mm:ss'
[Environment]::SetEnvironmentVariable('SqlSetupStartDate',$date,'Machine')

 } -PreCondition {

     $installSqlOn_D_Drive

 } -Action {

     Write-Host '*** Installing SQL Server on D drive... please wait... ***' -ForegroundColor Yellow

} -PostAction {

    Write-Host '*** Writing SQL install end time to env. var. SqlSetupEndDate ***' -ForegroundColor Yellow
    $date = Get-Date -Format 'yyyy-MM-dd HH:mm:ss'
[Environment]::SetEnvironmentVariable('SqlSetupEndDate',$date,'Machine')

} -PostCondition {

Write-Host '*** Verifying temp files deleted ***' -ForegroundColor Yellow
     # in case if the folder exits this will return False, causing the whole script to stop
     (-not (Test-Path -Path 'D:\TempSqlFiles'))

 }
Running PSake Scripts in Pester Tests
Wherever you can invoke a PowerShell script, you can invoke a PSake file. If you’re building infrastructure tests with Pester, you can invoke PSake within tests.
Related: Writing Pester Tests for PowerShell
For example, maybe you have a Pester test to confirm the SQL setup ZIP file exists in a folder after you run the DownloadSql task. In that case, you build a simple Pester test and invoke the DownloadSql task within the test and check for the ZIP file right after it runs.
Describe 'SQL install with PSake' {

    It 'Downloads Sql files' {

        $setup = 'C:\Downloads\SqlSetup.zip'

        if(Test-Path -Path $setup)
        {
            Remove-Item -Path $setup
        }

        # the single task under test here is DownloadSql
        Invoke-PSake -BuildFile C:\Work\psakefile.ps1 -TaskList DownloadSql

        $setup | Should -Exist
    }
}
Passing Parameters to Tasks
Once you start using PSake you might want to parametrize some of the tasks. Typically, with PowerShell functions and scripts, you will pass various named parameters to the function/script; PSake is different.
To pass parameters to PSake files, you can use a Properties block that defines key/value pairs which PSake then makes available inside of each task in the file.
Be sure to define
Propertiesblock at the top of the PSake file. All PSake operations are read from the top down.
For example, to pass dynamic SqlYear and SqlVersion variables to each task in the PSake file, you can define them as shown below.
Properties {
    $SqlYear = '2017'
    $SqlVersion = '14.0'
}

task -Name DownloadSql -Action {

    Write-Host "SQL version to install: SQL $SqlYear (version $SqlVersion)"

}
When you then invoke the PSake file with Invoke-PSake, you would then see the following output. Notice that the $SqlYear and $SqlVersion variables have been expanded with the values defined in the Properties block.
psake version 4.9.1
Copyright (c) 2010-2018 James Kovacs & Contributors

Executing DownloadSql
SQL version to install: SQL 2017 (version 14.0)

psake succeeded executing C:\Work\PSakefile.ps1

--------------------------------------------------
Build Time Report
--------------------------------------------------

Name        Duration
----        --------
DownloadSql 00:00:00
------      --------
Total:      00:00:00
Using the Properties Parameter
If you’d rather pass parameters to a task via a traditional parameter, PSake can help. You still need to keep the Properties block at the top of psakefile.ps1 as in the example above, but PSake lets you override the values.
To do so, define a hashtable with each of the key/value pairs you’d like to override. Then, pass the hashtable to the Properties parameter. PSake engine will use the values in the passed-in hashtable over those specified in the Properties block within the psakefile.ps1 script.
Note the differences in syntax between the
Propertiesblock and thePropertiesparameter. On thePropertiesblock each line is a variable and thus prefixed with a dollar sign, whereas thePropertiesparameter is a hashtable, so each item is a key, and written without a leading $. Another difference is that the hashtable is preceded with @ character.
Below you can see an example of using the Properties parameter.
$myNewProperties = @{
    SqlYear = '2019'
    SqlVersion = '15.0'
}

Invoke-PSake -TaskList DownloadSql -Properties $myNewProperties
PSake Task Modularization: Tasks as Files
At some point, your PSake file will probably grow exponentially especially if you need to orchestrate large automation tasks. To ensure you can manage all of those tasks, you should focus on modularization or splitting tasks up to make things easier to manage.
Related: How to Survive Refactoring a PowerShell Script from Hell
In this tutorial’s example, you were working with five tasks:
- ValidateDiskSpace
- DownloadSql
- ExtractSql
- InstallSqlDriveC
- InstallSqlDriveD
Each of these tasks is defined inside of a single pssakefile.ps1 script. If you anticipate adding more many more tasks over time, you should split those tasks up into separate files with each task inside e.g. ValidateDiskSpace.ps1, DownloadSql.ps1, InstallSqlDriveD.ps1, InstallSqlDriveD.ps1, etc.
For example InstallSqlDriveD.ps1 will contain only this code:
task InstallSqlDriveD -Description 'Install SQL on D:' -PreCondition { $installSqlOn_D_Drive } -Action {

	Write-Host "`n   *** Installing SQL Server on D drive ... please wait... ***`n" -ForegroundColor Yellow

}
Once the tasks are moved out, import the files into psakefile.ps1 using the Include function. Once this is done, the psakefile.ps1 content is reduced to this code:
$installSqlOn_C_Drive = $true
$installSqlOn_D_Drive = $false

Include "$PSScriptRoot\ValidateDiskSpace.ps1"
Include "$PSScriptRoot\DownloadSql.ps1"
Include "$PSScriptRoot\ExtractSql.ps1"
Include "$PSScriptRoot\InstallSqlOnC.ps1"
Include "$PSScriptRoot\InstallSqlOnD.ps1"
When
Invoke-PSaketriggers the psakefile.ps1 script,Invoke-PSakedoes not know or care whether the tasks are within the psake file or were imported by theIncludemethod.
Next Steps
PSake is a powerful script orchestrator that can be used for many purposes: Software builds, CI/CD, package deployments, installers creations, and more. The only limit is your imagination. Getting used to building large scripts with PSake forces you to think in tasks (code building blocks). The concept of tasks is leveraging the PowerShell syntax, and by using tasks you enrich your existing command line knowledge.
The code you produce with PSake becomes more readable, maintainable, and easier to test. After some practice you will find that dividing your steps to different tasks makes them easier to script. The small amount of extra work it takes pays back big time in the medium and long terms.
Where do you see PSake fitting into your work projects?


