

Administrators often use multiple types of applications for connecting to servers/computers. But have you wondered if there’s an easier way to do so? Why not use the Apache Guacamole as a remote desktop gateway?
Apache Guacamole supports multiple connection protocols and only by using a web browser without additional tools or extensions. And in this tutorial, you’ll learn how to install Apache Guacamole as a remote desktop gateway.
Read on and connect to your servers/computers non-excessively!
Prerequisites
This tutorial will be a hands-on demonstration. To follow along, ensure you have the following requirements:
- A Linux server – This tutorial uses the latest Ubuntu 20.04 server.
- A root or administrator user.
- A MariaDB database server installed on your server.
- A domain name pointing to the server IP address – This tutorial uses the example.io domain.
Installing Apache Guacamole’s Packages Dependencies
Apache Guacamole is a clientless remote desktop gateway that allows you to connect to computers/servers from anywhere and any time by only using a web browser.
Apache Guacamole is free and open-source and supports multiple standard remote access protocols (such as SSH, VNC, and RDP) and have two main parts:
- Guacamole Server – must be installed manually from the source code
- Guacamole Client – the Java serverlet web application, running under the Apache Tomcat. This client is the front-end of the Apache Guacamole.
Before installing the Guacamole server and client, you must first install packages dependencies on your Linux server.
1. Open your terminal and connect to your server.
2. Next, run the apt install command below to install packages dependencies for building the Guacamole server.
sudo apt install build-essential libcairo2-dev libjpeg-turbo8-dev libpng-dev libtool-bin uuid-dev libossp-uuid-dev libavcodec-dev libavformat-dev libavutil-dev libswscale-dev freerdp2-dev libpango1.0-dev libssh2-1-dev libtelnet-dev libvncserver-dev libwebsockets-dev libpulse-dev libssl-dev libvorbis-dev libwebp-dev -y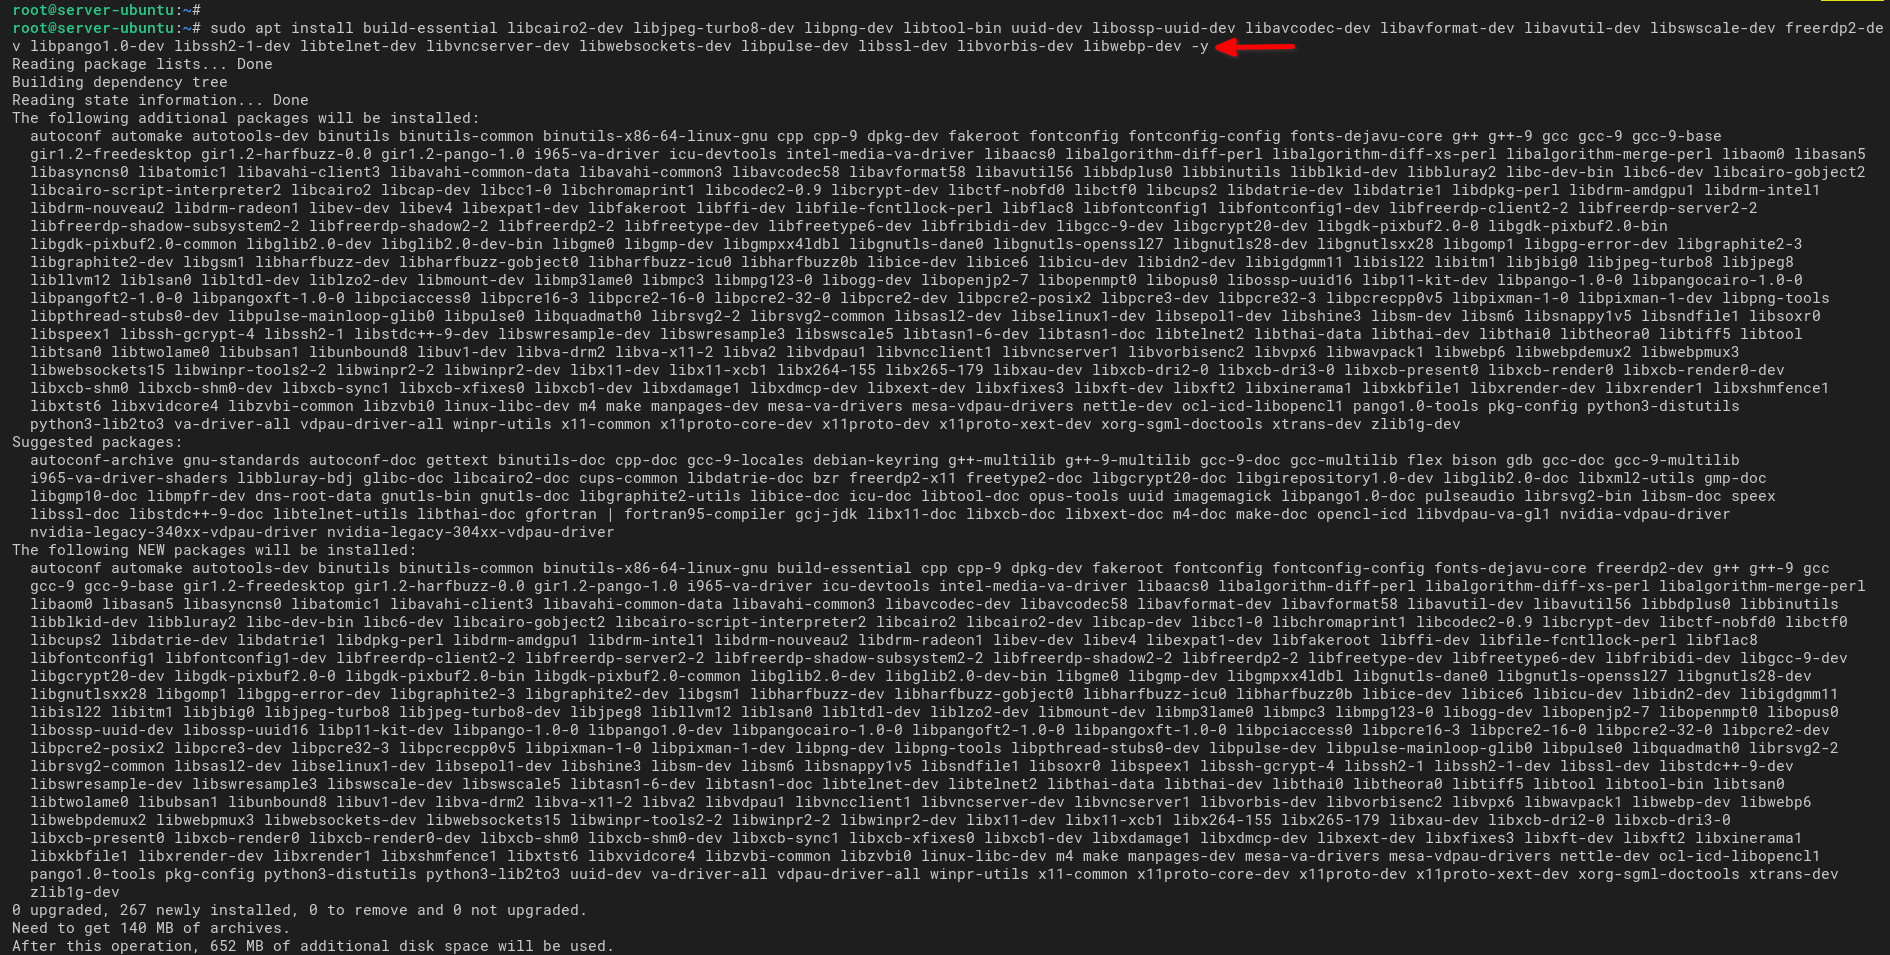
3. Next, run the below command to install the Apache Tomcat 9 package (tomcat9), which you’ll later use to run the Guacamole client application.
sudo apt install tomcat9 -y
4. Lastly, run the systemctl command below to start and enable the tomcat9 service, then verify the tomcat9 service status.
# Start and enable tomcat9
sudo systemctl enable --now tomcat9

# Verify tomcat9
sudo systemctl status tomcat9The output below shows that the tomcat9 service status is active (running).
Compiling and Installing Guacamole Server
Since you’ve installed packages dependencies for Apache Guacamole, it’s time to compile and install the Guacamole Server. And the only way to do so is manually from the source code.
To install the Guacamole Server:
1. Run the wget command below to download the source code of Guacamole server v1.4.0 (guacamole-server-1.4.0.tar.gz) in your working directory.
The latest version of Apache Guacamole is v1.4.0 for both the Guacamole server and client at the time of writing.
wget https://dlcdn.apache.org/guacamole/1.4.0/source/guacamole-server-1.4.0.tar.gz2. Next, run the below tar command to extract the guacamole-server-1.4.0.tar.gz file. This command extracts the Guacamole server source code to the guacamole-server-1.4.0 directory.
tar -xzf guacamole-server-1.4.0.tar.gz3. Run each command below to perform the following:
- Change your working directory (
cd) toguacamole-server-1.4.0.
- Run the
configurescript to set up the Guacamole server. Theconfigurescript is a Bash script generated by the GNU Autotools build system for setting up the Guacamole server.
- Automatically install (
--with-systemd-dir) the systemd service script for the Guacamole server to the/etc/systemd/system/directory.
- Disable dependency tracking (
--disable-dependency-tracking) to speed up the build time of the Guacamole server.
# change working directory
cd guacamole-server-1.4.0/

# configure Guacamole server installation and verify system requirements
./configure --with-systemd-dir=/etc/systemd/system/ --disable-dependency-tracking
After running the commands, you’ll see an output like the screenshot below.
Notice that all libraries for the Guacamole server installation are installed. You can see that Guacamole supports multiple protocols such as Kubernetes (through WebSocket), RDP, SSH, and VNC.

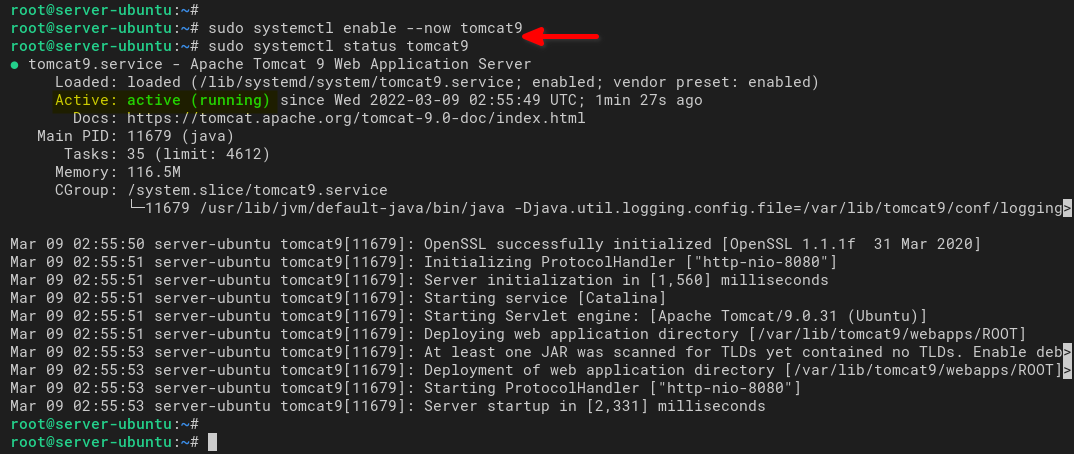
4. Now, run the make commands below to perform the following:
- These commands compile the Guacamole server (
make) on your Linux server.
- Install binary files of the Guacamole server (
make install) to the/usr/local/binand/usr/local/sbindirectories.
- Install libraries for the Guacamole server on the
/usr/local/libdirectory.
# Compiling the source code
make

# Installing Guacamole server
make install
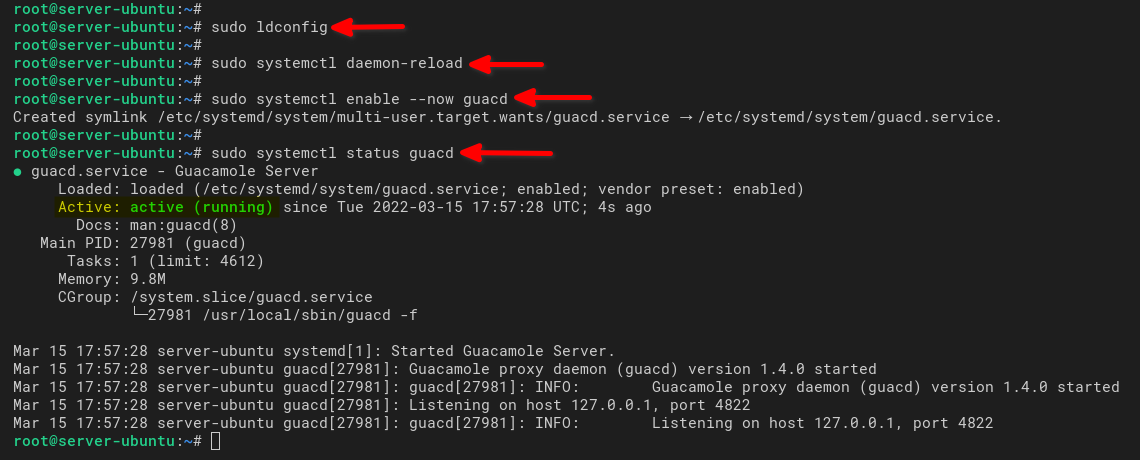
5. Run the below commands to update symbolic links of the system libraries (ldconfig), and reload the systemd manager (daemon-reload).
These commands don’t have outputs, but ensure your Linux server loads all new Guacamole server libraries and apply the Guacamole server’s new systemd service (guacd).
# Update symbolic links of the system libraries
sudo ldconfig
# Reload the systemd manager, and apply the new systemd service (guacd)
sudo systemctl daemon-reload
6. Lastly, run the systemctl commands below to start and enable the Guacamole server service (guacd) and verify the guacd service is running.
# Start and enable guacd
sudo systemctl enable --now guacd

# Verify guacd
sudo systemctl status guacd
You’ll see in the output below that the Guacamole server service guacd is active (running).
Creating Guacamole Configuration and Directory
Now that you’ve installed the Guacamole server, it’s time to create a configuration directory (/etc/guacamole/) for Apache Guacamole to work.
The /etc/guacamole/ directory will store the guacamole.properties and guacd.conf files as the main configuration for Apache Guacamole.
1. Run the echo command below to define the environment variable GUACAMOLE_HOME to the Apache Tomcat configuration (/etc/default/tomcat9).
This command ensures the tomcat9 service loads the Guacamole configuration directory (/etc/guacamole)
echo GUACAMOLE_HOME=/etc/guacamole >> /etc/default/tomcat92. Now, run the below command to create the Guacamole server configuration directory (/etc/guacamole) within additional directories below:
- The
extensionsdirectory stores Guacamole extensions.
- The
libdirectory stores libraries the Guacamole server needs.
mkdir -p /etc/guacamole/{extensions,lib}3. Lastly, run the below command to create Apache Guacamole configuration files (guacamole.properties and guacd.conf) below:
- The
guacamole.propertiesfile is the main configuration for Apache Guacamole.
- The
guacd.conffile is the configuration for the Guacamole server.
touch /etc/guacamole/{guacamole.properties,guacd.conf}Setting Up MariaDB Database
At this point, you’ve completed the basic configuration of Apache Guacamole. But, you still need to set up the authentication method for Apache Guacamole. This tutorial uses the MariaDB database for Apache Guacamole authentication.
To set up the MariaDB database for the Apache Guacamole:
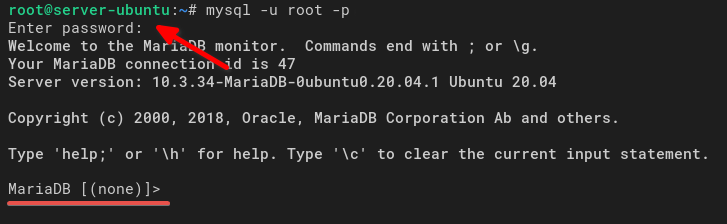
1. First, run the following mysql command to log in to the MariaDB shell as the default root user. Input the root password for the MariaDB server when prompted.
mysql -u root -pYou can tell from the prompt below (MariaDB [(none)]>) that you’re in the MariaDB shell.
2. Next, run the below MySQL query to create a new database guacamole_db and exit from the MariaDB shell.
CREATE DATABASE guacamole_db;
exit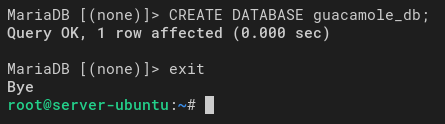
3. Run the wget command below to download the Guacamole database authentication extension.
You’ll need to install the database extension manually and import the database schema to set up database authentication for Apache Guacamole.
wget https://dlcdn.apache.org/guacamole/1.4.0/binary/guacamole-auth-jdbc-1.4.0.tar.gz4. Now run the below commands to extract the file guacamole-auth-jdbc-1.4.0.tar.gz, giving you the directory guacamole-auth-jdbc-1.4.0.
# Extract guacamole-auth-jdbc-1.4.0.tar.gz
tar -xf guacamole-auth-jdbc-1.4.0.tar.gz

# Change the working directory
cd guacamole-auth-jdbc-1.4.0/mysql/
5. Run the cat command below to import the Apache Guacamole MariaDB database schema (schema/*.sql) to the guacamole_db database.
The MariaDB database schema is used for multiple RDBMS, such as MariaDB/MySQL, PostgreSQL, and SQL Server.
# Check if the Apache Guacamole MariaDB database schema exists
ls
# Import the database schema (schema/*.sql) to the guacamole_db database
cat schema/*.sql | mysql -u root -p guacamole_db
Enter the MariaDB’s root user’s password when prompted, as shown below.

6. Now, rerun the mysql command below to log in to the MariaDB shell. You’ll set up a new MariaDB user for the Apache Guacamole.
mysql -u root -p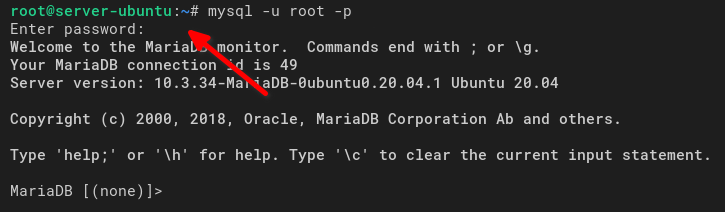
7. Lastly, run the MariaDB queries below to create a database user for the guacamole_db database.
# Create a new user called guacamole_user.
# Make sure to change the password with a strong password.
CREATE USER 'guacamole_user'@'localhost' IDENTIFIED BY 'StrongPassword';
# Allow the user guacamole_user to access the guacamole_db database.
GRANT SELECT,INSERT,UPDATE,DELETE ON guacamole_db.* TO 'guacamole_user'@'localhost';
# Reload privileges from the privilege tables
FLUSH PRIVILEGES;
# Exit from MariaDB shell.
exit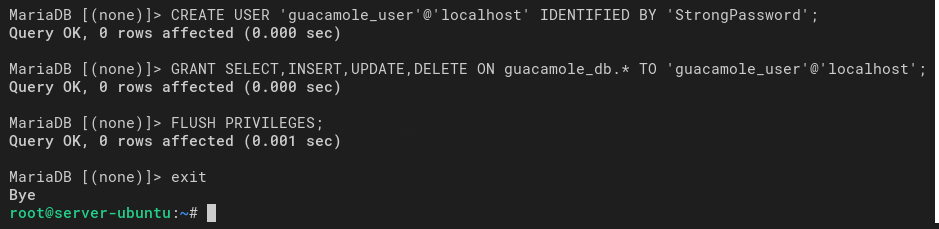
Installing Database Authentication Extension and MySQL/J Library
You’ve now created the MariaDB database and user for Apache Guacamole. Next, you will be installing the Guacamole database authentication extension and the MySQL/J connector for the database driver.
The Guacamole database authentication extensions allow you to set up Apache Guacamole with database authentication, such as MySQL/MariaDB and PostgreSQL. And the MySQL/J connector library is used to connect to the MySQL/MariaDB database.
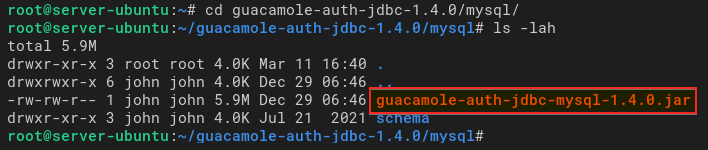
1. Run the below commands to change the working directory to guacamole-auth-jdbc-1.4.0/mysql/, and list the files inside the working directory.
# change working directory
cd guacamole-auth-jdbc-1.4.0/mysql/

# check list files
ls -lah
Like the one below, you’ll see the Guacamole database authentication extension (guacamole-auth-jdbc-mysql-1.4.0.jar).
2. Next, run the cp command below to install the Guacamole database authentication extension (guacamole-auth-jdbc-mysql-1.4.0.jar) to the /etc/guacamole/extensions/ directory.
This command installs and enables the MariaDB/MySQL extensions for the Apache Guacamole.
cp guacamole-auth-jdbc-mysql-1.4.0.jar /etc/guacamole/extensions/guacamole-auth-jdbc-mysql.jar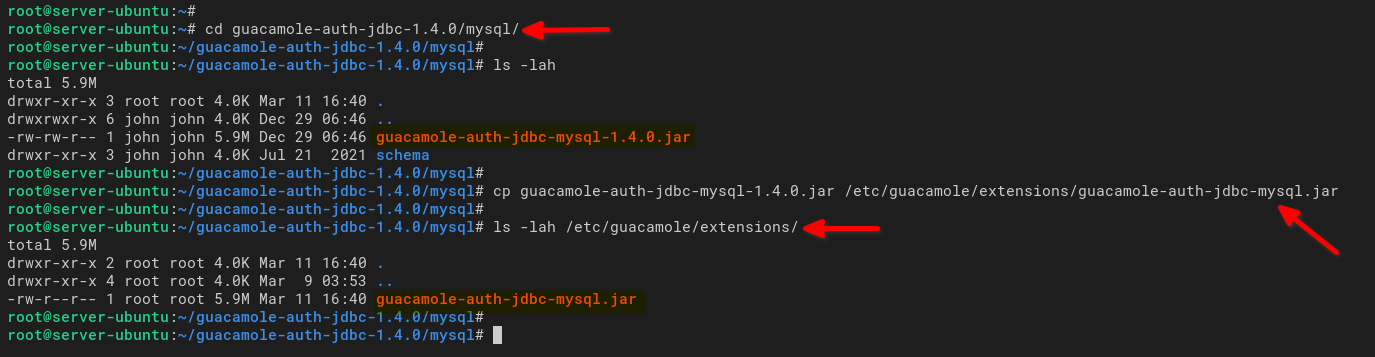
3. Run the wget command below to download the MySQL/J connector (library) for Java (mysql-connector-java_8.0.28-1ubuntu20.04_all.deb).
The Guacamole database authentication extensions will connect to the MariaDB database server using this Java library.
wget https://cdn.mysql.com//Downloads/Connector-J/mysql-connector-java_8.0.28-1ubuntu20.04_all.deb4. Now, run the dpkg command below to manually install the MySQL/J connector (mysql-connector-java_8.0.28-1ubuntu20.04_all.deb) to your Ubuntu system.
This command installs the MySQL/J library to the /usr/share/java directory.
dpkg -i mysql-connector-java_8.0.28-1ubuntu20.04_all.deb5. Lastly, run the below command to copy the MySQL/J connector library to the /etc/guacamole/lib/ directory. This command allows the Apache Guacamole to use the MySQL/J library to connect to the MariaDB database.
# copy the MySQL/J connector
cp /usr/share/java/mysql-connector-java-8.0.28.jar /etc/guacamole/lib/mysql-connector.jar
Configuring Apache Guacamole with MariaDB Database
You’ve now installed the Guacamole database authentication extension and the MySQL/J connector. But they’re not doing much unless you apply the database authentication.
You’ll apply the Guacamole database authentication through the Guacamole configuration (guacamole.properties). You’ll also set up the guacd binding IP address and port using the guacd.conf configuration.
1. Edit the /etc/guacamole/guacamole.properties file using your preferred editor and populate the configuration below.
Be sure to input the correct MariaDB user, password, and database name. Apache Guacamole will use this configuration to connect to the MariaDB database.
mysql-hostname: localhost
mysql-port: 3306
mysql-database: guacamole_db
mysql-username: guacamole_user
mysql-password: StrongPassword
2. Next, edit the /etc/guacamole/guacd.conf file and populate the following configuration.
This configuration runs the guacd service on the bind-address 0.0.0.0 or any IP address on the server with the default TCP port 4822.
[server]
bind_host = 0.0.0.0
bind_port = 4822
Lastly, run the systemctl command below to reload the guacd and tomcat9 services and apply new changes.
# restart guacd
sudo systemctl restart guacd

# restart tomcat9
sudo systemctl restart tomcat9
Installing the Guacamole Client Web Application
At this point, you’ve completed the Guacamole server installation with the MariaDB database authentication extension. You’ll now install the Guacamole client, the front-end of the Apache Guacamole software stack.
This tutorial uses the pre-built Guacamole client package (guacamole.war) from the official Guacamole download page.
Run the wget command below to download the full package (guacamole-1.4.0.war) of the Guacamole web application v1.4.0.
The latest version of the Guacamole web application is v1.4.0 as of this writing.
wget <https://dlcdn.apache.org/guacamole/1.4.0/binary/guacamole-1.4.0.war>

Now, run each command below to move and install the file guacamole-1.4.0.war to the /var/lib/tomcat9/webapps directory. This action makes the Guacamole client accessible from the path URL (/guacamole/).
# Rename guacamole-1.4.0.war to guacamole.war
mv guacamole-1.4.0.war guacamole.war

# Copy guacamole.war
cp guacamole.war /var/lib/tomcat9/webapps

# Verify guacamole.war
ls /var/lib/tomcat9/webapps

Setting Up Apache as a Reverse Proxy for Guacamole Client
After installing the Guacamole client on your server, you’ll need to install and configure the Apache webserver with an Apache virtual host configuration. You’ll enable the Apache webserver as a reverse proxy for the Guacamole client.
1. Follow the certbot documentation to generate free LetsEncrypt SSL certificates for your domain name. SSL certificates will secure and encrypt your connection to the Guacamole client web application.
2. Next, run the apt command below to install the Apache webserver.
sudo apt install apache2 -y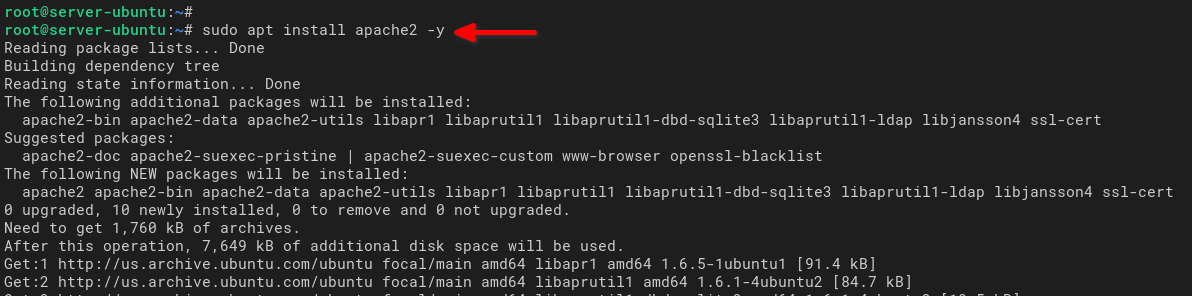
3. Once installed, run the a2enmod command below to enable modules for the Apache reverse proxy. sudo a2enmod proxy proxy_wstunnel proxy_http ssl rewrite  Enabling apache2 modules
sudo a2enmod proxy proxy_wstunnel proxy_http ssl rewrite
4. Now, create a new virtual host configuration file (/etc/apache2/sites-available/guacamole.conf) and populate the below configuration.
Change the example.io domain name with your domain name and the path of SSL certificates (/etc/letsencrypt/live/example.io/) with your SSL path.
This Apache virtual host configuration enables a reverse proxy for the Guacamole client web application. The client web application runs under the Apache Tomcat on port 8080 with URL path /guacamole.
<VirtualHost *:80>
ServerName example.io
ServerAlias www.example.io
Redirect permanent / https://example.io/
</VirtualHost>
<VirtualHost *:443>
ServerName example.io
ServerAlias www.example.io
<If "%{HTTP_HOST} == 'www.example.io'">
Redirect permanent / https://example.io/
</If>
ErrorLog /var/log/apache2/example.io-error.log
CustomLog /var/log/apache2/example.io-access.log combined
SSLEngine On
SSLCertificateFile /etc/letsencrypt/live/example.io/fullchain.pem
SSLCertificateKeyFile /etc/letsencrypt/live/example.io/privkey.pem
<Location /guacamole/>
Order allow,deny
Allow from all
ProxyPass http://127.0.0.1:8080/guacamole/ flushpackets=on
ProxyPassReverse http://127.0.0.1:8080/guacamole/
</Location>
<Location /guacamole/websocket-tunnel>
Order allow,deny
Allow from all
ProxyPass ws://127.0.0.1:8080/guacamole/websocket-tunnel
ProxyPassReverse ws://127.0.0.1:8080/guacamole/websocket-tunnel
</Location>
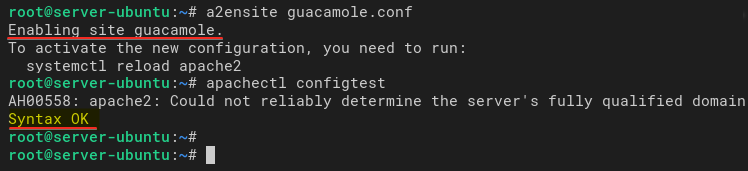
</VirtualHost>5. Run each command below to activate the guacamole.conf virtual host configuration and verify the Apache configuration. # activate guacamole.conf a2ensite guacamole.conf # verify apache2 configuration apachectl configtest
# activate guacamole.conf
a2ensite guacamole.conf

# verify apache2 configuration
apachectl configtest
If your configuration has no error, you’ll see a Syntax OK message output, like the one below.
6. Next, edit the Tomcat configuration (/etc/tomcat9/server.xml) and populate the following configuration inside the <Host> section.
This configuration allows an application within Tomcat to see the real IP address of the client. You’ll need this configuration because the main application Guacamole client is behind the Apache reverse proxy.
<Valve className="org.apache.catalina.valves.RemoteIpValve"
            internalProxies="127.0.0.1"
            remoteIpHeader="x-forwarded-for"
            remoteIpProxiesHeader="x-forwarded-by"
            protocolHeader="x-forwarded-proto" />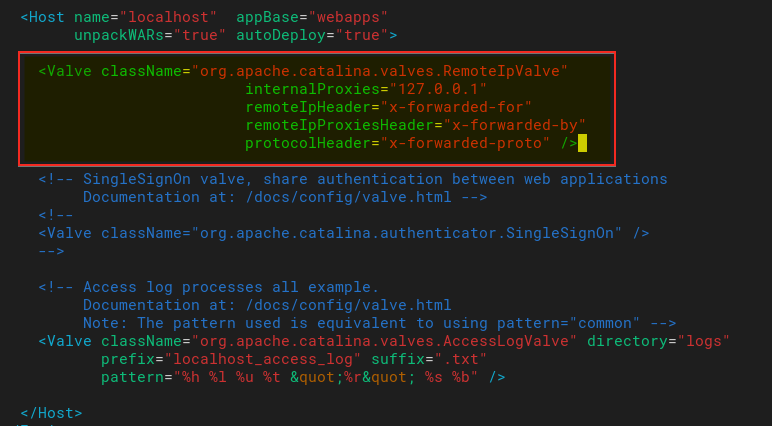
7. Lastly, run the systemctl command below to restart apache2 and tomcat9 services and apply new changes.
# Restart apache2
sudo systemctl restart apache2

# Restart tomcat9
sudo systemctl restart tomcat9
Verifying Apache Guacamole
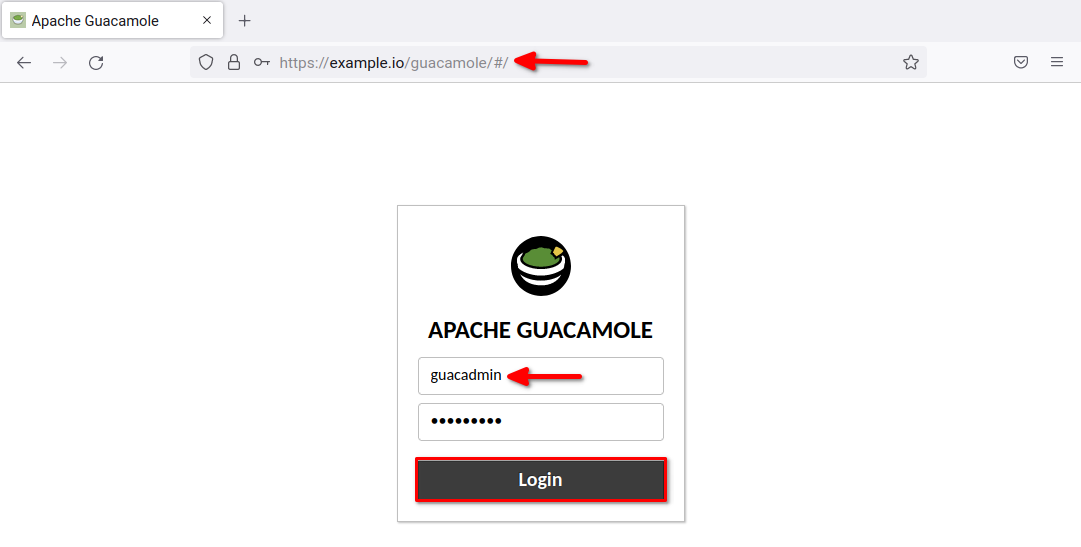
You’ve now completed Apache Guacamole installation with Apache2 reverse proxy. But how do you know installation works? You’ll verify the installation by accessing the Apache Guacamole from a web browser.
Open your web browser and input the domain name for Apache Guacamole installation followed by the URL path /guacamole (i.e., https://example.io/guacamole). If all configurations are correct, you’ll get the login page of the Apache Guacamole web application, as shown below.
Input the default user guacadmin and the password guacadmin, then click the Login button.
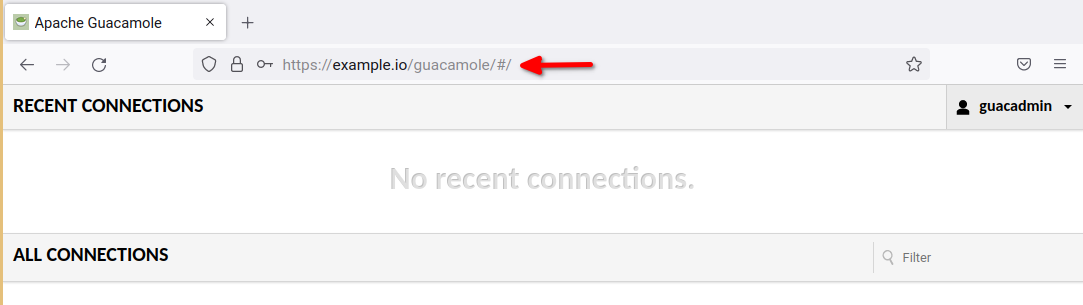
After logging in, you’ll see the blank page of the Apache Guacamole admin dashboard shown below.
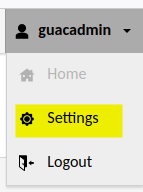
Next, click the user (guacadmin) on the top right, then select Settings to access the user account settings.
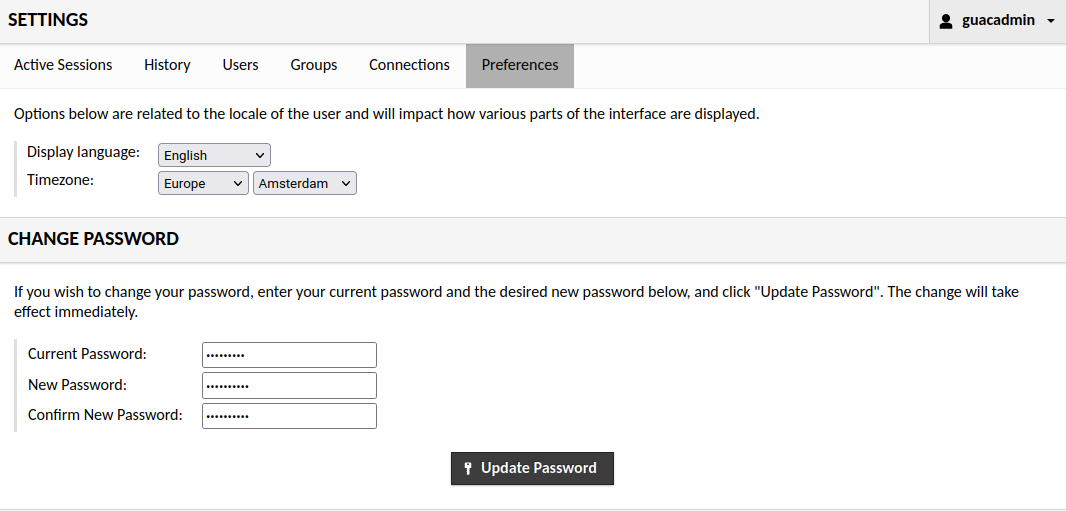
As you see below, you can change the default password for guacadmin user, create a new user, create new remote desktop connections, and set up the Apache Guacamole itself.
Conclusion
Throughout this tutorial, you’ve learned to install Apache Guacamole as a remote desktop gateway with MariaDB database authentication and the Apache reverse proxy. At this point, you already have a fully functional remote desktop gateway.
Now, why not explore integration with CAS authentication and the basic administration for Apache Guacamole? Check the official Guacamole Documentation to learn more about Apache Guacamole.


