


Apache Cassandra is a free and open-source NoSQL distributed database management system created by Facebook (now Meta). Cassandra’s distributed nature allows for high availability and high performance with no single point of failure.
Because of its scalability, Cassandra is suitable for massive active and critical data set. Big and famous organizations such as Apple, Bloomberg, BestBuy, eBay, Netflix, Spotify, and many more. And if you’re interested to know Apache Cassandra, you’re in the right place.
In this article, you’re going to learn how to set up and configure an Apache Cassandra Cluster on Linux systems. You’ll also learn how to interact with Cassandra using its command-line tools.
Prerequisites
To follow along with the examples in this tutorial, be sure to have the following requirements in place.
- You’ll need two Linux servers are in the same network. This tutorial will be using two Rocky Linux (v8.5) servers with the following details.
| Hostname | IP Address |
| cassandra01 | 172.16.1.10 |
| cassandra02 | 172.16.1.15 |
The Apache Cassandra documentation does not provide a prescriptive list of compatible Linux distros but mentions that Cassandra may run on CentOS, RHEL, Debian, and SUSE Enterprise Linux.
- You must have sudo privileges or access to the root account.
- Nano text editor or any Linux-based text editor.
Installing Java OpenJDK and Python
Before jumping in with the Apache Cassandra install, you first install the software dependencies. Cassandra is a Java-based application, and the latest version (v4.0 as of this writing) requires Java OpenJDK 1.8 and Python 3.6.
This tutorial uses the DNF package manager for RPM-based Linux distros. You may also use Yum or Apt on DEB-based distros like Ubuntu and Debian. Refer to your distro’s documentation to determine which package manager to use.
Follow the steps below to install Java OpenJDK 1.8 and Python 3.6 on each server.
1. Open your SSH client, connect to your server, and run the sudo su command to become root.
ssh user@server_name_or_IP
sudo su
2. Next, run the dnf command below to install the Java OpenJDK 1.8 and Python 3.6 packages. Wait for the installation to complete.
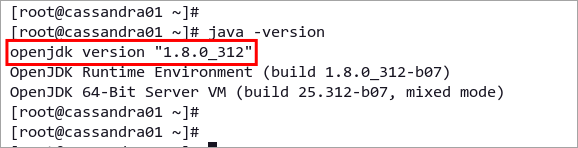
dnf install java-1.8.0-openjdk python36 -y3. Now, verify the Java version by running the command below.
java -versionBelow you can see the current version of Java OpenJDK is 1.8.0_312.
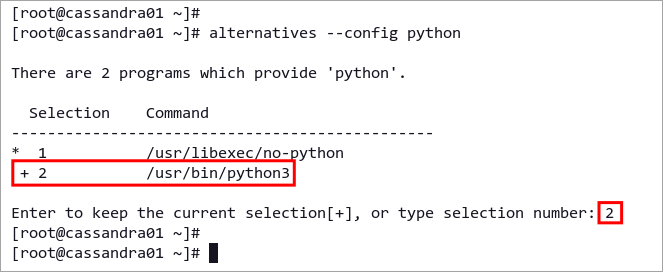
4. Next, set up the default Python interpreter on your servers to Python 3.6. To do so, run the alternatives command as below.
alternatives --config pythonType the number corresponding to your Python version at the command selection prompt. The example below shows that Python3 is option 2.
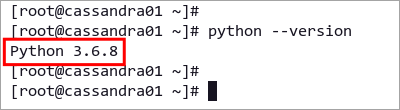
5. Lastly, execute the following command to verify the Python version.
python --versionYou should see that Python 3.x.x is the default, similar to the screenshot below.
Installing Apache Cassandra NoSQL Database
You’ve installed the dependencies and made sure they are suitable versions. Now it’s time to install Apache Cassandra!
While there are many ways to install Cassandra, the most convenient way is through the official repository. But there are a few quick steps you need to perform first. To install Cassandra NoSQL Database on Linux systems, proceed as follows.
1. Run the following command to create a new repository file for Cassandra.
nano /etc/yum.repos.d/cassandra.repo2. Copy the following Cassandra repository configuration. This repository is available for most Red Hat distributions, including Rocky Linux.
[cassandra]
name=Apache Cassandra
baseurl=https://downloads.apache.org/cassandra/redhat/40x/
gpgcheck=1
repo_gpgcheck=1
gpgkey=https://downloads.apache.org/cassandra/KEYS
3. After editing, save and close the file by pressing Ctrl+X, Y, and Enter.
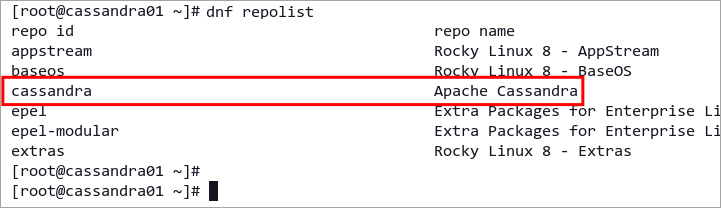
4. Next, execute the dnf command below to verify all available repositories on your system.
dnf repolistYou should see the Apache Cassandra repository in the repo list, as shown below.
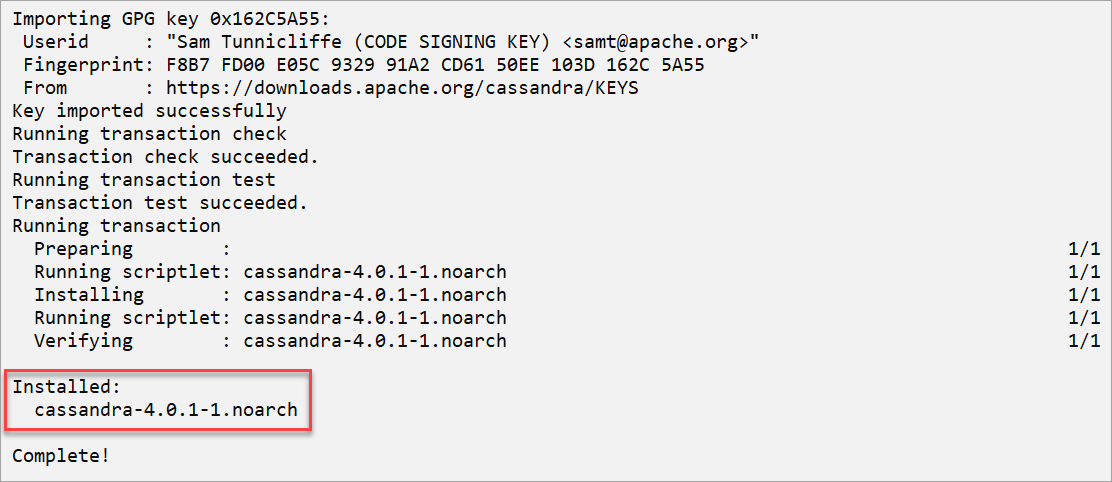
5. Now, install the Cassandra NoSQL Database by running the following command.
dnf install cassandra -yYou should see a confirmation message after installing Apache Cassandra, similar to the screenshot below.
Configuring the Apache Cassandra Cluster
Once you have installed Cassandra, you’ll need to edit the configuration /etc/cassandra/conf/cassandra.yaml and set up the Cassandra cluster.
To make the Cassandra cluster work, you’ll need to change the default Cassandra configuration on all servers, such as:
- Change the default
cluster_name. - Add server IP addresses to the
seedsoption. - Change the default
listen_addressto the local IP address. - Enable the
rpc_addressfor client connections.
Now, proceed with the following steps to set up the Cassandra cluster.
1. On cassandra01, run the following command to open the Cassandra configuration cassandra.yaml for editing.
nano /etc/cassandra/conf/cassandra.yaml2. Change the default value of the cluster name with the new name. This tutorial uses the new cluster name ATA Cluster.
cluster_name: 'ATA Cluster'
3. Now, add each server’s IP address with default Cassandra TCP port 7000 to the seeds option below. The format follows the pattern IP:Port,IP:Port, and the default port is 7000.
seeds: "172.16.1.10:7000,172.16.1.15:7000"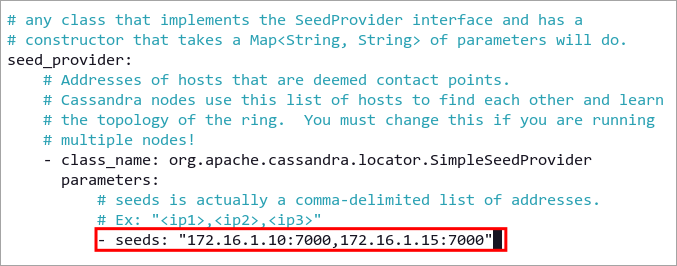
4. Next, change the default listen_address to the server’s IP address, not localhost. The option listen_address defines which IP address Cassandra will be running.
# for cassandra01
listen_address: 172.16.1.10

# for cassandra02
listen_address: 172.16.1.15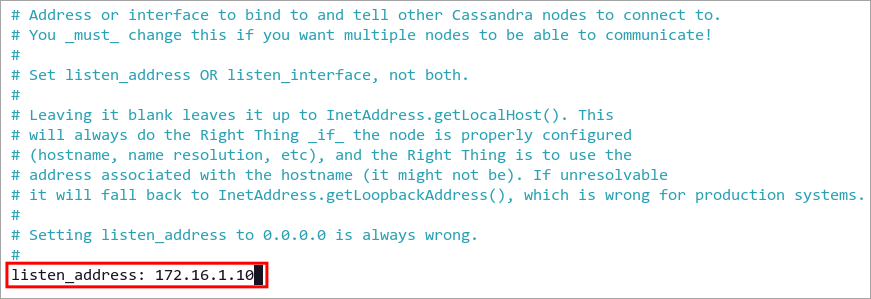
5. Next, change the default option rpc_address with the server IP address, the same value as the listen_address option. On the Cassandra cluster environment, all client connections go through the local server IP address on default TCP port 9042.
# for cassandra01
rpc_address: 172.16.1.10

# for cassandra02
rpc_address: 172.16.1.15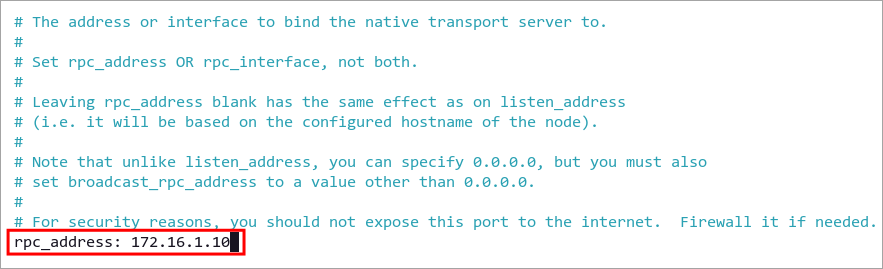
6. Save and close the configuration file by pressing Ctrl+X, Y, and Enter.
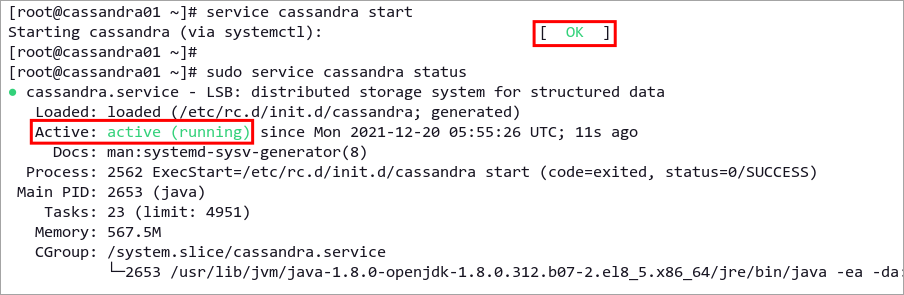
7. After editing the Cassandra configuration, run the following command to start the Cassandra service. This command will automatically start the cluster and reach other servers whose IP addresses are on the seeds option.
service cassandra start8. Now, confirm the Cassandra service status by running the command below.
service cassandra statusYou will get an output similar to the screenshot below. As you can see, the Cassandra service is active (running).
Securing the Apache Cassandra Cluster with Firewall
Setting up a firewall for securing services is an essential task in the production environment. Doing so allows you to limit access to the Cassandra cluster only from specific IP addresses or network ranges.
On generic Red Hat Linux distributions, firewalld is the default firewall software.
By default, Cassandra requires two TCP ports need to be open. Port 7000 is the default cluster port, and port 9042 is the native default transport port for client connections.
Follow these steps to secure Cassandra cluster deployment with a firewall.
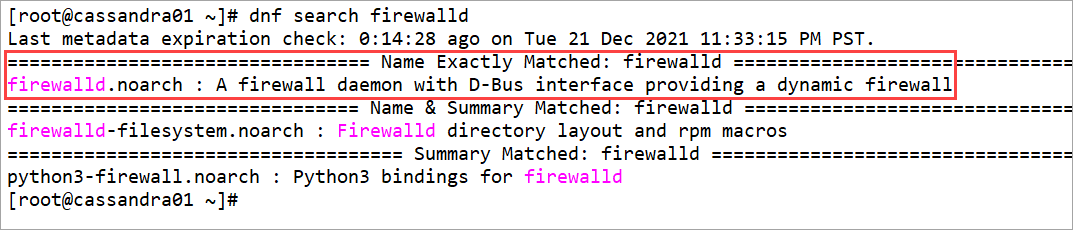
1. First, confirm whether you already have firewalld on your servers by running the command below.
dnf search firewalldIf
firewallddoes not exist, follow steps #2 and #3. But iffirewalldalready exists on the server, skip to step #4 instead.
2. If you don’t have firewalld on your system, run the following command to install it.
dnf install firewalld -y3. Now, start the firewalld service by running the command below. This command will start the firewalld service with default rules, opening essential ports and services such as SSH and DHCP clients.
systemctl start firewalldBy default, firewalld provides a command-line interface
firewall-cmdfor managing and maintaining firewall rules.
4. Run the following firewall-cmd command to create a new zone for the Cassandra cluster and reload the firewalld rules.
# add firewalld zone cassandra-cluster
firewall-cmd --new-zone=cassandra-cluster --permanent

# reload firewalld
firewall-cmd --reload
You will see the output message success, which means the operation is successful. The option --permanent makes new firewall rules permanent.

5. Next, add your server network CIDR to the cassandra-cluster zone. This rule allows any servers or clients on the CIDR 172.16.1.0/24 to talk and connect. To add a single IP address, input the IP address 172.16.1.20.
firewall-cmd --zone=cassandra-cluster --add-source=172.16.1.0/24 --permanent6. Now, run the command below to add Cassandra service ports 7000 and 9042 to the cassandra-cluster zone.
# add storage_port Apache Cassandra to the zone cassandra_cluster
firewall-cmd --zone=cassandra-cluster --add-port=7000/tcp --permanent

# add Apache Cassandra port for client connections
firewall-cmd --zone=cassandra-cluster --add-port=9042/tcp --permanent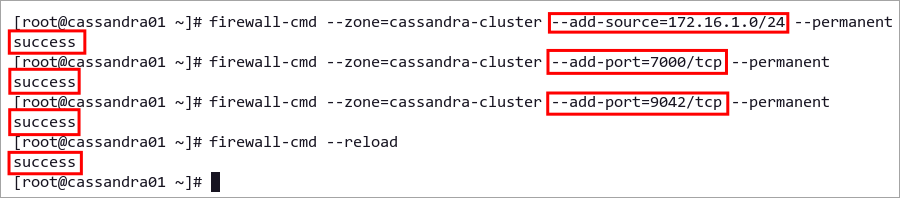
7. Lastly, reload firewalld rules to apply a new configuration by running the command below.
firewall-cmd --reloadThe Cassandra cluster is now accessible only through the 172.16.1.0/24 network and will drop all connections from other networks.
Checking the Apache Cassandra Cluster Status
Nodetool is a native command utility for managing and monitoring the Cassandra cluster. This tool allows you to show the Cassandra cluster’s metrics status, such as tables and keyspaces, server metrics, applications, client connection metrics, etc.
In general, administrators run the nodetool command directly on the operational Cassandra server performing routine database maintenance and monitoring.
Follow the steps below to learn the basics of monitoring the Cassandra cluster using the nodetool utility.
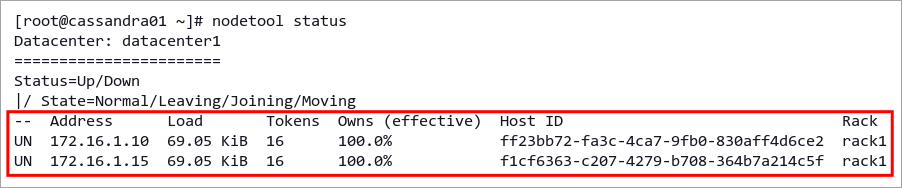
1. Check the Cassandra cluster status by running the following command.
nodetool statusYou will get an output similar to the screenshot below.
- U means the node is UP or running.
- N means the node is NORMAL.
- The Address can be the node IP address or URL.
- Load is the size of files in the Cassandra data directory. This value refreshes every 90 seconds.
- The Token is the number of tokens available on the node.
- The Host ID is the network id of the node. Each node has a different id.
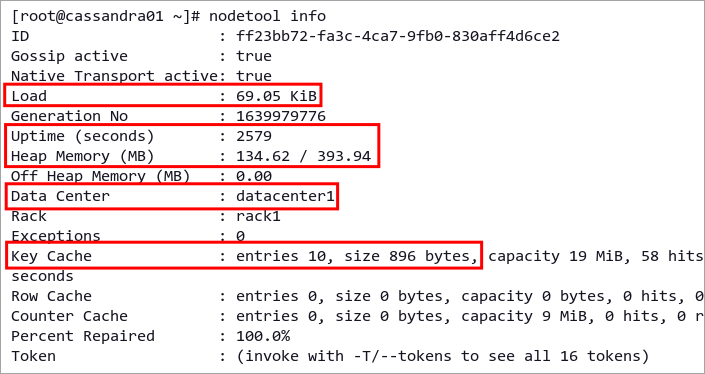
2. Now, run the command below to get detailed information about the single node.
nodetool infoBelow, you can see detailed information about the node such as:
- Uptime
- Heap memory info
- Load
- Key cache and Counter cache
- Datacenter location
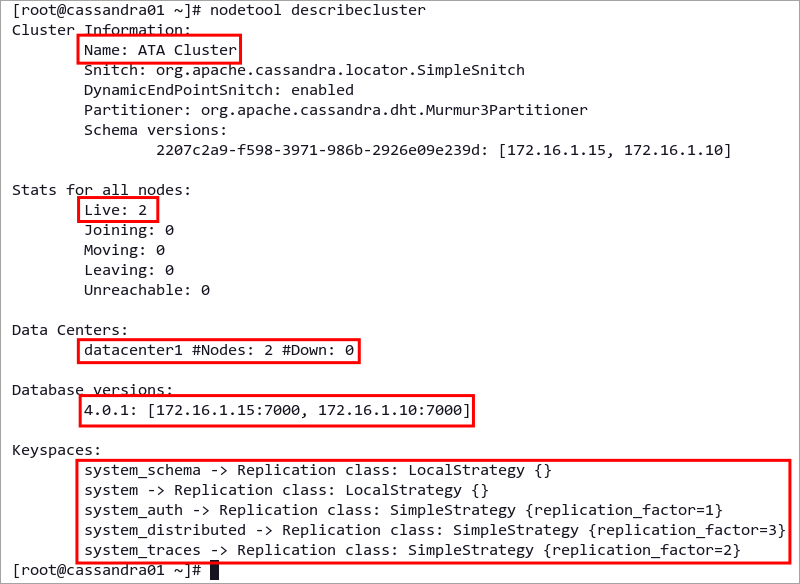
3. Next, display the Cassandra cluster details by running the command below.
nodetool describeclusterYou can see below the detailed Cassandra cluster.
- Cluster Information contains basic information about the Cassandra cluster, including name, default Cassandra partitioner, and schema version.
- Stats for all nodes indicate the current status of all nodes on the Cassandra cluster.
- If you’ve built the Cassandra cluster on multiple data centers, you will see all of your datacenters on the Data centers section.
- The Database versions section shows the Cassandra version on each cluster node.
- The list of all available keyspaces or databases on the Cassandra cluster is available under the Keyspaces section.
Connecting to the Apache Cassandra Cluster
Installing the Apache Cassandra package on the server also installs the Cassandra Query Language Shell (CQLSH). This tool allows admins to connect to Apache Cassandra and manage databases or keyspaces and users.
Follow the below steps to connect to the Cassandra cluster using the command-line cqlsh.
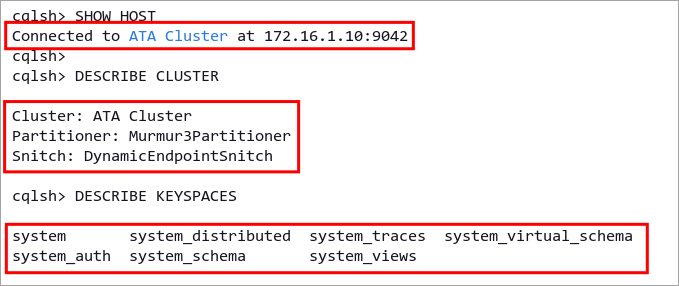
1. Run the cqlsh command below for connecting to the Cassandra cluster. Specify the Cassandra IP address, and the default port for client connections is 9042.
cqlsh 172.16.1.10 9042Once you connect to the Cassandra cluster, you will see a similar output like the screenshot below. This example uses the cluster name ATA Cluster on the server IP address 172.16.1.10.

2. Now, run the following CQL queries to check which server you connected to, check cluster name, and check all available keyspaces on the Cassandra.
# show detailed host
SHOW HOST

# show cluster name
DESCRIBE CLUSTER

# list all available keyspaces (databases)
DESCRIBE KEYSPACES
You will see a similar output to the screenshot below. The SHOW HOST query shows you where you’re connected, the query DESCRIBE CLUSTER shows you the Cassandra cluster name, and the query DESCRIBE KEYSPACES shows you the list of keyspaces on your Cassandra node.
3. Finally, type the exit to log out from the cqlsh environment.
Conclusion
Throughout this tutorial, you’ve learned how to install and configure Apache Cassandra on Linux. You’ve also configured the Apache Cassandra cluster using two Linux servers and secured the deployment using the Firewalld.
At this point, you’re ready to add more servers and scale your deployments, providing high availability, consistency, and redundancy for your data.
What’s next for you? Perhaps begin with setting up the authentication and authorization on your Cassandra cluster, then set up keyspace/database replication for your applications. And while you’re at it, why not learn how to maintain the Apache Cassandra cluster with nodetool?


