


If you are reading this tutorial, chances are you use Ansible for automation in your daily workloads. But as with all software, Ansible can occasionally have issues. Worry not, though. Command-line options and Ansible debug can help!
In this tutorial, you’ll learn to troubleshoot playbooks, resolving any potential issues as quickly as possible, so you can get back to automating.
Read on and smoothly run your playbooks without messing things up!
Prerequisites
This tutorial will be a hands-on demonstration. If you’d like to follow along, be sure you have the following.
- An Ansible control node with Ansible installed.
- A managed node or host that the control node can access via SSH. Here’s a guide in starting SSH with Powershell.
- Python 3.x is installed on both the control node and the managed node (host).
- An inventory file set up and populated with hostnames or IP addresses of your managed host.
Troubleshooting Using the Command-Line Options
Running into errors when executing your playbooks can be a pain. Naturally, you’d need a way to troubleshoot and debug your playbooks to avoid messing things up. Luckily, Ansible lets you troubleshoot playbooks by appending options in the ansible-playbook command.
By default, Ansible has a built-in syntax checker called --syntax-check. This syntax checker is a great way to catch mistakes in your YML files before running your playbooks.
To demonstrate how the syntax checker works:
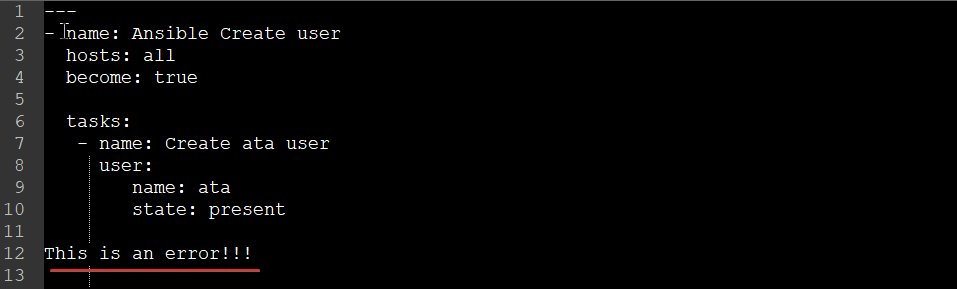
1. Create a YAML file (playbook) in your current working directory on your control node using your preferred text editor and populate the following code. You can name the file as you like, but for this tutorial, the file is named create_user.yml.
The code below runs a task to create a user named ata on your managed node.
---
- name: Ansible Create user
  hosts: all
  become: true

  tasks: # Runs a task to create a user named 'ata'
   - name: Create ata user
     user:
        name: ata
state: present2. Next, open your terminal, and run the following command to test the create_user.yml playbook for syntax errors (--syntax-check).
The syntax checker parses the YAML file and looks for any potential errors without running any of your playbook tasks.
ansible-playbook --syntax-check create_user.ymlIf your playbook passes the syntax check without errors, you’ll see the name of your playbook (create_user.yml) as in the following screenshot. But if there are errors in your playbook, you’ll see an error message and the line number where the error occurred explicitly (step four).

3. Open the create_user.yml file in a text editor and add a line that says “This is an error!!!” at the bottom to cause a syntax error, then save and close the file.
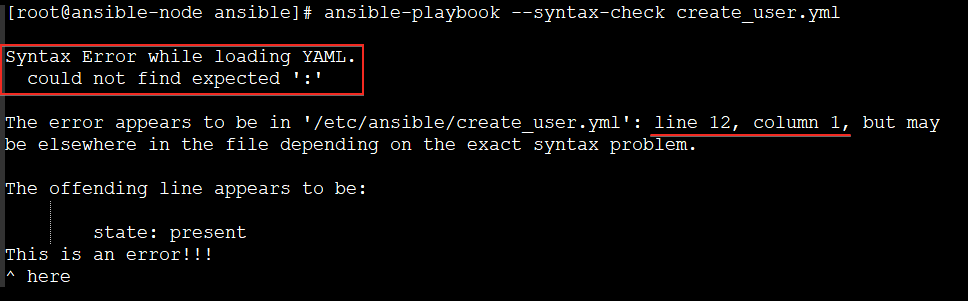
4. Now, rerun the below command to perform a --syntax-check on your playbook (create_user.yml).
ansible-playbook --syntax-check create_user.ymlAs you can see below, the syntax checker caught the error and displayed the message Syntax Error while loading YAML, followed by the line number where the error occurred (12).
5. Go back to the create_user.yml file and remove the random line you added to cause an error. Save the changes you made and close the file.
6. Next, rerun the below command to perform a --syntax-check to ensure there are no more errors in your playbook (create_user.yml).
ansible-playbook --syntax-check create_user.yml
7. Run the below command to perform a dry run (--check) on your playbook (create_user.yml).
Performing a dry run is a great way to test your playbook for errors before running it on live systems. A dry run lets you simulate running a playbook without changing any data or taking any action on the hosts.
ansible-playbook --check create_user.yml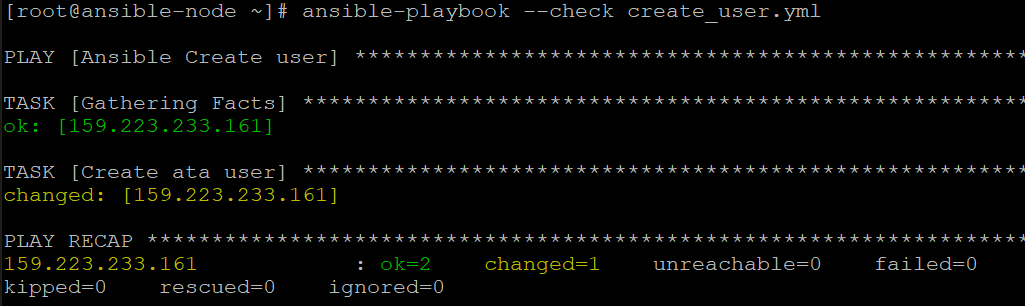
Note that not all modules support the –check flag. For example, modules that change data or the system do not support the –check flag.
Tasks using modules that support the –check flag shows the output of running the task on target hosts and any changes made if the module were executed.
8. After the dry run, execute the below command to connect to one of the hosts via ssh to verify no changes are made on the managed hosts. Replace root and 159.223.233.161 with your managed host’s actual username and IP address.

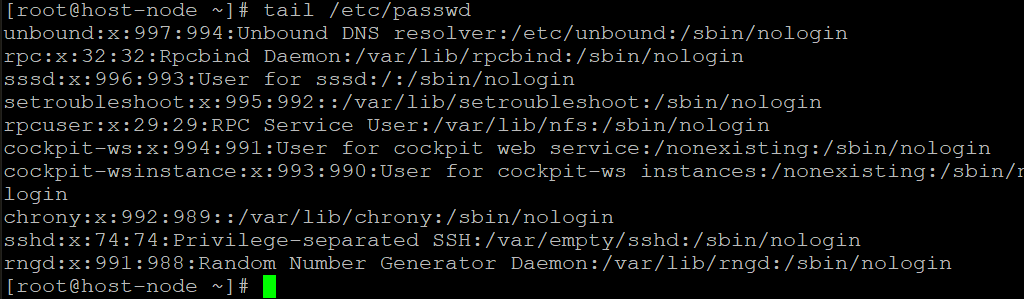
9. Now, run the tail command below to check if the user ata was created in the /etc/passwd file.
tail /etc/passwdYou’ll see that no ata user was created after the dry run, as shown below since the dry run only checked for errors without actually running the playbook.
10. Finally, run logout to leave the managed host.
logout
Enabling Playbook Debugger to Start When Running a Playbook
You’ve seen that troubleshooting playbooks using options in the ansible-playbook command works like a charm. But apart from those options, Ansible also has the built-in playbook debugger.
The Ansible playbook debugger is a powerful tool that allows you to step through your playbook and see the results of each task as they execute.
1. Run the below command to create a config file called ansible.cfg in your home directory (the root directory in this example). This file contains configuration options for the playbook debugger.
ansible-config init --disabled > ansible.cfg
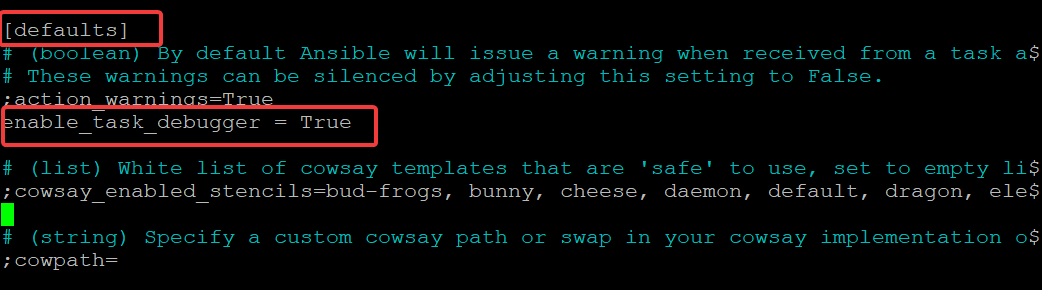
2. Next, open the ansible.cfg file in a text editor and add the enable_task_debugger = True line under the defaults section, as shown below. This setting enables the playbook debugger to start automatically when you run the playbook. Save the changes and close the file.
Once the playbook debugger is enabled, any failed or unreachable task will begin the inline debugger interaction prompt.
3. Run the below command to ensure that you are using the correct config file, which should be ansible.cfg in your home directory, as shown below.
ansible --version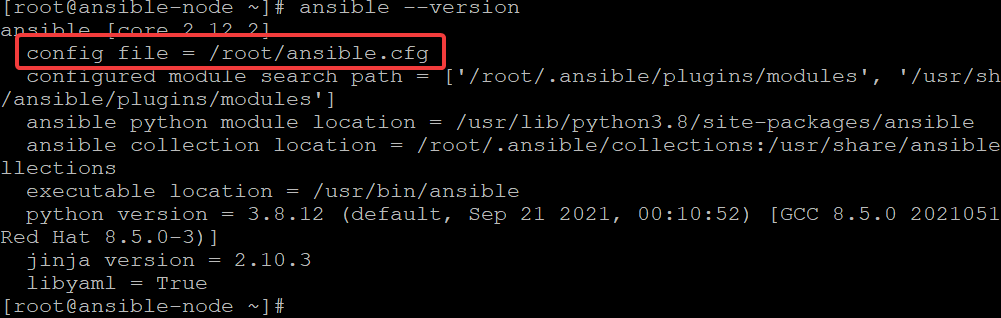
Troubleshooting with the Ansible Debug
Since you’ve set the playbook debugger to start whenever you run a playbook, you can now put the debugger keyword anywhere in a playbook. Doing so enables task debugging, such as playbooks, roles, blocks, or even individual tasks.
The debugger keyword supports five values, including the most commonly used value (on_failed) when debugging a play:
| Value | Result |
| always | The debugger will always run when specified, regardless of the outcome. |
| never | The debugger will never run, regardless of the outcome. |
| on_failed | The debugger will only run if the task fails (for debugging task failures). |
| on_unreachable | The debugger will only run if the task is unreachable. Use this value when your managed host is unreachable or when a task has a timeout. |
| on_skipped | The debugger will only run if the task skipped itself by execution |
To troubleshoot a playbook with Ansible debug:
1. Create a debugger_demo.yml playbook in your favorite editor, and populate the following code. Save the changes and close the playbook.
The code below installs a package called does_not_exist on the managed host using yum. But since the package doesn’t exist in the yum repository, the task will fail and invoke the debugger.
---
- name: Debugger demo
  hosts: all
	# Enable debugging for a task.
  debugger: on_failed # Invokes the debugger if the task fails
  vars: # Set a variable to hold the package name
    - pkg_name: does_not_exist
  tasks:
   - name: Install a package # Installs the package the pkg_name variable holds
     yum:
      name: "{{ pkg_name }}"
      state: present
2. Next, run the below command to execute the playbook (debugger_demo.yml).
ansible-playbook debugger_demo.ymlThe task fails since the debugger_demo.yml playbook tries to install a package that doesn’t exist, as shown below. You’ll also notice an inline debugger prompt.

Once you invoke the debugger, you will have access to many debugger arguments/commands that help you step through the playbook, as shown below.
| Command | Shortcut | Action |
| p | Print the value of a variable. For example, you can use it to print the value of a task’s result. | |
| task.args[key] = value | no shortcut | Sets the value of a task’s argument directly in the debugger inline prompt. This argument is useful when testing the behavior of a task with different arguments. For example, to set the value of a task’s hostname argument to “www.example.com”, use this argument like so: task.args[‘hostname’] = ‘www.example.com’. |
| task_vars[key] = value | no shortcut | Updates the task variables (you must use update_task next) |
| update_task | u | Recreate a task with updated task variables. |
| redo | r | Restarts the playbook from the beginning and reruns the entire play. But any new changes you made to task arguments using the task.args argument will remain in effect. You can use this argument to correct any issues you’ve discovered quickly. |
| continue | c | Continue executing, starting with the next task. |
| quit | q | Quit the debugger. |
3. Run the below command to inspect what task argument values (task.args) are used during task execution.
p task.argsIn the output below, you can see the task is using the default values for the name and state arguments. These default values are defined in the vars section of the debugger_demo.yml playbook. Notice the package name (does_not_exist) with a state of present.

4. Now, run the following command to update the state argument to a package (bash) that exists in the managed host’s repository.
task.args['name']='bash'At this point, you have a new inline value for the task.args[‘name’] argument(bash). You’re no longer using the variable defined in the vars section of the playbook.
5. Rerun the command below to inspect task argument values and verify the changes.
p task.argsBelow, the bash package is now being used as the value for the task argument.

6. Finally, run the redo debugger argument to restart the playbook and rerun the entire play.
redoThis time, the task runs, as shown below. Notice that you get an ok status since the Bash package exists in the managed host’s repository.

Conclusion
Debugging playbooks can be a challenge, but Ansible provides tools to make the process easier. And in this article, you’ve learned how to use the command-line options and the Ansible debugger to help you step through your playbook and troubleshoot issues.
You also learned to get around the debugger’s arguments/commands to inspect and modify task arguments during playbook execution. At this point, you already have a fully functional Ansible environment and the knowledge required to start debugging your automation.
Why not try the Ansible debugger on some of your playbooks to Ansible debug network automation? You’ll find the Ansible debugger is an invaluable tool for troubleshooting issues and understanding the behavior of your automation.


