


If you’re looking for a way to create and manage users in a Linux system without compromising security, Ansible create user functionality is worth looking into. The Ansible create user functionality lets you effectively manage users and user attributes with a single playbook and a single command.
In this tutorial, you’ll learn how to create and manage users in one go like a champ with the Ansible create user module.
Read on and start creating tons of users with different attributes!
Prerequisites
This tutorial comprises step-by-step instructions. If you’d like to follow along, be sure you have the following in place:
- An Ansible controller host – This tutorial uses Ansible v2.11.7 on an Ubuntu 20.04.3 LTS machine.
- A remote Linux computer – This tutorial uses Ubuntu 20.04.3 LTS as the remote node to test the create user functionality.
- An inventory file set up and one or more hosts already configured to run Ansible command and playbooks on. The remote Linux computer is called myserver, and this tutorial uses an inventory group called web.
- Python v3.6 or later installed both on your Ansible controller host and the remote node machine. This tutorial uses Python v3.8.10 on a Ubuntu machine.
Creating Linux Users Using Ansible Ad Hoc Commands
Do you plan to create a user quickly? Running ad hoc commands will do the trick. Ad hoc commands are a quick way to run a single command on a remote host and deploy the specified changes.
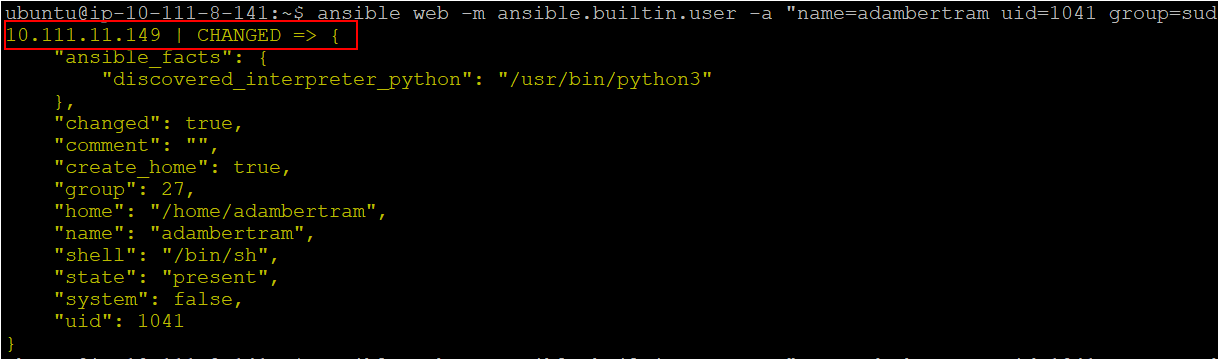
Log onto your Ansible controller host, and open your terminal. Now, run the ansible command below to connect to the host called web using the ansible.builtin.user module (-m).
The command passes an argument (-a) that lets Ansible create a new user (adambertram) on the remote node with the uid (uid=1041) you specified in the command.
ansible web -m ansible.builtin.user -a "name=adambertram uid=1041 group=admin"Once the command completes, you’ll see a CHANGED message, as shown below, that confirms Ansible successfully created the new user on the remote host with the below parameters, as indicated by the changed: true result, along with additional information.
Building Ansible Playbook to Create and Manage Users
Creating a single user or managing an attribute of a single user may be okay with an ad-hoc command, but creating or managing dozens of users can be challenging. So instead of using ad-hoc commands, integrate the Ansible create user functionality with a playbook using the ansible-playbook command.
1. First, log in to the Ansible controller host,
2. Run the following commands to create the ~/ansible_create_user directory and change to that directory. This directory will contain the playbook and all the required configuration files that you’ll use to invoke the Ansible create user module.
mkdir ~/ansible_create_user
cd ~/ansible_create_user
3. Now, open your favorite text editor and create a file called main.yml in the ~/ansible_create_user directory. Copy and paste the following YAML playbook contents to the main.yml file.
The playbook below creates the user and manages the user attributes, such as name, group, state, shell type, and home directory.
To list available valid login shells for use at the time, run the
cat /etc/shellscommand on the Linux machine.
---
- name: Ansible Create user functionlity module demo
hosts: web # Defining the remote server inventory host group
# Defining the remote server where the ansible create user module
# will manage the objects
remote_user: ubuntu # Using Remote user as ubuntu
tasks:
# name - Defines the username that is present or to create
# groups - Adds users in secondary groups or use groups
# state: present - Creates a user or works with a user
# state: absent - Deletes a user
# shell - Specifies shell-type a user can work on
# home - Sets a user’s home directory
# createhome: yes - Create a home directory for a user
# createhome: no - Do not create a home directory for a user
# Creating the user Adam Listek
- name: Add the user 'Adam Listek' with a specific uid and a primary group of 'sudo'
ansible.builtin.user:
name: adamlis
comment: AdamListek
uid: 1077
group: sudo
createhome: yes # Defaults to yes
home: /home/adamlis # Defaults to /home/<username>
# Adding the user qa_editor in the editor group
- name: Add group "editor" to remote node
group:
name: qa_editor
gid: 2212
state: present
# Adding the user Rochela in the qa_editor group and bash shell
- name: Add the user 'Rochella' with a bash shell, appending the group 'editor' to the user's groups
ansible.builtin.user:
name: rochella
shell: /bin/bash
groups: qa_editor
append: yes
# Removing the user shanky from the system
- name: Remove the user 'Shanky' if present in the linux system
ansible.builtin.user:
name: shanky3
state: absent
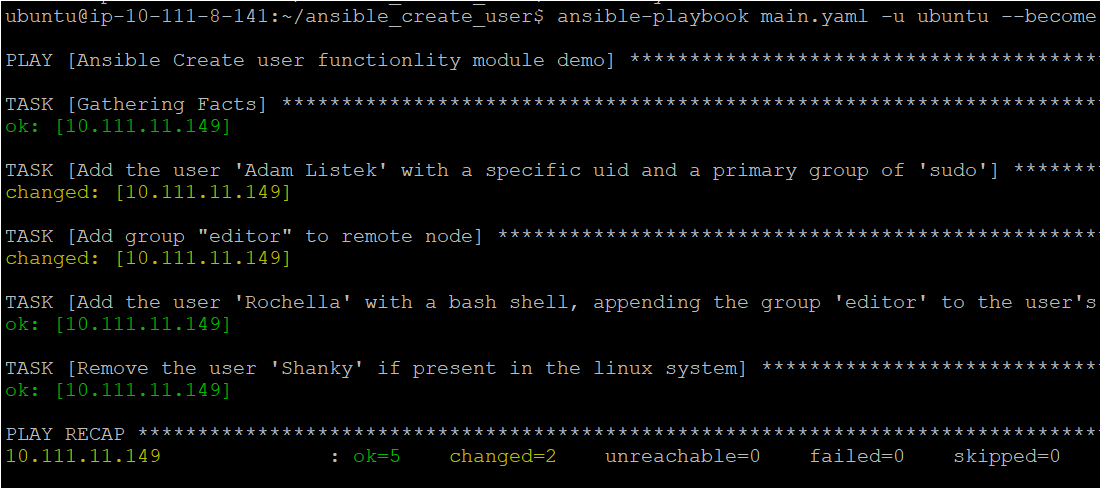
remove: yes4. Run the command below to invoke the playbook (main.yml) that executes the tasks to create users on the remote host. The -u flag specifies the user ubuntu, and the --become flag sets ubuntu as superuser.
ansible-playbook main.yml -u ubuntu --becomeBelow, you can see that some tasks show changed status, which indicates the remote host wasn’t in the proper state and was modified to run the command. At the same time, the other tasks that show an ok status don’t require any changes.
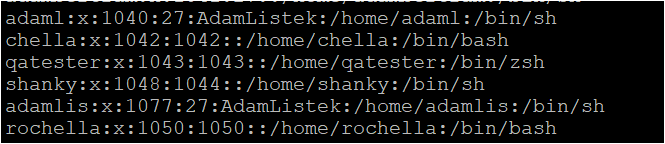
5. Now, run the cat command below to verify if Ansible successfully created all the objects defined in the main.yml playbook.
cat /etc/passwdAs you can see below, Ansible created all the users with their respective user IDs as specified in the main.yml file.
Generating Secure User Passwords in Ansible Playbook
You already know how to create the user without a password, which is fine if you need to use it for development purposes. But ideally, securing a user password is a must as it’s crucial to keep the user account safe.
You’ll generate a secure encrypted password and apply it in the playbook to secure a user password. But first, you’ll install the whois software on your machine, which contains the mkpasswd utility used to generate a password.
1. Run the following command to install the whois software package with the apt package manager on your machine.
apt install whois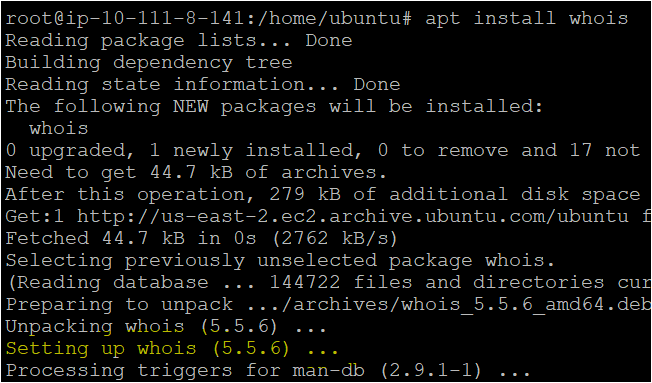
whois software which contains the mkpasswd utility2. Next, run the mkpasswd command below to generate an encrypted password (--method=sha-512).
mkpasswd --method=sha-512Specify a user password in the prompt, then you’ll see a generated encrypted password, as shown below.

Now, create the playbook named main_secure.yaml and copy/paste the code below.
The playbook below creates the user matt with uid: 1053, group: sudo, and the generated encrypted password from step two.
---
- name: Ansible Create user functionlity module demo
  hosts: web
# Defining the remote server where the ansible create user module will manage the objects
  remote_user: ubuntu   # Using Remote user as ubuntu
  tasks:
    - name: Add the user 'Matt' with a specific uid and a primary group of 'sudo'
      ansible.builtin.user:
        name: matt
        comment: matt_ata
        uid: 1053
        group: sudo
        password: '$6$kjPn3KClxO.Lujw$BjDr2y4vvJK3Q.C/nLET.A/FD9OxN6DNASmLetapq9LiXVVlTrYnvlEGuITZiVkV3JhX.vbsZ68/hnbdRsYnx1'
        createhome: yes     # Defaults to yes
        home: /home/matt    # Defaults to /home/<username>
4. Finally, run the ansible-playbook command below to execute the playbook (main_secure.yaml), creating a secure password user. The command, -u ubuntu, tells the remote system to use the ubuntu user while also elevating permissions via sudo with the --become command.
ansible-playbook main_secure.yaml -u ubuntu --become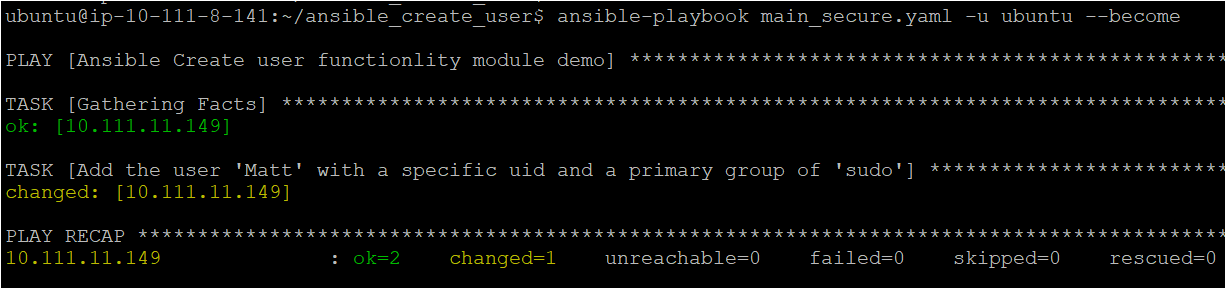
Generating SSH Keys for Remote Node Authentication
If users need to log in to remote nodes securely, two potential ways to authenticate are either by using a username and password or with SSH keys. SSH keys are sets of matching cryptographic keys used for authentication and are highly secure. In this example, you’ll generate SSH keys for a user using an Ansible playbook.
Create a playbook named ssh.yaml, then copy/paste the following code. The below playbook creates the SSH keys for the user matt inside the home directory, which you can further use to authenticate.
---
- name: Ansible SSH functionlity module demo
  hosts: web
	# Defining the remote server where the ansible create user module will manage the objects
  remote_user: ubuntu   # Using Remote user as ubuntu
  tasks:

		# Creating the SSH key for the user matt in .ssh directory
    - name: Create a 2048-bit SSH key for user matt in ~matt/.ssh/id_rsa
      ansible.builtin.user:
        name: matt
        generate_ssh_key: yes
        ssh_key_bits: 2048
        ssh_key_file: ~/.ssh/id_rsa
Now run the below command to execute the playbook (ssh.yaml), which generates SSH keys for a user (matt).
ansible-playbook ssh.yaml -u ubuntu --become
Setting and Removing Password Expiry Date of Linux Users
Managing user accounts doesn’t stop at creating them. Setting and removing password expiry dates is also crucial in user account management. If users’ passwords expire, users cannot perform any function on the system.
1. Assuming you are still on Ansible controller host node, create another playbook named expiry.yaml, then copy/paste the code below and save it. The below playbook sets and removes different users’ password expiry dates.
---
- name: Ansible user expiry functionality module demo
  hosts: web
	# Defining the remote server where the ansible create user module
	# will manage the objects
  remote_user: ubuntu   # Using Remote user as ubuntu
  tasks:

    - name: To set the limit to expire the QA Tester's account
      ansible.builtin.user:
        name: rochella
        shell: /bin/zsh
        groups: qa_editor
        expires: 1422403388

    - name: Removing the expiry time of the user shanky
      ansible.builtin.user:
        name: shanky
        expires: -1

    - name: Set maximum expiration date for password for user AdamListek
      user:
        name: adamlis
        password_expire_max: 16

    - name: Set minimum expiration date for password for user AdamListek
      user:
        name: adamlis
        password_expire_min: 6
2. Now run the below command to execute the playbook (expiry.yaml), which automatically sets and removes users’ password expiry dates.
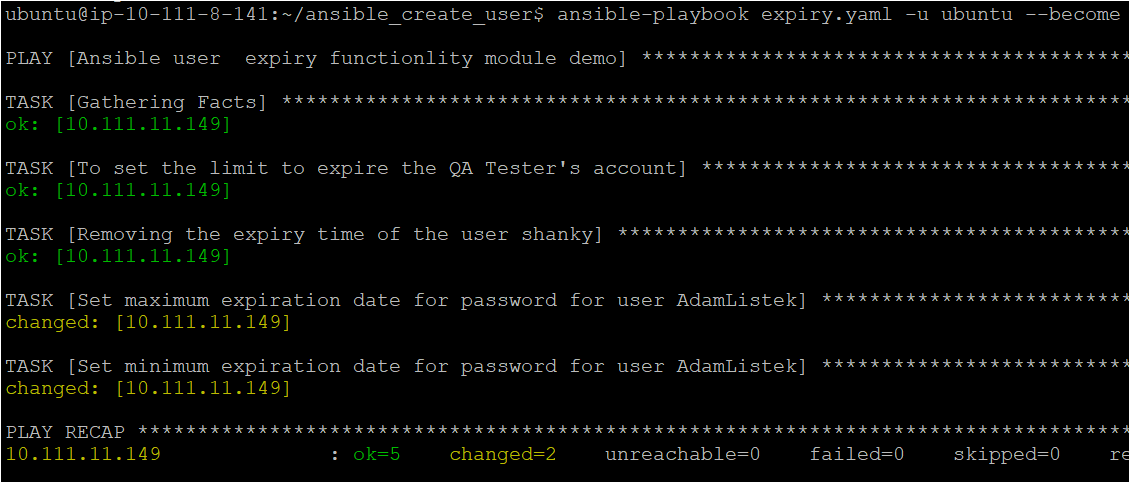
3. Finally, run the command below to verify if Ansible successfully updated the user’s (adamlis) attributes, such as password expiry.
sudo chage -l adamlisAs you see below, for user adamlis, the maximum number of days between password change is set to 16 and minimum to 6.

Conclusion
Throughout this tutorial, you’ve learned how to declare multiple Ansible create user functionalities in a playbook to create and manage Linux users. With the Ansible create module, you get a quick way to effectively work with Linux users and user attributes on remote hosts.
Now, would you prefer Ansible as the automation tool to help you create and manage users in a Linux system?


