

Did you know you can monitor for just about every action in Windows? No, you don’t need to buy some fancy software. The infrastructure monitors events like when services start and stop when someone creates a file or folder and more is already there via Windows Management Instrumentation (WMI) events.
WMI events are not a PowerShell-specific feature, but one of the easiest ways to leverage WMI events and create some handy tools is PowerShell. In this step-by-step tutorial, you will learn how to take advantage of WMI events with PowerShell and get the skills to build some handy monitoring tools!
Let’s get it on!
Prerequisites
You’ll see many demos in this hands-on tutorial. If you’d like to follow along with any of the demos, be sure you have the following:
- Windows 7+ or Windows Server 2012+ – This tutorial will use Windows Server 2019.
- Logged in as user in the local administrators group.
- Windows PowerShell 5.1 or PowerShell 6+ – This tutorial will use PowerShell v7.1.2.
Understanding WMI and CIM
Before you can get into WMI events, it’s important first to understand the infrastructure upon which they are built. Although this tutorial won’t go in-depth on WMI, you can always refer to Microsoft’s WMI documentation to learn more.
WMI and its related data model Common Information Model (CIM) are models built into Windows that store just about any piece of information in a repository you need related to the inner workings of Windows and what’s running on it.
WMI and CIM are powerful tools admins use to manage Windows both locally and remotely. Using WMI or CIM, admins can query information on a Windows system like installed applications, service status, files on the file system, and just about everything else.
WMI and CIM are how many enterprise monitoring solutions collect operating system and application health information. But you don’t need to buy an expensive monitoring tool to leverage WMI; you have PowerShell!
Let’s start with the two basic elements, and as we go, you will learn the other needed elements:
- Classes: The classes are the events and properties that the application, such as PowerShell, can call to read and update data. classes are located inside a namespace.
- Namespace: The namespace is a container for WMI related classes. Think of it as a My Picture folder that holds picture-related content. There are multiple namespaces, and the most common one is CIMv2 which holds most of the OS classes. But, all the namespaces are located under the big single namespace Root.

WMI vs. CIM
WMI and CIM are both methods to interact with the repository on a Windows system containing tons of information and to work with WMI events (more on that later). But, both methods have a few differences, mainly the way admins interact with them remotely.
WMI started with Windows NT4 and was the original (and only) way to interact with the repository. When you manage a Windows system with WMI, Windows uses Distributed Component Object Model (DCOM). DCOM is a remote protocol WMI uses to expose information within the data repository on a Windows machine.
To work over a network, DCOM uses Remote Procedure Call (RPC). To communicate over a network, RPC uses dynamic port ranges which is sometimes a challenge for firewalls and Network Address Translation (NAT) devices.
If you’re having troubles with RPC, check out the article Test RPC Connections with the Dynamic Ports.
Microsoft decided to leverage CIM to provide a more modern approach to interacting with the data repository in Windows. Instead of RPC, CIM uses WS-MAN (Web-Service for Management), an HTTP protocol much better suited for remote management.
Throughout this article and others, WMI and CIM may be used interchangeably. The data repository both management methods interact with is typically called a WMI repository. Nearly all terms refer to WMI, whereas CIM is typically referred to in PowerShell cmdlets.
WMI vs. CIM and PowerShell
Lucky for you, you have some options when it comes to WMI and CIM with PowerShell. PowerShell supports both ways of interacting with the data repository. When you run the Get-Command command in PowerShell, you may notice various Wmi cmdlets like Get-WmiObject, Invoke-WmiMethod, Remove-WmiObject, Register-WmiEvent, and Set-WmiInstance.
If you’re running Windows PowerShell 3 or greater (which you better be!), you’ll also see some similarly named cmdlets like Get-CimInstance, Get-CimClass, and Remove-CimInstance.
Which PowerShell cmdlets should you use? The answer is simple; the CIM cmdlets. CIM is the new standard Microsoft focusing on. The WMI cmdlets aren’t even available in PowerShell Core!
Querying WMI: The Basics
Before you can get into WMI events, you must understand how to query WMI with PowerShell. Querying information from the WMI repository is the most common use of WMI data.
To query WMI data in the PowerShell world, the Get-CimInstance cmdlet is your friend. This cmdlet has a few different ways to query WMI data. But, this tutorial is going to focus on the Query parameter. The Query parameter allows you to provide a Windows Query Language (WQL) query to query WMI.
For example, perhaps you’d like to find all of the WMI instances in the Win32_Service class. Similar to SQL, you’d use the query Select * from Win32_Service, as shown below. The asterisk (*) tells WMI to return all properties of each instance found.
Get-CimInstance -Query 'Select * from Win32_Service'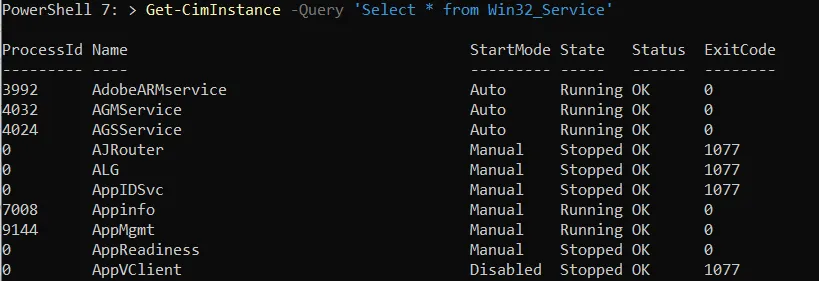
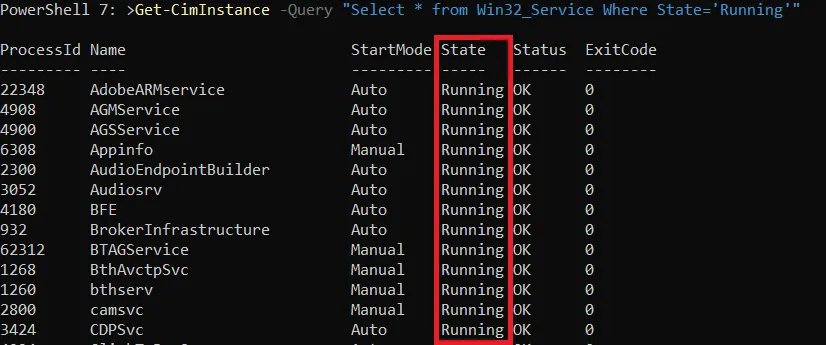
In the example above, you found all instances of each service in the Win32_Service class, but what if you only want to find a few? In that case, you’d use the WHERE clause. The WHERE clause creates a filter to only return instances matching a specific condition.
The WHERE clause tells Get-CimInstance only to return instances where the instance property matches a specific value. For example, maybe you only want to find the service instances where the State property is Running. If so, you’d define the WHERE clause Where State='Running', as shown below.
Get-CimInstance -Query "Select * from Win32_Service Where State='Running'"You can see below that Get-CimInstance only returned the service instances where the State property was equal to Running.
WMI Events: The Actions of WMI
WMI contains a large repository of information about thousands of items in Windows. You can get to that information by querying it as you did above but it also has another lesser-known feature; WMI events.
In Windows, at any point in time, hundreds of events could be occurring. When you use various features of Windows like creating files, stopping and starting services, installing software, or anything else, a WMI event is probably triggered.
Just about every action that’s performed on Windows can be exposed via a WMI event. When an action is performed on Windows, Windows triggers an event via its internal infrastructure. By default, you can’t see these events; they’re happening in the background. To see these events, you must subscribe to them.
Building a Sevice Monitoring Script with PowerShell
To demonstrate how WMI events work, rather than bore you with tons of information, let’s instead build a useful tool. Since WMI events happen when an event happens in Windows, you can create some handy monitoring tools using them.
Perhaps you’d like to write a message to a log file when a Windows service status changes on a critical server. Then, you can subscribe to the WMI events those actions trigger when they happen. When you subscribe to the event and the event triggers, you can perform some action like logging to file, sending an email, or just about anything else you can do with PowerShell.
Instead of buying some expensive monitoring solution, a simple PowerShell script can be a great poor man’s monitoring tool! If you’re ready, open your PowerShell console, and let’s get started!
Finding the CIM Class
Within WMI, like static instances, events are contained in classes. These classes contain all of the static data you queried above and where changes to those instances are triggered. You can find a list of all CIM classes in the Microsoft documentation.
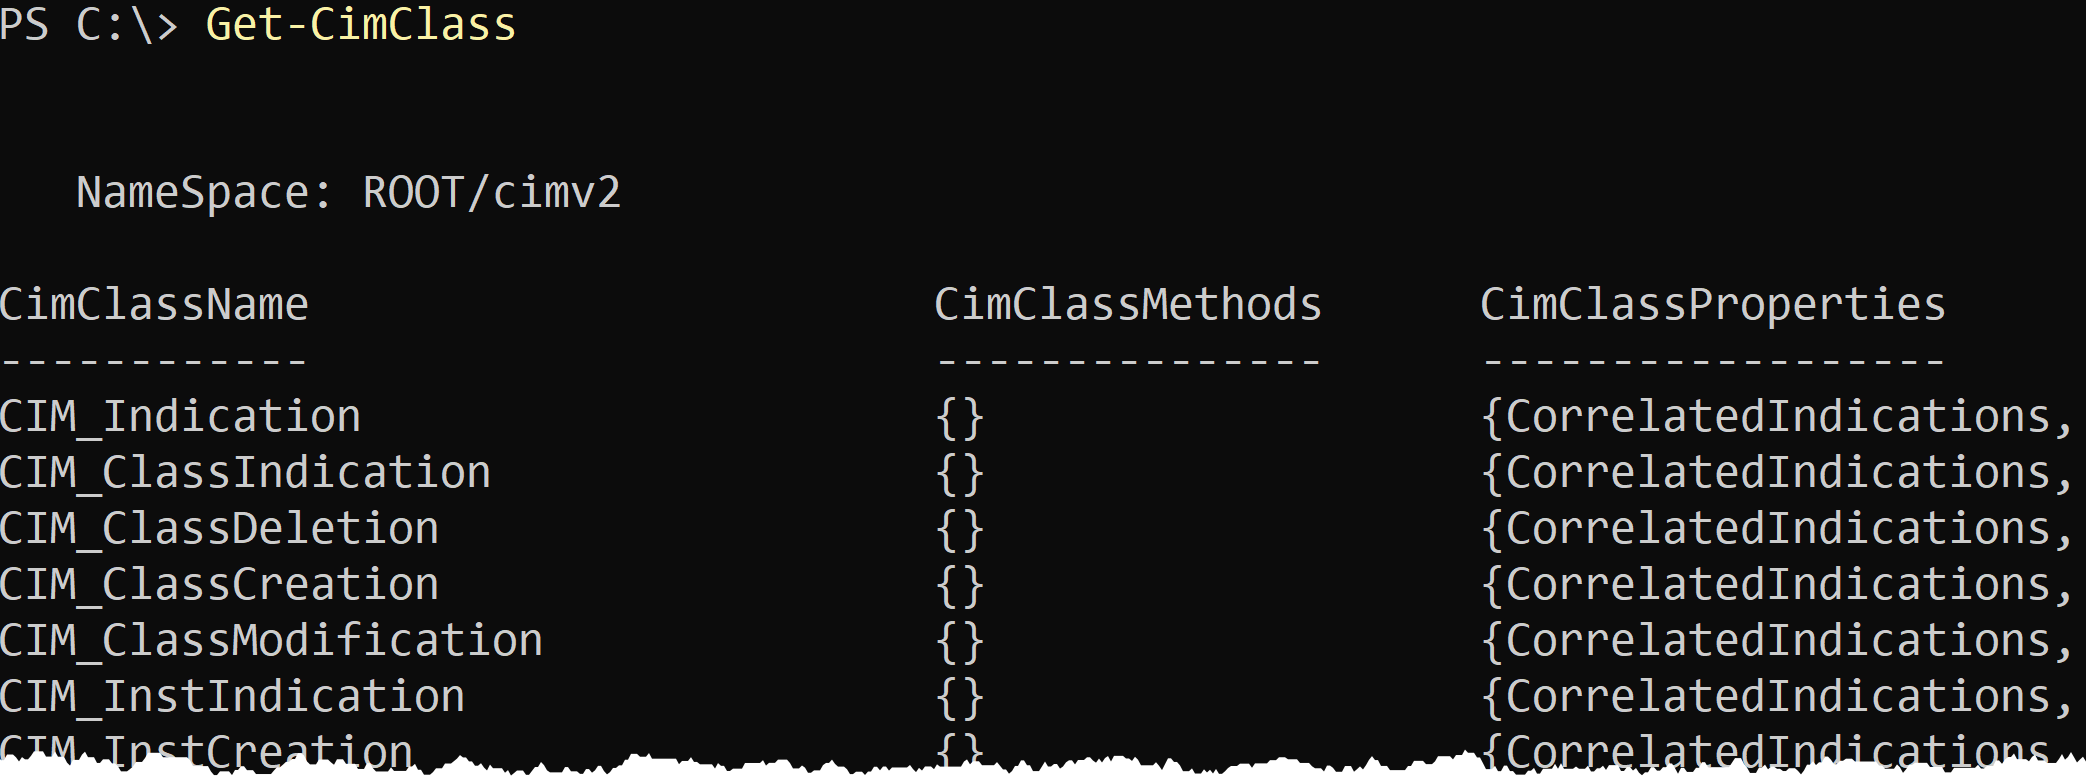
To find all CIM classes, run the Get-CimClass cmdlet with no parameters. The Get-CimClass cmdlet, by default, returns all classes in the ROOT/cimv2 namespace. The ROOT/cimv2 namespace is the “main” namespace nearly all interesting Windows classes are stored in.
Get-CimClassYou can see below though, that a lot of classes are returned.
Perhaps you’ve done some digging and finally realized that Windows services are all stored in the Win32_Service. So, when you know the class name, use the ClassName parameter to specify the name, as shown below.
Get-CimClass -ClassName Win32_Service
Finding the CIM Class Properties
Once you know what class to look into, you must then figure out what property to look at. When the value of an instance property changes (or an entire instance is created or removed), an event fires. You must capture that state change. To do that, you must know what property it is you’d like to monitor.
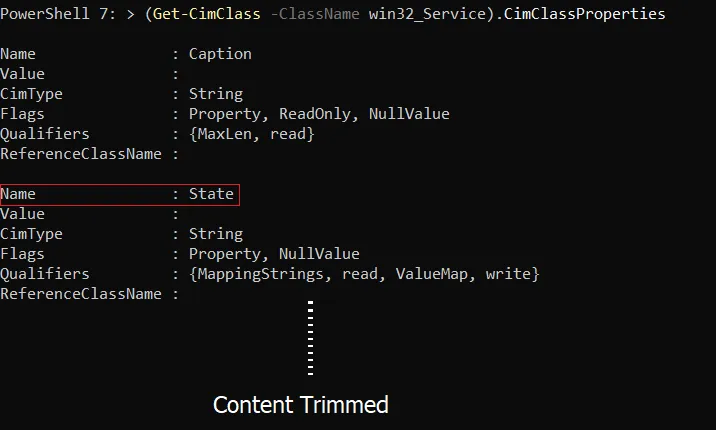
To find that property, inspect the CimClassProperties PowerShell object property on the CIM class instance you queried in the previous section.
(Get-CimClass -ClassName win32_Service).CimClassPropertiesNotice below that one of those properties is the State property.
Now that you know what CIM class and property you’d like to monitor, it’s time to subscribe to the WMI event!
Building a WMI Event Subscription: The High-Level Overview
Building a WMI event subscription can be a confusing task if you’ve never created one before. To help you keep action straight, let’s first cover the forest before the trees and outline the basic steps.
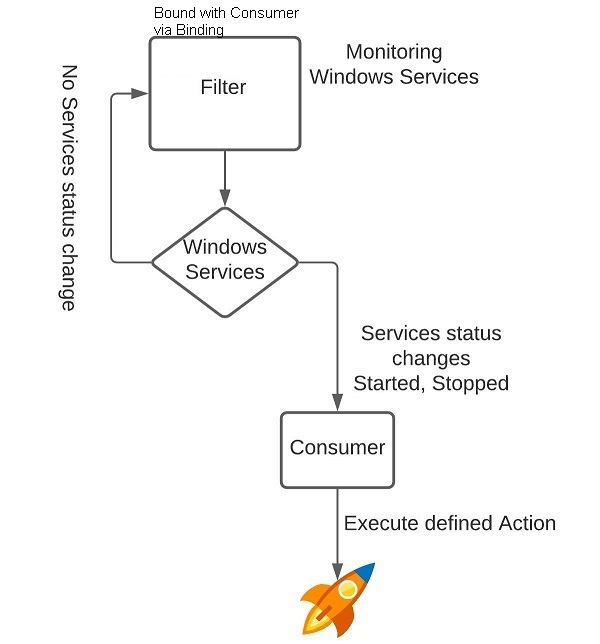
Creating a WMI event subscription requires four rough steps:
- Crafting the WQL query – Just like when querying static data, you must create a WQL query that will match the type of WMI event you’d like to see. But, unlike querying the datastore, you must employ a few more complicated components in the query, like system classes and checking cycles (more on those later).
- Creating the event filter – Once you’ve created the WQL query, you must create the event filter. The event filter registers the WQL query in CIM.
- Creating the consumer – The consumer defines the action to take when the event filter query returns a change in the class. For example, whenever a service status is started, stopped, created, or removed, the consumer triggers an action.
- Binding the event filter to the consumer – The glue that links the Windows WMI query with the consumer. The binding is what notifies the consumer when the event filter has received a match.
When you put each of these items together, you create a subscription.
Crafting the WQL Query
A WQL query for a WMI event looks a bit different than performing a simple query with Get-CimInstance. Below you’ll find a typical WMI event query.
Select * from <system class> within <checking cycle> where TargetInstance ISA '<class name>'Since the WQL query may look daunting at first, let’s break it down and understand how each component works.
The System Class
In the Get-CimInstance example, you had discovered that you’d like to be notified when a change to an instance in the Win32_Service class was made. You still need this class, but instead of a WQL query that looks like this:
Select * from Win32_ServiceInstead, the query will start like below. The main class you’re querying isn’t the class that contains the instance you’d like to be notified on. Instead, the class is a system class.
Select * from <system class>System classes are an internal class that represents the type of change the event incurs. A WMI event has four types of system classes:
- InstanceModificationEvent – Checks for any property value changes on an instance in a class. This class is what you’ll be using because you’d like to monitor a property value
Statuson an instance (service) of theWin32_Serviceclass. - InstanceCreationEvent – Checks for any new instances. If, for example, you’d like to monitor for any new services created, you’d use this system class.
- InstanceDeletionEvent – Checks for any removed instances. If, for example, you’d like to monitor services removed, you’d use this system class.
- InstanceOperationEvent – This system class checks for all event types, modification, creation, and deletion.
For our monitoring script, the beginning of the WQL query will look like the following:
Select * from __InstanceModificationEventWMI system class names always start with two underscores (__) followed by the name of the class.
The Checking Cycle
Next, you have the checking cycle. The checking cycle includes the keyword within and a value representing a polling interval represented in seconds.
within <checking cycle>WMI events are not real-time, so you must define a certain interval for your subscription to check for changes. If, for example, you set the checking cycle to 10, the subscription will check for a change from the last polling cycle every 10 seconds. If a change is found, it triggers the consumer.
If an instance is changed, created or removed depending on the system class within the polling interval the change won’t be detected! Consider the frequency you need but make sure it’s CPU and memory friendly!
For the tutorial’s service monitoring example, let’s set the checking cycle to 10 to poll WMI every 10 seconds for a change in a Windows service. The WQL query is growing!
Select * from __InstanceModificationEvent within 10The Filter
Finally, to complete the WQL query, you must define a filter to limit the instances returned from the system class. You must define that filter in the form below. In this case, the CIM class you’d like to monitor is called the TargetInstance.
where Targetinstance ISA '<class name>'
ISAis an operator that applies a query to the subclasses of a specified class.
Since the tutorial is building a subscription to monitor Windows services, you’d create the filter like below:
where Targetinstance ISA 'Win32_Service'As is, the filter looks for all instances of Win32_Service. If you’d like only to monitor a single property, perhaps a specific service, you’d use the AND operator.
where Targetinstance ISA 'win32_Service' AND Targetinstance.name='bits'The AND or OR operators add other conditions to get more accurate results.
The tutorial filter (and the entire query) is now complete as the code snippet below.
Select * from __InstanceModificationEvent within 10 where Targetinstance ISA 'win32_Service' AND Targetinstance.name='bits'Creating the Event Filter
Now that you have the query filter, the rest of the process is much easier to understand! You must now create the event filter to use that query. An event filter is actually another CIM instance that’s part of the __EventFilter class inside of the Root/subscription namespace.
Below you can see a code snippet with everything you need. The below script assigns the WQL query to the $FilterQuery variable. It then creates a hashtable containing each of the required properties and values the event filter needs. It then runs the New-CimInstance cmdlet to create the event filter finally.
The resulting CIM instance object is then stored in a variable ($CIMFilterInstance) for later use.
$FilterQuery="Select * from __InstanceModificationEvent within 10 where TargetInstance ISA 'Win32_Service'"
$CIMEventFilterProperties = @{
	## The name of the event filter. This can be anything related.
	Name="MyServiceFilter"
	## The namespace for the targetted class, for example, the targetted class for
	## **Win32_Service** is Root/CIMv2
	EventNameSpace="Root/CIMV2"
	## The query language, usually **WQL**.
	QueryLanguage="WQL"
	## The query to use.
	Query=$FilterQuery
}

$CIMFilterInstance=New-CimInstance -ClassName __EventFilter -Namespace "Root/SubScription" -Property $CIMEventFilterProperties
Now, run Get-CimInstance to verify the new CIM instance of __EventFilter has been created.
Get-CimInstance -Namespace root/subscription -ClassName __EventFilter
Creating the Consumer
Next, it’s time to create the consumer or the action that will happen when Windows triggers the WMI event. When creating the consumer, you have a few options depending on the type of action you’d like to trigger.
- ActiveScriptEventConsumer – Executes a script in an arbitrary scripting language such as VBscript.
- CommandLineEventConsumer – Starts a process
Ensure that the executable’s ACL is defined correctly to prevent someone replacing the EXE with a malicious binary.
- LogFileEventConsumer – Creates a text log.
- NTEventLogEventConsumer – Writes an event to Windows event log.
- SMTPEventConsumer – Sends an email.
For this tutorial, let’s use the LogFileEventConsumer consumer type to write to a log file when the service matched in the WQL query is changed.
$CIMCOnsumerProperties = @{
	## The name that the script will register in the **Root/Subscription** namespace
	Name="MyServiceConsumer"
	## The file path and name which the log writes to when the event is triggered.
	FileName="C:\\MyCIMMonitoring.txt"
	## The text to write in the log. You can add a variable by using the
	## %TargetInstance.WMIProperty%. In this example, the **Caption** and the **State
	##** are used.
	Text = "The Service %TargetInstance.Caption% has been Changed: %TargetInstance.State%"
}
$CIMEventConsumer=New-CimInstance -ClassName LogFileEventConsumer -Namespace 'ROOT/subscription' -Property $CIMCOnsumerProperties

## Examples of other consumers
######################
## NTEventLogEventConsumer
######################
## $Template = @(
##	'The Service %TargetInstance.Caption% has been Changed: %TargetInstance.State%'
##)
##$CIMCOnsumerProperties=@{
## ## Name of the Consumer
##	Name="MyEventLogConsumer"
## ## The Event ID to use
##	EventID =[UInt32] 7040
##  EventType can hold one of the following values
##    ## - **0**: Successful Event
##    ## - **1**: Error Event
##    ## - **2**: Warning Event
##    ## - **4**: Information Event
##    ## - **8**: Success Audit Event
##    ## - **16**: Failure Audit Event
##  EventType=[UInt32] 1 #Information
## ## The name of the Event Source.
##  SourceName="Service Control Manager"
##  Category=[UInt16] 0
##  ## The number of line of the **InsertionStringTemplates**
##  NumberOfInsertionStrings =[UInt32] $Template.Length
##  ## The message text to show in the Windows EventLog record.
##  InsertionStringTemplates = $Template
##}
## $CIMEventConsumer=New-CimInstance -ClassName NTEventLogEventConsumer -Namespace 'ROOT/subscription' -Property $CIMCOnsumerProperties

######################
## CommandLineEventConsumer
######################
## $CIMCOnsumerProperties=@{
##  ## A unique name for the consumer.
##	Name="MyStartAppConsumer"
##  ## The path and the parameter for the application intended to start when the event is triggered.
##	CommandLineTemplate ='pwsh.exe c:\\myscript.ps1 -ServiceName %TargetInstance.name% -NewState %TargetInstance.State%'
##  ## (Optional) Terminate the application after a set number of seconds. This is helpful to protect your server resources.
##  ## KillTimeout = 5
##}
##$CIMEventConsumer=New-CimInstance -ClassName CommandLineEventConsumer  -Namespace 'ROOT/subscription' -Property $CIMCOnsumerProperties

######################
## SMTPEventConsumer
######################
## The Email message body
## $Message= 'The File Server changed %Targetinstance.Name% , %TargetInstance.Status%'

## $CIMCOnsumerProperties=@{
##	Name="MyService-EmailConsumer"
##	## The email address of the sender.
##	FromLine ='[email protected]'
##	## the recipient’s email address.
##	ToLine = '[email protected]'
##	## SMTP Server to relay the message to.
##	SMTPServer = 'MySMTPServer.MyDomain.Com'
##	## The message subject
##	Subject = 'File Server Changed…'
##	Message= $Message
##}
##$CIMEventConsumer=New-CimInstance -ClassName SMTPEventConsumer   -Namespace 'ROOT/subscription' -Property $CIMCOnsumerProperties
Each consumer class has its own parameters, so check the
CimClassPropertiesfor more details about each class e.g.(Get-CimClass -ClassName __NTEventLogEventConsumer).CimClassProperties.
Once you’ve created the consumer, again, check for it’s existence with Get-Ciminstance.
Get-CimInstance -Namespace Root/Subscription -ClassName LogFileEventConsumer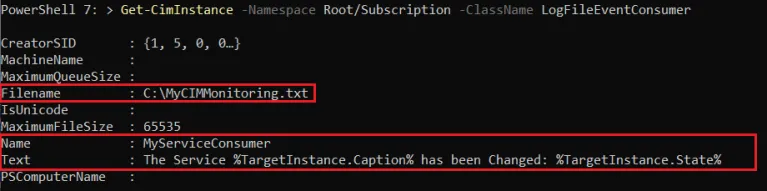
Binding the Event Filter and Consumer Together
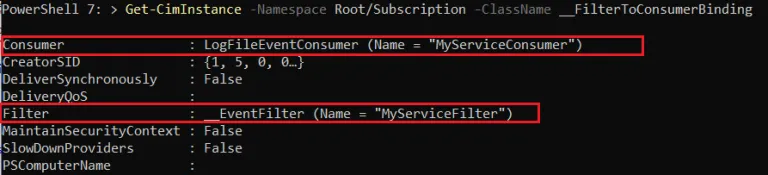
Finally, it’s time to complete this subscription and bind the event filter and consumer together! As you might have guessed, creating the binding means creating one more CIM instance. This time you must create a new instance in the __FilterToConsumerBinding class.
The below code snippet is using the two instances created earlier (the filter and the consumer) as a hashtable which defines the properties necessary to create a new instance. It’s then passed to New-CimInstance as before to create the binding.
$CIMBindingProperties=@{
	Filter = [Ref]$CIMFilterInstance
	Consumer = [Ref]$CIMEventConsumer
}

$CIMBinding = New-CimInstance -ClassName __FilterToConsumerBinding -Namespace "root/subscription" -Property $CIMBindingProperties
As always, confirm the binding has been created by running Get-CimInstance again.
Get-CimInstance -Namespace Root/Subscription -ClassName __FilterToConsumerBindingAs you can see, the binding has information about both the Filter and the Consumer.
Testing the Subscription
You are finally done! It’s time to test out the fruits of your labor! The only thing you need to do now is change the BITS service status to see if PowerShell writes an entry to the log file at C:\MyCIMMonitoring.txt.
Depending on the status of the BITS service, either stop or start it or just restart it with the Restart-Service cmdlet.
Get-Service -Name BITS | Restart-ServiceWait for about 10 seconds and check the C:\MyCIMMonitoring.txt. You should now see the Text in the log file you defined when creating the consumer.
Get-Content -Path C:\MyCIMMonitoring.txt
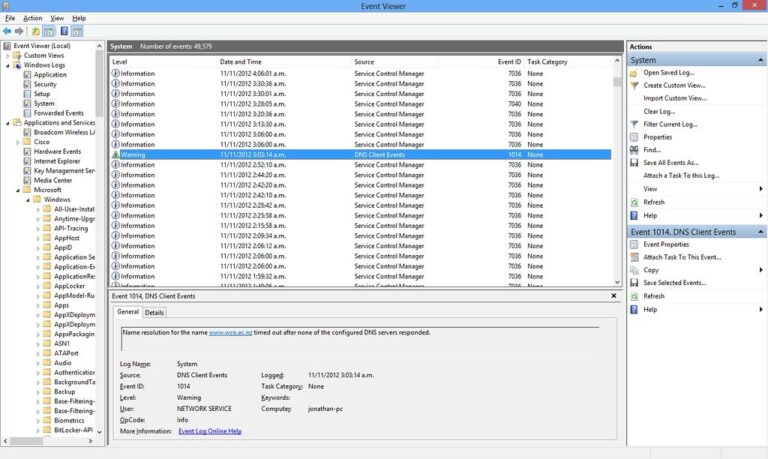
To monitor all WMI event activity, check out the Windows event log at the path Applications and Services Log\Microsoft\Windows\WMI-Activity\Operational.
Stopping and Cleaning Up the Subscription
Once you’re done with the subscription, it’s time to clean it up. To stop and remove the WMI event subscription, you must remove the event filter, consumer, and binding instances.
Remove the event filter by first finding the instance with Get-CimInstance.
Get-CimInstance -Namespace Root/Subscription -ClassName __EventFilter | Remove-CimInstance

## For more than one instance
Get-CimInstance -Namespace Root/Subscription -ClassName __EventFilter | where {$.name -like "MyServiceFilter"} | Remove-CimInstance
Next, remove the consumer the same way.
Get-CimInstance -Namespace Root/Subscription -ClassName LogFileEventConsumer | Remove-CimInstance

## For more than one instance
Get-CimInstance -Namespace Root/Subscription -ClassName LogFileEventConsumer | where {$_.Name -like "MyServiceConsumer"} | Remove-CimInstance

Finally, remove the binding. The property to find the binding is a bit different. Instead of the Name property, the binding instance has a Filter property which is actually an object with a Name property.
Get-CimInstance -Namespace Root/Subscription -ClassName __FilterToConsumerBinding | Where-Object {$_.Filter.Name -like "MyServiceFilter"} | Remove-CimInstance
Conclusion
WMI/CIM is a handy and powerful system for finding information about Windows and monitoring it with WMI events. Monitoring changes with WMI events gives you great visibility and a faster reaction to possible issues, making it easier to automate a response for each event.
For a great real-world example, check out How to Track Active Directory Changes with WMI Events.


