
Have you ever found yourself in that familiar dance with your computer, tapping in your password every time it boots up? Wondering if there’s a way to skip the password waltz and make your Windows experience a tad more hassle-free? Yes, there is, with the magic of Windows Auto Login.
In this tutorial, you’ll learn to enable Windows Auto Login, a convenient feature to streamline your daily computer routine.
Read on and make those login screens seem like a thing of the past!
Prerequisites
Before enabling Windows Auto Login, ensure you fulfill the following requirements to follow along in this tutorial:
- A computer running Windows 7 or higher – This tutorial uses Windows 10 for demonstrations.
- Administrative access to make system changes.
Enabling Windows Auto Login via the Registry Editor
Setting up a Windows computer prompts you to create a user account with a password. This feature is meant to protect your personal data and prevent unauthorized access to your computer.
But if you are the sole user of your computer or have a secure environment, providing your password every time you start your computer may be unnecessary. Enabling Windows Auto Login can save you time and make the process more convenient.
To enable Windows Auto Login via the Registry Editor, follow these steps:
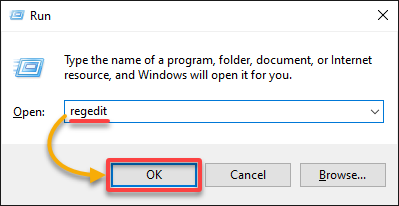
1. Open the Run dialog box (Win + R), input regedit, and press Enter (or click OK) to open the Registry Editor.
The Registry Editor provides a granular level of control over the Windows Registry. You can modify various settings, including auto-login, which makes Registry Editor a powerful tool for advanced users and system administrators.
💡 Important: Create a registry backup before making alterations in the Registry Editor. This backup will enable you to reinstate the registry in the event of any complications.
2. In the Registry Editor, navigate to the registry key path below by expanding the registry keys in the left pane or paste the path to the address bar at the top.
This registry key stores various settings related to the Windows logon process.
Computer\HKEY_LOCAL_MACHINE\SOFTWARE\Microsoft\Windows NT\CurrentVersion\Winlogon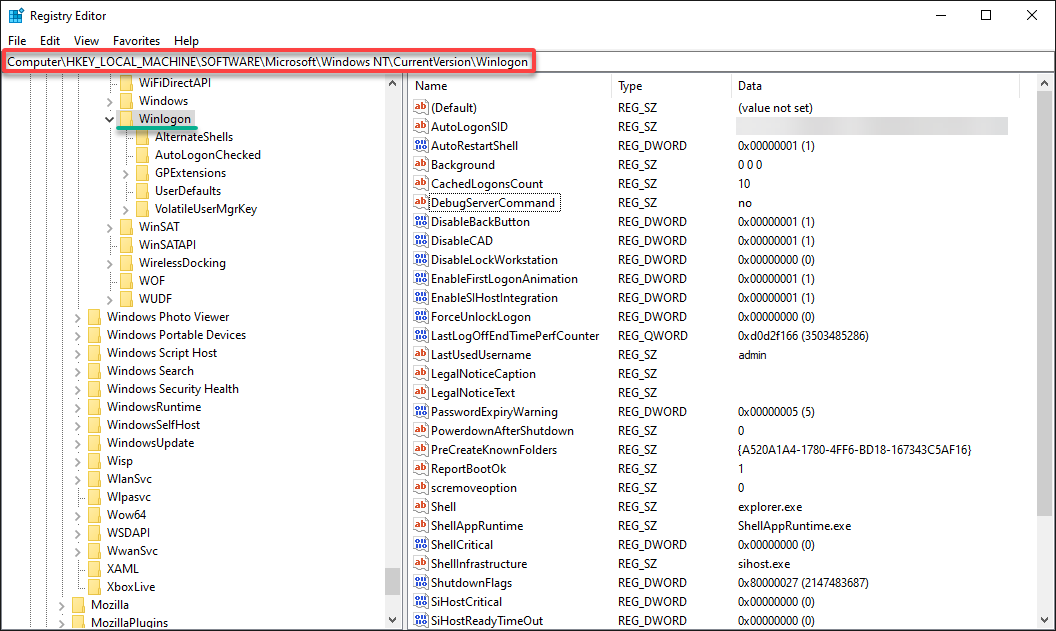
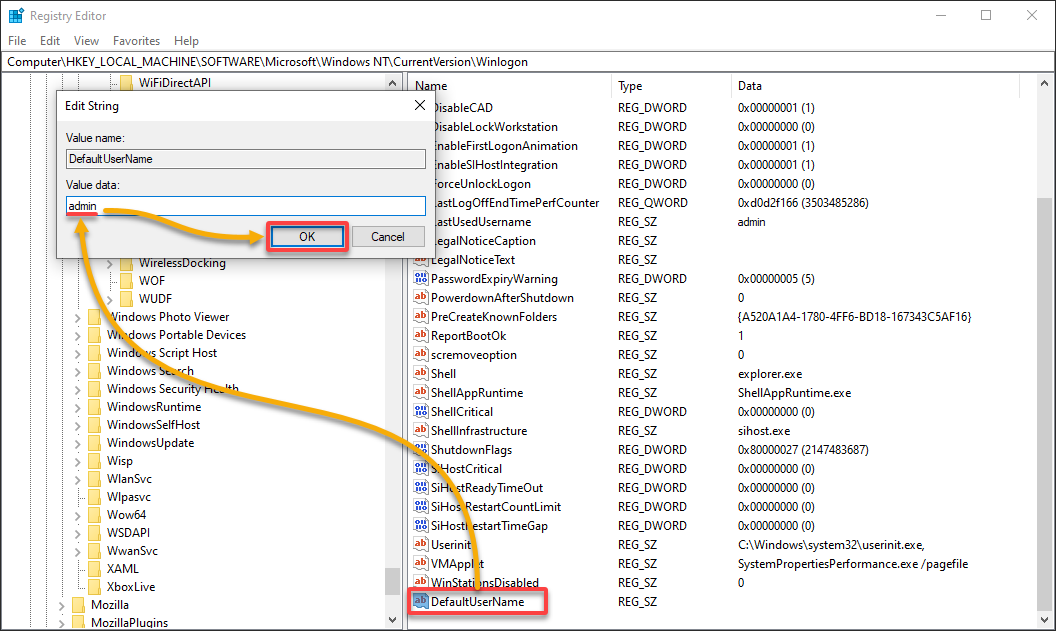
3. Right click on the Winlogon key (left-hand pane) → New → String value to add a new entry for the DefaultUserName.
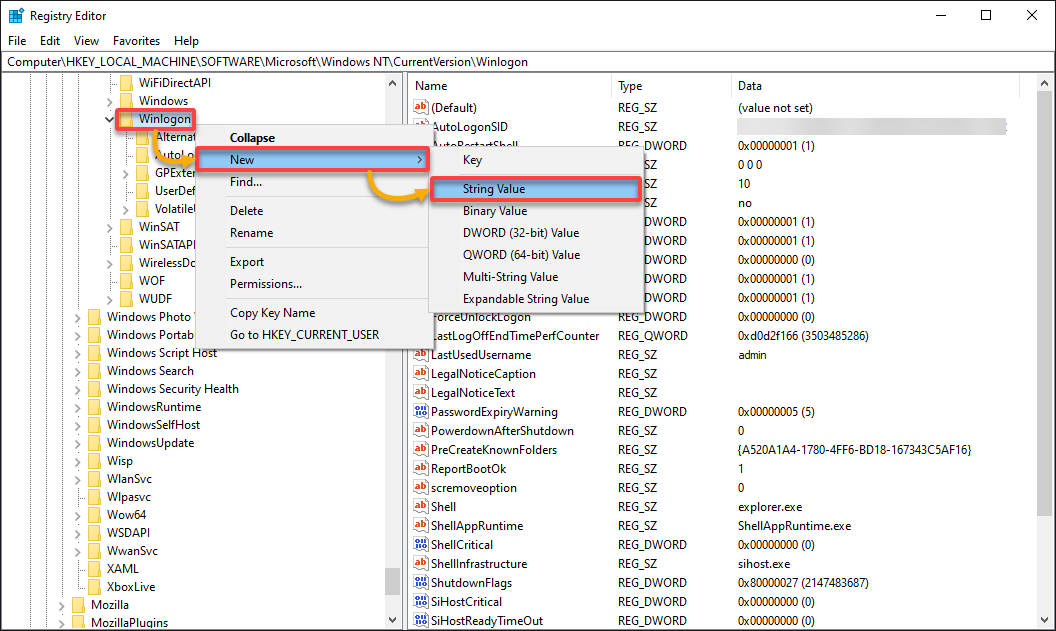
4. Now, configure the new entry with the following:
- Change the entry’s name (right-hand pane) to DefaultUserName. This entry informs Windows which user account to log in to by default.
- Double-click the entry to edit its properties.
- On the Edit String dialog box, provide your username in the Value data field, and press Enter (or click OK) to save the entry.
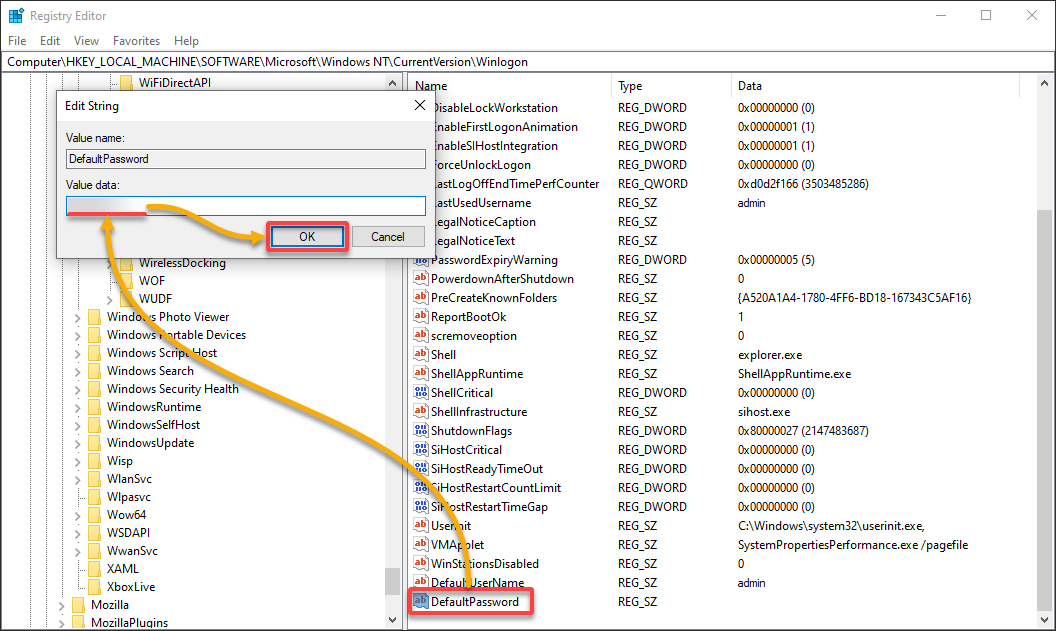
5. Create a new entry (String value) as you did in step three, but this time, name the entry DefaultPassword and provide your password.
Ensure there are no extra characters or trailing spaces in this field to avoid login errors, as this entry instructs Windows to enter this password during login automatically.
6. Next, create another entry (String value) named AutoAdminLogon, and set its value to 1 to enable automatic logon in on your Windows system.

7. Lastly, exit the Registry Editor, restart your computer to apply the changes, and wait for Windows to log in with the user account you specified automatically.
If everything works correctly, you’ll bypass the login screen on future starts.
💡 If you experience log-in issues, restart your computer once more and hold the Shift key while Windows starts up to override the automatic login behavior temporarily. This override takes redirects to the login screen, where you can select a different user account or enter a password manually.
Enforcing Netplwiz Tool to Enable Windows Auto Login
The Registry Editor is a powerful tool for making changes to your Windows system, but at the same time, it poses a significant risk of messing everything up. If you’re skeptical about using Registry Editor, another tool you can use to enable Windows Auto Login is the Netplwiz tool.
This tool is a built-in Windows utility that allows you to manage user accounts, including enabling Windows Auto Login. Netplwiz provides a graphical user interface (GUI) that is more user-friendly and easier to navigate for most users, especially those unfamiliar with the Registry Editor.
To enable Windows Auto Login via the Netplwiz tool, carry out the following:
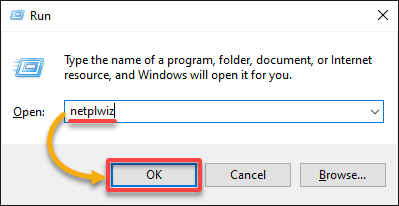
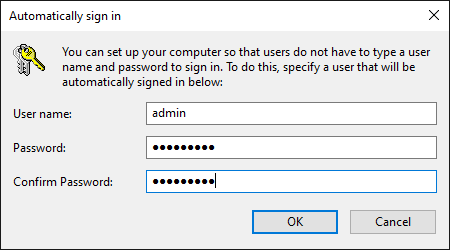
1. Open the Run dialog box (Win + R), input netplwiz, and press Enter (or click OK) to open the User Accounts window.
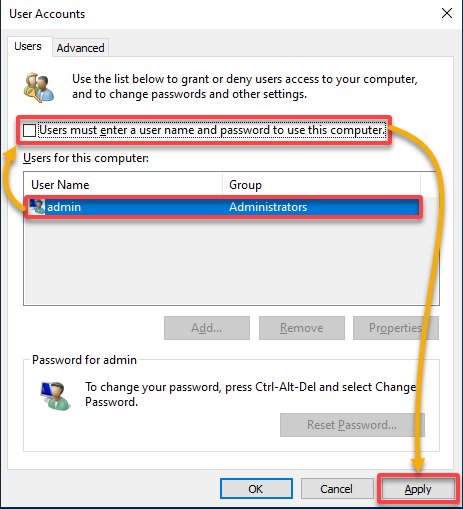
2. In the User Accounts window, enable Windows Auto Login with the following under the Users tab:
- Select the account you want Windows to log in with by default automatically.
- Untick the box that says Users must enter a user name and password to use this computer. Disabling this option tells Windows to log in with your selected account automatically.
💡 If the checkbox is missing in your version of Windows, jump to the following section to see how to fix it.
Once Windows Auto Login is enabled, click Apply to save the changes.
3. Provide the credentials of your selected default user, and click OK to confirm.
💡 If you’ve linked your Windows OS with your Microsoft account, you might need to enter the email address associated with your Microsoft account instead of your username.
4. Now, restart your computer to apply the changes and test if Windows automatically logs in as your default user.
Fixing the Missing Checkbox in the User Accounts Window
The Users must enter a user name and password to use this computer checkbox, often seen when configuring automatic login, is typically disabled by default for security reasons. Microsoft sets this as a default behavior to promote a more secure login process.
But when necessary, or if you know exactly what you’re doing, restoring this checkbox is possible with the help of the Registry Editor.
To restore the missing checkbox, complete the steps below:
1. Open the Registry Editor and navigate to this registry key below, related to passwordless authentication in Windows.
Computer\HKEY_LOCAL_MACHINE\SOFTWARE\Microsoft\Windows NT\CurrentVersion\PasswordLess\Device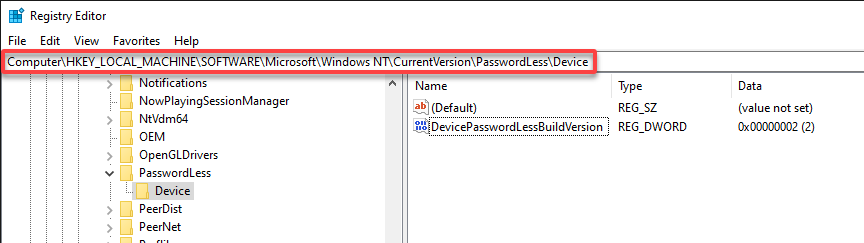
2. Restore the missing checkbox with the following:
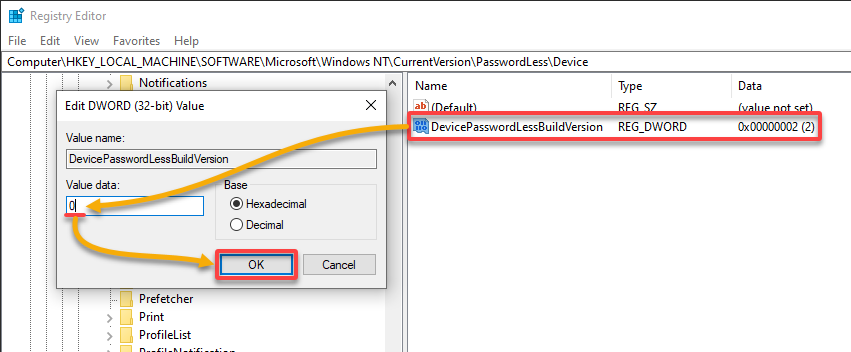
- Locate and double-click the DevicePasswordLessBuildVersion entry in the right-hand pane of the Registry Editor to edit its value. This entry controls the visibility of the “Users must enter a user name and password to use this computer” checkbox in the User Accounts window.
- Change the Value data to 0 in the Edit DWORD (32-bit) Value window, and click OK. Doing so instructs Windows to display the missing checkbox in the User Accounts window.
Alternatively, open PowerShell as administrator and run the following commands to modify the value of the DevicePasswordLessBuildVersion entry.
These commands have no output, but this approach lets you avoid accidentally clicking or modifying other keys or values in the Registry Editor.
$registryKeyPath = 'HKLM:\SOFTWARE\Microsoft\Windows NT\CurrentVersion\PasswordLess\Device'
$valueName = 'DevicePasswordLessBuildVersion'
Set-ItemProperty -Path $registryKeyPath -Name $valueName -Value 03. Close the Registry Editor and reboot your system, which also applies the changes.
4. Finally, reopen the User Accounts window and verify that the checkbox is visible.
Conclusion
There you have it—a journey through the ins and outs of enabling Windows Auto Login. In this tutorial, you’ve mastered the art of registry edits and harnessed the power of the Netplwiz tool. You even tackled the elusive missing checkbox in the User Accounts window.
Your computer is now set to welcome you with open arms whenever it powers up! Just remember to consider the security implications of having an automatic login.
Now, why not explore other valuable tips and tricks for Windows 10 to make your computing experience more efficient and enjoyable? From keyboard shortcuts to quick access settings, there are always new ways to improve your productivity and make the most out of your Windows device!


