


Has anyone ever asked to use your computer? Would you let them use your user account knowing that they can access everything? Good thing there’s a solution – use a Windows 10 guest account.
In this article, you’re going to learn all the ways to create a Windows 10 guest account. You’ll learn how to create restricted accounts with the GUI and PowerShell and you’ll even see how to convert accounts, let’s get started!
Prerequisites
Before going any further, below are some prerequisites. You’ll need these requirements to follow along with the examples in this article.
- You must use a Windows 10 computer. The examples in this article use Windows 10 Home.
- Windows PowerShell 5.1 – This version already ships with Windows 10. If you already have PowerShell 7 installed, you can use that, too.
Related: How to Check your PowerShell Version (All the Ways!)
- Local admin access to the Windows 10 computer.
When you’ve settled the requirements, then you’re ready to start making Windows 10 guest accounts.
Creating a Windows 10 User Account using the Windows System Settings
In previous Windows versions, you have the option to enable the built-in guest account. However, in Windows 10 version 1607, the built-in guest account is usable only in Shared PC mode, which is not available by default.
Don’t worry, though; there’s still a way to create a user account that simulates the Windows 10 guest account.
In this section, you’ll learn how to set up a new local guest user account on your Windows 10 PC with the least number of steps possible using the graphical user interface (GUI).
The two main steps to create a Windows 10 guest account are as follows:
- Create a new standard user account. Newly created accounts are standard accounts by default.
- Modify the new user’s group membership, effectively converting the standard user account to a guest account.
Read on to learn how to create a standard Windows account, underpinning the guest account.
Creating a New Standard Account
The following steps will walk you through creating a standard account in Windows, a precursor to creating a visitor account.
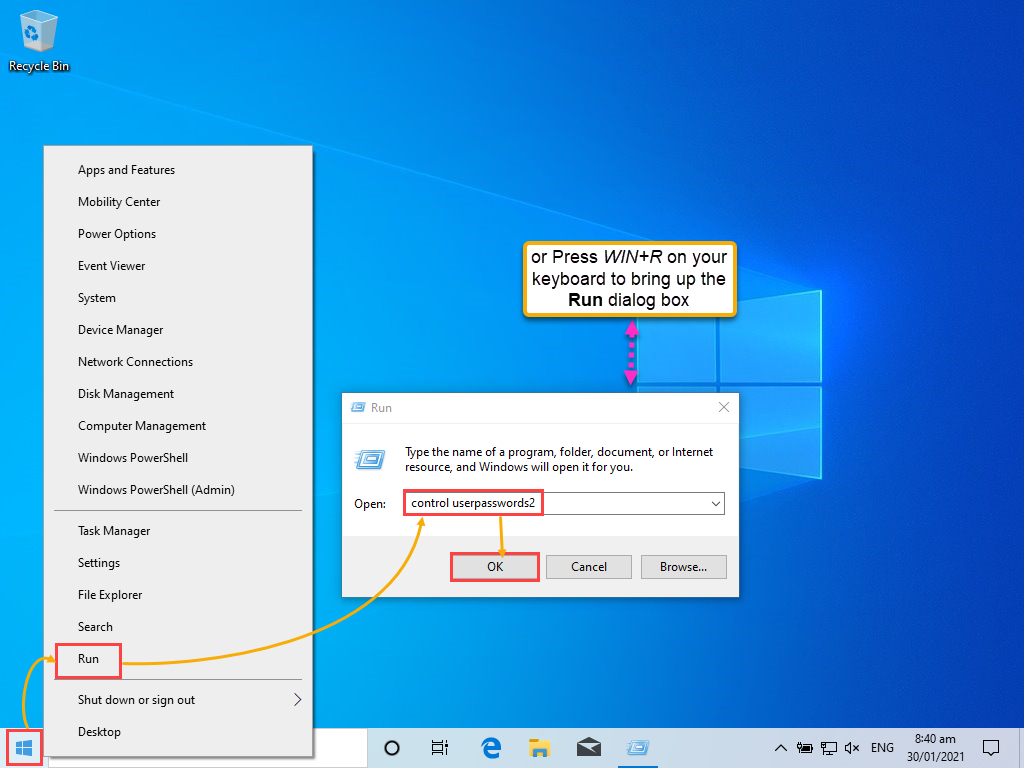
- First, on your Windows desktop, right-click on the Start menu, or press the
WIN+Xshortcut on your keyboard to bring up the context menu.
2. Click on Run to open the Run dialog.
3. Once the Run dialog appears, type control userpasswords2 inside the Open text entry section.
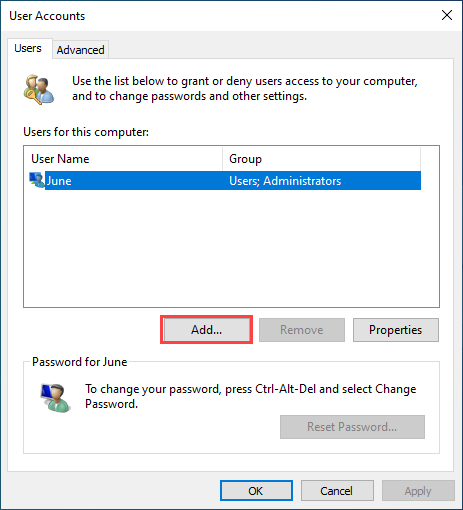
4. Click OK or press Enter to open the User Accounts window, where you will see a list of existing user accounts on your computer.
5. In the screenshot below, click Add to add a new user.
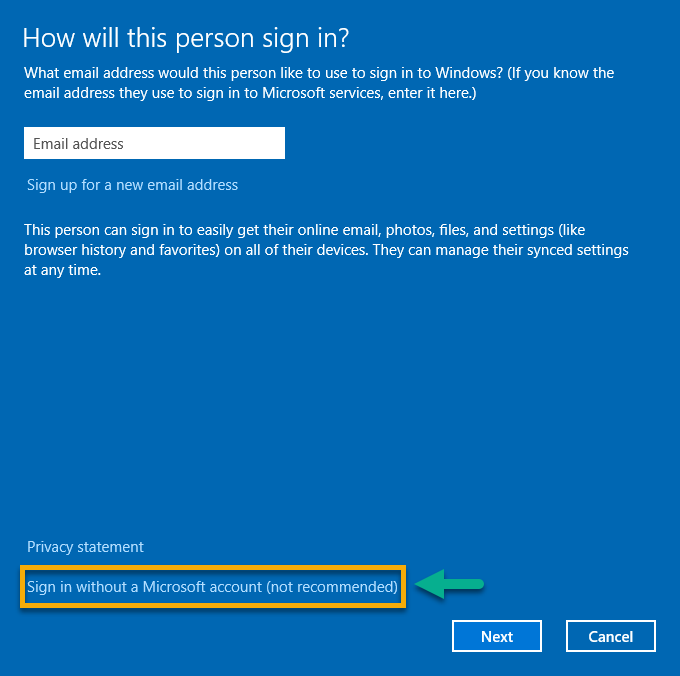
6. The next window asks, How will this person sign in?. Because your goal is to create a local user, you do not need to enter an email address. Instead, click on the Sign in without a Microsoft account link at the bottom of the window.
7. The differences between a Microsoft account and a local account are listed in the Add a user window. As you are creating a local user account, click on the Local account button.

8. In the User name box, type in the account name you want to create. Although this article uses the name Visitor, choose a descriptive name for your guest account. Adding a password is optional, but doing so will increase the guest accounts security. Click Next to finalize the account.

Click on the Finish button to exit the Add a user window.
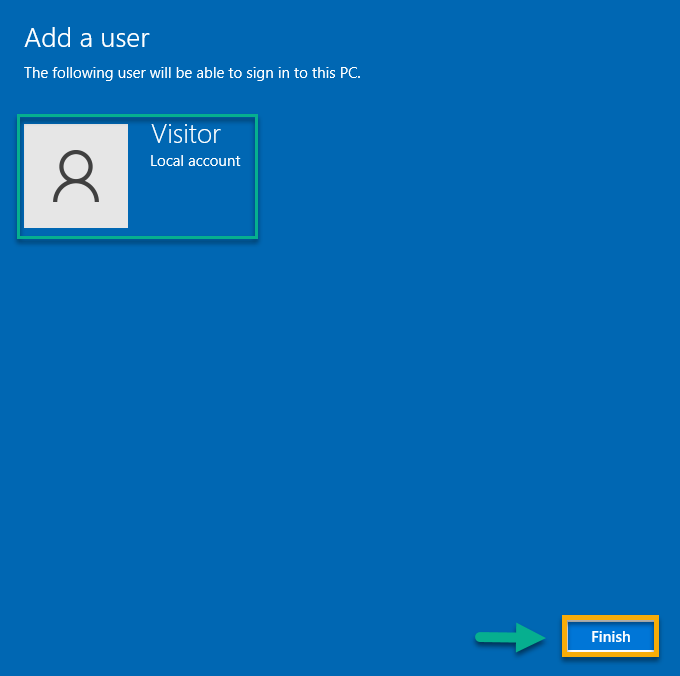
After creating the standard user account, you’ll be directed back to the User Accounts window. You’ll find that there is now an additional user listed, Visitor, as you can see in the screenshot below.
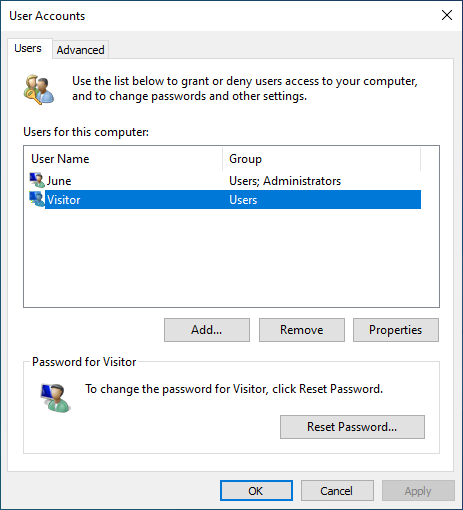
By default the Visitor account is a member of the Users group. As this account is a standard user, you’ll now need to convert the user account to a guest. Read on to learn how to convert a standard account into a guest account!
Converting the Standard User Account to a Guest User Account
Your newly created Visitor account is a Standard account. A standard account has many more permissions than a guest account. Let’s now convert a standard user account to a guest user account to remove these extra permissions. Assuming you’re still in the User Accounts window:
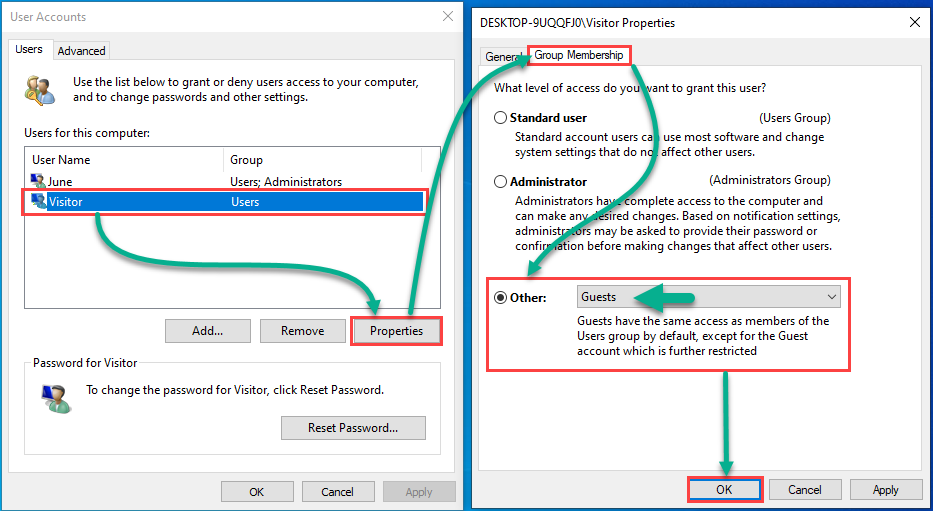
- First, click to highlight the Visitor account in the User Accounts window.
- Once selected, click on Properties.
- When the Visitor account properties window appears, click on the Group Membership tab.
- On the Group Membership tab, you’ll see several different account types. The Guest account type is not one of the displayed options. Click the radio button next to Other, click on the dropdown selection box, and choose the Guests option.
- Finally, click on the OK button to finalize your chosen user account membership.
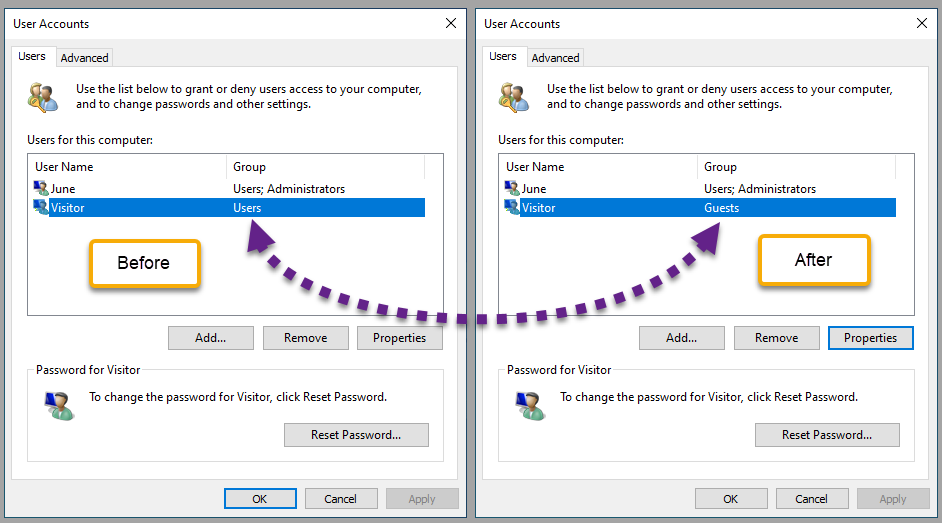
Great! You have successfully converted a standard user account to a guest user account type. As you can see in the image below, the group membership changed from Users to Guests.
What if you need to remove the guest account? Read on to learn how you can do so via the User Accounts window.
Removing the Guest Account using the GUI
Guest accounts are typically used temporarily. If you no longer need a guest account you can remove the account.
To delete the guest account, highlight the guest account from the User Accounts list and click on Remove, as shown in the screenshot below.
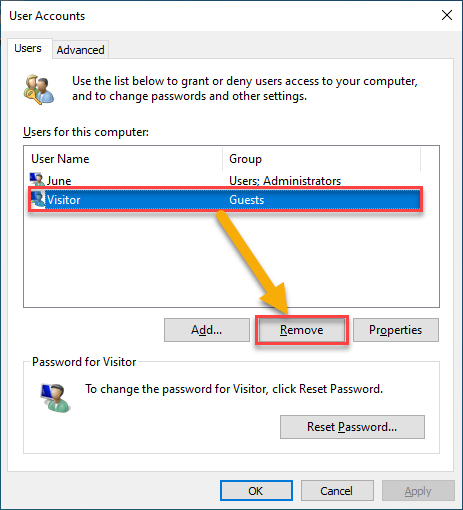
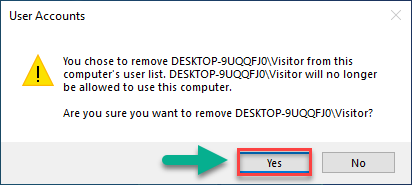
As you can see in the image below, you will receive a warning message confirming the removal operation. Click Yes to confirm removing the Windows 10 guest account.
As is often the case, there are many ways to create a user account in Windows, read on to learn how to do so using the command prompt.
Adding a Windows 10 Guest Account using the Command Prompt
Using the command prompt is a potentially faster method of creating guest accounts than using the GUI. In this example, you’ll use the command prompt to create a Windows 10 guest account.
- Create a local user named Visitor.
- Remove the Visitor account as a member of the Users group.
- Add the Visitor account as a member of the Guests group.
Creating a Guest Account using Only Three Lines of Commands
Originating in earlier versions of Windows, the net user commands allow adding, removing, and modifying user accounts on a computer via the command-line.
In this section, you’ll use the net user command to create a user account and then convert that user account into a guest user. To start creating a guest account, follow the below steps.
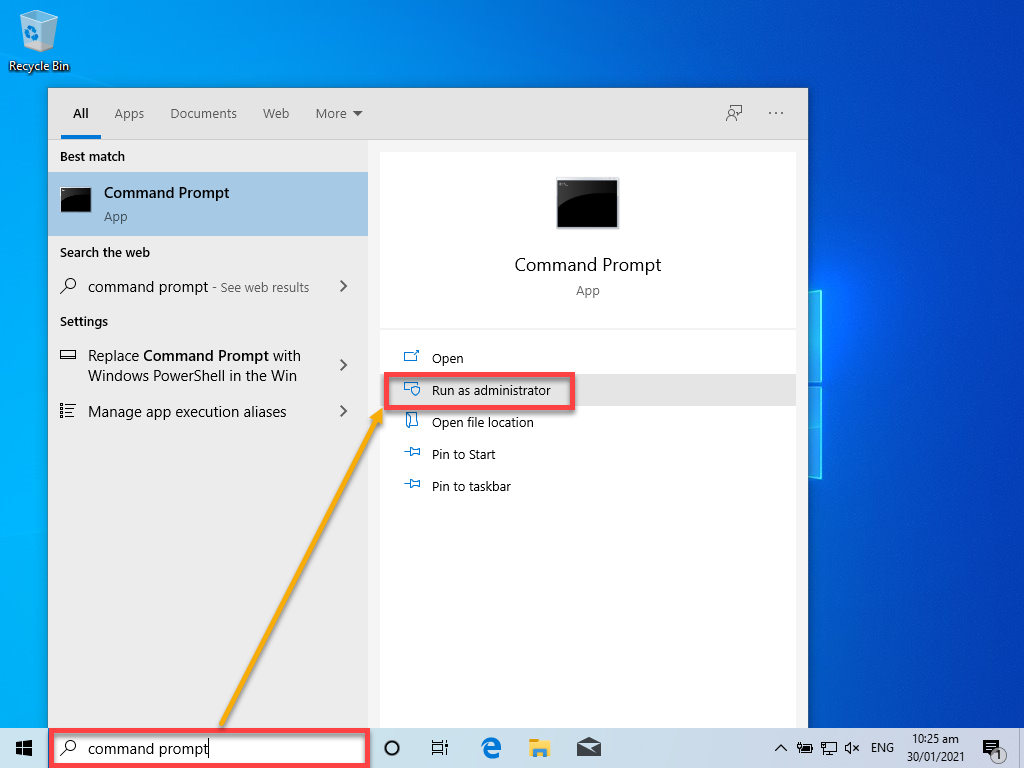
First, open an elevated command prompt by entering the text, Command Prompt, in the Windows search box. Once the Command Prompt application is shown in the search result, highlight the Command Prompt application, and click the Run as administrator option as shown below.
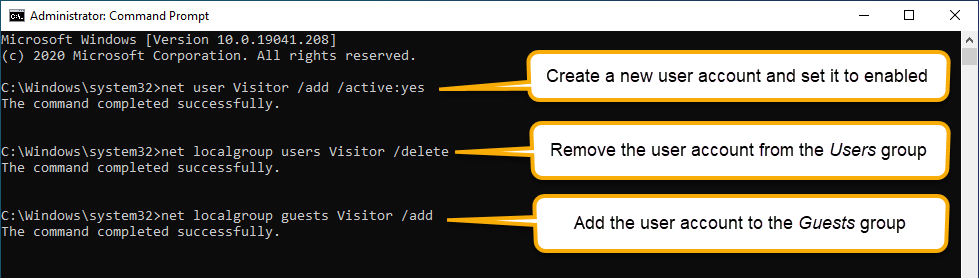
Next, it is easiest to copy and paste each command below into the opened command prompt window. The /active:yes parameter will also enable the account, which would otherwise be disabled by default.
net user Visitor /add /active:yes
net localgroup users Visitor /delete
net localgroup guests Visitor /add
Just like that, you’ve created a new Windows 10 guest account using the command prompt. Read on to learn how to remove a user account using the command prompt as well.
Removing the Guest Account using the Command Prompt
When you no longer need a guest account, you can delete the guest account in an elevated command prompt. To remove the guest account, use the command below, substituting Visitor for the user account to remove.
net user Visitor /delete
The deletion process will not prompt for a confirmation! You will only see a command completion message upon account removal.
Adding a Windows 10 Guest Account using PowerShell
In this section, you’ll learn an alternative to the net commands using the PowerShell cmdlets, New-LocalUser and Add-LocalGroupMember to provision a new guest account in a single line of code!
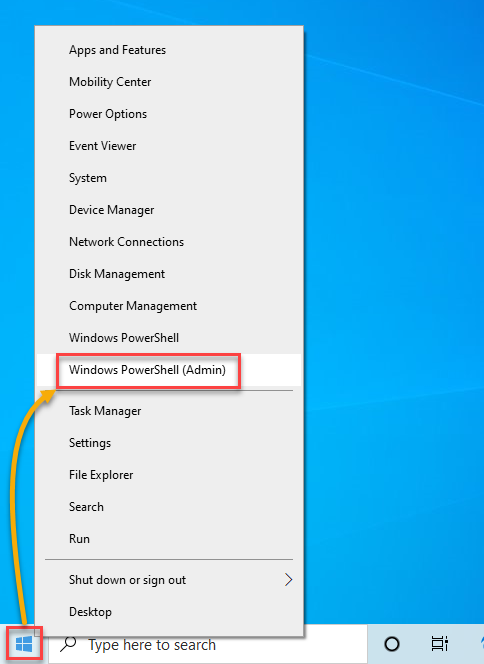
- To create a guest account open an elevated PowerShell session. To run PowerShell as an administrator, right-click on the Start menu and click on Windows PowerShell (Admin).
Related: How to Run PowerShell as Administrator
2. Next, the command below will create a new local user account named Visitor without a password via the NoPassword parameter. The resulting object is passed into the Add-LocalGroupMember cmdlet adding the account into the Guests group.
You will not receive a confirmation unless there was an error in the process. In this case, no news is good news.
Related: Back to Basics: Understanding PowerShell Objects
New-LocalUser -Name Visitor -NoPassword | Add-LocalGroupMember -Group Guests3. To confirm whether the command successfully created the Visitor account, use the Get-LocalGroupMember command below. The below command looks for a group member called Visitor in the Guests group.
Get-LocalGroupMember -Group Guests -Member VisitorThe screenshot below shows the actual output when running the commands in PowerShell. As you can see, the Get-LocalUser command returned the user named Visitor, which indicates that you’ve successfully created a new guest account.

Removing the Guest Account using PowerShell
As in the previous examples, when you need to remove a Windows 10 guest account, you can use PowerShell. To remove a user, use the Remove-LocalUser cmdlet in an elevated PowerShell session. To remove the guest account named Visitor, run the command below in PowerShell.
Remove-Localuser -Name Visitor
Be aware that you will not receive a confirmation prompt when running
Remove-LocalUser!
To verify that the Visitor account has been removed, run the Get-LocalUser command as shown below. The resulting error will indicate that the user account no longer exists.
Get-LocalUser -Name Visitor

Next Steps
Allowing guests to use your computer need not be risky with a Windows 10 guest account. In this article, you’ve learned how to use the GUI, the command prompt, and PowerShell to create a new Windows 10 guest user account.
To further apply what you’ve learned here, try to automate the Windows 10 guest account creation process. Create a PowerShell script that asks for the name of the new guest user!
Related: Read-Host: A Great Way to Get Input to your PowerShell Scripts


