


Badly need a centralized and comprehensive platform to manage your VMs? Look no further, as the VMware vCenter Server is here to solve the dilemma.
This platform allows you to control and monitor your virtualized infrastructure, such as VMs, hosts, storage, and networking, with ease and peace of mind. And in this tutorial, you will learn various key aspects of managing your VMs via the VMware vCenter Server.
Dive in and take complete control of your virtualized environment!
Prerequisites
Before you dive deeper, you will need the following to carry out the hands-on demonstrations:
- A machine running Windows OS – This tutorial uses Windows 10 pro v1H2, but other OSes also work.
- VMware ESXi host installed and connected to the VMware vCenter Server – This tutorial uses VMware ESXi 7.0.0 (Build 15843807).
- VMware vCenter Server installed – This tutorial uses VMware vCenter Server 8.0.0.10000 (Build 20519528).
- VMware vCenter Server credentials were created during the installation and deployment of the vCenter Server on the ESXi host.
Creating VMs in VMware vCenter Server
VMs are the critical component of a virtual infrastructure. In VMware vCenter Server, you create VMs and add them to the host inventory. When you create a VM, you associate it with a particular datastore and select an OS and virtual hardware options.
Every virtual machine has virtual devices that provide the same functions as physical hardware. A VM gets CPU and memory, access to storage, and network connectivity from the host it runs on.
To create VMs in VMware vCenter Server, follow the steps below:
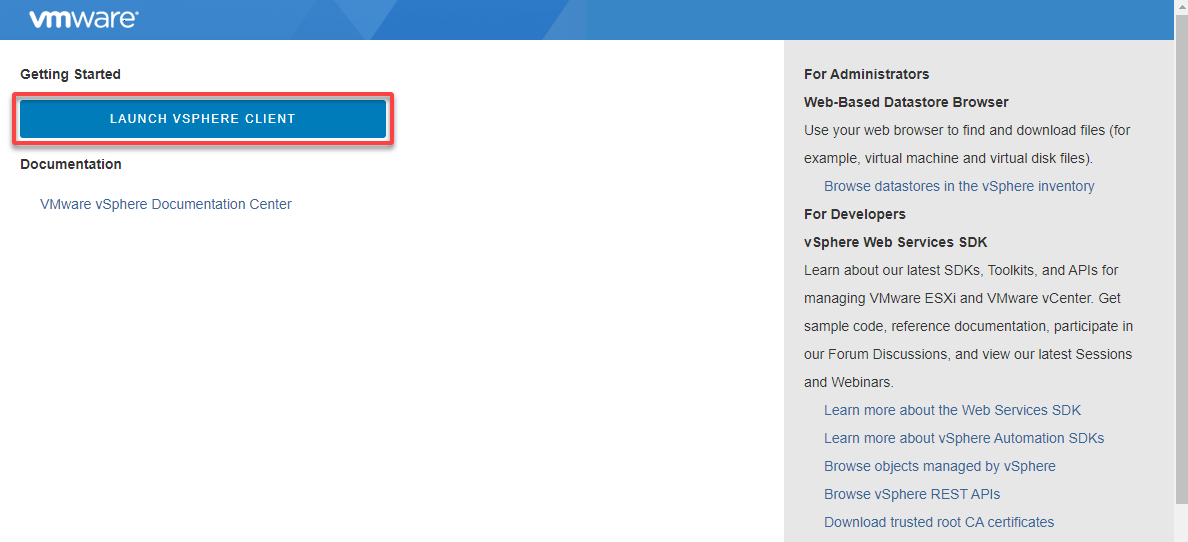
1. Open your favorite web browser, access the VMware vCenter Server IP address or hostname, and click Launch vSphere Client. Your browser redirects to the vSphere Client login page (step two).
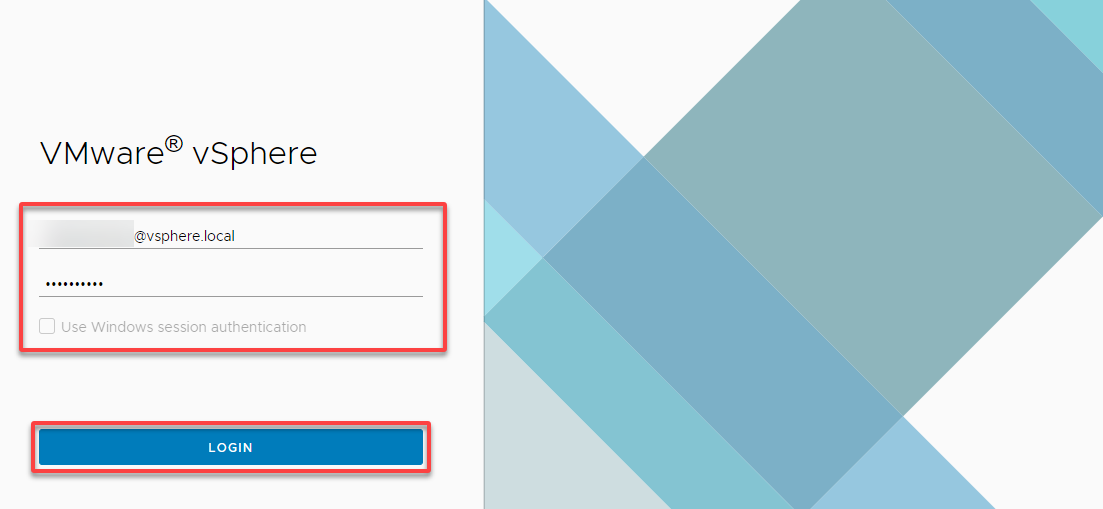
2. Next, log in to the vSphere Client with your username and password.
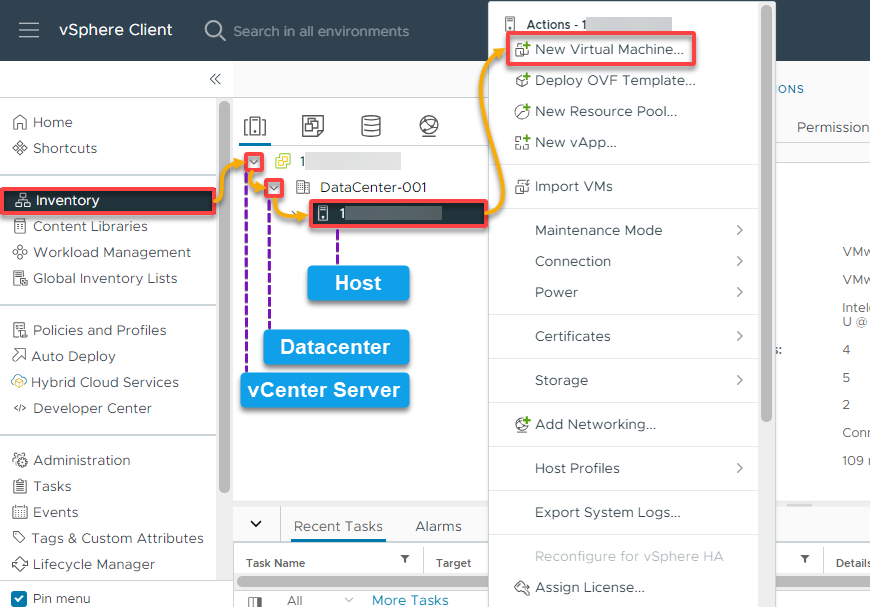
3. Once signed in, initiate a new VM configuration as follows:
- Navigate to Inventory (left pane), and expand your vCenter Server.
- Expand the datacenter (DataCenter-001) or cluster where you want to create your VM.
- Right click your host, and choose New Virtual Machine, which opens a wizard where you will configure your new VM.
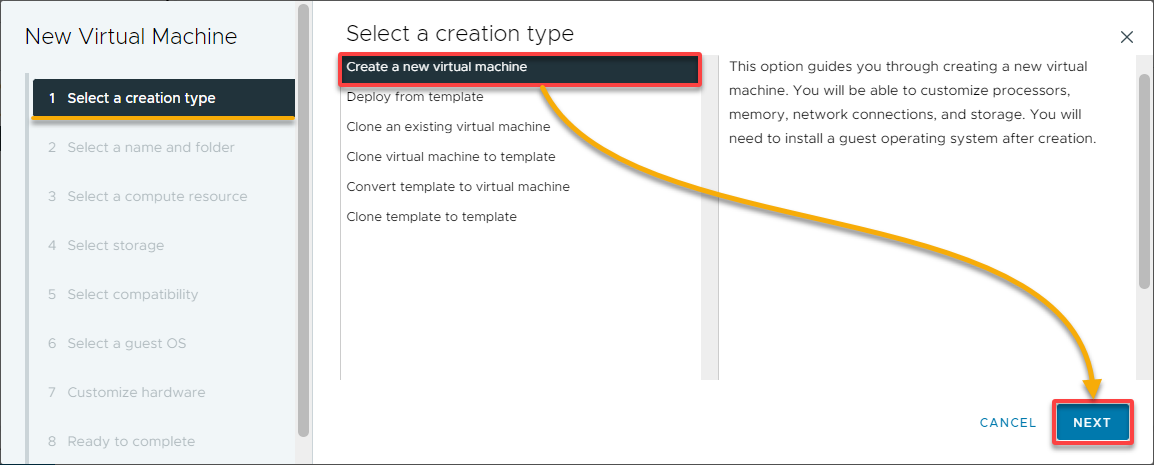
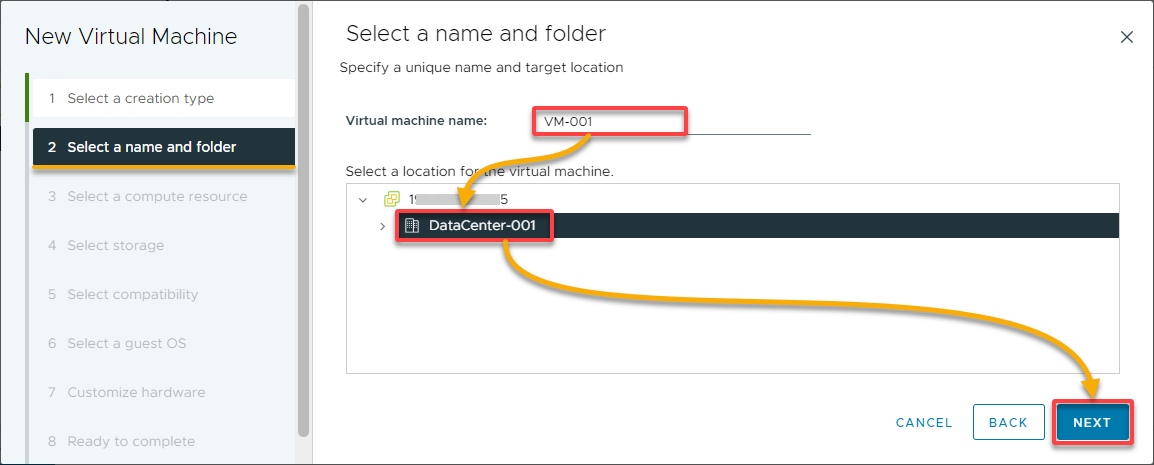
4. In the New Virtual Machine wizard, select the Create a new virtual machine option since you are creating a new VM from scratch, and click Next.
💡 Optionally, you can choose to deploy a VM from a template instead, which creates a VM that is a copy of the template. With this option, the new VM will have the virtual hardware, installed software, and other properties that are configured for the template.
5. Next, specify a descriptive VM name (i.e., VM-001) and location to place your VM (DataCenter-001).
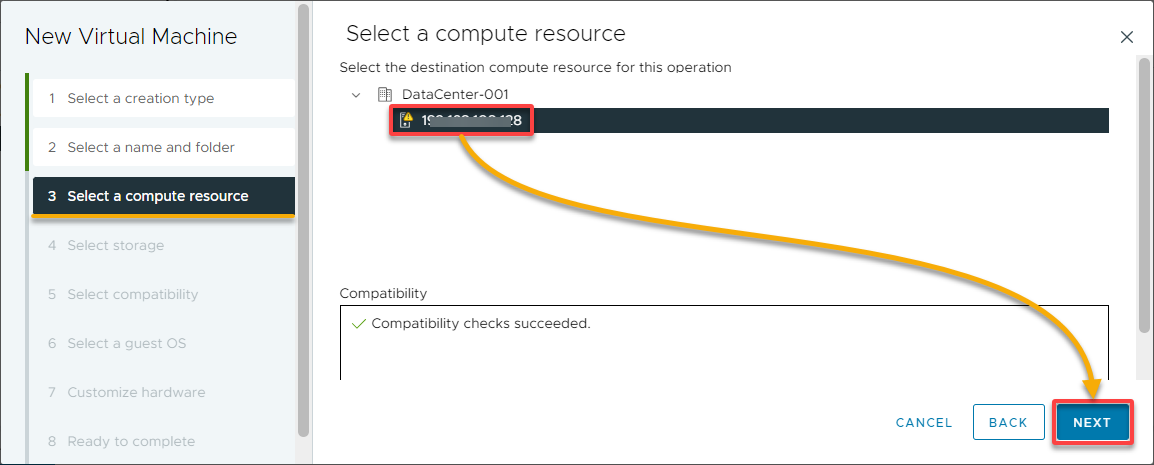
6. For the compute resource, select a host or cluster on which the VM will run.
You can let vCenter Server automatically select a suitable host or manually specify the host or cluster.
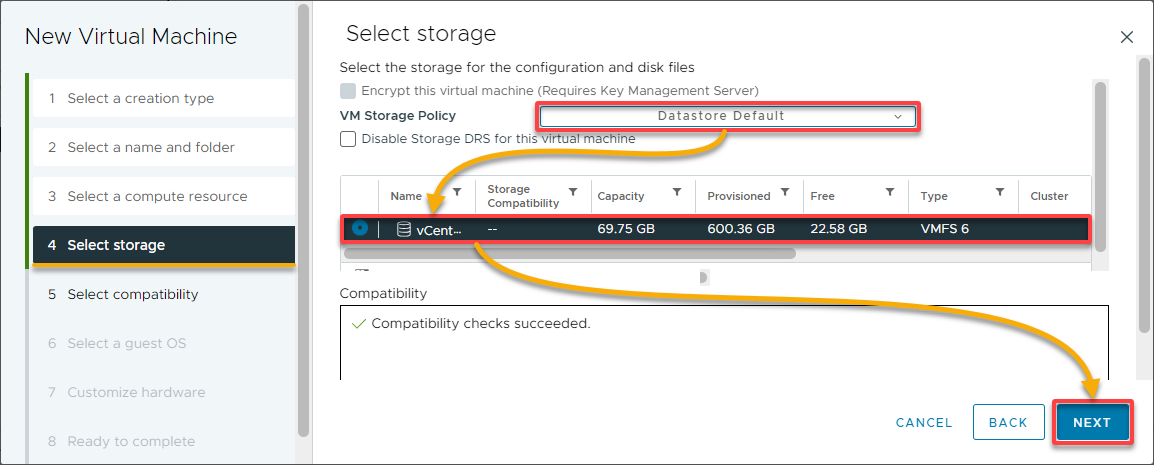
7. On the Select storage page, select the storage type for your VM and a datastore in the list to store the VM files, and click Next.
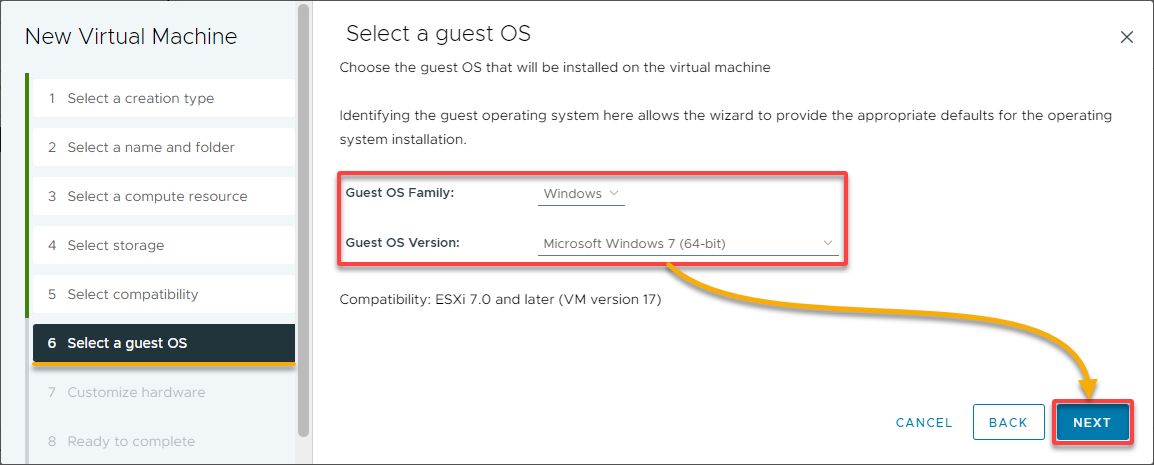
8. Select a guest OS (i.e., Windows) and version (i.e., Microsoft Windows 7 (64-bit)) that your VM will run. This selection helps optimize VM settings and guest customization options.
9. Specify the desired hardware settings for the VM, allocate resources based on your requirements and adjust settings as needed, and click Next.
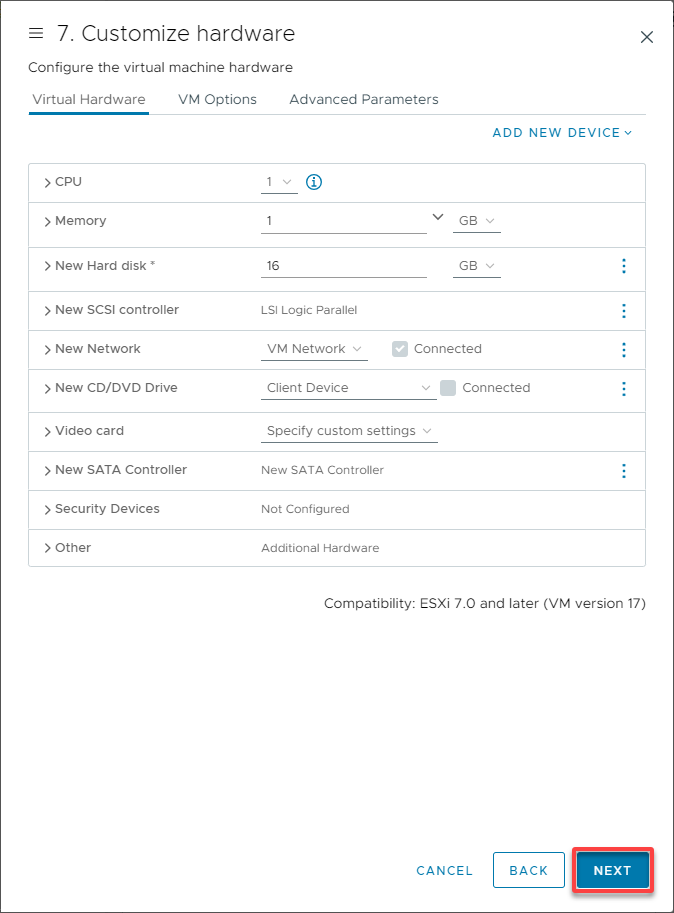
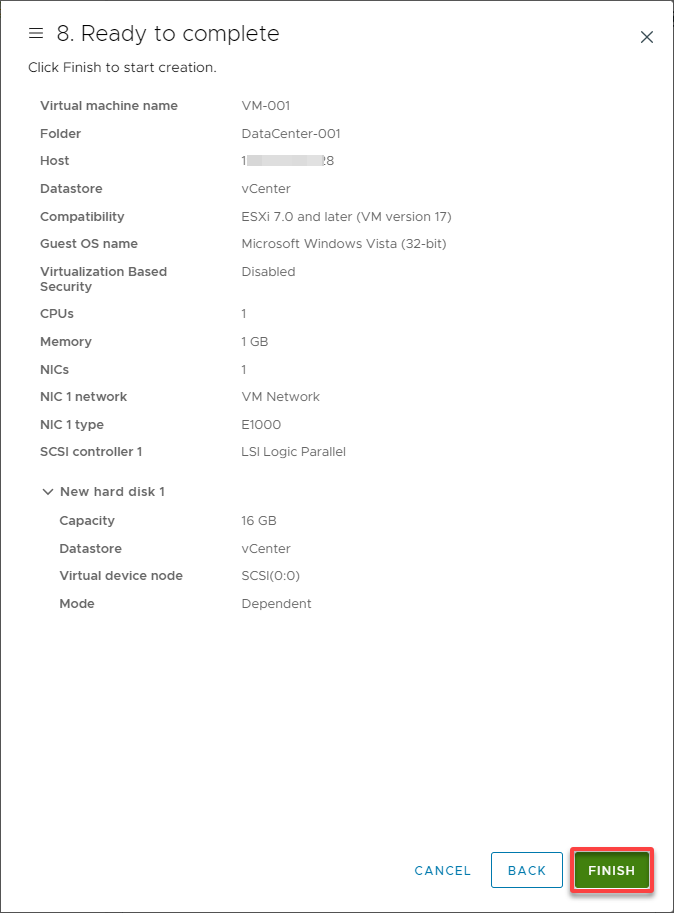
10. Lastly, review the configuration summary, and click Finish to create your new VM.
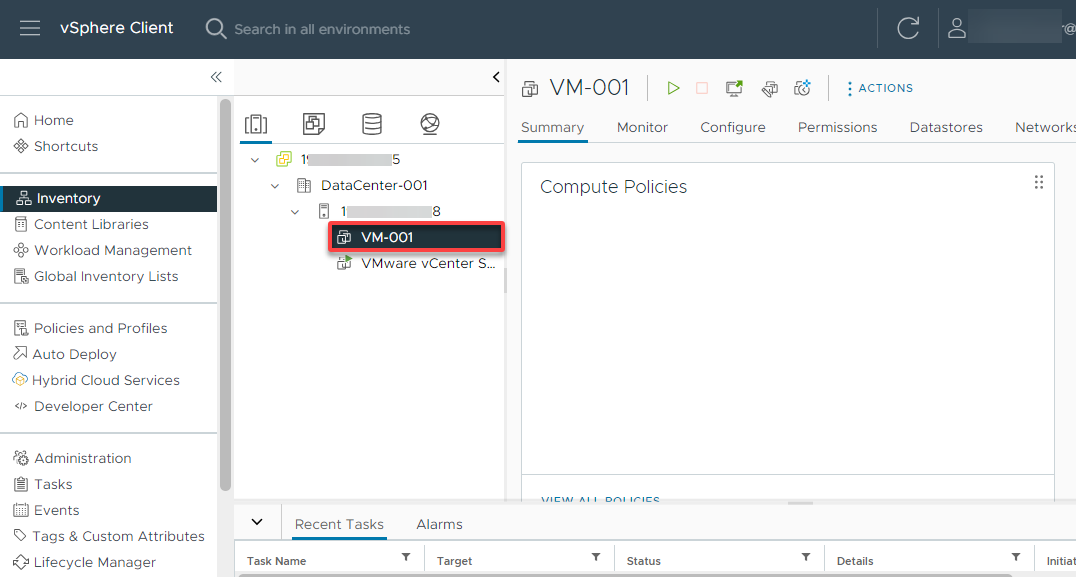
Once created, your VM appears in the list, as shown below.
Creating Resource Pools to Group VM and Allocate Resources
With your VM created, you must look into resource management and prioritization. Resource management involves allocating CPU, memory, storage, and network resources to VMs based on their requirements.
You will create a resource pool, which logically groups VMs and allocate resources to them collectively.
To create a resource pool, follow these steps:
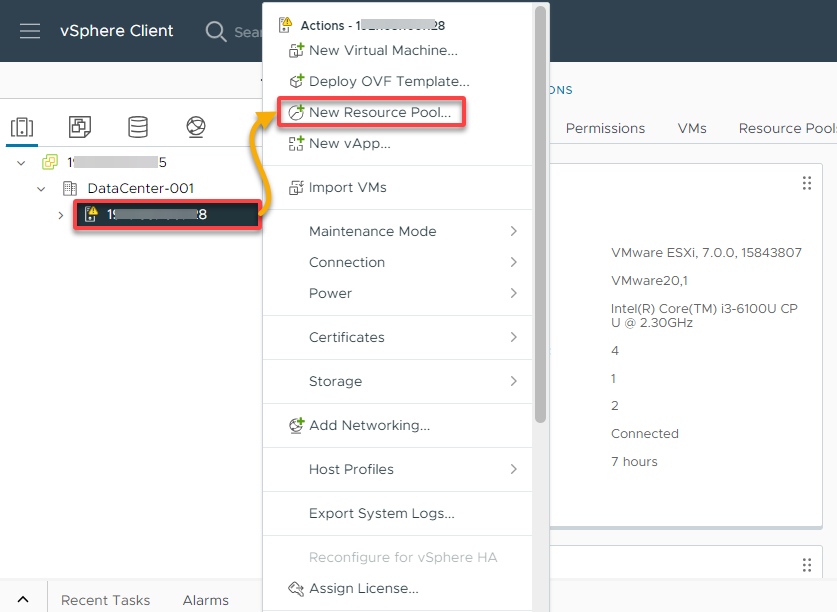
1. In the vCenter Server Inventory page, right-click your cluster or host where you wish to create the resource pool and select New Resource Pool.
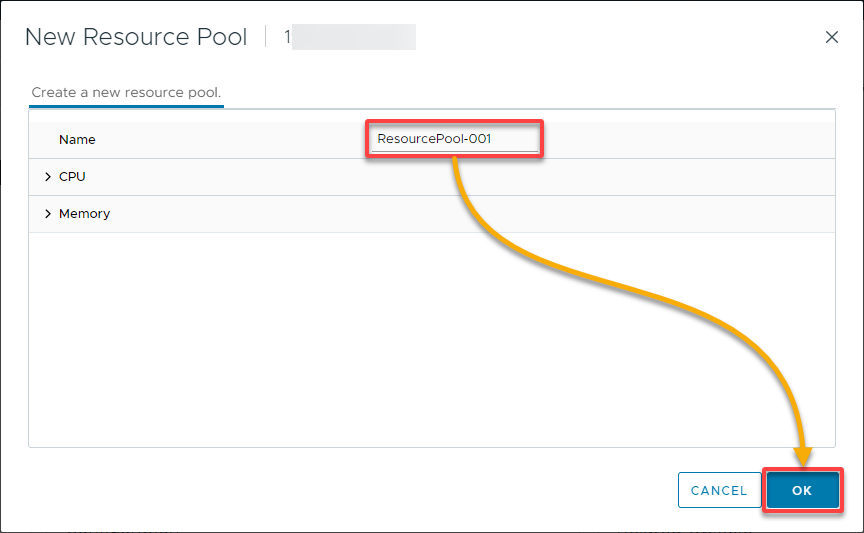
2. Next, provide a descriptive resource pool name, and click OK to confirm.
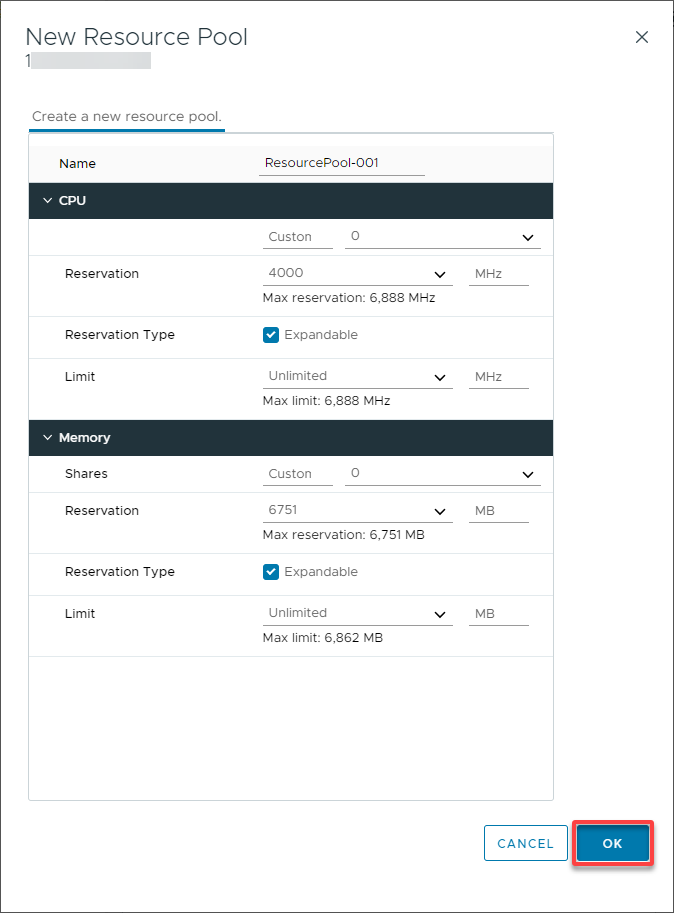
3. Configure the resource pool settings according to your requirements, and click OK to create the resource pool. These settings determine how resources are distributed among the VMs within the resource pool.
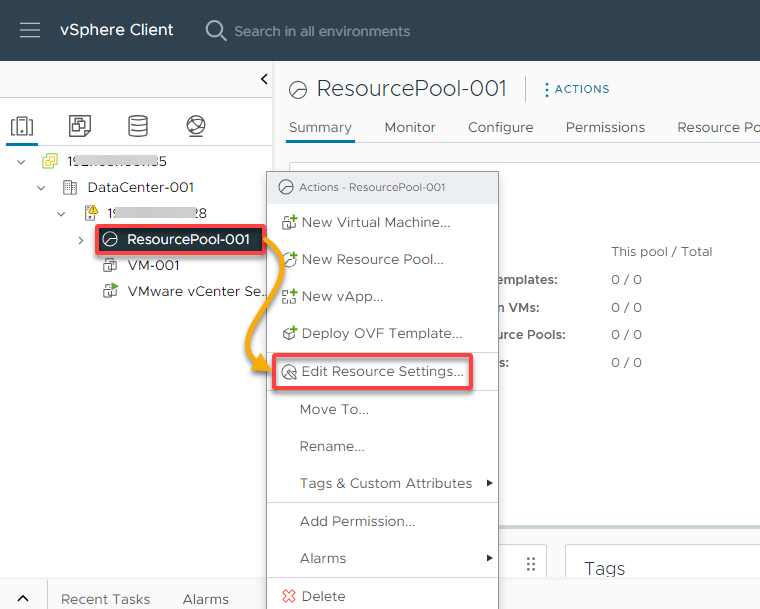
Once created, the resource pool appears in the Inventory under the selected cluster or host, as shown below.
Optionally, you can right-click the resource pool and select Edit Resource Settings to configure its settings further.
4. Now, drag and drop VMs from the Inventory onto the resource pool in the vSphere Client, as shown below.
As you can see below, you can effectively manage and allocate resources within your VMware vCenter Server environment by creating resource pools. Doing so ensures optimal utilization of CPU and memory across your VMs.
Monitoring VM Performance
Creating VMs and resource pools is not the end-point of managing your VMs. Monitoring your VMs’ performance is crucial in keeping each VM in its prime. Abruptly crashing VMs does not sound ideal, right?
Monitoring VM performance involves checking CPU usage, memory consumption, disk I/O, and network activity. This process assists in identifying and troubleshooting performance issues.
💡 Performance optimization involves using features like Distributed Resource Scheduler (DRS). This feature automatically balances VM workloads across the host and optimizes resource utilization.
To monitor VM performance, you can use various tools and features provided by vCenter Server:
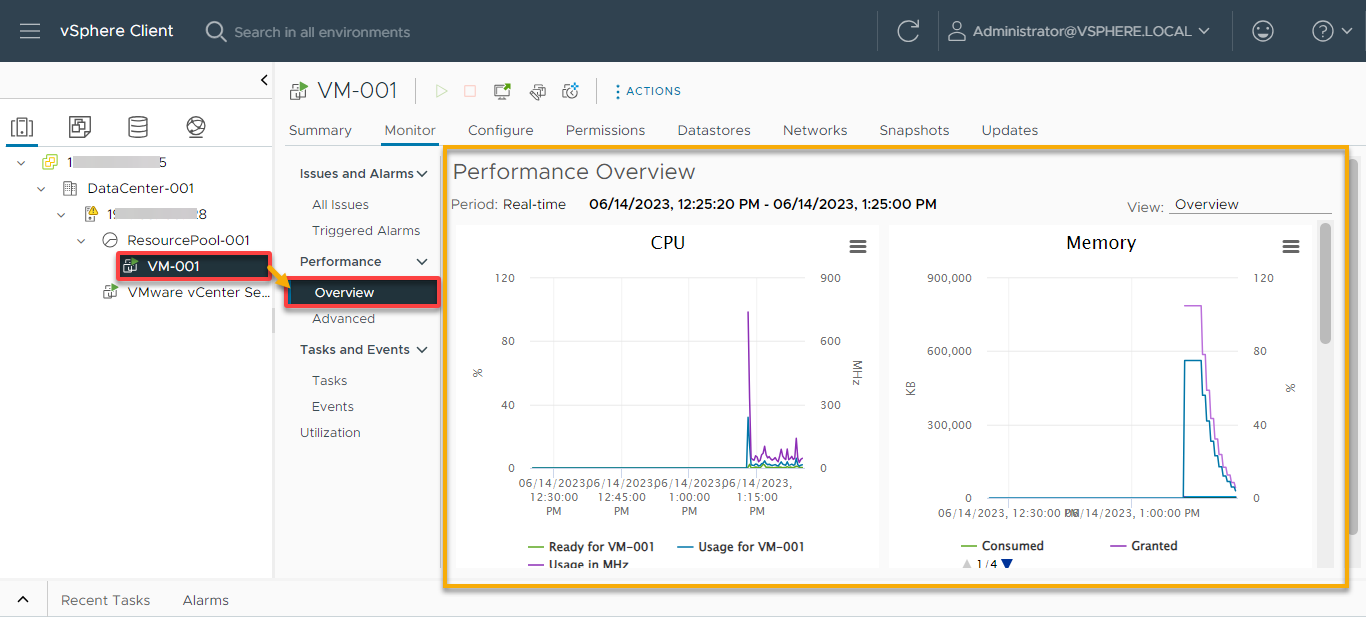
1. Select your VM (VM-001) under your resource pool (ResourcePool-001) to overview the VM’s performance.
Below, you will see various real-time performance charts displaying CPU, memory, network, and storage usage.
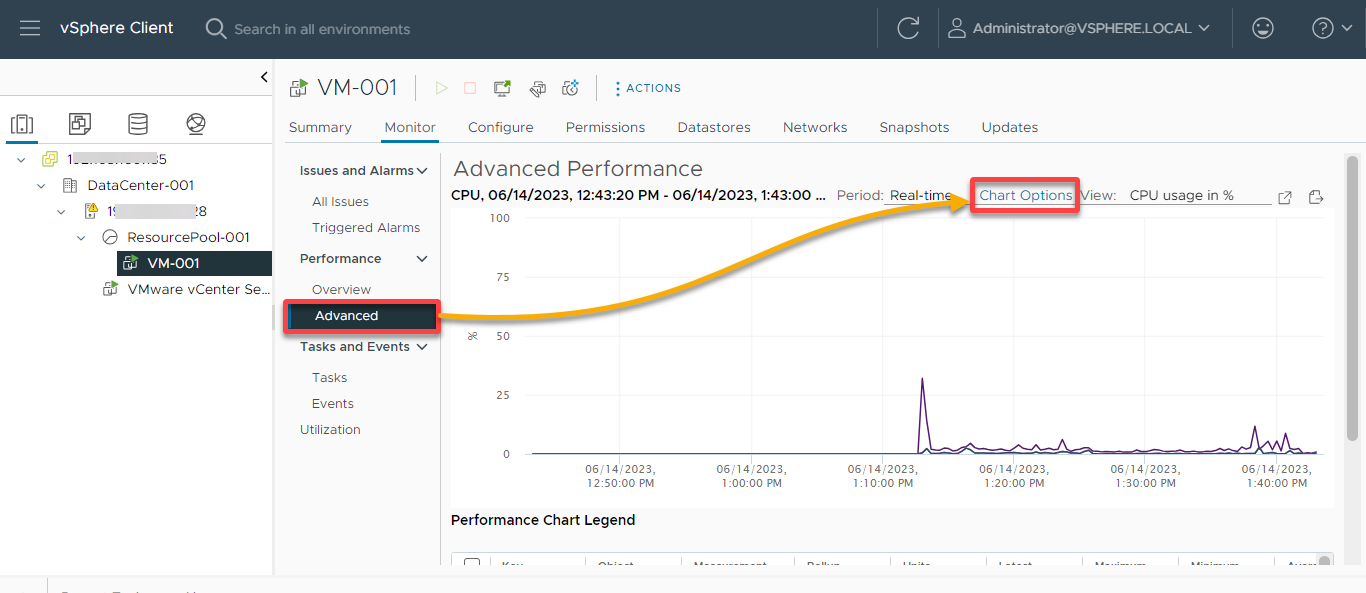
2. Next, navigate to Advanced, and click on the Chart Options to customize the performance charts to analyze specific performance metrics further.
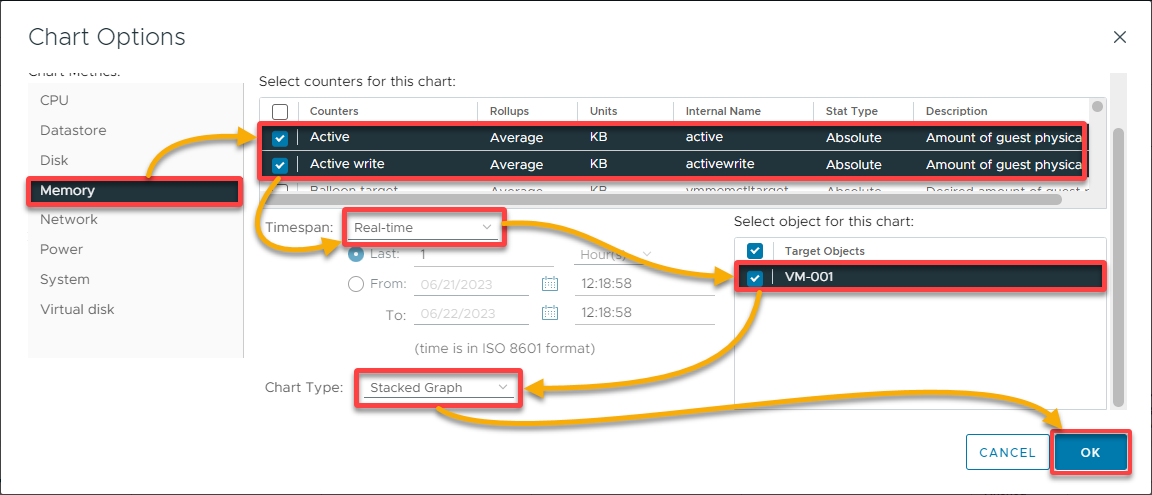
3. Now, select your desired metrics, time range, and interval in the Chart Options dialog box, and click OK to save the changes.
For instance, you can monitor the Memory of Active and Active write counters in Real-time on your VM (VM-001) and set the Chart Type as Stacked Graph.
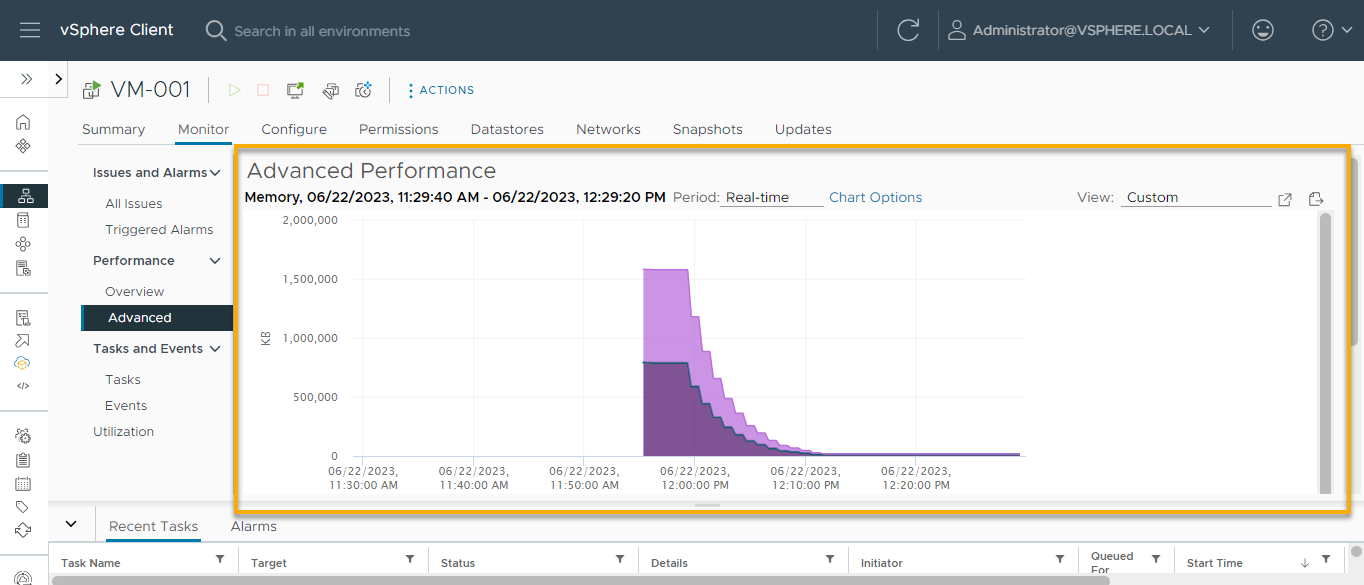
After saving the chart options changes, you can monitor your VM memory usage on a stacked graph. You can repeat the same steps (two to three) for different resources using different metrics.
💡 VMware vCenter Server provides a wide range of performance monitoring capabilities, and the steps above provide a basic overview of the process. Depending on your specific requirements, you may need to explore additional tools or features within the vCenter Server ecosystem.
Setting Up Alarms to Detect Potential Issues
Overviewing a VM’s performance is not the only way to closely monitor your resources. Setting up alarms helps in proactive monitoring and alerting. Alarms allow administrators to detect and respond to potential issues or events in the virtual environment.
Moreover, alarms provide a way to automate monitoring and ensure timely actions are taken when specific conditions are met. Some of these automated actions include but are not limited to, sending email notifications, running scripts, or powering off VMs.
To set up an alarm for a VM in VMware vCenter Server:
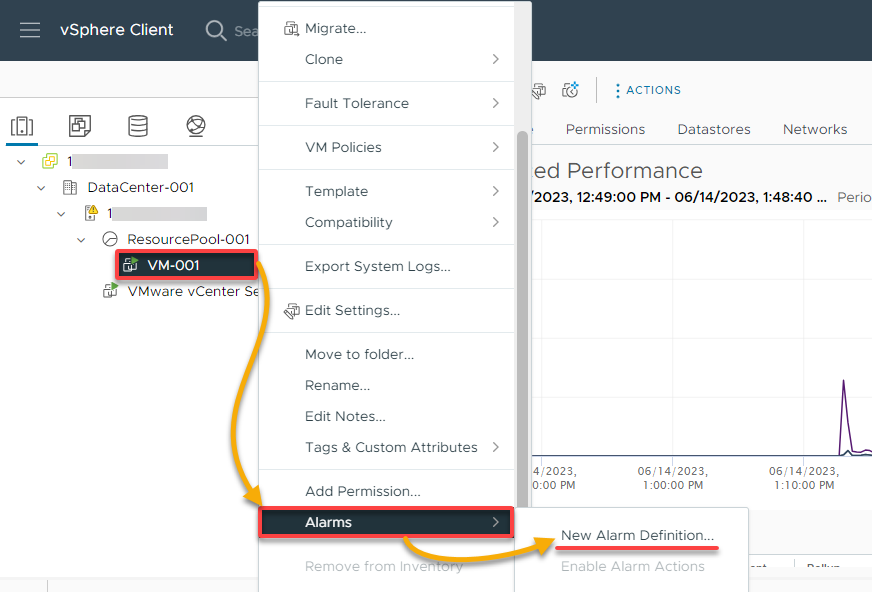
1. Right click on your VM name, hover to Alarms, and select New Alarm Definition, which opens a window where you can configure the alarm (step two).
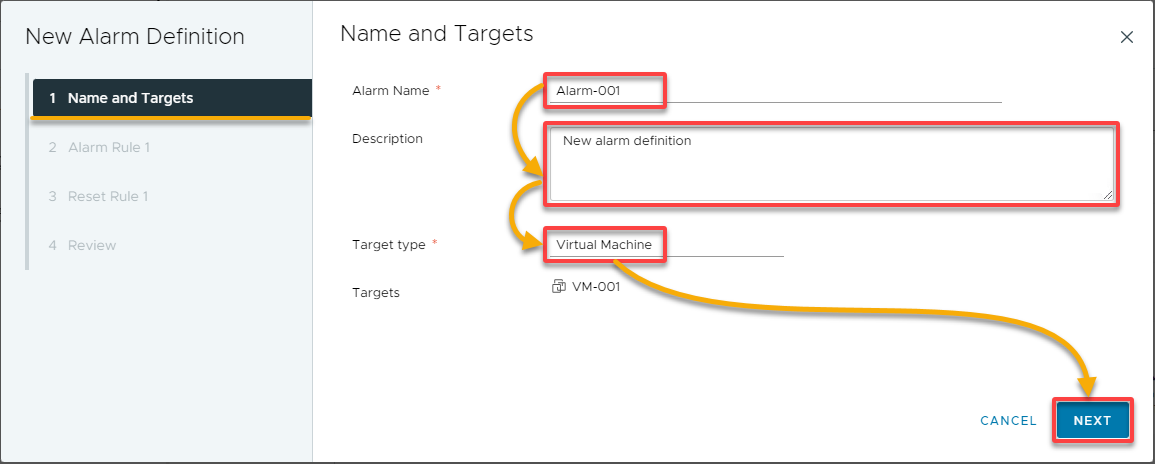
2. Next, configure the Name and Targets of the alarm as follows:
- Alarm Name – Provide a descriptive alarm name.
- Description – Input a description, which is optional but helps distinguish one alarm from another.
- Target type – Select the inventory object that this alarm monitors, in this case, a Virtual Machine.
Once configured, click Next to proceed.
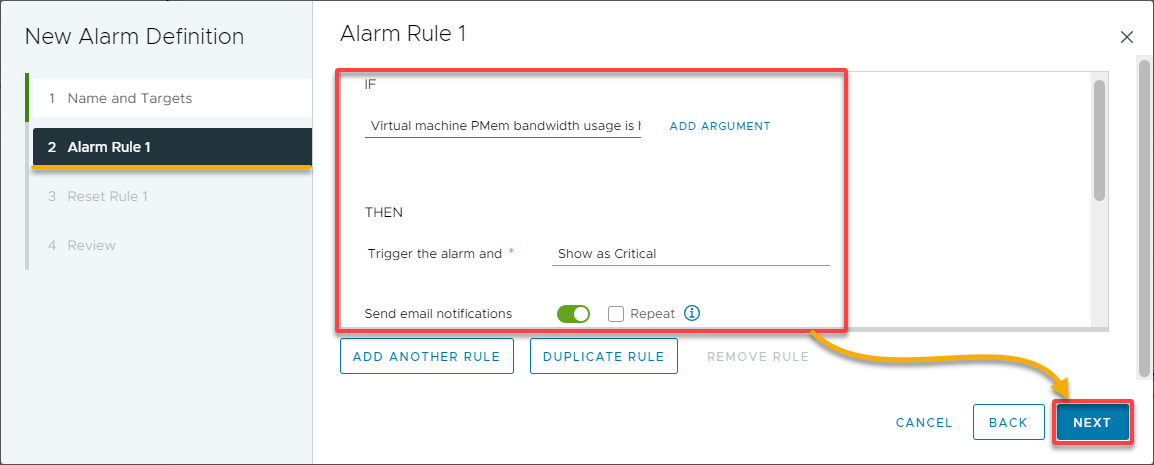
3. Select and configure the events, states, or conditions that trigger the alarm for the Alarm Rule, and click Next.
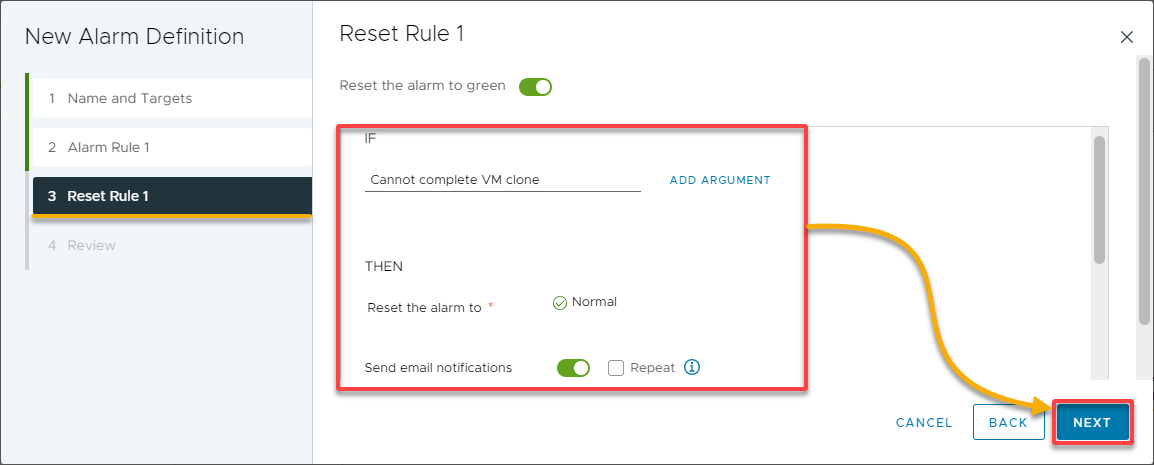
4. Similarly, select and configure the events, states, or conditions that trigger the alarm for the Reset Rule, and click Next.
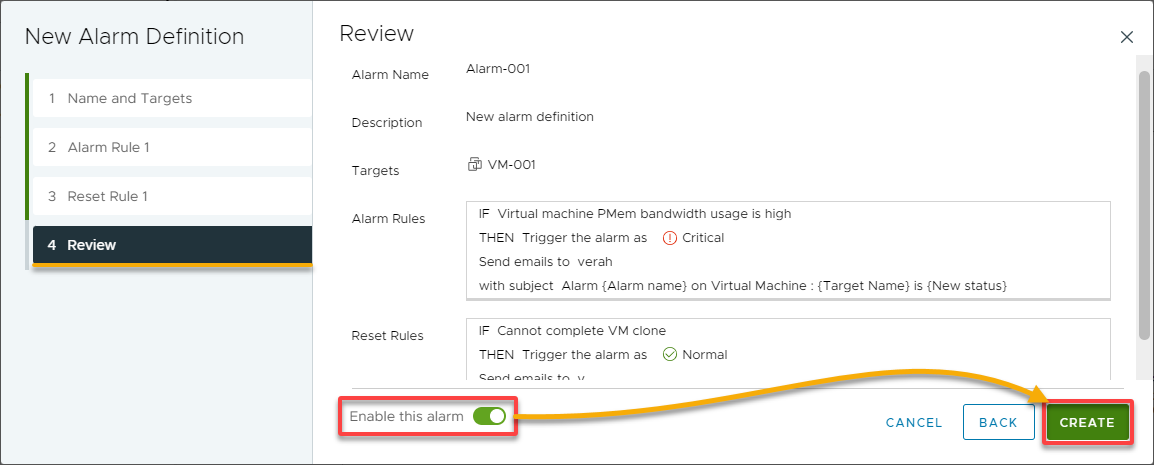
5. Conclusively, review your selected configuration, switch on the Enable this alarm toggle to enable the alarm, and click Create to add the new alarm.
Managing VM Snapshots in the VMware vCenter Server
When performance monitoring is insufficient to safeguard your VMs from failing, a snapshot can be your fail-safe. Snapshots capture the entire state of your VM’s memory and power settings when you take the snapshot.
VMware vCenter Server lets you manage your VM snapshots, like taking, reverting, and deleting snapshots. Read on to see how to manage VM snapshots, starting with taking snapshots.
Taking VM Snapshots
For quickly safeguarding data in your VMs, a snapshot does not exactly provide VM backup but is one of the most popular data protection tools.
To take snapshots in the VMware vCenter Server:
Navigate to the VMware Host Client Inventory, right-click on your VM, hover Snapshots, and choose Take Snapshot.
💡 Note that you can take a snapshot when a VM is powered on, powered off, or suspended. But to take a snapshot of a suspended VM, wait until the suspend operation finishes before you proceed.

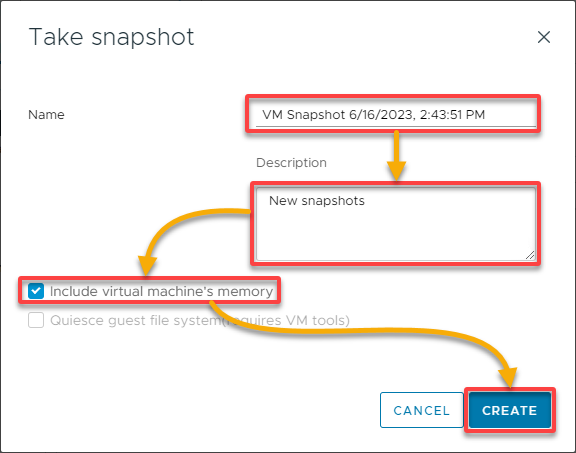
Now, configure the snapshot as follows:
- Name – Provide a descriptive snapshot name. Including the date and time the snapshot is taken is strongly recommended.
- Description – Type a description for the snapshot. This field is optional but helps provide more details about your snapshot.
- Tick the Include virtual machine’s memory box to capture the VM’s memory.
💡 Optionally, tick the Quiesce guest file system (requires VM tools) box instead to pause running processes on the guest OS. As a result, the file system contents are in a known consistent state when you take a snapshot.
Once configured, click Create to take a snapshot.
Reverting VMs to the Latest Snapshots
When your VM is acting up and you find no way around it, reverting to its latest snapshots is your best shot. When you restore a snapshot, you return the VM’s memory, settings, and the state of the VM disks to the state they were in when you took the snapshot.
To revert to a snapshot, follow these steps:
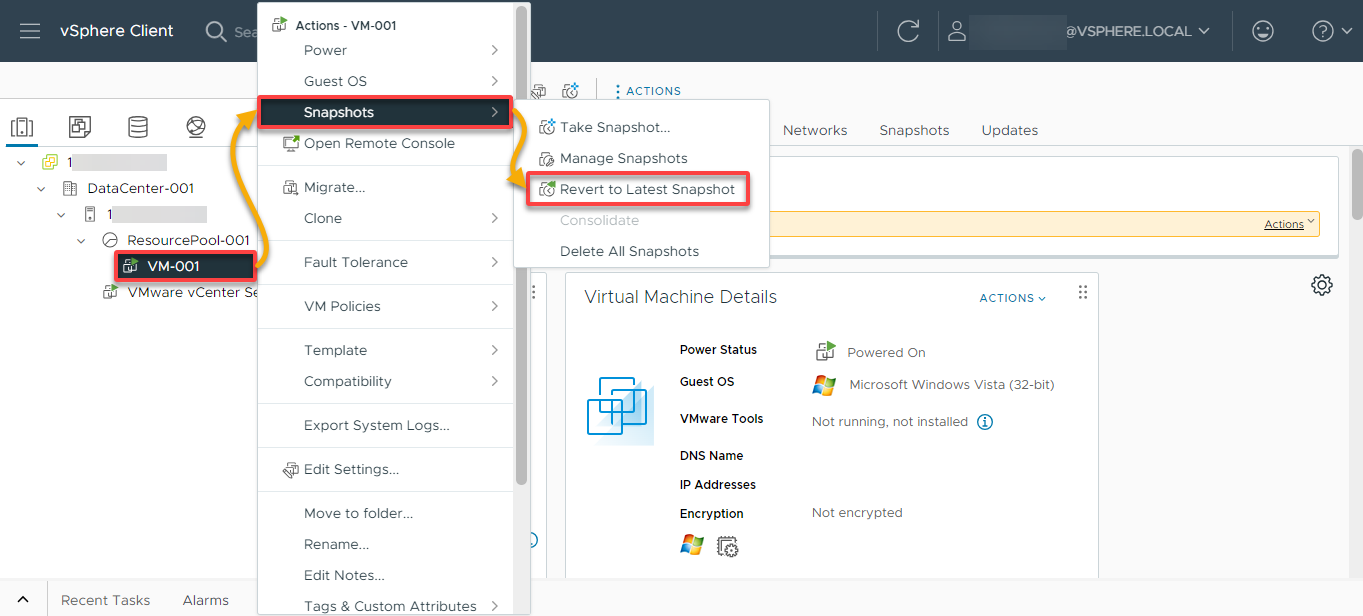
In the VMware Host Client Inventory, right-click your VM in the list, select Snapshots, and choose Revert to Latest Snapshot.
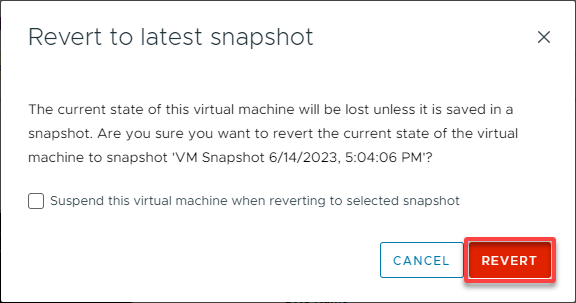
💡 Note that when reverting a VM to a previous snapshot, the current state of the VM will be lost unless you save it in a snapshot.
When prompted, click Revert to confirm reverting to the VM’s most recent snapshot.
Deleting VM Snapshots
Snapshot files are consolidated and written to the parent snapshot disk and merge with the VM base disk. As a result, keeping one too many snapshots only leads to cluttering, and deleting some of them is only practical.
Worry not, though. Deleting snapshots does not change the VM or other snapshots but consolidates the changes between snapshots and previous disk states.
To delete VM snapshots:
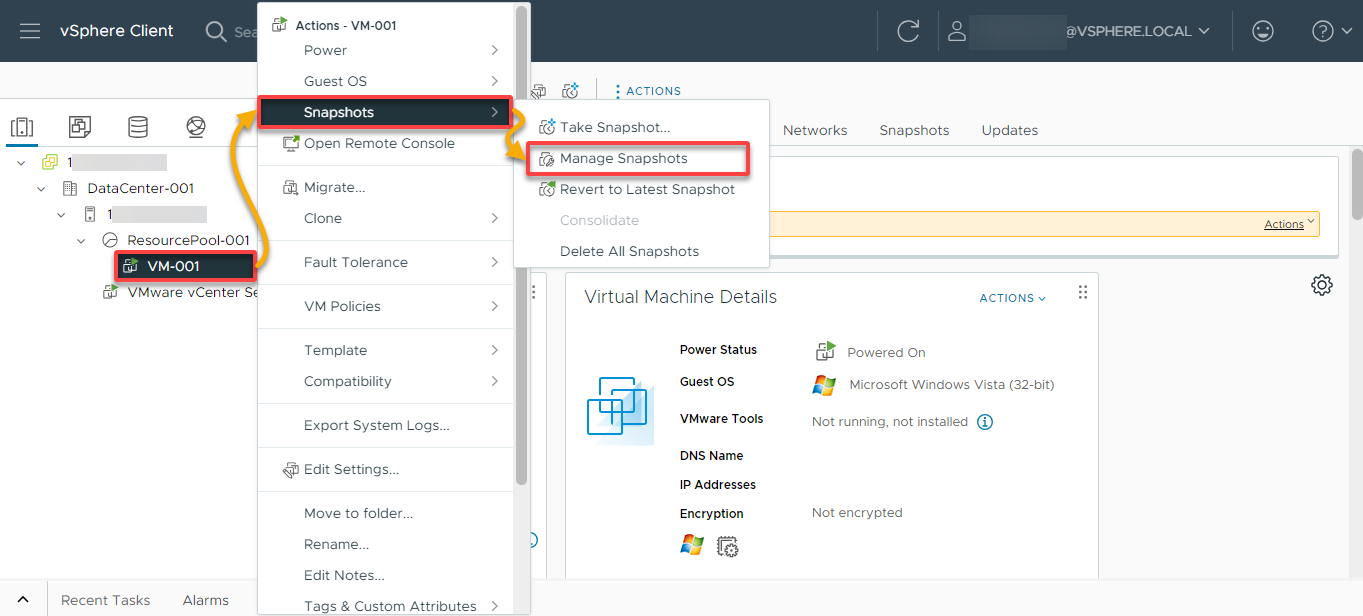
1. On the VMware Host Client Inventory, right-click your VM, select Snapshots, and choose Manage Snapshots.
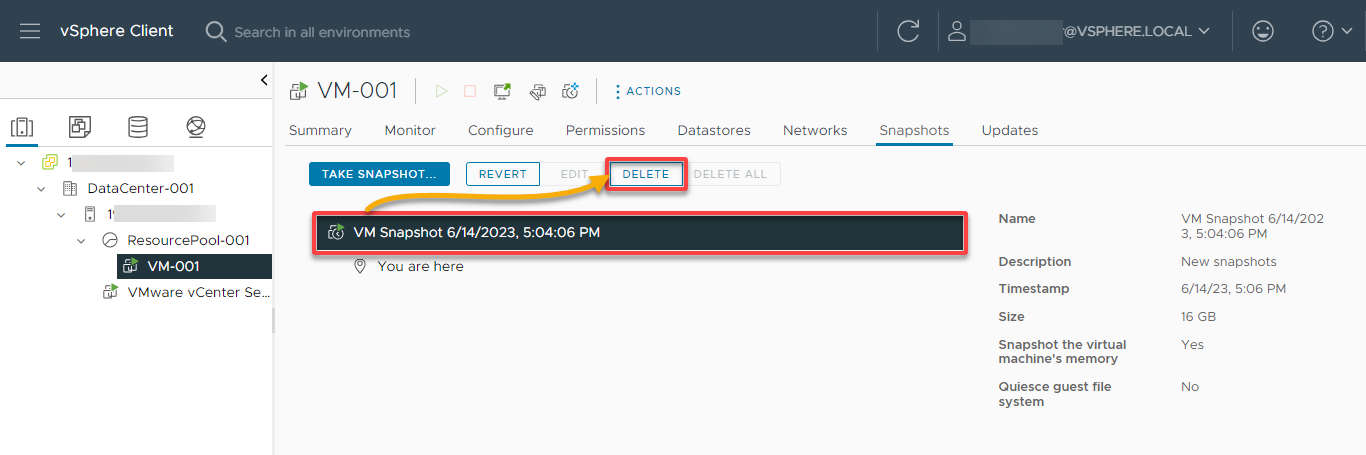
2. Next, click your target snapshot, and click DELETE to remove the snapshot.
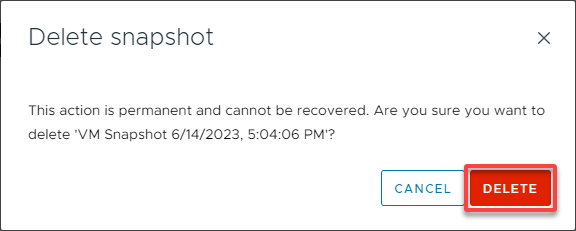
3. When prompted, click Delete to confirm deleting the snapshot.
💡 When you delete a snapshot, data are written from the delta disk containing information about the deleted snapshot to the parent disk. And when you delete the base parent snapshot, all changes merge with the base VM disk.
Configuring VMs Networking
Part of keeping your VMs healthy is establishing secure and stable communication between VMs and other components. VMware vCenter Server allows configuration and management of network connectivity within a VMware vSphere environment.
Some of the key aspects of vCenter Server networking include:
| Key Aspect | Details |
|---|---|
| Virtual Switches (vSwitches) | vSwitches provide network connectivity within the VMware environment. They can be created at the host level or as distributed switches that span multiple hosts. |
| Port Groups | Logically group the network ports within a vSwitch. Each port group defines network settings, such as VLAN IDs, security policies, and traffic shaping parameters. VMs are connected to specific port groups to access network connectivity. |
| Network Adapters | Represent the virtual network interfaces of VMs. The adapters are attached to specific port groups or vSwitches to enable network connectivity. Each VM can have one or more network adapters with different settings or connected to other networks. |
To create a vSwitch in VMware vCenter Server:
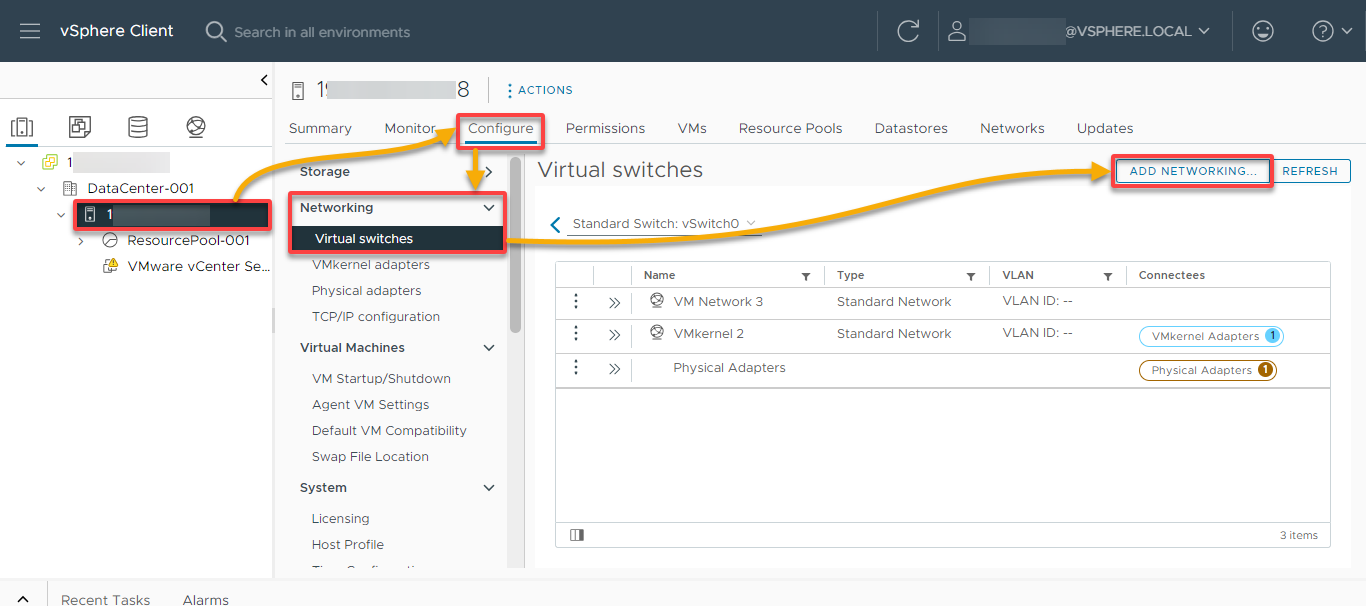
1. In the vSphere Client, select your host, navigate to the Configure tab, expand Networking, select Virtual switches, and click ADD NETWORKING. A wizard opens where you can add a network configuration (step two).
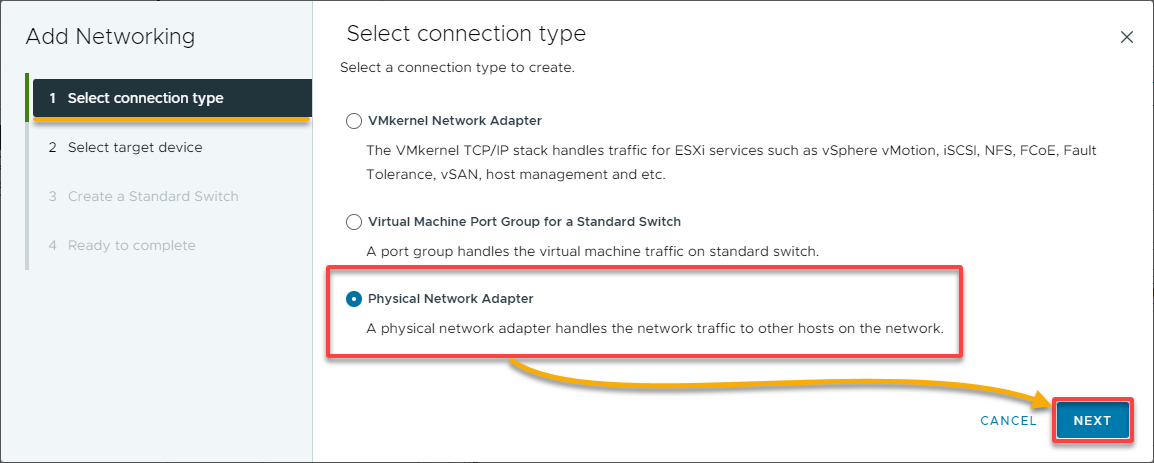
2. Next, select a connection type for the new standard switch, and click NEXT.
But for this example, choose the Physical Network Adapter option to add physical network adapters to an existing or a new standard switch.
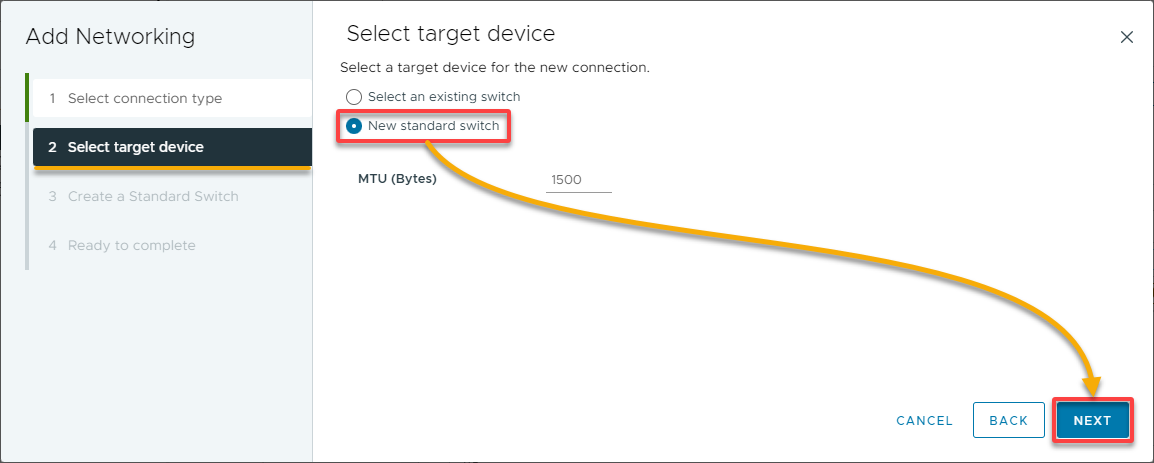
3. For the target device, select New standard switch and click NEXT.
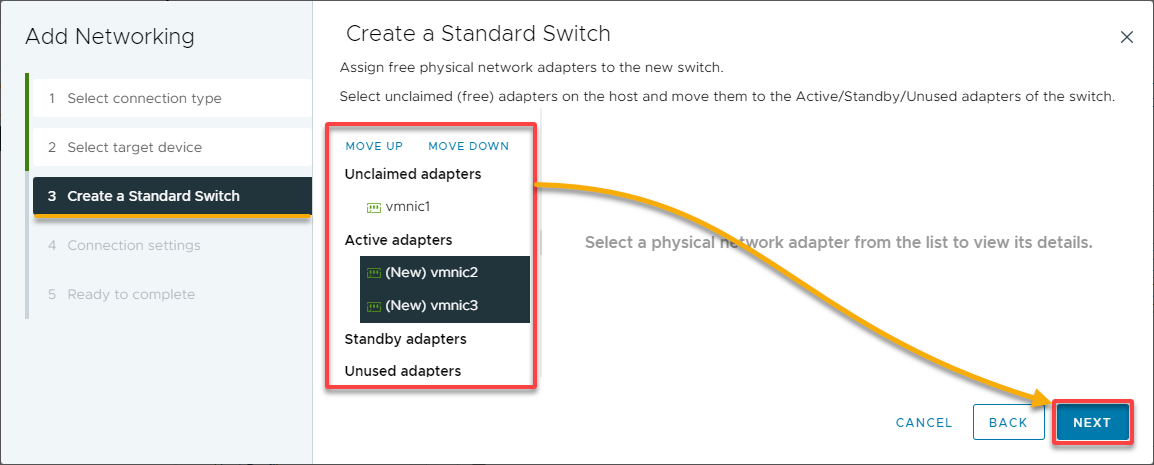
4. Now, add physical network adapters to the new standard switch with the following:
- Select one or more physical network adapters from the list. Configure at least two physical network adapters in the Active adapters list for higher throughput and to provide redundancy.
- (Optional) Use the Move Up and Move Down arrows above the Unclaimed adapters list to change the adapter’s position.
Once added, click NEXT to continue.
5. Provide a descriptive Network label or accept the generated label, set the VLAN ID (optional) to configure VLAN handling in the port group, and click NEXT.

6. Review your selected configuration, and click Finish to add the network configuration.

Assigning Network Adapters to VMs
Now that you have successfully created the virtual network adapter, it is time to configure and attach virtual network interfaces to your VM within the virtualized environment. Doing so enables it to establish network connections, communicate, and use network services.
Once you have assigned the network adapter, you may need to configure network settings within the guest OS of the VM to ensure proper network connectivity and functionality.
To assign a network adapter to a VM in VMware vCenter Server:
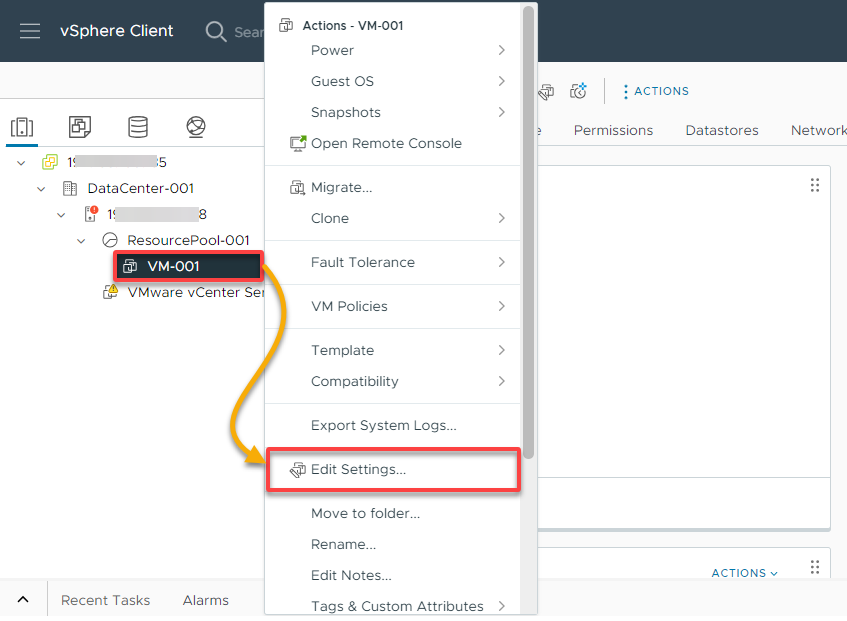
1. In the vCenter Server Inventory, right-click on the VM to assign a network adapter and choose Edit Settings. A window opens where you can edit the network settings of your selected VM (step two).
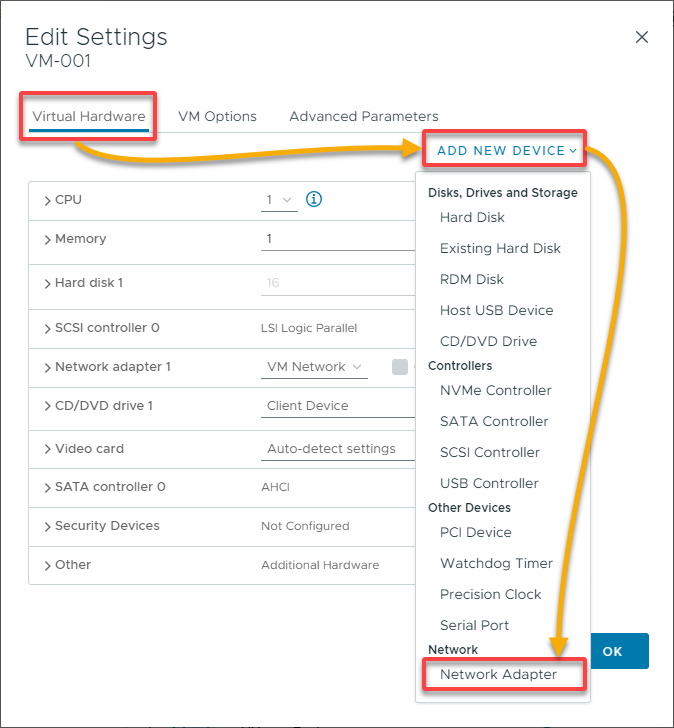
2. Next, click Add New Device under the Virtual Hardware tab and select Network Adapter from the drop-down menu to initiate adding a new network adapter.
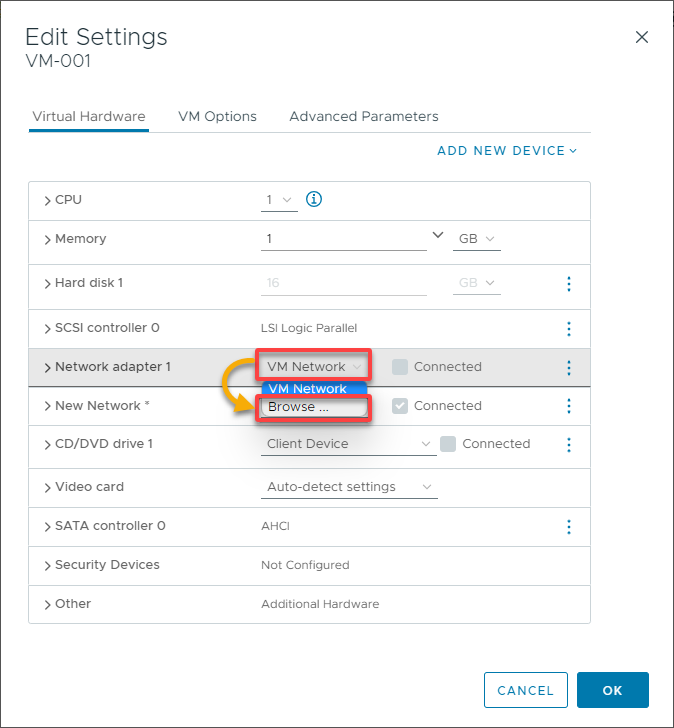
3. Click the drop-down adjacent to Network adapter 1, and choose Browse to look for your desired network adapter (step four).
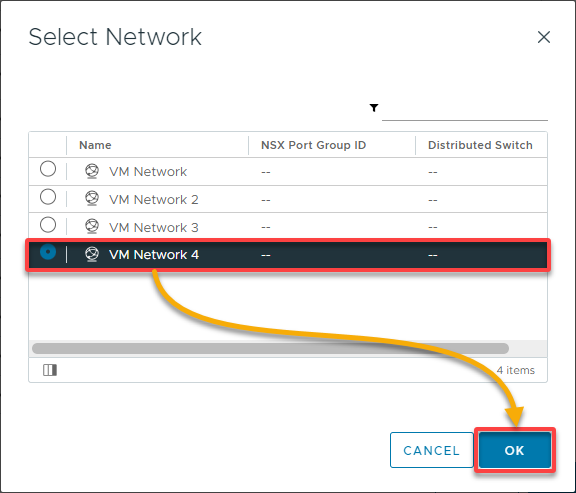
4. Now, choose your desired network adapter to connect to and click OK.
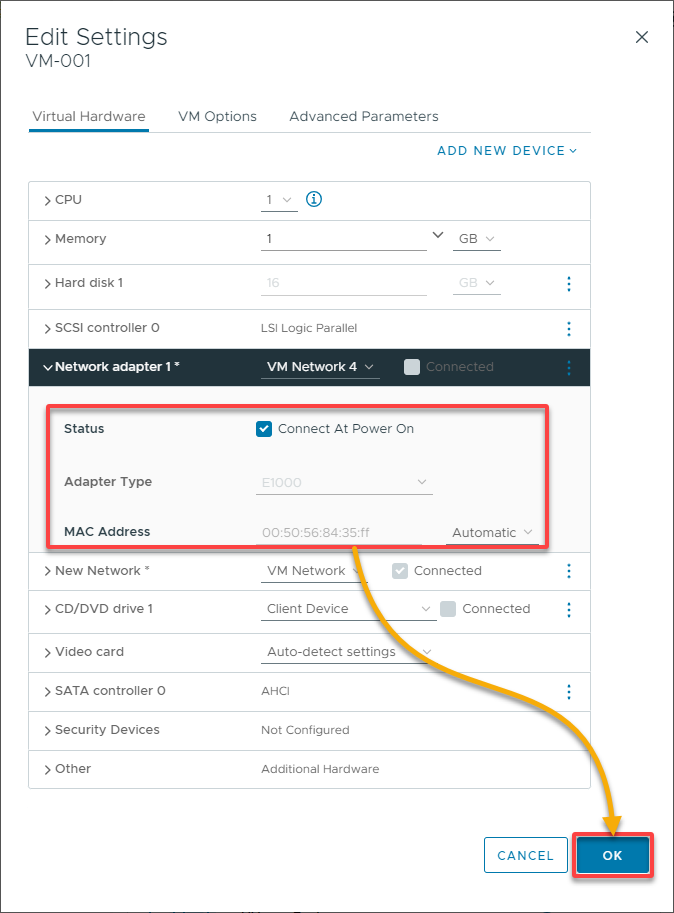
5. Finally, click OK to save the changes and exit the VM settings.
Optionally, you can modify the network adapter as follows:
- Status – Tick the box to automatically connect to the network adapter when you run your VM.
- Adapter Type – Select the network adapter type from the drop-down field.
- MAC Address – Select how to assign the MAC address (i.e., Automatic) from the drop-down field.
After assigning the network adapter, your VM will have network connectivity based on the configuration of the selected network or port group. If necessary, you can repeat these steps to add network adapters to the VM.
Conclusion
Throughout this tutorial, you have learned how you can leverage features provided by the VMware vCenter Server to manage your virtualized infrastructure. By effectively managing your VMs, you can optimize your virtual infrastructure’s performance, ensure data protection and availability, and simplify day-to-day operations.
Now, why not explore other features that VMware has to offer, such as VMware cloud solutions? Take advantage of running enterprise applications at scale without complex code or configuration changes!


