

Have you been curious about configuring and managing networking components within a VMware virtualization environment? Look no further. Fill in your curiosity with how VMware networking works!
In this tutorial, you will learn how to configure the virtual networks within your VMware virtualization infrastructure and connect your VMs to the physical networks.
Dig in and start managing your VM networks with VMware networking!
Prerequisites
This tutorial comprises hands-on demonstrations, so ensure you have the following in place to follow along:
- A machine running a Windows OS – This tutorial uses Windows 10 pro v1H2, but other OSes will work.
- VMware ESXi host installed and connected to your VMware vCenter Server – This tutorial uses VMware ESXi 7.0.0 (Build 15843807).
- VMware vCenter Server installed – This tutorial uses VMware vCenter Server 8.0.0.10000 (Build 20519528).
- VMware vCenter Server credentials were created during the installation and deployment of the vCenter Server on the ESXi host.
Creating and Configuring a Virtual Switch for VMware Networking
In your virtualized environment, you must ensure connectivity works between network entities. These entities include VMs, physical networks, and VMkernel services (such as management, vMotion, and Storage vMotion).
How do you connect these network entities? You must create and configure a virtual switch (vSwitch), a software-based networking component, in an ESXi Host.
There are two types of a vSwitch as follows:
- Standard vSwitch – Lets you create virtual networks suitable for smaller environments and simpler networking requirements.
- Distributed vSwitch – An advanced vSwitch available in the vSphere Enterprise Plus edition. This vSwitch type provides more advanced features like centralized management, better visibility, and enhanced network performance optimization.
But in this tutorial, you will use a standard vSwitch for demonstration.
Adding a Standard vSwitch in an ESXi Host
Creating a standard vSwitch in an ESXi host involves configuring a virtual switch to manage networking connectivity for VMs.
To create a new standard vSwitch in an ESXi host, follow these steps:
1. Log in to the VMware vSphere Client to connect to the ESXi host.
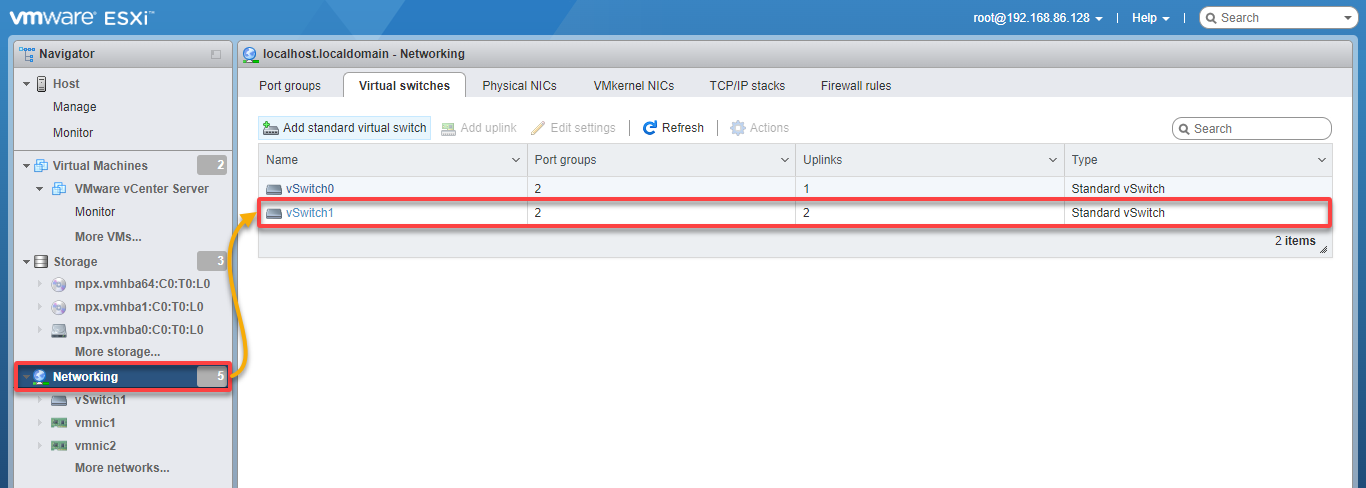
2. Next, navigate to Networking (left pane) → Virtual switches tab, and click Add standard virtual switch. A wizard opens where you will configure a new standard vSwitch (step three).
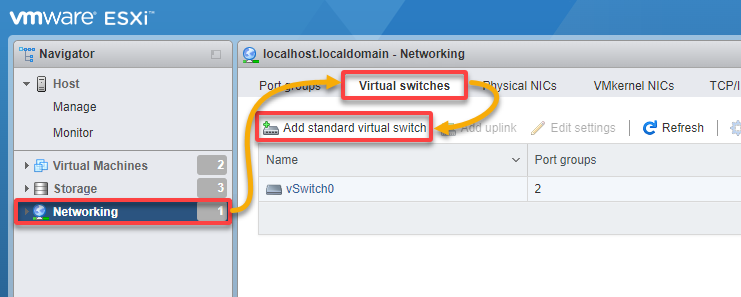
3. Now, provide a vSwitch Name (i.e., vSwitch1), leave other options default, and click Add to add the new standard vSwitch.
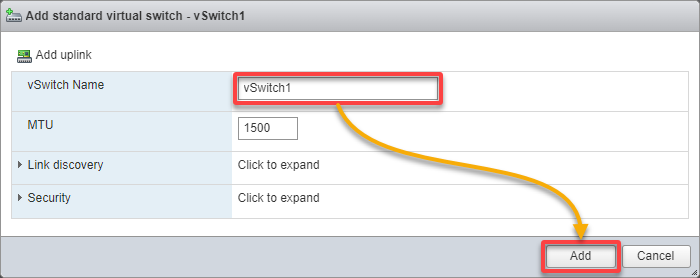
Below, you can see your new vSwitch is added to the list.
Adding an Uplink to Connect the vSwitch and Physical Network
With a vSwitch added, you must ensure it connects to your physical network by adding an uplink. An uplink is a physical network adapter or network interface card (NIC) on the ESXi host that connects your vSwitch to your physical network.
To add an uplink to connect your vSwitch and your physical network:
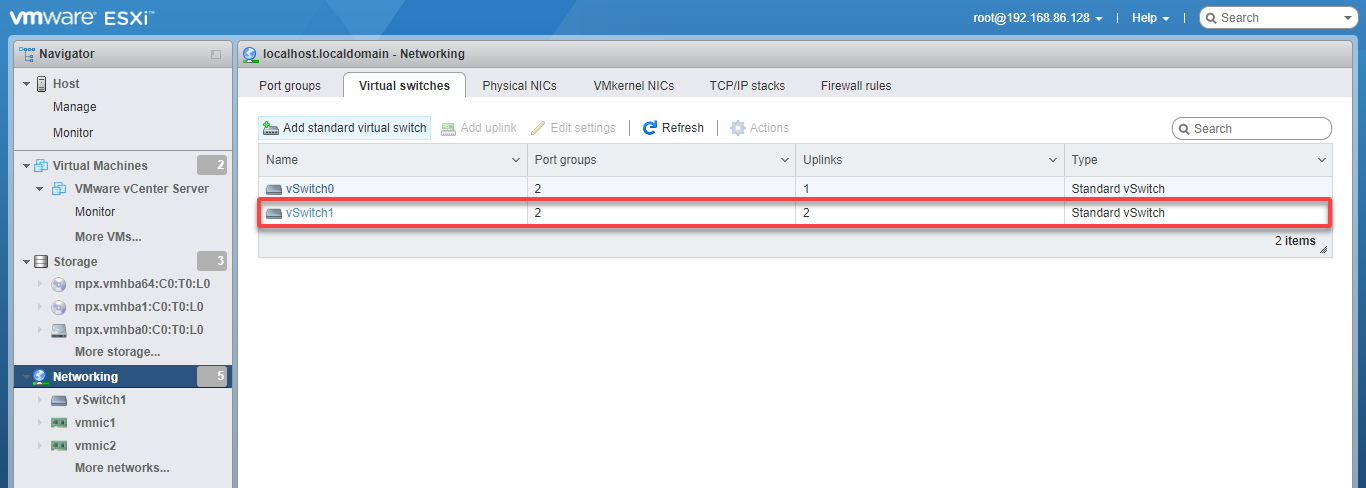
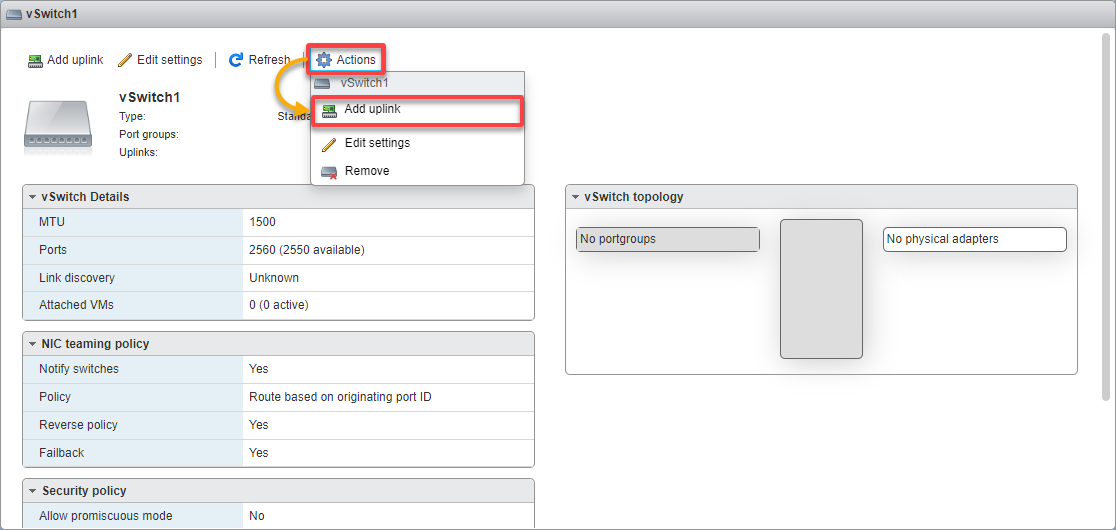
1. On the Networking page (left pane), click your newly added vSwitch (vSwitch1) to access its details.
2. Next, click the Actions menu and choose Add uplink on your vSwitch’s details window to initiate adding an uplink.
An uplink, which serves as a connection point, can be used for redundancy, load balancing, and increased network bandwidth.
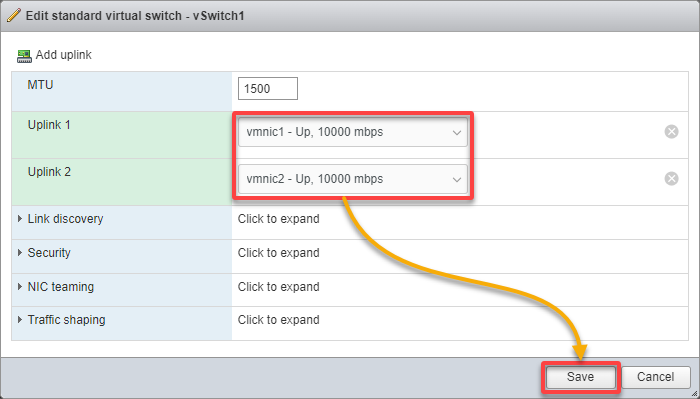
3. Now, select two of your NICs (Uplink 1 and Uplink 2) for link redundancy purposes, and click Save to finalize adding the new uplink.
A vSwitch can have one or more uplink ports (physical NICs) connecting to the physical network and one or more port groups for VMs to connect (covered later in this tutorial).
Optionally, you can configure other advanced options, such as:
- Link discovery – Allows you to monitor the network connectivity status of your physical network adapters connected to your standard vSwitch.
- Security – Involves implementing measures, as follows, to protect your virtual network and VMs connected to it.
| Feature | Function |
|---|---|
| Promiscuous Mode | Allows a virtual network adapter to see all network traffic in the vSwitch. |
| MAC Address Changes and Forged Transmits | Control whether VMs can change their MAC addresses or forge transmits. |
- NIC teaming – Allows you to combine multiple physical network adapters into a single logical interface. This option provides redundancy and increased network throughput by distributing network traffic across the teamed adapters.
- Traffic shaping – Lets you control and manage the network bandwidth for VMs connected to your vSwitch.

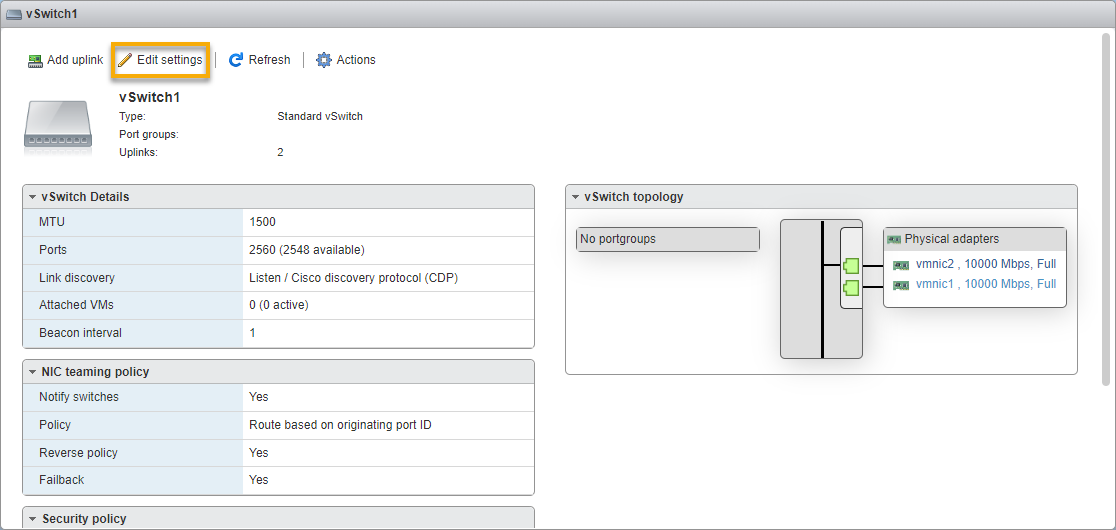
Once saved, you can always edit your vSwitch settings, as shown below.
Implementing Network Segmentation
VMware vSphere allows you to segment your virtual networks to improve security and isolation. In a nutshell, network segmentation caters to optimized network performance and improved security posture.
Providing unique security services per network segment, you gain more control over network traffic with network segmentation. How? Creating segments reduces the attack surface, limiting how far an attack can spread and impedes an attacker’s lateral movement.
Read on to see implementing network segmentation in action.
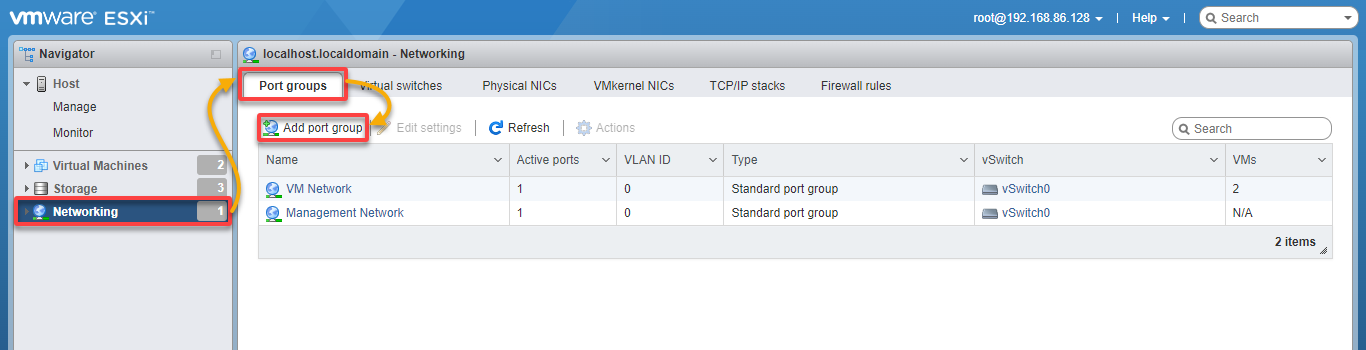
Adding a New Port Group in an ESXi Host
Port groups are logical groups of ports on a vSwitch, and they determine how VMs connect to the network.
To create a new port group to link with your vSwitch, follow the steps below:
Navigate to Networking (left pane) → Port groups tab, and click Add port group. A wizard opens, where you will configure your new port group (step two).
💡 By default, the ESXi host creates two port groups. One is the VM Network for guest VMs, and the other is the Management Network for the ESXi host’s VMkernel network adapter, where you can manage the ESXi host.
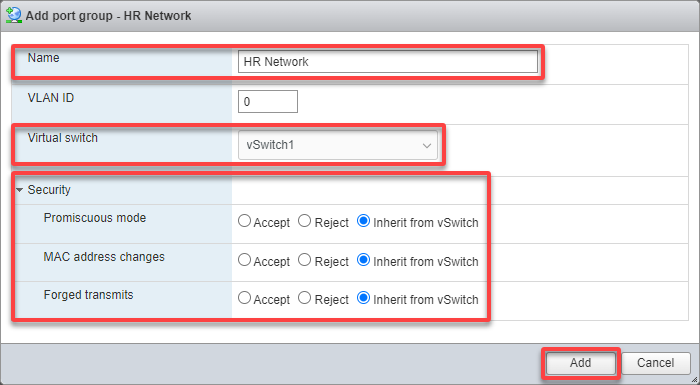
Now, configure your new port group in the Add port group window as follows:
- Name – Provide a descriptive name for your port group (i.e., HR Network).
- VLAND ID (optional) – Specify the VLAN ID to associate with this port group (if your network uses VLANs).
- Virtual switch – Select your vSwitch (vSwitch1) on which this port group will be created.
- Security (optional) – Configure security policies to determine how the virtual NICs connected to this port group behave.
Once configured, click the Add button to finish creating the new port group.
Assigning a Port Group to a VM
Adding a new port group in your ESXi host does not automatically connect your VM to a network. You must configure your VM’s network settings to connect it to a desired network segment.
To assign a port group to your VM:
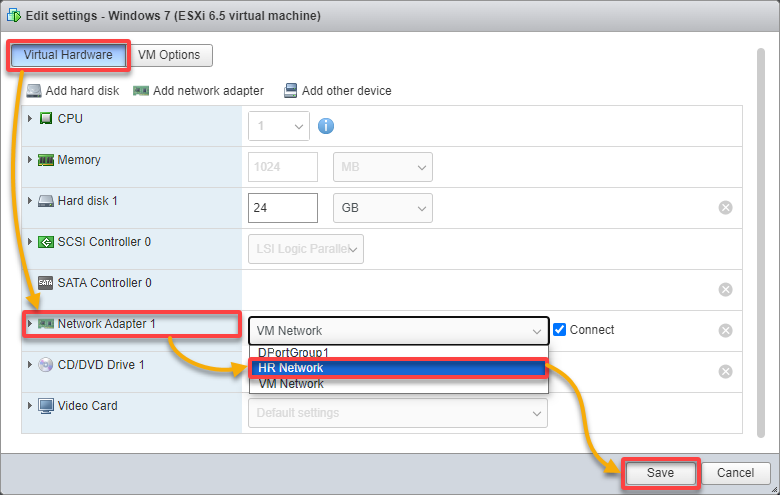
Expand Virtual Machines (left pane), right-click on your VM’s name (i.e., Windows 7), and choose Edit settings. A window opens where you can edit your VM’s settings (step two).

Now, configure the VM’s settings with the following:
- Click the Virtual Hardware tab (top-left) in the VM’s Edit settings window.
- Locate and navigate to the network adapter (i.e., Network Adapter 1) you plan to connect to your port group.
- Select your port group (i.e., HR Network) to assign your VM from the drop-down field. This port group is what corresponds to your desired network segment.
Once configured, click Save for the changes you made to the VM’s network adapter settings to take effect.
Your VM is now connected to the specified port group and is part of the corresponding network segment. Repeat these steps for each VM you want to assign to different port groups or network segments.
💡 Any changes to network settings may affect the VM’s connectivity. Thus, ensure you have configured the port group settings and firewall rules appropriately. Doing so allows the desired communication between VMs within and across segments.
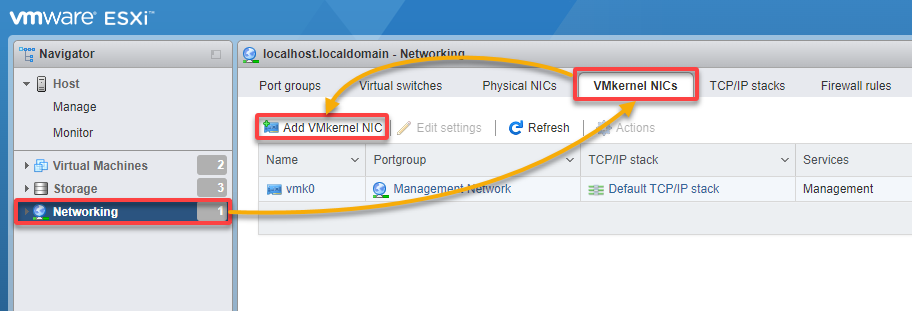
Adding a VMkernel NIC to Improve Network Efficiency and Stability
A VMkernel NIC in an ESXi host is used for management purposes, such as handling management-related traffic, vMotion, iSCSI, or other services.
VMkernel NICs are distinct from the regular virtual network adapters that connect VMs to the network. They serve critical roles in managing and optimizing the virtualized environment.
To create a VMkernel NIC, follow these steps:
Navigate to Networking (left pane) → VMkernel NICs tab, and click Add VMkernel NIC to initiate adding a VMkernel NIC.
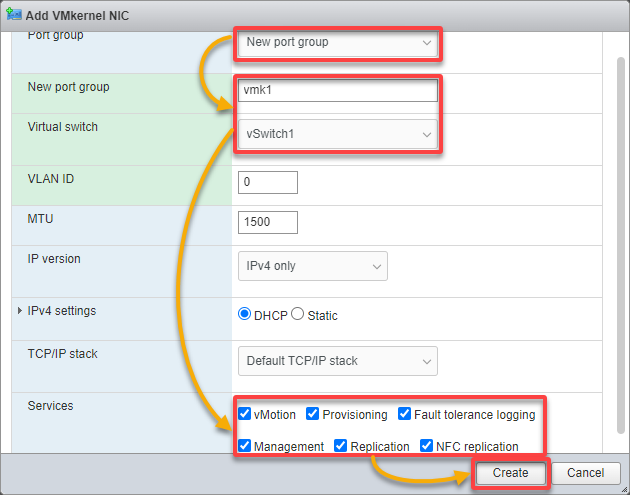
Now, configure a new VMkernel NIC as follows:
- Port group – Select an existing or create a new port group. But in this example, choose the New port group option.
- New port group – Provide a port group name (i.e., vmk1) on which you wish to create the VMkernel NIC. This port group will be dedicated to handling management traffic.
- Virtual switch – Select your vSwitch (vSwitch1) on which this VMkernel NIC will be created.
- VLAND ID (optional) – Configure the VMkernel NIC’s IP settings, including assigning an IP address, subnet mask, and default gateway. You can also configure DNS settings if necessary.
- Services – Select the services to enable on this VMkernel NIC based on your requirements.
Once configured, click the Create button to finalize creating the new VMkernel NIC.
Creating and Configuring vSphere Distributed Switches
Network management in massive virtual environments can be challenging as you need consistent network policies and settings for all ESXi hosts. The good news is that you can overcome this challenge by adding vSphere distributed switches (VDSs) in your vCenter Server.
What a VDS provides is as follows:
- A centralized management and configuration of virtual networking across multiple hosts in a VMware virtualized environment.
- Allows consistent network policies and settings to be applied to all ESXi hosts connected to the distributed switch, simplifying network management in larger environments.
- Support for consistently advancing VMware vSphere networking features.
💡 Note that you can only configure a VDS within the vCenter Server. That VDS will be configured with the same settings on all ESXi hosts within your Datacenter. With this feature, you do not need to manually set up standard vSwitches on each ESXi host.
Adding a New Distributed Switch to the vCenter Server
Before applying network policies and settings to all ESXi hosts, you must add a new distributed switch to your vCenter Server.
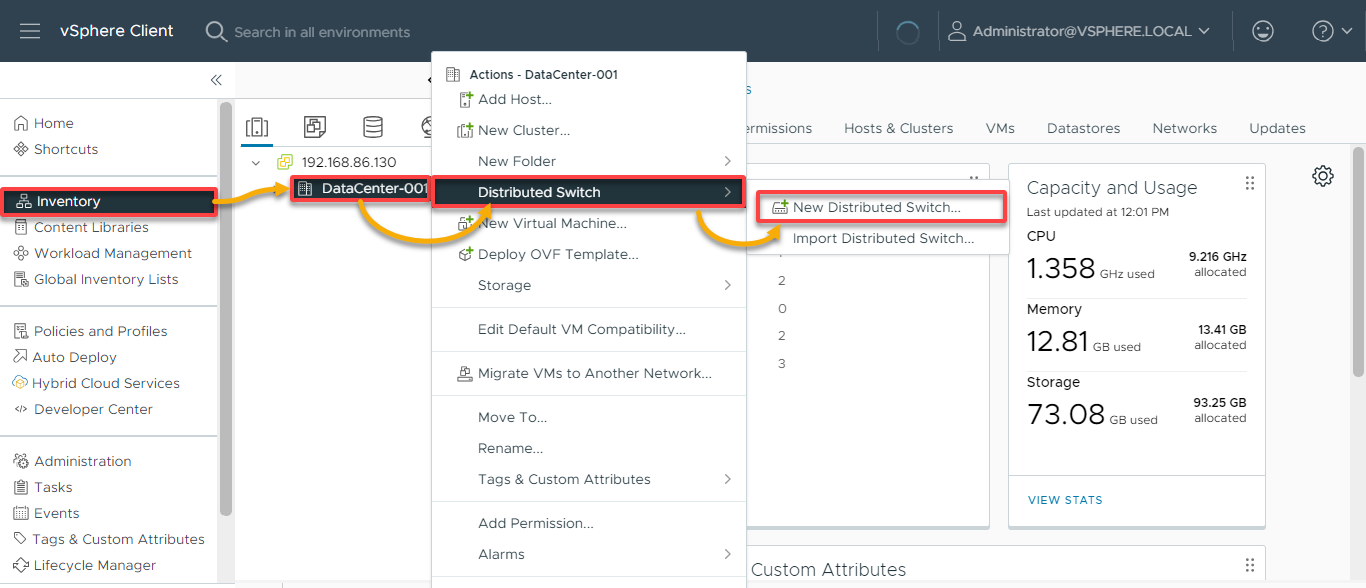
1. Log into the vCenter Server via the vSphere web client using your credentials.
2. Next, navigate Inventory, right-click your Datacenter name (i.e., DataCenter-001), hover Distributed Switch, and choose New Distributed Switch.
A wizard opens where you will configure a new distributed switch (step three).
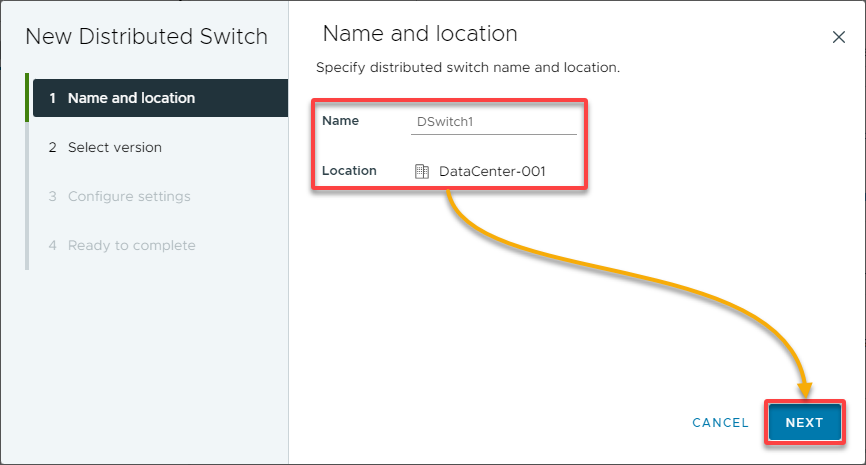
3. In the New Distributed Switch wizard, provide a Name (i.e., DSwitch1) and Location (i.e., DataCenter-001) for your distributed switch, and click Next.
4. Now, choose the distributed switch version compatible with the ESXi hosts within your datacenter and click Next.

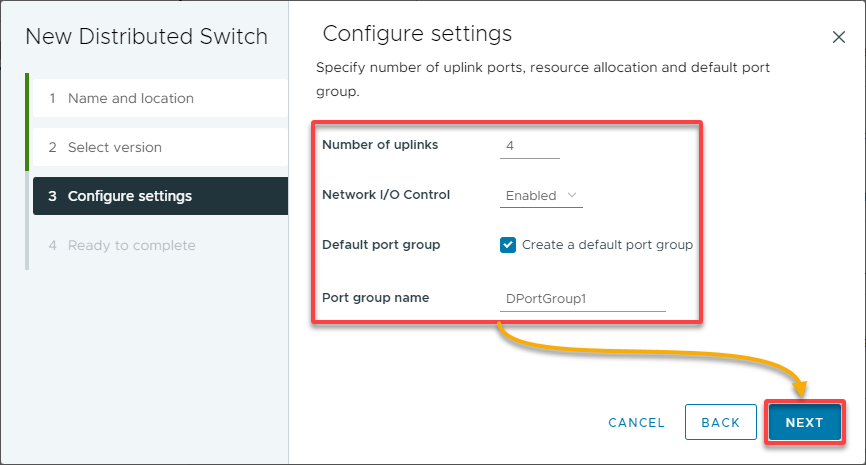
5. Configure the switch’s settings as follows:
- Number of uplinks – Provide the number of uplinks, like physical network adapters.
- Network I/O Control – Enable this option to set Quality of Service (QoS) levels on network traffic.
- Default port group – Tick the box to create a default port group.
- Port group name – Set a name for your default port group (i.e., DPortGroup1).
Once configured, click Next to proceed.
6. Ultimately, review the configurations and click Finish to finalize creating a new distributed switch.

Adding Hosts to the Distributed Switch
With a distributed switch at your disposal, the course of action is to add hosts to your distributed switch. Doing so enables VMs on your hosts to communicate with each other and the physical network.
To add hosts to your distributed switch:
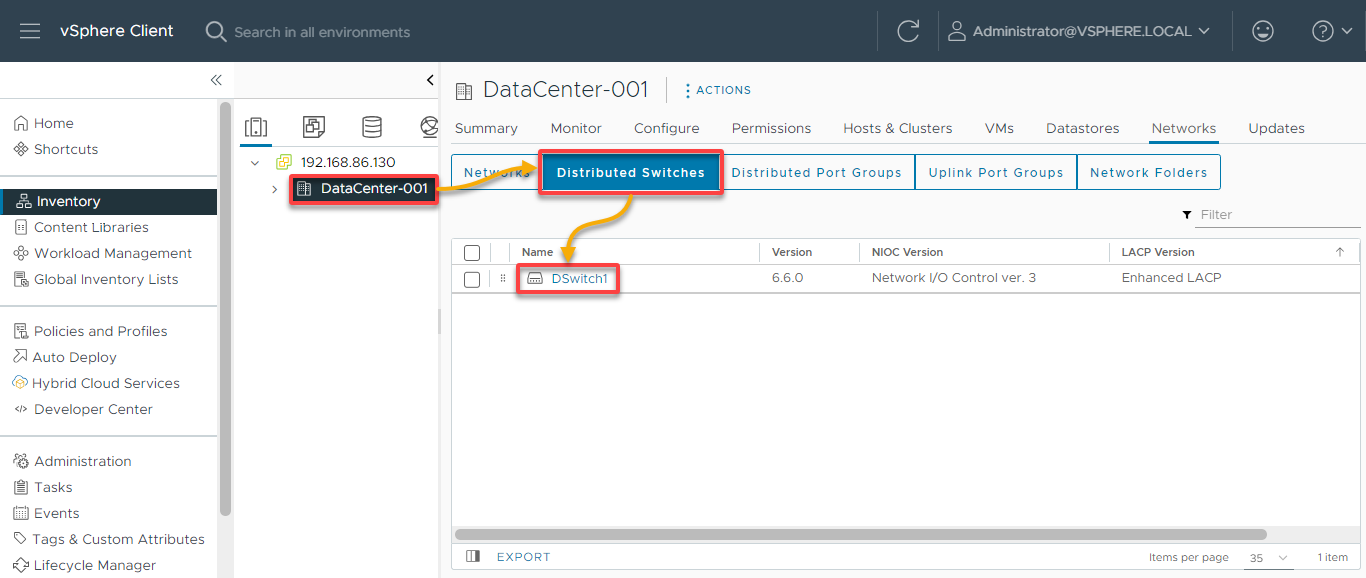
1. On your Datacenter’s page, navigate to the Distributed Switches tab and click your distributed switch’s name (DSwitch1) to access the switch’s management page.
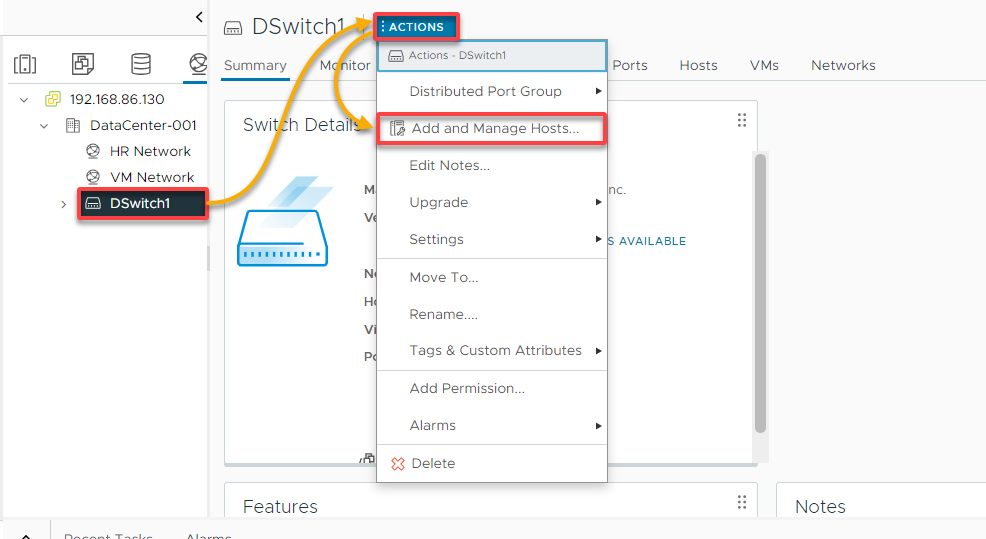
2. Next, click the ACTIONS drop-down menu and choose Add and Manage Hosts to initiate adding/managing a host.
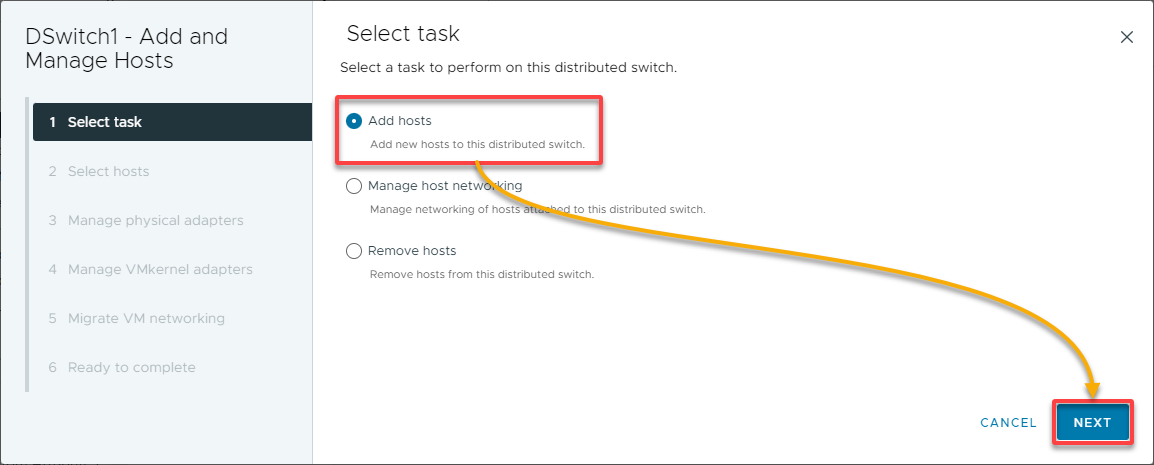
3. In the Select task page, select the Add hosts option since you are adding a new host, and click Next.
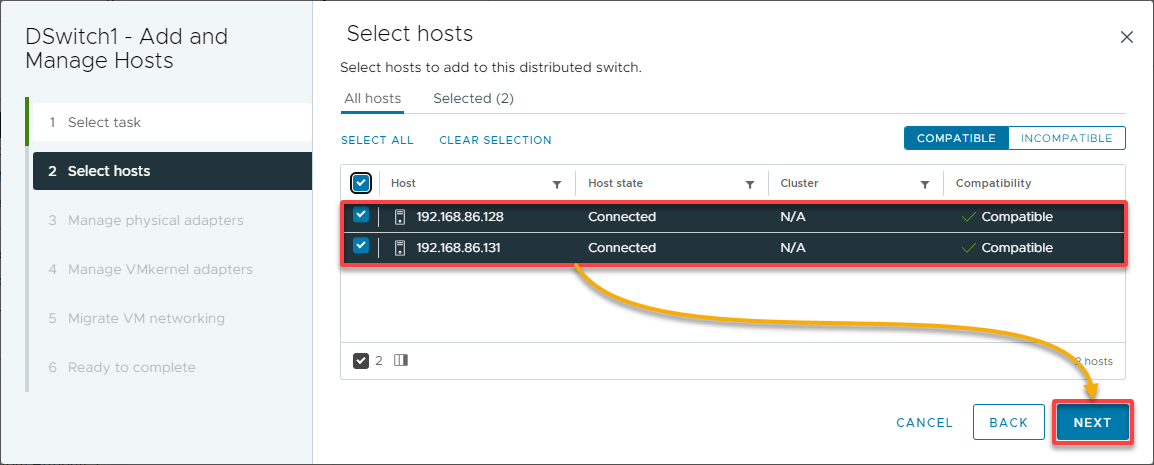
4. Now, select the ESXi hosts you want to add to your distributed switch, and click Next.
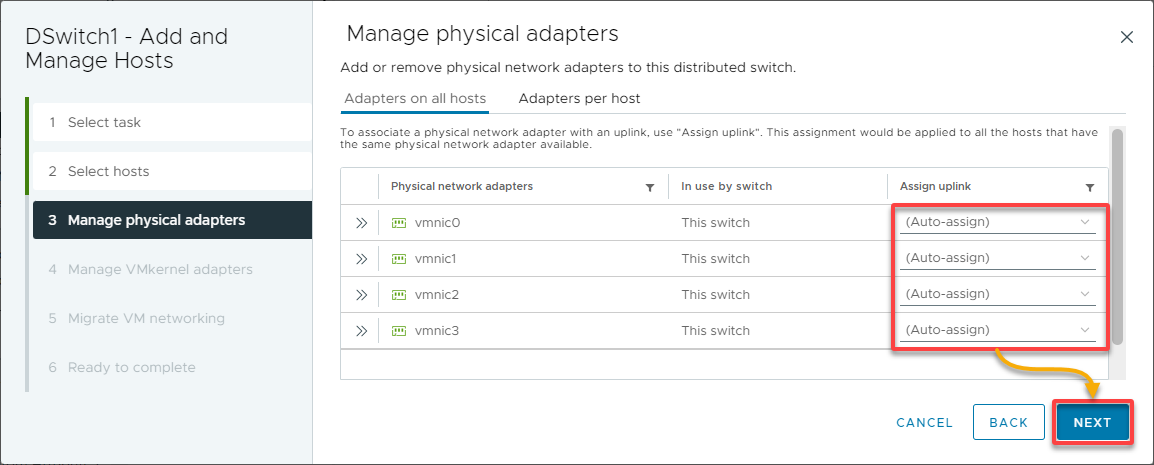
5. Optionally, specify the number of uplinks (i.e., vmnics) to assign to your distributed switch on each host (or choose the default settings), and click Next.
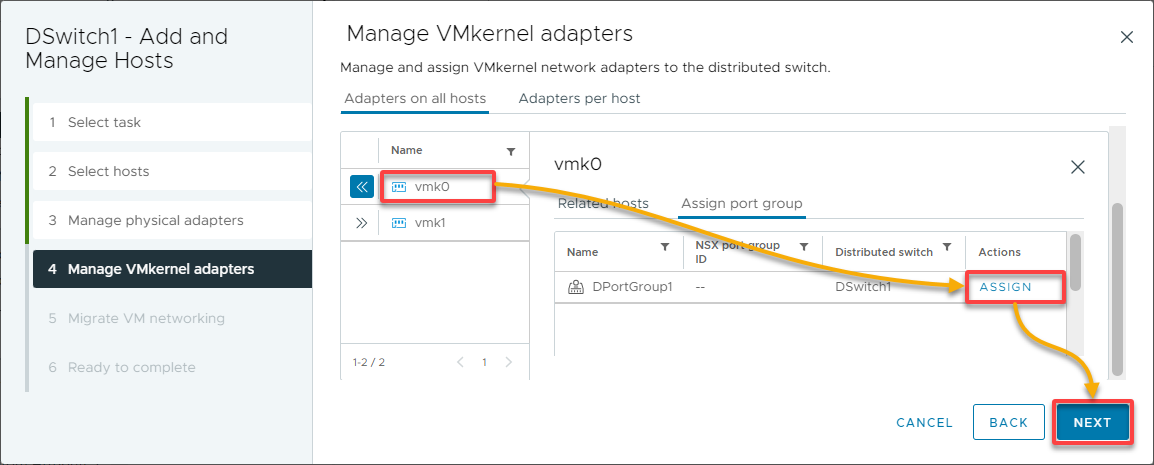
6. Configure VMkernel network adapters (vmk), which is optional, by assigning them a port group (or leaving the default settings) and clicking Next.
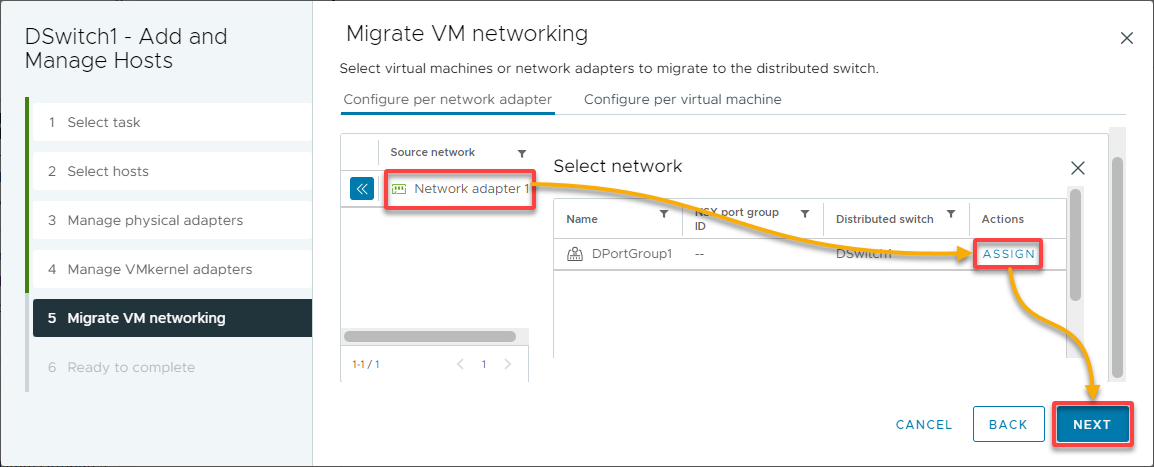
7. Next, choose Network adapter 1, click ASSIGN adjacent to your desired distributed port group (i.e., DPortGroup1), and click Next.
This action connects your VM to the distributed switch.
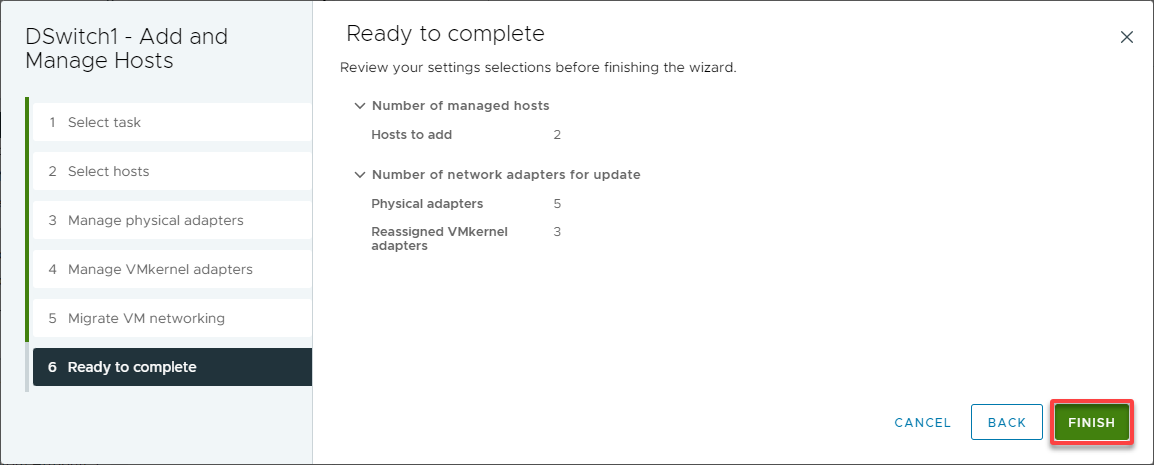
8. Lastly, review your selected settings and click Finish to finalize adding hosts to your distributed switch.
Now, you can manage network configurations, such as VLANs, security policies, and load balancing, from a centralized location. Moreover, any changes to your distributed switch automatically apply to all hosts connected to that switch.
Configuring Distributed Port Group Settings
A distributed port group is a logical entity that defines networking settings for a group of VM network adapters. These settings control how your VMs communicate with each other and external networks.
Configuring distributed port group settings lets you modify networking policies for multiple port groups on a vSphere distributed switch.
1. On your distributed switch’s page (DSwitch1), click on ACTIONS → Distributed Port Group → Manage Distributed Port Groups.
A wizard opens where you can manage distributed port groups (step two).

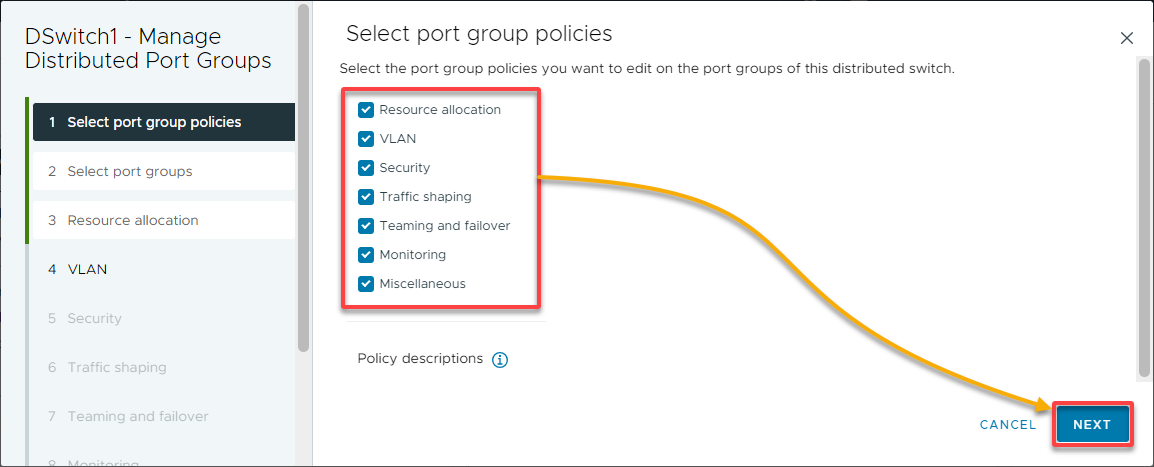
2. Next, tick the boxes next to the policy categories to modify, and click Next.
Port group policies define the rules and configurations that govern network traffic behavior for VMs within a specific port group.
3. Next, select your distributed port group (i.e., DPortGroup1) to edit, and click Next.
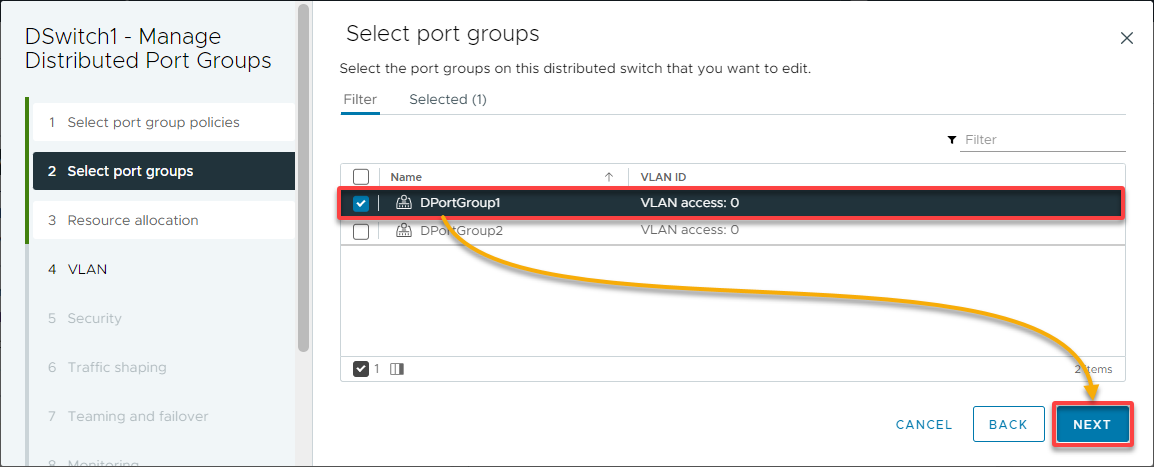
💡 Note that the following steps are optional, and you can keep clicking Next to opt with the default settings.
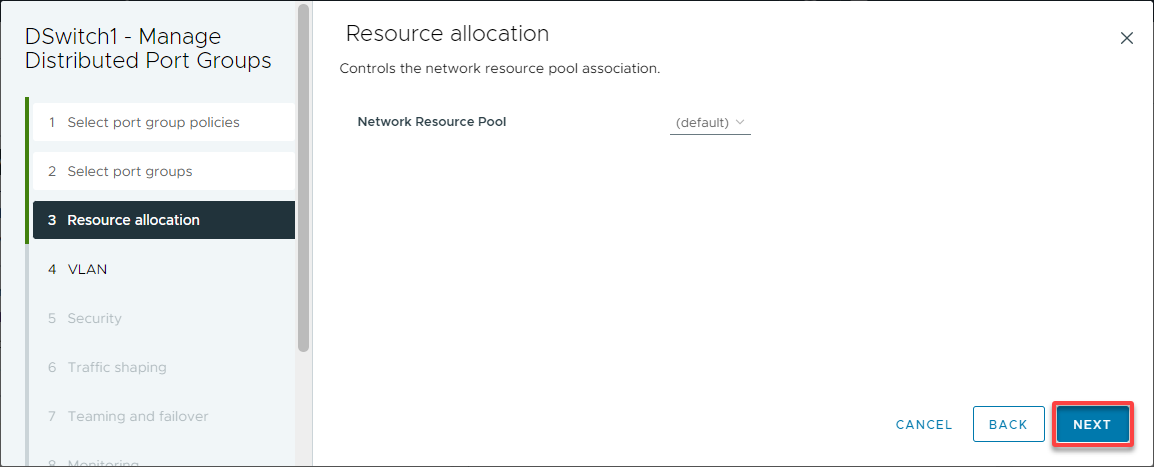
4. Now, use the Network Resource Pool drop-down field to add or remove resource allocations, and click Next. This tutorial uses the default network resource pool, as shown below.
A network resource pool allows you to prioritize network traffic for specific applications or VMs.
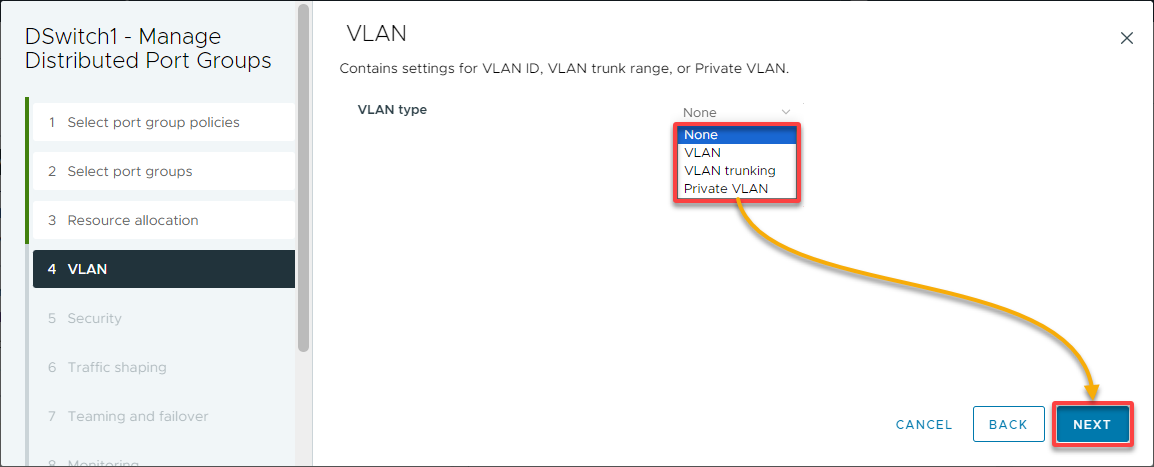
5. On the VLAN page, use the drop-down menu to edit the VLAN policy (or keep None selected), and click Next.
These options allow assigning a VLAN ID to a port group, enabling the segregation of network traffic based on VLANs.
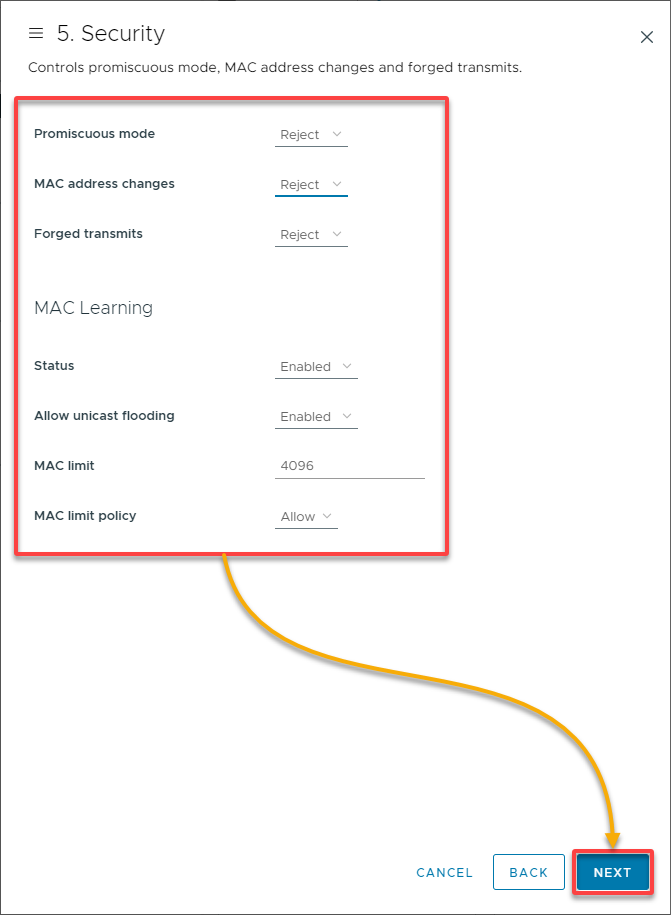
6. Configure the security by selecting options in the drop-down fields to edit the security exceptions for enhanced security and click Next.
7. Configure the traffic shaping using the drop-down fields to enable or disable Ingress or Egress traffic shaping and click Next.
These settings help to manage the amount of inbound and outbound network traffic for VMs in a port group.

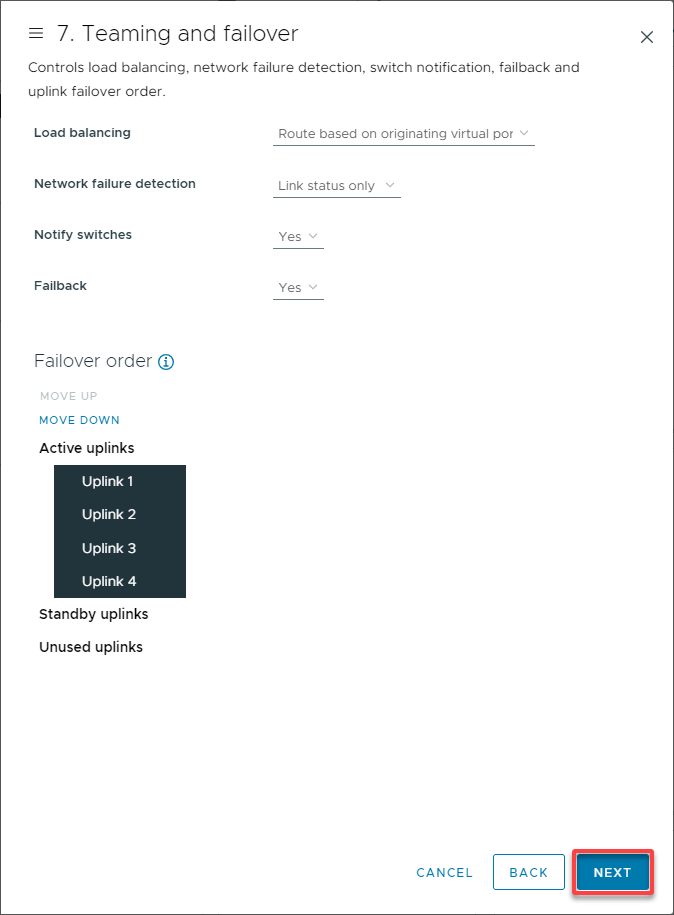
8. Next, edit the teaming and failover settings with the drop-down fields and click Next.
These settings allow you to configure load-balancing algorithms and teaming policies for the network adapters of VMs.
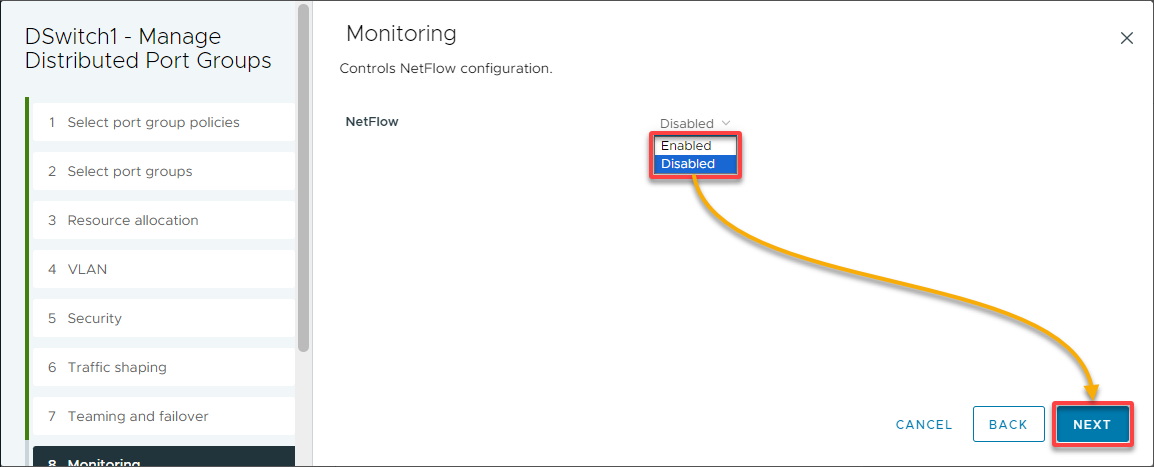
9. On the Monitoring page, enable or disable NetFlow with the drop-down fields, and click Next.
NetFlow provides visibility into network traffic patterns for monitoring and troubleshooting purposes.
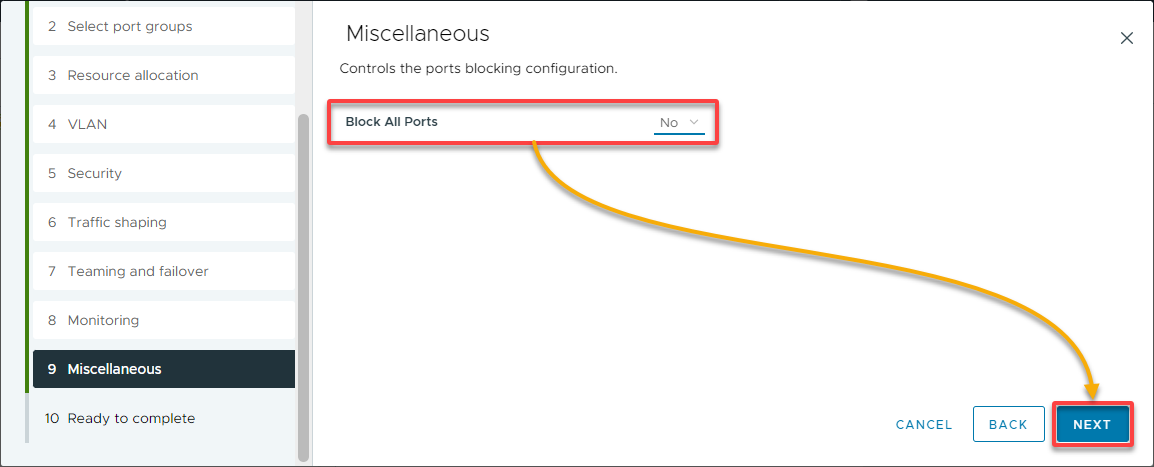
10. Select Yes or No from the drop-down field, and click Next.
Note that selecting Yes shuts down all ports in the port group, which disrupts the normal network operations of the hosts or virtual machines using the ports.
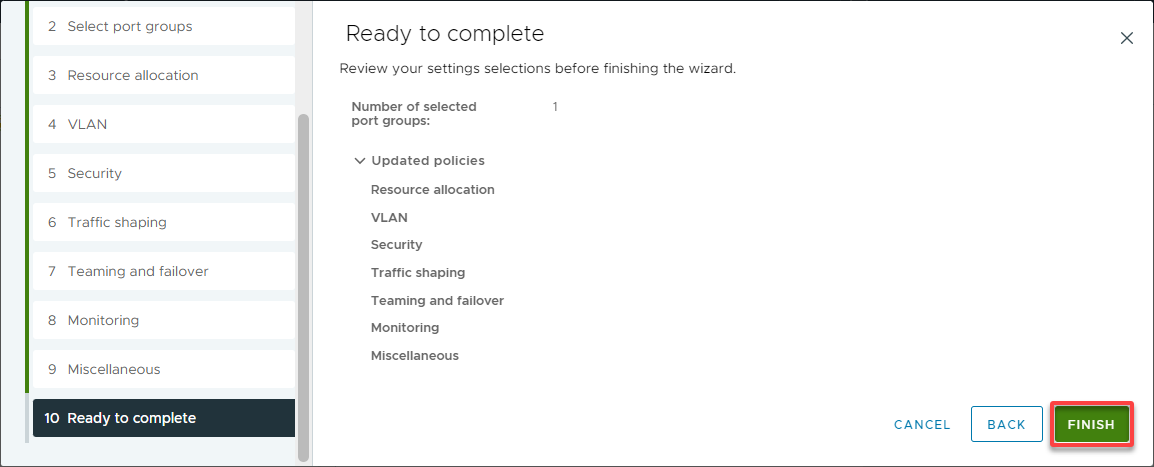
11. Finally, review your selected settings and click Finish to save changes to your distributed port group settings.
Conclusion
Throughout this tutorial, you have gone through practical examples to understand better how VMware networking works. You can now confidently create and connect virtual switches to your VMs, configure VLANs, and distribute switches for your VMware virtualization environment.
With your fully functional virtual networking, why not explore the VMware vRealize Network Insight and vRealize Operations Manager tools? Look into how you can effectively monitor and troubleshoot your network performance!


