


If you’ve found yourself with too many physical servers consuming too much electricity and taking up way too much data center space, it’s time to virtualize them. Or maybe you need to convert a Hyper-V virtual machine (VM) to VMware. The VMware Converter utility or VMware vCenter Converter is a great way to do that.
The VMware Center Converter converts physical machines running Windows and Linux operating systems into VMware Workstation, VMware Player, or VMware vSphere virtual machines.
This tutorial will teach you how to install VMware vCenter Converter, connect to physical machines, and convert virtual machines from Hyper-V into VMware. By the end of the article, you will know enough to begin large-scale P2V operations!
Kick it!
VMware ceased general support for vCenter Converter Standalone 6.2 as of 2019-12-14 per the Product Lifecycle Matrix (vmware.com) notes.
Prerequisites
When migrating existing VMs, check out VMware vSphere to leverage advanced features and networking. Make local VM development a cinch with VMware Workstation PRO & Player.
To follow along with this tutorial, you are going to need the following:
- A Windows computer to install the VMware converter on. Specific prereqs will be provided in each section where applicable.
- A user account with admin privileges on the machine(s) you’ll be converting.
- (Optional) VMware ESXi – You’ll need a place to host your newly converted machines. This tutorial will use VMware ESXi v7.0.
Downloading and Installing VMware Converter
Before you being converting physical computers into virtual machines, you must download and install vCenter Converter Standalone. To do that:
1. Open your favorite web browser and navigate to the VMware Customer Connect All Products page.
If you do not have an existing account, you will first need to register for a new account.
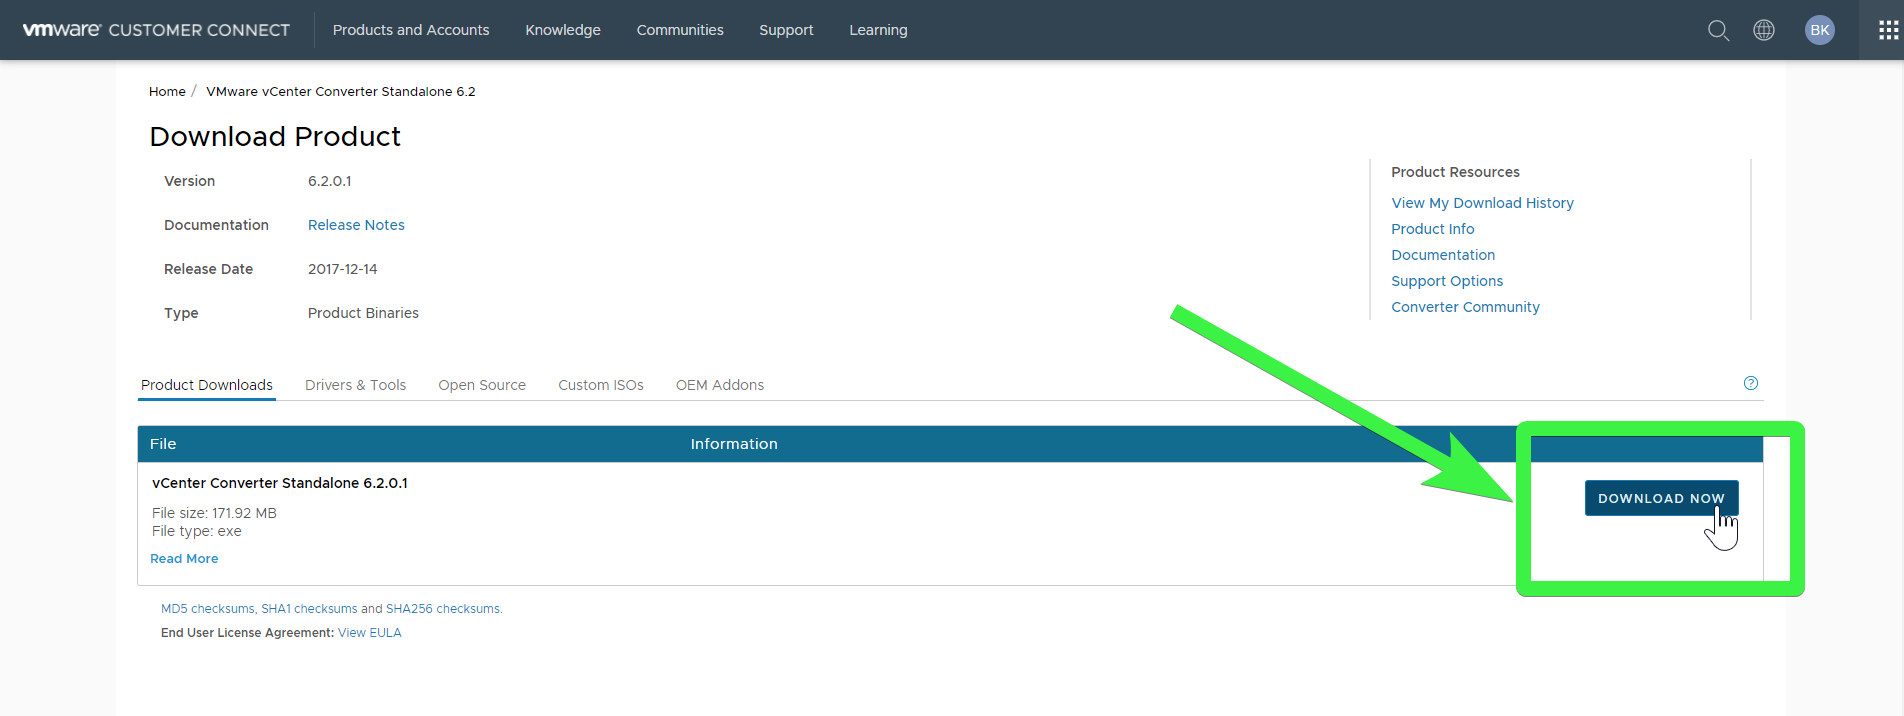
2. Search for “VMware vCenter Converter Standalone” and click on Download Product to get to the download page.
3. Click on the version shown under Product Downloads. At the time of this writing, the latest version is v6.2.0.

4. Click on the Download Now button to begin the download.
5. Find the installer you just downloaded and run it accepting all defaults and the license agreement.
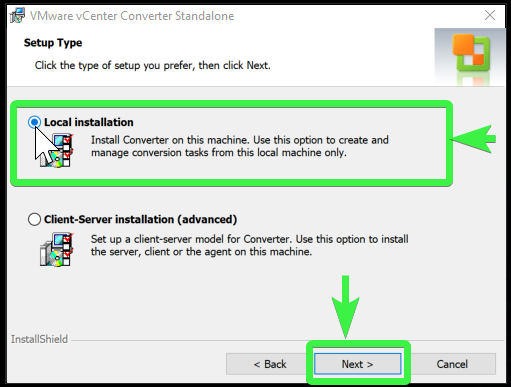
6. When you get to the Setup Type screen, choose the default of Local Installation and then click Next.
The VMware Converter also supports a client-server model. Selecting Client-Server installation (advanced) defines adds a port configuration. There are HTTPS (443), HTTP (80), and the Agent Service Port (9089) that can be configured or left to their default values.
In client-server mode, you can start vCenter Converter and connect to another computer with the client-server mode installed and VMware converter services running. You can perform conversions using a higher-powered server with more bandwidth, a faster CPU, and more memory to do concurrent conversions.
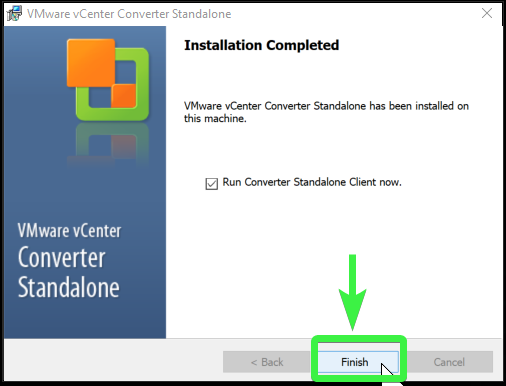
7. Continue through the rest of the prompts until and click on the Finish button when complete. The VMware vCenter Converter Standalone application opens.
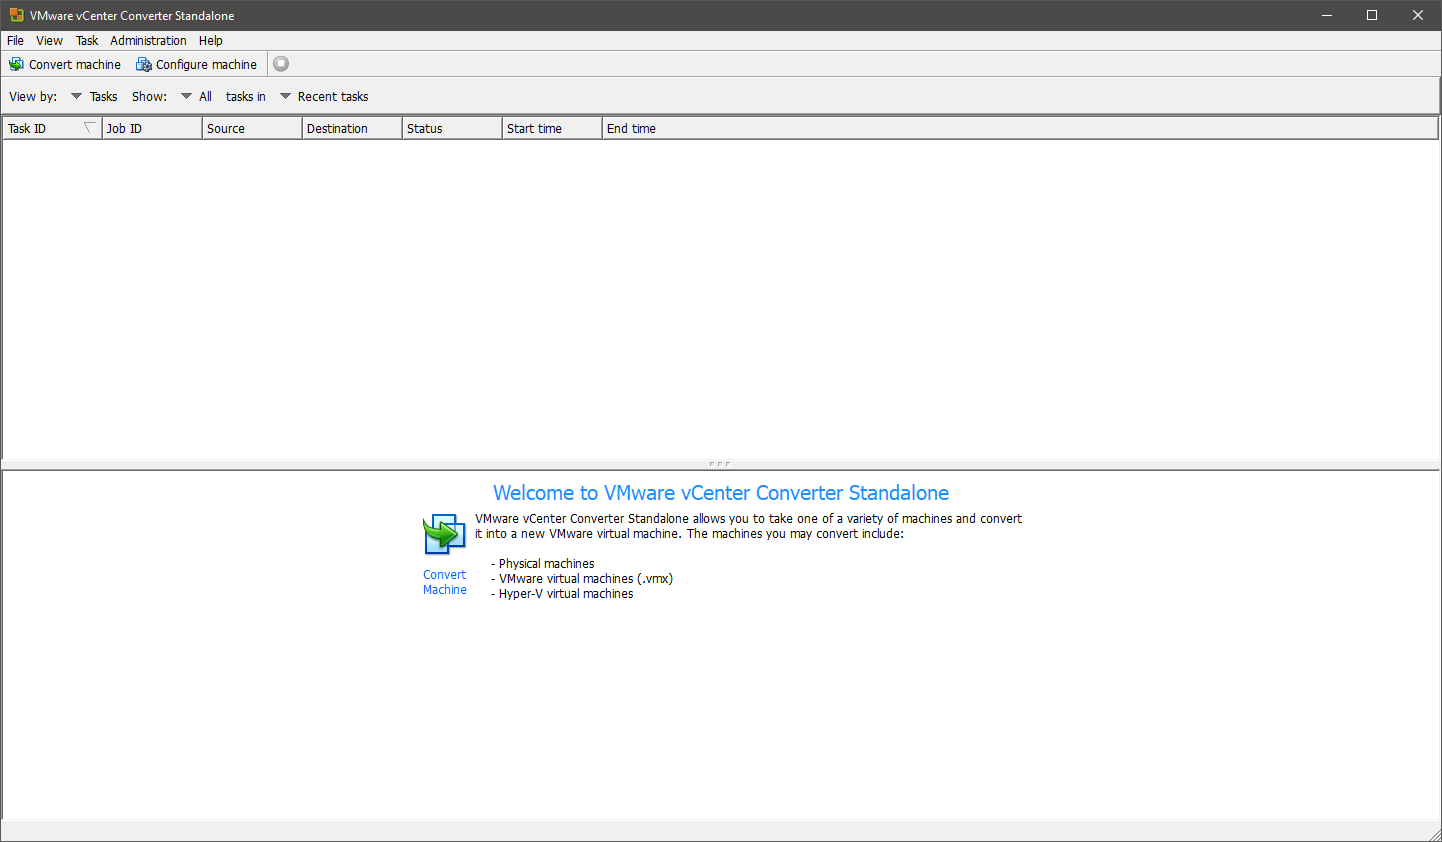
You’ll now be at the main screen of the VMware Center Converter Standalone utility and ready to go!
Converting a Windows or Linux Computer (Physical or Hyper-V)
If you have an old Windows or Linux computer sitting around on failing hardware where, for whatever reason, you cannot upgrade the operating system (OS), it’s time to virtualize it.
It’s time to bring in VMware vCenter Converter and virtualize that old Windows or Linux machine!
Windows Host Prerequisites
Before you get too crazy and try to start virtualizing that old Windows machine, you must first ensure the Windows computer you’re virtualizing meets a few prerequisites.
1. The Windows computer running a supported operating system.
2. If enabled, the Windows firewall is disabled. But, disabling the firewall is temporary, and you can re-enable the firewall after a successful conversion.
3. Simple file-sharing is disabled.
4. User Account Control (UAC) is turned off or ensure you’re using a local Administrator account on the Windows computer being converted.
5. The destination where you’ll be moving the newly converted machine has enough resources to support the VM. The physical host’s memory and disk space will be replicated to your destination VM host.
Linux Host Prerequisites
If you’re converting a Linux host, just like Windows, ensure you have a few things configured ahead of time.
- SSH is enabled
- You have access to the root account or an account with sudo privileges to run commands without a password.
- Have the GRUB boot loader installed. LILO is not supported.
Hyper-V VM Prerequisites
- The Hyper-V VM is shut down
vCenter Converter can also convert existing VMware virtual machines on older infrastructure or those on VMware Workstation.
Setting up the Source System
If you’ve met all of the prerequisites for the computer to convert and you’d like to convert a physical host, it’s time to get down to business and begin the conversion process. First up, you must deploy the agent to the remote host. The agent is the software that will communicate with the Converter utility to perform the conversion.
You do not need to install a converter agent for Hyper-V VMs.
1. Click the Convert Machine button in the top-left corner of the window.
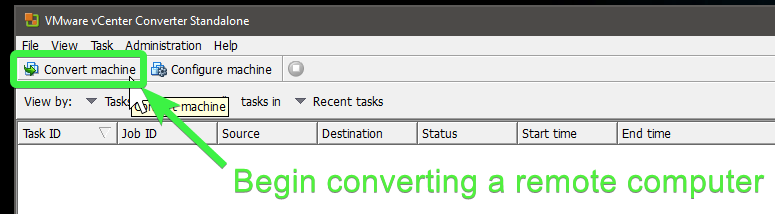
2. The computer the tutorial will be converting is not the same machine as the VMware Converter tool installed and powered on.
Physical Windows Hosts
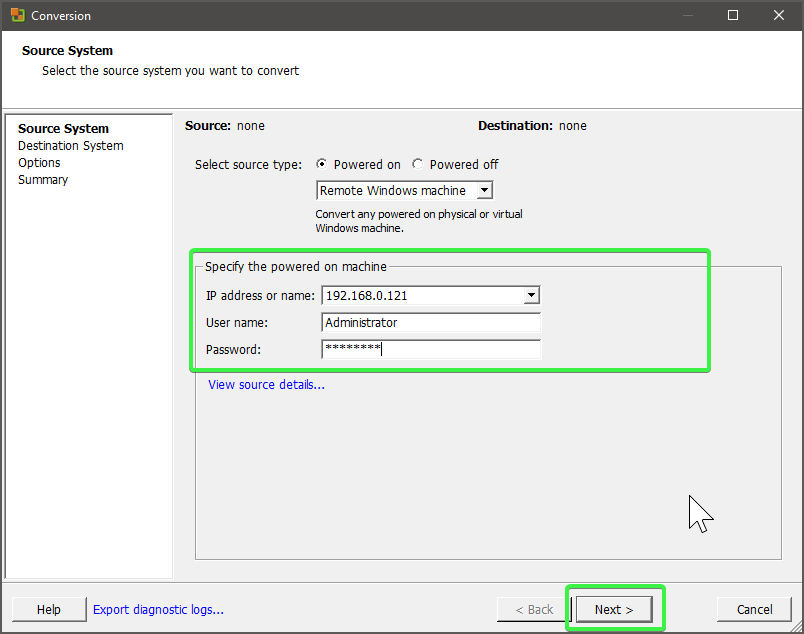
Choose the Powered On option followed by the Remote Windows machine option.
All Windows hosts must be powered on to perform a conversion unless they are a Hyper-V guest VM. To access those options you would choose the Powered off radio button.
Next, specify the IP Address or fully-qualified domain name of the remote Windows host in the IP address or name box. Next, specify the User name and Password of the local administrative account on the remote Windows host. This tutorial uses a Local Administrator account.
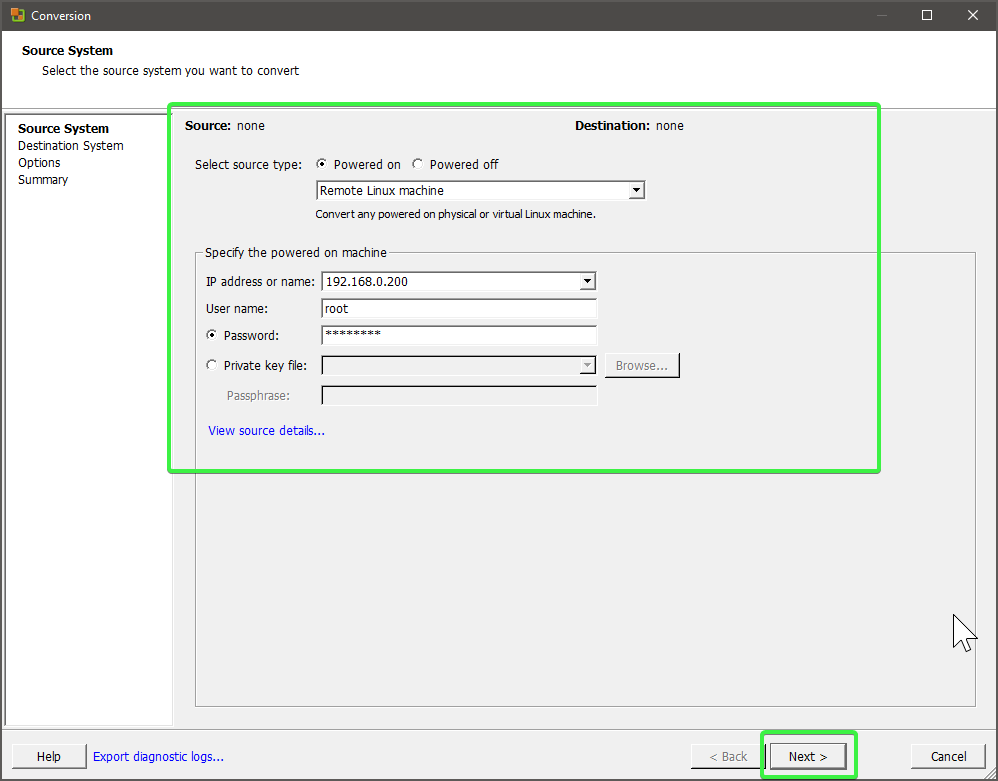
Physical Linux Hosts
Select Remote Linux machine for the source type and provide the IP address or FQDN of the remote Linux host and the username to authenticate to the host.
If you use passwordless logins with SSH, you will need a private key file here that matches the public key file configured on the remote Linux machine.
Click Next to proceed to the next screen.
You might be prompted with a Remote Host Thumbprint. If so, click on Yes to continue connecting to the host. This happens if the computer you are connecting from has never connected to the remote host before.
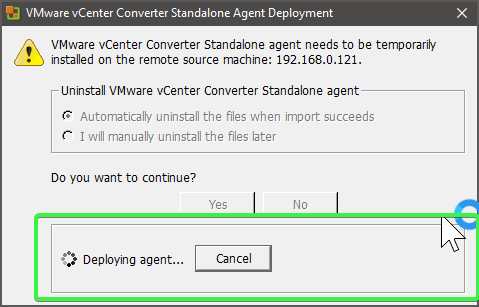
3. Now, click Yes to accept the default of Automatically uninstall the files when import succeeds to begin the agent installation. This process takes a few minutes.
Once you’ve created the new VM, you have no need for the conversion agent.
Hyper-V VMs Only
On the Source System screen, select the Powered Off option. Doing so will change the drop-down selections showing you an option for Hyper-V Server. Once selected, provide the IP address or FQDN of the Hyper-V host and the username to authenticate to the host.
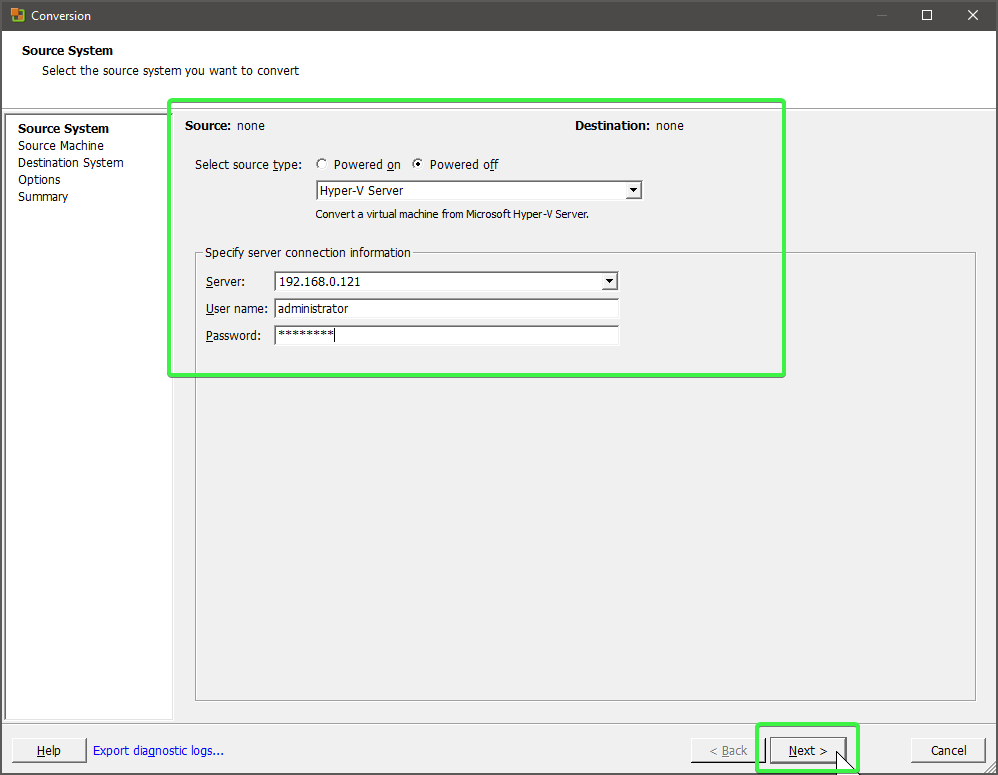
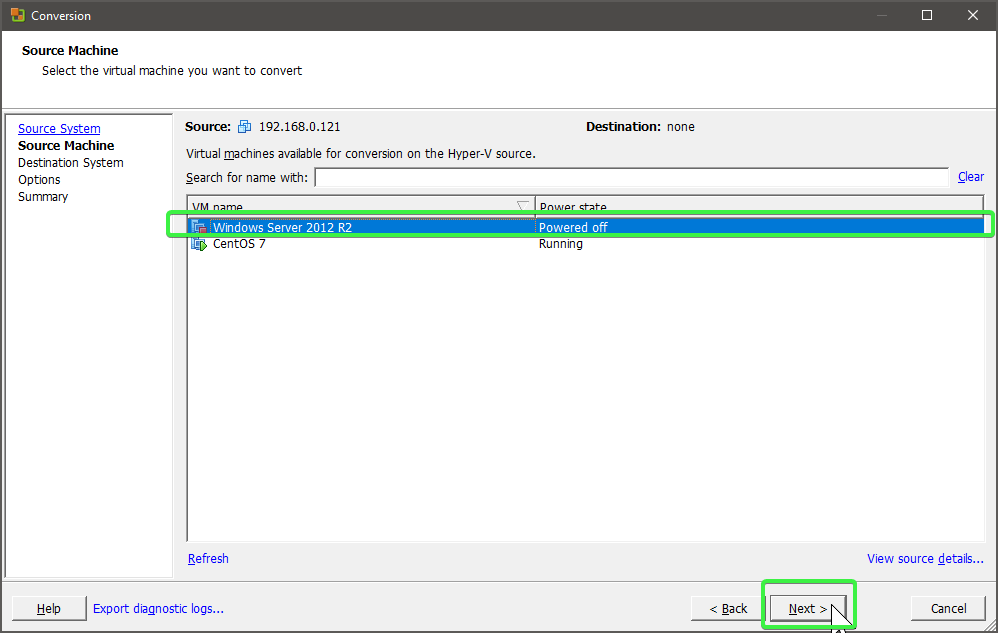
Once connected to the Hyper-V server, you will see a list of VM guests that are available. Select the VM you want to convert and click Next. In the example below, you are converting the VM guest Windows Server.
You can only convert powered off VMs on Hyper-V.
Configuring the VM’s Destination Host and Other Options
It’s time to configure some settings about the remote host.
1. Since the tutorial will be hosting the new VM on VMware ESXi, choose VMware Infrastructure virtual machine for the Selection destination type dropdown.
There are two other options available in the drop-down. VMware Workstation or other VMware Virtual Machine. These are useful for making a lab machine but not used for production P2V operations usually.
When you select VMware Infrastructure virtual machine, you must then provide the host details of your ESXi host or vCenter server cluster. Provide the IP address or FQDN of the VMware hypervisor host in the Server dropdown along with a user with permission to log into the VMware Infrastructure.
The user account used to connect should have the appropriate rights to perform administrative operations on an ESXi host or vSphere cluster.
When ready, click on Next.

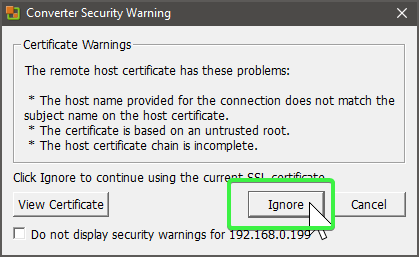
2. You may now receive a Converter Security Warning box regarding some Certificate Warnings. Click Ignore. You will receive this warning because the certificate isn’t trusted.
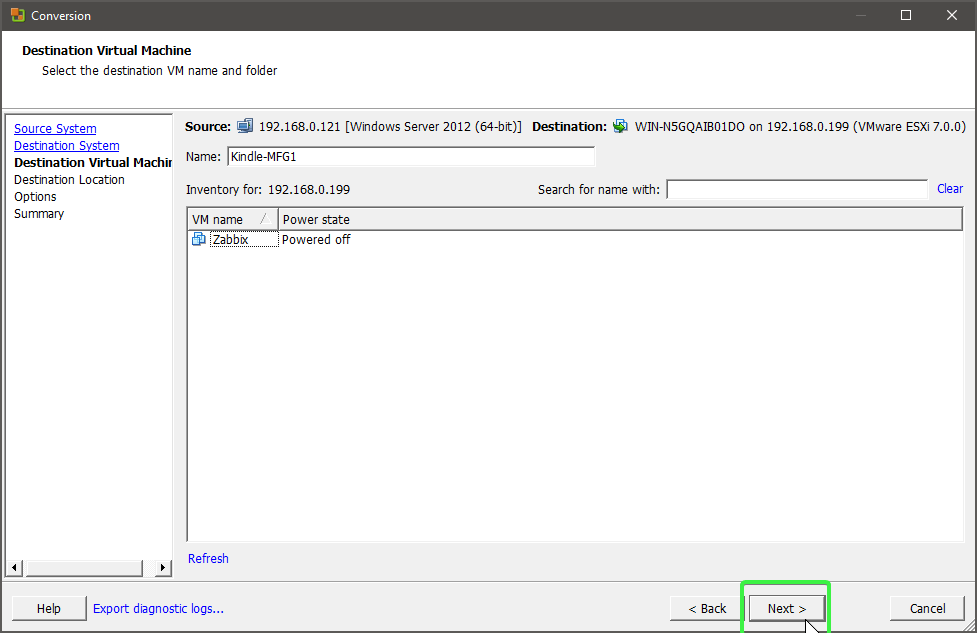
You should then come to an inventory of all VM guests on the host.
3. Provide a Name for the VM that you’ll create and click Next.
4. Now, select what Datastore and Virtual machine version you’d like the VM to be. Be sure to choose a datastore that has plenty of free space. You don’t want to convert a virtual machine that cannot be stored.
Also, always specify the virtual machine version that matches your VMware Infrastructure supported version. Version 17 is supported on ESXi 7.0 but wouldn’t be supported on ESXi 6.0, for example.
Click Next, when complete.

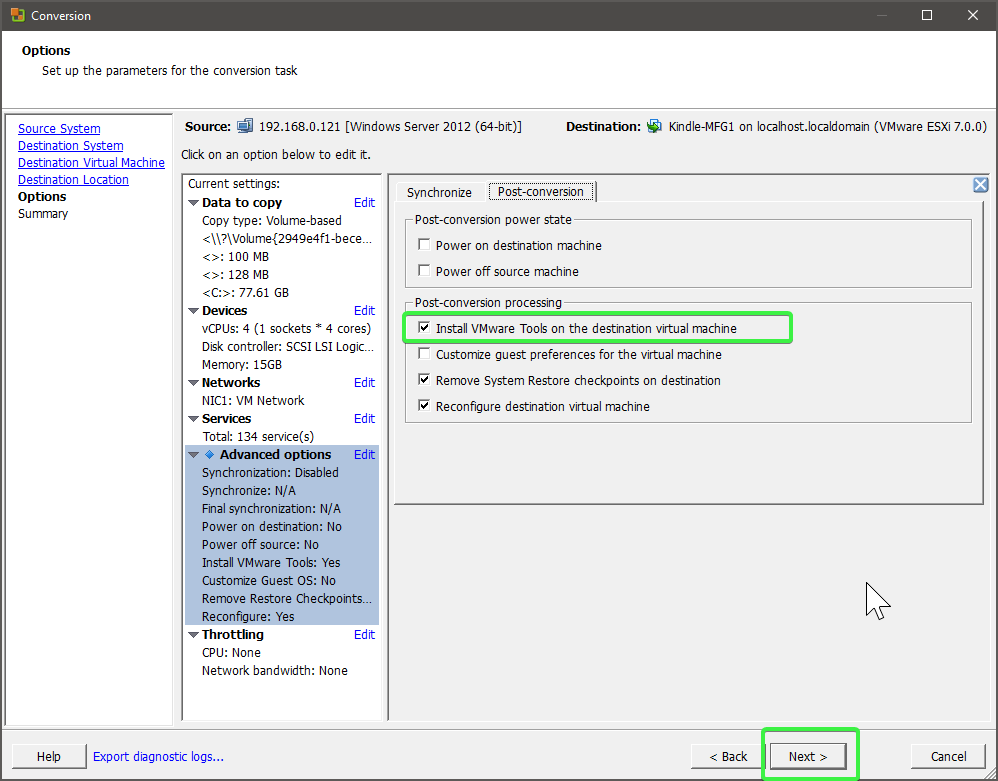
5. On the Options screen, configure a few settings.
If you’re interested in a breakdown of many options on the Options screen, skip to the Adjusting Conversion Options section.
Physical Windows Hosts
Select the check box for Install VMware Tools on the destination virtual machine under Post-conversion processing.
VMware Tools provides a set of services that enhance the manageability of a VMware virtual machine. You want this on your converted VM.
Hyper-V VMs
No extra configuration is necessary for Hyper-V VMs on the Options screen.
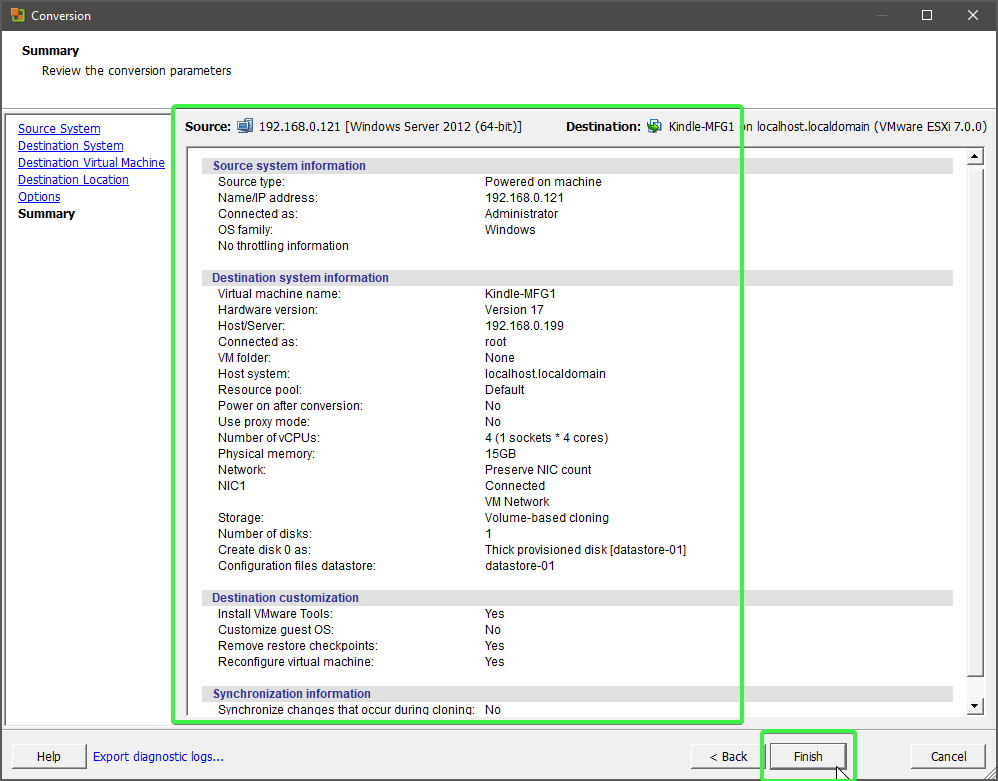
Finally, on the Summary page, review the configuration settings, and when satisfied, click Finish to begin the conversion process.
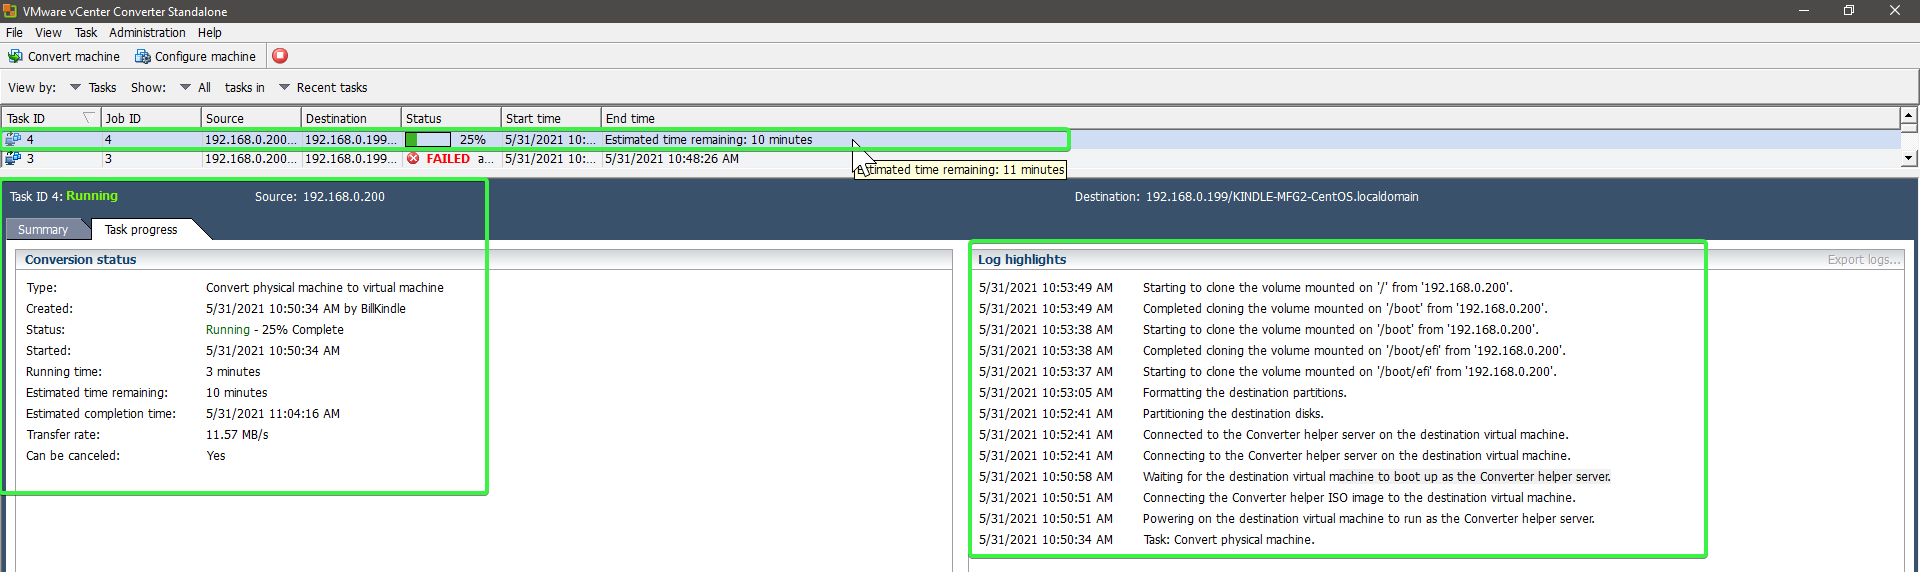
After clicking Finish, you are taken back to the main vCenter Converter screen where you’ll now see the conversion is Running along with the estimated time the conversion will take.
7. Once the Status has changed to Completed, start the newly converted virtual machine. Since the tutorial is using ESXi, the below screenshot is showing that.
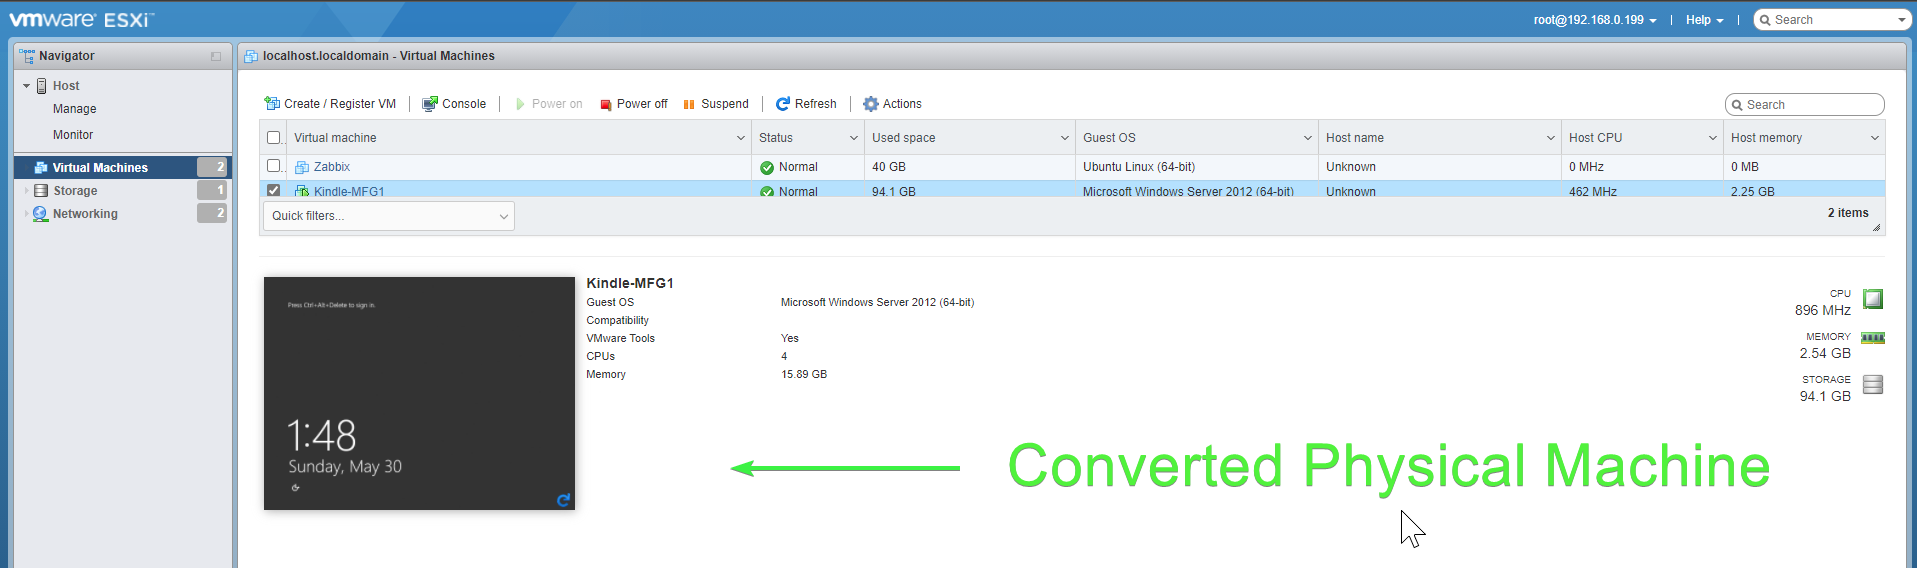
8. Log into the newly-created VM and verify all networking, services, and apps are working correctly.
9. Finally, shut down the physical host permanently.
That’s it! You’ve converted a physical computer to a VMware VM!
Adjusting Conversion Options
When converting a physical or Hyper-V host in the last section, you came across an Options screen. This screen contained a whole lot of information that the tutorial skipped over.
When learning how to convert a VM with the VMware converter, you don’t have to pay attention to these options. But, when you’re converting a host in production, the story changes.
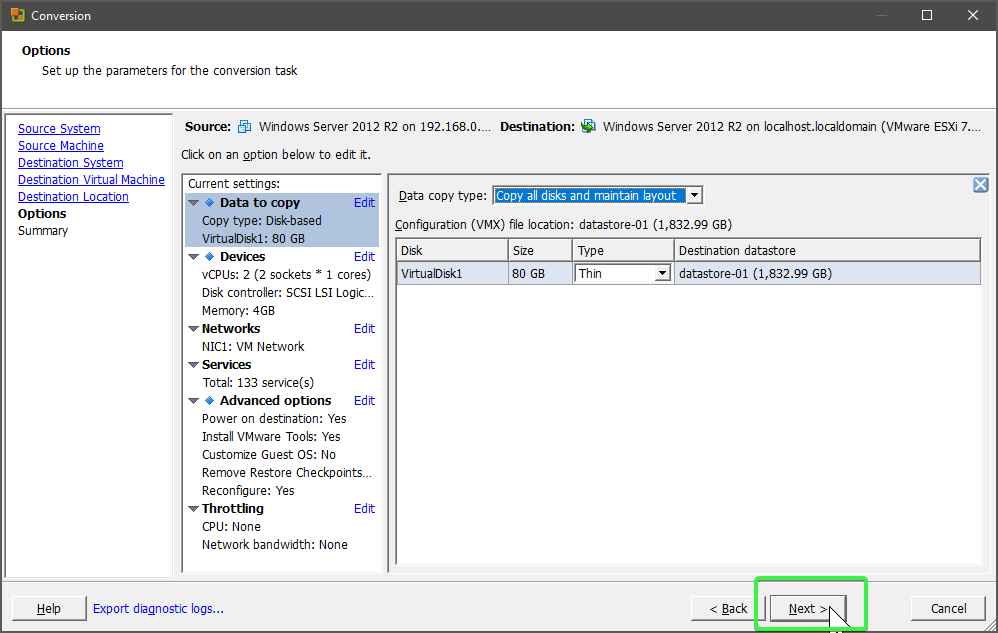
Defining Thin-Provisioned Disks (Data to Copy)
Inside the Data to Copy section, you’ll see many options on how the converter will read source storage and provision the destination storage.
By default, VMware vCenter Converter creates thick-provisioned disks when creating disks for the converted VMs. Thick-provisioned disks are virtual disks that reserve as much space on the datastore as they are assigned. A thin-provisioned virtual disk, on the other hand, doesn’t reserve space on the datastore.
How do you choose one or the other? By adjusting the Destination size options.
Click on the Advanced link in the Data to Copy section.
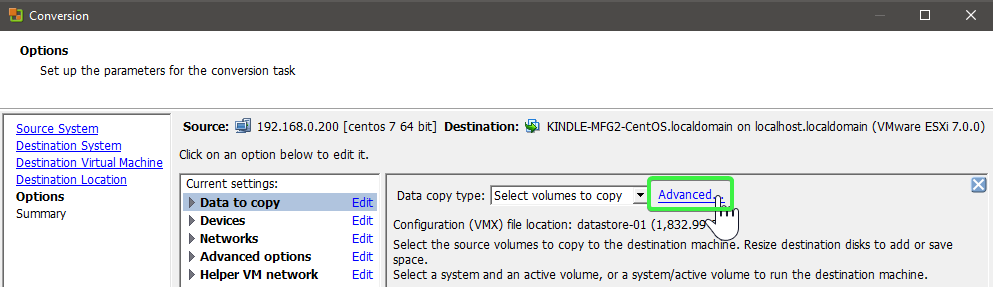
Notice the Used space and Total space columns, as shown below. The used space is significantly smaller than the physically allocated space.
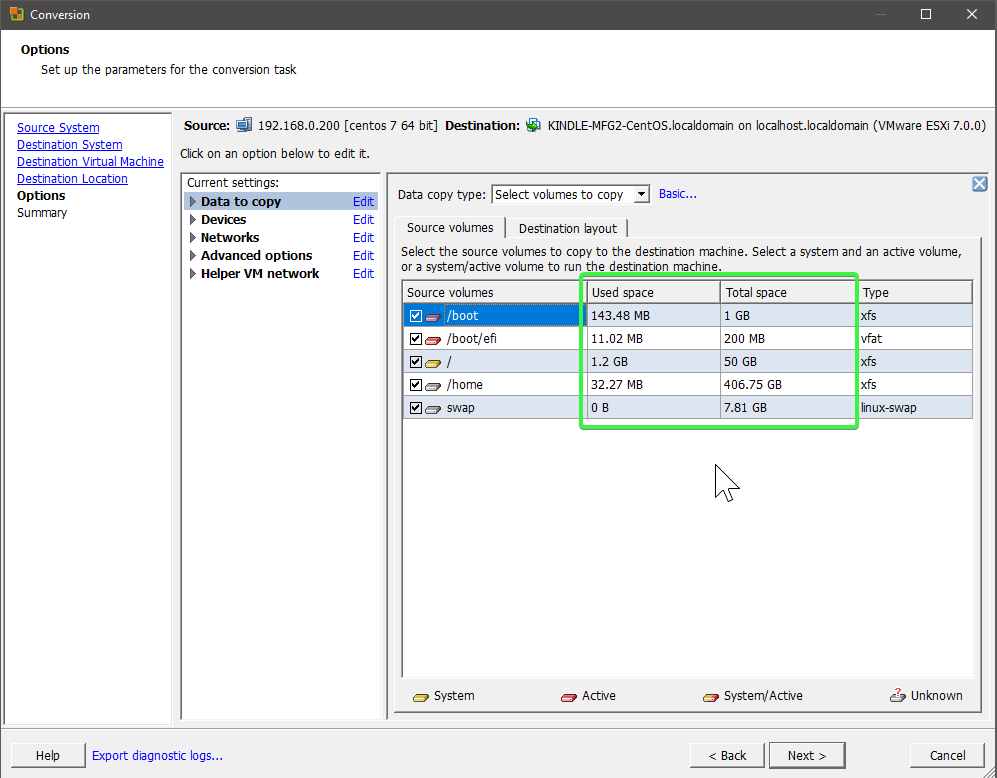
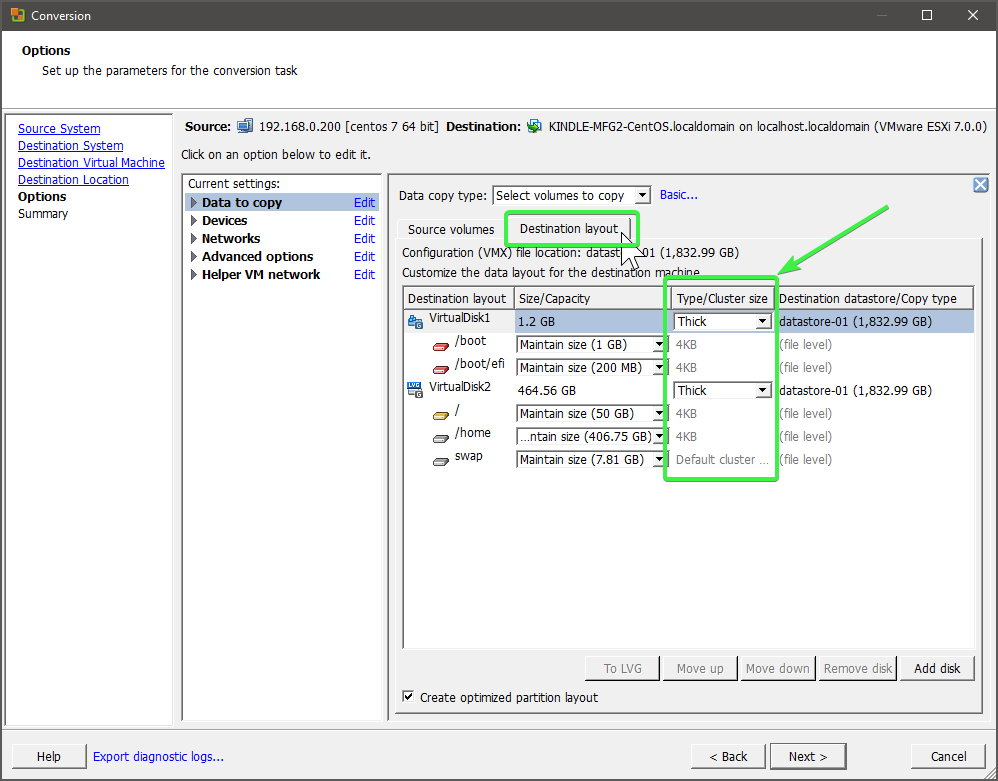
Click on the Destination layout tab. This tab contains information about each volume that the VMware converter will create. You can see below that it defaults to a Thick-provisioned type.
Changing the Type/cluster size option to Thin will ensure the converted VM will take up less disk space initially when fully converted.
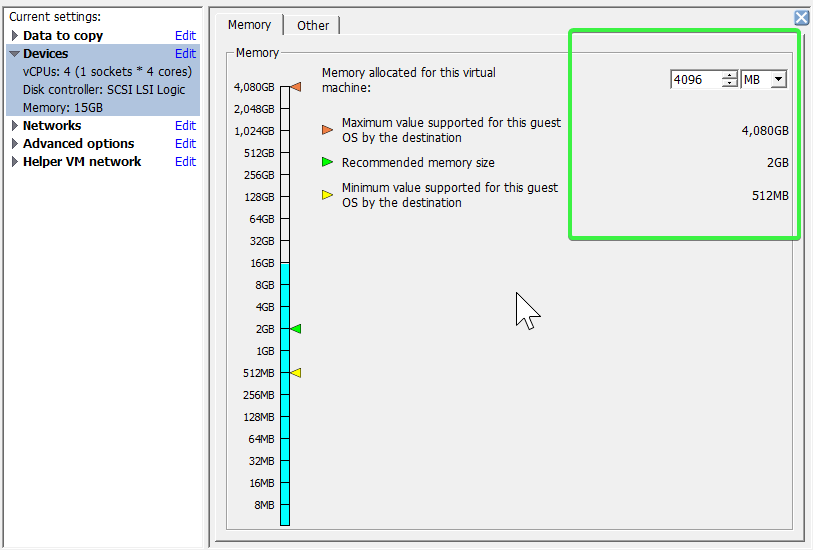
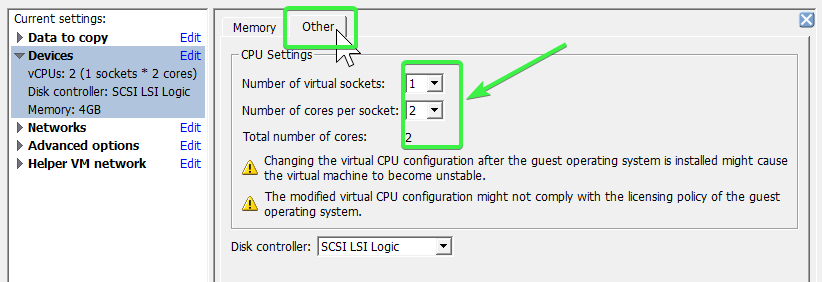
Adjusting Memory and vCPU (Devices)
One of the joys of virtualization is the ability to increase or decrease RAM and CPU allocation dynamically. This saves valuable system resources that can be provisioned to other machines that need additional resources in the short term.
You’ll immediately see the Memory tab on the Devices screen, which allows you to adjust the amount of memory the converted VM will have.
Click on the Other tab, and you can then adjust the number of virtual sockets and cores along with the virtualized disk controller.
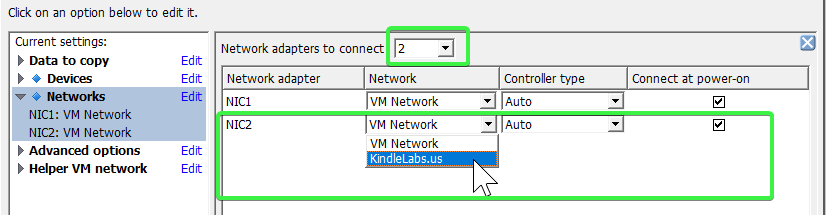
Defining a vNIC (Networks)
Imagine for a moment you are converting a virtual machine that will need a second vNIC for load balancing purposes. Your virtual host has plenty of physical NICs distributed among all your VM guests as virtual switches and virtual networks.
By default, the VMware Converter will only create a single virtual NIC. To accommodate this scenario, you can allocate those additional vNICs during the conversion process.
In the Networks screen, you can define the number of vNICs you’d like to assign to the VM along with options on which network to connect them to, the type of controller used, and to connect them when the VM is powered on.
Post-Conversion Options (Advanced Options)
If you take a peek under the Advanced Options section, you’ll see a few different tasks to perform once the conversion occurs.
Under Advanced Options, you can force the Converter to immediately power on or off the converted machine, install the latest VMware Tools that further enhance the virtual machine’s capabilities, or configure several guest OS preferences.
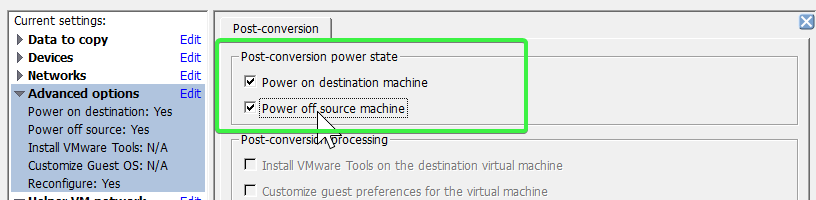
These settings could have unintended consequences when changed during conversion. If you have to make any firewall rule adjustments, for example, your MAC addresses will change and have to be updated. The same rule applies to any DHCP reservations that are tied to MAC addresses.
Interesting Windows Guest OS Preferences
If you’re converting a physical Windows host, several options are specific to Windows, you might find interesting.
- Customizing the Identity fo the Destination VM
- Entering Windows Licensing
- Setting Time Zone of Destination VM
- Assigning Workgroup or Domain Details
- Stop Running Services on Source Machine
One option, in particular, Synchronize the Destination Machine with Changes Made to the Source Machine, is a nice feature when converting Windows computers. This option enables the VMware Converter to constantly monitor a physical host or source VM and sync changes to the converted VM.
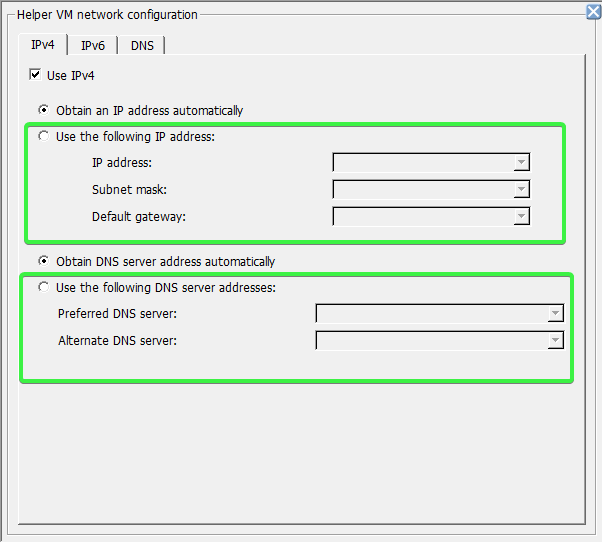
The Helper VM (Helper VM network)
For the VMware vCenter Converter to perform a seamless conversion, a small VM known as a helper VM is created temporarily on your VM destination. This helper VM processes the data the Converter accumulates throughout the conversion process.
To function properly, the helper VM needs network access to the source machine so that the Convert can clone files from the source machine. The helper VM uses DHCP to get an IP address by default. But, if your network does not have DHCP enabled, you will need to provide the helper VM with a static IP address.
Under the Helper VM network section, you’ll see various radio buttons allowing you to statically assign the helper VM’s IP address and DNS servers.
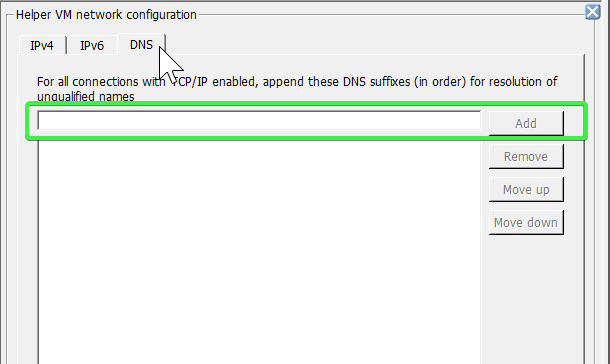
Click on the DNS table and you’ll be able to add DNS suffixes for name resolution
Conclusion
When migrating existing VMs, check out VMware vSphere to leverage advanced features and networking. Make local VM development a cinch with VMware Workstation PRO & Player.
In this guide, you’ve learned how to install, configure, and convert physical hosts and Hyper-V VMs using VMware vCenter Converter.
With your newfound knowledge, get out there, find those aging machines and get them virtualized!


