


When you’re developing in Visual Studio, writing unit tests is key for any successful software project. But writing a unit test is only one piece of the testing workflow. You must then execute and organize the output in a logical manner. This is where Visual Studio Test Explorer comes in handy.
Not a reader? Watch this related video tutorial!In this demo-driven tutorial, you will learn what Visual Studio Test Explorer is and how to leverage this handy feature to organize all of your test cases.
What is Visual Studio Test Explorer?
When you create a new project in Visual Studio, software developers typically (hopefully) also include unit tests in that project. Unit tests ensure the code runs as expected. But including tests doesn’t do much good if you don’t run and understand the results.
Visual Studio Test Explorer is your interface to unit tests. Test Explorer is a handy feature of Visual Studio that allows you to run unit tests within a project, customize how they’re run, and interpret their output.
Test Explorer allows you to manipulate the order that unit tests are run, create custom playlists to segment out which unit tests run, and run tests in various user-defined groups. Once executed, Test Explorer displays test results, how long each test ran and other messages generated during the test.
In a nutshell, Test Explorer is a feature in Visual Studio that helps you run and interpret unit test results.
Prerequisites
The remainder of this tutorial will be demo-driven. If you’d like to follow along with the demos provided, be sure to have the following:
- Visual Studio 2019 – This tutorial will use Community edition running on Windows 10 any edition will work.
- The .NET 5.0 language SDK – The SDK comes when you install .NET 5.0. The tutorial will use C#
Test Explorer supports any language that targets .NET, C/C++, Python, JavaScript, and more.
Test Explorer also supports other unit-testing frameworks like xunit and MSTest.
Setting up the Example Project
Rather than ramble on about Test Explorer without any real hands-on work, let’s get your hands dirty and work with a real Visual Studio project. For the rest of this tutorial, you’re going to work with a pre-created .NET 5.0 project called TestExplorerExample.
If you have your own project, Test Explorer will work just as well but the instructions provided in the tutorial will not be exactly the same.
To get started:
1. Clone the TestExplorerExample GitHub repository using Git. This tutorial will assume you’ve cloned the Git repository to ~/TestExplorerExample.
2. Open Visual Studio 2019.
3. In Visual Studio, navigate to the ~/TestExplorerExample folder and open the TestExplorerExample.sln solution file.
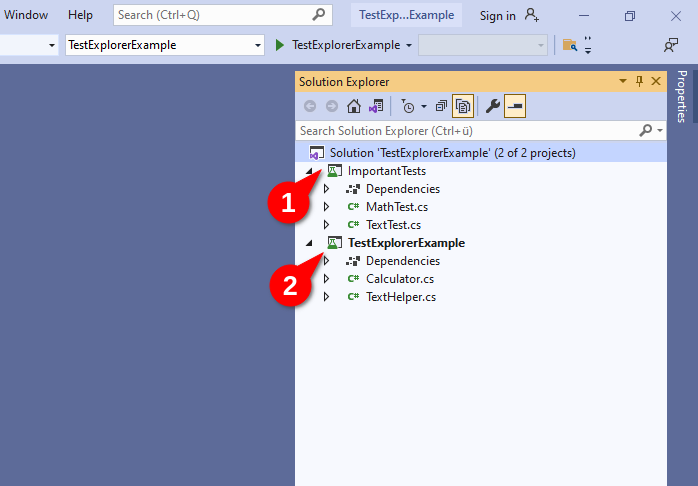
The solution contains two projects; the unit tests called ImportantTests and the application called TestExplorerSample as you can see below.
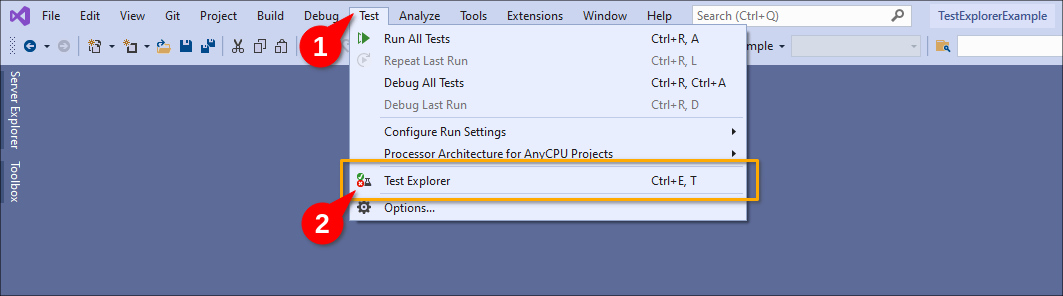
4. Now, click on the Test menu at the top of the screen and click on Test Explorer.
Test Explorer will either dock to one side or open as a separated window.
Like all Visual Studio windows, you can dock the window to the sides by dragging the window to the desired position.
Understanding the Test Explorer Interface
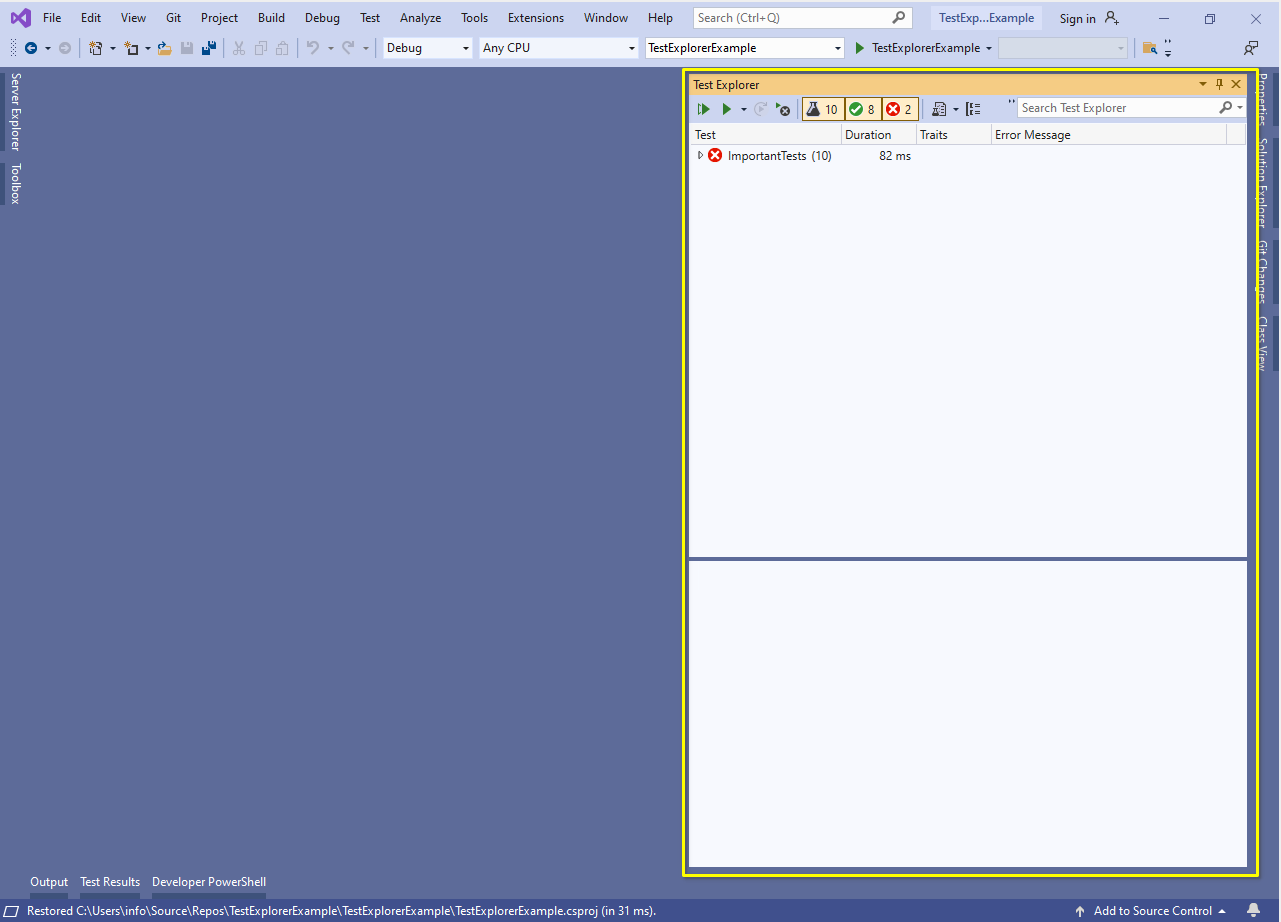
When you first open Visual Studio Test Explorer, you’ll immediately see three main areas
1. The toolbar with various elements to control tests. You can see beaker as a button and the number 10 beside it. That’s the number of tests defined in the ImportantTests project.
2. The list of available tests defined in groups (more later). In the example below, you can see your project called ImportantTests and has 10 unit tests inside.
3. A summary section that provides an overview of your unit tests and execution status (when the time comes).

Important: If you don’t see any unit tests show up in Test Explorer, initiate a project rebuild.
The Toolbar
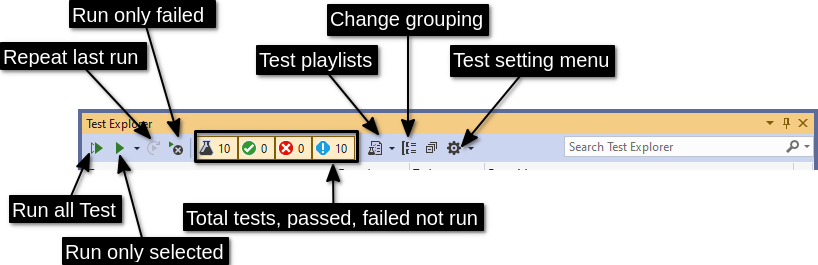
The toolbar is the most common place you’ll find yourself clicking around in. The toolbar is where you will run tests, define test groupings, and more.
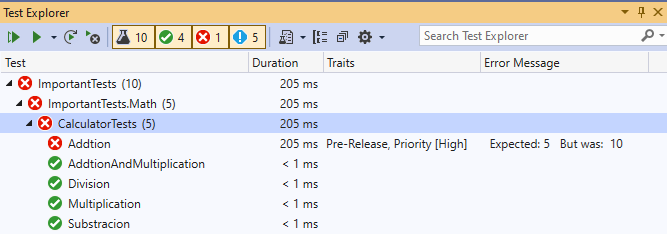
You can see a description of each element of the toolbar in the following screenshot. The tutorial project contains 10 tests. You can see the total number of tests to the right of the beaker icon along with the number of passed tests (0), failed tests (0) and those that have yet to run (10).
Once your project grows to dozens, hundreds or even thousands of tests, the Change grouping option will help you focus on specific parts of your project.
The Tests List
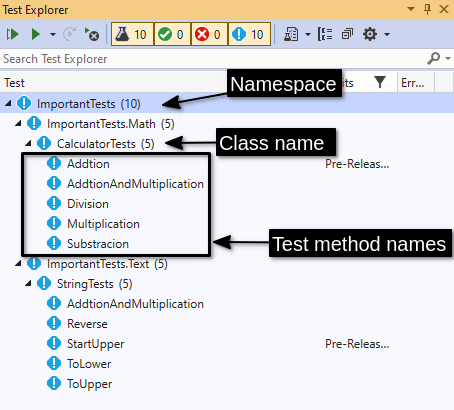
Click on the ImportantTests project in the test list pane and you’ll see below that Test Explorer breaks down the project into various default groups. These groups, by default, are broken down hierarchically from the Namespace —> Class Name —> test methods.
You’ll also see four default columns in the tests list:
- Test – The name of the test case.
- Duration – Once executed, how long the test lasted.
- Traits – Custom attributes that can be attached to unit tests .
- Error Message – Once executed and failed, the error that occurred.
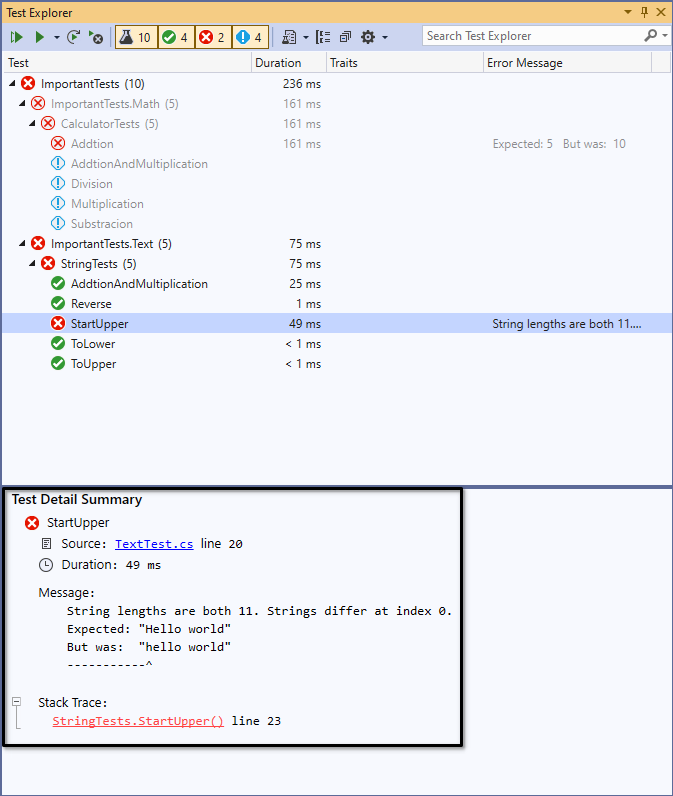
The Tests Summary
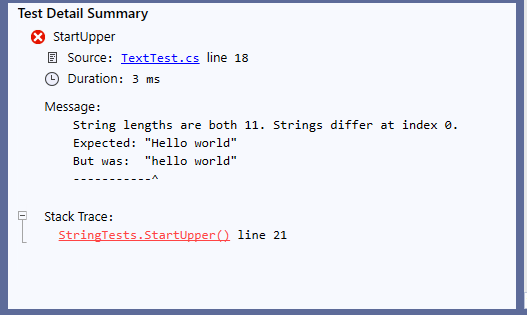
Finally, the test summary section provides information depending on the state of the selected element in the list. Below you can see an example of a failed test run which includes the outcome, total duration, and in the case of a failed test, error text.
Running Unit Tests
Once you have built a set of unit tests, you must execute them somehow. Visual Studio Test Explorer provides an intuitive interface to run and interpret those results. If you’re following the tutorial and have opened the TestExplorerDemo project, you’ll already have some unit tests ready to run.
Executing All Tests
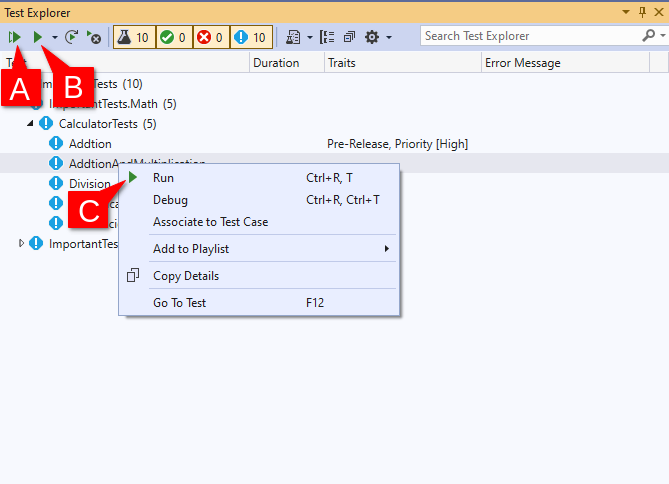
Assuming you have Visual Studio Test Explorer open in the tutorial’s project, to run all tests, click the left play button on the toolbar’s left (A). Test Explorer will run all tests currently visible.
Executing a Single or Group of Tests
As you learned above, Test Explorer groups tests together by various criteria. If you’d like to run all tests within a group, right-click the group and click Run. To run a single test, perform the same action on a single method test.
For this tutorial, click on the play button to execute all tests. Once tests have been executed, Test Explorer will show you the results as shown below.
You’ll see that each test will get a new state:
- Failed – Threw an error or failed a check
- Passed – Finished without an error
- Skipped – Not ran, for example because they are tagged as Ignore
- Not run – Will run but haven’t ran yet

Now, click on a test case or group. You’ll see the summary section at the bottom will update displaying test results. The summary will contain the error message (if any) and the duration of the test.
Getting Custom Audio Test Notifications
You must be running Visual Studio 2019 Update 16.9 Preview 3 on Windows 10 to get custom audio test notifications at the time of this writing.
If you have many tests that take a long time to run, you’re probably not staring at the screen waiting for the results. If so, you can set up custom sounds when tests succeed or fail!
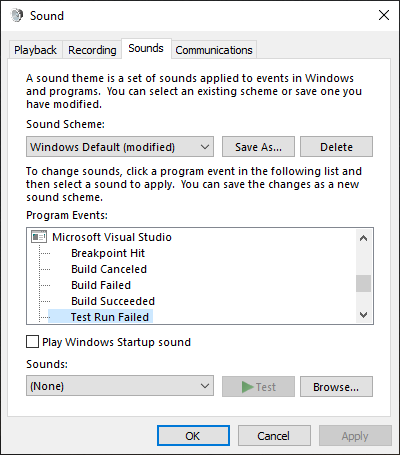
To do so, open the Windows 10 audio dialog and click on the Sounds tab. Next, scroll down the Program Events list until you see Microsoft Visual Studio. Next, click on Test Run Failed or Test Run Succeeded, select the sound from the Sound dropdown box and click OK.
Customizing Test Explorer Columns
Once you get used to the default Visual Studio Test Explorer interface, you can change up just about anything, if necessary. For example, if you’d rather see different attributes in the tests list, you can customize what’s shown.
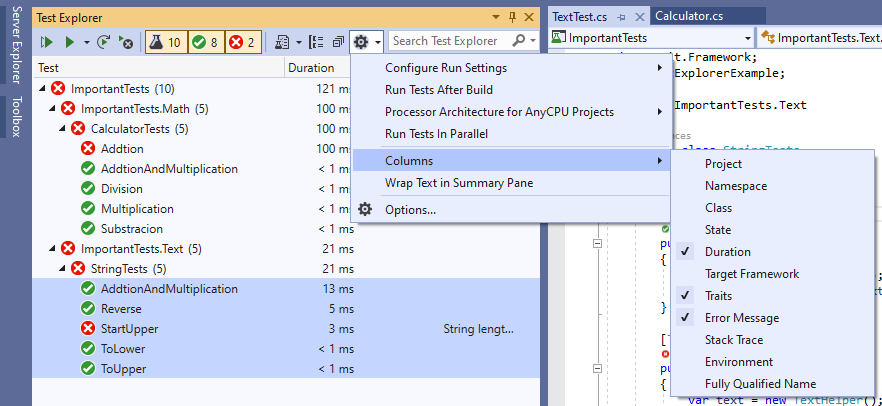
To change up the columns in the tests list, click on the Settings gear in Test Explorer, click on Columns and select the column name you’d like to add (or remove).
Grouping Tests
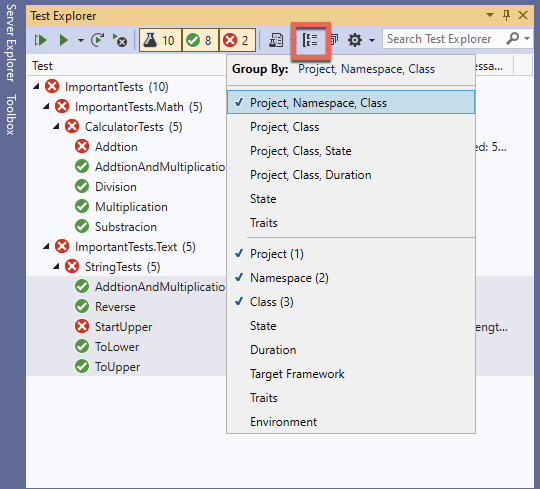
By default, tests are grouped by Project, Namespace and Class. If this grouping doesn’t fit your needs, you can change the group based on other attributes. To change grouping, click on the icon in the toolbar as shown below. Test Explorer will present you with a list of options to group by.
Each group will change how Test Explorer displays the tests in the tests list.
If you decide to group the tests by Duration, Test Explorer will create a Fast, Medium and Slow group.
Finding Tests by Filtering
In this tutorial project’s test suite, you’re only working with 10 tests. In the real-world, you might have hundreds or even thousands. Rather than scrolling through tests and unfolding every group, use the built-in search console.
You can find the search console in the upper right corner of Test Explorer. The search console allows you to construct various queries to search and filter unit tests with a standard query syntax of Search term:"Search value".
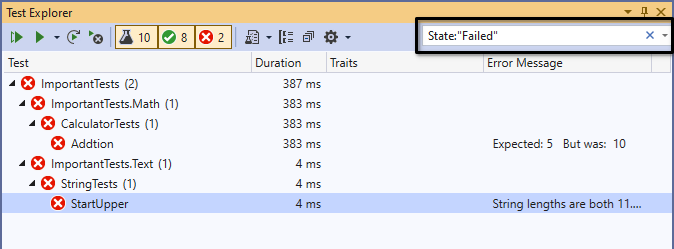
For example, to find all failed tests, provide a key value of State with a value of Failed.
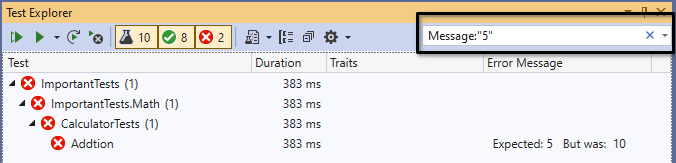
To find all tests that contain the string 5 in the message, use Message:"5".
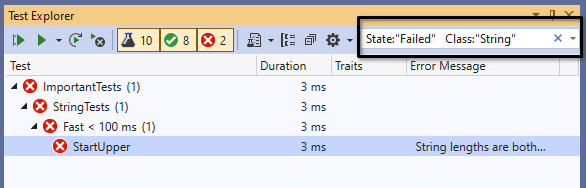
5 in the Message.And, as the last example, combine conditions together to find all failed tests that failed within a class containing the word String.
Understanding and Adding Custom Traits
By default, each test method has various attributes associated with it like it’s name, the class it’s in, how long its tests generate (Duration) and more. Using these attributes, you can then find and display the tests in many different ways.
Sometimes though, the default attributes aren’t enough. What if you need to assign a custom category to a test or perhaps a priority? In that case, you need to create a unit test trait.
Traits are key/value pairs or just a simple key that you can assign to a test. Traits allow you to “tag” or assign a new meaning to a particular test. In Test Explorer, once you’ve assigned a trait, you can use them to group and filter tests.
Creating a Single-Value Trait
Let’s first start off by creating a new trait in nUnit. To create a new trait for the tutorial project:
Some unit test frameworks come with pre-built traits that you can extend. NUnit, for example, comes with two classes you can use to add traits to a test method, Category and Property.
1. Open the MathTest.cs file under the ImportantTests project.
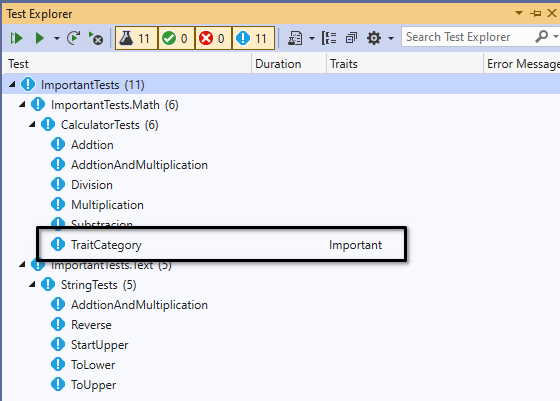
2. Copy the code below into the CalculatorTests class. The below code uses the Category attribute to define a new category value called TraitCategory.
[Test]
 [Category("Important")]
 public void TraitCategory(){}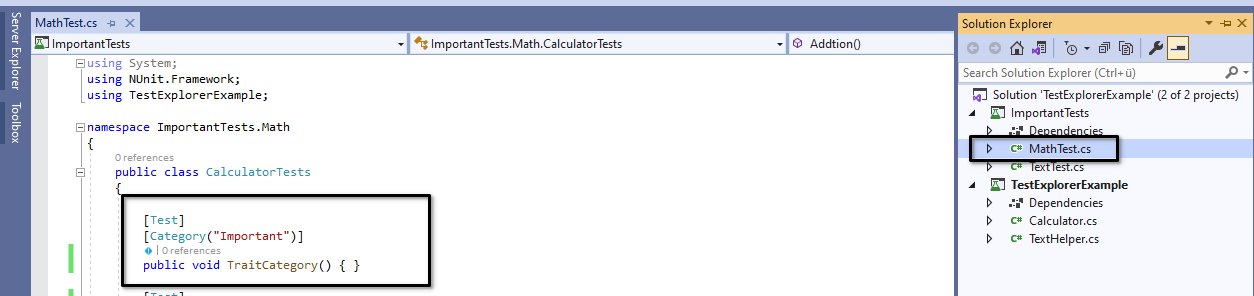
4. Once rebuilt, open the Test Explorer again and you’ll notice a new trait called TraitCategory under the CalculatorTests class.
Creating a Single-Value Trait Using a Custom Class
Alternatively, nUnit allows you to create a custom child class derived from the Category attribute used above by creating your own Attribute class. To do so, add the code below into the CalculatorTests class inside the MathTest.cs file and rebuild the project like before.
By default, the class name (except the word Attribute) will be used as the value of the trait.
[AttributeUsage(AttributeTargets.Method, AllowMultiple=false)]
public class ImportantAttribute : CategoryAttribute
{ }

[Test]
[Important]
public void TraitCustomAttribute(){}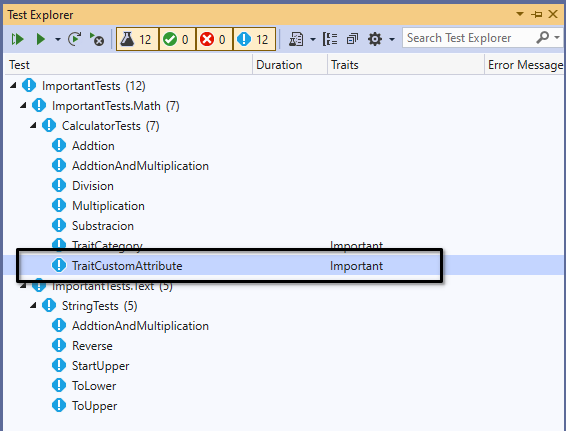
Creating a Key/Value Trait
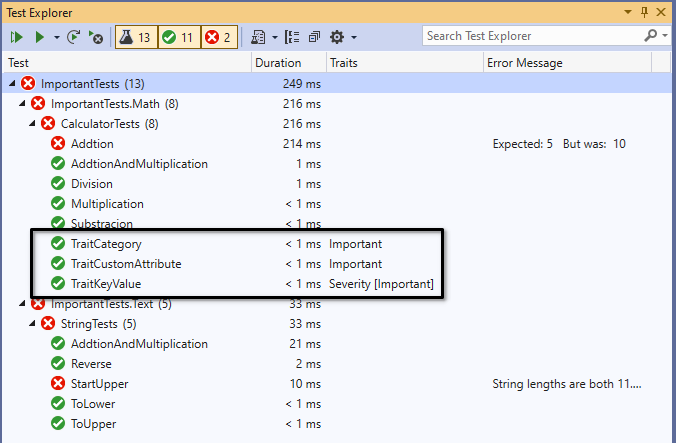
If you need to apply more than one value to a trait, NUnit has your back. Let’s now walk through an example of creating a trait using a key/value pair. You will create key/value traits using the NUnit Property class.
Copy the code below into the CalculatorTests class inside the MathTest.cs file, rebuild the project as before and run all tests. You’ll see below that Test Explorer now shows the new TraitKeyValue trait with the Severity [Important] key/value pair.
[Test]
[Property("Severity", "Important")]
public void TraitKeyValue(){}
Once you’ve created some traits, you can then use the
Traitattribute when finding test cases such asTrait:"Important".
Creating a Test Playlist
To get a better overview and focus on specific parts of a project, Visual Studio allows you to create test playlists. A test playlist contains tests even from different classes and help you organize tests even further.
Test playlists are stored in single files that can be shared with anyone using the same Visual Studio project. Common use cases for test playlist include:
- Defining smaller lists in bigger projects to focus on specific use cases
- Creating a list specific for a module in your software
- Creating a list that would otherwise not be possible with the filters offered by Test Explorer
To create a test playlist in this tutorial project:
- Right click on the ImportantTests test project and select Add to Playlist —> New Playlist from the context menu.
You can also mark multiple elements by pressing SHIFT. A new Test Explorer window will open showing only the selected test cases.
2. In the Tests: Playlist XX box, click the Save button as shown below and provide a filename to save the test playlist.
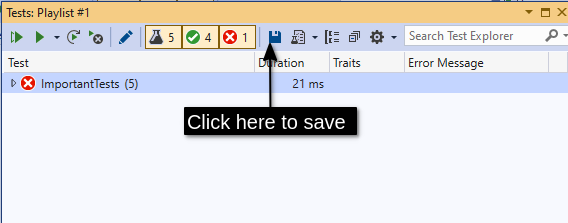
By default, test files are saved with the .playlist extension.
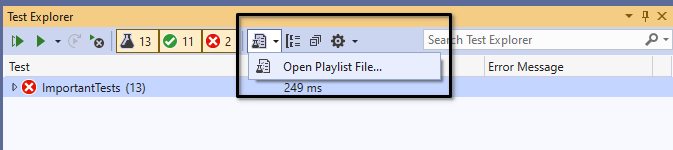
3. Once you’ve saved the playlist, click on the Playlist button in the toolbar and select Open Playlist File….
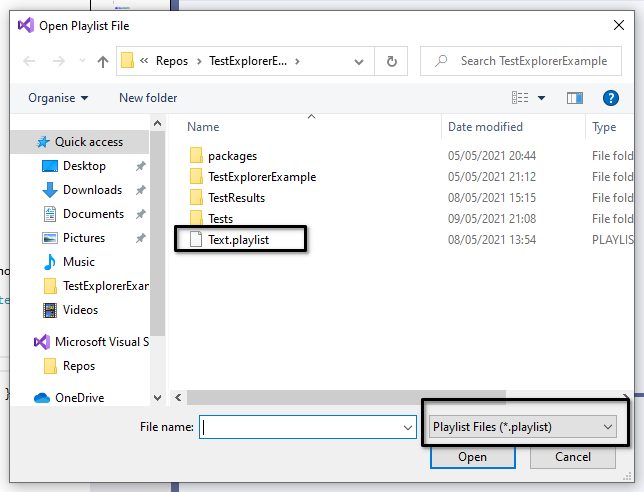
4. Find the playlist file from the file dialog and open it.
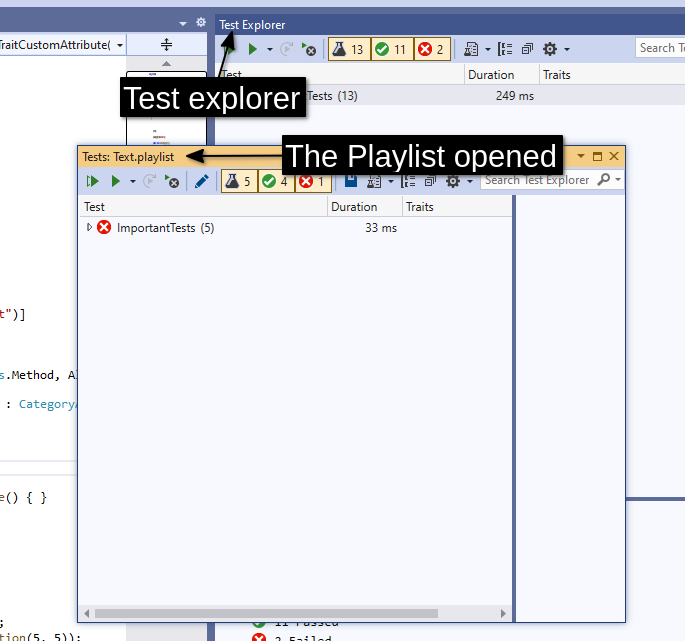
Test Explorer will then show the Tests: XXXX playlist dialog box where you can work with the tests included in that playlist.
Conclusion
The Test Explorer is more than just a simple list of tests available in a Visual Studio project. You can organize and group any size and number of tests. Now that you know how to run unit tests in Visual Studio Test Explorer (and organize them), do you think this will affect how you write unit tests in the future?


