

Are you a newcomer to a team and been instructed to checkout a remote branch from the Git code repository? Whether part of a sprawling enterprise or a compact team, mastering remote Git branches is key to seamless code collaboration. In this guide, delve into the process of retrieving code from a remote Git repository, focusing on the ‘git checkout remote branch’ command.
Not a reader? Explore this related video tutorial!Prerequisites
- This tutorial employs version 2.30 of Git SCM (source code management) on Windows 10, although it’s compatible with any Git-supported OS.
Other potential installation methods for Windows include Chocolatey and Git4Win.
- A remote Git repository from platforms like GitLab, GitHub, or Azure DevOps is required. This article provides sample repositories for a hands-on experience, or you can utilize your own.
Understanding a Remote Branch
Git repositories chronicle and track a sequence of related commits within a branch. By default, a commit resides in the currently active branch, usually termed main or master.
A remote branch is a branch located in a remote Git repository. These remote repositories, termed as “remotes,” are the destinations your local Git repository will scout for external commit updates once set up.
Discover available branches using the Git branch command. The branch marked with an asterisk (*) is the active one. The branches listed below are solely local as no remote branches have been fetched yet.
git branch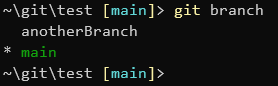
git branch command.Mastering Git Checkout Remote Branch
Suppose you have a local Git repository and the need arises to collaborate with other developers. This is where the Git checkout command comes into play, enabling you to fetch the latest commits from a remote branch on a remote Git repository.
Once a remote branch is configured, Git will mirror the remote branch instead of a local-only branch. Below is an example of the command git checkout remote <branch>.
git checkout remote mainClone the Remote Git Repository
Now that an existing repository is at your disposal, it’s time to dive in. Follow the steps below to clone the remote repository to a local folder on your machine.
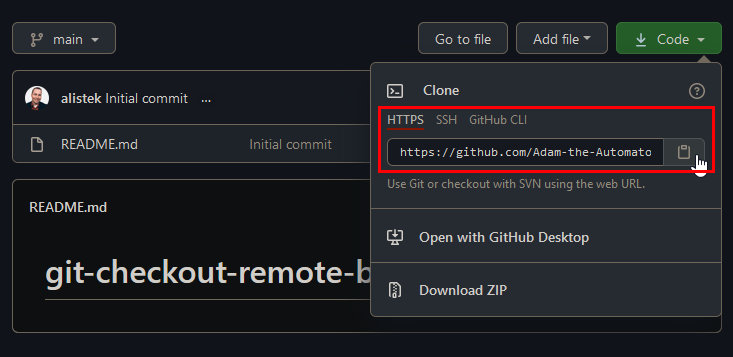
1. It’s often simpler to clone a remote repository via the HTTPS URL rather than SSH to sidestep certificate and firewall issues.
- Head over to the repository on GitHub.
- Hit the Code button and select HTTPS.
- Click the Clipboard icon adjacent to the link to copy the URL to your clipboard.
2. Having copied the HTTPS URL to your clipboard, open a command-line interface using your preferred CLI, such as Windows Command Prompt or the Windows Terminal.
3. Navigate to the folder where you wish the cloned repository to reside. For this tutorial, the git folder in the home directory is utilized as depicted in the screenshots. Execute the following command to clone the repository, which creates a sub-folder housing the remote repository.
# GitHub git clone https://github.com/Adam-the-Automator/git-checkout-remote-branch
4. Traverse to the cloned repository with the command, cd git-checkout-remote-branch.
Execute the following status command to ascertain that the repository has been successfully cloned. The Git status command unveils the differences between the local branch and remote branch, aiding in determining if your branch is connected and updated! The default Git remote is termed origin, prefixed to the main remote branch. git status
git status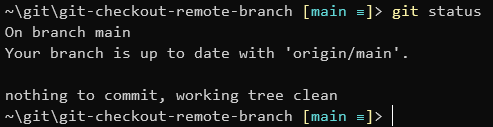
For most modern Git software,
mainis the default primary branch. You may encounter an older application that usesmasterfor their default branch name, but both names are functionally the same. This tutorial uses branches namedmain,RemoteBranch,SomeBranch, andAnotherBranch.
What is a Git Remote and How to Track Remote Branches
Cloning a repository automatically creates a reference to a remote source, known as a remote. This reference is used to check for new commits or push new changes to the remote repository.
A Git repository itself may have multiple remotes, but a branch can only reference a single remote.
Tracking a remote branch establishes a relationship with a local branch. This relationship enables you to effortlessly push or pull commits from the remote branch to the local branch. Moreover, a tracked branch determines how far ahead or behind in commits the local branch is from the remote.
Listing a Git Repository’s Remotes
Firstly, ensure the repository you’re working with has any Git remotes. To do this, view Git remotes in your repository with the git remote command as shown below. In this instance, two remotes are displayed, origin and remote2.
git remote
Two additional tracked remote repositories are named
originandremote2, where your remotes may be different.
To glean more detail about the configured remotes, add the v switch to display the full Git remote URI.
git remote -v
You may wonder why the separate URI’s for
fetchandpush. Some Git workflows allow you to check for updates to a repository at a different URI than where you may send changes, this is called the triangular workflow.
Viewing Available Remote Branches
Display all available branches, both local and remote, in your repository with the branch command. To show the remote branches as well, append the all switch, as exemplified below.
git branch --allIn the image below, the remote repository origin used in this tutorial is shown as anticipated. Nonetheless, this image omits all branches from the remote named Remote2.

If a branch on your remote isn’t showing on the branch list, you must update your list of available remote branches as covered in the next section.
Updating the Available Remote Branches
At times, a remote repository may add or alter branches. To ensure you are working with the most up-to-date branches, it’s necessary to run the git fetch command.
The fetch command connects to the remote repository, retrieving a list of all available branches. View your currently tracked branches post running the git fetch command to see that the remote branch is now visible, as demonstrated below.
# Retrieve available remote branches
git fetch

# Verify that all branches are now available on the local Git repository
git branch --all
Below, the branch remotes/origin/RemoteBranch is now visible in the list of available remote branches post executing the git fetch command.
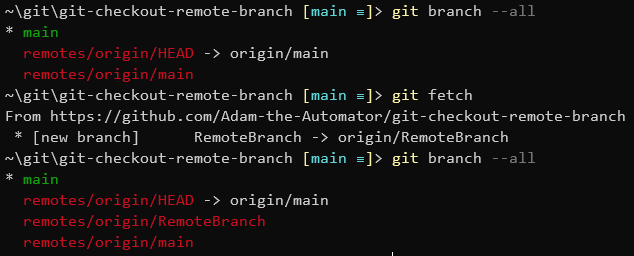
git fetch to update the list of available remote branches.The fetch command only checks for updates from the remote that’s currently tracked in the present branch. To have Git check for updates from all remotes in the repo, irrespective of tracking status, append the all parameter.
git fetch --allTo fetch the available branches from a specific remote, include the remote name in the git fetch command, like Remote2 in the example below, which retrieves the branch, main.
# List available branches in a local Git repository
git branch --all
# Fetch available branches from remote2
git fetch Remote2
# Verify that the remote2 branch, main, is now available
git branch --all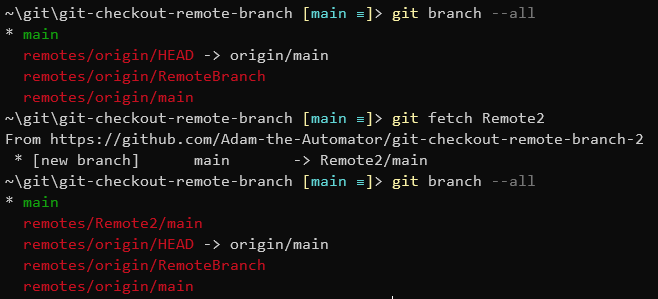
main from remote2 with the git fetch command.Any time you check for remote updates with
git fetch,git pull, orgit push, Git compares commits with the remote branch. Local branches can track any Git remote branch. Additionally, multiple local branches can set to track the same remote branch.
Viewing Each Branch’s Remote Tracking
To see the tracked remote branch alongside the corresponding local branch, employ the vv parameter with the command git branch. The command results display a list of remotes and branches in the format [<remote>/<branch>] as illustrated below.
git branch -vv
Altering a Branch’s Remote Tracking
There might be a necessity to alter your local branch to track a different remote branch. To set your current branch to a specific remote branch, employ the u parameter, as illustrated below.
git branch -u Remote2/main
Checking out Git Remote Branches
With new branches created on the remote Git repository, you may need to perform a git checkout remote branch operation. Checking out a remote repository branch is executed through the checkout command.
If the following conditions are satisfied, Git will autonomously determine the right remote, download a local copy of the remote branch, and set the local copy to track against the remote branch. Verify the following conditions are not met through the results of git branch --all command.
- A local branch with the same name does not already exist.
- Multiple remotes that use the same remote branch name do not exist.
To perform the git checkout remote branch operation, use the git checkout command and type the name of the remote branch as seen below.
git checkout RemoteBranch
git checkout.If your local repository already contains a local branch with the same name, add the b parameter to specify an alternate local branch name before the remote branch to checkout.
git checkout -b AnotherBranch origin/RemoteBranch
If your local repository has multiple remotes with the same branch name, specify which remote and branch to track local commits against.
git checkout --track origin/RemoteBranch
Future versions of Git may possibly prefer that you use the
git switchcommand for changing and creating branches. The Gitswitchcommand is only for branches while the Git checkout command has many abilities. Irshad S. wrote a nice primer on the rationale if you’d like to read more about it.
Pushing a Local Branch to a Remote
Upon creating a local branch devoid of a corresponding remote branch for tracking, you can propel the branch to the remote using the git push command. The most straightforward method to establish a new branch on your preferred remote is by employing the u parameter.
The u parameter, as utilized earlier, necessitates the arguments of the repository name and the source branch. By solely specifying HEAD as the source branch name, Git comprehends to use the current local branch name as the name on the remote, in this case, NewBranch.
# Checkout and switch to NewBranch
git checkout -b NewBranch
# Create NewBranch on the origin remote
git push -u origin HEAD
# Verify that the branches on the remote now exist
git branch -vv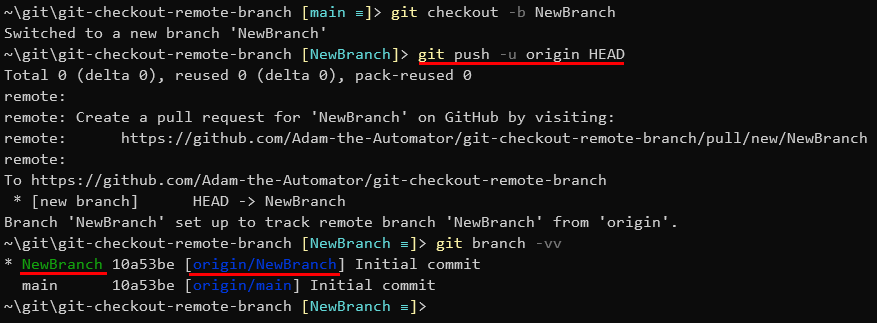
HEADis a shortcut that simply means the current branch. You can push other branches to the remote and establish tracking by using their name instead ofHEAD.
At times, the name of the current local branch does not match with the remote branch’s name. To utilize a distinct name, specify the desired branch name after the source, joined by a colon, as demonstrated below.
# Create the current branch on the origin remote as AnotherBranch
git push -u origin HEAD:AnotherBranch
# Verify that the local NewBranch now exists as AnotherBranch on the origin remote
git branch -vv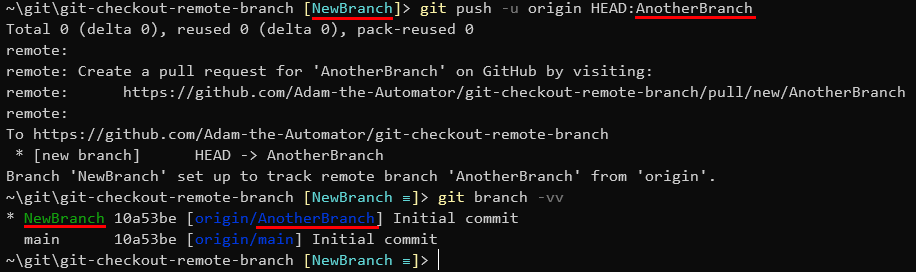
Next Steps and Additional Git Resources
Having reviewed the essentials of Git, managing remotes, and performing git checkout remote branch, you are now equipped with a wealth of knowledge that will aid in averting future frustrations. The steps to checkout remote branch in Git and best practices shared will serve as invaluable resources moving forward.
Should you wish to delve deeper into other facets of managing a Git repository, the following resources are highly recommended:
- A primer on detached heads: Discover scenarios where a detached HEAD is beneficial or inadvertent, and how to handle it.
- Git switch: A command dedicated to dealing with branches, unlike the multifaceted Git
checkout.


