

There comes a time in any Active Directory (AD) administrator’s career when he or she must transfer FSMO roles (or seize them). Domain controllers (DCs) come and go and the FSMO roles hosted on those DCs must be moved around.
Not a reader? Watch this related video tutorial!In this tutorial, you’re going to learn how to transfer and seize all of the AD FSMO roles, step by step. You’ll see how to move FSMO roles via various GUI tools and PowerShell.
Let’s get started!
Prerequisites
If you’d like to follow along, please be sure you have the following:
- At least two DCs – This tutorial will be using Windows Server 2019 with a forest-functional level of Windows Server 2016 although not much has changed.
- A domain-joined computer with RBAC installed or you’re on a DC’s desktop directly
Related: How to Install and Import the Active Directory PowerShell Module
- Windows PowerShell v5.1
- Log on with an AD account to a computer that’s connected to the Domain. To query for the roles, no special privileges are required. Further privileges are required for transferring or seizing the roles though.
Transferring FSMO Roles with the GUI
There are two ways to transfer FSMO roles; the GUI and PowerShell. Let’s first walk through transferring FSMO roles via a few different MMC snap-ins.
RID Master, PDCe and Infrastructure Master
Let’s first knock out the domain-specific FSMO roles.
- Open up ADUC (dsa.msc), right-click on the domain and choose Operations Masters. Here you’ll find all of the FSMO roles unique to the domain (RID Master, PDCe and Infrastructure Master) represented via the RID, PDC and Infrastructure tabs.
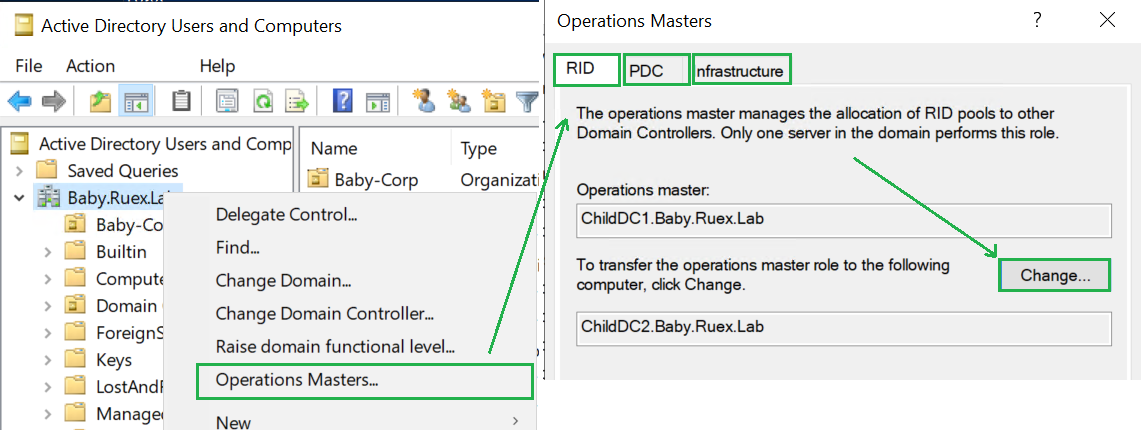
2. Click on each tab. You’ll notice the current FSMO role holder (Operations master) and a Change button.
3. Click on the Change button under each tab and select the new DC to perform transfers for the RID Master, PDCe and Infrastructure Master FSMO roles.
Domain Naming Master
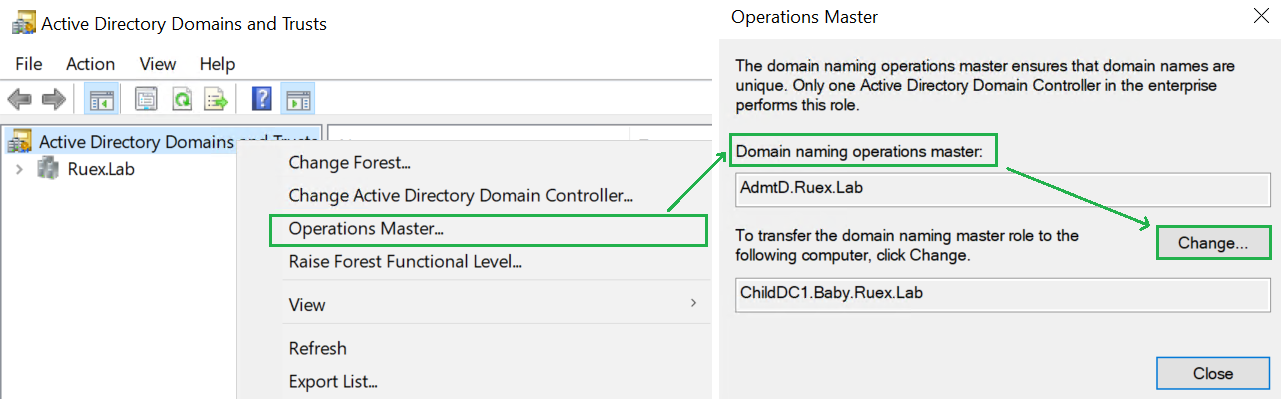
Next, let’s move onto the Domain Naming Master role. You can view and change this FSMO role in the Active Directory Domains and Trusts Console.
- Open up the Active Directory Domains and Trusts Console (domain.msc).
2. Right-click on the Active Directory Domains and Trusts parent node and click on Operations Master. Here you’ll see the current DC holding this role described as Domain naming operations master.
3. Click on the Change button and choose the DC you’d like to transfer to.
Schema Master
Next up and finally is the Schema Master role. To change this role, you’ll need the Active Directory Schema MMC snap-in.
Before beginning, first ensure you’re logged in with an account that is in the Schema Administrators AD group.
- Open up an elevated command prompt or PowerShell console and run
regsvr32.exe "schmmgmt.dll". The Active Directory Schema snap-in is not available by default. This command registers the necessary DLL for schema management.
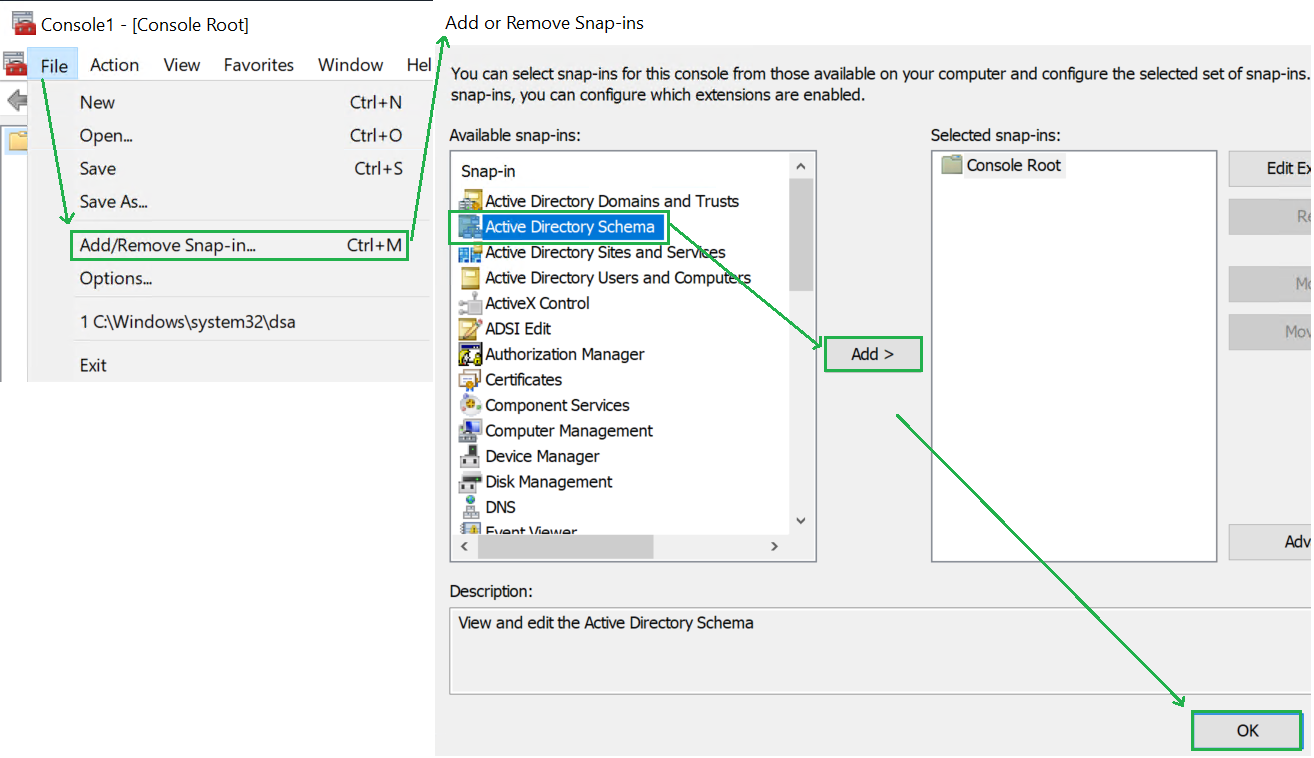
2. Open the mmc.exe utility.
3. Click on File —> Add/Remove Snap-in.
4. Select Active Directory Schema from the Available snap-ins and click on Add > and OK.
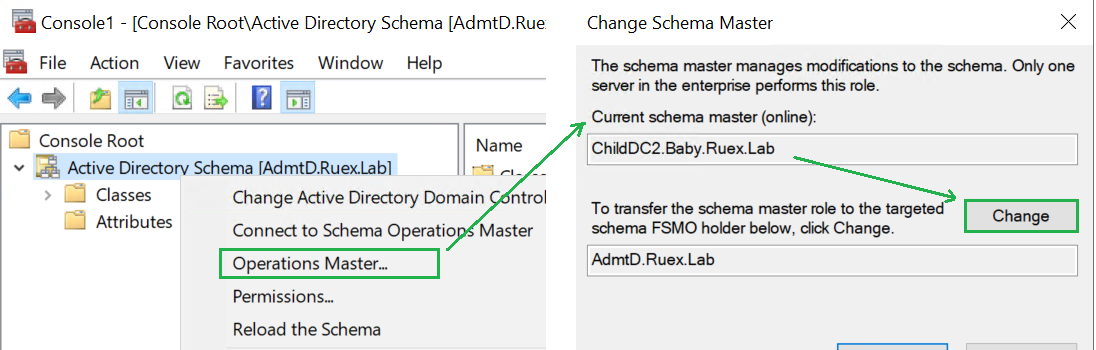
5. Once in the snap-in, right-click Active Directory Schema [<your domain name>] and choose Operations Master to view the current Schema Master in the pop-up window.
6. Click on Change and select the new DC to transfer the Schema Master role.
Transferring FSMO Roles with PowerShell
If you’re more in the mood for the command-line, PowerShell’s got your back.
Viewing Current FSMO Role Holders
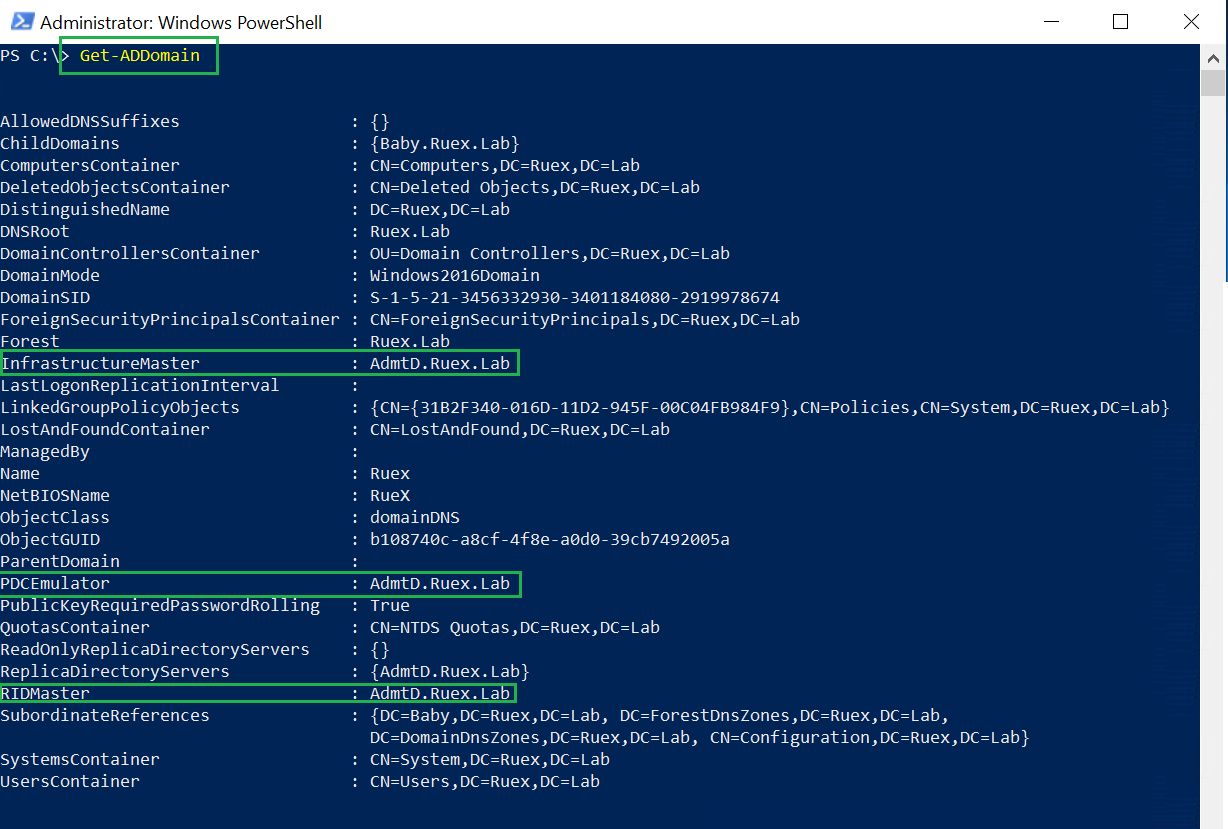
Let’s first learn how to view the current FSMO role holders before transferring with PowerShell. To do that, open up an elevated Windows PowerShell console and run Get-ADDomain and Get-ADForest to find each of the current FSMO role holders as shown below.
Get-ADDomain
Get-ADForest
Get-ADDomain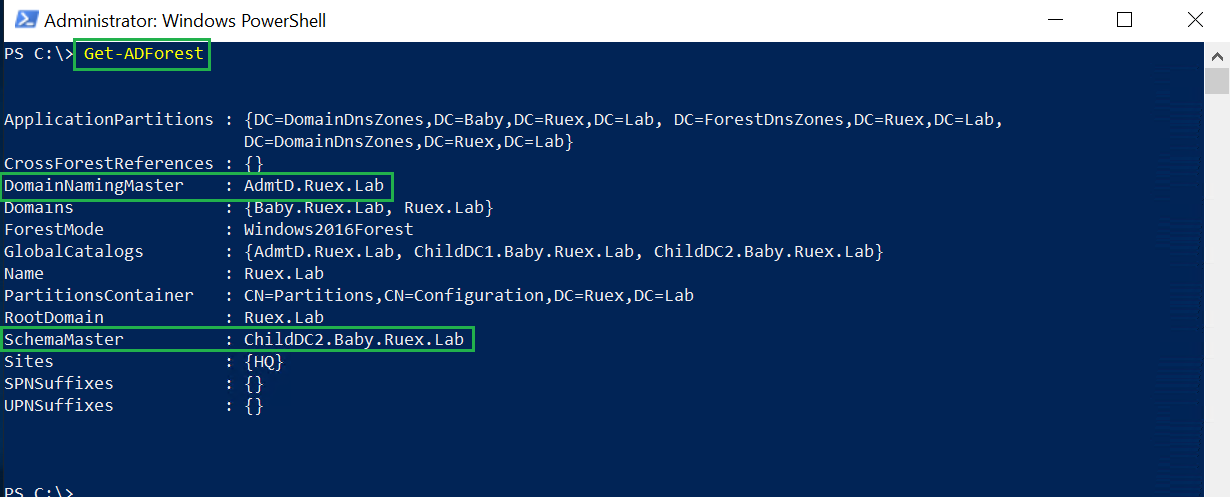
Get-ADForestTransferring the FSMO Roles
Once you know what DCs hold the current FSMO roles, you can transfer them too. To do so in Windows PowerShell, run the Move-ADDirectoryServerOperationMasterRole command using the Identity parameter for the DC to transfer the FSMO role to (ChildDC1 in this case) followed by the name of the FSMO role. The below example is transferring the RID Master role.
Move-ADDirectoryServerOperationMasterRole -Identity "ChildDC1" RidMaster
For the FSMO role name, you can use
PDCEmulator,RIDMaster,InfrastructureMaster,SchemaMasterandDomainNamingMaster.

You can also transfer more than one role at once by defining each role name separated by a comma e.g.
Move-ADDirectoryServerOperationMasterRole -Identity "ChildDC1" PDCEmulator,InfrastructureMaster.
Maybe you’re really lazy and don’t want to type out those long names. In that case, you can also just use numbers with each FSMO role corresponding to a specific number.
| Role Name | Number |
| PDCEmulator | 0 |
| RIDMaster | 1 |
| InfrastructureMaster | 2 |
| SchemaMaster | 3 |
| DomainNamingMaster | 4 |
Using the identifiers instead of the role names, the command to transfer the PDCE role is as short as Move-ADDirectoryServerOperationMasterRole ChildDc2 0
You are prompted about transferring the FSMO role name, just to be sure you know what you’re doing. Since this is not a frequent task, you may want to consider using the full name(s) of the role(s) you want to transfer. Especially if you’re using the command in a script someone else will use; it’s easier to understand.
Seizing FSMO Roles with the GUI
If you need to move a FSMO role from one DC to another, transferring roles is always the best option. Transferring ensures the FSMO role is completely removed from the old DC and transferred to the new DC. But things don’t always go as planned.
If a DC is no longer online or has failed in some way, you can seize FSMO roles which essentially builds a new FSMO role on a new DC without removing the old one.
Only seize a FSMO role when you’re sure you cannot bring back the current role holder back online. Once the role is seized, make sure the old FSMO role holder is never brought back.
Seizing roles with the GUI is done by removing a DC computer account within the Active Directory Users and Computers (ADUC) console. To do so:
- First, connect ADUC to the DC you’d like to transfer the FSMO role to. To that, in ADUC, right-click on the root Active Directory Users and Computers node and click on Change Domain Controller.
2. Search for the DC you’d like to connect to and connect to it.
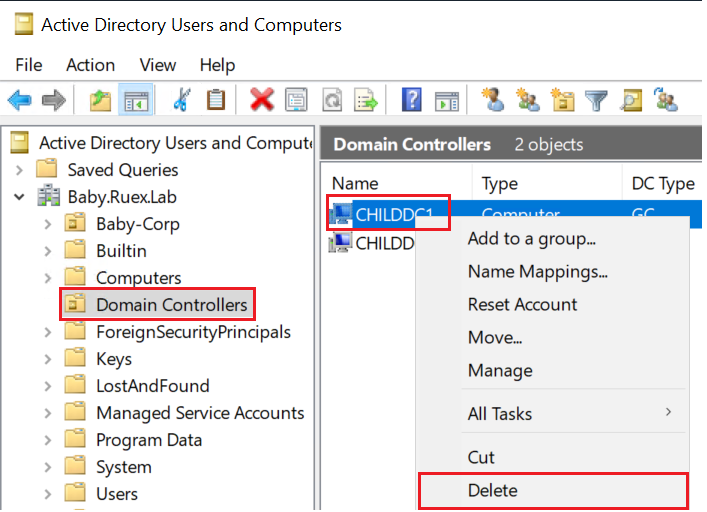
3. Click on the Domain Controllers OU.
4. Right-click on the DC you’d like to seize the FSMO role from and click on Delete.
5. Next, click Yes through the first two prompts.


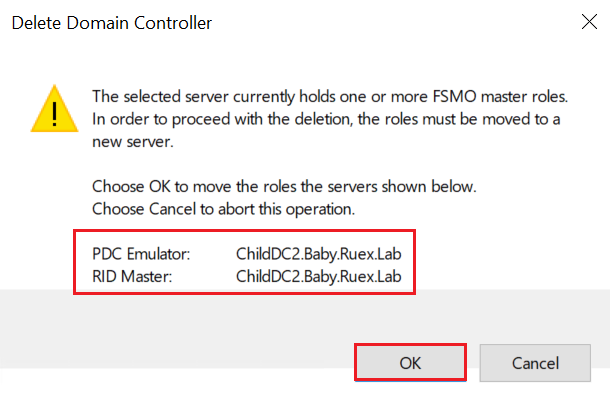
6. Finally, you’ll get a prompt notifying you that the DC was a FSMO role holder and the role(s) will be moved to another DC. This will be the DC your ADUC Console is connected to. Click OK and the computer account of the offline DC will be deleted and the roles will be seized and moved to the new DC.
Seizing FSMO Roles with PowerShell
To seize FSMO roles with PowerShell, ensure you have Windows PowerShell open and run Move-ADDirectoryServerOperationMasterRole providing the name of the new DC as the Identity parameter value along with the Force parameter.
The example below is seizing the RID Master role and assigning it to the NewDC3 DC.
Move-ADDirectoryServerOperationMasterRole -Identity "NewDC3" RidMaster -Force
The same FSMO role names used for transferring also apply to the
Move-ADDirectoryServerOperationMasterRolecmdlet also.
Conclusion
Moving FSMO roles isn’t a daily task but when you’re promoting new DCs, demoting old DCs and decommissioning servers, you’ll need to know about FSMO roles.
Follow the steps in this tutorial to help you know the this task off your list!


