


If you’re building a massive infrastructure with Terraform, storing information about your infrastructure is a crucial matter. But how do you store infrastructure information? Not a problem, Terraform backend has got you covered!
Terraform backend allows you to keep your Terraform state file containing all resource details and tracking which were provisioned or will be provisioned with Terraform. And in this tutorial, you’ll learn how Terraform’s backend lets team members or developers securely manage states without impacting existing resources.
Read on and never miss a piece of your infrastructure’s information!
Prerequisites
If you’d like to follow along in this tutorial, ensure you have the following in place:
- A local machine – This tutorial uses Ubuntu 21.04.5 LTS, but other operating systems with Terraform will work.
- Terraform installed on your machine – This tutorial uses Terraform v1.0.
- An Amazon Web Service (AWS) account – You can create a free-tier account if you don’t have one.
- An existing AWS S3 Bucket – This tutorial uses an S3 bucket named mys3bucketata.
- AWS CLI installed and configured on your machine – This tutorial uses aws-cli/2.6.1.
- A code editor – Even though you can use any text editor to work with Terraform configuration files, you should have one that understands the HCL Terraform language. Try out Visual Studio (VS) Code.
What is Terraform State and Why a Backend
Have you come across the terms Terraform state and state file while working with Terraform? These two essential components are needed when you have a team that works on the same projects or as your infrastructure grows.
In a nutshell, these components serve as follows:
- Terraform state – contains bindings between objects in remote systems and is defined in your Terraform configuration files. And all these states are stored in the Terraform state file.
- Terraform state file – is by default stored locally on your machine where you run the Terraform commands with the name of terraform.tfstate.
Terraform state is stored in JSON format. As a result, when you run either terraform show or terraform output command, Terraform fetches the output from the Terraform state file in JSON format.
You can also import existing infrastructure you created by other means, such as manually or using scripts within Terraform state file. But the topic of importing infrastructure is beyond this tutorial.
Keeping the Terraform state file in your local machine (aka local backend) is fine when you’re working as an individual. But when you work in a team, storing the state file in a backend, such as AWS S3, is a much better option.
While you write anything on the resource that is a Terraform configuration file, the Terraform state file gets locked. As a result, Terraform prevents someone else from using the state file and prevents it from being corrupted.
Defining Local Terraform Backend
You’ve been introduced to the idea behind leveraging Terraform state and state file. But enough about the introduction. It’s time to get your hands dirty with Terraform!
But before using Terraform state and backends, you must define them first in configuration files. You’ll set the local backend to store the state file in your local machine in a specified location.
1. SSH to your Ubuntu machine.
2. Next, run the commands below to create a working directory called ~/terraform-backend-demo and switch to that directory. This directory will contain all of the configuration files you’ll be working on in this tutorial.
mkdir ~/terraform-backend-demo
cd ~/terraform-backend-demo
3. Create a file called main.tf inside the ~/terraform-backend-demo directory with your preferred code editor. This file is the Terraform configuration for your AWS EC2 instance.
4. Now, copy/paste the following configuration to the main.tf file, and save the changes.
The ami declared in the code below is an Amazon Machine Image (AMI). This AMI provides the information required to launch an instance, such as the type of OS, which software to install, etc.
You can find Linux AMIs using the Amazon EC2 console.
# Creating the instance with the instance_type t2.micro
resource "aws_instance" "my-machine" {
# Declarling the AMI
  ami = "ami-0a91cd140a1fc148a"
  instance_type  = "t2.micro"
}
5. Create another file in ~/terraform-backend demo, name it provider.tf and populate the content below. This provider.tf file defines providers (i.e., AWS, Oracle, Azure, etc.) so that Terraform can connect with the correct cloud services.
The below code also uses the local backend (local) with path set to home/ubuntu/terraform-backend-demo/terraform.tfstate. Terraform stores the state file in this path and later use the same backend to create the AWS EC2 instance.
The tutorial creates resources in the us-east-1 region. But a list of regions that AWS support is also available.
# Declaring the Provider Requirements and Backend
terraform {
  backend "local" {
    path = "home/ubuntu/terraform-backend-demo/terraform.tfstate"
}
  # A provider requirement consists of a local name (aws),  source location, and a version constraint.
  required_providers {
    aws = {
      # Declaring the source location/address where Terraform can download plugins
      source  = "hashicorp/aws"
      # Declaring the version of aws provider as greater than 3.0
      version = "~> 3.0"
    }
  }
}

# Configuring the AWS Provider in us-east-1 region
provider "aws" {
  region = "us-east-1"
}
6. Finally, run the tree command to verify all required files in the ~/terraform-backend-demo directory.
tree
Provisioning an AWS EC2 instance with Terraform
You’ve set up a Terraform configuration and variables files, but they’re not doing much right now. You’ll have to initiate Terraform, create the AWS EC2 instance and verify your local backend.
To provision the AWS EC2, like all other Terraform configurations, Terraform uses three commands in sequence (terraform init, terraform plan, and terraform apply).
If the Terraform configuration files you created are not correctly formatted, you can run the terraform fmt command to fix them.
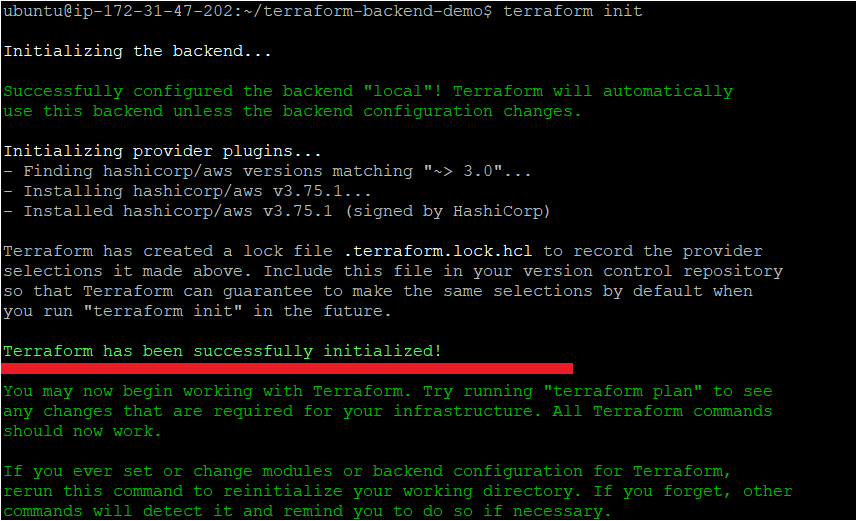
1. Run the terraform init command below in the ~/terraform-backend-demo directory to initialize the plugins and providers required to work with resources.
terraform initIf all goes well, you’ll see the message that says Terraform has been successfully initialized in the output, as shown below.
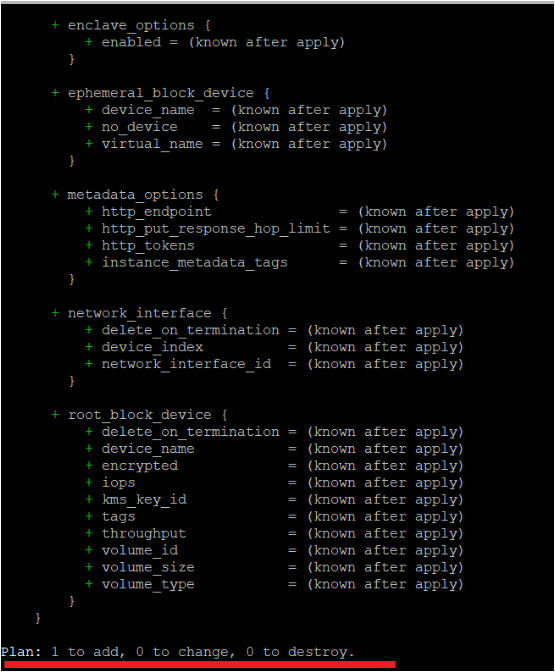
2. Next, run the terraform plan command below to ensure your configuration files syntax is correct and gives you a blueprint of resources provisioned in your infrastructure.
terraform planOnce the command completes, you’ll see a message like Plan: “X” to add, “Y” to change, or “Z” to destroy in the output. Below, the Plan shows 1 to add as four resources need to be created.
3. Finally, run the terraform apply command to provision the AWS EC2 instance using each configuration (*.tf) in the working directory (~/terraform-backend-demo).
The –auto-approve parameter automatically accepts all prompts while running the command.
terraform apply --auto-approveNote down the instance ID from the output. You’ll use it to verify the instance created in the AWS EC2 instance dashboard later.

Verifying the AWS EC2 Instance and Local backend
You’ve successfully created a new AWS EC2 instance in your AWS account. But how do you know it’s running? You’ll verify the instance in your AWS account and Terraform state file if the instance is created on your local machine in a specified location.
1. Open your favorite web browser, navigate the AWS Management Console, and log in to your AWS account.
2. In the AWS Management Console, click on the search bar at the top, search for ‘EC2’, and click on the EC2 menu item.
Your browser redirects to the EC2 instance dashboard, where you’ll see all your EC2 instances. Verify that the Instance ID is the same as what you noted in the last step of the “Provisioning an AWS EC2 instance with Terraform” section.

3. Lastly, run the following commands to verify the state file on your local machine
# Change working directory
cd /home/ubuntu/terraform-backend-demo
# Print contents of the terraform.tfstate file
cat terraform.tfstate
Like in your AWS EC2 dashboard, verify the same instance ID inside the terraform.tfstate file, as shown below.

Configuring a Remote Backend
There’s nothing wrong with storing your state file locally on your machine by setting the local backend if you’re working on a project by yourself. But when you’re working with a team, you need a way to keep the backend on a remote machine by configuring an AWS S3 bucket.
Why configure a remote backend? Doing so lets all the team members update the Terraform state file and manage the resources without impacting them.
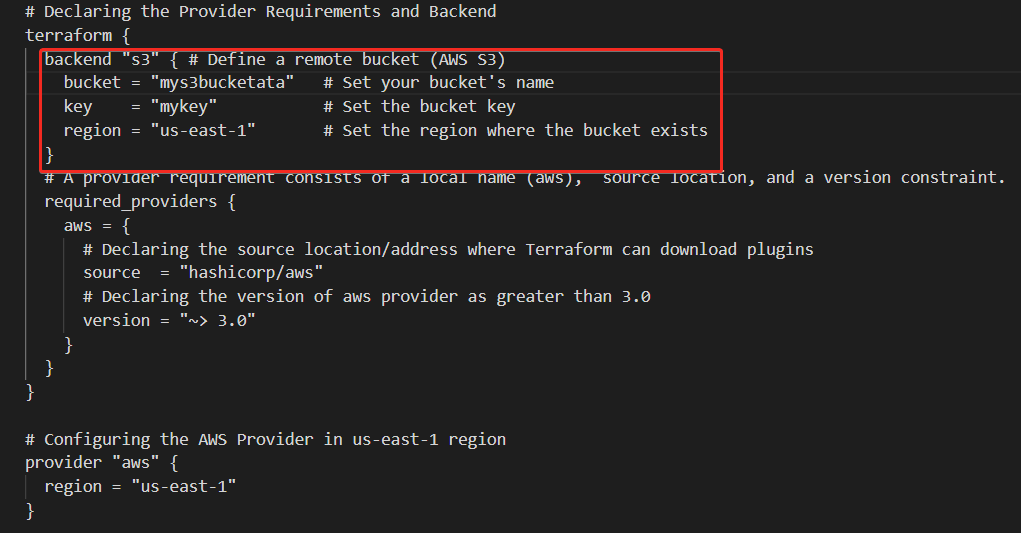
1. Open the provider.tf file and replace the local backend config block with the following lines to define a remote backend instead (AWS S3).
  backend "s3" { # Define a remote bucket (AWS S3)
    bucket = "mys3bucketata" # Set your bucket's name
    key    = "mykey"         # Set the bucket key
    region = "us-east-1"     # Set the region where the bucket exists
  }
2. Next, rerun the terraform init command in the ~/terraform-backend-demo directory to initialize the plugins and providers required to work with resources. But this time, you’ll append the -migrate-state flag as you’re changing the state location from local to AWS S3 bucket.
terraform init -migrate-state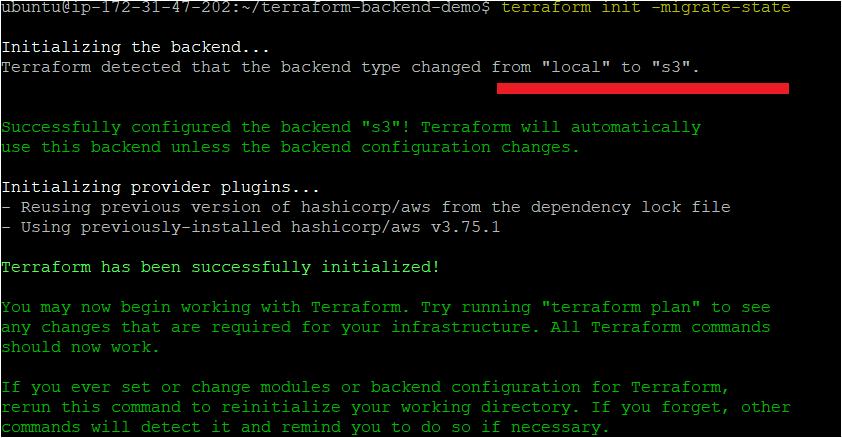
3. Run the following commands as you did in steps two and three of the “Provisioning an AWS EC2 instance with Terraform” section. But this time, you’re applying the configurations for an AWS S3 bucket as the remote backend.
terraform plan
terraform apply
Note down your S3 bucket’s instance ID to compare it to the one in your AWS account later.

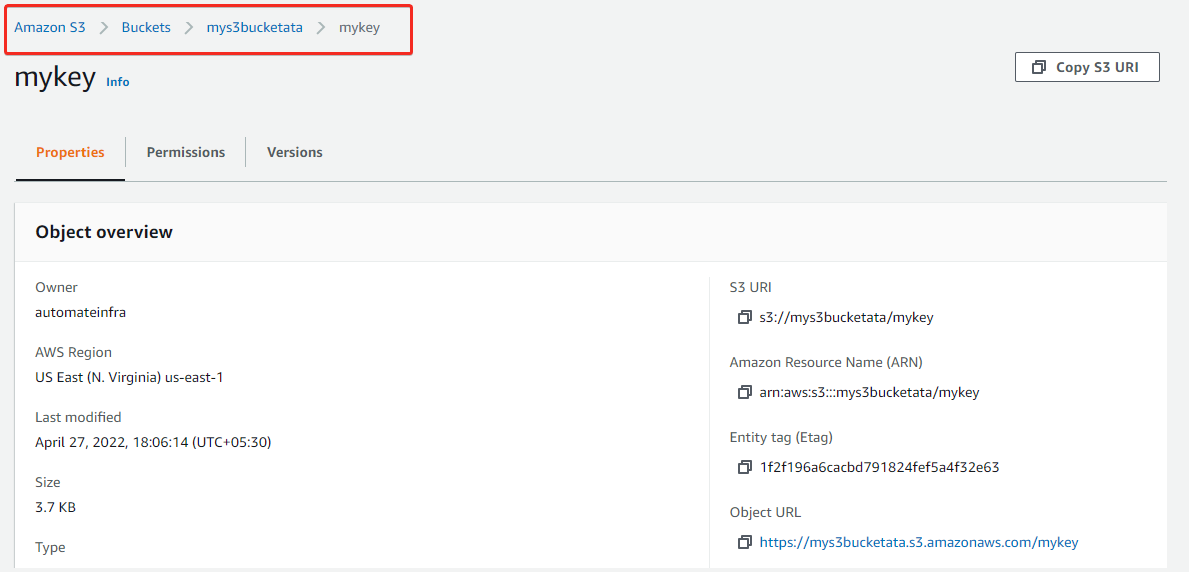
4. Now, navigate to your AWS S3 buckets dashboard on your web browser. And click on your bucket (mys3bucketata) and your bucket key (mykey) to verify if the Terraform state file has been created.
As you can see below, the Terraform state file is now stored in your AWS S3 bucket (mys3bucketata).
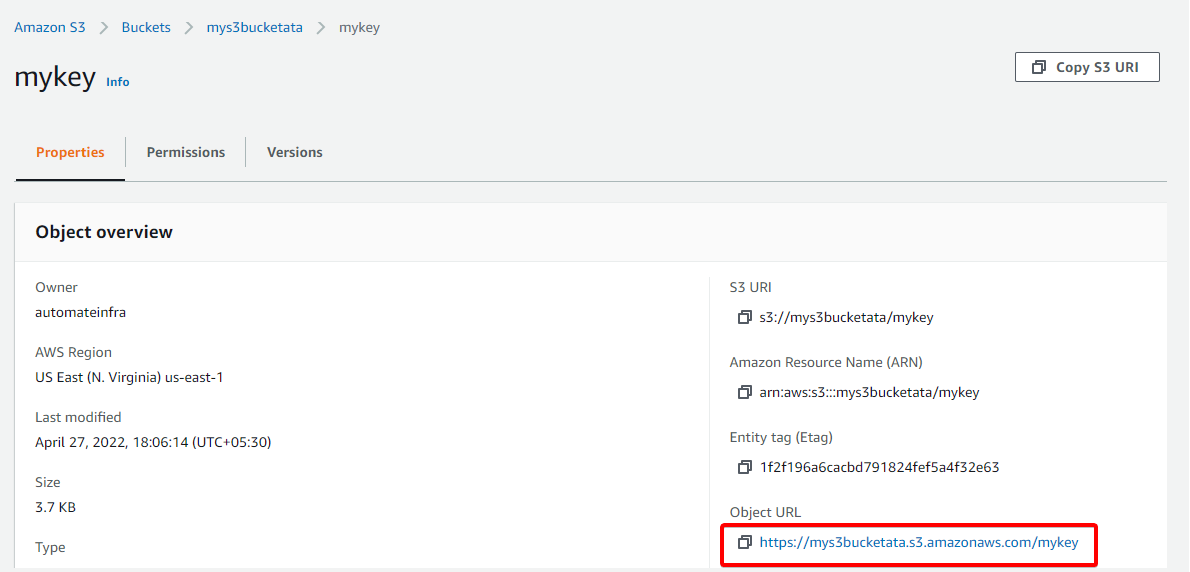
5. Lastly, click on the Object URL, as shown below, to verify the details of the newly created instance in the state file.
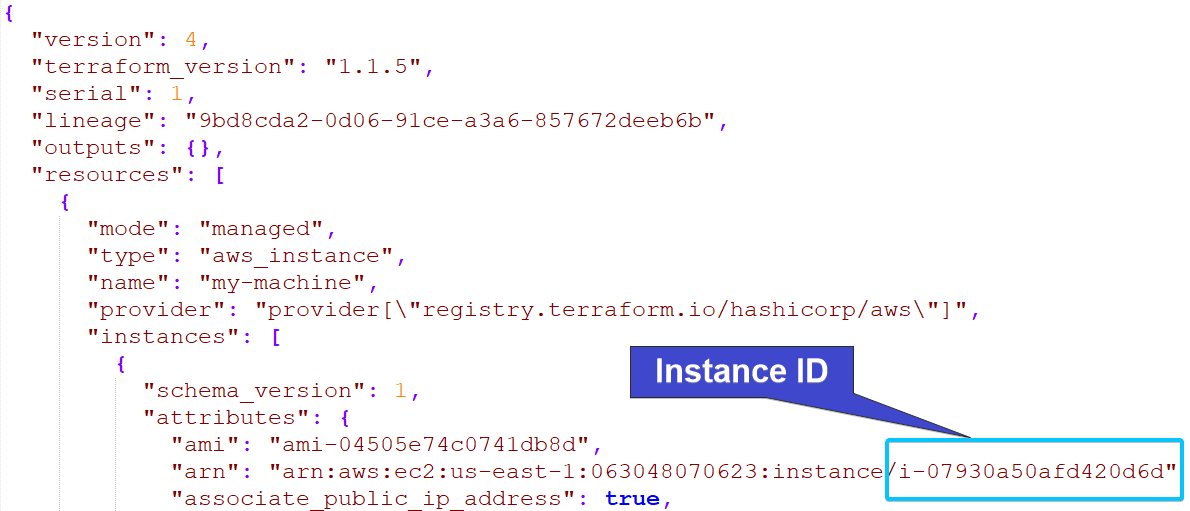
As you can see below, the instance that Terraform launched (i-07930a50afd420d6d) is present in the Terraform state file.
Conclusion
In this tutorial, you’ve learned the importance and how the Terraform state and backend work. You’ve also touched on securing your Terraform state with Terraform backends, local backend, and remote backend (AWS S3).
With this newfound knowledge, why not try storing the states of other AWS services with Terraform backends? Or perhaps migrate state from S3 to Terraform Cloud?


