


Are you tired of monitoring the load of your AWS instances and the traffic it receives? Why not automate everything by deploying Terraform Autoscaling Groups? Auto-scaling allows some of the servers to sleep during low load and adds more servers during the high load, saving on electricity costs for companies.
In this tutorial, you will learn how to build and run a Terraform configuration to build Autoscaling Groups and deploy them with Terraform.
Read on and achieve zero downtime on your instances!
Prerequisites
This post will be a step-by-step tutorial. If you’d like to follow along, ensure you have the following in place:
- An Amazon Web Service (AWS) account.
- A code editor – Even though you can use any text editor to work with Terraform configuration files, consider using Visual Studio (VS) Code as it understands the HCL Terraform language well.
- Terraform – This tutorial uses Terraform v1.1.5 running on Ubuntu 20.04 LTS, but any operating system with Terraform should work.
Building the Terraform Configuration for an AWS Autoscaling Group
Before running Terraform commands to build and deploy the infrastructure, you must create the Terraform configuration files. You’ll build a Terraform configuration to create an AWS Autoscaling group in your AWS account.
1. Log in to your machine using your favorite SSH client.
2. Next, create a folder named ~/terraform-autoscaling-demo, then change (cd) the working directory to that folder. This folder will contain all of the configuration files you’ll be working on in this tutorial.
mkdir ~/terraform-autoscaling-demo
cd ~/terraform-autoscaling-demo
3. Open your favorite code editor, copy/paste the following configuration, and save the file as main.tf in the ~/terraform-autoscaling-demo directory. This main.tf file is the Terraform configuration for the Autoscaling group.
The code below creates an autoscaling launch configuration (web_config) and provisions an Autoscaling group (autoscalegroup). The Autoscaling group also comes with its components (aws_autoscaling_schedule and aws_autoscaling_policy).
# Creating the autoscaling launch configuration that contains AWS EC2 instance details
resource "aws_launch_configuration" "aws_autoscale_conf" {
# Defining the name of the Autoscaling launch configuration
  name          = "web_config"
# Defining the image ID of AWS EC2 instance
  image_id      = "ami-04505e74c0741db8d"
# Defining the instance type of the AWS EC2 instance
  instance_type = "t2.micro"
# Defining the Key that will be used to access the AWS EC2 instance
  key_name = "automateinfra"
}

# Creating the autoscaling group within us-east-1a availability zone
resource "aws_autoscaling_group" "mygroup" {
# Defining the availability Zone in which AWS EC2 instance will be launched
  availability_zones        = ["us-east-1a"]
# Specifying the name of the autoscaling group
  name                      = "autoscalegroup"
# Defining the maximum number of AWS EC2 instances while scaling
  max_size                  = 2
# Defining the minimum number of AWS EC2 instances while scaling
  min_size                  = 1
# Grace period is the time after which AWS EC2 instance comes into service before checking health.
  health_check_grace_period = 30
# The Autoscaling will happen based on health of AWS EC2 instance defined in AWS CLoudwatch Alarm
  health_check_type         = "EC2"
# force_delete deletes the Auto Scaling Group without waiting for all instances in the pool to terminate
  force_delete              = true
# Defining the termination policy where the oldest instance will be replaced first
  termination_policies      = ["OldestInstance"]
# Scaling group is dependent on autoscaling launch configuration because of AWS EC2 instance configurations
  launch_configuration      = aws_launch_configuration.aws_autoscale_conf.name
}
# Creating the autoscaling schedule of the autoscaling group

resource "aws_autoscaling_schedule" "mygroup_schedule" {
  scheduled_action_name  = "autoscalegroup_action"
# The minimum size for the Auto Scaling group
  min_size               = 1
# The maxmimum size for the Auto Scaling group
  max_size               = 2
# Desired_capacity is the number of running EC2 instances in the Autoscaling group
  desired_capacity       = 1
# defining the start_time of autoscaling if you think traffic can peak at this time.
  start_time             = "2022-02-09T18:00:00Z"
  autoscaling_group_name = aws_autoscaling_group.mygroup.name
}

# Creating the autoscaling policy of the autoscaling group
resource "aws_autoscaling_policy" "mygroup_policy" {
  name                   = "autoscalegroup_policy"
# The number of instances by which to scale.
  scaling_adjustment     = 2
  adjustment_type        = "ChangeInCapacity"
# The amount of time (seconds) after a scaling completes and the next scaling starts.
  cooldown               = 300
  autoscaling_group_name = aws_autoscaling_group.mygroup.name
}
# Creating the AWS CLoudwatch Alarm that will autoscale the AWS EC2 instance based on CPU utilization.
resource "aws_cloudwatch_metric_alarm" "web_cpu_alarm_up" {
# defining the name of AWS cloudwatch alarm
  alarm_name = "web_cpu_alarm_up"
  comparison_operator = "GreaterThanOrEqualToThreshold"
  evaluation_periods = "2"
# Defining the metric_name according to which scaling will happen (based on CPU)
  metric_name = "CPUUtilization"
# The namespace for the alarm's associated metric
  namespace = "AWS/EC2"
# After AWS Cloudwatch Alarm is triggered, it will wait for 60 seconds and then autoscales
  period = "60"
  statistic = "Average"
# CPU Utilization threshold is set to 10 percent
  threshold = "10"
  alarm_actions = [
        "${aws_autoscaling_policy.mygroup_policy.arn}"
    ]
dimensions = {
    AutoScalingGroupName = "${aws_autoscaling_group.mygroup.name}"
  }
}
4. Create another file in ~/terraform-autoscaling-demo called provider.tf, and populate the content below. The provider.tf file defines providers such as AWS, Oracle, Azure, and so on. This configuration file lets you connect Terraform with the correct cloud services.
The tutorial will be creating resources in the us-east-1 region. But you can find the list of regions that AWS support.
provider "aws" {
   region = "us-east-1"
 }
5. Lastly, run the tree command below to verify that all required files are present in your project folder (~/terraform-autoscaling-demo).

Creating the AWS Autoscaling group with a Terraform Configuration
Now that you have the Terraform configuration file and variables files set up correctly, it’s time to initiate Terraform and create the AWS Autoscaling group.
To provision the AWS Autoscaling group, like all other Terraform configurations, Terraform uses three commands in sequence (terraform init, terraform plan, and terraform apply).
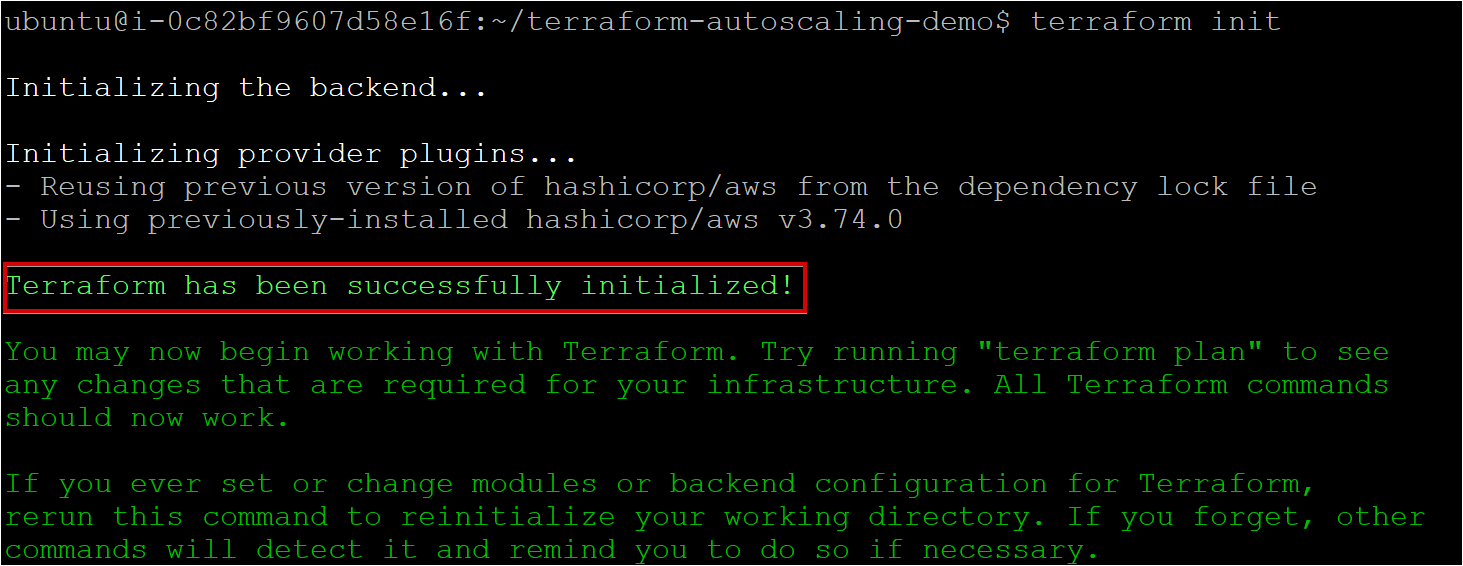
1. Run the terraform init command in the ~/terraform-autoscaling-demo directory. The command initializes the plugins and providers required to work with resources.
terraform initIf all goes well, you’ll see the message that says Terraform has been successfully initialized in the output, as shown below.
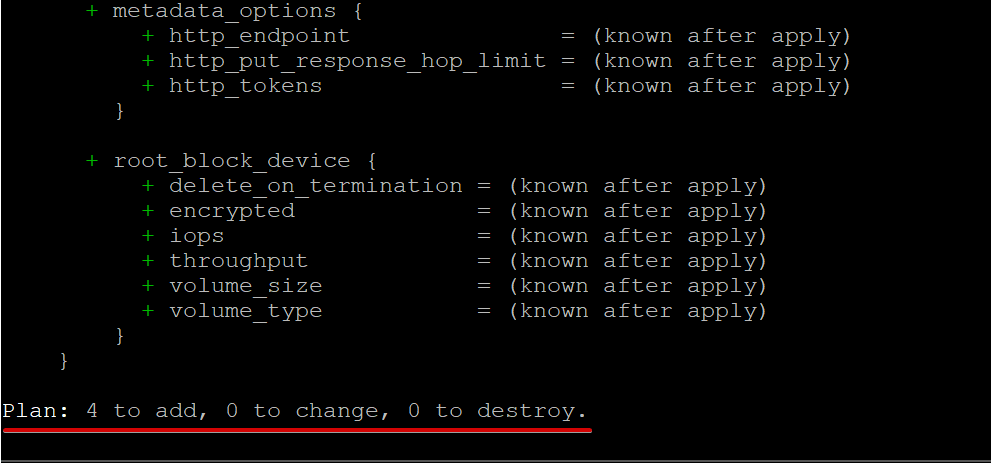
2. Next, run the terraform plan command to ensure your syntax of configuration files is correct and gives you a blueprint of resources that will be provisioned in your infrastructure.
terraform planIf successful, you should see a message that shows the Plan like the one below.
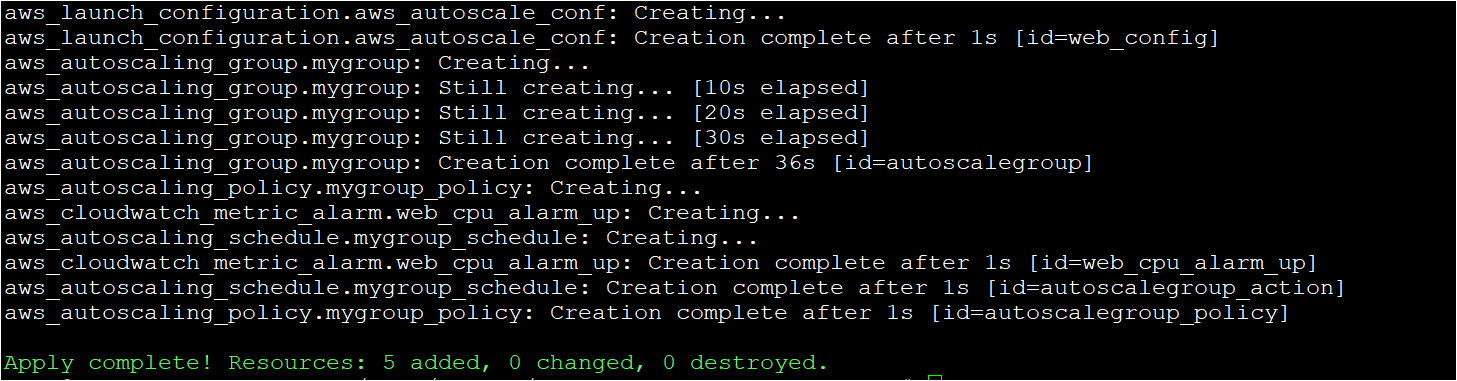
3. Finally, run the terraform apply command to remove the training wheels and invoke Terraform to create the AWS AutoScaling group.
The command tells Terraform to read each configuration (*.tf) in the current directory to compile a state sent to AWS. Terraform then builds the AWS Autoscaling group and other components.
There is no additional charge for AWS Auto Scaling. You pay only for the AWS resources needed to run your applications.
Verifying the AWS Autoscaling Group in AWS Cloud
By now, you should have created the AWS Autoscaling group and related components with Terraform. But how do you know they exist in your AWS cloud? Verify the Autoscaling group by manually checking in the AWS Management Console.
1. Open your favorite web browser and log in to the AWS Management Console.
2. On the console’s home page, click on the search box, search for and click ‘EC2’ to access the EC2 dashboard.
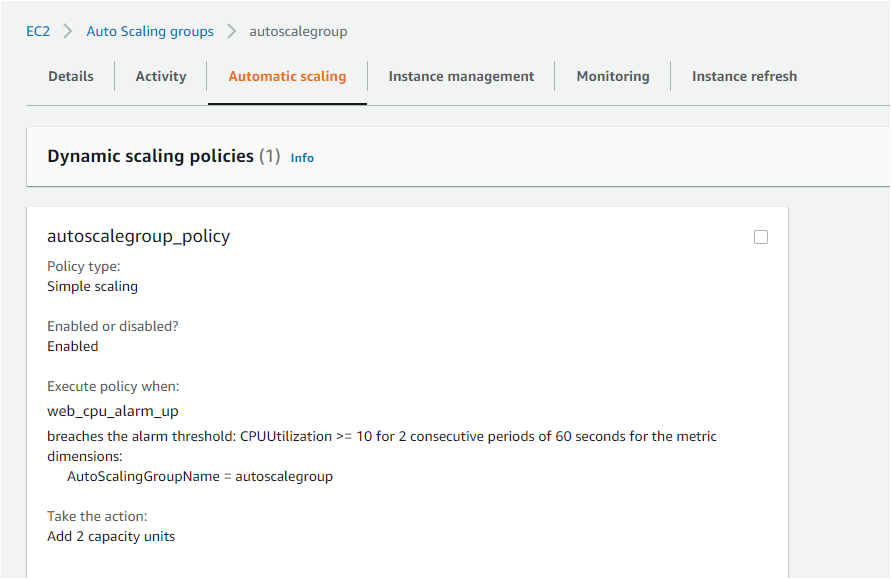
Click on the AWS Auto Scaling group menu item in the EC2 dashboard to manage your Auto Scaling groups.
The Desired number of AWS EC2 instances will be launched in the AWS Cloud in the EC2 dashboard with the below Autoscaling.
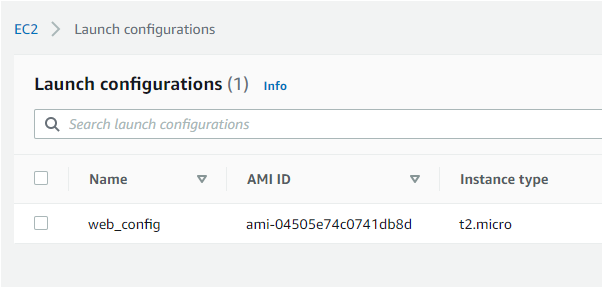
3. Lastly, click on AWS Auto Scaling Launch Configuration in the EC2 dashboard. You’ll see your autoscaling launch configuration (web_config) as shown below.
Autoscaling the EC2 instance with Load Testing
Now that you verified the Autoscaling group/policy and related components are set up correctly, it’s time to test if the Auto Scaling features work. How? By adding load on the instance recently launched with the AutoScaling group.
1. Open the AWS EC2 instance launched with the Autoscaling group using an SSH client.
2. Next, launch the terminal, and run the below command to install the load stress tool (stress-ng). The stress tool allows you to define and generate the stress on the Ubuntu machine.
You can also find other load stress tools available in the market.
sudo apt install stress-ng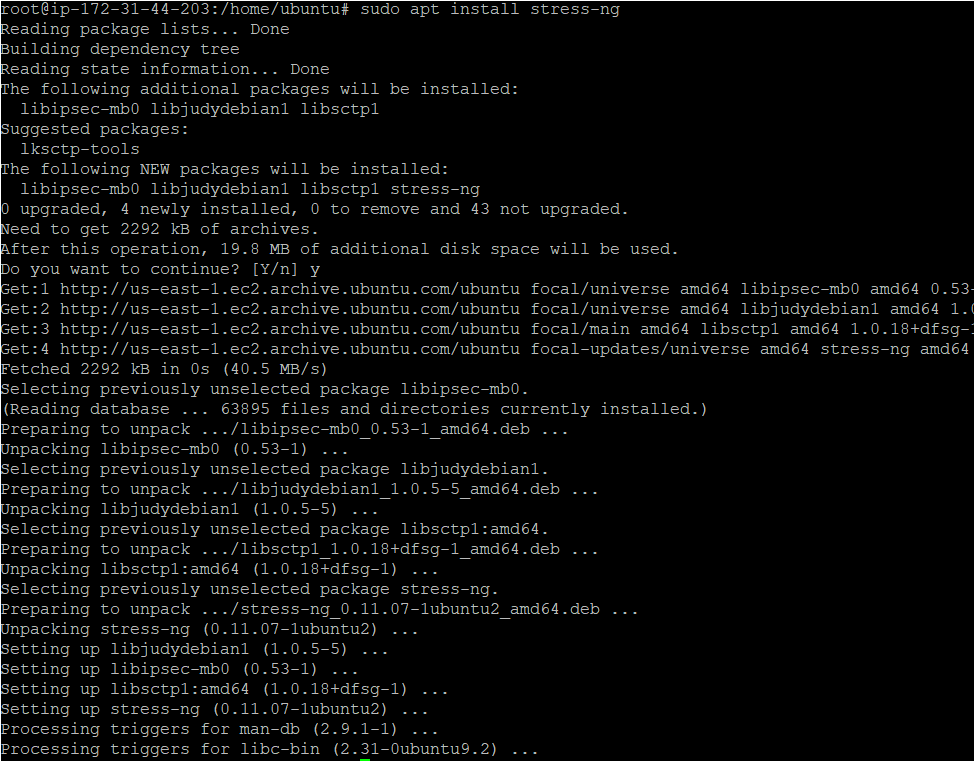
3. Run the stress-ng command below to generate the stress load on the instance.
The below command contains the following flags:
--cpu– Denotes the number of cores on which load will be generated.
-v– Enables verbose mode.
--timeout– Specifies the time for which load should be generated.
sudo stress-ng --cpu 4 -v --timeout 3000s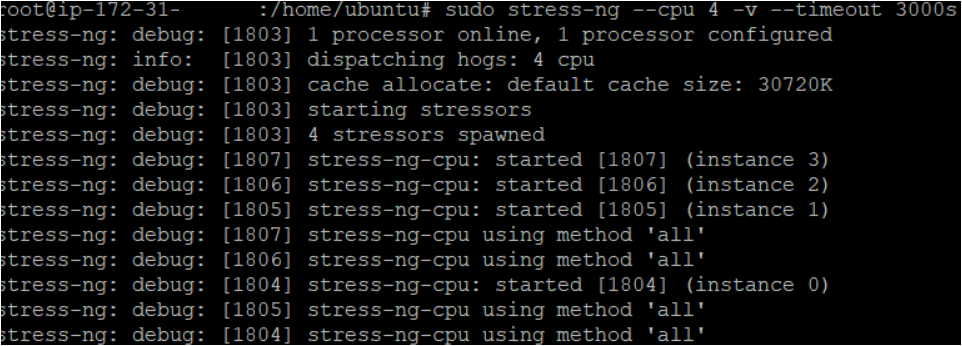
4. Now run the top command below as soon as you generate the load to show the Linux processes.
topBelow, you can see that the CPU spikes after generating the load to the instance.

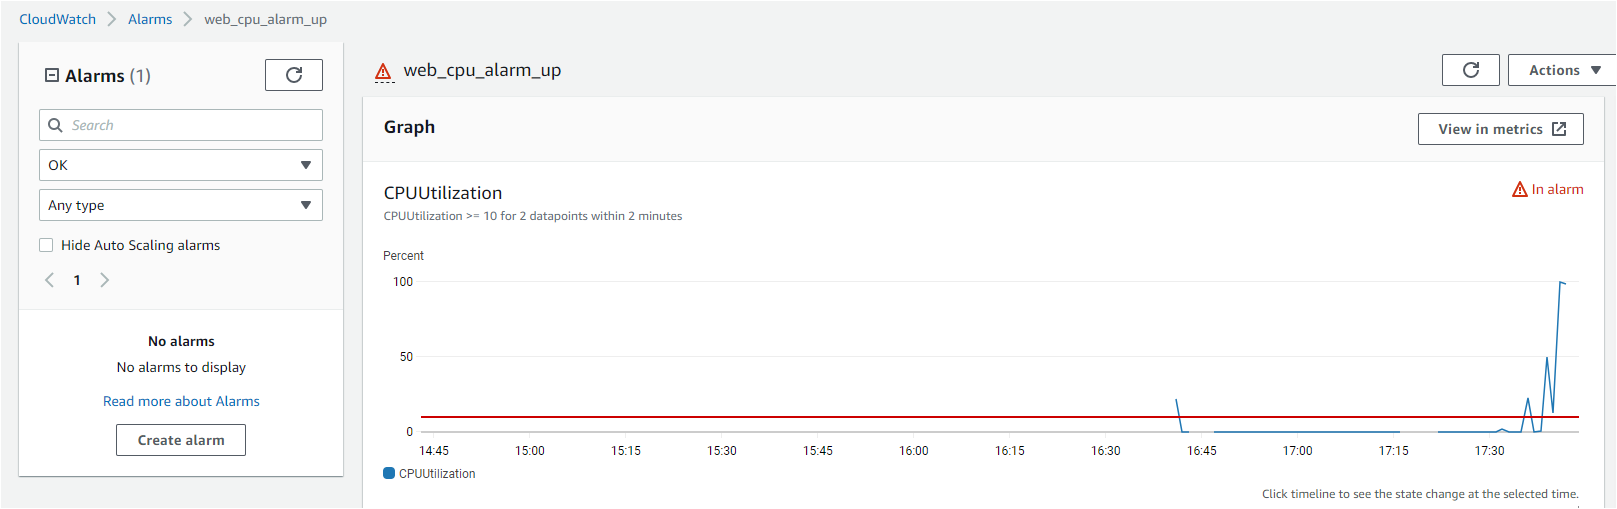
5. Hop over to the AWS CloudWatch service on AWS Cloud. You’ll notice that an Alarm is generated as CPU crossed (10%). The Alarm notified the autoscaling group to scale the number of instances from one to two, as specified in the autoscaling group.
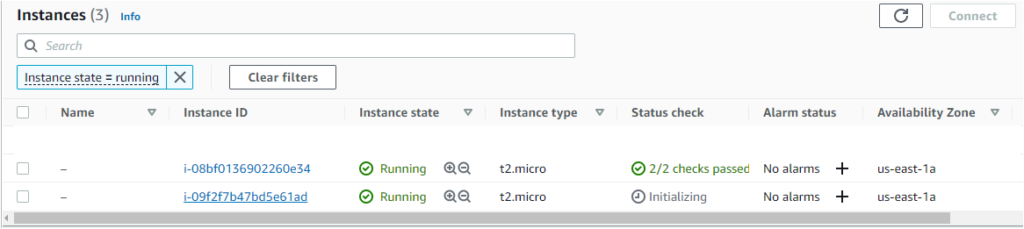
6. Finally, jump to your Instances in the EC2 dashboard to verify the AWS EC2 instances.
You’ll see that one more instance has launched, which confirms the successful setup of the AWS Autoscaling group and components.
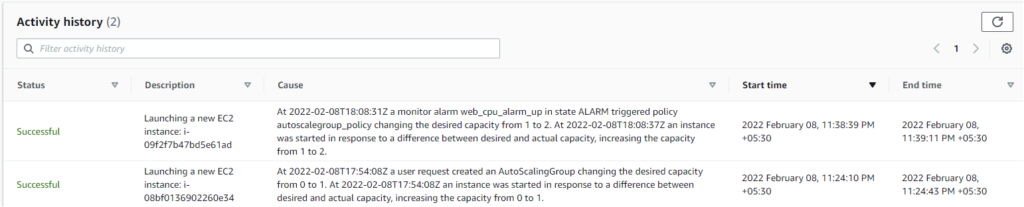
You can also verify the autoscaling activities in the AWS AutoScale group activities, as shown below.
Conclusion
In this tutorial, you’ve learned how to use Terraform to deploy an AWS Autoscaling Group and its components. Building an autoscaling application with AWS Autoscaling Group allows you to scale when needed and is a quick task.
Now, with this newfound knowledge, go nuts and implement Auto Scaling with other AWS services without worrying about the load on the servers!


