


A Solid State Drives (SSDs) performs much faster than the usual Hard Disk Drive (HDD) you get when buying a PC or laptop. An SSD offers lesser chances of failure, but as all drives age, failure is inevitable. So how would you avoid loss of data? There are tools you can use for an SSD health check and even extend its life.
In this article, you’ll learn how to check your SSD’s health and performance via health check tools such as Crystal Disk Info and cmdlets available in PowerShell.
Let’s get started!
Prerequisites
The tutorial runs all demos on a Windows 10 Build 19042 machine installed on an SSD, but other builds of Windows PC will work.
Performing SSD Health Check via CrystalDiskInfo
Perhaps you’re looking for a method to perform an SSD health check that doesn’t make you look like a geek. If that’s the case, take a look at CrystalDiskInfo. Crystal Disk Info is a free GUI HDD/SDD utility software available on the Crystal Mark website.
Differently themed versions of Crystal Disk Info are available to download, but this tutorial uses the standard version.
Download CrystalDiskInfo by clicking on CrystalDiskInfo, as shown below. Now run the installer you downloaded to install CrystalDiskInfo on your PC.

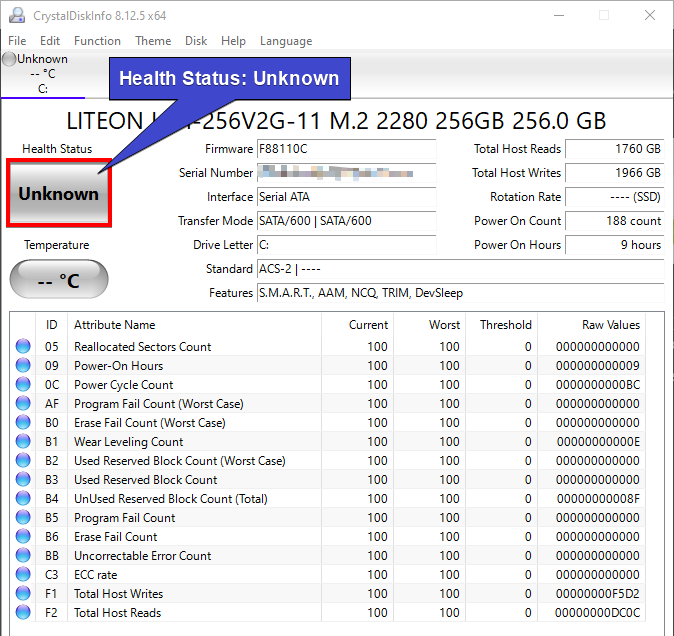
Launch CrystalDiskInfo from your desktop, and you’ll see a bunch of information about your SSD, as shown below.
Depending on your SSD’s health, the health status either appears Green (good), Yellow (caution), Red (failed), or Gray (unknown state). You can see below that the SSD’s health is Unknown, which indicates a firmware update is needed for the SSD or CrystalDiskInfo does not support the controller.
Your SSD manufacturer will usually provide firmware updates for bug fixes, performance, or security enhancements.
Performing an SSD Health Check via PowerShell
Even though CrystalDiskInfo might cover the most commonly used drive controllers, not all are supported. This limitation is one of the primary reasons to turn to PowerShell when performing an SSD health check.
If you spend most of your time running commands in PowerShell, then performing an SSD health check via PowerShell is what suits you best. PowerShell lets you check your SSD for read-write errors, wear leveling, percent, temperature, and several other important details.
Let’s cover how to jointly use two primary cmdlets (the Get-PhysicalDisk and Get-StorageReliabilityCounter) to get a better view of your SSD’s health status.
- The
Get-PhysicalDiskcmdlet retrieves all physical disks visible to any storage management provider. Storage management providers are storage management applications that provide integrated storage management services. - The
Get-StorageReliabilityCountercmdlet allows you to check the counters of the disk/ drive being queried.
Now open PowerShell as administrator, and run the Get-PhysicalDisk cmdlet on its own to return basic information about your SSD.
Get-PhysicalDisk
PowerShell is readily available to determine whether your SSD is in good condition or if it requires a replacement. And as you can see below, the SSD’s status is Healthy, which indicates the SSD is working normally and there are no problems.

Retrieving SSD Usage Statistics
The Get-PhysicalDisk command provides a handful of information about your SSD. But perhaps you’re only interested in information showing your SSD usage statistics, such as the write latency or power-on hours.
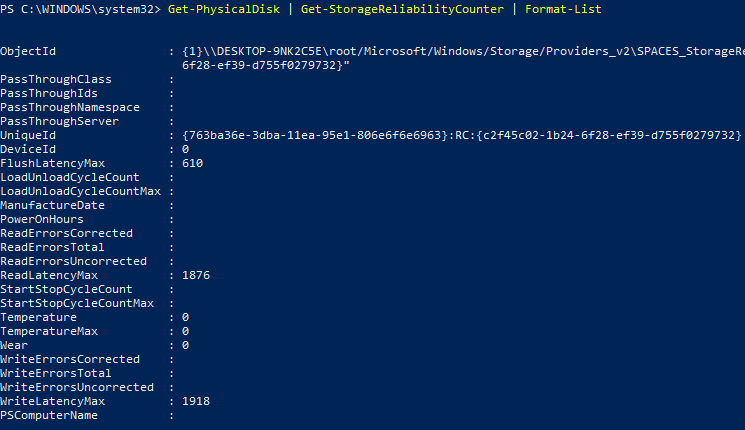
To narrow down returned SSD information, pipe the Get-StorageReliabilityCounter cmdlet to the Get-PhysicalDisk cmdlet and format the result as a list (Format-List).
Get-PhysicalDisk | Get-StorageReliabilityCounter | Format-ListBelow, you see most of the important SSD health information.
Perhaps you only want to get specific information, such as the ReadErrorsTotal and Wear. If so, you’ll be adding the Select cmdlet, as shown below. The Select cmdlet allows you to select specified properties of an object.
Now run the Get-PhysicalDisk command below to filter out the output list by specifying required information (ReadErrorsTotal and Wear).
Get-PhysicalDisk | Get-StorageReliabilityCounter | Select ReadErrorsTotal, WearBelow, you can see only the specified information, ReadErrorsTotal and Wear.
If you see a number other than 0 appearing for any of the two fields, consider replacing your SSD.

Formatting Health Check Output for Multiple SSDs
You’ve learned how to perform an SSD health check in a single SSD so far. But what if you have more than 1 SSD? Enclosing commands in a For Each loop will save time and get the specific information you need simultaneously.
In the command below, the Get-PhysicalDisk cmdlet reads a set of objects (foreach) returned by the Get-StorageReliabilityCounter cmdlet piped with the Format-List cmdlet. The command completes when it’s finished with the last object.
Get-PhysicalDisk | foreach { $_ | Get-StorageReliabilityCounter | Format-List }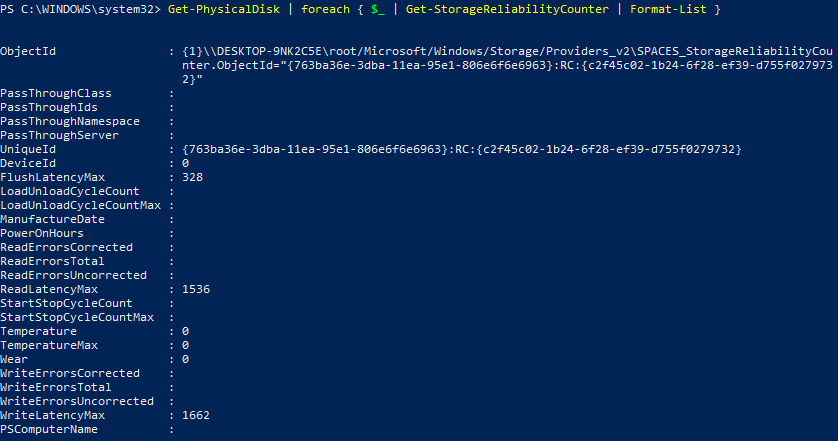
PowerShell offers extensive functionality, such as setting up a scheduled task to check your SSD’s health. That scheduled task can even email you the results, which would be more beneficial for a real-life scenario.
Erasing Unused Data Blocks with TRIM
Now that you know how to check your SSD’s health, it is vital to understand how to maintain the high performance of your SSD. As you perform read-write operations on your SSD, it will slowly wear out the flash memory cells.
Is there a way that you could minimize the damage and maximize the performance of your SSD? Sure there is! To keep an SSD at its prime performance, TRIM was designed. TRIM informs the operating system about which data blocks are no longer serve a purpose in a disk and can be safely erased.
Data recovery from a TRIM-enabled SSD is not possible due to the data being deleted permanently and overwritten.
TRIM is enabled by default for an SSD, but if you’re skeptical and want to confirm that TRIM is enabled, run the command below.
Run the fsutil behavior command below to query the system if TRIM (aka. DisableDeleteNotify) is enabled or not.
fsutil behavior query DisableDeleteNotifyBelow, you can tell that TRIM is disabled as the returned value is zero (0). If the command returned (1), then TRIM is currently enabled.

Now run the same previous command to enable TRIM, but instead of querying the behavior of the delete notifications, you set it to 1.
fsutil behavior set DisableDeleteNotify 1
Conclusion
In this tutorial, you’ve learned how to perform an SSD health check via CrystalDiskInfo and PowerShell which ships with your Windows PC. Now you can surely expect to avoid situations whereby your SSD would fail unknowingly.
The question now is, would you rely on third-party software to perform an SSD health check or stick to PowerShell?


