

Have you ever found yourself in a situation where you needed to perform a task on a Linux system, only to be met with a frustrating access denial? Well, say goodbye to those woes and welcome the world of special permissions in Linux!
This tutorial is your ticket to mastering the finer points of special permissions in Linux — Sticky Bit, Set User ID (SUID), and Set Group ID (SGID). These special permissions offer a higher level of security control.
Read on and securely manage your files with precision and confidence!
Prerequisites
Before you jump into the details of special permissions in Linux, ensure you have a Linux machine. This tutorial uses Ubuntu 22.04 LTS (Jammy Jellyfish) for hands-on demonstrations.
Executing Files with Special Permissions in Linux (SUID)
Linux file permissions typically determine a user’s ability to read, write, or execute a file based on their permissions and those of their group. Yet, there are situations where a user must execute a file with the permissions of the file’s owner rather than their own.
For instance, consider a program that only root users can run, but there’s a need for a regular user to execute it for a specific task. In such cases, SUID becomes invaluable.
To see how to set SUID permissions, follow these steps:
1. Open the terminal and execute the following commands to create a user (useradd) called A-user (arbitrary) and give it a password (passwd).
sudo useradd A-user
sudo passwd A-user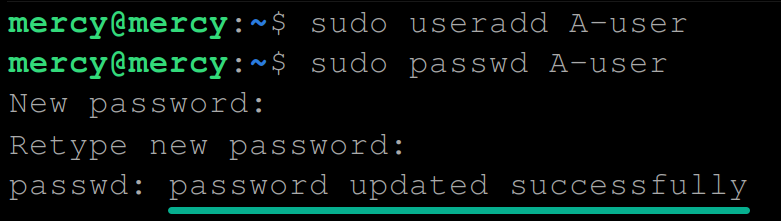
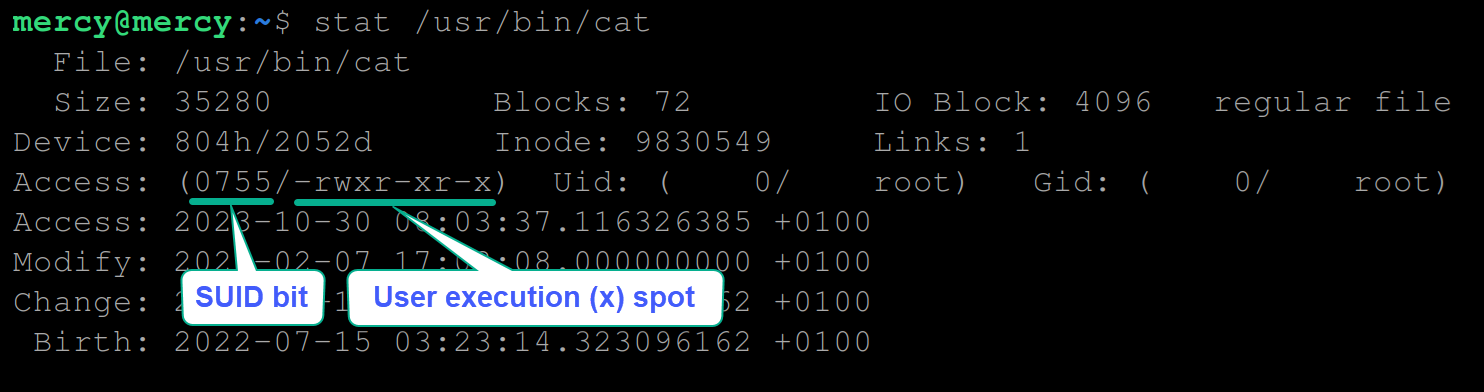
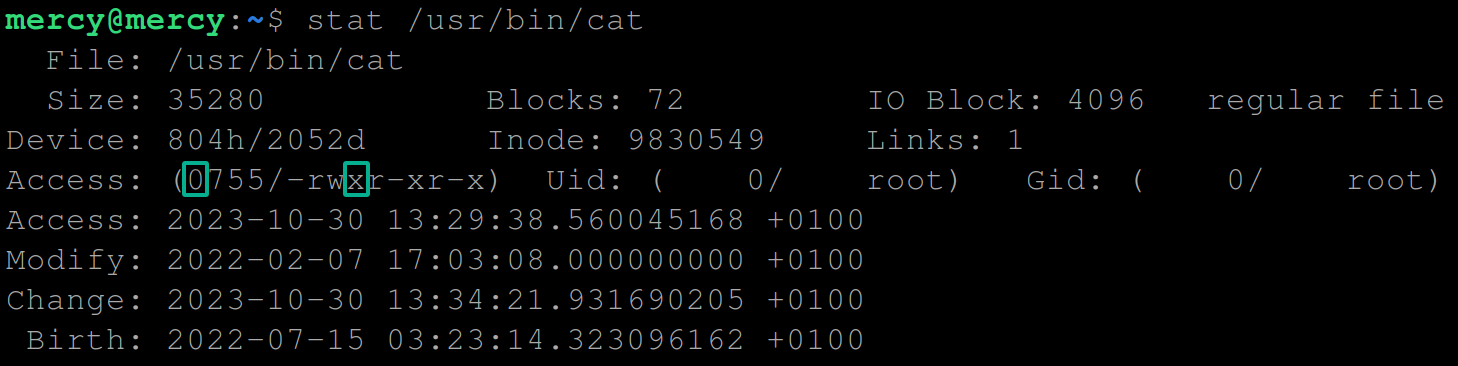
2. Next, run the stat command below to view the existing permissions of the cat command.
stat /usr/bin/catTake note of the access permissions below, as you’ll be needing it for comparisons later:
- 0755 – Allows the file to be executed with the permissions of its owner, providing elevated privileges to non-privileged users when running the file.
- -rwxr-xr-x – Sets permission to the owner to read, write, and execute the file (rwx), while group members and other users can read and execute the file (r-x and r-x).
cat command3. Now, run the below chmod command, which does not provide output but sets the SUID bit on the cat command.
This command allows the cat command to run with the file owner’s permissions rather than the permissions of the user running the command.
💡 Note that using SUID should be done with caution, as it can potentially introduce security risks if not implemented properly. Ensure you only apply SUID to trusted commands and files.
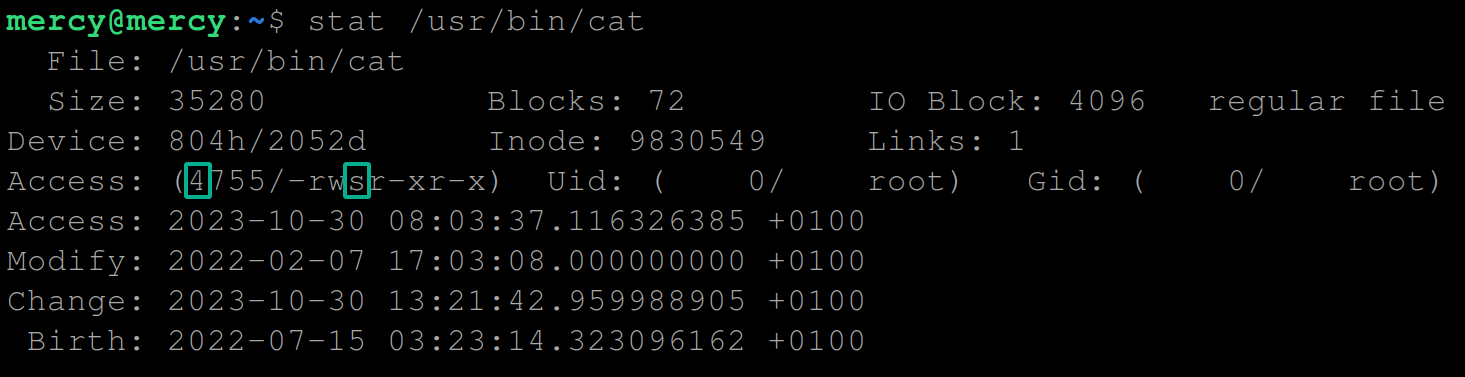
sudo chmod u+s /usr/bin/cat4. Once you’ve set the SUID bit, run the following stat command to verify the SUID bit by rechecking the permissions of the cat command.
stat /usr/bin/catIf successful, you’ll see the following, where you’ll make a comparison with the information you noted in step two:
- 0755 changed to 4755, where the number 4 represents the SUID bit.
- -rwxr-xr-x changed to -rwsr-xr-x, where s represents the user’s execute (x) permission spot respectively.
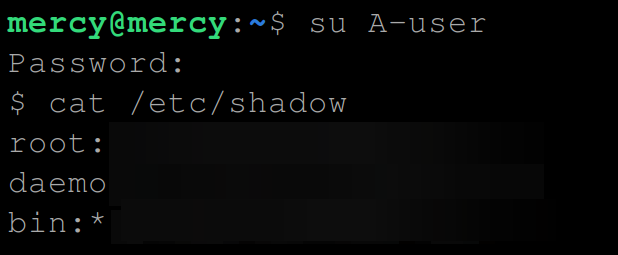
5. Run the below cat command to test the currently logged-in user’s permission to access the /etc/shadow file. This file is a critical system file that stores encrypted user passwords and related information, which only a root user can access.
By default, the cat command lets you view the contents of a file in Linux. But this behavior doesn’t always hold true for every file.
cat /etc/shadowThe message below appears since the current user does not have permission to access the file.

6. Now, run each command below to switch (su) to the new user (A-user), and try accessing the /etc/shadow file again.
This time, the cat command runs with the permissions of the file owner (usually root) rather than the permissions of the user who executed the command.
# Switch to A-user
su A-user
# View the contents of the /etc/shadow file
cat /etc/shadow
Since you temporarily granted permission to A-user to read the contents of that file, you’ll get an output like the one below.
7. For security reasons, execute the following commands to exit out of the current user (A-user) and revert the permissions of the cat command to its original state.
exit
sudo chmod u-s /usr/bin/cat
cat command8. Finally, run the below command to verify that the SUID bit has been removed.
stat /usr/bin/catNotice that the SUID bit 4 and s are no longer in the access permissions.
Enabling Collaborative Workflows in Linux Directories (SGID)
Executing files with special permissions in Linux via SUID undoubtedly works well. But what if you aim for collaborative workflows, where multiple users collaborate on projects? Typically, you must ensure that newly created files inherit the group ownership of the parent directory.
When confronted with this scenario, the SGID proves to be the game-changer. This powerful feature simplifies the management of shared resources and enhances group-based workflows in Linux environments.
To see how the SGID works, you’ll create a group, add users to it, set SGID permission on a directory, and test its functionality as follows:
1. Execute the following commands to log in as the root user and create a new group named demo (arbitrary). This group is what you’ll use to test the SGID functionality.
These commands do no
# Switch to root
sudo su
# Create a new group
groupadd demo
2. Next, run the commands below to create two users (userA and userB) that you’ll use to simulate a collaborative environment.
useradd -s /bin/bash userA
passwd userA

useradd -s /bin/bash userB
passwd userB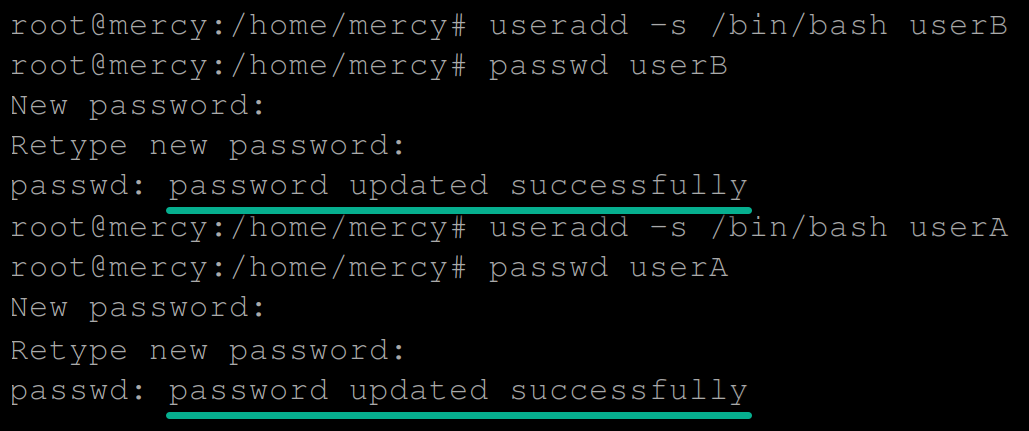
3. After creating new users, run the below usermod commands, which don’t produce output to the terminal but add the users (userA and userB) to the demo group.
usermod -aG demo userA
usermod -aG demo userB
4. Now, execute each command below, create a directory (mkdir) called /demo-dir (arbitrary), and set the directory’s user and group ownerships to userA and demo, respectively.
💡 When successful, these commands don’t produce output, which applies throughout this tutorial.
# Create a directory
mkdir /demo-dir
# Change the directory's ownership
chown userA:demo /demo-dir
5. Next, run the following ls command to view the permissions of the /demo-dir directory.
ls -ld /demo-dir/The output below verifies the /demo-dir directory’s user is set to userA and the group to demo.

6. With verified permissions, run the chmod command below to set the SGID bit on the /demo-dir/ directory as follows:
g+s– Set the SGID bit on the/demo-dir/directory.o-rwx– Remove all permissions (read, write, execute) for others.u+rwx– Grant read, write, and execute permissions to the owner.g+rwx– Grant read, write, and execute permissions to the group.
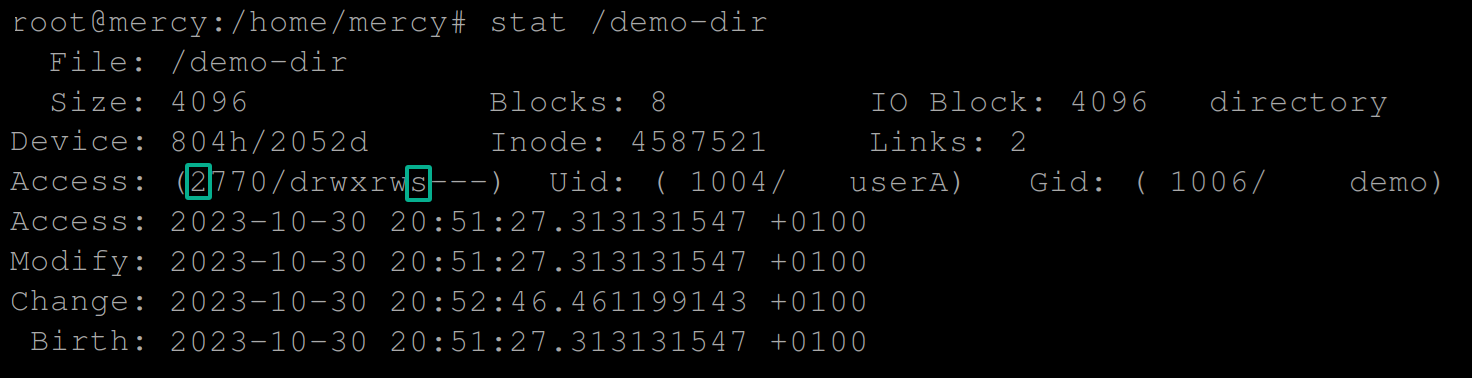
chmod g+s,u+rwx,g+rwx,o-rwx /demo-dir/7. Once SGID is set, run the following command to verify the permissions of the /demo-dir directory.
stat /demo-dirIf successful, you’ll see the SGID bit set, represented by the number 2 before the octal mode permission and s in the group owner execute (x) permission spot (rws).
8. Next, run each command below to create a /home directory for userA.
mkdir /home/userA
chown userA:userA /home/userA
9. Execute the following commands to switch (su) to userA and create a file (touch) called textA.txt (arbitrary) in the /demo-dir directory.
These commands have no output (which applies throughout this tutorial), but you’ll verify the file’s permissions in the following step.
# Switch to userA
su - userA
# Change directory
cd /demo-dir
# Create a text file
touch textA.txt
10. Run the below ls command to view the permissions of the textA.txt file.
ls -l textA.txtBelow, the textA.txt file’s group owner is demo, which is the primary group of the creator, userA. Members of the demo group can read and modify the file, while others can only read it.
To ensure new files in the /demo-dir directory inherit the directory’s group ownership, an SGID bit should be set on the directory, which you’ll cover in the following steps.

11. Now, invoke the following commands to exit out of the current user (userA) and set the SGID bit (chmod g+s) in the /demo-dir directory
# Exit userA
exit
# Set SGID to /demo-dir
chmod g+s /demo-dir
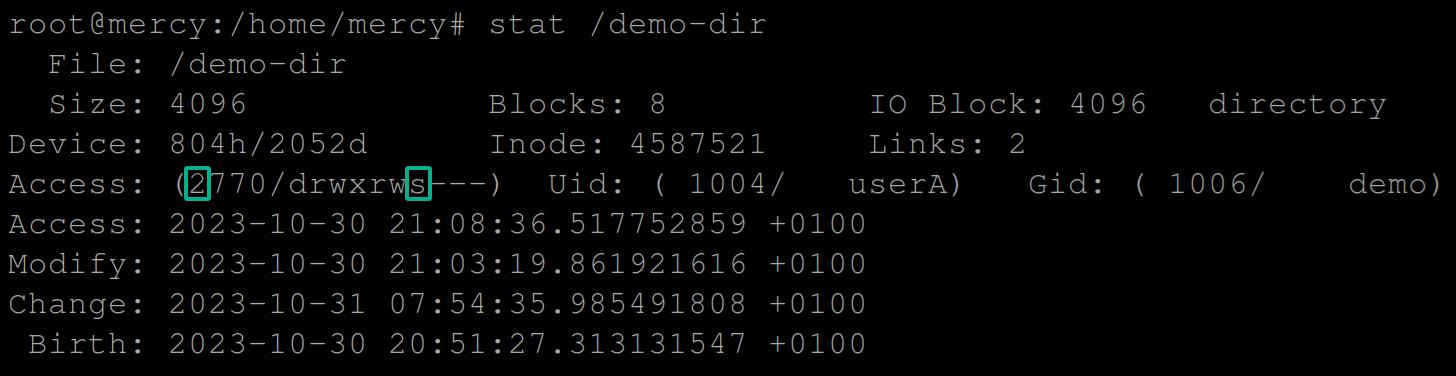
12. Once SGID is set, run the below command to verify the SGID bit you added to the /demo-dir directory.
stat /demo-dirAs shown below, you’ll notice the SUID bit 2 is added, and there is an s in the group owner execution spot. This output confirms the SGID bit has been successfully set to the /demo-dir directory.
13. Next, switch back to userA and create another file called testA.txt (arbitrary) in the /demo-dir directory.
# Switch to userA
su - userA
# Change directory
cd /demo-dir
# Create a text file
touch testA.txt
14. Once created, run the ls command below to check the ownership of the new file (testA.txt).
ls -l testA.txtIf the SGID works as expected, the output shows that while userA is the owner, the group ownership is demo due to the SGID bit set on the /demo-dir directory.

15. Now, create a /home directory for userB for further testing the SGID functionality.
mkdir /home/userB
chown userB:userB /home/userB
16. Switch to userB and create a file called testB.txt (arbitrary) in the same /demo-dir directory.
# Switch to userB
su - userB
# Change directory
cd /demo-dir
# Create a text file
touch testB.txt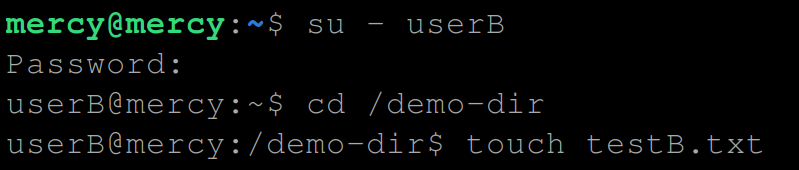
17. View (ls) the new file’s (testB.txt) information.
ls -l testB.txtCheck the ownership of the textB.txt file.

Protecting Files Within Directories (Sticky Bit)
Enabling collaborative workflows in Linux directories promotes teamwork and seamless collaboration. But when you must establish a secure environment for managing files effectively, the Sticky Bit permissions will do the trick.
By setting the Sticky Bit, you’re essentially putting the “keys to the castle” in the hands of the file owner, directory owner, or root user. Doing so ensures that only they have the authority to delete or rename the file within the directory, providing an additional safeguard for sensitive data.
To set Sticky Bit permissions, you must first create a shared directory with the following steps:
1. Log in as the root user and create a (shared) directory (mkdir) where multiple users can create files.
# Switch to root
sudo su
# Creata a directory (shared)
mkdir /shared-dir
2. Next, run the below commands to change the permissions of the /shared-dir directory to grant write permissions to everyone.
The first number (1) in 1777 sets the Sticky Bit, while the rest (777) makes the directory readable, writable, and executable by everyone.
# Change permissions, set Sticky Bit
chmod 1777 /shared-dir
# View the directory's permissions
ls -ld /shared-dir
The following are features or attributes of the Sticky Bit in a Linux system:
| Feature | Function |
| Directory Protection | When the Sticky Bit is set on a directory, it allows only the owner of a file within that directory to delete or rename their own files. Other users, even if they have write permissions to the directory, cannot delete or rename files owned by other users. |
| Shared Directories | The sticky bit is handy for directories that are shared among multiple users. For example, on a system with a /tmp directory used by all users to store temporary files, setting the Sticky Bit prevents users from accidentally or maliciously deleting files owned by other users. |
Below, you can see the letter ‘t’ in the latter part of the permission field, which indicates the Sticky Bit is set to the /shared-dir directory.

3. Switch to userA and create a file called fileA.txt (arbitrary) in the /shared-dir directory:
# Switch to userA
su - userA
# Create a text file
touch /shared-dir/fileA.txt
4. Exit out of userA, switch to userB, and create another file called fileB.txt (arbitrary) in the same /shared-dir directory.
# Exit userA
exit
# Swtich to userB
su - userB
# Create a text file
touch /shared-dir/fileB.txt
5. Now, exit userB, switch to userA, and attempt to delete userB‘s fileB.txt file.
# Exit userB
exit
# Switch to userA
su - userA
# Delete a file owned by userB
rm /shared-dir/fileB.txt
You’ll get an output like the one below since only the file owner can make changes or delete the file.

6. Finally, run the following command list (ls) all files within the shared directory (/shared-dir).
ls /shared-dir/If the Sticky Bit permissions work, you’ll see the fileB.txt file created by userB is safe and sound and hasn’t been deleted.

Conclusion
As you wrap up this exploration of special permissions in Linux, you’ve unlocked a robust set of tools: the SUID, SGID, and Sticky Bit. Armed with this knowledge, you can now fine-tune access control and safeguard your files with precision.
But don’t stop here! Why not try setting up a shared directory with SGID and experiment with how files inherit group ownership? The Linux world is your oyster, and with each endeavor, you’ll master the art of securing your system with finesse!


