


Have you ever downloaded a PowerShell script, ran it, and run into the infamous error message below? If so, you need the Set-ExecutionPolicy cmdlet and this tutorial!
Not a reader? Watch this related video tutorial!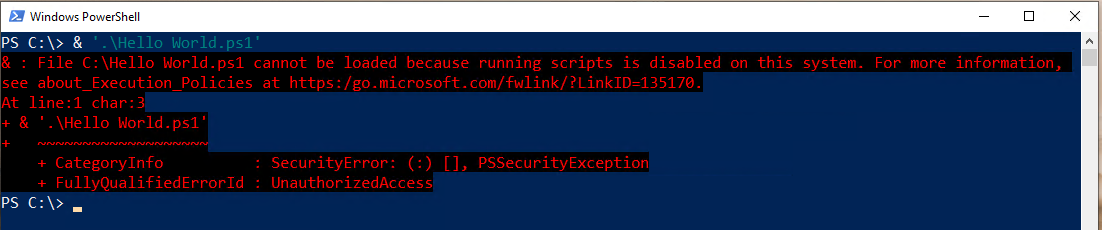
In this post, you’re going to learn about PowerShell execution policies and how to manage them with the Set-ExecutionPolicy cmdlet. By the end of this post, you’ll know not only to run scripts but how to use execution policies too!
This tutorial was written with Windows PowerShell in mind, and all demonstrations were performed with Windows PowerShell. Execution policies are not unique to Windows PowerShell, and they operate very similarly in PowerShell 6+. But, if you’re working with PowerShell 6+, you may find small differences in behavior.
What is an Execution Policy?
If you’ve ever run into the error described above, you’ve encountered an execution policy. PowerShell execution policies are a security mechanism to protect your system from running malicious scripts. Execution policies don’t prevent you from running PowerShell code in the console as a shell but script execution.
Microsoft says an execution policy isn’t technically a “security” measure but more of a gate you can open and close. After all, you can bypass a defined execution policy easily, as you’ll learn later.
Execution policies are based on trust. If you trust a script, chances are, it’s not malicious. Execution policies don’t typically prevent script execution of all scripts. Their primary purpose (most notably when configured more strictly) is to ensure you trust the script you’re running is cryptographically-signed with a certificate.
Execution Policy Scopes
As you’ve learned, execution policies restrict script execution, but PowerShell can execute scripts in many different contexts. PowerShell executes scripts under a user’s logged-in context or a global machine context, via scheduled tasks running as SYSTEM or within the scope of a single open PowerShell console.
To accommodate all of these contexts, PowerShell has five different contexts or scopes you can define an execution policy.
- MachinePolicy – This scope is limited to a single computer. It affects all users who log onto that computer, and an Active Directory group policy object sets it. When defined, it takes precedence over all other scopes.
- LocalMachine. This is the default scope that affects all computer users and is stored in the HKEY_LOCAL_MACHINE registry subkey. When you set an execution policy using
Set-ExecutionPolicy, this scope is the default.
The execution policy for LocalMachine is stored in the registry key HKEY_LOCAL_MACHINE\SOFTWARE\Microsoft\PowerShell\1\ShellIds\Microsoft.PowerShell.
- UserPolicy – The UserPolicy scope affects only a single user on a computer, and an Active Directory group policy object sets it. You cannot change this policy with
Set-ExecutionPolicy. - CurrentUser. The CurrentUser policy scope sets the execution policy only for the current user and is stored under the HKEY_CURRENT_USER registry hive. You cannot change this policy with
Set-ExecutionPolicy.
The execution policy for CurrentUser is stored in the registry key HKEY_CURRENT_USER\SOFTWARE\Microsoft\PowerShell\1\ShellIds\Microsoft.PowerShell.
- Process – This scope defines the execution policy for a single PowerShell session for a single user. The Process execution policy scope is the most granular execution policy you can define. Unlike other execution policies, this policy is saved in an environment variable called
PSExecutionPolicyPreferencerather than the registry.
Execution Policy Types
Execution policies have various “security levels.” These levels dictate how strict the execution policy is. For example, you can have an execution policy in place that essentially does nothing; it’s disabled, but, on the other hand, an execution policy can completely disable script execution.
Let’s cover each of the ways you can configure an execution policy’s security level from least to most restrictive.
Unrestricted
The least restrictive policy is one that does not affect at all; it’s Unrestricted. Unrestricted execution policies are essentially disabled. Users can run all scripts regardless of trust when an execution policy is Unrestricted.
Bypass
Like the Unrestricted type, an execution policy set to Bypass, blocks nothing.
While Bypass and Unrestricted have a similar effect, the Bypass execution policy type isn’t technically a type at all. It skips a defined execution policy entirely.
Undefined
Although not commonly used, you can essentially remove an execution policy by setting it to Undefined. When you set an execution policy to Undefined, PowerShell completely removes any assigned execution policies from the assigned scope.
On non-Windows computers, the execution policy is always set to Unrestricted and cannot be changed.
When all scopes are set to Undefined, PowerShell essentially treats all scopes as Restricted.
RemoteSigned
As you read earlier, execution policies are all about trust earned via a digital signature on scripts. PowerShell also takes into account where that script came from. Was it created on your local computer or from some random person on the Internet?
Scripts built somewhere other than your local computer should not be inherently trusted. This is why PowerShell provides the RemoteSigned execution policy. The RemoteSigned execution policy enforces that all scripts are written somewhere other than your local computer to be cryptographically-signed.
You can override this execution policy to some degree for files downloaded from the Internet using the
Unblock-Filecmdlet. Get more information on this behavior a little later in the How the RemoteSigned Policy Works section.
For Windows Server, RemoteSigned is assigned as the default policy.
AllSigned
If you’d like to ensure all PowerShell scripts are cryptographically-signed, set the execution policy to AllSigned. Like RemoteSigned, this execution policy takes the signing requirement a step further and enforces all scripts are signed before execution.
Even if you have the AllSigned execution policy set, you can still get around the execution policy by bypassing it, as you’ll learn later.
Restricted
The most restrictive execution policy is Restricted. When an execution policy is to Restricted, absolutely no scripts can execute; regardless of they’re trusted or not. This policy essentially disables script execution completely.
Also, unlike the less restrictive types, the Restricted type ensures PowerShell formatting and configuration files (PS1XML), module script files (PSM1), and PowerShell profiles cannot execute.
All Windows clients, by default, are set to a Restricted execution policy.
Technically, Microsoft defines a seventh execution policy called Default, but the type is essentially another label for RemoteSigned (Windows Server) and Restricted (Windows Clients).
How the RemoteSigned Policy Works
One particular scenario to point is how the RemoteSigned execution policy works. This execution policy (as you’ve learned) prevents scripts from running that have been created somewhere other than your local computer.
But how does PowerShell know the script was created elsewhere? Data streams.
Understanding and Querying NTFS Data Streams
Whenever you create a file on an NTFS file system, NTFS applies an alternate data stream (ADS) attribute to the file. An ADS has two file attributes: $Data and zone.Identifier. PowerShell uses the zone.Identifier attribute to identify whether a PowerShell script file created somewhere else.
Unlike other attributes like Compressed or Read Only, ADS attributes are hidden in File Explorer. But, by using PowerShell, you can inspect these data streams.
Run the Get-Item cmdlet using the path to the script and the Stream parameter as shown below. In this example, Hello World.ps1 was written on the local computer. Notice the only attribute assigned to the Stream property is $DATA. There is no ADS attribute.
Get-Item '.\Hello World.ps1' -Stream *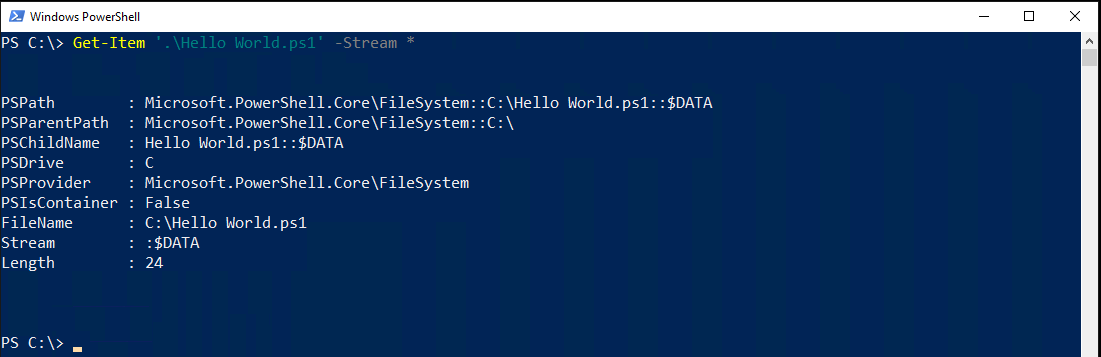
Now, run the same command on a script downloaded from the Internet. Notice now Get-Item returns another object completely with a Stream of Zone.Identifier.
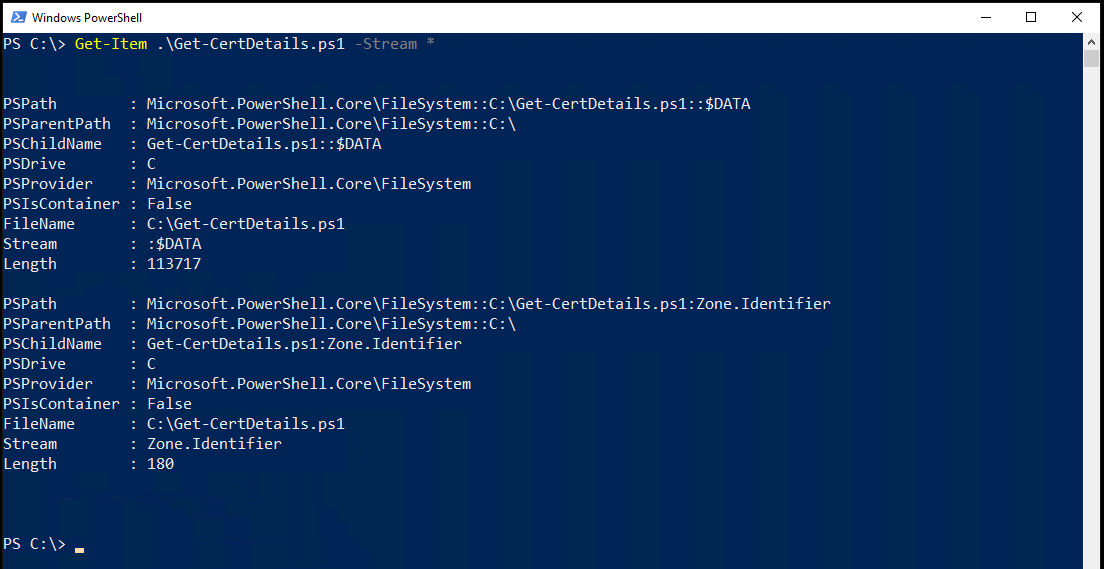
Once you know a file has an ADS, you can then use the Get-Content command to discover the zone. The zone defines where the file came from.
Get-Content .\Get-CertDetails.ps1 -Stream zone.identifierGet-Content will return a ZoneId value which represents the zone the file came from.

Possible zone values are:
Zone ID Zone
------- ---------------------
0       My Computer
1       Local Intranet Zone
2       Trusted sites Zone
3       Internet Zone
4       Restricted Sites Zone
Execution Policy Precedence
As covered above, many different execution policies exist at once. All of these execution policies, when combined, dictate the settings of your current session. When you have multiple execution policies in effect, you must have precedence.
Policy precedence is the order in which PowerShell applies different policies set at different scopes. Some execution policies have higher priority than others.
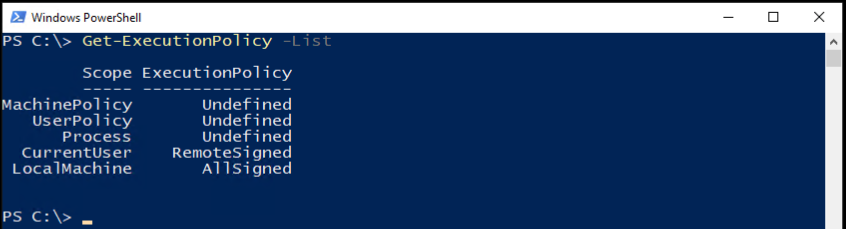
When you run Get-ExecutionPolicy -List, you will find all execution policies currently in effect ordered from lowest priority to highest. For example, since MachinePolicy has a lower priority, the LocalMachine and CurrentUser policies will override it.
Working with Execution Policies
Enough understanding the background of execution policies, let’s now dig into how to work with them! To work with PowerShell’s execution policies, you have two commands at your disposal Get-ExecutionPolicy to discover currently-defined policies and Set-ExecutionPolicy to set new policies.
Getting Currently-Assigned Policies
Before you can begin changing execution policies, you need to learn what you’re working with. To do that, you’ve got the Get-ExecutionPolicy command. This command enumerates all of the currently-assigned policies on a computer.
When you directly run the Get-ExecutionPolicy command on a PowerShell console with no parameters, it will show the execution policy set for your current PowerShell session.

To see the execution policy set to a scope, specify the Scope parameter using the scope name you’d like to see the results for.
Get-ExecutionPolicy -Scope Process
Get-ExecutionPolicy -Scope LocalMachine
To view all scopes and their execution policies, use List parameter as shown below.
Get-ExecutionPolicy -list
Changing Execution Policies
Once you know what execution policies are currently assigned, you can change them too. To change the policy on a single computer, you have the Set-ExecutionPolicy command at your disposal. But, if you’re in an organization, you’ll want to change policies in bulk. If that’s the case, you always have Group Policy if you’re in an Active Directory domain.
Using Set-ExecutionPolicy
Let’s first cover how to change policies with the Set-ExecutionPolicy command. To do so, open up PowerShell as administrator.
Now run the Set-ExecutionPolicy command with a single parameter (ExecutionPolicy) providing the name of the execution policy.
Set-ExecutionPolicy -ExecutionPolicy RemoteSignedPowerShell will then ask if you’d like to change the execution policy. If you do, type Y or A and hit Enter.

Some PowerShell commands need to run multiple other tasks to operate. If in the example above you enter Y, PowerShell may prompt you to continue for each step. If you press A, it will continue for all the subsequent steps.
Running Set-ExecutionPolicy Without Prompts
By default, when you run Set-ExecutionPolicy, it will prompt you whether or not you want to change the execution policy. You can skip this prompt by adding the Force parameter to your command. Using the Force parameter will suppress all confirmation prompts.
Set-ExecutionPolicy RemoteSigned -Force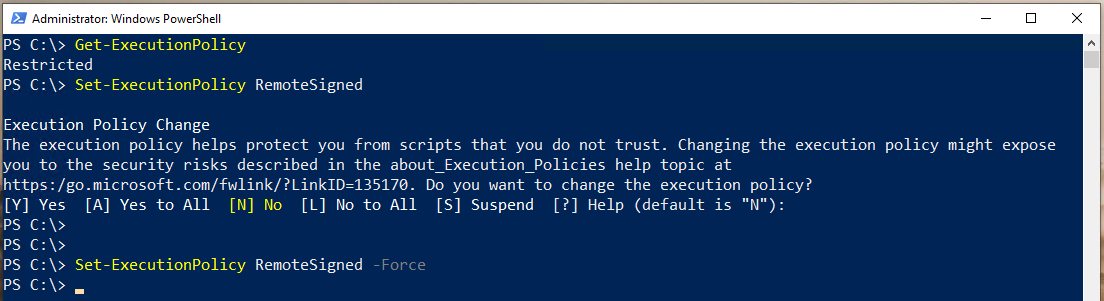
Setting PowerShell Execution Policy via Registry
Since most execution policies are stored in the registry (excluding Process), you can also change policies directly via the registry.
To change execution policies via the registry:
- Open up the Windows Registry Editor (regedit) or your choice of registry editing tool.
2. Navigate to the execution policy scope’s registry key you’d like to change.
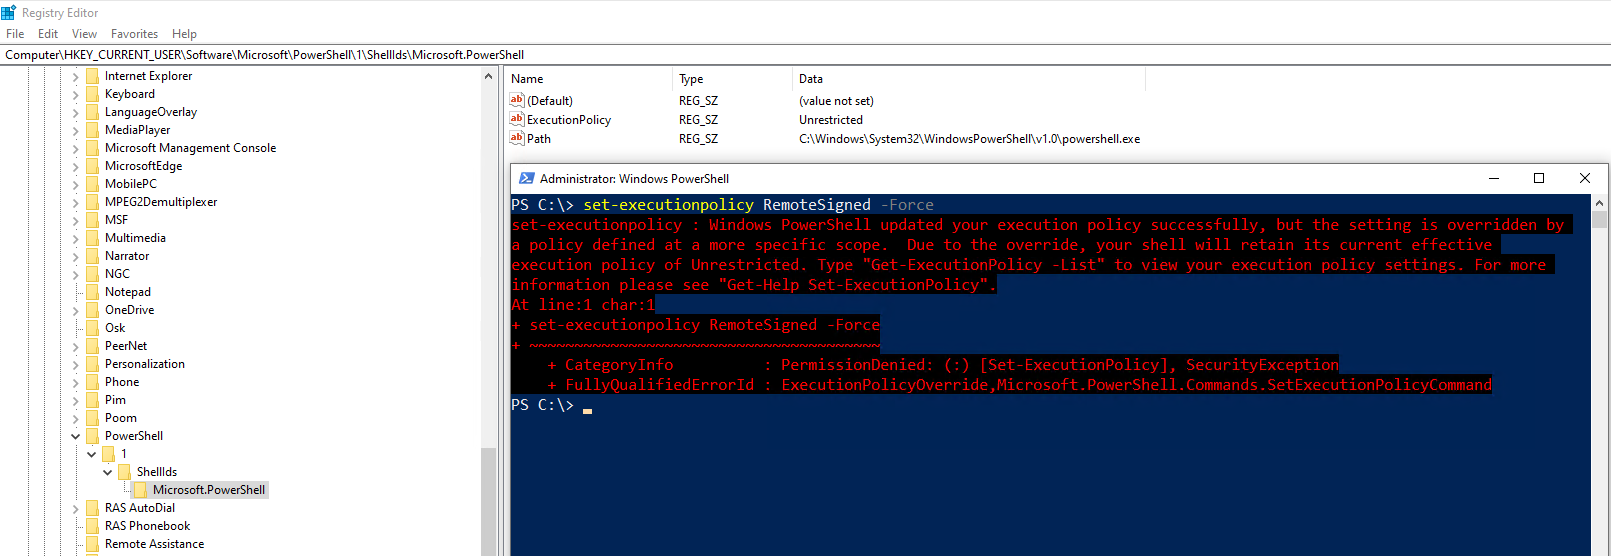
LocalMachine – HKEY_LOCAL_MACHINE\SOFTWARE\Microsoft\PowerShell\1\ShellIds\Microsoft.PowerShell
CurrentUser – HKEY_CURRENT_USER\SOFTWARE\Microsoft\PowerShell\1\ShellIds\Microsoft.PowerShell
3. Right-click on the registry key and create a new string value called ExecutionPolicy.
4. Double-click on the newly-created ExecutionPolicy string value and enter desired execution policy name (Restricted, RemoteSigned, AllSigned, Unrestricted, or Undefined).
5. Create another string value in the same key called Path. The Path string value represents the path to the PowerShell engine. Ensure the Path value is C:\Windows\System32\WindowsPowerShell\v1.0\powershell.exe which points to the Windows PowerShell engine.

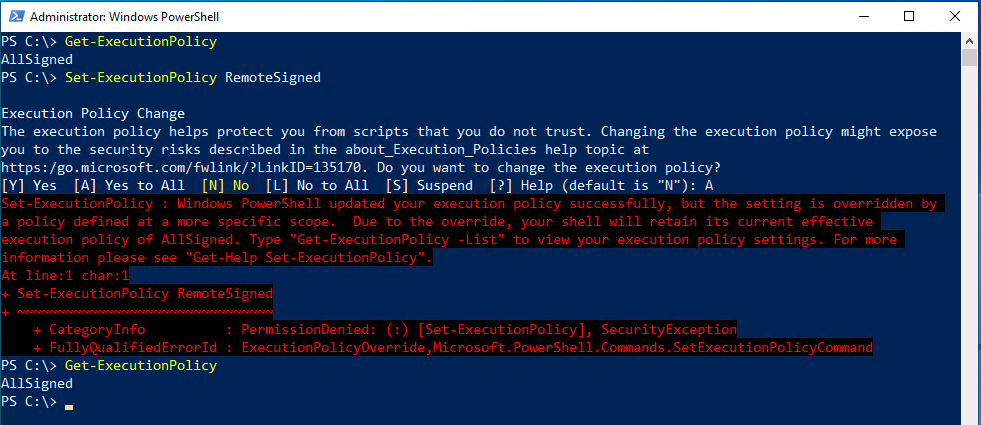
The CurrentUser execution policy overrides a LocalMachine policy. If you have a CurrentUser policy set in the registry and try to change the execution policy via Set-ExecutionPolicy, which, by default, sets the policy at the LocalMachine scope, PowerShell will return an error shown below.
Setting PowerShell Execution Policy via Group Policy
If you are in an organization with Active Directory, you’re not going to want to go around to all of your Windows machines and run the Set-ExecutionPolicy cmdlet. Instead, you can manage policies in bulk with Group Policy.
To manage execution policies via GPO:
Create the Group Policy Object
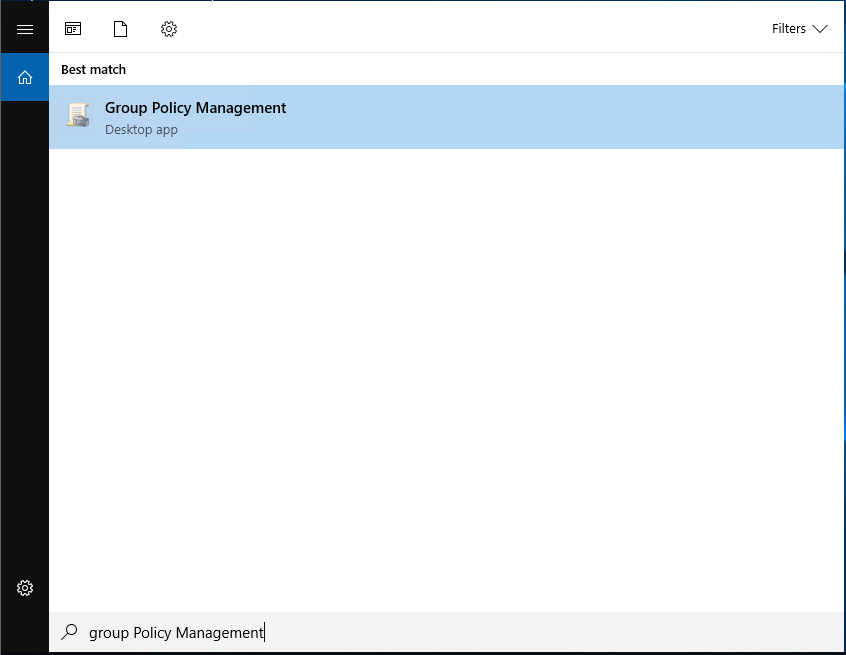
- Open up the Group Policy Management application on a domain controller or on your domain-joined workstation.
2. Expand Domains —> <your Active Directory forest> —> Group Policy Objects.
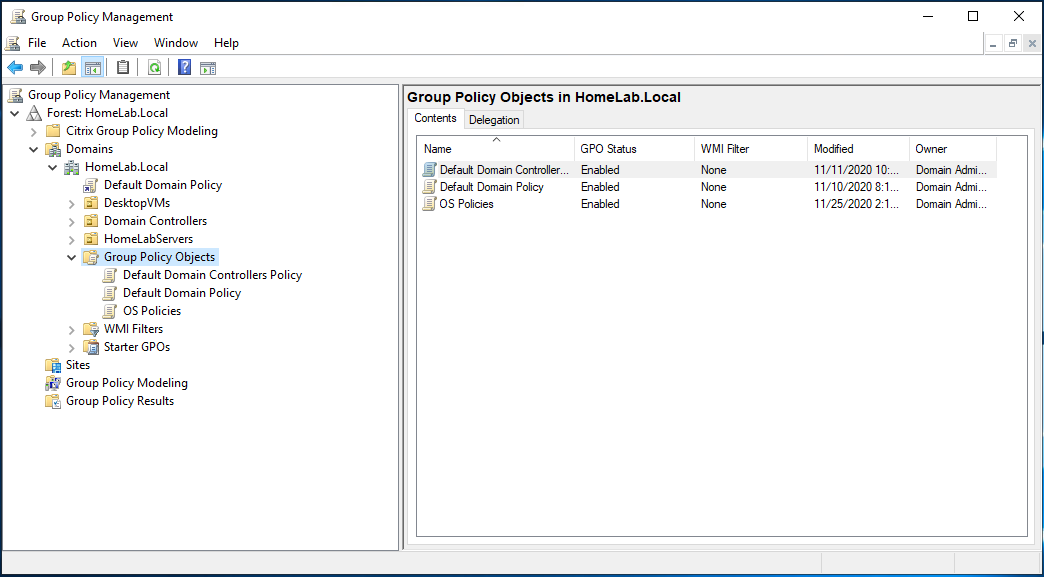
3. Right-click on Group Policy Objects and click New.
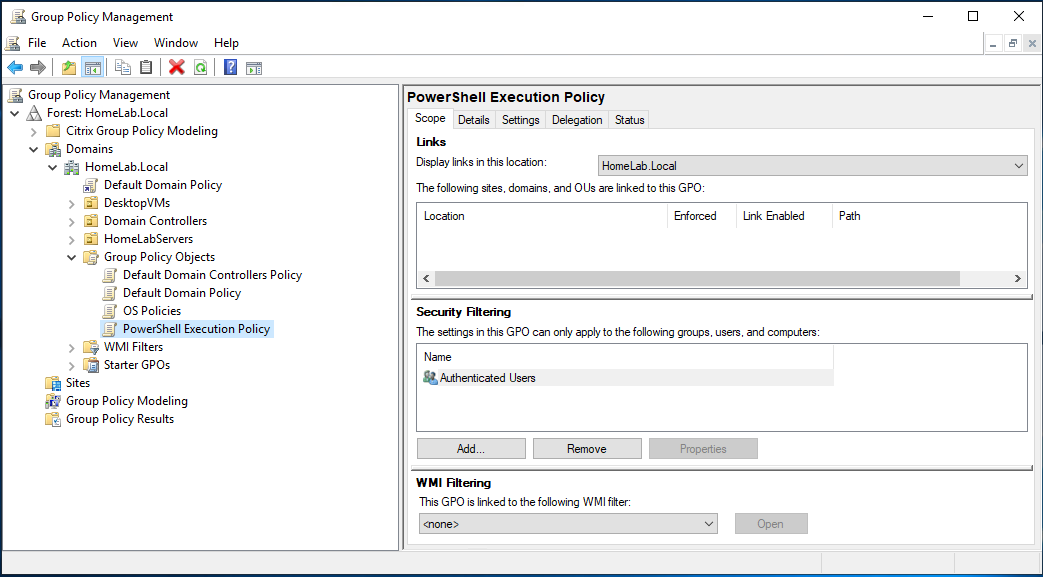
4. Give your GPO a name. In this tutorial, the GPO is called PowerShell Execution Policy.
5. Right-click on the newly-created GPO and click Edit.
6. Navigate to Computer Configuration\Policies\Administrative Templates\Windows Components\Windows PowerShell.
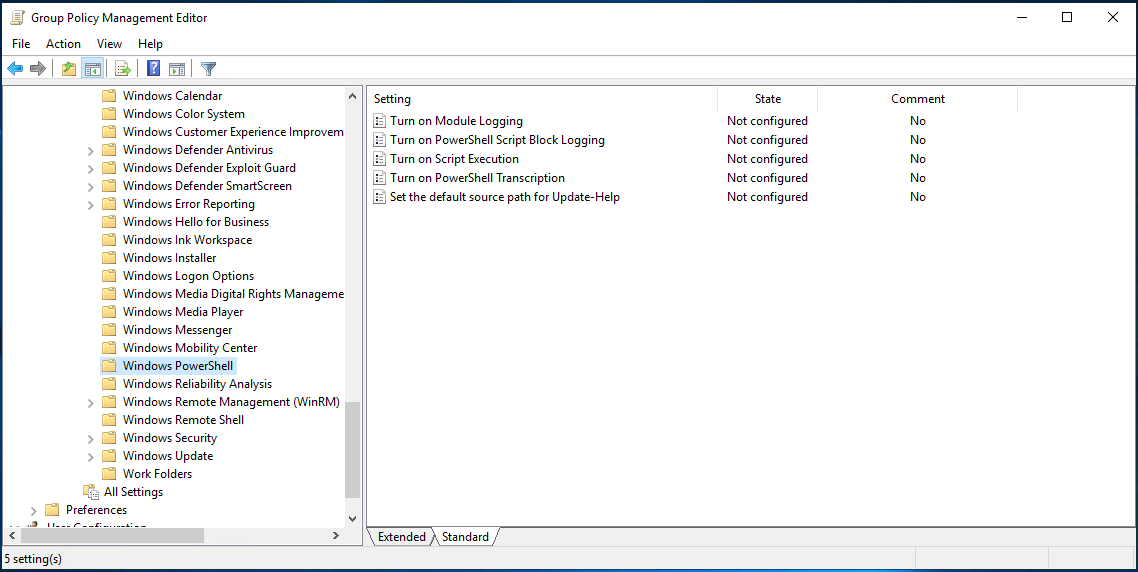
7. Open the setting in the right window pane, open the Turn on Script Execution setting.
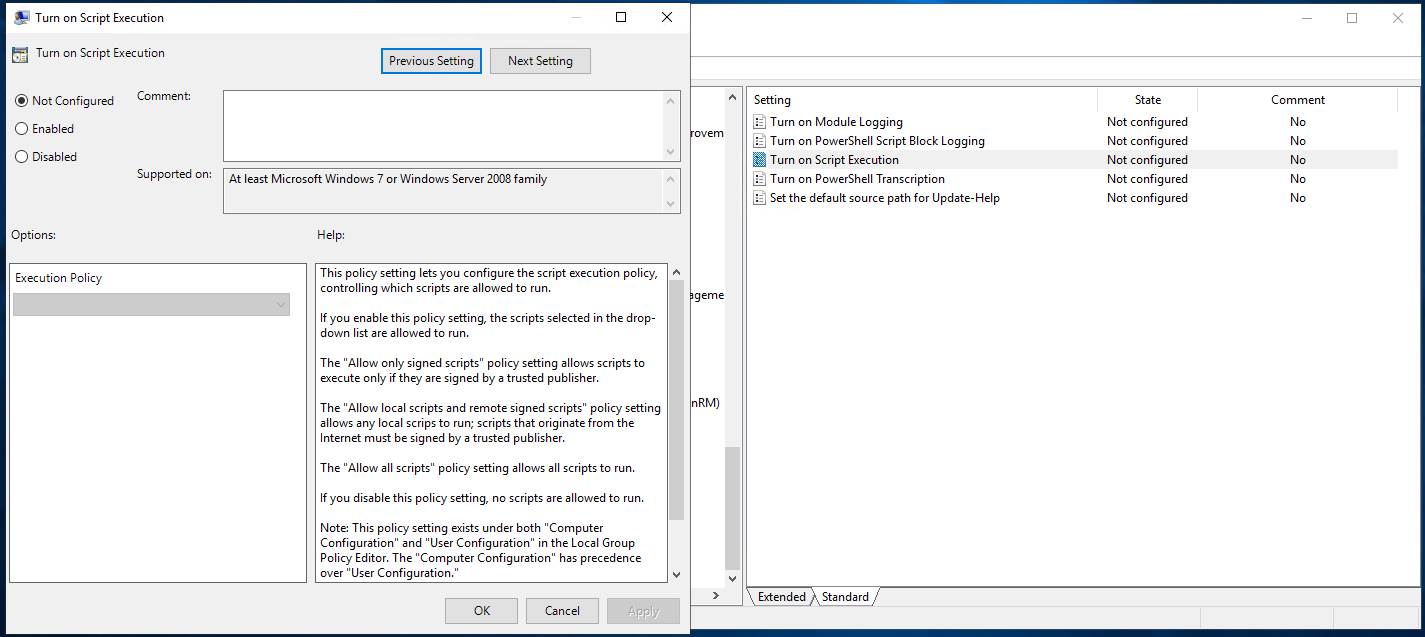
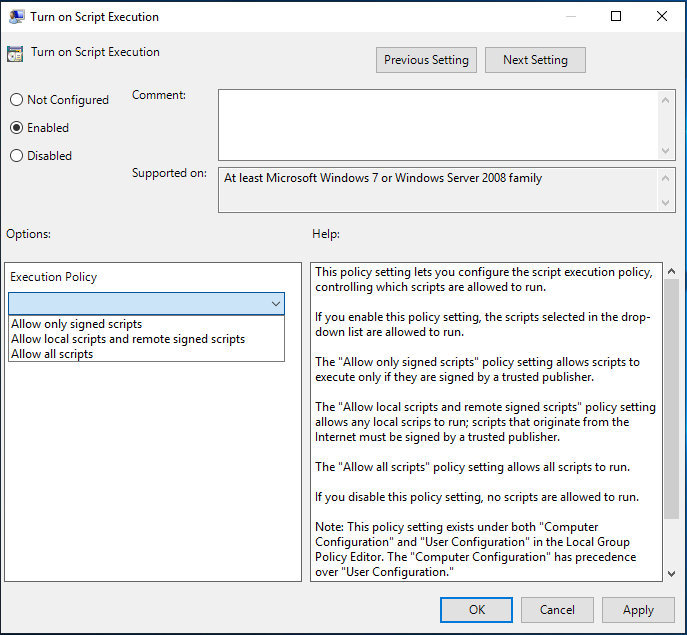
8. In the Turn on Script Execution box, Select the Enabled option. You can now select any one of the options shown below:
9. Now change the Execution Policy to your desired policy.
- Allow only signed scripts – Allows all scripts execution when a trusted publisher signs them.
- Allow local scripts and remote signed scripts – Allows local scripts to run but scripts that are downloaded from the internet should be signed by a trusted publisher.
- Allow all scripts – Allows all scripts to run.
Assign the Group Policy Object
Once you have the GPO created, it’s time to assign it to your target computers. To do that, you must assign the GPO to an Active Directory Organizational Unit (OU).
If, instead of creating a new GPO, you edited an existing GPO, that GPO has already probably already been assigned to an OU.
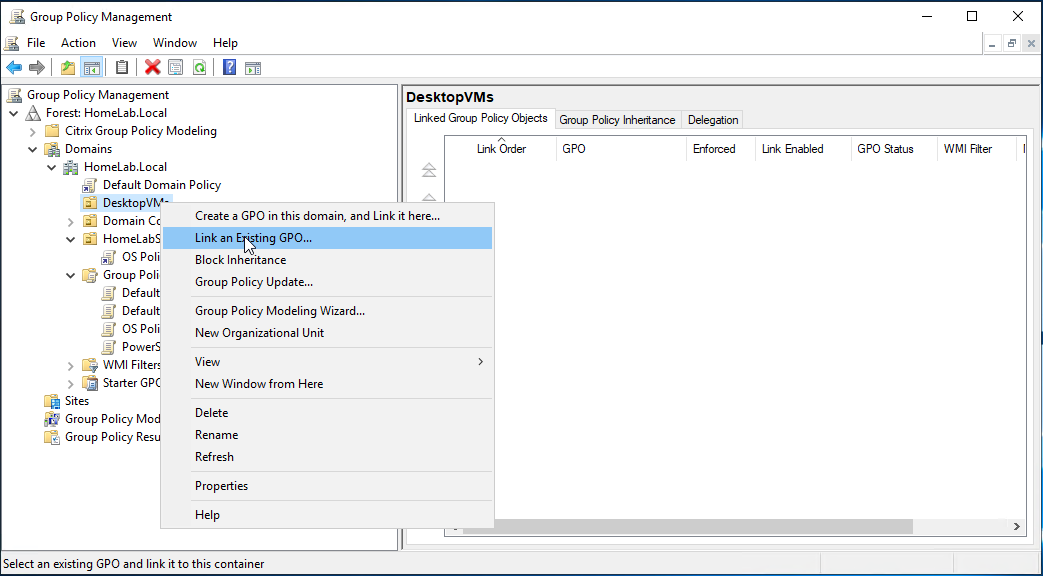
- In Group Policy Management, navigate to your OU of choice by going to Domains —> <your Active Directory forest> —> <Your OU>.
2. Right-click on the OU and select Link an Existing GPO…
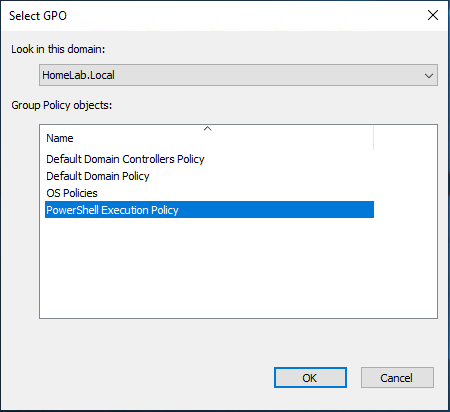
3. Select the GPO just created (PowerShell Execution Policy) and click OK.
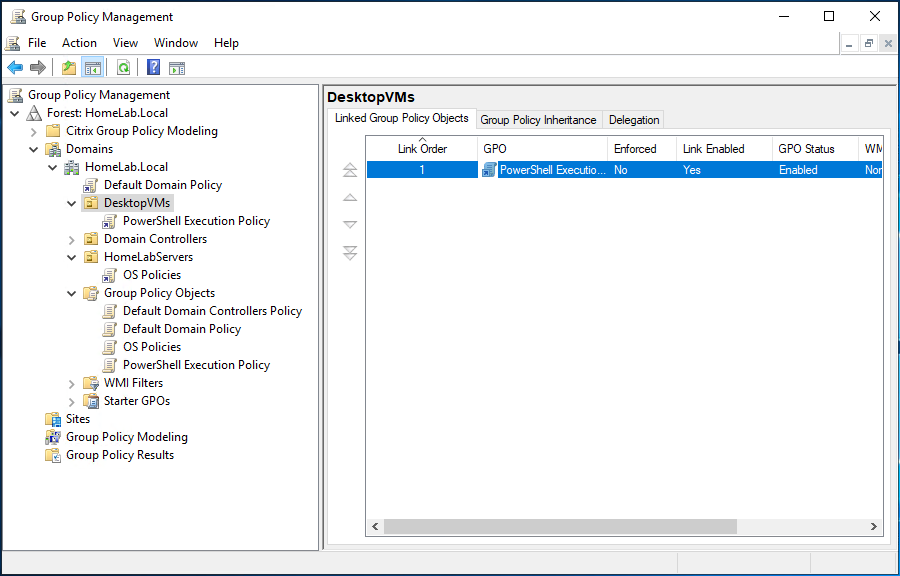
You should now see the GPO assigned to the OU as shown below.
At this point, you can either wait for the defined Group Policy refresh interval or run the gpupdate command on a target computer to force a refresh.
Locking Down Local Policy Changes
Once a GPO is in effect that changes the execution policy, local users can no longer change the policy via the local PowerShell console. If they try, they will receive an error, as shown below.
Bypassing the Execution Policy Completely
As mentioned earlier, an execution policy isn’t necessarily meant to be a security measure. Why? Because you can completely bypass it if you’d like in a few different ways.
Using the -ExecutionPolicy Bypass Parameter
Unlike the other execution policies, the Bypass policy is typically set not in the PowerShell console but passed to the powershell.exe engine run as administrator.
For example, to run a script called Hello World.ps1 completely skipping any execution policy, invoke powershell.exe, use the Bypass parameter and provide the file path as shown below.
powershell.exe -executionpolicy bypass -file '.\Hello World.ps1'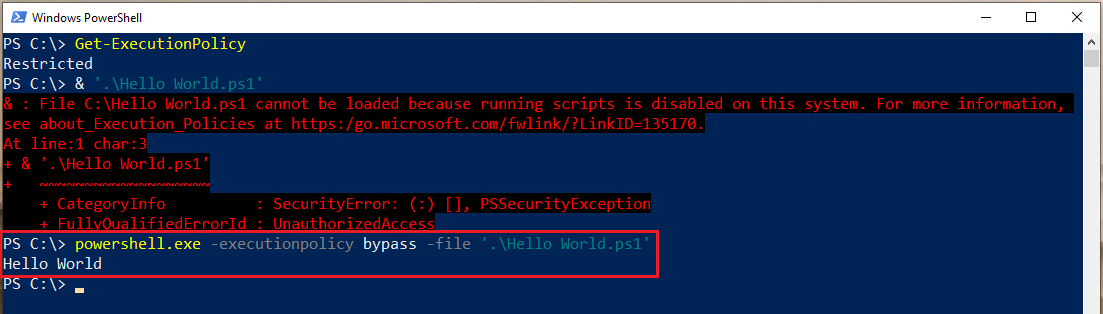
Reading Scripts and Executing Raw Code
You can also get around any execution policy by first reading the contents of a script and then passing that contents directly to the PowerShell engine. Doing so, runs each command individually and not as a whole script at once.
As you can see below, the execution policy is set to Restricted, but by reading the script and passing it to powershell.exe, it still works.
This approach is similar to opening a script in a PowerShell editor like PowerShell ISE or Visual Studio Code, selecting a line and pressing F8.
Get-Content '.\Hello World.ps1' | powershell.exe -noprofile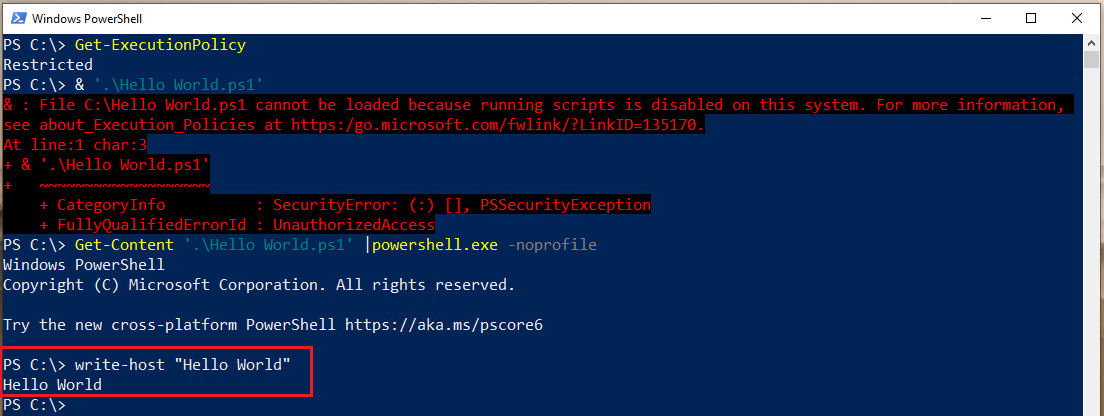
Conclusion
By now you should know all there is to know about PowerShell execution policies. Even though they’re not technically a security measure, you should still manage them in your organization according to organizational policies.


