


Logs are a critical part of applications and server infrastructure but analyzing them can be a pain if they are cluttered everywhere. Why not create a centralized logging system? Rsyslog may just be what you’re looking for!
A centralized logging system allows you to collect logs from multiple servers/applications to the central log server. And in this tutorial, you’ll learn how to set up centralized logging using the Rsyslog configuration on Linux servers.
Get ready and jump right in!
Prerequisites
This tutorial will be a hands-on demonstration. If you’d like to follow along, ensure you have the following:
- Two or more Linux servers – This tutorial uses three Debian 11 servers named central-rsyslog, client01, and client02.
- A user with sudo/root privileges on all servers.
Checking Rsyslog Service on All Servers
Rsyslog is a high-performance log processing for Linux distribution, installed by default on Debian-based and RHEL-based distributions.
Rsyslog is a reliable and extended version of the Syslog protocol with additional modern features. These additional features are multiple inputs and outputs, modular, and rich filtering capabilities.
At the time of this writing, the latest version of Rsyslog is v8.2112.0. So you’ll be checking the installed version of Rsyslog on your system and the status of the Rsyslog service. Doing so ensures that you get the latest features of Rsyslog and that Rsyslog is running without problem.
1. Open your terminal, log in to all servers, and run the sudo su command below to get the root privileges. Enter the password for your user when prompted.
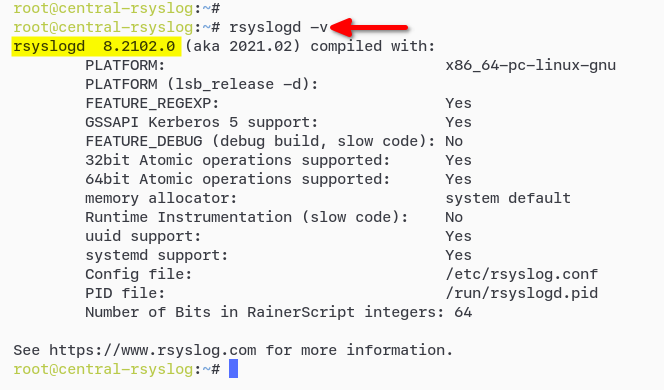
sudo su2. Next, run the rsyslogd command to check the Rsyslog version installed on your system.
Ensure that you have the Rsyslog v8.xxx on your system because some configurations are only available on Rsyslog v8.xxx.
# checking rsyslog version
rsyslogd -v
As you see below, The Debian 11 system comes with default Rsyslog v8.2102.0.
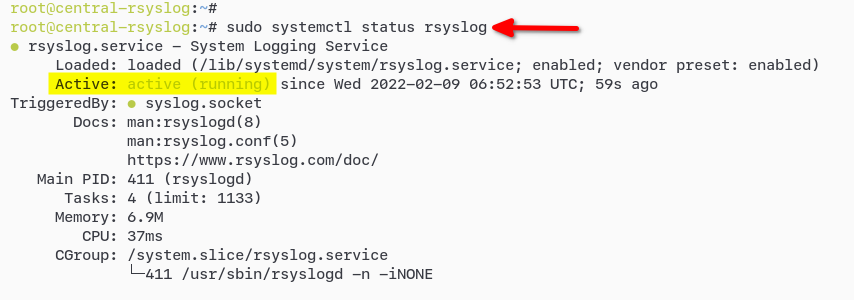
3. Lastly, run the systemctl command below to verify the Rsyslog service. Make sure the Rsyslog service is active (running).
# verify rsyslog service status
sudo systemctl status rsyslog
As you can see below, the Rsyslog service is active (running).
Configuring Rsyslog for Centralized Logging
Now that you have the latest version of Rsyslog running, it’s time to set up centralized logging using the Rsyslog configuration on the central-rsyslog server.
To set up centralized logging, you’ll enable the Rsyslog UDP input module imudp and create the Rsyslog template for receiving log messages from other servers. The imudp input module provides the ability for the central-rsyslog server to receive Syslog messages through the UDP protocol.
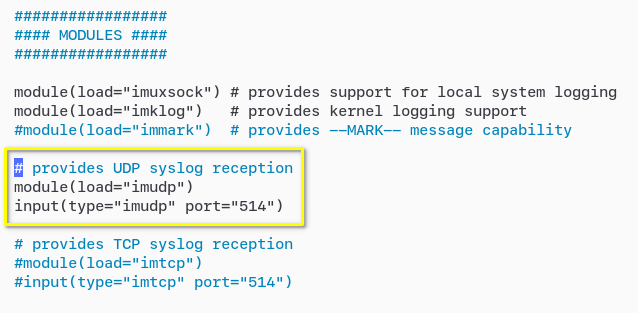
1. Edit the Rsyslog configuration file (/etc/rsyslog.conf) using your preferred editor and enable the configuration shown image below, then save the changes and exit the editor.
Throughout this tutorial, uncomment each configuration to enable them by removing the # sign at the beginning of each line.
This configuration enables the imudp input module to run on default UDP port 514.
2. Next, create a new Rsyslog template (/etc/rsyslog.d/50-remote-logs.conf) using your preferred editor and populate the template with the configuration below. Save the changes and exit the editor.
This Rsyslog template below enables the central-rsyslog server to store logs from remote servers to the /var/log/remotelogs/ directory .
# define template for remote loggin
# remote logs will be stored at /var/log/remotelogs directory
# each host will have specific directory based on the system %HOSTNAME%
# name of the log file is %PROGRAMNAME%.log such as sshd.log, su.log
# both %HOSTNAME% and %PROGRAMNAME% is the Rsyslog message properties
template (
    name="RemoteLogs"
    type="string"
    string="/var/log/remotelogs/%HOSTNAME%/%PROGRAMNAME%.log"
)

# gather all log messages from all facilities
# at all severity levels to the RemoteLogs template
*.* -?RemoteLogs

# stop the process once the file is written
stop
3. Run the commands below to create a new log directory (/var/log/remotelogs/) owned by the root user with adm group. Doing so allows the Ryslog service to write logs to the /var/log/remotelogs directory.
# create /var/log/remotelogs/ directory
mkdir -p /var/log/remotelogs/

# change the ownership to root:adm
sudo chown -R root:adm /var/log/remotelogs/
4. Now, run the rsyslogd commands below to verify the Rsyslog configurations (/etc/rsyslog.conf and /etc/rsyslog.d/50-remote-logs.conf).
Be sure to always check and verify the Rsyslog configuration after editing the Rsyslog configuration to ensure the configuration has no error.
# verify /etc/rsyslog.conf
rsyslogd -N1 -f /etc/rsyslog.conf

# verify /etc/rsyslog.d/50-remote-logs.conf
rsyslogd -N1 -f /etc/rsyslog.d/50-remote-logs.conf
If there’s no error, you’ll get the output like the one below.

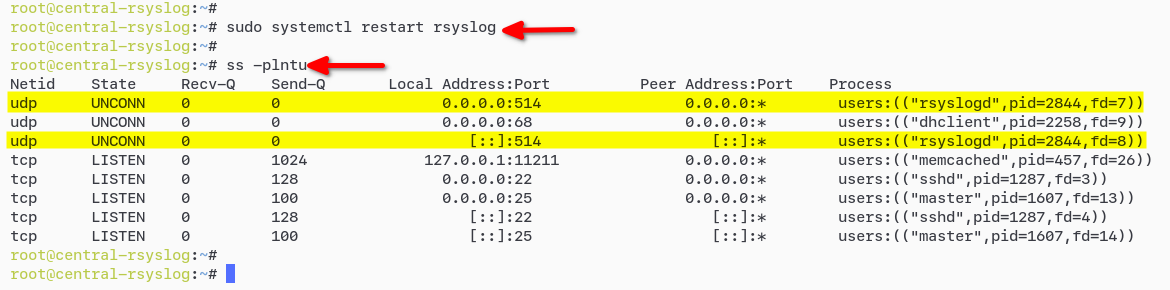
5. After verifying the configurations, run the below command to restart the rsyslog service and apply new configurations.
The Rsyslog service is already running with the imudp input module enabled and opened the default UDP port 514 for the Syslog protocol. The central-rsyslog server is now ready to receive log messages from other hosts.
# restart rsyslog
sudo systemctl restart rsyslog
6. Lastly, run the ss command below to verify the opened ports on your system.
# check open ports
ss -plntu
Below, you can see that the Rsyslog service with imudp input module enabled is running on default UDP port 514.
Sending Logs to Centralized Rsyslog Server
By now, you’ve configured centralized log management with Rsyslog configuration in the central-rsyslog server. But how do you know the central-rsyslog server receives logs? You’ll send logs remotely to the centralized Rsyslog server (central-rsyslog) by enabling and configuring the Rsyslog output module on the client machine.
In this demo, the client machine (with the hostname client01) uses the Rsyslog output module omfwd to send logs to the central-rsyslog server.
The omfwd module is a built-in module that processes messages/logs through Rsyslog templates. The module then transfers the messages to various targets via UDP and TCP using the Rsyslog action object.
1. Move to the client01 machine to set up and send logs to the central-rsyslog server.
2. Create new Rsyslog configuration (/etc/rsyslog.d/20-forward-logs.conf) using your preferred editor and populate the following configuration.
This configuration formats log messages using the SendRemote template and forwards log messages via UDP protocol to the target central-rsyslog server (172.16.1.10). Make sure to change the IP address with your central Rsyslog server’s IP address.
An Rsyslog template is constructs of Rsyslog message properties that specify formats of log messages. Check the documentation of the Rsyslog template to see different types of templates.
# process all log messages before sending
# with the SendRemote template
template(
    name="SendRemote"
    type="string"
    string="<%PRI%>%TIMESTAMP:::date-rfc3339% %HOSTNAME% %syslogtag:1:32%%msg:::sp-if-no-1st-sp%%msg%"
)

# forward log messages using omfwd module
# to the target server 172.16.1.10
# via UDP porotocol on port 514
# log messages is formatted using the SendRemote template
# setup queue for remote log
action(
    type="omfwd"
    Target="172.16.1.10"
    Port="514"
    Protocol="udp"
    template="SendRemote"

    queue.SpoolDirectory="/var/spool/rsyslog"
    queue.FileName="remote"
    queue.MaxDiskSpace="1g"
    queue.SaveOnShutdown="on"
    queue.Type="LinkedList"
    ResendLastMSGOnReconnect="on"
)

# stop process after the file is written
stop
3. Next, run the below rsyslogd command to verify the Rsyslog configuration and ensure there is no error.
# verify rsyslog configuration
rsyslogd -N1 -f /etc/rsyslog.d/20-remote-logs.conf
4. Run the systemctl command below to restart the Rsyslog service and apply a new configuration.
# restart rsyslog on client01 machine
sudo systemctl restart rsyslog
5. Now, move back to the central-rsyslog server to verify logs from the client01 machine.
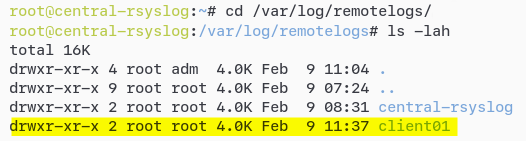
Run the below commands to navigate to the /var/log/remotelogs directory and list the files and directories inside that directory to verify the client01 directory exists.
# navigate to /var/log/remotelogs directory
cd /var/log/remotelogs/
# checking available directories
ls -lah
Below, you can see the client01 directory exists in the /var/log/remotelogs directory.
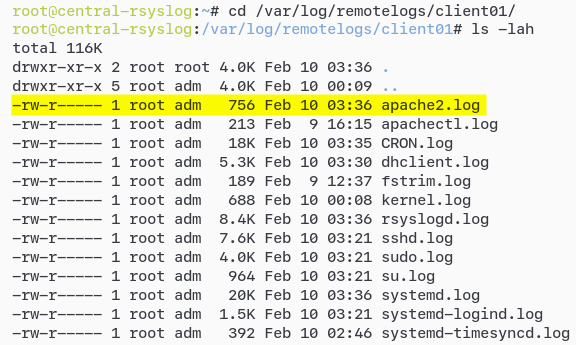
6. Run each command below to switch to the client01 directory and list (ls -lah) the log files inside the directory.
# navigate to client01 directory
cd client01/
# checking files inside client01 directory
ls -lah
A centralized logging system helps administrators analyze logs data from hundreds of servers in a single machine.
Choose one of the logs you want to view and analyze.

7. Lastly, run the cat command below to see your target log’s content. Replace logfile with the log file’s name, but this demo returns the content of the sshd.log file.
cat logfileBelow, you can see logs from the client01 machine stored in the sshd.log file in the Rsyslog server (central-rsyslog).

So far, you’ve seen that a centralized logging system makes log files safer because whenever applications/servers are terminated, you still have the log files on the central server.
Sending Logs of Specific Program to Rsyslog Server
You’ve just sent all application logs from the client01 machine to the central Rsyslog server (central-rsyslog). But what if you only need specific application logs, such as ssh or su? Implement the Rsyslog rainerscript control structure on the Rsyslog action object.
This demo uses the client02 machine to send sshd logs only to the Rsyslog server (central-rsyslog).
1. Move to the client02 machine to set up and send logs to the central-rsyslog server.
2. Create a new Rsyslog configuration (/etc/rsyslog.d/50-sshd.conf) using your preferred editor and populate the following configuration.
This configuration below only forwards logs for the application (programname) named sshd to the Rsyslog server (172.16.1.10). The log messages are also formatted by the SendRemote template.
# create new Rsyslog tempate for formatted logs
template(
    name="SendRemote"
    type="string"
    string="<%PRI%>%TIMESTAMP:::date-rfc3339% %HOSTNAME% %syslogtag:1:32%%msg:::sp-if-no-1st-sp%%msg%"
)

# implementation of if conditional on rsyslog
# to send specific logs for programname sshd
# stop the process after sending logs
if $programname == "sshd" then {
        action(type="omfwd" target="172.16.1.10" port="514" protocol="udp" template="SendRemote")
        stop
}
3. Next, run the rsyslogd command below to verify the Rsyslog configuration and ensure there is no error.
# verify rsyslog configuration
rsyslogd -N1 -f /etc/rsyslog.d/50-sshd.conf
4. Run the below command to restart the Rsyslog service, apply a new configuration, and log out from the client02 server to generate a new sshd log.
At this point, the central-rsyslog server has only received the sshd log instead of all system logs.
# restart rsyslog service
sudo systemctl restart rsyslog
5. Now, move back to the central-rsyslog server to verify logs from the client02 machine.
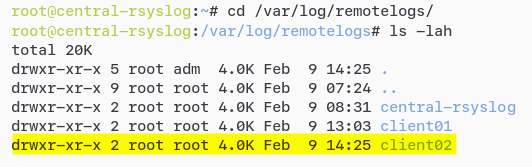
Run the below commands to list (ls -lah) available log files in the /var/log/remotelogs/ directory.
# navigate to /var/log/remotelogs/
cd /var/log/remotelogs/
# verify log directory for client02
ls -lah
As you see below, there’s a new directory named client02 that stores log messages from the client02 machine.
6. Run the below commands to navigate to the client02 directory and verify the available log files on that directory.
cd client02/
ls -lah
You will see the log file sshd.log for the programname sshd. Also, run the cat command to show the content of the log file sshd.log.
Below, you can see only one log file available, the sshd.log file, since you used the /etc/rsyslog.d/50-sshd.conf configuration.

7. Finally, run the cat command below to view and analyze the sshd.log file.
cat sshd.log
Sending Syslog Message-Converted Logs to Rsyslog Server
So far, you’ve seen how to send logs to your Rsyslog server, and that’s good enough. But perhaps you prefer to have your logs in Syslog message format to make them easier to read and analyze. If so, using the Rsys imfile input module will do the trick.
The imfile input module allows you to convert any text messages/logs into a Syslog message format. And in this demo, you’ll send logs of the Apache2 web server from the client01 machine to the Rsyslog server (central-rsyslog).
Combining the Rsyslog input module (imfile) with the output module (omfwd) allows you to send any Syslog message-converted logs to the Rsyslog server (central-rsyslog).
1. Move back to the client01 machine, create a new Rsyslog configuration /etc/rsyslog.d/50-apache2.conf, and populate the following configuration. Be sure to change the template name, ruleset name, and the input file for your logs.
The template below converts Apache logs to Syslog message format with the imfile module and sends those logs to the Rsyslog server (172.16.1.10).
# deifne global workDirectory for saving the state file of log messages.
global(workDirectory="/var/spool/rsyslog")

# enable the Rsyslog imfile module processing text files or logs.
module(load="imfile" PollingInterval="10")

# define template for apache2 for processing log messages.
# that will be forwarded to rsyslog server
template(
    name="TestLog"
    type="string"
    string="<%PRI%>%TIMESTAMP:::date-rfc3339% %HOSTNAME% %syslogtag:1:32%%msg:::sp-if-no-1st-sp%%msg%"
    )

# define ruleset "ApacheLogs" with action object to send logs to rsyslog server
# define the queue
ruleset(name="ApacheLogs") {
    action(
        type="omfwd"
        target="172.16.1.10"
        port="514"
        protocol="udp"
        template="TestLog"

        queue.SpoolDirectory="/var/spool/rsyslog"
        queue.FileName="remote"
        queue.MaxDiskSpace="1g"
        queue.SaveOnShutdown="on"
        queue.Type="LinkedList"
        ResendLastMSGOnReconnect="on"
        )
        stop
}

# define input files Apache2 logs to send to the Rsyslog server
# and apply ruleset "ApacheLogs"
input(type="imfile" ruleset="ApacheLogs" Tag="apache2" File="/var/log/apache2/*.log")
2. Next, run the rsyslogd command below to verify the /etc/rsyslog.d/50-apache2.conf configuration.
# verify rsyslog configuration
rsyslogd -N1 -f /etc/rsyslog.d/50-apache2.conf
3. Run the systemctl command below to restart the rsyslog service and apply new configurations. At this point, all Apache2 logs on the client01 machine will be forwarded to the Rsyslog server (central-rsyslog).
# restart rsyslog service
sudo systemctl restart rsyslog
4. Now, run the curl command below to generate the Apache2 logs. This command will generate new Apache2 log messages to the file /var/log/apache2/access.log.
# generate a new log for Apache
# by accessing via curl command
curl localhost
curl localhost/testnotfound
5. Move back to the Rsyslog server (central-rsyslog), and run the below commands to navigate to the /var/log/remotelogs/client01 directory list available log files.
# navigate to the directory /var/log/remotelogs/client01/
cd /var/log/remotelogs/client01/
# check available log files
ls -a
You can see below that the Rsyslog server (central-rsyslog) received the apache.log file from the client01 machine.
6. Lastly, run the cat command to show the content of the log file apache2.log.
# showing the content of apache2.log file
cat apache2.log
If the /etc/rsyslog.d/50-apache2.conf works, you’ll see the content of the log file in Syslog message format like the one below.

Conclusion
In this tutorial, you’ve learned how to set up centralized logging with Rsyslog configuration. You’ve also sent servers logs remotely to the centralized Rsyslog server using different types of Rsyslog input and output plugins. Now you don’t have to scour different places for logs anymore other than your Rsyslog server.
How else do you plan to use Rsyslog? Perhaps start exploring other Rsyslog input and output modules? Or integrate Rsyslog to another logging system, such as Fluentd and Logstash?


