


If you’re managing multiple pods within Kubernetes, and you noticed the status of Kubernetes pods is pending or in the inactive state, what would you do? The quickest way to get the pods running again is to restart pods in Kubernetes.
In this tutorial, you will learn multiple ways of rebooting pods in the Kubernetes cluster step by step. So sit back, enjoy, and learn how to keep your pods running.
Let’s get started!
Prerequisites
This tutorial houses step-by-step demonstrations. To follow along, be sure you have the following:
- Ubuntu 14.04.4 LTS machine or greater with Docker installed – This tutorial uses Ubuntu 18.04.5 LTS with Docker v19.03.8.
- A Kubernetes cluster
- The kubectl command-line interface is installed and configured to your cluster.
Restart Pods in Kubernetes by Changing the Number of Replicas
There are many ways to restart pods in kubernetes with kubectl commands, but for a start, first, restart pods by changing the number of replicas in the deployment.
In this strategy, you scale the number of deployment replicas to zero that stops all the pods and further terminates them. Pods are later scaled back up to the desired state to initialize the new pods scheduled in their place.
If you set the number of replicas to zero, expect a downtime of your application as zero replicas stop all the pods, and no application is running at that moment.
1. Open your terminal and run the commands below to create a folder in your home directory, and change the working directory to that folder.
In this tutorial, the folder is called ~/nginx-deploy, but you can name it differently as you prefer. This folder stores your Kubernetes deployment configuration files.
mkdir ~/nginx-deploy
cd ~/nginx-deploy
2. Next, open your favorite code editor, and copy/paste the configuration below. Save the configuration with your preferred name. But for this example, the configuration is saved as nginx.yaml inside the ~/nginx-deploy directory.
The below nginx.yaml file contains the code that the deployment requires, which are as follows:
- Name:
nginx-deployment– The deployment name. - Labels:
app:nginx– Used for tagging. - Replicas:
2– Allows you to define the number of pods you need for deployment - “Spec” Section – This allows you to specify the container details, such as the image (
nginx) container’s name (nginx-pod).
# Defining the Kubernetes API version
apiVersion: apps/v1
# Defining the type of the object to create
kind: Deployment
# Metadata helps uniquely identify the object,
# including a name string, UID, and optional namespace.
Metadata:
  name: nginx-deployment
# Labels are key/value pairs that are attached to objects, such as pods.
# Labels are intended to be used to specify identifying attributes
# of objects that are meaningful and relevant to users.
  labels:
    app: nginx
spec:
  replicas: 2
  selector:
    matchLabels:
      app: nginx
  template:
    metadata:
      labels:
        app: nginx
    spec:
      containers:
      - name: nginx-pod
        image: nginx
3. Run the kubectl apply command below to pick the nginx.yaml file and create the deployment, as shown below. kubectl apply -f nginx.yaml
kubectl apply -f nginx.yaml
apply command 4. Now, execute the kubectl get command below to verify the pods running in the cluster, while the -o wide syntax provides a detailed view of all the pods.
kubectl get pods -o wide
5. Run the kubectl scale command below to terminate all the pods one by one as you defined 0 replicas (--replicas=0).
kubectl scale deployment nginx-deployment --replicas=0
6. Run the kubectl get pods command to verify the numbers of pods.
kubectl get podsNotice below that all the pods are currently terminating. Keep running the kubectl get pods command until you get the “No resources are found in default namespace” message.

7. Now run the kubectl scale command as you did in step five. But this time, the command will initialize two pods one by one as you defined two replicas (--replicas=2).
kubectl scale deployment nginx-deployment --replicas=2
8. Finally, run the command below to verify the number of pods running. kubectl get pods
kubectl get podsYou will notice below that each pod runs and are back in business after restarting.

Restart Pods in Kubernetes with the rollout restart Command
You’ve previously configured the number of replicas to zero to restart pods, but doing so causes an outage and downtime in the application. So how to avoid an outage and downtime? By running the rollout restart command.
Run the rollout restart command below to restart the pods one by one without impacting the deployment (deployment nginx-deployment).
kubectl rollout restart deployment nginx-deployment
Now run the kubectl command below to view the pods running (get pods).
kubectl get podsNotice below that two of the old pods shows Terminating status, then two other shows up with Running status within a few seconds, which is quite fast. Why? Because there’s no downtime when running the rollout restart command.

Restart Pods in Kubernetes by Updating the Environment Variable
By now, you have learned two ways of restarting the pods, by changing the replicas and by rolling restart. In both approaches, you explicitly restarted the pods. But in the final approach, once you update the pod’s environment variable, the pods automatically restart by themselves.
1. Run the kubectl set env command below to update the deployment by setting the DATE environment variable in the pod with a null value (=$()). As soon as you update the deployment, the pods will restart.
kubectl set env deployment nginx-deployment DATE=$()
2. Now execute the below command to verify the pods that are running.
kubectl get podsBelow, you’ll notice that the old pods show Terminating status, while the new pods show Running status after updating the deployment.

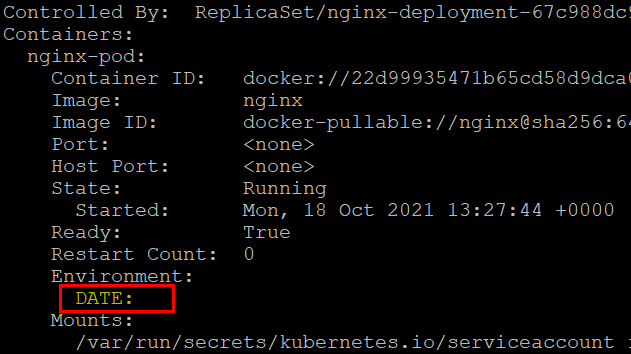
3. Finally, run the kubectl describe command to check if you’ve successfully set the DATE environment variable to null.
kubectl describeNotice below that the DATE variable is empty (null).
Conclusion
In this tutorial, you learned different ways of restarting the Kubernetes pods in the Kubernetes cluster, which can help quickly solve most of your pod-related issues.
Now, instead of manually restarting the pods, why not automate the restart process each time a pod stops working?


