

Are you looking for a hypervisor that does not break the bank? Or are you simply trying to learn about virtual machines (VMs)? Proxmox VE, an open-source (free) hypervisor for cost-efficient and flexible computing, is a must-try!
Proxmox VE lets you set up hosted or bare metal servers and can run different operating systems, including Linux-based and Windows.
Sit tight as you delve into virtualizing machines with Proxmox VE!
Prerequisites
This tutorial will be a hands-on demonstration. To follow along, be sure you have the following:
- A USB drive for installing Proxmox VE.
- A dedicated desktop or server computer to install Proxmox VE.
- A client computer for managing the Proxmox VE server via the GUI – This tutorial uses Windows 10 Pro.
- An administrator account and a shared folder named installers for storing installation files.
- An ISO image for the guest OS of your choosing.
Downloading and Installing Proxmox VE
Proxmox VE offers an integrated web-based UI where you can manage VMs and containers. But first things first, you have to download and install Proxmox VE. Downloading Proxmox VE is done in a few steps.
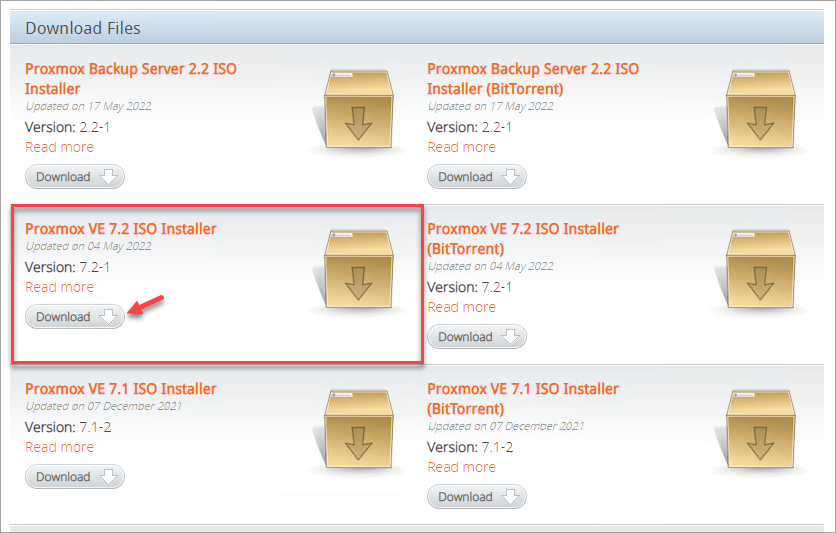
1. Open your preferred web browser, and visit Proxmox’s official download page.
Scroll down a bit to find Proxmox VE ISO installers, then choose and click the Download button to download the latest version.
2. Next, create a bootable USB drive for the Proxmox VE ISO installer.
3. Plug your bootable USB drive into your Proxmox VE dedicated computer and fire it up.
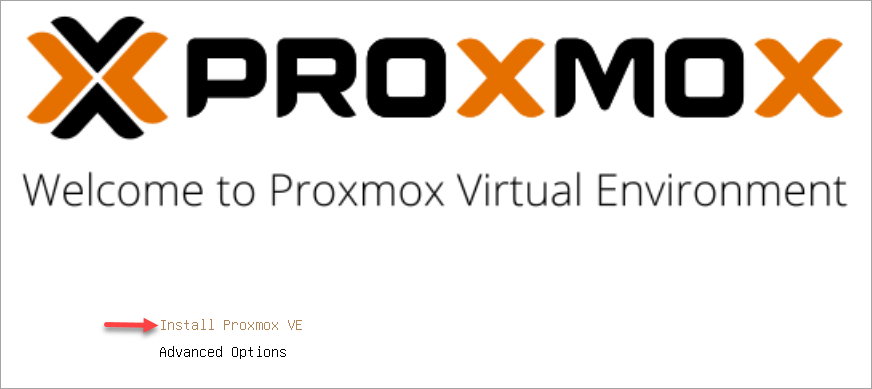
4. Ensure the Install Proxmox VE option is selected in the installation media, as shown below, and press Enter to install Proxmox VE.
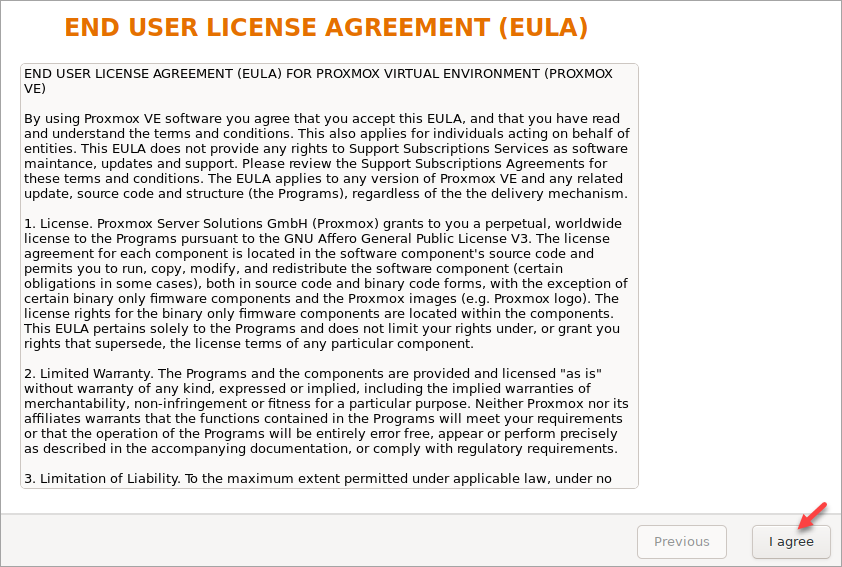
5. Now, accept the End User License Agreement (EULA) to proceed with the installation.
6. Click Next to proceed with the default options.
Below, the installer detects the target hard disk and assigns ext4 as the file system. But if you wish to select a different file system, click Options, choose your preferred file system, and click Next.

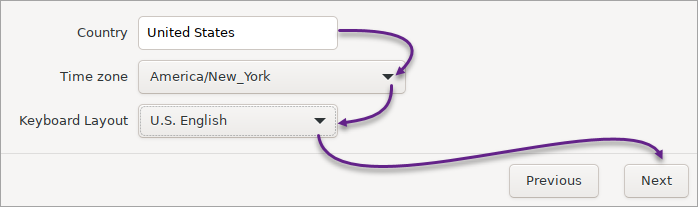
7. Configure the country, time zone, and keyboard layout, and click Next.
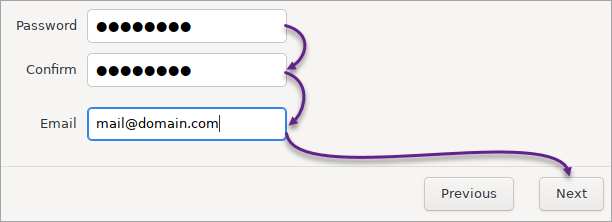
8. Provide, and confirm the following information:
- A root Password of at least eight characters long, a combination of letters, numbers, and symbols. You will need the root password to access your Proxmox VE server later.A valid Email address for receiving alerts and notifications from your Proxmox VE server.Click Next to proceed.
 Providing a root password and valid email address
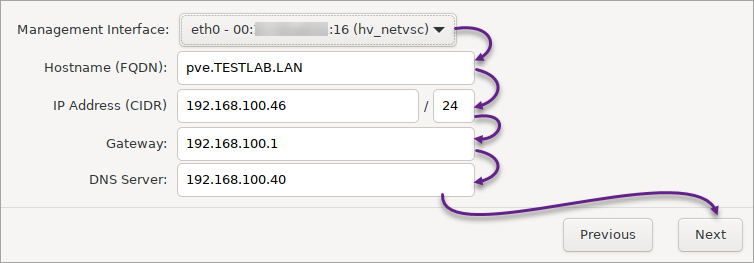
9. Under Management Network Configuration, click Next since the installer chooses the Management Interface automatically. But you can choose which one to use if you have two or more network interface cards.
The rest of the fields (Hostname, IP address, Gateway, and DNS Server) are automatically populated based on your network configuration.
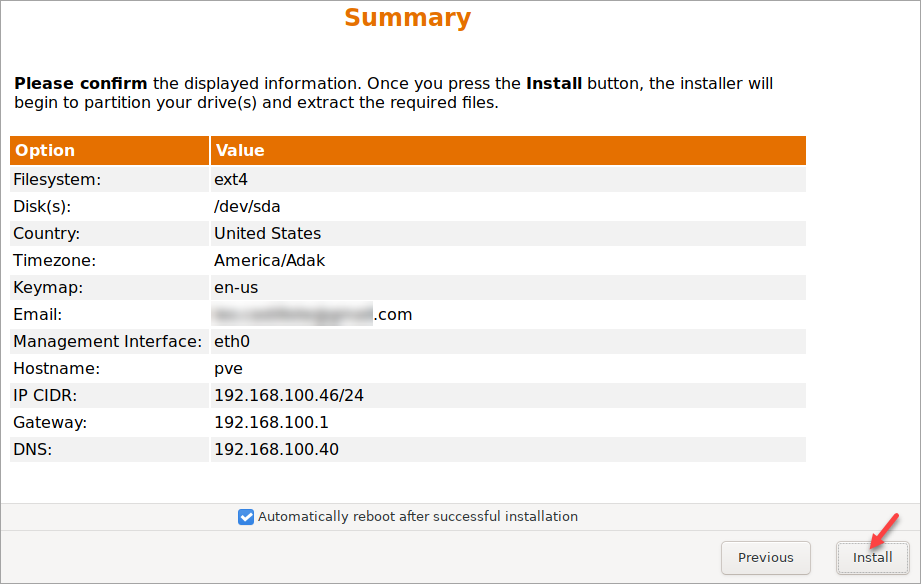
10. Review the summary information of your selected settings, and click Install to install your Proxmox VE server.
11. Finally, remove the installation media (USB drive) when prompted.
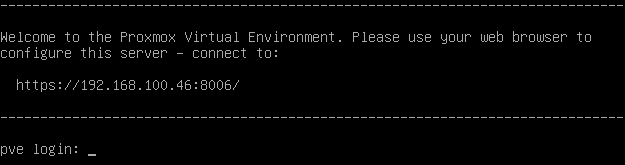
After successful installation, your Proxmox VE server displays the Welcome to the Proxmox Virtual Environment message, as shown below.
Note down the URL below (yours may be different) and keep the server running. You will need this URL later in accessing the Proxmox VE server’s GUI.
Accessing the Proxmox VE Server’s GUI
The display on the server side is command based, which is fine if you are primarily working in a terminal. But if you prefer to manage the server effortlessly, you can pull up the Proxmox VE server’s GUI on another computer connected to the same network.
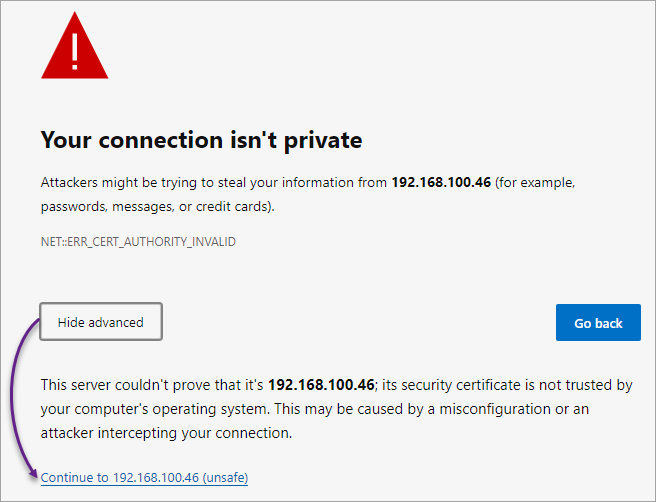
1. On your other computer, open your preferred web browser, and navigate to the URL you noted in the last step of the “Downloading and Installing Proxmox VE” section.
2. On Edge and Chrome, click Advanced → Continue (Edge) or Proceed (Chrome) to continue accessing the URL.
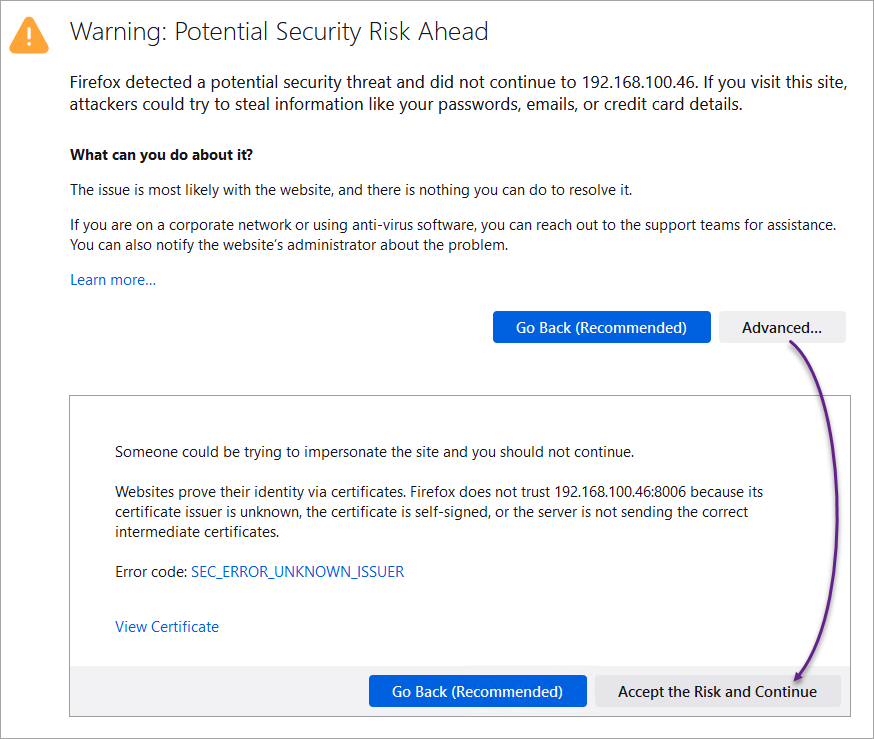
On Firefox, click Advanced → Accept the Risk and Continue.
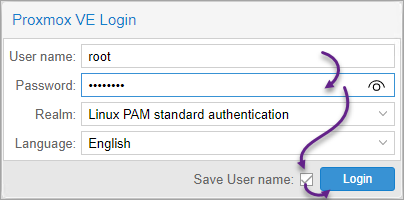
3. Log in to Proxmox VE with the following:
- User name – Input root, the default username.Password – Provide the password you set in step eight of the “Downloading and Installing Proxmox VE” section.Tick the Save User name checkbox to save the username for future logins.Click the Login button to log in to Proxmox VE.
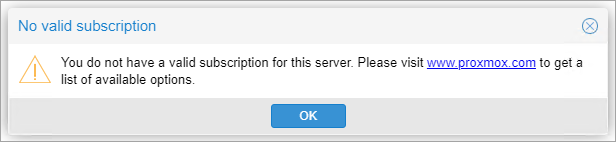
4. When prompted, click OK, as shown below.
This message only says you do not have a valid subscription, which you do not need for this tutorial.
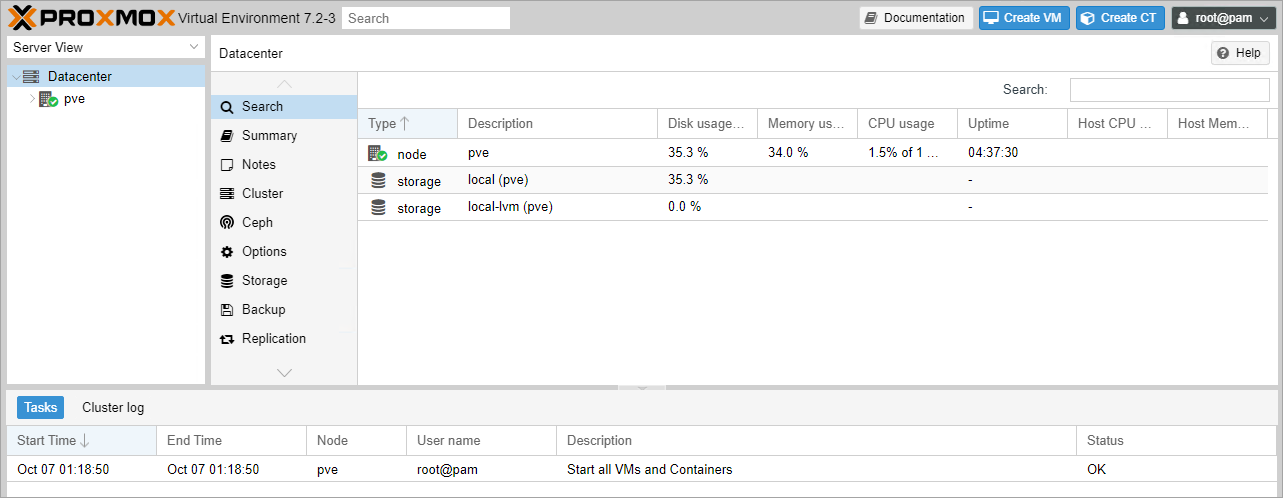
The image below shows a glimpse of the GUI, which confirms you have successfully logged in to Proxmox VE.
Creating a Network Storage for the Guest OS ISO Installers
Why let your local storage suffer when you can use network storage instead? The advantage of creating network storage is to save storage space on the local disk on your Proxmox VE server.
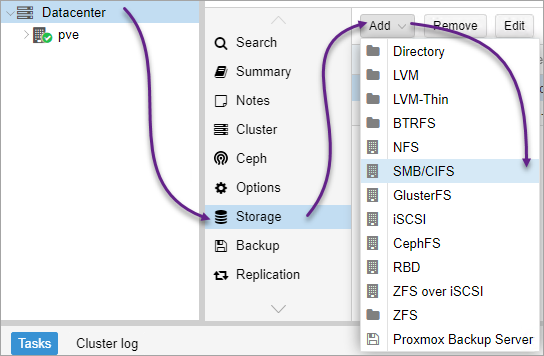
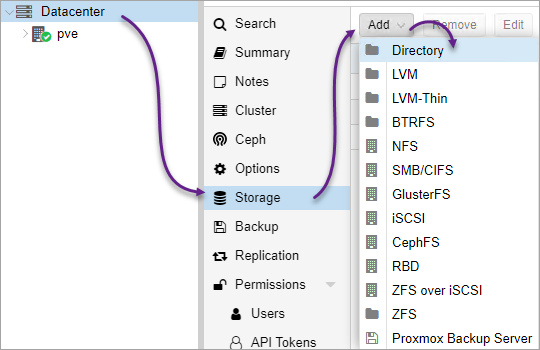
1. On your Proxmox VE server GUI, click Datacenter → Storage → Add → SMB/CIFS since the shared folder in this example is created in a Windows 10 computer.
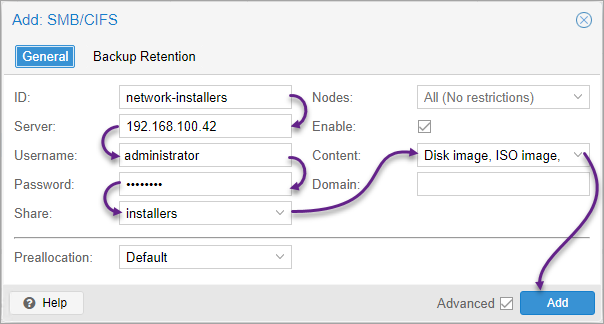
2. Next, configure the network storage with the following:
- ID – The name of the network storage you are creating (must not contain spaces).Server – The IP address of the server or client where your shared folder is located.Username and Password – The administrator account and password on the computer of the shared folder.Share – The folder you shared for your installers.Content – Click the dropdown field and choose Disk Image and ISO image.
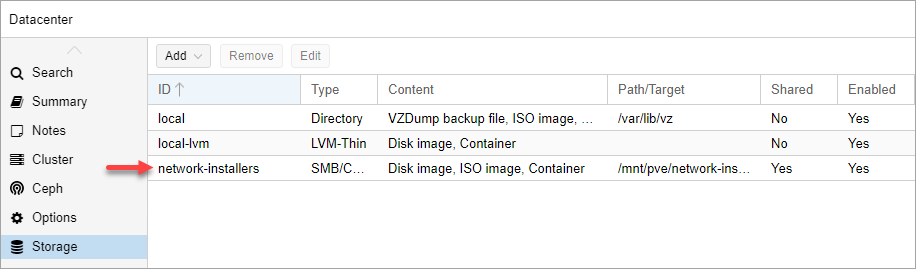
Once added, you will see the network storage in the list, as shown below.
3. Open File Explorer and copy the ISO image for your guest OS.
4. Lastly, navigate to the shared installers/template/iso folder, and paste the ISO image for installing the guest OS into this directory.

Creating a Local Directory for ISO Images
Perhaps you own a heft storage space and prefer to upload your ISO images to a local directory instead. If yes, let Proxmox VE help you fill up your storage with images.
1. On your Proxmox VE server dashboard, click Datacenter → Storage → Add → Directory to initiate adding a directory.
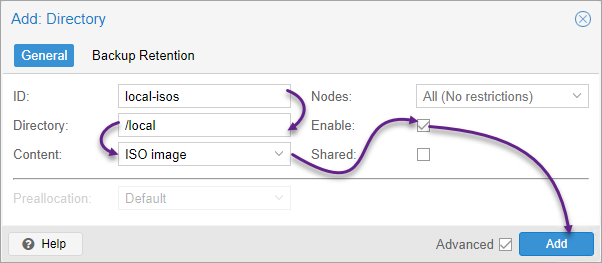
2. Configure the new local directory with the following steps:
- ID – Input the name of the folder you want to create.Directory – Set your directory path where you like to save ISO images.Content – Set the content designation of the directory to ISO image.Tick the Enable checkbox to enable your directory.
3. After creating a directory, expand your node (pve) → select your local directory (local-isos) → click on ISO Images → Upload to initiate uploading ISO images.

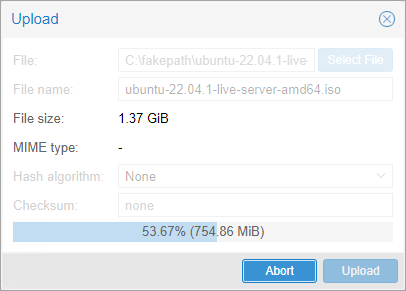
4. Now, click Select File to locate the ISO image you wish to upload and click Upload.
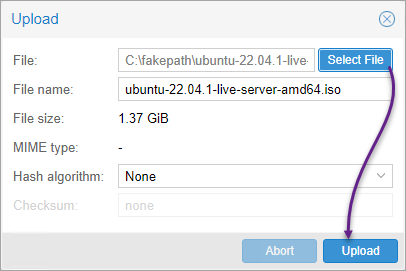
Below, you can see the upload progress, which takes time to complete depending on the file size of the ISO image.
Creating a Virtual Machine
Now that you have either network storage or a local directory to source your ISO image, it is time to create a VM.
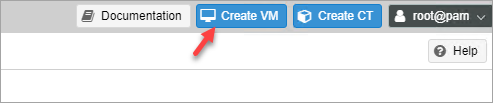
1. Return to your Proxmox VE server GUI and click Create VM (upper-right) to initiate creating a new VM in Proxmox VE.
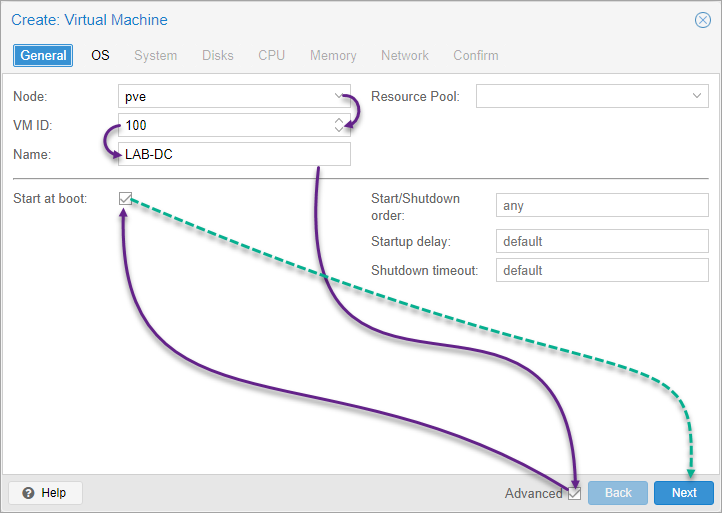
2. On the General tab, configure the following:
- Node – Since you only have one, your node is already selected by default.VM ID – The default value for the first VM is 100, but you can change it as you please.Name – The name of the VM you are creating.Tick Advanced → Start at boot, and click Next.
3. Under the OS tab, select the Use CD/DVD disc image file (iso) option, and configure the following:
- Storage – Select your network or local storage.ISO image – Choose the ISO image you wish to install to the VM, in this case, Windows 2019 Evaluation.Type – Select the type of OS to install on your VM. This tutorial’s choice is Microsoft Windows.Version – Pick an OS version to install. But in this example, the version set is 2019.Click Next to continue.

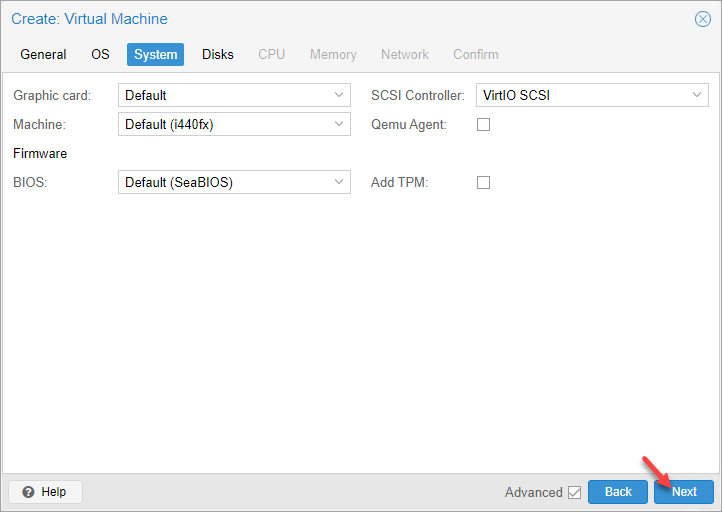
4. Now, keep or change the populated values in the System tab as you prefer, and click Next.
Suppose you need to establish an information exchange between the VM and the host, tick Qemu Agent (a helper daemon). In addition, if the guest OS requires TPM to run, tick Add TPM, select the Trusted Platform Module (TPM) Storage, and choose Version v2.0.
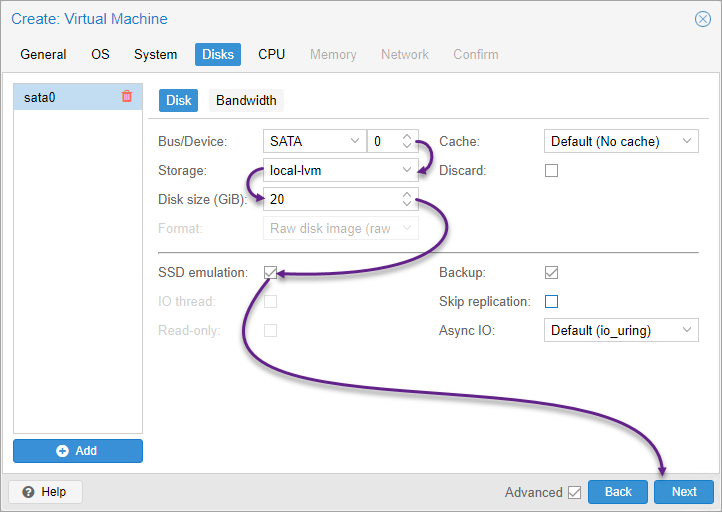
5. Configure the disk for the VM as follows:
- Bus/Device – Choose the disk’s device type.Storage – Select the location to store your VM.Disk size – Set the disk size of your VM.SSD emulation – Tick this option if you want the disk to imitate an SSD.
To add more disks, click Add at the bottom-left side.
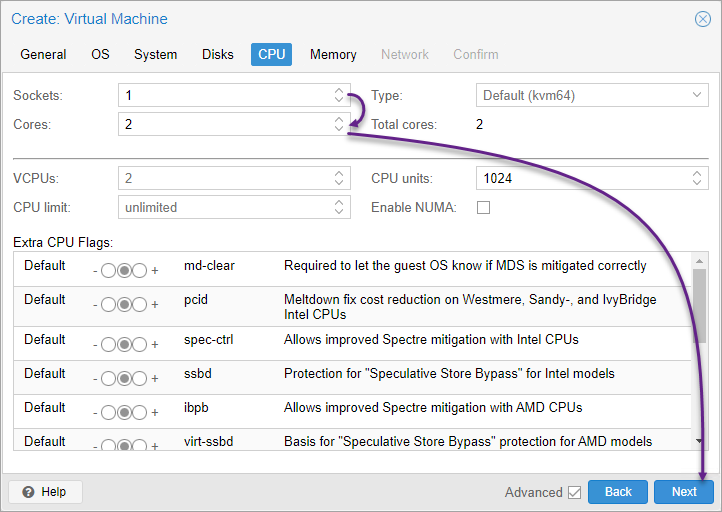
6. Next, on the CPU screen, indicate the number of sockets and cores to use, and click Next.
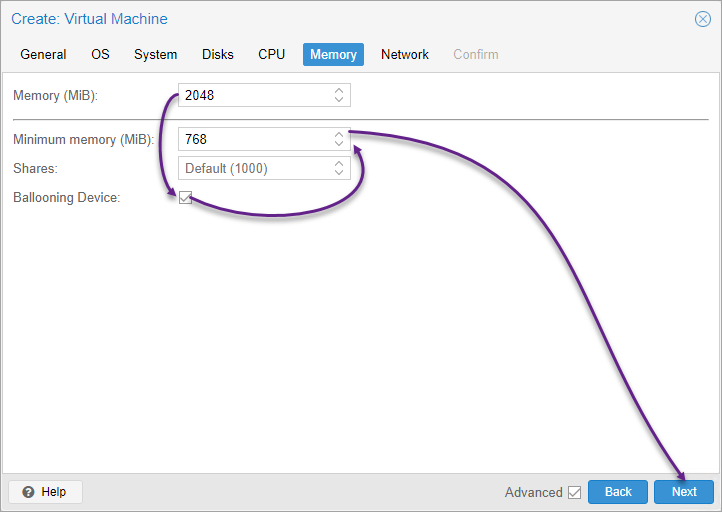
7. Configure the VM’s memory allocation under the Memory tab with the following:
- Indicate the Maximum allotted memory (in megabytes).Tick the Ballooning Device box, and specify the minimum memory (in megabytes) to make the memory dynamic.
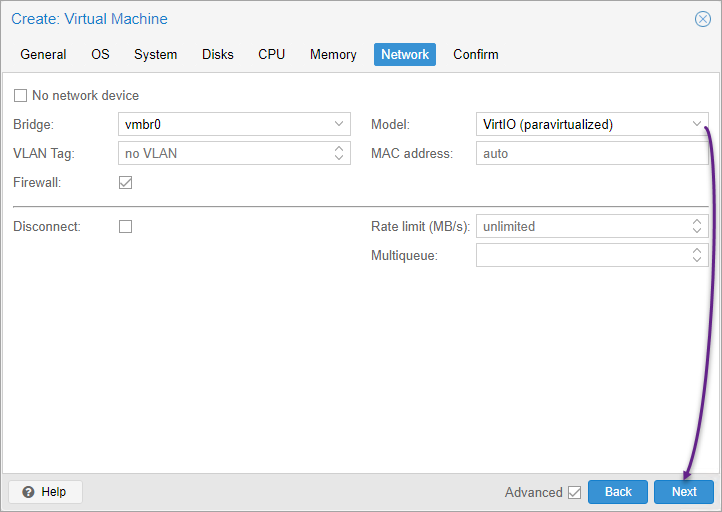
8. Change the Model to VirtIO (paravirtualized) on the Network screen, and click Next.
This option makes guest-to-hypervisor transitions more efficient. But note that at the moment, below are the supported types of devices:
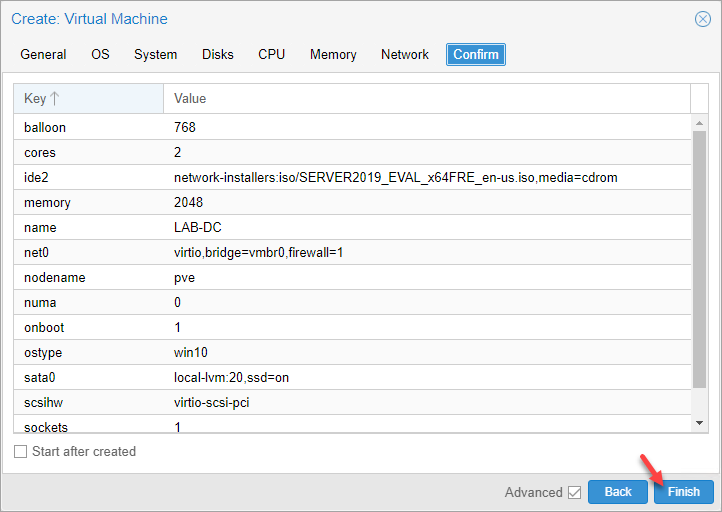
9. Review your selections, and click Finish to finalize creating the VM.
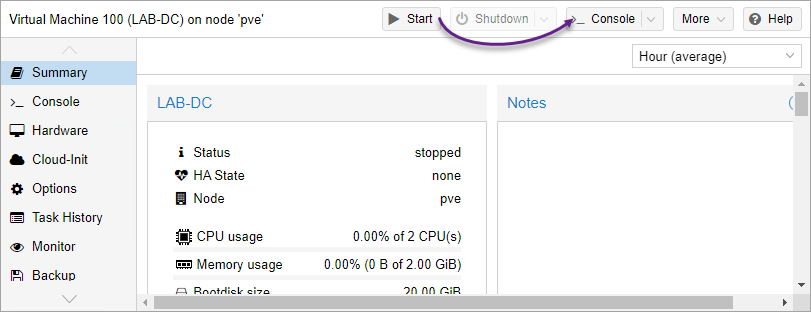
10. Lastly, expand your PVE node, and click your newly-created VM to display the VM options, as shown below.

Starting a VM and Installing the Guest OS
You have just created your first VM in Proxmox VE. But your VM is empty right now and is not even started yet.
There are three methods to start a VM. The first method is when you tick the Start at boot option during the VM creation. But in this example, you will go through the other two methods.
Start your VM with either of the following:
- Click Start, and Console at the top, which starts the VM in a separate window.
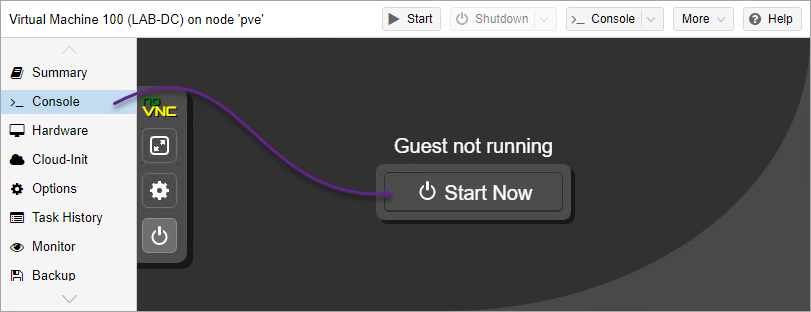
- Or click the Console option (left panel) and click Start Now.
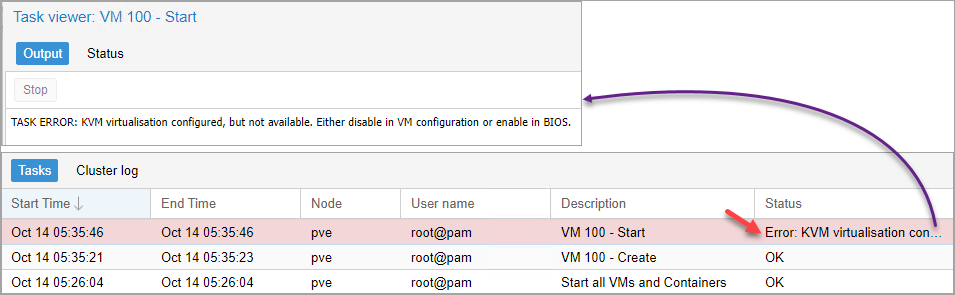
If you cannot start the VM for the first time, look for and double-click an error message at the bottom of the Server’s GUI to launch the Task Viewer window with the specific error.
As you can see below, there is a Kernel-based Virtual Machine (KVM) error. Close the Task Viewer window after reading the error.
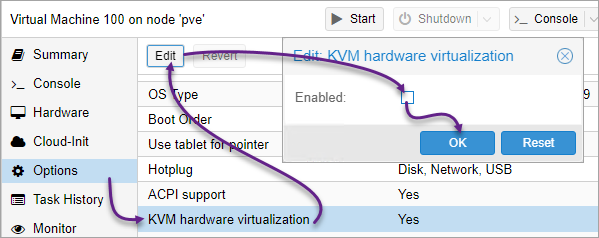
KVM hardware virtualization is only supported in Linux-based virtual environments. If you are running Proxmox VE inside Hyper-V and possibly other hypervisors, KVM is not supported.
To address the KVM virtualization error:
- Navigate to Options (left panel) → select KVM hardware virtualization → click Edit, untick the Enabled box, and click OK. Doing so disables the KVM hardware virtualization if you run Proxmox VE inside Hyper-V or other non-Linux Hypervisors.
If you installed Proxmox VE on a physical machine, refer to your motherboard’s manufacturer on how to enable hardware virtualization in the BIOS/UEFI settings.
- Once disabled, start the VM again and see if you still get an error.
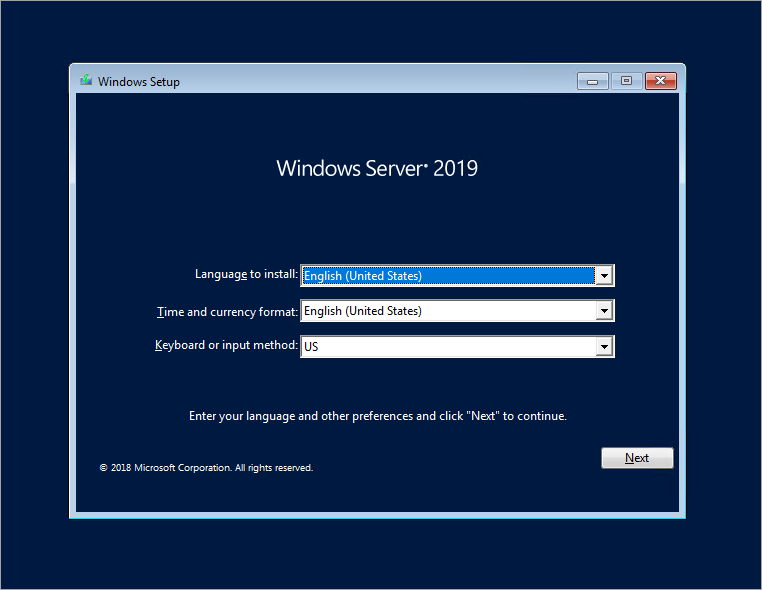
Now, install the guest OS on your VM once it starts and boots to the ISO image you selected during the VM creation (i.e., Windows).
You can see below that installing the guest OS inside the VM is similar to how you install an OS on a physical computer.
Conclusion
Congratulations on reaching this far! Throughout this tutorial, you have successfully created and started a VM with Proxmox VE. You have seen how you can install a guest OS on a VM. But are you willing to give Proxmox VE a chance to be part of your workflow?
Explore more of Proxmox VE for on-premises and cloud environments. Provide virtual application resources to multiple users simultaneously!


