


As organizations migrate to the cloud and adapt to decentralized work environments, overseeing access permissions becomes a central security concern. How to iron out this concern? The solution is more attainable than it may seem. Enter the realm of Privileged Identity Management (PIM), particularly with its Just-In-Time (JIT) access.
This tutorial is your key to unraveling the intricacies of access control in your Azure environment. Azure AD PIM offers a solution and a transformative approach to securing your organization’s vital assets.
Transform the way you wield access control with Azure AD PIM!
Prerequisites
Before diving into Azure AD PIM, ensure you have all listed below to follow along in this tutorial:
- A user to configure the PIM with a Global Administrator or Privileged Role Administrator Member.
Finding the Required Role in the Privileged Identity Management
Azure AD Privileged Identity Management (PIM) is a powerful service within Microsoft’s Azure Active Directory. This service enhances identity and access control management, especially for privileged accounts.
Azure AD PIM allows organizations to enforce JIT access to Azure resources. This capability ensures you control who gets the golden ticket to elevated permissions and for how long.
To configure Azure AD PIM, execute the following:
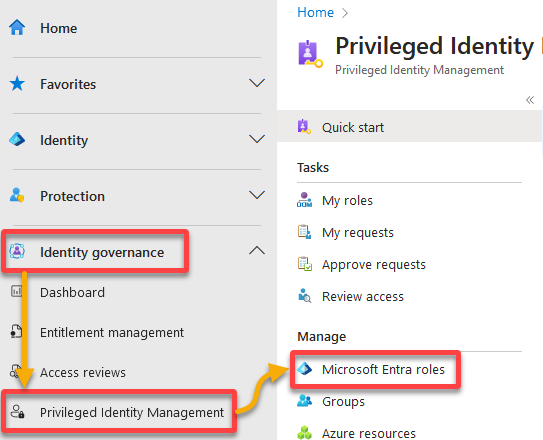
1. Open your favorite web browser and log in to the Entra portal.
2. Once logged in, click Identity governance (left pane) → Privileged Identity Management → Microsoft Entra Roles.
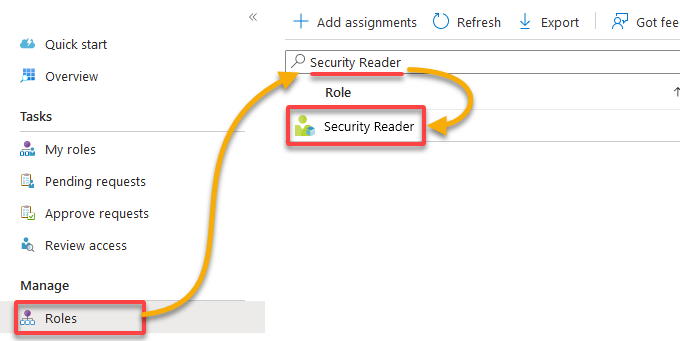
Your browser redirects to a page where you can manage Microsoft Entra roles (step three).
3. Under Manage (left pane), navigate to Roles, search for, and select Security Reader to access the role’s assignment page (step four).
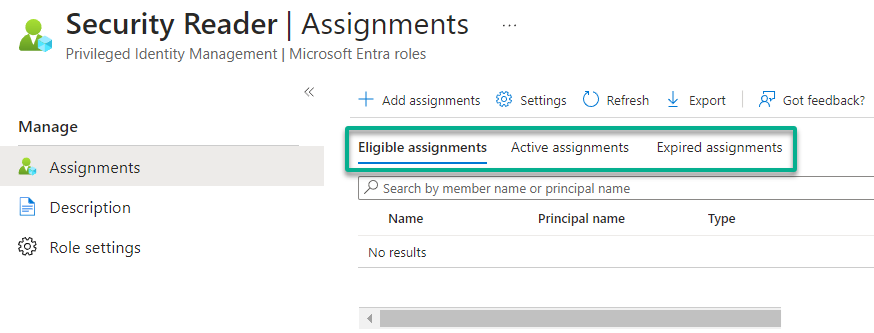
Suppose the management requires a user (i.e., User1) to be granted access for a limited time only and, after a specific approval, before accessing the Security portal. You’ll assign a user (User1) to this role in the following steps.
You’ll find three tabs on the next page, as in the screenshot below.
| Assignment | Details |
|---|---|
| Eligible assignments | The roles that a user is eligible to activate in Azure AD PIM. When a user is designated as eligible for a particular role, they can be assigned it when needed. But, the role is only actively assigned to them once they activate it. |
| Active assignments | The roles that a user has currently activated in Azure AD PIM. The list of the users who currently have and can take action based on the selected role. Usually, users appear in the list if a user manually added or through an activation of an eligible assignment. |
| Expired assignments | The roles that were previously activated by a user but have reached the end of their activation period. The user no longer has the permissions associated with the role unless the role is reactivated. Users who have lost access to resources can view assignment history for up to 30 days past expiration. |
Configuring the PIM Role Activation Settings
After finding the required role that aligns with your needs, the next pivotal step is to ensure a secure and streamlined access management process. This process involves configuring the settings of your target Azure AD role.
You’ll configure the settings that include the activation duration and whether MFA is required for role activation.
To configure your Azure AD role, follow these steps:
1. On the role’s Assignments page, click Settings to access the settings available to configure for the role.
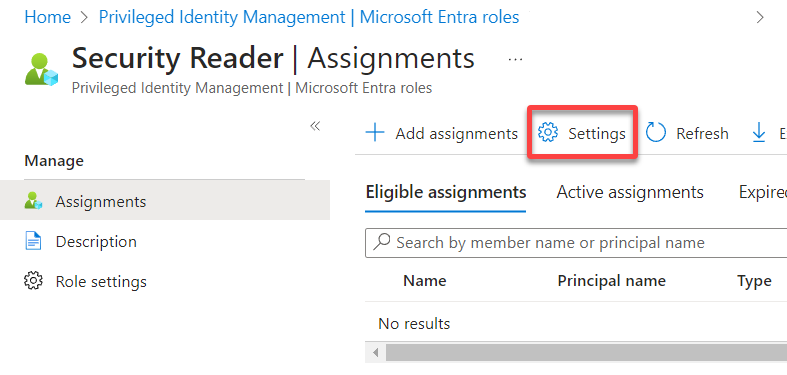
2. Now, click Edit to edit the role setting details, starting with the Activation settings.
The Activation settings pertain to the specific criteria and actions that users must fulfill and provide before the role becomes active for them.
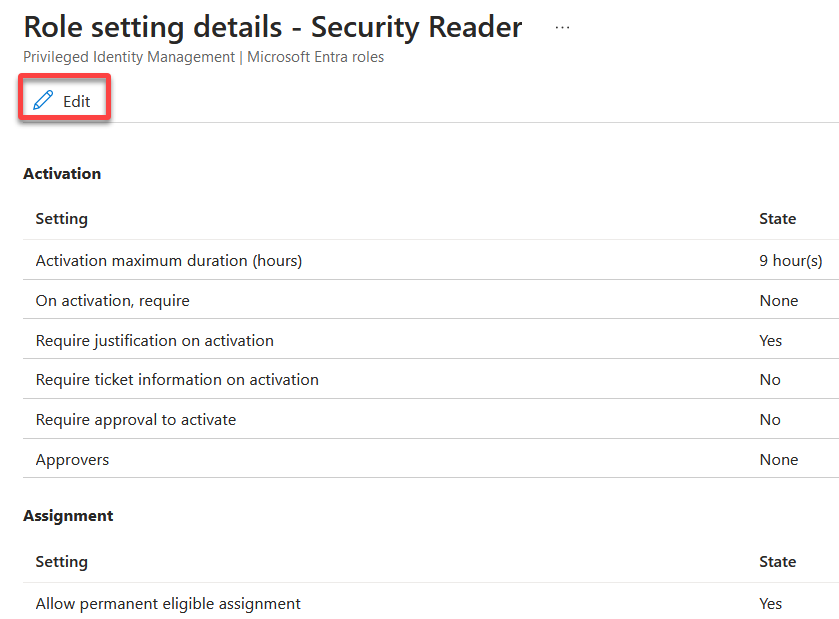
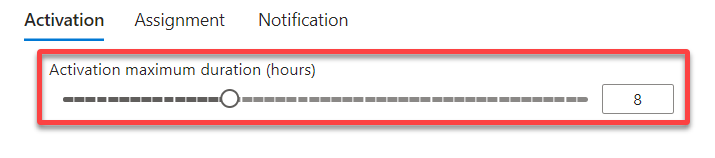
3. Set the number of hours the role will remain active for the user in the Activation maximum duration (hours) setting under the Activation tab.
Note that the default value is eight (8) hours, while the maximum is 24 hours. The user can act based on the role during this period, like anything the Security Reader provides.
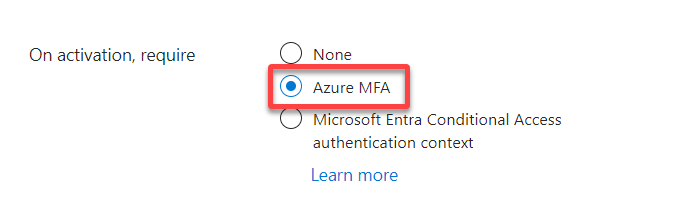
4. Next, set if Azure MFA is required in the On activation, require setting before activating the role for the user.
This setting ensures the ligament user applies for this role, where the options are as follows:
- None – No MFA is required for role activation.
- Azure MFA – The user is required to use MFA.
- Microsoft Entra Conditional Access authentication context – A feature of the Microsoft identity platform that allows you to apply granular policies. This feature lets you apply policies to sensitive data and actions instead of just at the app level.
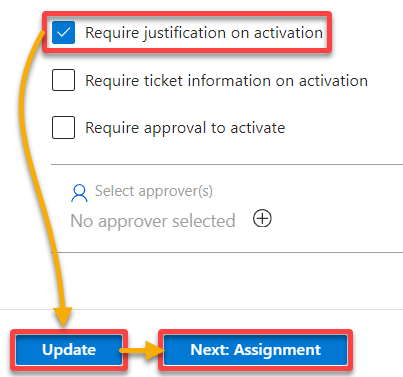
5. Now, choose an additional requirement from the following:
- Require justification on activation – Requires the user to justify activating the role.
- Require ticket information on activation – Requires the user for the Helpdesk ticket, not an integration with any helpdesk system, but only a reference.
- Require approval to activate – Select the list of admins or users to approve the request. After the user submits a request, an email is sent to the approvers’ list asking to approve or deny the request.
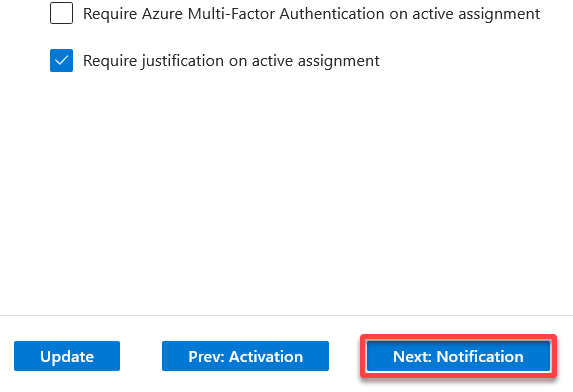
But in this example, tick the first box to require the user for justification, then click Update and Next: Assignment to continue.
Configuring the PIM Role Assignment Settings
From defining approval requirements to setting up assignment policies, you’re now stepping into the realm where access control meets strategic planning. You’ll configure the assignment settings that govern the broader framework for allocating roles.
Things can get confusing here, so invest your full attention throughout this section. For a heads-up, don’t get confused between the activation duration and the assignment duration.
To configure Assignment settings, carry out the following:
Tick any of the following boxes to configure a permanent eligibility or active assignment:
- Allow permanent eligible assignment – This setting controls whether users can be permanently designated as eligible for the Security Reader role.
When enabled, users can permanently be assigned the Security Reader role eligibility. As a result, they’ll always be eligible for activation, allowing administrators to streamline access for specific individuals without needing periodic review and reassignment. - Allow permanent active assignment – This setting determines whether users can have a permanent, ongoing active assignment for the Security Reader role.
When this option is enabled, users can have a continuous, active assignment for the Security Reader role without recurring activations.
This setting can be helpful for roles where constant access is required, and the organization has determined the role should be active at all times for specific individuals.
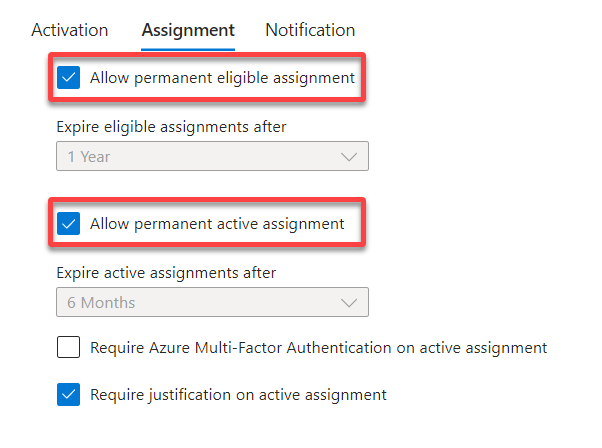
Alternatively, untick the two previous boxes and choose to expire eligible or active assignments after a certain period, as shown below.
- Expire eligible assignments after – This setting determines the period after which an eligible assignment, a user’s potential to be assigned a role, will expire if not activated.
When a user is designated eligible for a role but doesn’t activate it within the specified time frame, their eligibility expires. This behavior ensures that users don’t retain the potential to access privileged roles indefinitely (a JIT access approach). - Expire active assignments after – This setting governs the duration of an active assignment and the period a user can hold and exercise the privileges associated with a role. This time limit helps enforce temporary access and minimizes the risk of prolonged exposure to privileged roles.
Once a user activates a role, they have access to the associated privileges. This setting specifies the period for which the user will retain these privileges. The active assignment ends after the expiration of this period, and the user loses the associated permissions.
If User1 is added to the eligible or active users, User1 can request this role for the number of days, months, and years selected. But remember, this setting doesn’t signify the user has the privilege to do the tasks this role grants, as it’s only the ability to request, not act.

Once configured, click Update to save the current configuration, and click Next: Notification to configure the notification settings.
Configuring the PIM Role Notification Settings
With activation requirements configured, who should be notified of the requests? You must first establish a dynamic communication channel—email. This channel keeps you informed about critical events in your privileged access landscape.
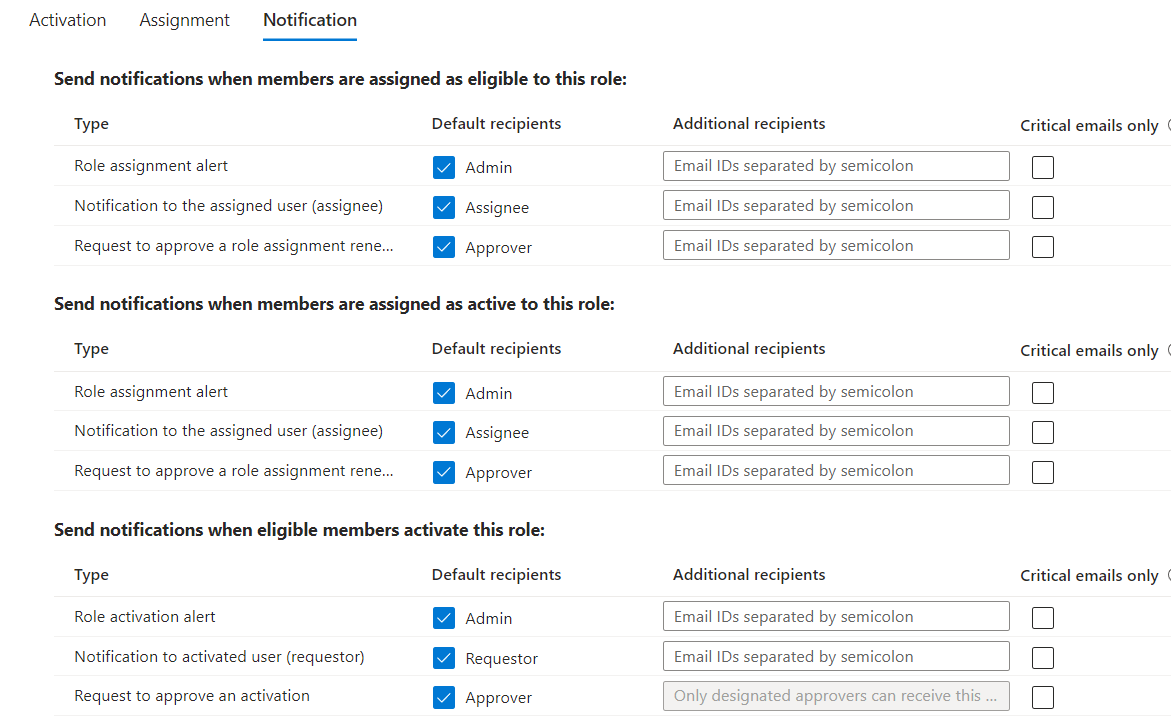
Below are the three available notification settings to configure:
- Send notifications when members are assigned as eligible to this role.
- Send notifications when members are assigned as active to this role.
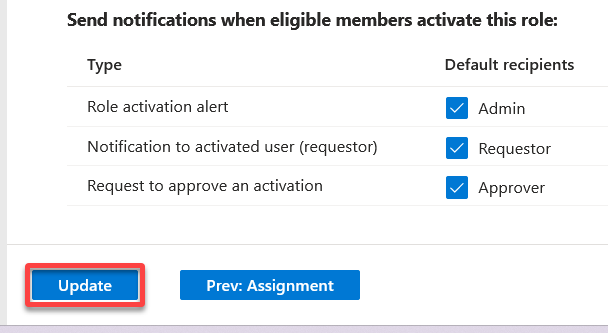
- Send notifications when eligible members activate this role.
Tick all boxes under each notification setting, as shown below:
- Role assignment alert – Informs the admin about the assignment event.
- Notification to the assigned user (assignee) – Informs the user who assigned the role about the event, such as assignment or activation.
- Request to approve a role assignment renewal/extension – Informs the approvers about the request so they take action on approving or rejecting the request.
Once configured, click Update to save and implement the changes.
This step ensures your communication channels are finely tuned to keep you in the loop regarding important activities related to PIM roles.
Testing the PIM Configurations
Security is a top priority, and with PIM in place, you’ve taken a significant stride toward safeguarding your organization’s privileged identities. But still, potential vulnerabilities might lie beneath the surface.
You must shine a spotlight on the dark corners to ensure there are no lurking threats by testing your PIM configurations.
To test your PIM configurations, proceed with these steps:
1. Log in with the user to request a role in Azure AD.
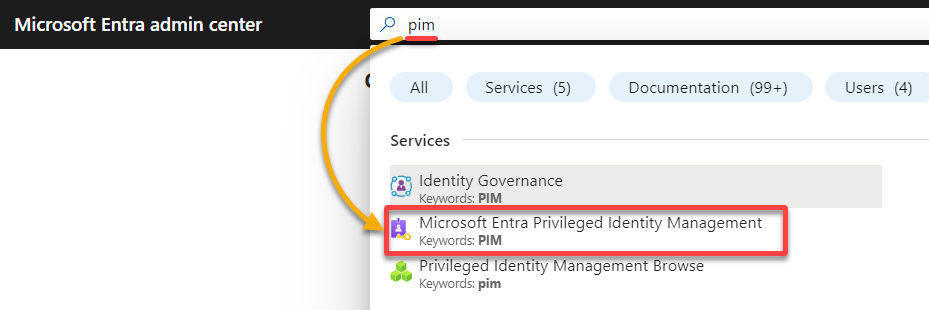
2. Once logged in, search for pim, and choose Microsoft Entra Privileged Identity Management from the list of services in the result.
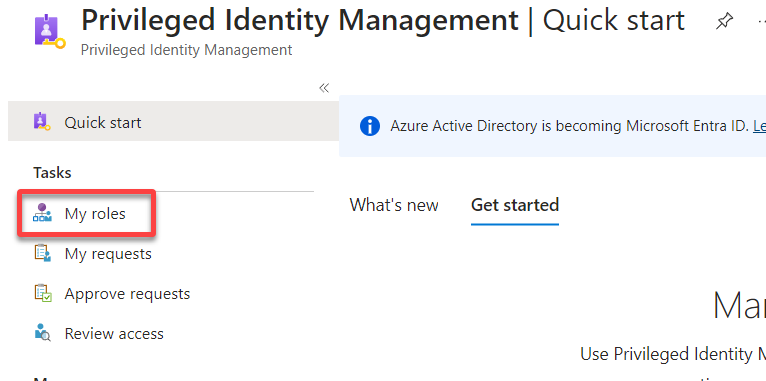
3. On the PIM dashboard, navigate to My roles (left-hand pane) to access the Microsoft Entra roles page for viewing the logged-in user’s eligible role assignments (step four).
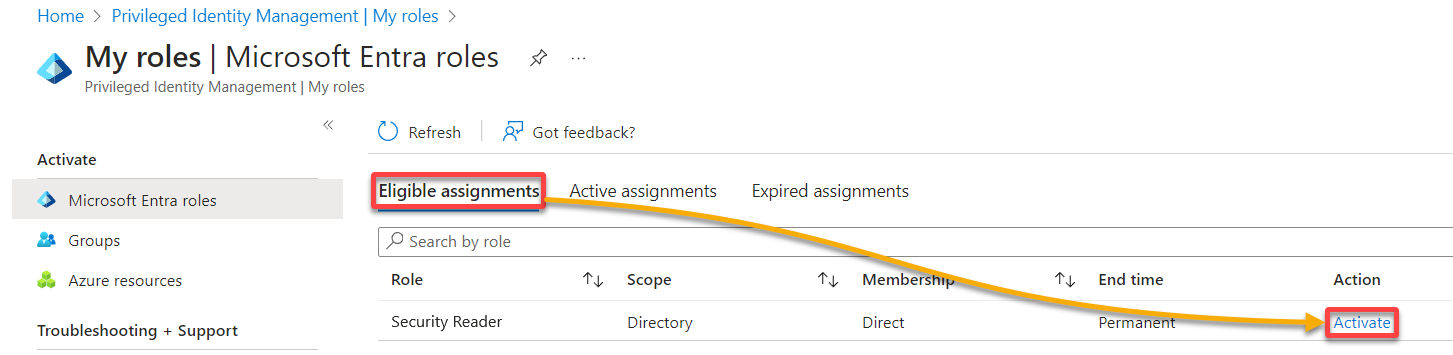
4. Under the Eligible assignments, click Activate on the far right, adjacent to the role name, to activate the role.
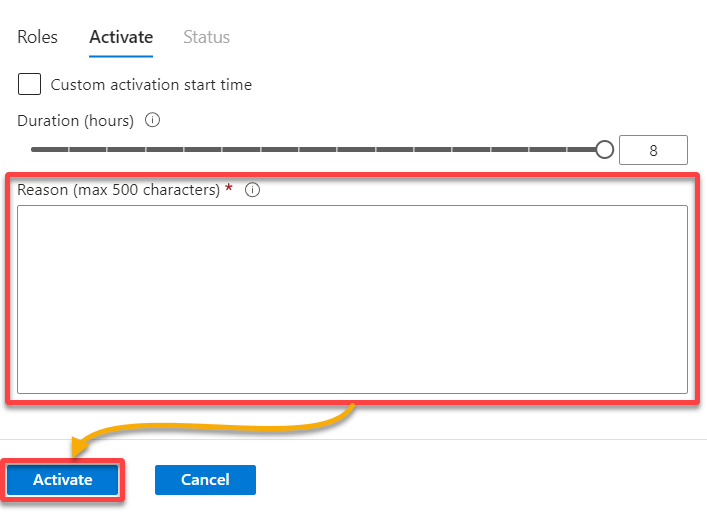
5. Fill in some additional information, and click Activate to request activation of the role.
💡 Note that the form below only appears depending on the role configuration done by the administrator.
If the role requires approval, an email is sent to the list of approvers requesting them to approve or deny your request. Otherwise, you’ll receive an email confirming the role activation is complete. Thus, you can proceed with the required task based on the duration specified for the role.
Conclusion
Throughout this tutorial, you dived deep into the nitty-gritty, configuring Privileged Identity Management (PIM) role activation, role assignment, and role notification settings. Ultimately, you’ve set the stage and successfully tested those configurations to ensure they’re as solid as a rock.
Conclusively, Azure AD PIM empowers organizations to enhance their security posture by effectively managing and monitoring privileged access. With PIM, you reduce the risk of unauthorized access, enforcing just-in-time access.
Now, where to from here? Why not dive into conditional access policies or consider integrating PIM with other Azure services? Integrations streamline your security operations and unleash the true potential of Azure’s interconnected ecosystem.
Explore more advanced PIM features and take your security game to unparalleled heights!


