
Working with PowerShell modules is an important piece of PowerShell automation. When you start learning PowerShell, the first steps usually are using single commands. This leads to building scripts which then leads to building functions.
Not a reader? Watch this related video tutorial!By using functions, you can make your scripts more modular. This allows you to be able to use the same code in many places without copying and pasting to code all over the place. Using functions lets you spend less time making the same edit to the same code everywhere it is used. Instead you can work on making your code better in a single place.
To take functions to the next level, you can combine these functions together into a module.
A module is a collection of functions in a text file with a psm1 extension. There are some optional additions, such as a module manifest and comment-based or external help that may also be included. These will be covered later on.
Prerequisites
I’ll be using Windows PowerShell 5.1 in this article. If you’re using an older version or PowerShell Core, your mileage may vary as to results you see.
Interacting with Modules
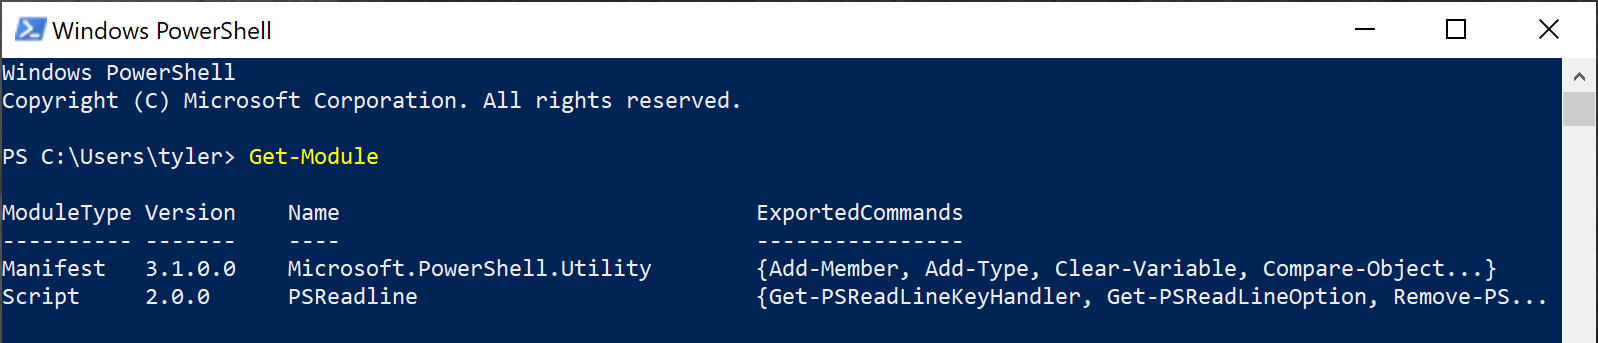
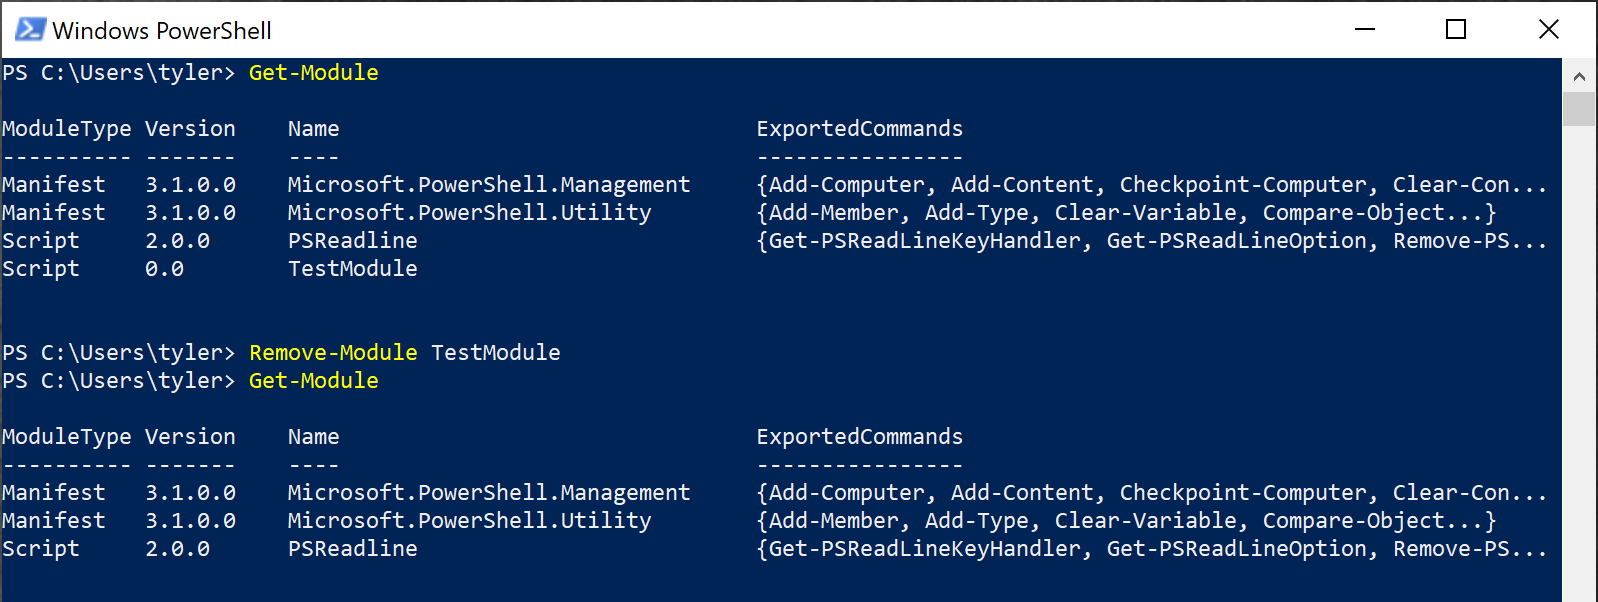
Once you first open a PowerShell session, you will start off with two modules. The first is Microsoft.PowerShell.Utility which contains many basic PowerShell functions that you use already. The other module is PSReadline. You can see these starting modules by using the Get-Module command.
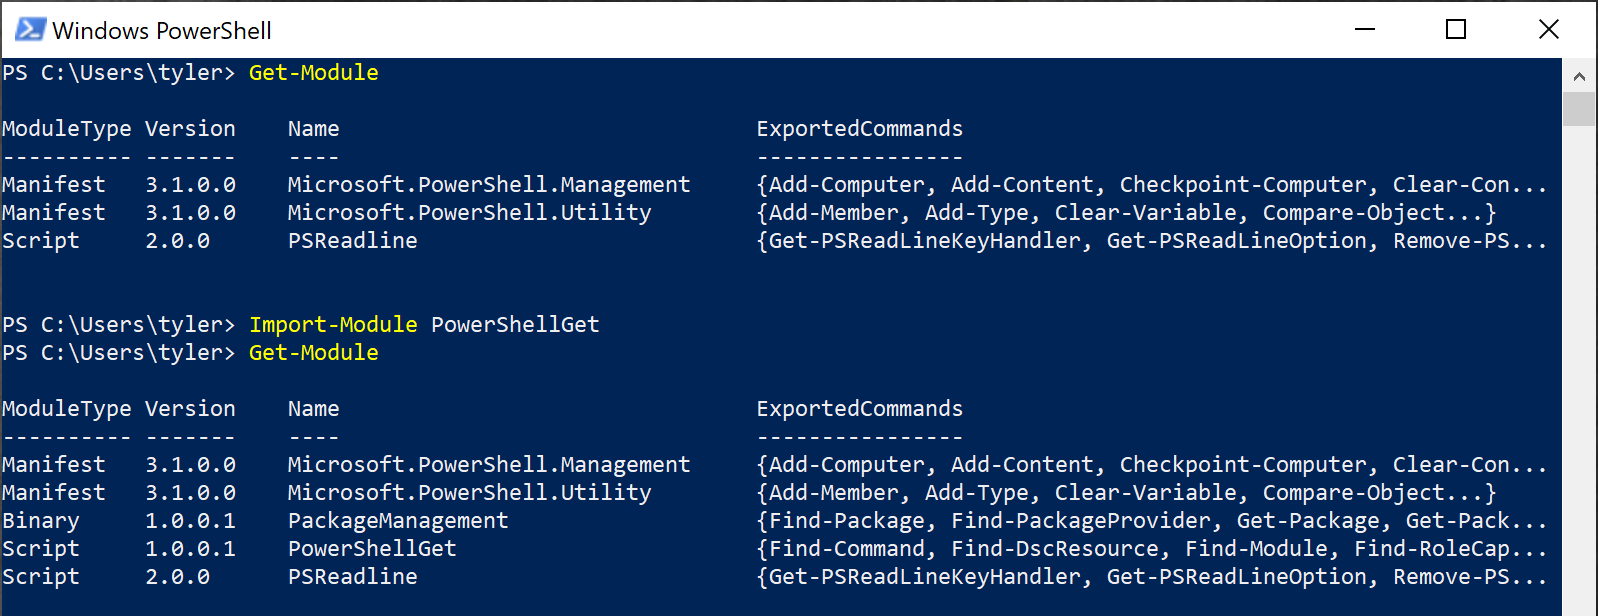
That said, this is not a complete list of all the modules available. Ever since PowerShell 3, modules that are installed will be imported as needed. If you are running an older version of PowerShell you will be required to use the Import-Module command to first import the module before using any of the commands.
There are times where you would still want to use Import-Module even in later versions. If you wanted to import a module after it is already installed, you can use Import-Module like this:
While Get-Module will show all the modules that are imported, you will not see modules that have not been imported yet. You can then use the ListAvailable parameter to show all the other modules that are available.

Get-Module -ListAvailableNot all Commands are Shown By Default
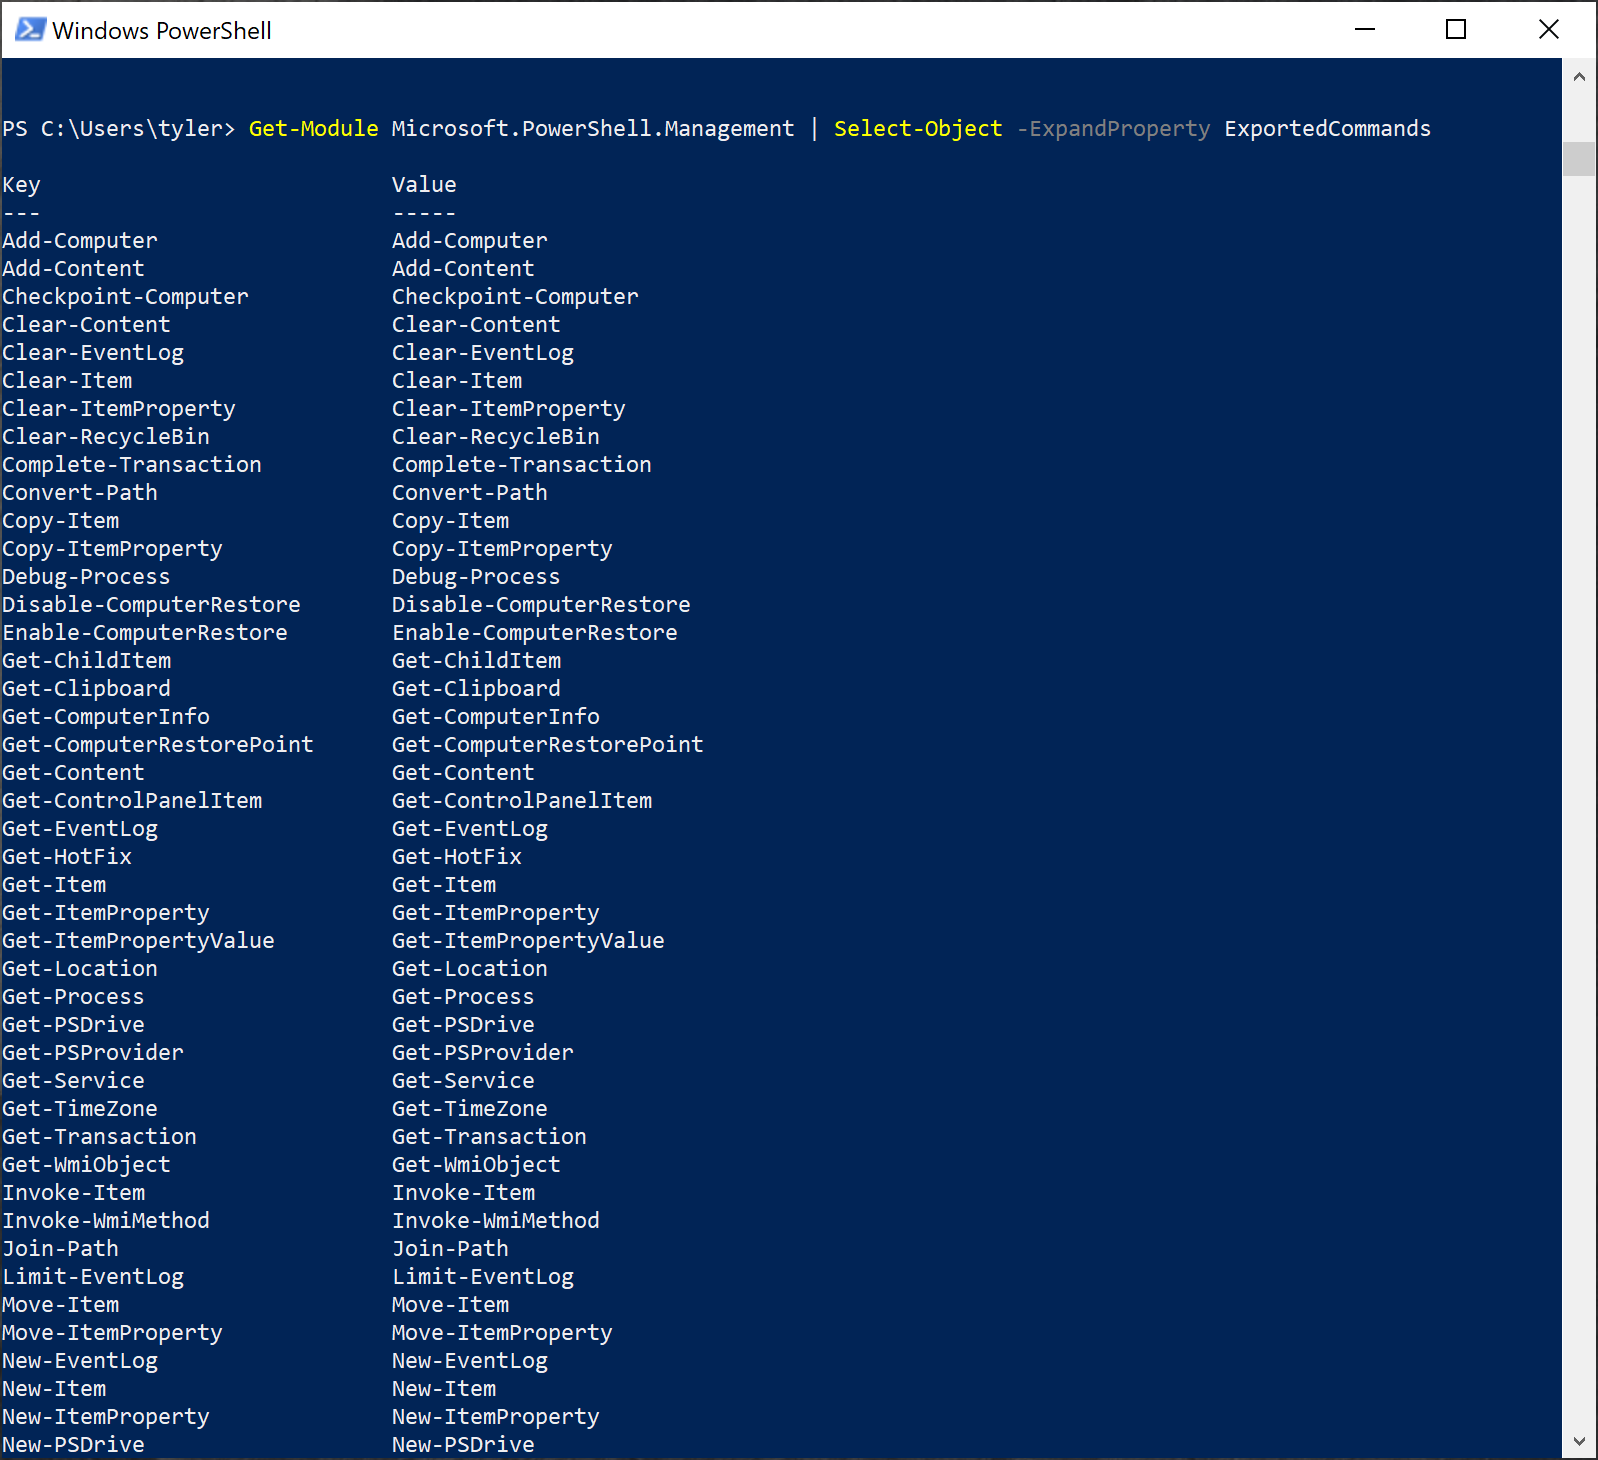
The ExportedCommands property contains a list of all the available commands that are exported from the module. You may see some differences between this list and what is in the module file. Exported commands is a feature built into the module manifest that allows the writer to leave a function as hidden. Module authors may also use the Export-ModuleMember cmdlet but that’s outside the scope of this article.
Module authors may want to have a function hidden because it’s meant to support other functions, not be user-facing. To have a function hidden the author would exclude it from the FunctionsToExport array in the manifest. Here you can see an expanded view of the ExportedCommands property.
Importing Modules
There are many ways to start using modules. You can manually import the module using the path to the module files. This allows you to be able to test and update the module without having to do much work. But this doesn’t allow for much portability, since you would have to use the exact path to the module. PowerShell will also not auto-import modules not in the $env:PSModulePath variable.
Selectively Importing Commands
You can use Import-Module to only import specific functions instead of the whole module by using the Function parameter. This can save time when importing modules from remote systems, such as the Office 365 modules.
All User Modules
Modules installed for all users get placed into C:\Program Files\WindowsPowerShell\Modules. This directory contains many pre-added modules including any modules installed using Install-Module using the default scope AllUsers.
Current User Modules
If you are installing a module but only want a single user to use it, there is a CurrentUser scope. This puts the module files in your Documents folder at C:\Users\<username>\Documents\WindowsPowerShell\Modules. This can be useful in an environment where you use folder redirection with the Documents folder.
In this case, you can install a module on one computer and use it on another since they would both be sharing the same documents folder.
System Modules
For completeness, there is also a module directory at C:\Windows\System32\WindowsPowerShell\1.0\Modules. While technically, a module placed in this path would be imported like one of the other paths, but it is not recommended as this is reserved for Microsoft’s system modules.
Naming is Important
You can manually place your module in one of these paths to make it available by default with a new session, but you have to make sure that you follow the required naming for modules. The folder that the module files are placed in, must be the same name as the psm1 module file and the psd1 module manifest if there is one.
Using Get-Module -ListAvailable that we had mentioned prior references these paths. You can see all the module paths using $env:PSModulePath -Split ';'. You may notice other paths in the list than what is shown here. Many programs add their own module paths when they are installed. One of the examples of this is SQL, which has its own modules included in its own module paths.

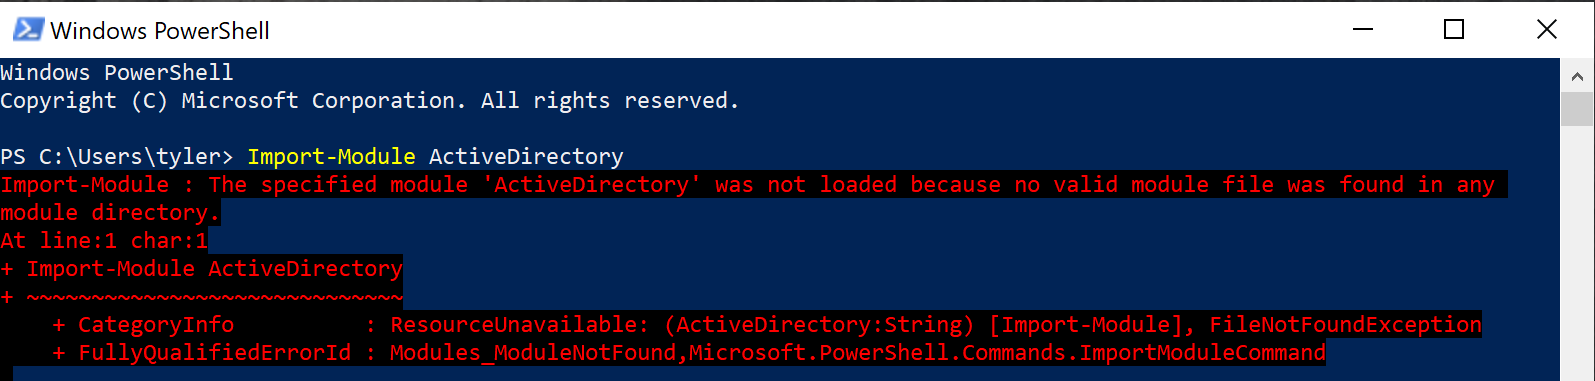
$env:PSModulePathThere are also some modules that you would install with a different process. One of the most significant examples of this is the ActiveDirectory module. From Windows 7 up to Windows 10 1803, you would install this with the Remote Server Administration Tools (RSAT) installer.
On newer versions of Windows 10 (1809+) this is only available through the Features On Demand. Installing RSAT installs the ActiveDirectory modules and many others that you would use to administer other Windows roles. On Windows server OSs, these modules are installed through the Server Manager.
Importing Remote Modules (Implicit Remoting)
There are some cases where it is not practical to have a module running locally. Instead it is better to connect to a remote device and import a module installed on it. When you do this, the commands are actually executed on the remote machine. This is frequently used with Microsoft’s Office 365 modules. Many of them connect to an Office 365 server that then imports a module. When you run any of the commands, they get run on the remote server and then the output is sent back to your session.
Another use of importing remote modules is when you do not have the module installed locally. This is what you would get if you did not have the ActiveDirectory module installed, but you tried importing it.
To import a remote module, you first have to create a PSSession. You can use New-PSSession to create the session. Then you would import the module available on the remote device using the PSSession parameter with Import-Module.
PS51> $AdminServer = New-PSSession -ComputerName $AdminServerName -Credential (Get-Credential)
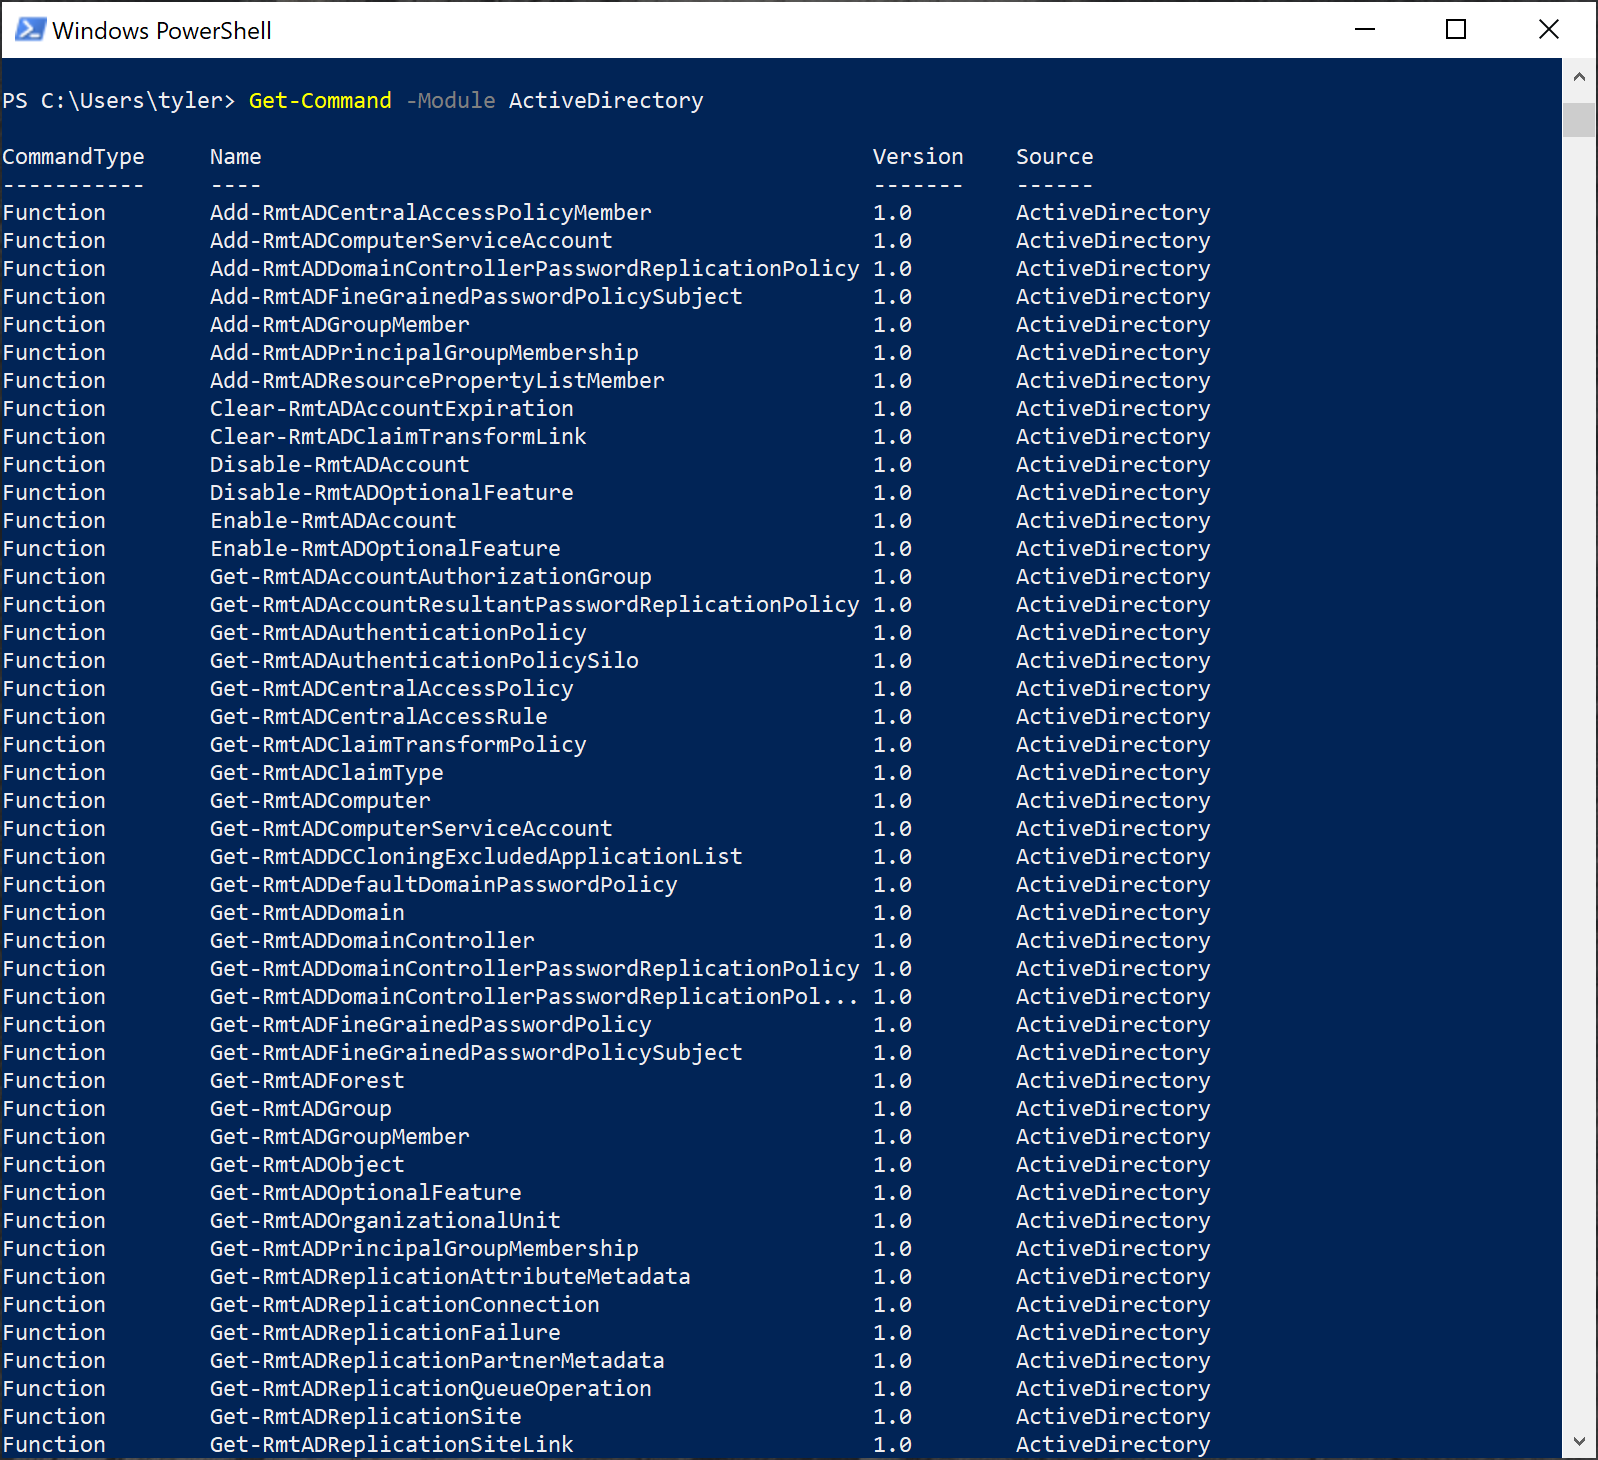
PS51> Import-Module -Name ActiveDirectory -PSSession $AdminServer -Prefix 'Rmt'Using this method of importing remote modules allows for faster code execution in a distributed environment. For example, if you are working from your computer, but the servers you are working on are across the US, it may take significantly longer to run certain commands locally against the servers. Whereas running the commands on a server and feeding the output back to your local session is much faster.
Adding a Module Prefix
You can also add a prefix on the functions imported from the remote machine. This option is available while importing local modules, but is rarely used outside of testing different versions of a module side by side.
If you ran the import command above and this is what you would see when you look at the commands:
In this case, you can use a prefix to show that it is not a local module. This can be used in cases where you are importing a module that is also available locally. Adding the prefix reduces confusion on where the code is being executed.
Removing Modules
You can also remove a module from the current session without using Remove-Module. This removes a module from the local session without removing the module files. You may want to use this in a case where you were using a remote session to use a module. You could use Remove-Module to clean up your session and then disconnect the remote session.
Another use of Remove-Module is if you are making changes to a module and you do not want to launch a new PowerShell session. In this case, you would use Remove-Module followed by Import-Module to reload it into your session. Alternatively, you can use the Force parameter with Import-Module. This will complete the unload and reload of the module for you.
What Makes up a PowerShell Module
A module can consist of one or more files. To meet the minimum requirements for a module, you must have a module file. This can be a PSM1 file or any other module file such as a binary module file. To build upon that, your psm1 should have functions defined in it, or it will not be much use to anyone.
While there are no requirements for how the functions should look or what they should do, there are some guidelines. It is usually preferred to have all of the functions in a module built around the same concept.
Modules Contain Like-Minded Functions
For example, the ActiveDirectory module only includes functions that interact with Active Directory in some way. Usually the function names also contain a prefix. Going back the ActiveDirectory module as an example, all of the nouns in the function names start with AD.
Using these guidelines helps with discoverability of the functions. Imagine you have just imported this new module and want to tab through the functions. This is much easier to do if all of the functions have a similar name structure. While you may frequently see modules start with PS, this prefix is officially reserved for Microsoft modules only. You probably will not cause an issue if you use PS at the start of your module, you may create a conflict with another module name.
Using these guidelines, if you had a bunch of functions that all had to do with interacting with the registry you could have something like:
function Get-ATARegistryKey {...}

function Set-ATARegistryKey {...}
Module Manifests
To build on the text module file, you can also include a module manifest. These files have a PSD1 extension and contain metadata about the module. This is where you would include information on the author, description of the module, other required modules, and many other attributes. To publish to a repository, it is required to have the Author and Description fields populated.
Here is an example of a manifest that we may have for our registry module:
#Module manifest for module 'ATARegistry'
#Generated by: Tyler
#Generated on: 8/11/2019
@{
	#Script module or binary module file associated with this manifest.
	RootModule = 'ATARegistry'
	#Version number of this module.
	ModuleVersion = '1.0'
	#Supported PSEditions
	#CompatiblePSEditions = @()
	#ID used to uniquely identify this module
	GUID = 'fef619fa-016d-4b11-a09d-b222e094de3e'
	#Author of this module
	Author = 'Tyler Muir'
	#Company or vendor of this module
	CompanyName = 'Adam the Automator'
	#Copyright statement for this module
	Copyright = '(c) 2019 tyler. All rights reserved.'
	#Description of the functionality provided by this module
	Description = 'This is a test module.'
	#Minimum version of the Windows PowerShell engine required by this module
	#PowerShellVersion = ''
	#Name of the Windows PowerShell host required by this module
	#PowerShellHostName = ''
	#Minimum version of the Windows PowerShell host required by this module
	#PowerShellHostVersion = ''
	#Minimum version of Microsoft .NET Framework required by this module. This prerequisite is valid for the PowerShell Desktop edition only.
	#DotNetFrameworkVersion = ''
	#Minimum version of the common language runtime (CLR) required by this module. This prerequisite is valid for the PowerShell Desktop edition only.
	#CLRVersion = ''
	#Processor architecture (None, X86, Amd64) required by this module
	#ProcessorArchitecture = ''
	#Modules that must be imported into the global environment prior to importing this module
	#RequiredModules = @()
	#Assemblies that must be loaded prior to importing this module
	#RequiredAssemblies = @()
	#Script files (.ps1) that are run in the caller's environment prior to importing this module.
	#ScriptsToProcess = @()
	#Type files (.ps1xml) to be loaded when importing this module
	#TypesToProcess = @()
	#Format files (.ps1xml) to be loaded when importing this module
	#FormatsToProcess = @()
	#Modules to import as nested modules of the module specified in RootModule/ModuleToProcess
	#NestedModules = @()
	#Functions to export from this module, for best performance, do not use wildcards and do not delete the entry, use an empty array if there are no functions to export.
	FunctionsToExport = @('Get-RegistryKey','Set-RegistryKey')
	#Cmdlets to export from this module, for best performance, do not use wildcards and do not delete the entry, use an empty array if there are no cmdlets to export.
	CmdletsToExport = @()
	#Variables to export from this moduleVariablesToExport = '*'
	#Aliases to export from this module, for best performance, do not use wildcards and do not delete the entry, use an empty array if there are no aliases to export.
	AliasesToExport = @()
	#DSC resources to export from this module
	#DscResourcesToExport = @()
	#List of all modules packaged with this module
	#ModuleList = @()
	#List of all files packaged with this module
	#FileList = @()
	#Private data to pass to the module specified in RootModule/ModuleToProcess. This may also contain a PSData hashtable with additional module metadata used by PowerShell.
	PrivateData = @{
		PSData = @{
			#Tags applied to this module. These help with module discovery in online galleries.
			#Tags = @()
			#A URL to the license for this module.
			#LicenseUri = ''
			#A URL to the main website for this project.
			#ProjectUri = ''
			#A URL to an icon representing this module.
			#IconUri = ''
			#ReleaseNotes of this module
			#ReleaseNotes = ''
		}
		#End of PSData hashtable
	}
	#End of PrivateData hashtable
	#HelpInfo URI of this module
	#HelpInfoURI = ''
	#Default prefix for commands exported from this module. Override the default prefix using Import-Module -Prefix.
	#DefaultCommandPrefix = ''
}
While this may look intimidating at first, Microsoft has a handy cmdlet you can use to generate a module manifest. The included command is New-ModuleManifest. To generate the manifest shown above you could used:
PS51> New-ModuleManifest -Path .\Scripts\TestModule.psd1 -Author 'Tyler Muir' -CompanyName 'Adam the Automator' -RootModule 'TestModule.psm1' -FunctionsToExport @('Get-RegistryKey','Set-RegistryKey') -Description 'This is a test module.'External Help Files
You may also see external help files in some modules. They could be identified by the <ModuleName>-Help.xml at the end of the file name. These external help files contain the same information that would normally be contained in the command-based help that you may find in a function definition.
This would also require you to add # .ExternalHelp <ModulePath>-Help.xml to your function to have it work properly when using the Get-Help command after importing the module. It is usually only common to see external help files with very large modules and due to that they are out of the scope.
Related Files
While these are the most common types of files you will see in a module, these are not the only files. Sometimes you will see binary files in addition to a text module as there are other dependencies. By exploring through the module paths, you can find many examples of additional file types in modules.
To have non-standard module files properly publish you would include other files in the FileList parameter in your module manifest.
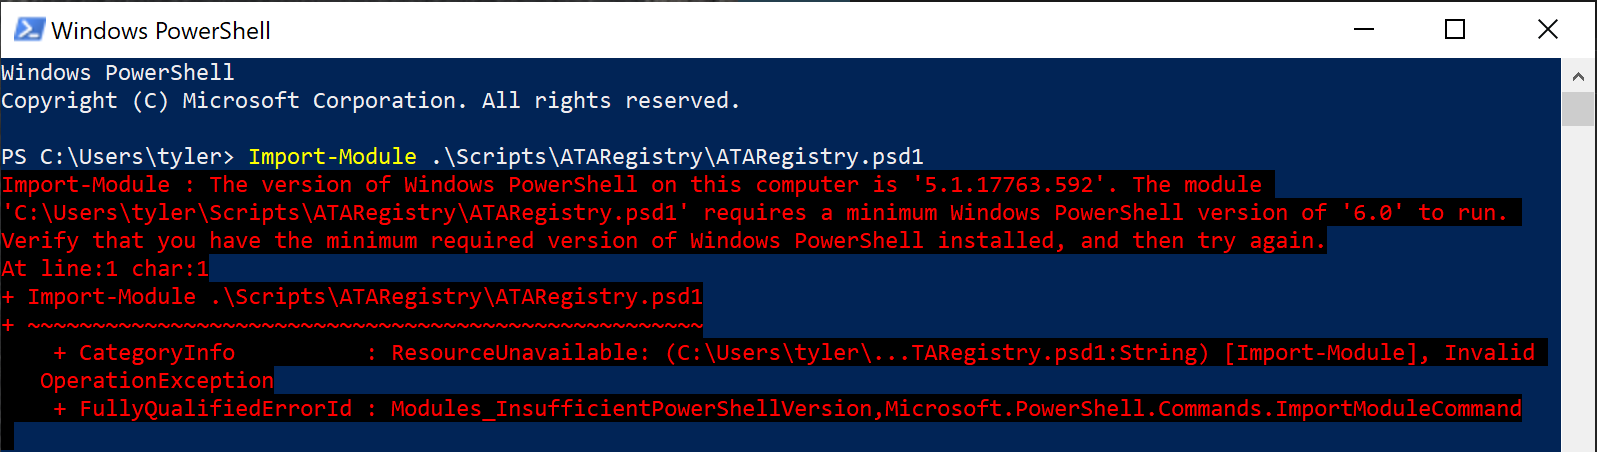
Within the module manifest, you will notice many other parameters that are currently empty. You can use these to define other requirements for using your module. For example, you can define the versions of PowerShell the module can work with. If you try to import the module on an unsupported version of PowerShell, this is what you would see:
PSRepositories
One of the key distribution options for modules is a PSRepository. At a 1000′ view, a PSRepository is a local where multiple people or multiple devices can access the module files. These are frequently web servers where you can publish files.
You can also use a directory for the repository, but this does limit you on the functionality of your repository. You can host a PSRepository yourself, or you can utilize one of the many options available on the internet like the PowerShell Gallery. You can see your PSRepositories by using the Get-PSRepository command.

By default, you will only have one entry and it will be for the PowerShell Gallery. You may notice that it will say untrusted. This is because PowerShell makes you aware that by using the PowerShell Gallery you may be using code not written and approved by Microsoft. This means that before any modules are installed from it, you will have to give explicit permission.
Adding PSRepositories
You can also add your own repositories. To trust PowerShell Gallery, you can run Get-PSRepository -Name PSGallery | Set-PSRepository -InstallationPolicy Trusted or you can accept the warning the first time you install a module from the PowerShell Gallery.
All of the commands that you would use to interact with these PSRepositories can be found in the PowerShellGet module. You can see the functions here:
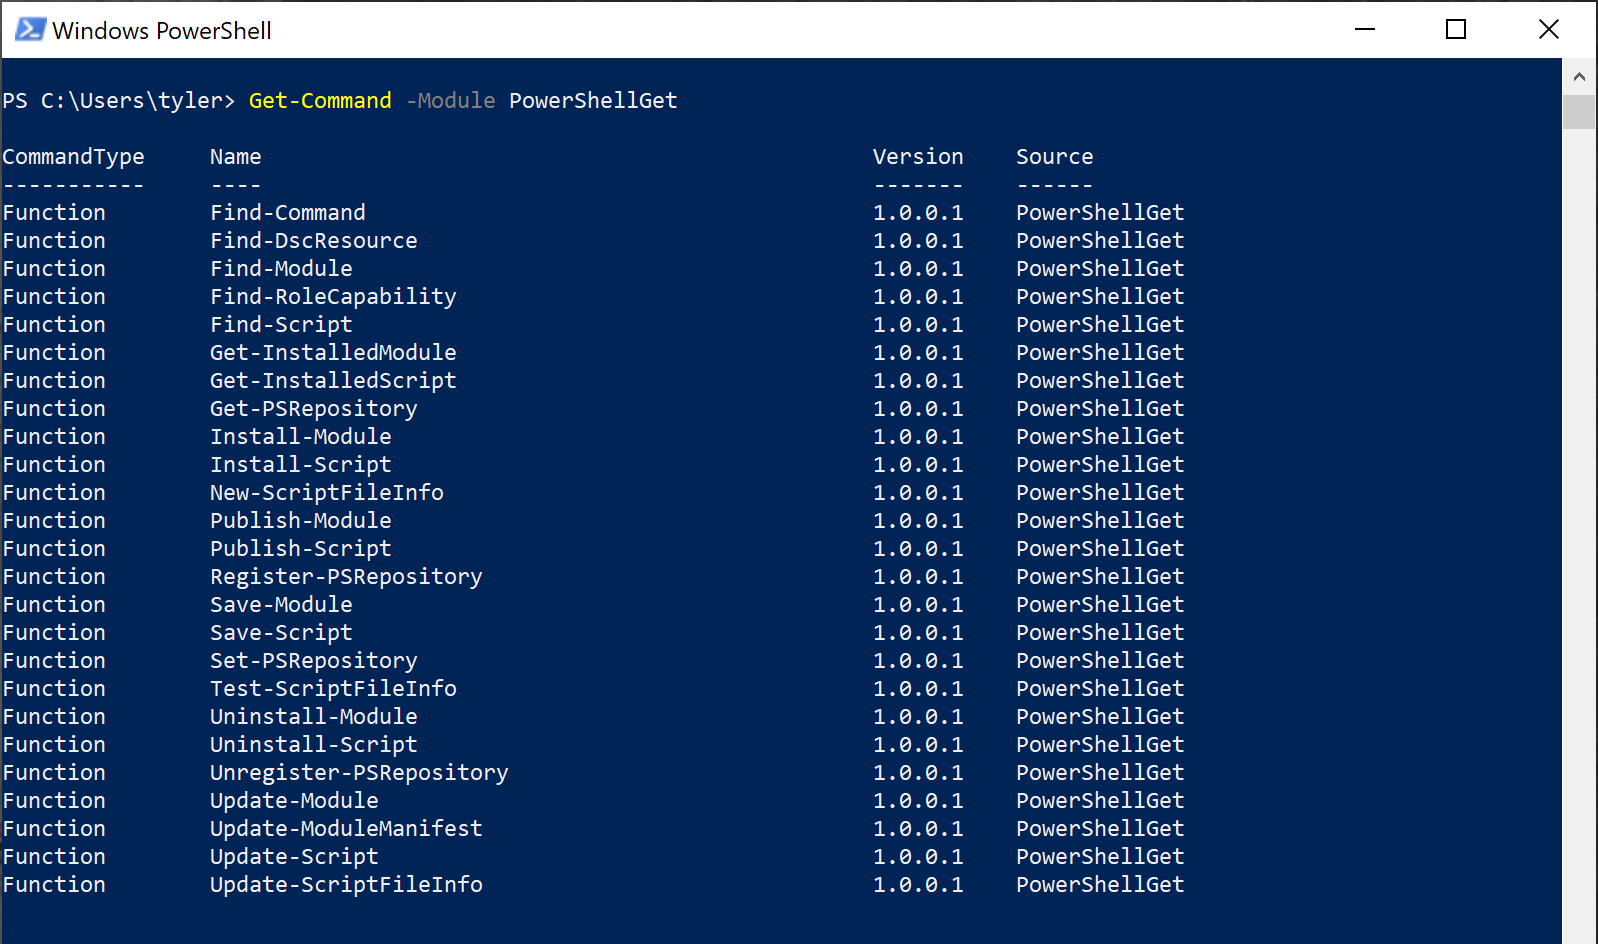
The PowerShellGet module may be required to be updated before interacting with certain repositories.
Finding Modules
Another key feature of using a PSRepository is being able to search for modules. This is accomplished using the Find-Module command. There are multiple ways to filter to find specifically what you are looking for, but for now you can search for the VMware modules like this:
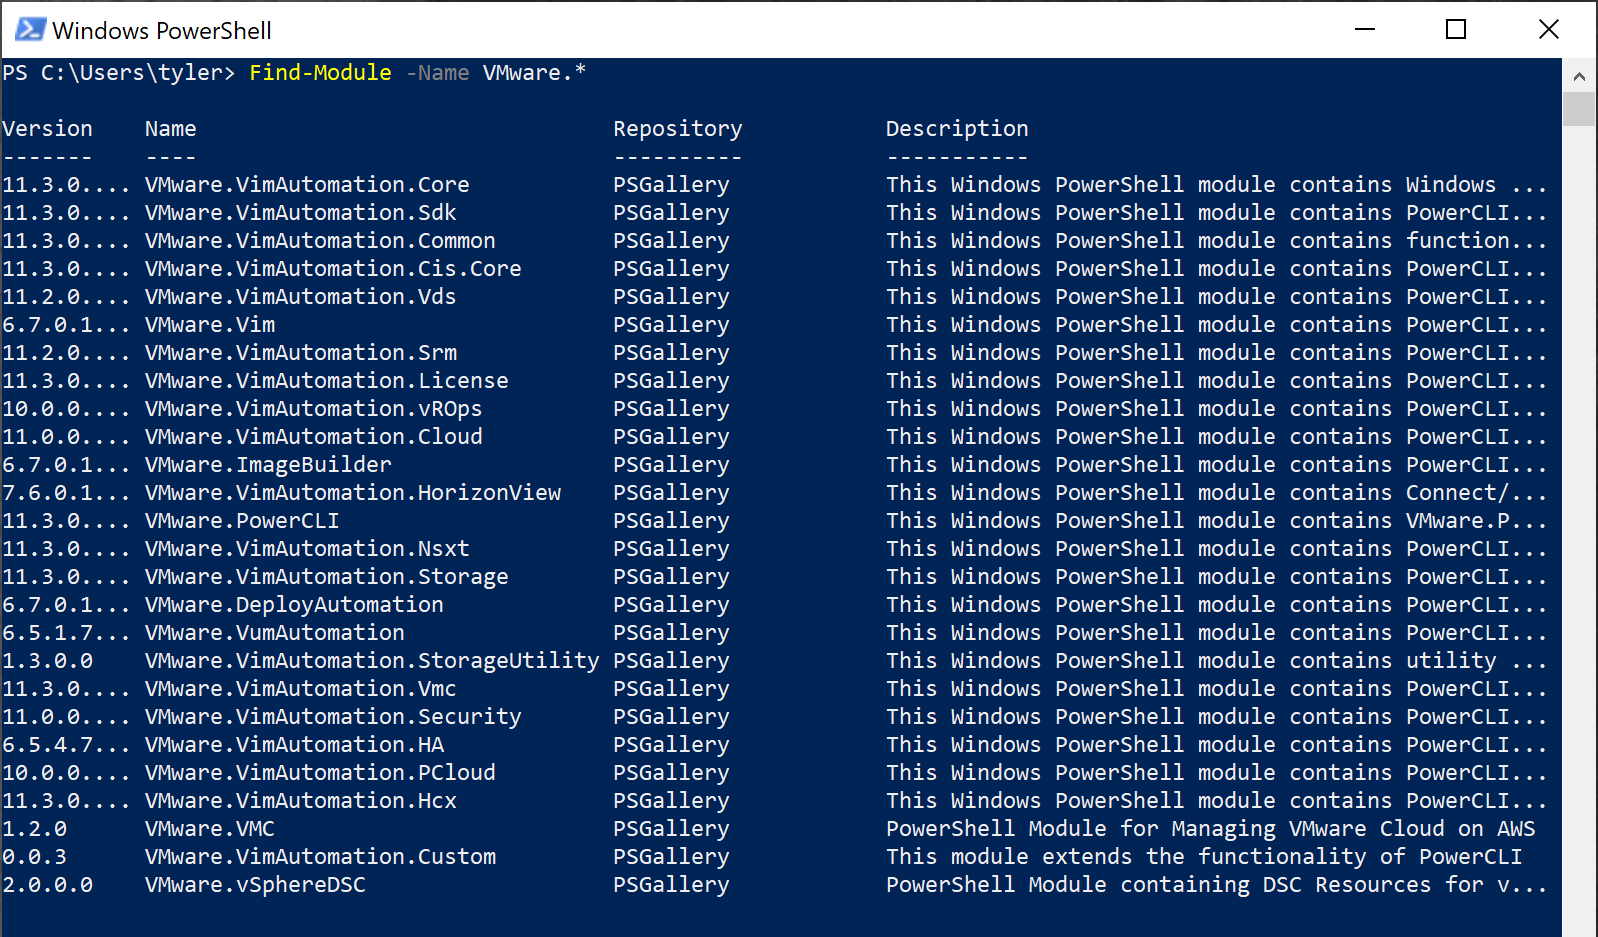
This will show all of the modules that start with VMware. While most of these are from VMware, you need to look at the author attribute to see who published the module.
Since anyone can upload to PowerShell Gallery, there are thousands of modules available. This means that you may find modules that do not work properly for your use case. Many modules that you will find are open source so you can contribute to them to improve the functionality of the module.
Installing Modules
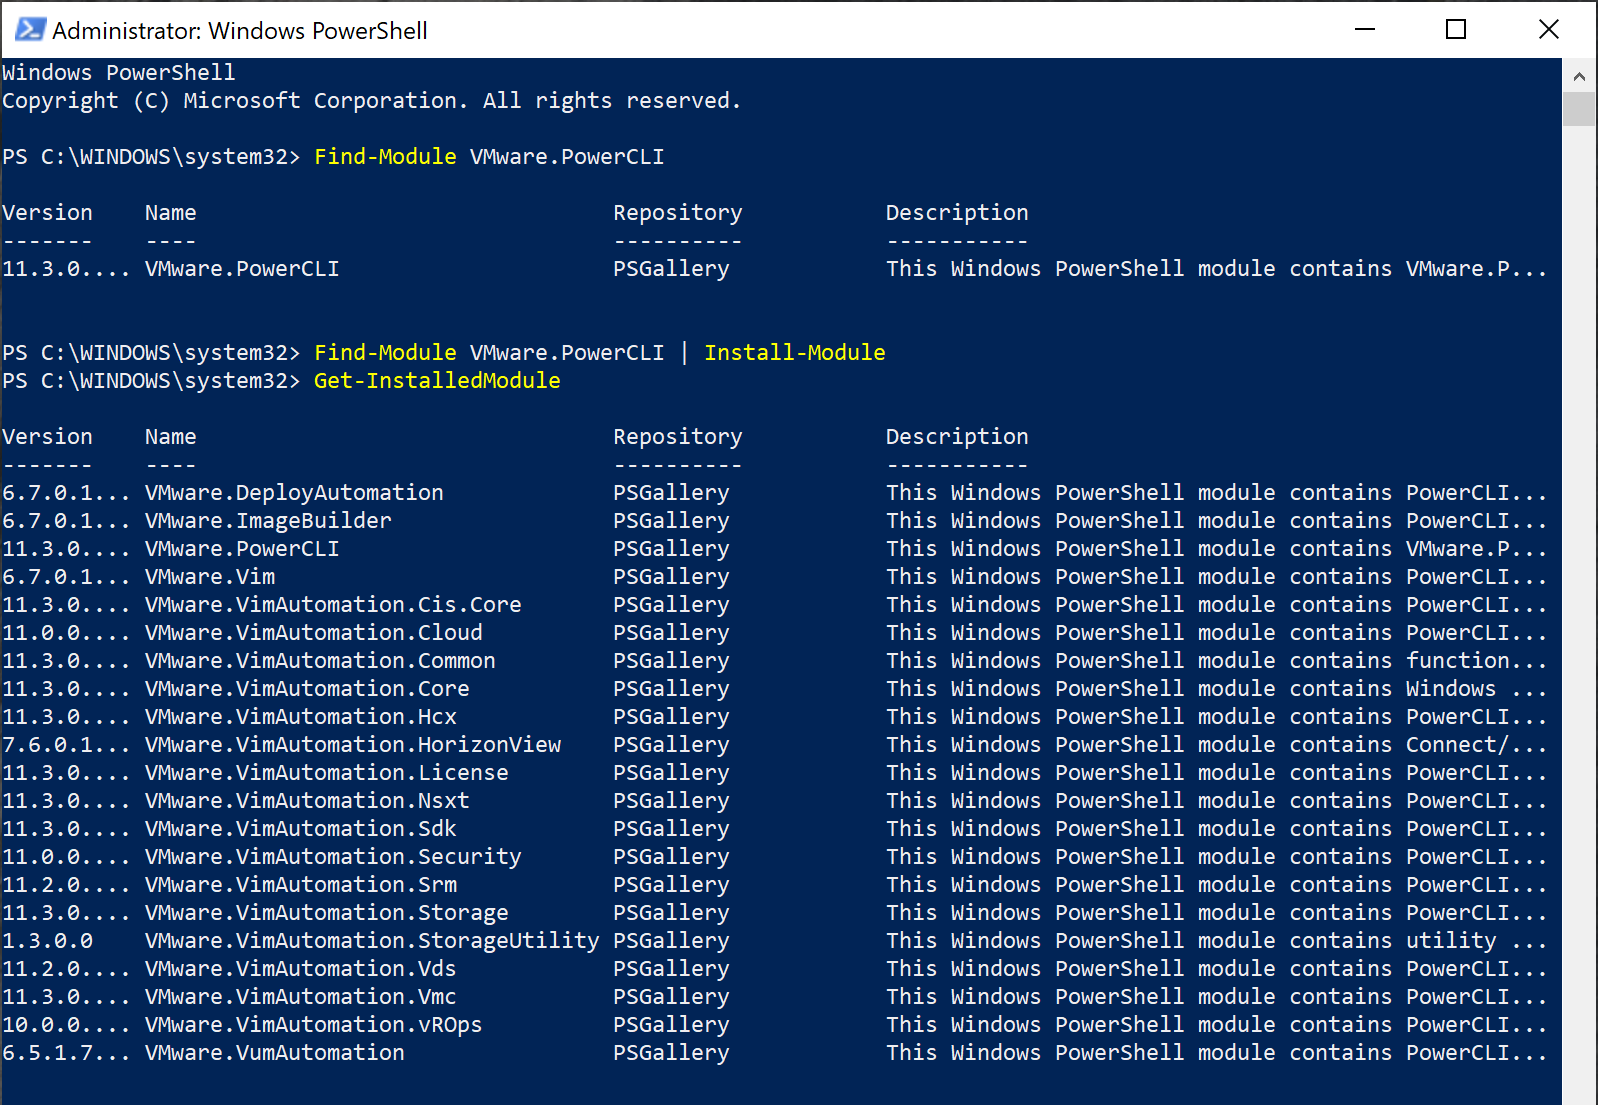
To use the Install-Module command, you have to have a trusted PSRepository that is hosting the module. This can be the PowerShell Gallery, another internet PSRepository, or a self-hosted site. You can pipe from the Find-Module command to be available to easily confirm the module before you install it.
You can also define the version of a module by using the MinimumVersion, MaximumVersion, or RequiredVersion parameters.
To see all of the modules installed using Install-Module you can use Get-InstalledModule. This will list all of the modules installed to the AllUsers scope or your CurrentUser scope.
Uninstalling Modules
Just like you can install a module, you can also uninstall a module. If the module was not installed via the Install-Module command, you can not uninstall it with the Uninstall-Module command.
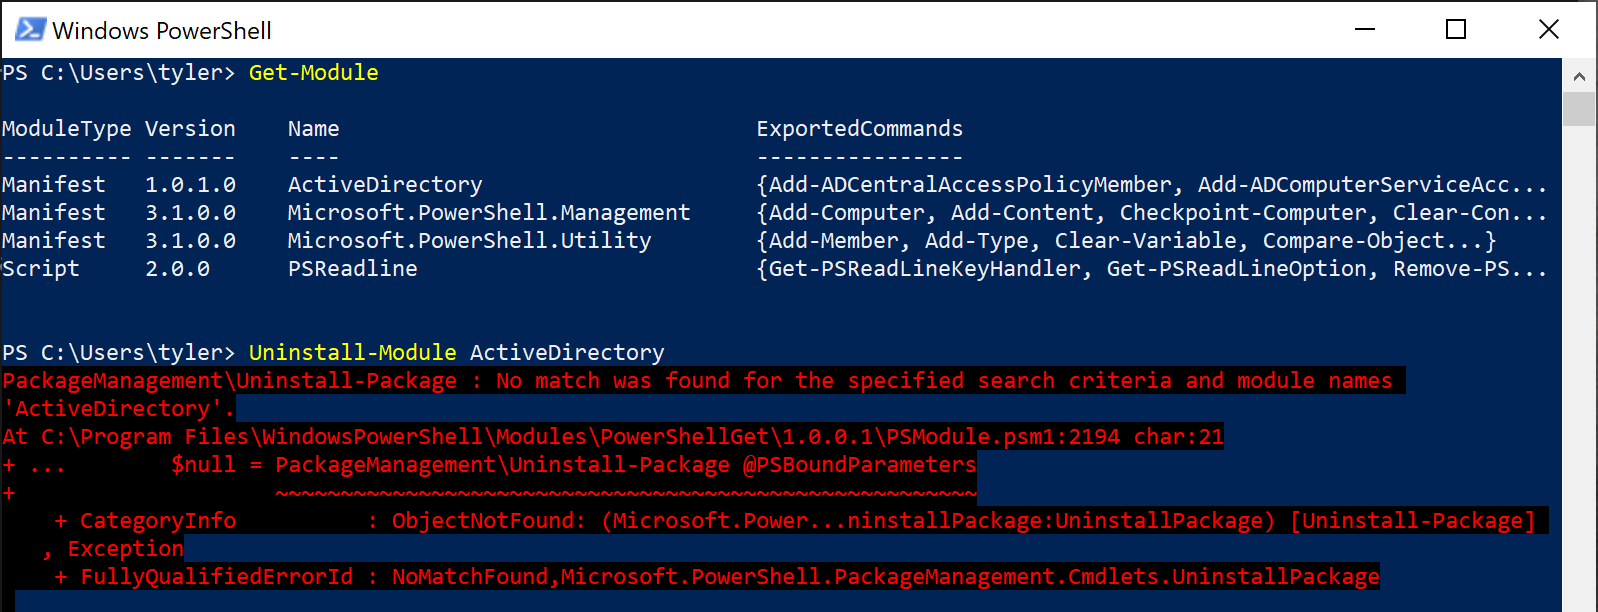
Uninstall-ModuleAs you can see here we are trying to uninstall the ActiveDirectory module. Since this module is not installed with Install-Module, you would receive an error when trying to use Uninstall-Module. For you to uninstall this module, we would have to uninstall it through reversing what you used to install the module.
To see a successful uninstall of a module, you can uninstall the VMware.PowerCLI module you installed earlier.
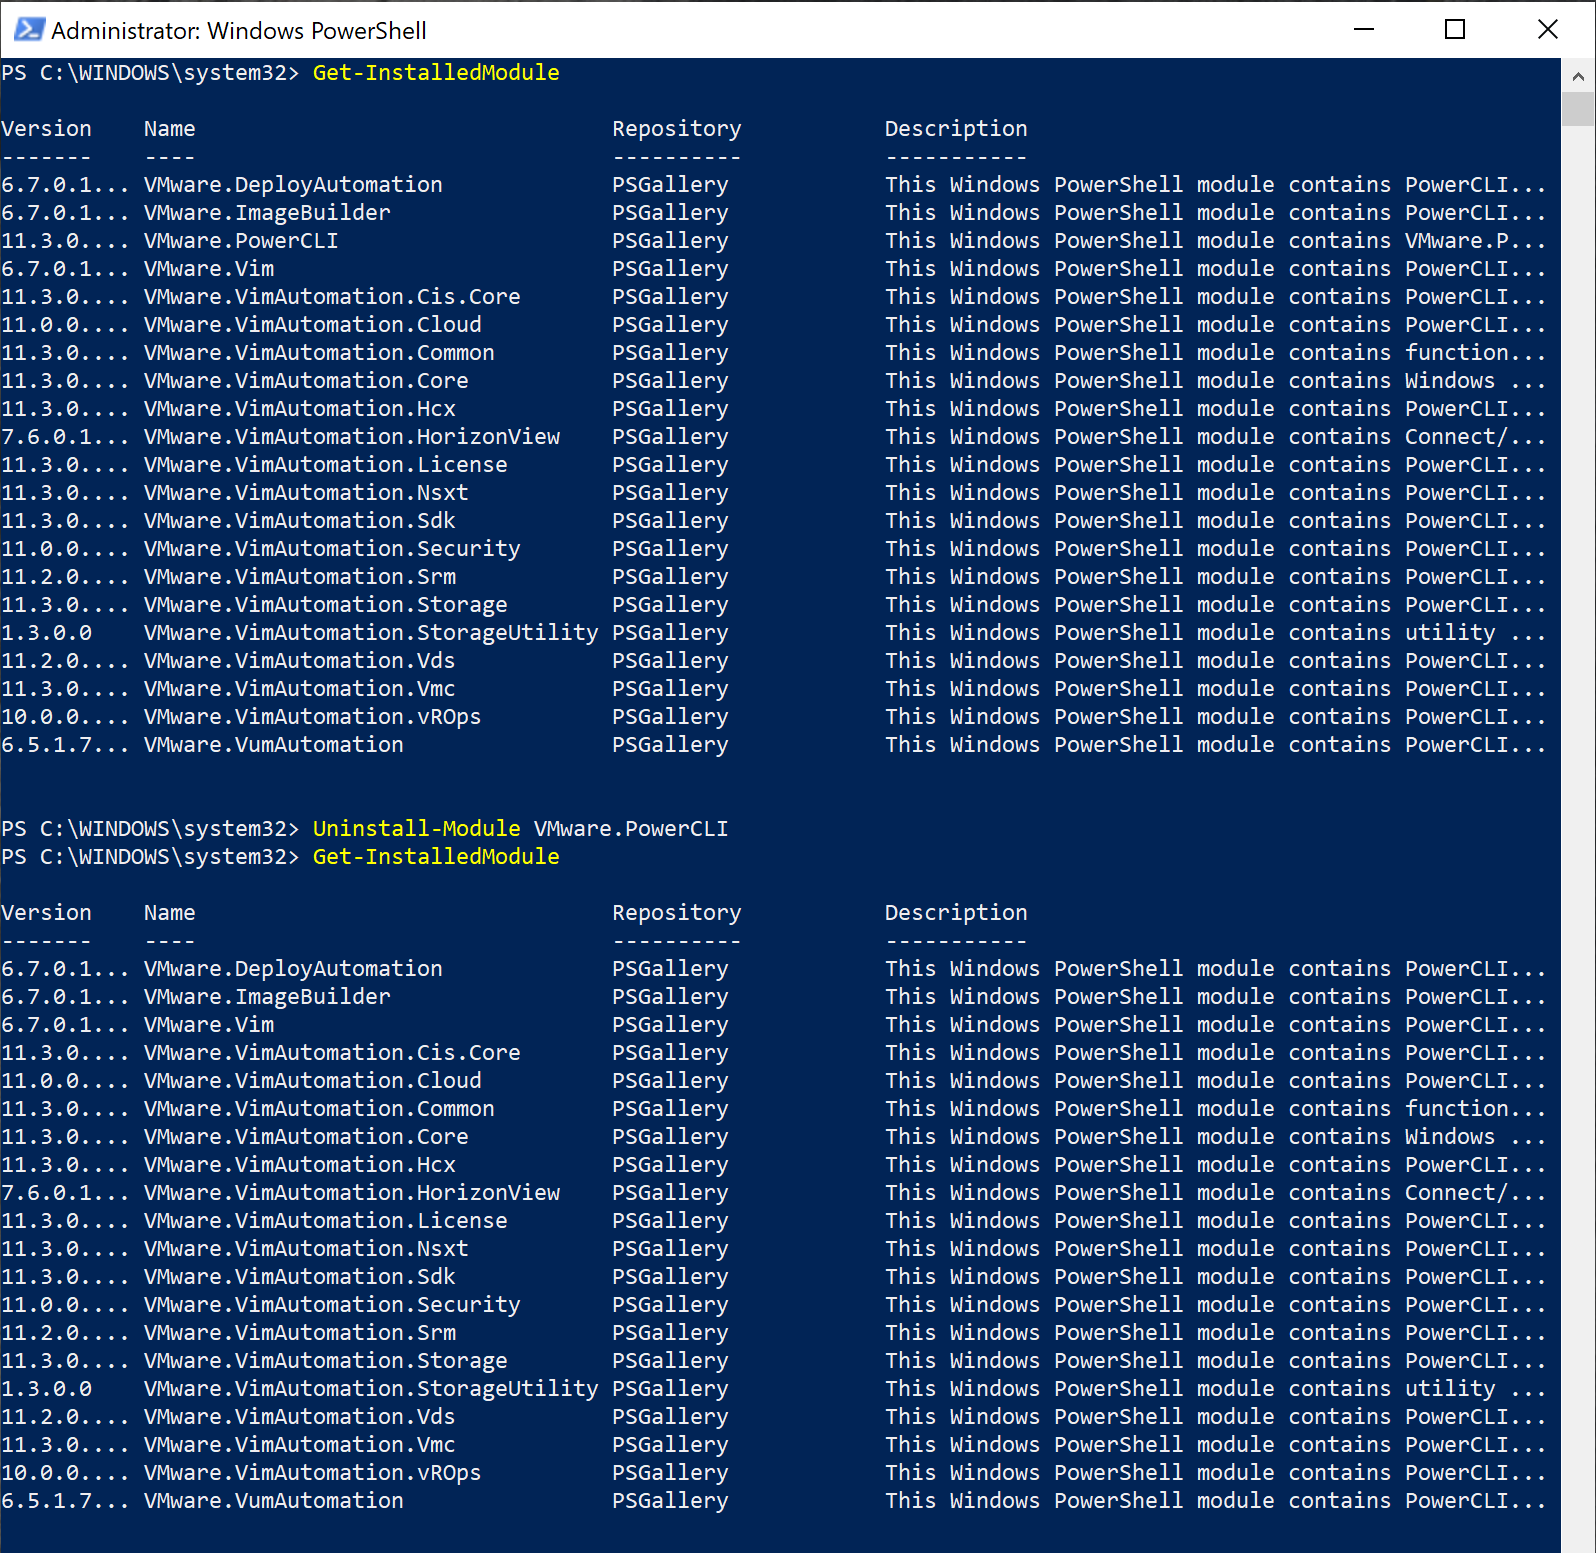
Even though you uninstalled VMware.PowerCLI, you can see that there are still many dependencies that are installed. If you wanted to uninstall all of the modules we could use Get-InstalledModule VMware.* | Uninstall-Module -Force.
The reason you would have such difficulties fully uninstalling this module is because it has so many dependencies. On top of that, some of these modules are dependencies of each other, which is why the Force parameter would be required.
Updating Modules
Now that you know how to install and uninstall a module, you may be wondering how you update a module that you have installed.
Just like other processes, if the module was not installed using Install-Module, you cannot update the using the PowerShell commands. You can use Update-Module to update a module to the newest release, or to a newer specific version.
There is also a switch to AllowPreRelease which would allow you to update to a version that has not been officially released. Sometimes this can help as there may have been a fix to a bug that you are experiencing or a new feature that was added that you would like to use.

Update-ModuleInspecting/Saving a Module
One of the much less used commands that is very helpful when vetting modules before use is Save-Module. Using this command, you can download a module to a path without installing it.
You can then inspect the files and if the module is not a binary module you can open up and look at the code that makes up the module. This can be good not only for making sure a module is not doing anything malicious, but also to learn how others are structuring their modules.
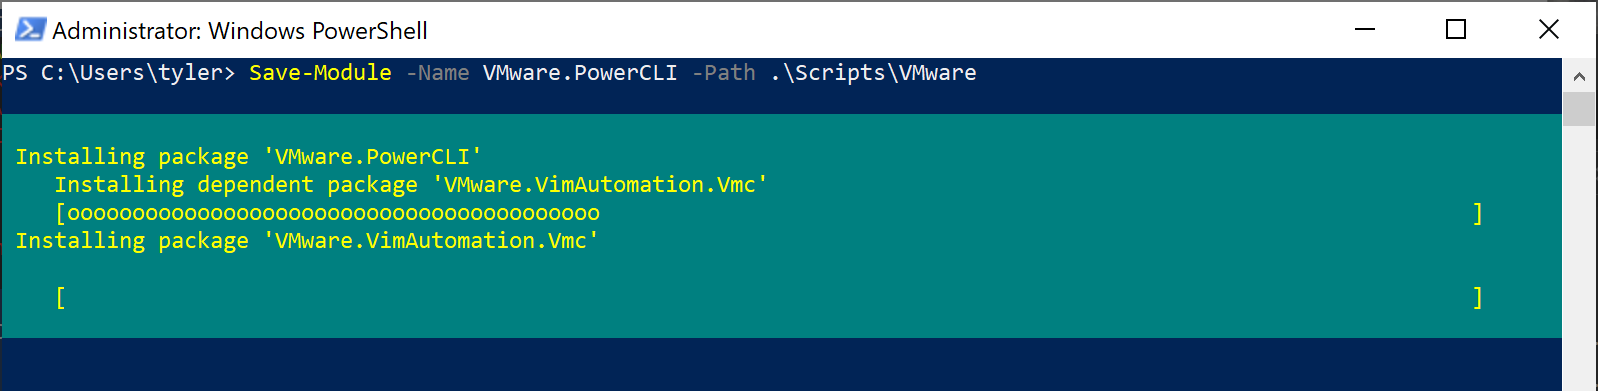
Save-ModuleIn this example, not only is the VMware.PowerCLI module downloaded, but also all of the dependencies. Here is what shows in the VMware.PowerCLI folder:
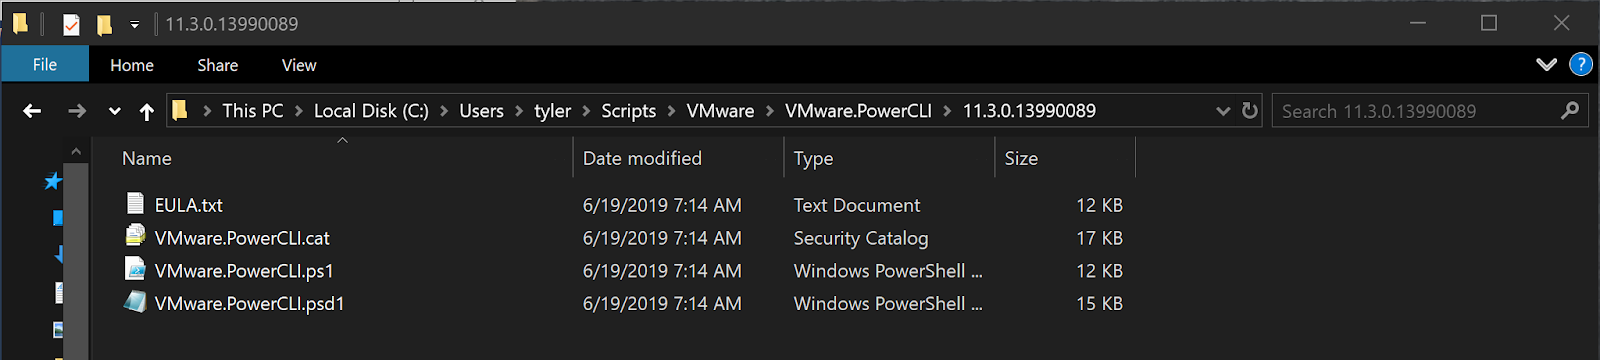
This is a good example of showing how there are sometimes non-standard module files included in the module such as the end user licensing agreement.
Writing your own Module
You have now seen how to interact with someone else’s module. Now you want to learn how to create your own so that you can start optimizing your code for scalability.
Create Template Files
First you need to create a folder for all of your module files. After you have the container, you need to create your module file. You have to make sure that your module file has the same name as your folder or else when trying to publish your module, PowerShell will not discover the module correctly.
PS51> New-Item -Path .\Scripts -Name ATARegistry -ItemType Directory
PS51> New-Item -Path .\Scripts\ATARegistry -Name ATARegistry.psm1
Now you also want to use a manifest, you will need to also name it the same as the container and module file.
PS51> New-ModuleManifest -Path .\Scripts\ATARegistry\ATARegistry.psd1 -Author 'Tyler Muir' -CompanyName 'Adam the Automator' -RootModule ATARegistry.psm1 -Description 'Used for interacting with registry keys'With the container, module file, and manifest file, you have a full functioning module. You could publish this module to a PSRepository and start installing it anywhere you wanted. Although, since the module file is empty, it probably will not do you much good. You can still use these files to test publishing to make sure your repository works.
Registering a PSRepository
Before you can publish your module, you will need to add another PSRepository to your session. For testing, you can use a local path as your PSRepository since it will be easy to set up and tear down.
Normally, if you were going to set up a PSRepository with a directory, you would want to make sure that multiple computers can access it. You can create a local repository like this:
PS51> New-Item -Path C:\ -Name Repo -ItemType Directory
PS51> Register-PSRepository -Name 'LocalRepo' -SourceLocation 'C:\Repo' -PublishLocation 'C:\Repo' -InstallationPolicy Trusted
If you were only downloading from the PSRepository and never publishing, you could exclude the PublishLocation parameter.
Publishing your Module
Since you already set the installation policy to trusted, you will not get a confirmation to allow a module to be installed from the repository. Now that you have a new PSRepository available, you can publish your module using Publish-Module -Name .\Scripts\ATARegistry -Repository LocalRepo.
After publishing your module, you can use the commands from above to find the module and install it.
Now that you have installed the module, you can use Get-Module to see the module imported into your local session. Since you did not add any functions to the FunctionsToExport array in the manifest, the ExportedCommands property is empty.

Adding to your Module
Now that you know you can publish and install your module, you can start to add some functionality to it. You could add a function to return a registry key so it looks like this:
function Get-ATARegistryKey {
    param (
        [string]$Path
    )
    Get-Item $Path
}
If you left the manifest as is and tried to upload your new module you would run into two problems. The first is you would receive an error stating that the version of your module already exists on your repository. This is because you have not changed the module version in the manifest file.
Exporting Module Functions
The other problem would be that after you imported the module, you would still see no functions in the ExportedCommands property because you have not added your new function to the manifest.
While your function would be able to be used without listing it in the FunctionsToExport list, it would make it much more difficult to locate.
As long as you do not define an empty array,
@(), for yourFunctionsToExportall functions, variables, and aliases are exported by default.
To fix these two problems, you can update your module file like this:
ModuleVersion = '1.1'
FunctionsToExport = 'Get-RegistryKey'
Now that you have added a function to your module and you have updated your manifest to reflect these changes, you can publish the new version of your module using the same command as before.
PS51> Publish-Module -Name .\Scripts\ATARegistry -Repository LocalRepo.Deciding Between FunctionsToExport and Export-ModuleMember
There are two similar features of PowerShell when exporting module members. The challenge is deciding between the two. Both are correct, but one may work better for you, depending on your needs.
When you are looking to dynamically control what functions are exported, use Export-ModuleMember as you can pass a list of functions to export. Typically, this is used when dot-sourcing multiple individual function PS1 files. By dividing the internal functions into a private folder and exportable functions into a public folder, you can easily export those by passing all public functions to the Export-ModuleMember function.
A few notes about Export-ModuleMember:
- Overrides the behavior of
FunctionsToExport, therefore if anExport-ModuleMembercommand is used, FunctionsToExport has no effect. Export-ModuleMemberdoes not export variables and aliases without explicitly defining them, unlikeFunctionsToExport, which does export those values.- Multiple
Export-ModuleMembercommands may be used and they stack instead of take precedence.
If you do not expect to have changes in your function list, using the FunctionsToExport configuration in the module manifest works fine, and does not require you to explicitly export variables and aliases.
Updating your Module
The last step would be for you to update your module in your session to be able to use the updated files. Using Update-Module ATARegistry you download the update that you just published to the repository.

Now you can see that you have the new version of the module and you can see the function that you have defined in the manifest.
Building Help Content
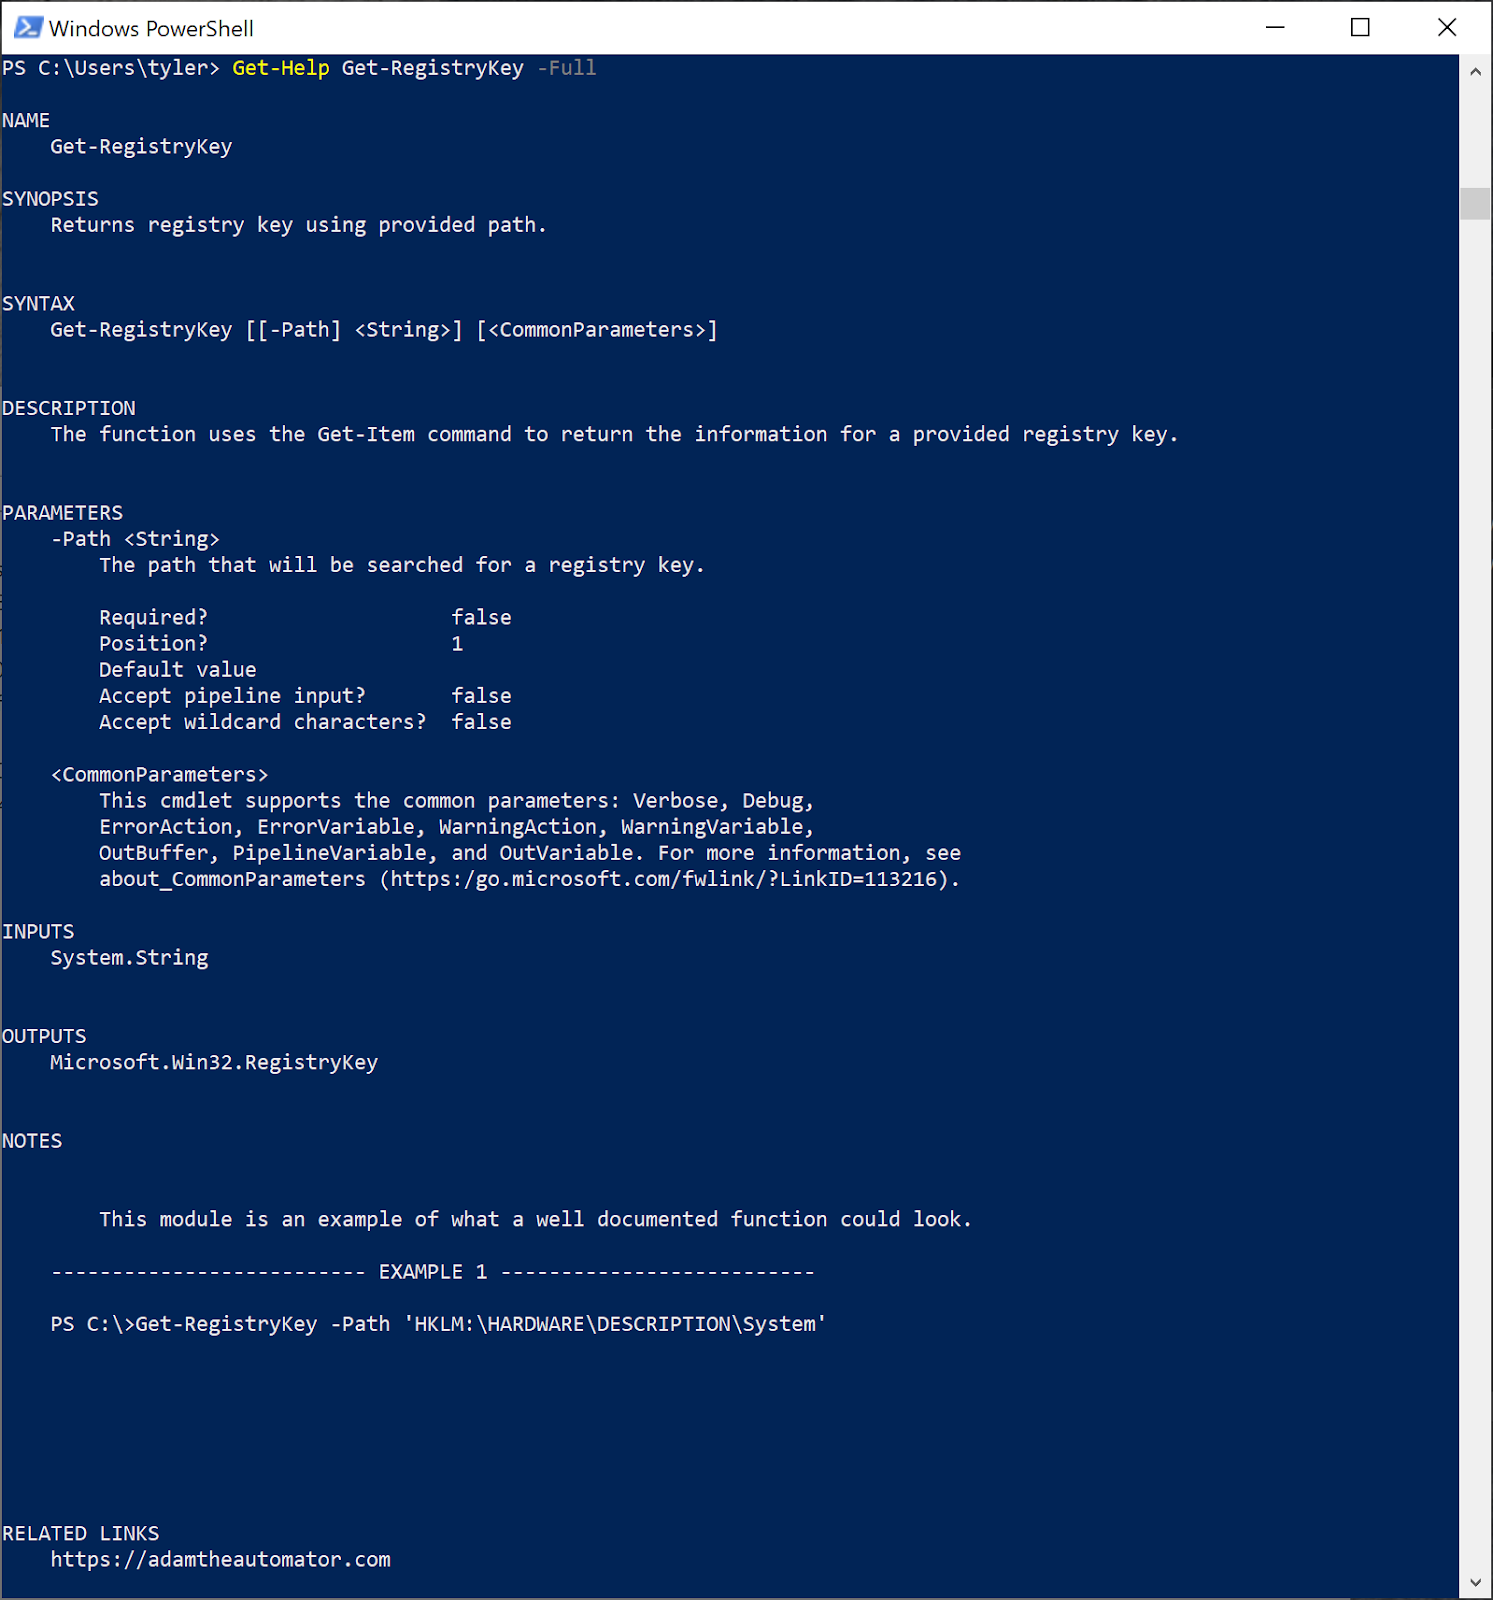
One of the options that was passed over earlier is the help system that is built into PowerShell. You have at some point probably used Get-Help on a function. This information can be added in two primary ways.
The first is to add comment-based help into the function definition. This is usually the way that many module writers implement. The other way is to use an external help file. You can use the Full parameter to show everything the help has to offer.
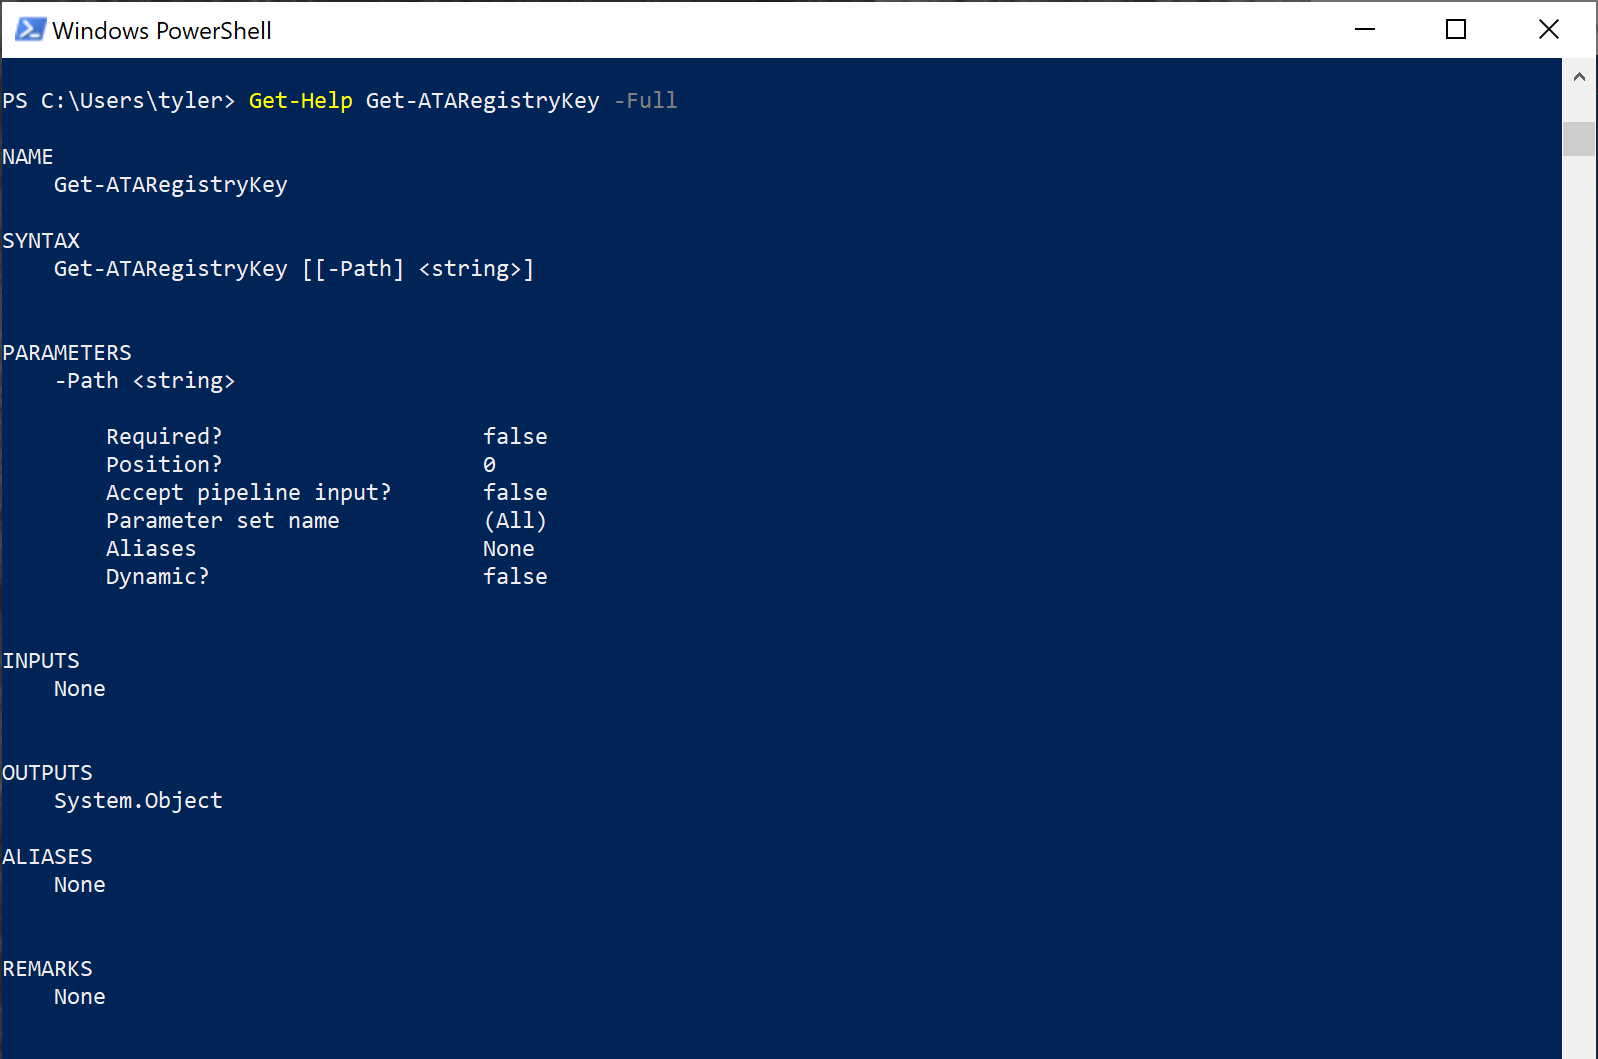
Get-HelpAs you can see, there really is not much information and the little information you do get most likely would not be helpful to anyone.
You can add some comment-based help to your module file to populate these fields in the help system. You can read about all of the options for comment-based help by using Get-Help about_Comment_Based_Help.
For now, you can update your function to look like below. This is a list of the most commonly used help parameters, but all of these are still optional and there are others that could be added instead.
Now your function looks like this:
 function Get-RegistryKey {
	<#
	    .SYNOPSIS
	    Returns registry key using provided path.
	    .DESCRIPTION
	    The function uses the Get-Item command to return the information for a provided registry key.
	    .PARAMETER Path
	    The path that will be searched for a registry key.
	    .EXAMPLE
	    Get-RegistryKey -Path 'HKLM:\HARDWARE\DESCRIPTION\System'
	    .INPUTS
	    System.String
	    .OUTPUTS
	    Microsoft.Win32.RegistryKey
	    .NOTES
	    This module is an example of what a well documented function could look.
	    .LINK
	ATA Learning
	#>
	param(
		[string]$Path
	)
	Get-Item $Path
}
There are some special help parameters, like .FORWARDHELPTARGETNAME. This option forwards all incoming help requests to a different command. This could be used in a case where the help should show the same information for multiple commands.
Now that you have added the help, you can update the version in the module manifest, publish the new version, and update the installed version for your session like you did earlier.
If you now look at the help for the function, you can see there is much more information available. This is a great way to include documentation on how to use the functions especially for someone who is less experience and may not be able to quickly understand what the module is doing by looking at the code.
Get-HelpIn the case of an external help file, the information added is the same, but the information is placed in a separate file and linked within the function.
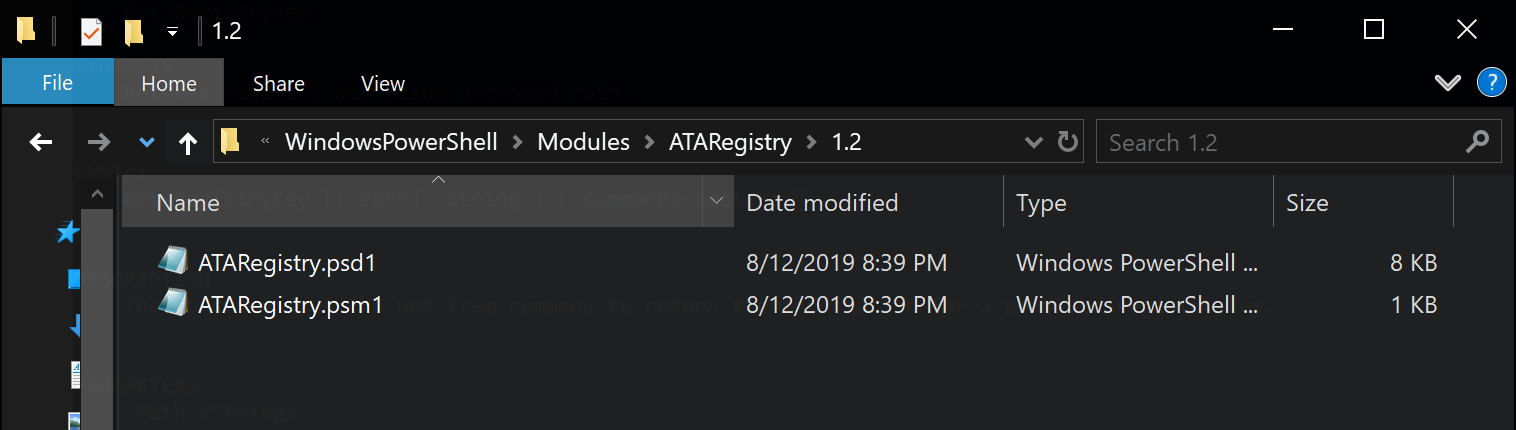
If you look in the AllUsers module path you can see the version of the module and all of the module files that you have been installing.
If you go back to your PSRepository path C:\Repo that you created earlier, you can see a bunch of NUPKG files. There will be one for each version that was published. These are compressed versions of what you published when using Publish-Module.
Summary
Once you’ve got a handle on the PowerShell console, PowerShell as a language and writing scripts, building your own modules is the last step. Modules allow you to begin developing useful tools in PowerShell. If designed and built correctly by creating modules for a single purpose, you’ll inevitably find yourself writing less and less code over time. You’ll start referencing your module functions in more code and building from there.
Module functions allow you to abstract away the code you find yourself repeating in scripts. They represent “labels” to reference later on in code that can be called at any time rather than reinventing the wheel and trying to figure out how you had already accomplished your goal previously. Modules are the final “packaging” of PowerShell code that groups together like-minded code to prevent wasting time on problems you have already solved.


